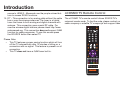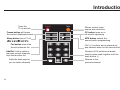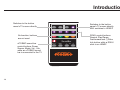
1
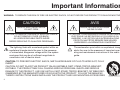
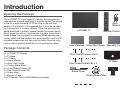
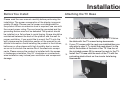
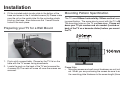
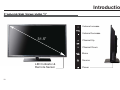
Hello Congratulations on your new purchase of an oCOSMO HDTV!! We thank you for your support. To ensure safety and many years of trouble free operation of your HDTV, please read this manual carefully before making any adjustments. Please also write down your TV p/n number and s/n number (located on the back of the TV) on a piece of paper in case you need to reference it. Please keep the paper and this manual in a safe place for future references. We hope you enjoy your new HDTV. Features r Energy saving LED backlit 720P HD display panel r MHL enabled HDMI® port (only under HDMI 2) for your MHL enabled device (tablet or cellphone) r Roku™ ready TV (Supports Roku streaming stick under HDMI 2 / MHL port) r USB connection to display pictures and play music files For technical assistance, please call our toll-free telephone number (855) 662-6766 and select option 3. You can also email our technical support group at [email protected] or chat with us online at oCOSMO.com under the SUPPORT tab. For all other general inquiries, please call our toll-free telephone number (855) 662-6766 and select option 4. You can also email our customer service group at [email protected] or chat with us online at oCOSMO.com under the SUPPORT tab. We recommend you register your oCOSMO HDTV at our online website http://www.oCOSMO.com/. 1 *NQPSUBOU*OGPSNBUJPO 8"3/*/(503&%6$&5)&3*4,0''*3&03&-&$53*$4)0$,%0/05&9104&5)*4130%6$5503"*/03.0*4563& $"65*0/ "7*4 3*4,0'&-&$53*$"-4)0$, %0/0501&/ 3*426&%&$)0$-&$53*26& /&1"40673*3 $"65*0/503&%6$&5)&3*4,0'&-&$53*$4)0$, %0/053&.07&$07&303#"$, /064&34&37*$"#-&1"354*/4*%& 3&'&34&37*$*/(5026"-*'*&%1&340//&- 5IFMJHIUOJOHGMBTIXJUIBSSPXIFBETZNCPMXJUIJOBO FRVJMBUFSBMUSJBOHMFBMFSUTUIFVTFSUPUIFQSFTFODF PGVOJOTVMBUFEEBOHFSPVTWPMUBHFXJUIJOUIFTZTUFN FODMPTVSFUIBUNBZCFPGTVGGJDJFOUNBHOJUVEFUP DPOTUJUVUFBSJTLPGFMFDUSJDTIPDL "55&/5*0/10633%6*3&-&3*426&%&%$)"3(& -&$53*26&/&3&5*3&;1"4-&$067&3$-&06 -"33*°3& *-/&4&53067&©-*/53*&63"6$6/& 1*°$&1067"/5®53&31"3&1"3-64"(&3 4"%3&44&3©6/31"3"5&63$0.15&/5 5IFFYDMBNBUJPOQPJOUXJUIJOBOFRVJMBUFSBMUSJBOHMF BMFSUTUIFVTFSUPUIFQSFTFODFPGJNQPSUBOUPQFS BUJOHBOENBJOUFOBODFJOTUSVDUJPOTJOUIJTVTFST HVJEF $"65*0/5013&7&/5&-&$53*$4)0$,."5$)8*%&#-"%&0'1-6(508*%&4-05'6--: */4&35 $"65*0/%0/051-"$&5)*4130%6$50/"/6/45"#-&$"3545"/%53*10%#3"$,&5 035"#-&5)&130%6$5.":'"--$"64*/(4&3*0641&340/"-*/+63:"/%4&3*064 %"."(&505)&130%6$564&0/-:8*5)"$"3545"/%53*10%#3"$,&5035"#-&3&$ 0..&/%&%#:5)&."/6'"$563&30340-%8*5)5)&130%6$5'0--085)&."/6'"$ 563&34*/4536$5*0/48)&/*/45"--*/(5)&130%6$5"/%64&.06/5*/("$$&4403*&4 *NQPSUBOU*OGPSNBUJPO 3&$0..&/%&%#:5)&."/6'"$563&3"130%6$5"/%$"35$0.#*/"5*0/4)06-%#&.07&%8*5)$"3& 26*$,45014&9$&44*7&'03$&"/%6/&7&/463'"$&4.":$"64&5)&130%6$5"/%$"35$0.#*/"5*0/ 5007&3563/ 8"3/*/('$$3FHVMBUJPOTTUBUFUIBUBOZVOBVUIPSJ[FEDIBOHFTPSNPEJGJDBUJPOTUPUIJTFRVJQNFOUOPUFYQSFTTMZBQQSPWFE CZUIFNBOVGBDUVSFSDPVMEWPJEUIFVTFSTBVUIPSJUZUPPQFSBUFUIJTFRVJQNFOU $"65*0/ 5IJTQSPEVDUTBUJTGJFT'$$SFHVMBUJPOTXIFOTIJFMEFEDBCMFTBOEDPOOFDUPSTBSFVTFEUPDPOOFDUUIFVOJUUPPUIFSFRVJQNFOU 5PQSFWFOUFMFDUSPNBHOFUJDJOUFSGFSFODFXJUIFMFDUSJDBQQMJBODFTTVDIBTSBEJPTBOEUFMFWJTJPOTVTFTIJFMEFEDBCMFTBOEDPO OFDUPSTGPSDPOOFDUJPOT /PUFUP$"57TZTUFNJOTUBMMFST5IJTSFNBJOEFSJTQSPWJEFEUPDBMMUIF$"57TZTUFNJOTUBMMFSTBUUFOUJPOUP"SUJDMFPGUIF /BUJPOBM&MFDUSJDBM$PEFUIBUQSPWJEFTHVJEFMJOFTGPSQSPQFSHSPVOEJOHBOEJOQBSUJDVMBSTQFDJGJFTUIBUUIFDBCMFHSPVOETIBMMCF DPOOFDUFEUPUIFHSPVOEJOHTZTUFNPGUIFCVJMEJOHBTDMPTFUPUIFQPJOUPGDBCMFFOUSZBTQSBDUJDBM 5IJTQSPEVDUVUJMJ[FTUJOMFBETPMEFS%JTQPTBMPGUIFTFNBUFSJBMTNBZCFSFHVMBUFEEVFUPFOWJSPONFOUBMDPOTJEFSBUJPOT'PS EJTQPTBMPSSFDZDMJOHJOGPSNBUJPOQMFBTFDPOUBDUZPVSMPDBMBVUIPSJUJFTPSUIFPOMJOFXFCTJUFIUUQFBSUIDPN 4BGFUZ*OTUSVDUJPOT &MFDUSJDJUZJTVTFEUPQFSGPSNNBOZVTFGVMGVODUJPOTCVU JUDBOBMTPDBVTFQFSTPOBMJOKVSJFTBOEQSPQFSUZEBN BHFJGJNQSPQFSMZIBOEMFE5IJTQSPEVDUIBTCFFOFO HJOFFSFEBOENBOVGBDUVSFEXJUIUIFIJHIFTUQSJPSJUZPO TBGFUZ)PXFWFSJNQSPQFSVTFDBOSFTVMUJOFMFDUSJDTIPDL BOEPSGJSF*OPSEFSUPQSFWFOUQPUFOUJBMEBOHFSQMFBTF PCTFSWFUIFGPMMPXJOHJOTUSVDUJPOTXIFOJOTUBMMJOHPQFSBU JOHBOEDMFBOJOHUIFQSPEVDU5PFOTVSFZPVSTBGFUZBOE QSPMPOHUIFTFSWJDFMJGFPGZPVS-&%CBDLMJU-JRVJE$SZTUBM 5FMFWJTJPOQMFBTFSFBEUIFGPMMPXJOHQSFDBVUJPOTDBSFGVMMZ CFGPSFVTJOHUIFQSPEVDU 3FBEUIFTFJOTUSVDUJPOT ,FFQUIFTFJOTUSVDUJPOT )FFEBMMXBSOJOHT 'PMMPXBMMJOTUSVDUJPOT %POPUVTFUIJTBQQBSBUVTOFBSXBUFS $MFBOPOMZXJUIESZDMPUI %POPUCMPDLBOZWFOUJMBUJPOPQFOJOHT*OTUBMMJOBDDPS EBODFXJUIUIFNBOVGBDUVSFSTJOTUSVDUJPOT %POPUJOTUBMMOFBSBOZIFBUTPVSDFTTVDIBTSBEJBUPST IFBUSFHJTUFSTTUPWFTPSPUIFSBQQBSBUVTJODMVEJOH BNQMJGJFST UIBUQSPEVDFIFBU %POPUEFGFBUUIFTBGFUZQVSQPTFPGUIFQPMBSJ[FEPS HSPVOEJOHUZQFQMVH"QPMBSJ[FEQMVHIBTUXPCMBEFT XJUIPOFXJEFSUIBOUIFPUIFS"HSPVOEJOHUZQFQMVH IBTUXPCMBEFTBOEBUIJSEHSPVOEJOHQSPOH5IFXJEF CMBEFBOEUIFUIJSEQSPOHBSFQSPWJEFEGPSZPVSTBGFUZ *GUIFQSPWJEFEQMVHEPFTOPUGJUJOUPZPVSPVUMFUDPOTVMU BOFMFDUSJDJBOGPSSFQMBDFNFOUPGUIFPCTPMFUFPVUMFU 1SPUFDUUIFQPXFSDPSEGSPNCFJOHXBMLFEPOPS QJODIFEQBSUJDVMBSMZBUUIFQMVHTDPOWFOJFODFSFDFQUB DMFTBOEUIFQPJOUXIFSFUIFZFYJUGSPNUIFBQQBSBUVT 0OMZVTFBUUBDINFOUTBDDFTTPSJFTTQFDJGJFECZUIF NBOVGBDUVSFS 6TFPOMZXJUIUIFDBSUTUBOEUSJQPECSBDLFUPSUBCMF TQFDJGJFECZUIFNBOVGBDUVSFSPSTPMEXJUIUIFBQQB SBUVT8IFOBDBSUJTVTFEVTFDBVUJPOXIFONPWJOH UIFDBSUBQQBSBUVTDPNCJOBUJPOUPBWPJEJOKVSZGSPN UJQPWFS 6OQMVHUIJTBQQBSBUVTEVSJOHMJHIUFOJOHTUPSNTPS XIFOVOVTFEGPSMPOHQFSJPETPGUJNF 3FGFSBMMTFSWJDJOHUPRVBMJGJFETFSWJDFQFSTPOOFM 4FSWJDJOHJTSFRVJSFEXIFOUIFBQQBSBUVTIBTCFFO EBNBHFEJOBOZXBZTVDIBTQPXFSTVQQMZDPSEPS QMVHJTEBNBHFEMJRVJEIBTCFFOTQJMMFEPSPCKFDUT IBWFGBMMFOJOUPUIFBQQBSBUVTUIFBQQBSBUVTIBTCFFO FYQPTFEUPSBJOPSNPJTUVSFEPFTOPUPQFSBUFOPSNBM MZPSIBTCFFOESPQQFE Safety Instructions This product is designed and manufactured to operate within defined design limits, and misuse may result in electric shock or fire. To prevent the product from being damaged, the following rules should be observed for the installation, use and maintenance of the product. Read the following safety instructions before operating the display. Keep these instructions in a safe place for future reference. r r r r r To avoid the risk of electric shock or component damage, switch off the power before connecting other components to the TV. Unplug the power cord before cleaning the TV. Please use a micro-fiber cleaning cloth for cleaning the bezel of the TV only. Do not use a liquid or a spray cleaner for cleaning the product. Do not use abrasive cleaners. Always use the accessories recommended by the manufacturer to ensure compatibility. When moving the TV from an area of low temperature to an area of high temperature, condensation may form on the housing. Do not turn on the TV immediately after this to avoid causing fire, electric shock or component damage. Do not place the TV on an unstable cart, stand, or table. If the TV falls, it can injure a person and cause serious damage to the appliance. Use only a cart or stand recommended by the manufacturer or sold with the TV. r r r r r r Any heat source should maintain a distance of at least 5 feet away from the TV, i.e. radiator, heater, oven, amplifier etc. Do not install the product too close to anything that produces smoke or moisture. Operating the product close to smoke or moisture may cause fire or electric shock Slots and openings in the back and bottom of the cabinet are provided for ventilation. To ensure reliable operation of the TV and to protect it from overheating, be sure these openings are not blocked or covered. Do not place the TV in a bookcase or cabinet unless proper ventilation is provided. Never push any object into the ventilation slots of the TV. Do not place any objects on the top of the Product. It could short circuit parts causing a fire or electric shock. Never spill liquids on the TV. Do not use the TV in a portrait format (by rotating 90 degrees) under high temperature environment (25°C or higher), since this would retard heat dissipation and would eventually damage the TV. The TV should be operated only from the type of power source indicated on the label. If you are not sure of the type of power supplied to your home, consult your dealer or local power company. The power cable must be replaced when using different voltage from that specified in the User Manual. For more information, contact your dealer. 5 4BGFUZ*OTUSVDUJPOT r r r r r r r r 5IF57JTFRVJQQFEXJUIBUISFFQSPOHFEHSPVOEFEQMVH BQMVHXJUIBUIJSEHSPVOEJOH QJO5IJTQMVHXJMMGJUPOMZ JOUPBHSPVOEFEQPXFSPVUMFUBTBTBGFUZGFBUVSF*GZPVS PVUMFUEPFTOPUBDDPNNPEBUFUIFUISFFXJSFQMVHIBWF BOFMFDUSJDJBOJOTUBMMUIFDPSSFDUPVUMFUPSVTFBOBEBQUFS UPHSPVOEUIFBQQMJBODFTBGFMZ%POPUEFGFBUUIFTBGFUZ QVSQPTFPGUIFHSPVOEFEQMVH %POPUPWFSMPBEQPXFSTUSJQTBOEFYUFOTJPODPSET0WFS MPBEJOHDBOSFTVMUJOGJSFPSFMFDUSJDTIPDL 5IFXBMMTPDLFUTIPVMECFJOTUBMMFEOFBSUIFFRVJQNFOU BOETIPVMECFFBTJMZBDDFTTJCMF 0OMZUIFNBSLFEQPXFSTPVSDFDBOCFVTFEGPSUIFQSPE VDU"OZQPXFSTPVSDFPUIFSUIBOUIFTQFDJGJFEPOFNBZ DBVTFGJSFPSFMFDUSJDTIPDL %POPUUPVDIUIFQPXFSDPSEEVSJOHUIVOEFSTUPSNT5P BWPJEFMFDUSJDTIPDLBWPJEIBOEMJOHUIFQPXFSDPSEEVSJOH FMFDUSJDBMTUPSNT 6OQMVHUIFVOJUEVSJOHBMJHIUOJOHTUPSNPSXIFOJUXJMMOPU CFVTFEGPSBMPOHQFSJPEPGUJNF5IJTXJMMQSPUFDUUIF57 GSPNEBNBHFEVFUPQPXFSTVSHFT %POPUBUUFNQUUPSFQBJSPSTFSWJDFUIFQSPEVDUZPVSTFMG 0QFOJOHPSSFNPWJOHUIFCBDLDPWFSNBZFYQPTFZPVUP IJHIWPMUBHFTUIFSJTLPGFMFDUSJDTIPDLBOEPUIFSIB[ BSET*GSFQBJSJTSFRVJSFEQMFBTFDPOUBDUZPVSEFBMFSBOE SFGFSBMMTFSWJDJOHUPRVBMJGJFETFSWJDFQFSTPOOFM ,FFQUIFQSPEVDUBXBZGSPNNPJTUVSF%POPUFYQPTFUIJT BQQMJBODFUPSBJOPSNPJTUVSF*GXBUFSQFOFUSBUFTJOUPUIF r r r r r r QSPEVDUVOQMVHUIFQPXFSDPSEBOEDPOUBDUZPVSEFBMFS $POUJOVPVTVTFJOUIJTDBTFNBZSFTVMUJOGJSFPSFMFDUSJD TIPDL %POPUVTFUIFQSPEVDUJGBOZBCOPSNBMJUZPDDVST*GBOZ TNPLFPSPEPSCFDPNFTBQQBSFOUVOQMVHUIFQPXFSDPSE BOEDPOUBDUZPVSEFBMFSJNNFEJBUFMZ%POPUUSZUPSFQBJS UIFQSPEVDUZPVSTFMG "WPJEVTJOHESPQQFEPSEBNBHFEBQQMJBODFT*GUIFQSPE VDUJTESPQQFEBOEUIFIPVTJOHJTEBNBHFEUIFJOUFSOBM DPNQPOFOUTNBZGVODUJPOBCOPSNBMMZ6OQMVHUIFQPXFS DPSEJNNFEJBUFMZBOEDPOUBDUZPVSEFBMFSGPSSFQBJS$PO UJOVFEVTFPGUIFQSPEVDUNBZDBVTFGJSFPSFMFDUSJDTIPDL %POPUJOTUBMMUIFQSPEVDUJOBOBSFBXJUIIFBWZEVTUPS IJHIIVNJEJUZ0QFSBUJOHUIFQSPEVDUJOFOWJSPONFOUTXJUI IFBWZEVTUPSIJHIIVNJEJUZNBZDBVTFGJSFPSFMFDUSJD TIPDL )PMEUIFQPXFSDPOOFDUPSXIFOSFNPWJOHUIFQPXFS DBCMF1VMMJOHUIFQPXFSDBCMFJUTFMGNBZEBNBHFUIF XJSFTJOTJEFUIFDBCMFBOEDBVTFGJSFPSFMFDUSJDTIPDLT 8IFOUIFQSPEVDUXJMMOPUCFVTFEGPSBOFYUFOEFEQFSJPE PGUJNFVOQMVHUIFQPXFSDPOOFDUPS 5PBWPJESJTLPGFMFDUSJDTIPDLEPOPUUPVDIUIFDPOOFDUPS XJUIXFUIBOET *OTFSUCBUUFSJFTJOBDDPSEBODFXJUIJOTUSVDUJPOTXIJMF VTJOHUIFSFNPUFDPOUSPM*ODPSSFDUQPMBSJUJFTNBZDBVTF EBNBHFBOEMFBLBHFPGUIFCBUUFSJFTPQFSBUPSJOKVSZBOE DPOUBNJOBUJPOUIFSFNPUFDPOUSPM 4BGFUZ*OTUSVDUJPOT r *GBOZPGUIFGPMMPXJOHPDDVSTQMFBTFDPOUBDUUIFEFBMFS 5IFQPXFSDPOOFDUPSGBJMTPSGSBZT -JRVJETQSBZTPSBOZPCKFDUESPQTJOUPUIF57 5IF%JTQMBZJTFYQPTFEUPSBJOPSPUIFSNPJTUVSF 5IF%JTQMBZJTESPQQFEPSEBNBHFEJOBOZXBZ 5IFQFSGPSNBODFPGUIF%JTQMBZDIBOHFT TVCTUBOUJBMMZ r 0QFSBUJOHFOWJSPONFOU5FNQFSBUVSF$_$' ')VNJEJUZUPOPODPOEFOTJOH"MUJUVEF _GU Antenna Cable Ground Clamp Antenna Discharge Unit Electric Service Equipment Ground Clamps 57"OUFOOB$POOFDUJPO1SPUFDUJPO Grounding Conductors &YUFSOBM5FMFWJTJPO"OUFOOB(SPVOEJOH *GBOPVUTJEFBOUFOOBPSDBCMFTZTUFNJTUPCFDPOOFDUFEUP UIF57NBLFTVSFUIBUUIFBOUFOOBPSDBCMFTZTUFNJTFMFDUSJ DBMMZHSPVOEFEUPQSPWJEFTPNFQSPUFDUJPOBHBJOTUWPMUBHF TVSHFTBOETUBUJDDIBSHFT"SUJDMFPGUIF/BUJPOBM&MFDUSJ DBM$PEF"/4*/'14"QSPWJEFTJOGPSNBUJPOXJUISFHBSE UPQSPQFSHSPVOEJOHPGUIFNBTUBOETVQQPSUJOHTUSVDUVSF HSPVOEJOHPGUIFMFBEJOXJSFUPBOBOUFOOBEJTDIBSHFVOJU TJ[FPGUIFHSPVOEJOHDPOEVDUPSTMPDBUJPOPGBOUFOOBEJT DIBSHFVOJUDPOOFDUJPOUPHSPVOEJOHFMFDUSPEFTBOESFRVJSF NFOUTPGUIFHSPVOEJOHFMFDUSPEF Power Service Grounding Electrode System -JHIUOJOH1SPUFDUJPO 'PSBEEFEQSPUFDUJPOPGUIF57EVSJOHBMJHIUOJOHTUPSNPS XIFOJUJTMFGUVOBUUFOEFEPSVOVTFEGPSMPOHQFSJPETPGUJNF VOQMVHUIF57GSPNUIFXBMMPVUMFUBOEEJTDPOOFDUUIFBOUFOOB PSDBCMFTZTUFN 1PXFS-JOFT %POPUMPDBUFUIFBOUFOOBOFBSPWFSIFBEMJHIUPSQPXFSDJS DVJUTPSXIFSFJUDPVMEGBMMJOUPTVDIQPXFSMJOFTPSDJSDVJUT $POUFOUT )FMMP *NQPSUBOU*OGPSNBUJPO 4BGFUZ*OTUSVDUJPOT 57"OUFOOB$POOFDUJPO1SPUFDUJPO $POUFOUT *OUSPEVDUJPO 0QFOJOHUIF1BDLBHF 1BDLBHF$POUFOUT *OTUBMMBUJPO #FGPSF:PV*OTUBMM "UUBDIJOHUIF57#BTF 1SFQBSJOHZPVS57GPSB8BMM.PVOU .PVOUJOH1BUUFSO4QFDJGJDBUJPO *OUSPEVDUJPO 'SPOUBOE4JEF7JFXTPGUIF57 #BDL7JFXPGUIF57 57$POOFDUJPOT P$04.0573FNPUF$POUSPM *OTUBMMJOH#BUUFSJFTUPUIF3FNPUF 4FUVQ 4VHHFTUJPOTGPS$POOFDUJOHZPVS57 4XJUDIJOH7JEFP4PVSDFTPOZPVS57 0QFSBUJPO /BWJHBUJOHUIF57.FOV 6TJOHUIF57.FOV %FUBJMFE&YQMBOBUJPOT .BJOUFOBODF $MFBOJOHUIF57 'SFRVFOUMZ"TLFE2"T $BMM6T*G:PV/FFE)FMQ 4QFDJGJDBUJPO 8BSSBOUZ %JTDMBJNFS $PNQMJBODF Introduction Opening the Package The oCOSMO TV is packaged in a carton. Any standard accessories are packed separately in another carton. The weight of the TV is approximately 12.32 lbs. Due to the size and weight of the product, it is suggested that it must be handled by a minimum of 2 or more persons. Since the glass can be easily scratched or broken, please handle the product gently. Never place the unit on a surface with the glass facing downwards unless it is on protective padding. When opening the carton, check that the product is in good condition and that all standard accessories and items are included. Save the original box and all packing materials for future shipping needs. AAA Batteries oCOSMO TV User’s Manual Remote Control Quick Start Guide Warranty Card Package Contents 1 x oCOSMO TV Display 1 x TV Base 1 x TV Neck 1 x User’s Manual 1 x Quick Start Guide 1 x Circular Metal Plate 4 x Thick Thread Screws (A) 4 x Fine Thread Screws (B) 1 x Screw driver 1 x Warranty Card 1 x TV Remote Control (AAA Batteries included) Thick Thread Screws (A)x 4 Fine Thread Screws (B) x 4 TV Base Screw Driver Circular Metal Plate Neck 9 Installation Before You Install Please read the user manual carefully before performing the installation. The power consumption of the display is approximately 43 watts. Please use the power cord designated for the product. When an extension cord is required, use one with the correct power rating. The cord must be grounded and the grounding feature must not be defeated. The product should be installed on a flat surface to avoid tipping. Space should be maintained between the back of the product and the wall for proper ventilation. If you would like to mount the TV onto the wall, please see the installation section of the manual for additional information. Avoid installing the product in the kitchen, bathroom or other places with high humidity dust or smoke, so as not to shorten the service life of the electronic components. Please ensure the product is installed with the screen in landscape orientation. Any 90° clockwise or counterclockwise installation may induce poor ventilation and component damage. Attaching the TV Base Screws (B) Screws (A) 1. Find a cloth covered table. Please lay the TV flat on the table with the TV screen facing downwards. 2. If your TV comes with the neck pre-installed,then you may skip to step 3. To install the neck,place it in the slot at the bottom of the back of the TV. Use four of the included screws (B) to secure the neck to the TV. 3. Install the TV base onto the neck of the TV with the protruding plastic block on the circular hole facing downwards. Screws (A) 10 Installation 4. Fit the included metal circular plate to the bottom of the base and screw in the 4 included screws (A).Please make sure the rail on the metal plate fits the protruding plastic block on the base. Also make sure the 3 small circular holes fit the neck piece. Preparing your TV for a Wall Mount Mounting Pattern Specification The TV uses 200mm horizontal by 100mm vertical mounting specification. The screw size to mount with the TV is M4. The mounting holes on the TV are 6mm deep. Please write down your TV p/n number and s/n number (located on the back of the TV on a barcode sticker) before you mount the TV. Screws (B) 1. Find a cloth covered table. Please lay the TV flat on the table with the TV screen facing downwards. 2. Locate the neck on the back of the TV and unscrew the 4 screws (B). The neck will come off once the screws are removed. Please Note: r Mounting screws and wall mount hardware are not included. When you are purchasing the screws be sure to add the mounting plate thickness to the screw length (6mm). 11 Introduction Front and Side Views of the TV Volume Increase Volume Decrease 31.5” Channel Up Channel Down Menu S LED Indicator & Remote Sensor 12 Source Power Introduction HDMI 2 /MHL COMPONENT COMPOSITE Back View of the TV Shared Audio Source 13 Introduction TV Connections The oCOSMO HDTV contains a variety of possible connections on the back of the TV. Please reference the picture on p.13 while you read through the explanations. 1. HEADPHONE – This connection is for headphones to be attached to the TV. 2. Optical Out - This connection port is used for sending out digital audio signals to digital surround sound receivers. The square (OPTICAL SPDIF OUT) connector sends out either bit-stream or PCM digital sound signal to a home theater receiver with digital coax input. 3. Analog Audio Out – This connection is for connecting to analog audio receivers. 4. Video – Video connects to devices that use composite video cables such as VCR or DVD player or Wii™. Connect the yellow for video and the red / white for audio. This port uses the same the audio jacks with YPbPr. If you use this connection, you will not be able to use YPbPr. 5. YPbPr – This connection port is for DVD players or satellite / cable set-top boxes that use component cables. From left to right, connect green, blue, and red for video, and then connect white for left channel audio, and red for right channel audio. This port uses the same audio jacks 14 6. 7. 8. 9. with Video. If you use this connection you will not be able to use the yellow Video connection. USB – USB connects to USB flash drives for playing music and picture. The USB port is also used for updating the TV’s firmware. VGA - This connection port connects to a PC for video using VGA cable. Be sure to connect your audio cable to the VGA Stereo input if you want sound out of VGA video source. Audio In - This connection port is for people who want to provide audio to the TV when using a PC or a DVI video device. The sources use 3.5mm mini-jack audio cable. HDMI1-3 – HDMI connects to devices that use HDMI cable, such as Blu-ray or HD DVD player, or HD cable / satellite set-top box. This connection port receives pure digital audio and high definition signal through one single cable. This port also can accept a HDCP video device for video. HDMI 2 also doubles as the MHL connection for cell phones. MHL is a protocol where the TV will display what your cell phone displays. If your cell phone supports MHL you can purchase a MHL cable from any electronic store and connect it to HDMI 2 and also your cell phone. Make sure the TV’s source is changed to HDMI 2 and turn on your cell phone. You should see an image of your cell phone screen. HDMI 2 also supports ROKU™ streaming stick. Plug the ROKU stick to HDMI 2, and switch your Introduction source to HDMI 2. Afterwards use the purple colored buttons to access ROKU functions. 10. DT – This connection is for analog cable without the cable box or over-the-airwave antennas. The tuner is a hybrid tuner that tunes to both analog and digital channels with antenna. This connection uses coaxial RF cable. For over-the airwave digital stations please check http://www. antennaweb.org. This connection does not support QAM function for cable companies. To use this source press the SOURCE button then select TV. Please Note: r This TV features a power saving function which will turn off the TV automatically after 10 minutes of idling on a connection with no signal. This feature is present on all connection. r This TV does not have a QAM tuner built in. oCOSMO TV Remote Control The oCOSMO TV’s remote control follows SONY® TV’s universal remote code. To find the code, please contact your cable company or satellite TV company’s tech support team. Power Info Freeze Sleep CC MTS Fav Add/Del Fav _ Fav + 1 2 3 4 5 6 7 8 9 0 R Picture Sound Mute CH VOL Aspect Guide Source ENTER Exit Menu TV USB YPBPR MHL A B C D Power SoundBar Source Mode _ Vol + 15 Introduction Turns the TV on and off Freeze button will freeze the current displayed picture Sleep button turns TV off Fav button shows the favorite channels list Add/Del button adds or removes current channels from the favorites list Adds the dash sign for you to switch channels 16 Power Info Freeze Sleep CC MTS Fav Add/Del Fav _ Fav + 1 2 3 4 5 6 7 8 9 0 R Shows current video source and resolution CC button turns on or off closed captioning MTS button selects the second audio programming FAV (+/-) buttons act as channel up and channel down for the favorites list Numbers (0-9) switches channels directly when used together with the dash button (-) Returns to the previous channel Introduction Cycles through preset picture modes Turns sound on or off Picture Increases or decreases the volume Sound Mute CH VOL Changes channel up or down Aspect Cycles through preset sound modes Displays antenna only Electronic Program Guide Cycles through different TV display ratios Guide Source Cycles through all available TV connections Enter button selects the current selection ENTER Menu Exit Opens the TV Menu or quits current function Directional buttons navigate through the menu Closes the TV menu completely Any purple colored buttons offer similar function while TV is connected to a ROKU stick under HDMI 2 17 Introduction Switches to the button name’s TV source directly No function, buttons are not used TV USB YPBPR MHL A B C D Power SoundBar oCOSMO sound bar control buttons Power, Source, Mode, Vol-, Vol+ while an oCOSMO sound bar is connected to the TV 18 Source Mode _ Vol + Switches to the button name’s TV source directly MHL switches to HDMI 2 ROKU control buttons Rewind, Play/Pause, Fastforward and (*) Roku Info button while a ROKU stick is on HDMI2 Introduction Installing Batteries to the Remote Please insert two AAA batteries into the remote control. Make sure that you match the (+) and (-) symbols on the batteries with the (+) and (-) symbols inside the battery compartment. Afterwards, re-attach the battery cover. r r r r r ing or leakage that may pose a fire risk or lead to personal injury. Dispose the batteries in accordance with local laws and regulations. Keep the batteries away from children and pets. If the remote control is not used for a long time, remove the batteries. Keep the remote control away from moisture, sunlight, and high temperatures. Do not mix heavy duty and alkaline batteries. Please Note: r Only use AAA batteries. r Do not mix new and old batteries. This may result in cracking or leakage that may pose a fire risk or lead to personal injury. r Inserting the batteries incorrectly may also result in crack19 Setup Suggestions for Connecting your TV If you want to connect an antenna... HDMI 2 /MHL THIS IS A HIGH DEFINITION SETUP 20 Once you screw in and tighten the antenna coax cable you have to scan for the channels before you can watch TV. 1. Turn on the TV by pressing the POWER button on the oCOSMO TV remote. 2. Press the TV button to switch to the source TV. 3. Press the MENU button to activate the TV's menu. Use Żor Źbuttons to highlight the CHANNEL option and press ENTER. 4. Inside the CHANNEL option highlight SIGNAL TYPE and make sure it is AIR. If not, use the Ż or Źbutton to switch it to AIR. 5. Select AUTO CHANNEL SEARCH with the Ÿ or źbutton and press ENTER to use the option. 6. When the search finishes you can watch the TV. Setup If you want to connect a cable box or satellite box to the DT digital tuner... HDMI 2 /MHL THIS IS A STANDARD DEFINITION SETUP Once you screw in and tighten the coax cable to your cable box or satellite box, you need to switch to the correct source and correct channel to watch TV. 1. Press POWER on your oCOSMO remote to turn on the TV. 2. Press the TV button to switch to the source TV. 3. Press MENU activate the TV’s menu and select the CHANNEL option. 4. Inside the CHANNEL option highlight SIGNAL TYPE and make sure it is AIR. If not, use the Ż or Źbutton to switch it to CABLE. 5. Press the EXIT button to close the TV’s menu. 6. Find out what channel you need to be on by calling your cable or satellite TV provider (usually it is on channel 3). 7. To switch channels press the number you want to switch to then press the ENTER button to execute the switch. 8. Turn on your cable or satellite box. 9. You can now watch the TV. 10. Be sure to use your cable or satellite box’s remote to change channels. Please Note: To setup the cable or satellite box remote r control for controlling the TV, please call the cable or satellite TV company and ask them for SONY® TV’s universal remote code. 21 Setup If you want to connect a HD cable or satellite box using HDMI ... HDMI 2 /MHL THIS IS A HIGH DEFINITION SETUP 22 Once you push in the HDMI cable on both the cable or satellite box and the TV, you need to switch to the correct source to watch TV. 1. Turn on the cable or satellite box. 2. Press POWER on your oCOSMO remote to turn on the TV. 3. Press the SOURCE button near the arrow buttons to open the source menu. 4. Use the Ÿ or źbutton to highlight the HDMI connection you plugged your HDMI cable to and press ENTER to select it. 5. You can now watch the TV. 6. Be sure to use your cable or satellite box’s remote to change channels. Please Note: r To setup the cable or satellite box remote control for controlling the TV, please call the cable or satellite TV company and ask them for SONY® TV’s universal remote code. Setup If you want to connect a computer to the TV... HDMI 2 /MHL Once you securely tighten the VGA cable on both the computer and the TV and also push in the 3.5mm minijack for audio on both ends, you need to switch to the correct source to use the TV as a computer monitor. 1. Turn on the computer. 2. Make sure the resolution of the computer is 1360x768 at 60hz refresh rate. 3. Press POWER on your oCOSMO remote to turn on the TV. 4. Press the SOURCE button near the arrow buttons to open the source menu. 5. Use the Ÿ or ź button to highlight PC as the source and press ENTER to select it. 6. You can now use the TV as a computer display. Please Note: r If the TV shows the message “NOT SUPPORT”, the signal is incompatible. Check the computer resolution and refresh rate. Can also try restarting computer. 23 Setup If you want to connect a headphone to the TV... Once you connect the headphone to the TV, the TV’s speakers will automatically be muted. You can control the volume by using the VOL+ or VOL- button on the TV’s remote control. 24 Setup If you want to connect a digital surround sound receiver to the TV with optical out... THIS IS A DIGITAL SURROUND SOUND SETUP Once you plug the optical SPDIF cable into the TV’s optical out and your surround sound’s receiver digital optical in connection, the TV will automatically output digital sound signals to your receiver. You can change the sound signal output by going into the TV’s menu. 1. Turn on your surround receiver and press POWER on the TV’s remote to turn on the TV. 2. Press MENU to open up the TV’s menu. 3. Navigate to the SOUND option by using the use the Ż or Źbutton then select it with the ENTER button. 4. Use the Ÿ or źbutton to highlight the OTHER SETTINGS option and press ENTER to select it. 5. You can change the sound signal by highlighting DIGITAL AUDIO OUTPUT then using the Ż or Ź button to change the signal. 25 Setup If you want to connect a stereo receiver to the TV with audio out... Once you plug the red and white audio plugs by matching the same colors on both the TV and the stereo receiver the TV will automatically output sound to the receiver. Please Note: r You cannot change the volume of the TV by using the TV’s VOL(+/-) buttons. You need to use the receiver’s volume controls to adjust volume. THIS IS A STEREO AMPLIFIER SETUP 26 Setup If you want to connect a regular cable box, satellite box, or a DVD player with yellow, red, and white plugs... COM326,7E Video6ource Audio6ource THIS IS A STANDARD DEFINITION SETUP Once you plug in 3 colored plugs (yellow, red, and white) by matching the same colors on both the TV and the DVD player or cable/satellite box, you’ll need to change to the correct source in order to watch TV. 1. Turn on the DVD player or cable/satellite box. 2. Press POWER on your oCOSMO remote to turn on the TV. 3. Press the SOURCE button near the arrow buttons to open the source menu. 4. Use the Ÿ or ź button to highlight the AV connection and press ENTER to select it. 5. You can now watch the TV. 6. Be sure to use your cable or satellite box’s remote to change channels. Please Note: r This setup shares the same audio connection with YPbPr. You can only use one or the other, not both. To setup the cable or satellite box r remote control for controlling the TV, please call the cable or satellite TV company and ask them for SONY® TV’s universal remote code. 27 Setup If you want to connect a HD cable or satellite box to the TV with YPbPr... COMPONENT Audio6ource Video6ource THIS IS A HIGH DEFINITION SETUP 28 Once you plug in 5 colored plugs (white, red, green, blue, and red) by matching the same colors on both the TV and the cable or satellite box, you’ll need to change to the correct source in order to watch TV. 1. Cable or satellite box. 2. Press POWER on your oCOSMO remote to turn on the TV. 3. Press the SOURCE button near the arrow buttons to open the source menu. 4. Use the Ÿ or ź button to highlight the YPbPr connection and press ENTER to select it. 5. You can now watch the TV. 6. Be sure to use your cable or satellite box’s remote to change channels. Please Note: This setup shares the same audio r connection with AV. You can only use one or the other, not both. To setup the cable or satellite box r remote control for controlling the TV, please call the cable or satellite TV company and ask them for SONY® TV’s universal remote code. Setup If you want to use the USB connection on the TV... Once you plug in the USB flash drive into the USB connection on the back of the TV, press the USB button on the TV’s remote control to display picture files or play music. Please Note: r The USB connection on the TV only recognizes USB flash drives, any other USB storage device or USB peripherals will not work on the TV. r The TV only plays MP3 music files and JPEG non-progressive picture files. 29 Operation Switching Video Sources on your TV Navigating the TV Menu To switch video sources find the S button on the side of the TV and press it. Use CH (Ÿ/ź) button to navigate up and down. S button is used as the select button. To navigate the TV menu please use the directional buttons on the TV remote and the ENTER to select functions you want to change or use. You can also use the buttons on the TV to navigate the menu. Use CH(Ÿ/ź) to navigate up and down and VOL(+/-) to navigate left and right. opens and closes the menu. S is used as the select button. ENTER The source HDMI 2 / MHL will automatically display to the word ROKU if a ROKU streaming stick is connected. 30 Menu Exit 0QFSBUJPO 6TJOHUIF57.FOV 1JDUVSF 1*$563&5IJTPQUJPOBEKVTUTUIFQJDUVSFRVBMJUZXJUIWBSJPVT TFUUJOHTTVDIBTUJOUDPOUSBTUTIBSQOFTTBOETDSFFOTJ[F 406/% 5IJT PQUJPO BEKVTUT UIF TPVOE RVBMJUZ XJUI WBSJPVT TFUUJOHTTVDIBTCBTTUSFCMFFRVBMJ[FSBOETVSSPVOENPEF $)"//&-5IJTPQUJPOBEKVTUTUIF57UVOFSGVODUJPOTTVDI BTTDBOOJOHGPSBOUFOOBDIBOOFMTBOEFEJUJOHUIFGBWPSJUFMJTU 1"3&/5"-5IJTPQUJPOBEKVTUTUIF7DIJQQBSFOUBMHVJEBODF BOECMPDLJOHGVODUJPOGPSUIFTPVSDFT57BOE7*%&0 4&5615IJTPQUJPOBEKVTUTUIF57NFOVTMBOHVBHF57JOUFS 1SFTT.&/6UPPQFOUIF57TNFOV 1SFTTŻPSŹUPTFMFDU1*$563&BOEQSFTT&/5&3 OBMDMPDLBOEDMPTFEDBQUJPOJOH 05)&34 5IJT PQUJPO BEKVTUT NJTDFMMBOFPVT TFUUJOHT PG UIF 6TFŸPSźUPTFMFDUUIFPOFZPVXBOUUPBEKVTUBOEŻ PSŹPS&/5&3UPBEKVTUUIFN 57TVDIBTOPTJHOBMQPXFSPGGBOEOPPQFSBUJPOQPXFSPGG Operation PICTURE SETTINGS: This option gives various adjustments to the picture you are viewing. 5. Tint: This option changes the white balance in the picture. 6. Sharpness: This option changes the picture quality between blurry and smooth or sharp and pixilated. SCREEN SIZE: This option adjusts the size of the picture displayed. On the remote you can use the ASPECT button to adjust the screen size. 1. Picture Mode: This option changes various preset color and power saving modes for the TV. 2. Brightness: This option changes the picture’s detail in dark colors. 3. Contrast: This option changes the difference between dark and bright objects. 4. Color: This option changes the amount of color in the picture. 32 PC SETTINGS: This option adjusts syncing frequency that affects the VGA connection’s picture quality. 1. Auto Adjust: This option automatically adjusts the picture syncing in with the signal of the TV. 2. Horizontal Position: This option adjusts the left or right po- Operation sition of the PC picture. 3. Vertical Position: This option adjusts the up or down position of the PC picture. 4. Clock: This option tunes in large increments the syncing of the PC video signal. 5. Phase: This tunes in small increments the syncing of the PC video signal. 6. Reset: This option resets all the adjusted setting under PC SETTINGS. COLOR TEMPERATURE: This option adjusts the general color of the entire picture from warm to cool. ADVANCE PICTURE SETTINGS: This option contains various special picture functions. 1. Dynamic Contrast: This option allows the TV to automatically adjust the contrast of the TV depending on the picture you are viewing. 2. Film Mode: This option will enable the TV to support 24p mode for movies so that they will play smoother. 3. Noise Reduction: This option will reduce general pixilation by blurring them. 4. MPEG Noise Reduction: This feature reduce DVD video pixelation by blurring them. 33 0QFSBUJPO 406/% 406/%4&55*/(45IJTPQUJPOHJWFTWBSJPVTBEKVTUNFOUTUP UIFTPVOEZPVBSFMJTUFOJOHUP 1SFTT.&/6UPPQFOUIF57TNFOV 1SFTTŻPSŹUPTFMFDU406/%BOEQSFTT&/5&3 6TFŸPSźUPTFMFDUUIFPOFZPVXBOUUPBEKVTUBOEŻ PSŹPS&/5&3UPBEKVTUUIFN 4PVOE.PEF5IJTPQUJPOTXJUDIFTCFUXFFOQSFTFUTPVOE TFUUJOHTTUBOEBSETPGUVTFSBOEEZOBNJD #BTT5IJTPQUJPOBEKVTUTUIFBVEJPCBTTMFWFMPGUIF57 5SFCMF5IJTPQUJPOBEKVTUTUIFBVEJPUSFCMFMFWFMPGUIF57 #BMBODF5IJTPQUJPOBEKVTUTUIFCBMBODFCFUXFFOUIFUXP TQFBLFSTNPWJOHUIFTPVOEMFGUUPSJHIU 0QFSBUJPO 463306/%.0%&5IJTPQUJPOFOBCMFTUIFUXPTQFBLFSTUP QSPWJEFBXJEFSNPSFTVSSPVOEJOHTPVOEFGGFDU "/"-0(406/%5IJTPQUJPOBEKVTUTUIFTFDPOEBVEJPQSP HSBNNJOHJOBOBMPHDIBOOFMT %*(*5"-406/%5IJTPQUJPOBEKVTUTUIFTFDPOEBVEJPQSP HSBNNJOHJOEJHJUBMDIBOOFMT 05)&34&55*/(45IJTPQUJPOPGGFSTWBSJPVTTPVOETFUUJOHT %JHJUBM"VEJP0VUQVU5IJTPQUJPOBEKVTUTUIFUZQFPGEJHJUBM BVEJPTJHOBMPVUQVUUFECZUIF57CFUXFFO1$.BOE $) &26"-*;&34&55*/(45IJTPQUJPOBMMPXTUIFVTFSUPBEKVTU UIFJOUFSOBMTPVOEFRVBMJ[FSPGUIF57CZFJUIFSTFMFDUJOHCVJMU JOQSFTFUNPEFTPSJOEJWJEVBMTPVOEGSFRVFODJFT "7-5IJTPQUJPOFOBCMFTUIF57UPBVUPNBUJDBMMZBEKVTUUIF WPMVNFPGUIF57QSPHSBNGPSZPV 4QFBLFS5IJTPQUJPOUVSOTUIF57TQFBLFSTPOPSPGG 0QFSBUJPO $)"//&- 1SFTT.&/6UPPQFOUIF57TNFOV 1SFTTŻPSŹUPTFMFDU$)"//&-BOEQSFTT&/5&3 6TFŸPSźUPTFMFDUUIFPOFZPVXBOUUPBEKVTUBOEŻ PSŹPS&/5&3UPBEKVTUUIFN 1MFBTF/PUF r 5IF$)"//&-PQUJPOJTPOMZBWBJMBCMFXIJMFZPVBSF VOEFSUIFTPVSDF57:PVDBOPOMZVTFUIJTPQUJPO XJUIBOBOUFOOB $)"//&- -*45 5IJT PQUJPO TIPXT ZPV UIF DVSSFOU MJTU PG DIBOOFMTGPVOEUISPVHI"650$)"//&-4&"3$) '"703*5&-*455IJTPQUJPOTIPXTZPVUIFDVSSFOUMJTUPGGB WPSJUFDIBOOFMTBEEFE $)"//&- 4&55*/( 5IJT PQUJPO PGGFST OVNFSPVT BEKVTU NFOUTGPSZPVSTDBOOFEDIBOOFMT $IBOOFM /VNCFS5IJT PQUJPO TIPXT UIF DVSSFOU DIBOOFM OVNCFS $IBOOFM-JTU5IJTPQUJPOBMMPXTZPVUPTLJQBDIBOOFMGSPN UIFDIBOOFMMJTU 0QFSBUJPO $IBOOFM-BCFM5IJTPQUJPODIBOHFTUIFDIBOOFMOBNF 1"3&/5" 'BWPSJUF$IBOOFM5IJTPQUJPOBMMPXTUIFVTFSUPBEEPSSF NPWFUIFDVSSFOUDIBOOFMBTBGBWPSJUFDIBOOFM 4*(/"-5:1&5IJTPQUJPOTXJUDIFTUIFEJHJUBMUVOFSBDDFQUJOH TJHOBMCFUXFFODBCMFGPSBOBMPHDBCMF PSBJSGPSBOUFOOBT "650$)"//&-4&"3$)5IJTPQUJPOTFBSDIFTGPSUIFBWBJM BCMF57DIBOOFMTXIJMFVTJOHBOBMPHDBCMFPSBOUFOOB 1MFBTF/PUF r 2".GPSEJHJUBMDBCMFJTOPUTVQQPSUFECZUIJT57 1SFTT.&/6UPPQFOUIF57TNFOV 1SFTTŻPSŹUPTFMFDU1"3&/5"-BOEQSFTT&/5&3 6TFŸPSźUPTFMFDUUIFPOFZPVXBOUUPBEKVTUBOEŻ PSŹPS&/5&3UPBEKVTUUIFN -0$,1"3&/5"-$0/530-5IJTPQUJPOMPDLTUIFQBSFOUBM DPOUSPM :PVMM OFFE UP QVU JO B QBTTXPSE UP BDDFTT BMM PUIFS GFBUVSFT5IFEFGBVMUQBTTXPSEJT 7$)*15IJTPQUJPOCMPDLT57TIPXTVOEFSUIFEJHJUBMUVOFS 0QFSBUJPO 647$)*1.PWJFSBUJOHCMPDLTNPWJFTQMBZFEVOEFSUIF 4&561 EJHJUBM UVOFS XIJMF SFDFJWJOH 6457 CSPBEDBTUJOH TJHOBMT 57SBUJOHCMPDLT57TJUDPNTBOETIPXTVOEFSUIFEJHJUBM UVOFSXIJMFSFDFJWJOH6457CSPBEDBTUJOHTJHOBMT $"/"%"7$)*1&OHMJTISBUJOHCMPDLT57TIPXTXJUIUIF FOHMJTIMBOHVBHF'SFODISBUJOHCMPDLT57TIPXTXJUIUIF GSFODIMBOHVBHF #MPDL6OSBUFE4IPX5IJTPQUJPOCMPDLTBOZ57QSPHSBN JOHUIBUEPFTOPUIBWFBOZSBUJOH %PXOMPBEBCMF 3BUJOH5IJT JT B PQUJPO VOEFS UIF OFX7 $)*1XIFSFSBUJOHTDBOCFEPXOMPBEFEGSPNUIFDIBOOFM $MFBS%PXOMPBEBCMF%BUB5IJTPQUJPODMFBSTUIFNFNPSZ CVGGFSPGUIFEPXOMPBEFESBUJOHT $)"/(& 1"44803% 5IJT PQUJPO DIBOHFT UIF -0$, 1" 3&/5"-$0/530-PQUJPOTQBTTXPSE ,&:1"%-0$,5IJTPQUJPOMPDLTUIFCVUUPOTPOUIF57GSPN GVODUJPOJOHFYDFQUGPSUIFQPXFSCVUUPO 4063$& -0$, 5IJT PQUJPO MPDLT UIF WJEFP TPVSDFT GSPN XPSLJOH 1SFTT.&/6UPPQFOUIF57TNFOV 1SFTTŻPSŹUPTFMFDU4&561BOEQSFTT&/5&3 1MFBTF/PUF 6TFŸPSźUPTFMFDUUIFPOFZPVXBOUUPBEKVTUBOEŻ r 1MFBTF SFGFS UP 3"5*/(4 &91-"*/&% GPS NPSF JOGPSNB PSŹPS&/5&3UPBEKVTUUIFN UJPOPOSBUJOHTEFGJOJUJPOT r 5IFEPXOMPBEBCMFSBUJOHBOEDMFBSEPXOMPBEBCMFEBUBPQ UJPOTNJHIUCFHSBZFEPVU5IFJSGVODUJPOBMJUZEFQFOETPO MPDBM57TUBUJPOTTVQQPSU Operation CLOSED CAPTION: This option provides subtitles for TV shows and movies played on TV while using the sources TV and AV. 1. Caption Display: This turns on or off the closed captioning. 2. Analog Caption Type: This option chooses the subchannel that supplies the closed captioning. For United States, usually the setting is CC1. TEXT1-4 displays advertisements of the channel. 3. Digital Caption Type: This option chooses the subchannel for digital channel closed captioning. For United States, usually the setting is Service1. 4. Digital CC Preset: This option unlocks the user’s ability to change caption styles. 5. Digital CC Style: This option lets the user change the way digital caption on the TV is displayed with options (size, font, opacity, text color, background opacity and background color. MENU LANGUAGE: This option changes the language of the TV menu between English, French, and Spanish. CLOCK: This option changes the internal clock of the TV. 1. Time Zone: This option adjusts the time zone of the clock. 2. Auto Clock: This option sets the TV to the TV channel’s clock (You must have an antenna to use this feature). 3. Setup Time: This option adjusts the time and date. 4. Day Of The Week: This shows you the day of the week. 5. Daylight Savings Time: This option toggles daylight savings time adjustment. 6. 24 Hour Mode: This feature tells time in a 24 hour fashion instead of showing AM and PM. OSD TIMER: This option adjusts the idle time that the TV’s menu stays on the screen. Please Note: r Closed captioning is only available with source AV and TV. r Closed captioning is dependent on your local TV station. r TEXT1-4 will give you block boxes in the middle of the screen if there are no information to broadcast. 39 0QFSBUJPO 05)&34 1SFTT.&/6UPPQFOUIF57TNFOV 1SFTTŻPSŹUPTFMFDU05)&34BOEQSFTT&/5&3 6TFŸPSźUPTFMFDUUIFPOFZPVXBOUUPBEKVTUBOEŻ PSŹPS&/5&3UPBEKVTUUIFN #-6&#"$,5IJTPQUJPODIBOHFTUIFCMBDLCBDLHSPVOEPGUIF 57XIFOUIFSFJTOPUIJOHUPEJTQMBZUPCMVFDPMPS /0 4*(/"- 108&3 0'' 5IJT PQUJPO UVSOT UIF57 PGG BVUP NBUJDBMMZBGUFSUIF57IBTSFDFJWFEOPTJHOBMGPSBDFSUBJOUJNF /0 01&3"5*0/ 108&3 0'' 5IJT PQUJPO UVSOT UIF 57 PGG BVUPNBUJDBMMZBGUFSUIF57IBTSFDFJWFEOPSFNPUFDPOUSPMDPN NBOEGPSBDFSUBJOQFSJPEPGUJNF "--3&4&55IJTPQUJPOSFTFUTUIFFOUJSF57NFOVBOEXJQFT BMMNFNPSZGSPNUIFDIBOOFMTTDBOOFEJOCZUIF57 Operation Detailed Explanations Browsing Music and Photo In the USB function, select Music or Photo. USB Connection Explained This TV is a widescreen TV with an USB port. With the USB port the TV can access USB flash drives (up to 2GB) and display JPEG pictures or play MP3 files. To use this feature connect a USB flash drive to the USB port of the TV and press the USB button to start browsing for music and pictures. USB ENTER Use the Ÿ or ź button to select the file you want and use the ENTER to play the file. Use the EXIT button to exit a folder. Once you press the USB button the USB menu will come up. Select either the music or picture you want to browse using the arrow buttons. Press the ENTER button to select the file you want. Media Setting 41 Operation 1. 2. 3. 4. 5. 6. SLIDESHOW INTERVAL – This option adjusts the time interval of a displayed picture. SLIDESHOW EFFECT – This option adjusts the video effects when pictures interchange. SLIDESHOW REPEAT – This option toggles the repeat function for displaying pictures. MUSIC PLAY MODE – This option adjusts the music playing option. MUSIC PLAY REPEAT – This option toggles the repeat function for playing music. MUSIC AUTO PLAY – This function toggles the auto play feature which will play any music found in the USB flash drive once you insert the flash drive. Technical Limitation 1. The USB port does not support USB hubs. 2. The USB port does not support USB hard drives or USB peripherals. 3. The USB flash drive supports FAT32 and FAT16 file system only. 4. The biggest file size is 2 gigabyte (FAT32). 5. The picture function only supports JPEG file (baseline only, progressive is not supported). 6. The music function only supports MP3 that is from 32-48k Hz using a data rate of 32-320 kbps. 7. All USB functions are operated by the remote control. None of the buttons physically located on the TV will respond to USB functions. 42 Closed Captioning Explained Your TV is equipped with an internal Closed Caption decoder. It allows you to view conservations, narration and sound effects as subtitles on your TV. Closed Captions are available on most TV program, and on some VHS home video tapes, at the election of the program provider. CC ENTER _ CC – Press this button to enable the CC function. You can then use the Ÿźbuttons to select if you want CC off or CC on. You can use the ŻŹ buttons to select between different CC channels. Please Note: r Digital Closed Caption service is a new caption service available on digital TV programs (also at the election of the service provider). It is a more flexible system than the original Closed Caption system, because it allows a variety of caption sizes and font styles. r Not all programs and VHS video tapes offer closed caption. Please look for the CC symbol to ensure that cap- 0QFSBUJPO r r r UJPOTXJMMCFTIPXO *OUIF$MPTFE$BQUJPOTZTUFNUIFSFDBOCFNPSFUIBO POFDBQUJPOTFSWJDFQSPWJEFE&BDIJTJEFOUJGJFECZJUT PXOOVNCFS5IF$$BOE$$TFSWJDFTEJTQMBZTVCUJUMFT PG57QSPHSBNTTVQFSJNQPTFEPWFSUIFQSPHSBNTQJDUVSF *OUIF$MPTFE$BQUJPOTZTUFNUIF5&95PS5&95TFS WJDFTEJTQMBZUFYUUIBUJTVOSFMBUFEUPUIFQSPHSBNCFJOH WJFXFEFHXFBUIFSPSOFXT 5IFTFTFSWJDFTBSFBMTP TVQFSJNQPTFEPWFSUIFQSPHSBNDVSSFOUMZCFJOHWJFXFE $MPTFE$BQUJPOJOHGPSUIJT57POMZXPSLTVOEFSTPVSDFT 57BOE7*%&0 573BUJOHT&YQMBJOFE (FOFSBM0QFSBUJPO 5PCMPDLDIBOOFMTZPVEPOUXBOUZPVSDIJMESFOUPXBUDIZPV DBOGJMUFSUIFNXJUIUIFSBUJOHTGVODUJPO.1""MFUTZPVDPOUSPM SBUJOHTGPSNPWJFT'PSSFHVMBS57QSPHSBNTZPVDBOVTF 6457TFUUJOHT6457TFUUJOHTMFUTZPVGJMUFSXIBUDPOUFOUZPV XBOUBUFBDIBHFMFWFM57:UP57."SFGFSUPEFGJOJUJPOT CFMPX #FMPXBSFEFGJOJUJPOTGPSFBDITFUUJOH 64573BUJOH 57:6457 m'PS"MM$IJMESFO 5IJTQSPHSBNJTEFTJHOFEUPCFBQQSPQSJBUFGPSBMMDIJMESFO 8IFUIFSBOJNBUFEPSMJWFBDUJPOUIFUIFNFTBOEFMFNFOUTJO UIJTQSPHSBNBSFTQFDJGJDBMMZEFTJHOFEGPS BWFSZZPVOHBVEJFODFJODMVEJOHDIJMESFOGSPNBHFT5IJT QSPHSBNJTOPUFYQFDUFEUPGSJHIUFOZPVOHFSDIJMESFO 57:6457 m%JSFDUFEUP0MEFS$IJMESFO 5IJTQSPHSBNJTEFTJHOFEGPSDIJMESFOBHFBOEBCPWF*UNBZ CFNPSFBQQSPQSJBUFGPSDIJMESFOXIPIBWFBDRVJSFEUIFEFWFM PQNFOUBMTLJMMTOFFEFEUPEJTUJOHVJTICFUXFFONBLFCFMJFWF BOESFBMJUZ5IFNFTBOEFMFNFOUTJOUIJTQSPHSBNNBZJODMVEF NJMEGBOUBTZWJPMFODFPSDPNFEJDWJPMFODFPSNBZGSJHIUFO DIJMESFOVOEFSUIFBHFPG5IFSFGPSFQBSFOUTNBZXBOUUP DPOTJEFSUIFTVJUBCJMJUZPGUIJTQSPHSBNGPSUIFJSWFSZZPVOH DIJMESFO/PUF'PSUIPTFQSPHSBNTXIFSFGBOUBTZWJPMFODF NBZCFNPSFJOUFOTFPSNPSFDPNCBUJWFUIBOPUIFSQSPHSBNT JOUIJTDBUFHPSZTVDIQSPHSBNTXJMMCFEFTJHOBUFE57:'7 57(6457 m(FOFSBM"VEJFODF .PTUQBSFOUTXPVMEGJOEUIJTQSPHSBNTVJUBCMFGPSBMMBHFT "MUIPVHIUIJTSBUJOHEPFTOPUTJHOJGZBQSPHSBNEFTJHOFE TQFDJGJDBMMZGPSDIJMESFONPTUQBSFOUTNBZMFUZPVOHFSDIJM ESFOXBUDIUIJTQSPHSBNVOBUUFOEFE*UDPOUBJOTMJUUMFPSOP WJPMFODFOPTUSPOHMBOHVBHFBOEMJUUMFPSOPTFYVBMEJBMPHVF PSTJUVBUJPOT 571(6457 m1BSFOUBM(VJEBODF4VHHFTUFE 5IJTQSPHSBNDPOUBJOTNBUFSJBMUIBUQBSFOUTNBZGJOEVOTVJU BCMFGPSZPVOHFSDIJMESFO.BOZQBSFOUTNBZXBOUUPXBUDI JUXJUIUIFJSZPVOHFSDIJMESFO5IFUIFNFJUTFMGNBZDBMMGPS QBSFOUBMHVJEBODFBOEPSUIFQSPHSBNDPOUBJOTPOFPSNPSF PGUIFGPMMPXJOHNPEFSBUFWJPMFODF7 TPNFTFYVBMTJUVB UJPOT4 JOGSFRVFOUDPBSTFMBOHVBHF- PSTPNFTVHHFTUJWF 0QFSBUJPO EJBMPHVF% 576457 m1BSFOUT4USPOHMZ$BVUJPOFE 5IJTQSPHSBNDPOUBJOTTPNFNBUFSJBMUIBUNBOZQBSFOUT XPVMEGJOEVOTVJUBCMFGPSDIJMESFOMFTTUIBOZFBSTPGBHF 1BSFOUTBSFTUSPOHMZVSHFEUPFYFSDJTFHSFBUFSDBSFJONPOJUPS JOHUIJTQSPHSBNBOEBSFDBVUJPOFEBHBJOTUMFUUJOHDIJMESFOVO EFSUIFBHFPGXBUDIFTVOBUUFOEFE5IJTQSPHSBNDPOUBJOT POFPSNPSFPGUIFGPMMPXJOHJOUFOTFWJPMFODF7 JOUFOTF TFYVBMTJUVBUJPOT4 TUSPOHDPBSTFMBOHVBHF- PSJOUFOTFMZ TVHHFTUJWFEJBMPHVF% 57."6457 m.BUVSF"VEJFODF0OMZ 5IJTQSPHSBNJTTQFDJGJDBMMZEFTJHOFEUPCFWJFXFECZBEVMUT BOEUIFSFGPSFNBZCFVOTVJUBCMFGPSDIJMESFOVOEFS5IJT QSPHSBNDPOUBJOTPOFPSNPSFPGUIFGPMMPXJOHHSBQIJD WJPMFODF7 FYQMJDJUTFYVBMBDUJWJUZ4 PSDSVEFJOEFDFOU MBOHVBHF- 57QSPHSBNEFTDSJQUJPO '7'BOUBTZ7JPMFODF 77JPMFODF 44FYVBM4JUVBUJPOT -"EVMU-BOHVBHF %4FYVBMMZ4VHHFTUJWF%JBMPH .1""3BUJOH (.1"" (FOFSBMBVEJFODFT"MMBHFTBENJUUFE 1(.1"" 1BSFOUBMHVJEBODFTVHHFTUFE4PNFNBUFSJBMNBZOPUCF TVJUBCMFGPSDIJMESFO 1(.1"" 1BSFOUTTUSPOHMZDBVUJPOFE4PNFNBUFSJBMNBZCFJOBQQSP QSJBUFGPSDIJMESFOVOEFS 3.1"" 3FTUSJDUFE6OEFSSFRVJSFTBDDPNQBOZJOHQBSFOUPSBEVMU HVBSEJBOBHFWBSJFTJOTPNFKVSJTEJDUJPOT /$.1"" /PPOFBOEVOEFSBENJUUFE 9.1"" 9JTBOPMEFSSBUJOHUIBUJTVOJGJFEXJUI/$CVUNBZCF FODPEFEJOUIFEBUBPGPMEFSNPWJFT Operation TV Aspect Ratio Explained Browsing Channels This TV is a widescreen TV, but a lot TV programs are still broadcasting in a square format, therefore the TV is offering multiple ways of viewing videos. There are mainly two types of signal format, Full (16:9 fomat), Normal (4:3 format), while others offer a novel ways to view the TV. Simply use the ASPECT button on the TV’s remote control to cycle between the multiple modes. Browsing through the entire channel list on the TV can be tedious. This TV features a favorite channel list, where you can add in channels that you always want to watch NORMAL Most analog TV channels have 4:3 signal formats. If the original 4:3 aspect ratio (1.33:1 source) is preserved, black bars are added to the left and right of the display image. This aspect keeps that aspect ratio and shows you the black bars on the side. WIDE This mode will stretch the picture to a widescreen ratio. If you have a perfect 16:9 ratio picture you will not see any black bars. If you are watching a widescreen movie in 1.85:1 or 2.35:1 ratio, you will still get black bars on the top and bottom of the screen. If you use this mode on 4:3 pictures they will be stretched and distorted horizontally. CINEMA This mode cuts off all 4 sides to try to make a widescreen movie fit better on the TV screen. ZOOM When watching a 4:3 aspect ratio TV or movie, this mode zooms in to cut off most of the black bars on the side while preserving the 16:9 ratio. Because of the zoom, the top and bottom are cut off as well. Full 100% This mode is only available under DTV and HDMI. It will map dot by dot to the screen. Any resolution will be proportionate. Fav Add/Del Fav _ Fav + TO ADD TO THE FAVORITE LIST 1. Go to any channel you would like to include in your favorites list. 2. Press the ADD/DEL button on the remote control. You will see a (FAV) on the INFO banner denoting that this channel is in the favorites list. TO DELETE FROM THE FAVORITE LIST 1. Go to any channel you would like to remove from your favorites list. 2. Press the ADD/DEL button on the remote control. You will then see the (FAV) disappear on the INFO banner denoting that this channel is no longer in the favorites list. BROWSING CHANNELS WITH THE FAVORITE LIST 1. Press the FAVORITE button, and the list of channels you have added will be in a window. 2. Use the Ÿ or ź buttons to select the channel you want to jump to and press ENTER to confirm. 3. You can also use the FAV+/- keys to switch up and down the favorites list automatically. 45 Maintenance Cleaning the TV Frequently Asked Q&As IMPORTANT 1. The power cable has to be removed from the socket before cleaning the TV. 2. Do not use volatile solvent (alcohol, rosin, and toluene) to clean the TV. These types of chemicals might damage the housing and the LCD glass. Q: How do I program my cable or satellite remote to control my TV? A: Call up your cable or satellite TV company and ask for SONY®TV’s universal remote code. Cleaning the bezel and remote control 1. Use a 100% cotton cloth or micro-fiber cloth for cleaning. 2. If the remote control or bezel is dirty to the point where you cannot simply dry wipe it, please lightly dampen the cloth (the cloth cannot be dripping wet, because if water drips into the panel it will cause malfunction and possible permanent damage to the panel which will not be covered under the warranty) with clean water and wipe again. Wipe the display with a dry micro-fiber cloth or 100% cotton cloth afterwards. Please Note : Make sure you wring the water out of the cloth before cleaning the r bezel or remote in order to prevent water from penetrating into the electronics. Cleaning the Screen 1. Use a 100% cotton cloth or micro-fiber cloth for cleaning. 2. The LCD screen glass is extremely fragile. Do not scrape it with any material. Do not press or tap the screen to avoid cracking. When the screen is dirty to the point where you cannot simply dry wipe it, please lightly dampen the wiping material with clean water and wipe again. Wipe the display with a dry micro-fiber cloth or 100% cotton cloth afterwards. 46 Q: Does this TV support digital cable without a box? A: No, this TV does not have a QAM tuner built in. Q: Why is there no video after I connected my cable / satellite box to the TV with yellow, red, and white plugs but TV shows no video. A: Press the SOURCE button on the remote, make sure you are on the source called AV. Please also reference page 27 under setup to confirm you did connect the cables in the correct place. Q: Why is there no video after I connected my antenna? A: You need to use the TV menu to scan for channels. Q: Why is there no video after I connected my cable / satellite box with coax cable (the old style cable with needle in the middle and a ring to tighten the connection)? A: Did you make sure to switch the signal type to cable and change your TV channel to the correct one? Check page 2 for more instructions. Maintenance Q: How come the TV’s clock isn’t completely accurate? A: The TV’s digital clock needs to sync to a local TV station through the antenna signal to keep accurate time. and then reinstall the batteries. Try the remote to see if it works. If this did not work please contact our technical support team for help. Q: Why does the TV show not support or HDCP fail? A: The HDMI device you are using is not syncing correctly with the TV. Turn both the TV and your HDMI device off. Make sure the HDMI cable is plugged in correctly by unplugging both ends then plugging them back in. Turn on the TV, then turn on the HDMI device. If this still does not work, please contact technical support for further assistance. Q: Why is my picture blurry? A: Press the INFO button on the TV’s remote control. If you do not see 720P or 1080i or 1080P you are not seeing a HD signal, and the picture will be blurry because this is a TV built for HD video. Q: Why is the picture on the TV very dim or dark? A: Make sure the TV is not under POWER SAVING mode. Press the PICTURE button on the TV’s remote repeatedly to cycle through different picture modes. Q: Why is there no color or weird colors on my TV screen? A: Did you connect your cable correctly? Consult the SETUP section of this manual to make sure your cables are connected properly. If the TV worked before but does not any longer, you’ll need to contact our technical support team for help. Q: My remote doesn’t respond, what do I do? A: Turn off the TV, unplug it from the socket. Remove the batteries out of the remote for 15 minutes. Press the remote buttons and the power button randomly for a good 2 seconds, Q: Why is there a big black box in the middle of my screen? A: You have the closed captioning TEXT service turned on. Turn off closed captioning or make sure your captioning service is on service1 or cc1 to turn off the black box but still receive regular closed captioning. Q: Why is my picture cut off? A: Press the ASPECT button on the TV’s remote control repeatedly and make sure you are using WIDE or Full 100% aspect. If the picture is still cut off maybe you have a cable or satellite box that is controlling the signal. Use your cable or satellite box remote control and see if there is a zoom or scale button you can use to change the picture. Q: Why do I only have 5-10 channels under the TV source? A: Check the TV’s menu for SIGNAL TYPE under CHANNEL. If you have antenna, please use AIR as your signal type. If 47 .BJOUFOBODF ZPVIBWFDBCMFXJUIPVUBCPYQMFBTFVTF$"#-&BTZPVS TJHOBMUZQFBOEVTFUIF"650$)"//&-4&"3$)PQUJPOUP GJOEZPVSDIBOOFMT 28IZDBOU*HFUUIFSFTPMVUJPO*XBOUGSPNNZDPNQVUFS XIFOJUTDPOOFDUFEUPUIJT57 ".BLFTVSFUIF57JTSFDPHOJ[FEBTBQMVHBOEQMBZNPOJUPS VOEFSZPVSDPNQVUFS*GOPUUIFOUIFSFJTTPNFUIJOHXSPOH XJUIUIFDBCMFZPVBSFVTJOH"MTPNBLFTVSFZPVSWJEFPDBSE EPFTTVQQPSUXJEFTDSFFOSFTPMVUJPOTCZVQEBUJOHUIFWJEFP DBSEESJWFSTUPUIFMBUFTUWFSTJPO 28IZEPFTNZ.1QMBZFSPS64#IBSEESJWFOPUXPSL XIFO*DPOOFDUJUUPUIF57T64#QPSU "5IF57T64#QPSUPOMZXPSLTXJUI64#GMBTIESJWFTOPUI JOHFMTF 28IZEP*TFFJOWJTJCMFMJOFTNPWJOHVQUIF57PSEJTUPSUJPO POUIF57 "5IF57JTSFDFJWJOHJOUFSGFSFODFGSPNBOPUIFSFMFDUSJDBMEF WJDFFJUIFSDMPTFUPUIF57PSPOUIFTBNFQPXFSHSJEBTUIF 575SZNPWJOHUIF57BXBZGSPNUIFEFWJDF 28IZEPFTNZ57QJDUVSFIBWFBCMBDLCPSEFS ":PVOFFEUPVTF)%.*BTZPVSTPVSDFUPXBUDIB)%QJD UVSF"MTPNBLFTVSFZPVS)%EFWJDFCMVSBZQMBZFSTBUFMMJUF PSDBCMFCPY JTDPOGJHVSFEUPPVUQVU)%TJHOBMT $BMM6T*G:PV/FFE)FMQ 1SPEVDUTBSFPGUFOSFUVSOFEEVFUPBUFDIOJDBMQSPCMFN SBUIFSUIBOBEFGFDUJWFQSPEVDUUIBUNBZSFTVMUJOVO OFDFTTBSZTIJQQJOHDIBSHFTCJMMFEUPZPV0VSUSBJOFE TVQQPSUQFSTPOOFMDBOPGUFOSFTPMWFUIFQSPCMFNPWFS UIFQIPOFPSFNBJM'PSNPSFJOGPSNBUJPOPOXBSSBOUZ TFSWJDFTPSSFQBJSTBGUFSUIFXBSSBOUZQFSJPEQMFBTF DPOUBDUPVSTVQQPSUEFQBSUNFOUBUUIFOVNCFSCFMPX 'PSUFDIOJDBMIFMQDPOUBDUPVSP$04.05FDIOJDBM4VQ QPSU(SPVQWJBFNBJMPSQIPOF1MFBTFIBWFZPVSP$04 .0QOOVNCFSTFSJBMOVNCFSBOEEBUFPGQVSDIBTF BWBJMBCMFCFGPSFZPVDBMM 0QFSBUJPO)PVST.PO'SJBU".m1.145 5FMFQIPOF 5FDIJDBM4VQQPSU&NBJMP$04.054!PDPTNPDPN $VTUPNFS4FSWJDF&NBJMP$04.0$4!PDPTNPDPN Specification Panel Active Screen Size 32 class 31.5” (measured diagonally) viewable Aspect Ratio 16 : 9 PC Resolution 1360 x 768 Maximum Video Resolution Scaled 1080P (Native 720P) Refresh Rate 60 Hz General Dimension with stand 29.1” x 8.1” x 19.3” without stand 29.1” x 3.5” x 17.3” Weight with stand 12.32 lb without stand 11.44 lb VESA Hole Pattern 200mm x 100mm VESA Hole Pattern Screw Size M4 x 6mm PC VGA x 1 USB 2.0 x 1 Analog Audio In x 1 3.5mm mini-jack Optical Out x 1 SPDIF Digital Optical Out Analog Audio Out RCA Analog Audio Out x 1 Headphone x 1 Stand Screw Size ST4 x 8mm (4pcs) Power Power Range 100-240 VAC, 50/60 Hz 3.0 A TV Menu Language English, Spanish, French Power Consumption Avg. 43 W / Max 50 W Contrast 5000:1 I/O HDMI x 3 HDMI #2 is with MHL and ROKU stick support Standby 1W Brightness 250 cd/m² YPbPr Component x 1 Audio plugs are shared with AV Backlight Life LED backlit 50,000+ hours AV Composite x 1 Audio plugs are shared with YPbPr Viewing Angle 178º horizontal, 178º vertical RF Antenna Input x 1 This input supports NTSC/ATSC. QAM is not available. Response Time 8ms (grey to grey) Colors 16.7 million (8 bit panel) Certifications & Compliance cTUVus ISTA 3A FCC Class B Energy Star HDMI 1.3 49 8BSSBOUZ 1MFBTF SFBE UIJT XBSSBOUZ DBSE DBSFGVMMZ JU JT Bi0/&:&"3 -*.*5&%8"3 3"/5:u PO QBSUT BOE MBCPS EBZT GPS DPNNFSDJBM VTF BOE JT POMZ WBMJE XIFOQVSDIBTFEGSPNBO"VUIPSJ[FE3FTFMMFSPOMZPOOFXBOEOPOSFGVSCJTIFE QSPEVDUBOEBWBJMBCMFUPDVTUPNFSTJOUIF$POUJOFOUBM64"MBTLB)BXBJJBOE 1VFSUP3JDP4FFCFMPXGPSUIFP$04.0&YUFOEFE4FSWJDFXBSSBOUZ P$04.0T3FTQPOTJCJMJUZ P$04.0VOJUTQVSDIBTFEGSPNBOBVUIPSJ[FEP$04.0643FTFMMFSJOUIF 6OJUFE4UBUFTBOEUIBUBSFVTFEJOUIFGJGUZ 6OJUFE4UBUFTPS1VFSUP3JDP BOE$BOBEBBSFXBSSBOUFEUPCFGSFFGSPNNBOVGBDUVSJOHEFGFDUTJONBUFSJBMT BOEXPSLNBOTIJQGPSBQFSJPEPGPOF ZFBSGSPNUIFEBUFPGUIFJSPSJHJOBM SFUBJMQVSDIBTFPSBQFSJPEPGOJOFUZ EBZTGPSDPNNFSDJBMVTF *GUIFVOJU GBJMTUPDPOGPSNUPUIJTXBSSBOUZXFXJMMTFSWJDFUIFVOJUTVTJOHOFXPSSFGVS CJTIFEQBSUT*OUIFFWFOUUIBUUIFQBSUSFRVJSFEGPSSFQMBDFNFOUJTOPMPOHFS JOQSPEVDUJPOBOEPSJTPCTPMFUFP$04.0XJMMSFQBJSPSSFQMBDFUIFVOJUXJUI TJNJMBSPSMJLFQBSUTPGFRVBMWBMVF*GBTJNJMBSPSMJLFQBSUJTOPUBWBJMBCMFB DIBSHFNBZCFJODVSSFEUPUIFPXOFSGPSBOZVQHSBEFEQBSUTTVCTUJUVUFE 4FSWJDF-BCPS %VSJOHBQFSJPEPGPOF ZFBSGSPNUIFFGGFDUJWFXBSSBOUZEBUFPSBQFSJPE PGOJOFUZ EBZTGPSDPNNFSDJBMVTF P$04.0XJMMQSPWJEFXIFOOFFEFE TFSWJDFMBCPSUPSFQBJSBNBOVGBDUVSJOHEFGFDUBUJUTEFTJHOBUFE4FSWJDF$FOUFS 5P PCUBJO XBSSBOUZ TFSWJDF JO UIF 6OJUFE 4UBUFT ZPV NVTU GJSTU DBMM PVS $VT UPNFS4VQQPSUBU 5IFEFUFSNJOBUJPOPGTFSWJDFXJMMCFNBEF CZP$04.0$VTUPNFS4VQQPSU1-&"4&%0/053&563/:0636/*550 P$04.08*5)06513*03"65)03*;"5*0/ 1BSUT /FXPSSFNBOVGBDUVSFEQBSUTXJMMCFVTFEGPSSFQBJSTCZP$04.0BUJUTEFTJH OBUFE4FSWJDF$FOUFSGPSPOF ZFBSPSOJOFUZ EBZTGPSDPNNFSDJBMVTF GSPNUIFFGGFDUJWFXBSSBOUZEBUF4VDISFQMBDFNFOUQBSUTBSFXBSSBOUFEGPSUIF SFNBJOJOHQPSUJPOPGUIFPSJHJOBMXBSSBOUZQFSJPE 4FSWJDF %VSJOH UIF POF ZFBS PS OJOFUZ EBZT GPS DPNNFSDJBM VTF XBSSBOUZ QFSJPEP$04.0XJMMBUJUTPQUJPOBOETPMFEJTDSFUJPOSFQBJSPSSFQMBDFEF GFDUJWFQBSUTJODMVEJOHSFQMBDFNFOUPGUIFFOUJSF1BOFM5IF$VTUPNFSXJMMCF SFRVJSFEUPTIJQUIFVOJUUPUIF4FSWJDF$FOUFSJOEJDBUFEBUUIFUJNF$VTUPNFS 4VQQPSUJTDPOUBDUFEUPNBLFUIFOFDFTTBSZSFQBJSTZPVBSFSFTQPOTJCMFGPSBMM USBOTQPSUBUJPODIBSHFTUPUIFTFSWJDFGBDJMJUZP$04.0JTOPUSFTQPOTJCMFGPS UIFEFJOTUBMMBUJPOPSSFJOTUBMMBUJPOPGUIFVOJU 1BDLBHJOHBOE4IJQQJOH*OTUSVDUJPO 8IFO ZPV TFOE UIF QSPEVDU UP BO BVUIPSJ[FE P$04.0 TFSWJDF GBDJMJUZ ZPV NVTUVTFUIFPSJHJOBMDBSUPOCPYBOEQBDLJOHNBUFSJBMPSBOFRVJWBMFOUBTEFT JHOBUFECZP$04.0*GZPVOPMPOHFSIBWFUIFNQMFBTFDPOUBDUP$04.0T $VTUPNFS4VQQPSU /PU$PWFSFE 5IJTXBSSBOUZEPFTOPUDPWFSUIFGPMMPXJOHDPTNFUJDEFGFDUTEBNBHFNBM GVODUJPOTPSGBJMVSFTSFTVMUJOHGSPNTIJQQJOHPSUSBOTJUBDDJEFOUTBCVTFNJT VTFPQFSBUJPODPOUSBSZUPGVSOJTIFEJOTUSVDUJPOTPQFSBUJPOPOJODPSSFDUQPXFS TVQQMJFTPQFSBUJPOXJUIGBVMUZBTTPDJBUFEFRVJQNFOUNPEJGJDBUJPOBMUFSBUJPO JNQSPQFSTFSWJDJOHUBNQFSJOHBOEPSEBNBHFGSPNGJSFXBUFSMJHIUOJOHQPXFS TVSHFT BCOPSNBM FOWJSPONFOUBM DPOEJUJPOT PS PUIFS BDUT PG OBUVSF OPSNBM XFBSBOEUFBSP$04.0SFTFSWFTUIFSJHIUUPEFUFSNJOFiXFBSBOEUFBSuPO BOZBOEBMMQSPEVDUT VOTBUJTGBDUPSZWJTVBMPSBVEJPQFSGPSNBODFOPUDBVTFE CZBNBOVGBDUVSJOHEFGFDUPSEJTQMBZTPOXIJDIUIFTFSJBMOVNCFSIBTCFFOSF NPWFEPSEFGBDFE*NBHF4UJDLJOHDBVTFECZPQFSBUJOHBUFYDFTTJWFCSJHIUOFTT MFWFMTGPSFYUFOEFEQFSJPETPSNJTIBOEMJOHBSFOPUDPWFSFECZUIJTXBSSBOUZ *OTUBMMBUJPOSFNPWBMUSBOTQPSUBUJPOBOESFJOTUBMMBUJPOPGBEJTQMBZBOESPVUJOF NBJOUFOBODFBOEDMFBOJOHBSFOPUDPWFSFECZUIJTXBSSBOUZ"OZIBSEXBSF DPNQPOFOUTBOEPSTPGUXBSFCVOEMFEXJUIUIFEJTQMBZBSFOPUDPWFSFECZUIJT XBSSBOUZ"OZEBNBHFTDBVTFEEJSFDUMZPSJOEJSFDUMZCZ#VZFSTPS3FTFMMFST i7BMVF"EEFE'FBUVSFuBSFOPUDPWFSFECZUIJTXBSSBOUZPSP$04.0*OD"OZ EBNBHFTPGBOZLJOEJODMVEJOHCVUOPUMJNJUFEUPEJSFDUPSJOEJSFDUEBNBHFT MPTUQSPGJUTMPTUTBWJOHTPSPUIFSTQFDJBMJODJEFOUBMFYFNQMBSZPSDPOTFRVFO UJBMEBNBHFTXIFUIFSGPSCSFBDIPGDPOUSBDUUPSUPSPUIFSXJTFPSXIFUIFSBSJT JOHPVUPGUIFVTFPGPSJOBCJMJUZUPVTFUIFQSPEVDUFWFOJGP$04.0*/$PS 8BSSBOUZ BOZEFBMFSEJTUSJCVUPSPGBVUIPSJ[FETFSWJDFQSPWJEFSQBSUOFSIBTCFFOBEWJTFE PGUIFQPTTJCJMJUZPGTVDIEBNBHFTPSBOZDMBJNCZBOZPUIFSXBSSBOUZBSFOPU DPWFSFECZUIJTXBSSBOUZPSP$04.0 "/: *.1-*&%8"33"/5*&4 */$-6%*/("/: *.1-*&%8"33"/5: 0' .&3$)"/5"#*-*5:"/%'*5/&44'03"1"35*$6-"3163104&4)"-- #&-*.*5&%*/%63"5*0/505)&1&3*0%0'5*.&4&5'035)"#07& 063-*"#*-*5:'03"/:"/%"---044&4"/%%"."(&43&46-5*/( '30."/: $"64&8)"540&7&3 */$-6%*/( 063 /&(-*(&/$&"- -&(&% %"."(& 03 %&'&$5*7& (00%4 8)&5)&3 46$) %&'&$54 "3& %*4$07&3"#-& 03 -"5&/5 4)"-- */ /0 &7&/5 &9$&&% 5)& 163$)"4&13*$&0'5)&%*41-":8&4)"--/05#&3&410/4*#-& '03 -044 0' 64& $0..&3$*"- -044 03 05)&3 */$*%&/5"- 03 $0/4&26&/5*"- %"."(&4 40.& 45"5&4 %0 /05 "--08 -*.*5" 5*0/40/)08-0/("/*.1-*&%8"33"/5:-"454035)&&9$-6 4*0/03-*.*5"5*0/0'*/$*%&/5"-03$0/4&26&/5*"-%"."(&4 405)&"#07&-*.*5"5*0/403&9$-64*0/4.":/05"11-:50:06 5IJT XBSSBOUZ HJWFT ZPV TQFDJGJD MFHBM SJHIUT BOE ZPV NBZ BMTP IBWF PUIFS SJHIUTXIJDIWBSZGSPNTUBUFUPTUBUF5IJTJTUIFPOMZXBSSBOUZBQQMJDBCMFOP POFJTBVUIPSJ[FEUPFYUFOEPSNPEJGZJUPSUPHSBOUBOZPUIFSXBSSBOUZ P$04.0SFUBJOTUIFSJHIUUPBTTFTTBMMXBSSBOUZDMBJNTBOEUPEFUFSNJOFJG EBNBHFTBSFDPWFSFECZUIFXBSSBOUZ*ODBTFPGBDMBJNUIBUJTOPUDPWFSFE CZUIFXBSSBOUZZPVXJMMCFDPOUBDUFEUPEFUFSNJOFXIFUIFSP$04.0TIPVME SFQBJSUIFEBNBHFGPSBGFFPSXIFUIFSUIFQSPEVDUTIPVMECFSFUVSOFEUPZPV BTSFDFJWFECZUIFSFQBJSDFOUFS WJDFLFFQUIFEBUFECJMMPSTBMFSFDFJQUBTFWJEFODFPGUIFQVSDIBTFEBUF*GZPV DBOOPMPOHFSPCUBJOZPVSSFDFJQUUIFXBSSBOUZXJMMSFWFSUUPUIFVOJUTNBOV GBDUVSFEBUFBDDPSEJOHUPUIFTFSJBMOVNCFSPGUIFVOJU5IJTMJNJUFEXBSSBOUZ BQQMJFTPOMZUPUIFPSJHJOBMQVSDIBTFSBOEJTOPOUSBOTGFSBCMF 8BSSBOUZ4FSWJDF 'PSXBSSBOUZTFSWJDFJOGPSNBUJPODPOUBDUP$04.05FDIOJDBM4VQQPSUBUFNBJM BEESFTT PDPTNP54!P$04.0DPN WJB QIPOF BU PS WJB 8PSME8JEF8FCDIBUUJOHTFSWJDFBUXXXP$04.0DPNP$04.05FDIOJDBM 4VQQPSUJTBWBJMBCMF.POEBZUP'SJEBZ".UP1.1BDJGJD5JNF1BSUT BOETFSWJDFMBCPSUIBUBSFP$04.0TSFTQPOTJCJMJUZTFFBCPWF XJMMCFQSP WJEFEXJUIPVUDIBSHF0UIFSTFSWJDFTPSTFSWJDFTOPUDPWFSFECZUIFXBSSBOUZ BSFBUUIFPXOFSTFYQFOTF:PVNVTUQSPWJEFUIFNPEFMTFSJBMOVNCFSBOE EBUFPGQVSDIBTF#FGPSFZPVBTLGPSXBSSBOUZTFSWJDFSFBEZPVS6TFS.BOVBM :PVNJHIUBWPJEBTFSWJDFDBMM 8BSSBOUZDPOEJUJPOTBSFTVCKFDUUPDIBOHFGPSMBUFTU8BSSBOUZ5FSNTBOE$PO EJUJPOT BOE BEEJUJPOBM JOGPSNBUJPO SFHBSEJOH ZPVS XBSSBOUZ QMFBTF TFF DPN QMFUFEFUBJMTPOMJOFBUXXXP$04.0DPN %FBE1JYFM1PMJDZ P$04.0TFUTMJNJUPOUIF-$%BUEFBEQJYFMTJOBDMVTUFSBEKBDFOUUPFBDI PUIFSPSEFBEQJYFMTJOBDPNCJOBUJPOPGDPMPSBOECSJHIUOFTT"OZOVNCFS PGEFBEPSCBEQJYFMTVOEFSUIFMJNJUJTDPOTJEFSFEUPCFXJUIJOOPSNBMQFSGPS NBODFTQFDJGJDBUJPOPGUIF-$%BOEJTOPUDPOTJEFSFEEFGFDUJWF 0XOFST3FTQPOTJCJMJUZ &GGFDUJWF8BSSBOUZ%BUF 8BSSBOUZCFHJOTPOUIFEBUFPGTBMFUPUIFFOEVTFS5PFOTVSFXBSSBOUZTFS Disclaimer This product qualifies for ENERGY STAR in the “power saving” mode and this is the setting in which power savings will be achieved. Changing this mode under picture settings or enabling other features will increase power consumption that could exceed the limits necessary to qualify for ENERGY STAR rating. For more information on the ENERGY STAR program, please refer to www.energystar.gov. ® HDMI, the HDMI logo and High-Definition Multimedia Interface are trademarks or registered trademarks of HDMI Licensing LLC. MHL and the MHL logo are a trademark, registered trademark or service mark of MHL, LLC in the United States and /or other countries. 52 %JTDMBJNFS 3PLVBOEUIF3PLVMPHPBSFSFHJTUFSFEUSBEFNBSLTPG3PLV *ODJOUIF6OJUFE4UBUFTBOEPUIFSDPVOUSJFT P$04.0JTBUSBEFNBSLPSSFHJTUFSFEUSBEFNBSLPGP$04.0 (SPVQ P$04.0*ODTIBMMOPUCFMJBCMFGPSUFDIOJDBMPSFEJUPSJBM FSSPSTPSPNJTTJPOTDPOUBJOFEIFSFJOOPSGPSJODJEFOUBMPSDPO TFRVFOUJBMEBNBHFTSFTVMUJOHGSPNGVSOJTIJOHUIJTNBUFSJBMPS UIFQFSGPSNBODFPSVTFPGUIJTQSPEVDU *OUIFJOUFSFTUPGDPOUJOVJOHQSPEVDUJNQSPWFNFOUP$04.0 *ODSFTFSWFTUIFSJHIUUPDIBOHFQSPEVDUTQFDJGJDBUJPOTXJUI PVUOPUJDF*OGPSNBUJPOJOUIJTEPDVNFOUNBZDIBOHFXJUIPVU OPUJDF /PQBSUPGUIJTEPDVNFOUNBZCFDPQJFESFQSPEVDFEPS USBOTNJUUFECZBOZNFBOTGPSBOZQVSQPTFXJUIPVUQSJPSXSJU UFOQFSNJTTJPOGSPNP$04.0*OD $PNQMJBODF '$$$PNQMJBODF4UBUFNFOU 5IJTEFWJDFDPNQMJFTXJUI1BSUPGUIF'$$3VMFT 0QFSBUJPOJTTVCKFDUUPUIFGPMMPXJOHDPOEJUJPOT 5IJTEFWJDFNBZOPUDBVTFIBSNGVMJOUFSGFSFODF 5IJTEFWJDFNVTUBDDFQUBOZJOUFSGFSFODFSFDFJWFEJODMVEJOH JOUFSGFSFODFUIBUNZDBVTFVOEFTJSFEPQFSBUJPO 1MFBTF/PUF5IJTFRVJQNFOUIBTCFFOUFTUFEBOEGPVOEUP DPNQMZXJUIUIFMJNJUTGPSB$MBTT#EJHJUBMEFWJDFQVSTVBOU UPQBSUPGUIF'$$3VMFT5IFTFMJNJUTBSFEFTJHOFEUP QSPWJEFSFBTPOBCMFQSPUFDUJPOBHBJOTUIBSNGVMJOUFSGFSFODFJO BSFTJEFOUJBMJOTUBMMBUJPO5IJTFRVJQNFOUHFOFSBUFTVTFTBOE DBOSBEJBUFSBEJPGSFRVFODZFOFSHZBOEJGOPUJOTUBMMFEBOE VTFEJOBDDPSEBODFXJUIUIFJOTUSVDUJPOTNBZDBVTFIBSN GVMJOUFSGFSFODFUPSBEJPDPNNVOJDBUJPOT)PXFWFSUIFSFJT OPHVBSBOUFFUIBUJOUFSGFSFODFXJMMOPUPDDVSJOBQBSUJDVMBS JOTUBMMBUJPO*GUIJTFRVJQNFOUEPFTDBVTFIBSNGVMJOUFSGFSFODF UPSBEJPPSUFMFWJTJPOSFDFQUJPOXIJDIDBOCFEFUFSNJOFECZ UVSOJOHUIFFRVJQNFOUPGGBOEPOUIFVTFSJTFODPVSBHFEUP USZUPDPSSFDUUIFJOUFSGFSFODFCZPOFPSNPSFPGUIFGPMMPXJOH NFBTVSFT r r r 3FPSJFOUPSSFMPDBUFUIFSFDFJWJOHBOUFOOB *ODSFBTFUIFTFQBSBUJPOCFUXFFOUIFFRVJQNFOUBOEUIF SFDFJWFS $POOFDUUIFFRVJQNFOUJOUPBOPVUMFUPOBDJSDVJUEJGGFSFOU GSPNUIBUUPXIJDIUIFSFDFJWFSJTDPOOFDUFE $BVUJPO5PDPNQMZXJUIUIFMJNJUTGPSBO'$$$MBTT#DPN QVUJOHEFWJDFBMXBZTVTFUIFTJHOBMDPSEBOEQPXFSDPSETVQ QMJFEXJUIUIJTVOJU 5IF'FEFSBMDPNNVOJDBUJPOT$PNNJTTJPOXBSOTUIBUDIBOH FTPSNPEJGJDBUJPOTUPUIFVOJUOPUFYQSFTTMZBQQSPWFECZUIF QBSUZSFTQPOTJCMFGPSDPNQMJBODFDPVMEWPJEUIFVTFSTBVUIPS JUZUPPQFSBUFUIFFRVJQNFOU &VSPQFBO/PUJDF 1SPEVDUTXJUIUIF$&NBSLJOHDPNQMZXJUICPUIUIF&.$ %JSFDUJWF&&$ &&$ BOEUIF-PX7PMUBHF %JSFDUJWF&&$ JTTVFECZUIF$PNNJTTJPOPGUIF&VSP QFBO$PNNVOJUZ