1
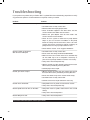
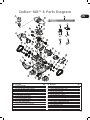
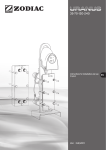
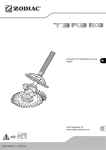
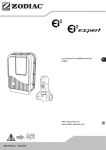
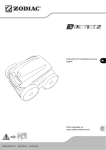
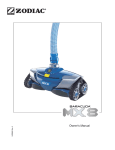
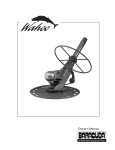
Guarantee
TERMS AND CONDITIONS
The greatest care and technical expertise has been taken in the
manufacturing of our ZODIAC® automatic pool cleaners.
Unless otherwise stipulated, we contractually guarantee the correct
operation of our new Products. We guarantee that our Products
conform to their technical specifications and that they are free of
material and manufacturing default.
The present warranty is limited, at our discretion, either to the repair or
exchange for a new or repacked product.
All Product returns must first be approved and decided by our services.
Returns sent by your Retailer without our prior approval will not be
accepted.
In particular, the spare parts warranty will only be honoured after
analysis and inspection of the returned spare parts by our company
who then, will make a decision to replace said parts.
In all cases the seller’s legal warranty will continue to apply.
We introduce improvements and/or modifications to our products on a
regular basis in keeping to keep abreast of technological progress. It is
not possible for us to add such improvements to our previous models
as part of this warranty.
Any requests concerning the warranty must be made to
your retailer.
THE WARRANTY WILL NOT APPLY
IN ANY OF THE FOLLOWING CASES
• Accidents, crushing, deterioration and damage due to shock and/or
external causes or to causes unrelated to the damage observed
• If the device has been tampered with by a person unrelated to
our workshop or a by a technician who is not approved by us, or if
modifications have been made without prior written consent from us
• If the device has been damaged as a result of mishandling by the
user or due to usage that does not conform to the user’s manual that
is included with the product
• If the device, its components, and/or the hose sections are exposed
for an extended period of time to direct sunlight
• If the device, its components, and/or the hose sections have been
damaged due to chemical imbalance of the pool water.
In order to benefit from the warranty, the End User agrees to respect
the following parameters concerning the water balance of the
swimming pool:
- pH: 6.8 < pH < 7.6
- free chlorine (* : < 3,0 mg/L
- total bromine (*): < 5.0 mg/L
- stabilising agent (if used): < 75 mg/L
- total dissolved metals (iron, manganese, copper, zinc…) : < 0.1 mg/L
(*): It is imperative that swimming pool cleaners be removed from the
pool before using a shock treatment.
Note: Using water drawn from a well is forbidden.
• The present warranty does not apply to visible defects that the
retailer failed to report upon accepting delivery of the Products.
• Also excluded from the warranty are: defects or deterioration due to
the unsuitability of the Product with respect to the End User’s needs,
due to normal wear, to negligence, to incorrect installation, also to a
use that does not conform to the recommendations mentioned in the
User Manual, to a lack of maintenance and/or a handling accident,
to incorrect storage, and/or to tests, instructions and/or specifications
made by your Retailer
• Any modifications made by the Client, by the End User or by any
third party to our Products will automatically void the warranty in full.
The same will apply if original parts were to be replaced with spare
parts not sold by us.
• Your Retailer will be responsible for ensuring compatibility of our
Products with any other pool equipment it may be installed with,
by checking with the different manufacturers concerned, also for
ensuring that all installation and operating instructions and rules are
respected in order for the overall system to operate correctly.
10
PERIOD COVERED BY THE WARRANTY
The warranty will cover a period of 2 years for the Zodiac® MXTM 8
robot cleaner.
The effective warranty start date is the date mentioned on the sales
invoice for the new Product as issued by the Retailer to the End User.
This document will be required as proof of purchase in order for the
warranty to be effective. Failing this, the Retailer shall bear the full cost
of any claims made by the end User under the contractual warranty and
after its expiry date.
Under no circumstances shall any repairs or replacements carried out
under the terms of this warranty cause its duration to be extended or
renewed.
SCOPE OF THE WARRANTY
• During the period covered by the warranty as stipulated above, any
part that has been acknowledged as being defective will be repaired
or replaced by the manufacturer with a new or fully functional part.
This warranty applies to any conformity defects potentially present at
the time of delivery of the product.
• In the case of a return of the product, shipping expenses to our
workshop will be borne by the end user.
• Shipping expenses for the new or repaired Product delivered to the
retailer will be borne by us, excluding any labour costs, travel and/
or accommodation expenses incurred as the result of repairs made
outside of continental France and excluding any payment of damages.
• Immobilisation and deprivation of use of an appliance due to repair
will not give the right to compensation.
THIS WARRANTY IS CONSIDERED VALID SUBJECT TO THE
INTRODUCTION OF NEW LEGAL REQUIREMENTS NOT YET
PUBLISHED AT THE TIME OF THE DRAWING UP OF THE
PRESENT CONDITIONS.
DAMAGES DURING TRANSPORTATION
Our products are always shipped at the users’ risk. Before accepting
delivery of the products, users should ensure that these are in perfect
condition. We will not be held responsible for any damages incurred
during transportation.
CAUTION CONCERNING USE IN A VINYL LINER POOL
Certain vinyl liner patterns are particularly susceptible to rapid surface
wear or pattern removal caused by objects rubbing on the vinyl surface,
such as pool brushes, pool toys, floats, fountains, chlorine dispensers,
and automatic pool cleaners. Some vinyl liner patterns can be seriously
scratched or abraded simply by rubbing the surface with a pool brush.
Ink used for the printed patterns may also rub off during installation or
when in contact with objects in the pool. Zodiac® will not be responsible
for damages to printed patterns, abrasion or markings on vinyl liners,
and the Limited Warranty will not cover these points.
Zodiac® will not be held responsible for any damage to the swimming
pool lining (vinyl liner, reinforced PVC, etc.) occurring as the result of an
excessive level of disinfectant (chlorine, bromine, active oxygen, etc.)
or an incorrect pH value. Any such damages will be not be covered by
the warranty.
DO NOT RESTRICT THE SUCTION , FAILURE TO HEED THIS
WARNING MAY RESULT IN A RISK OF SERIOUS INJURY AND
POSSIBLY DEATH.
Do NOT block the suction inlet or suction parts with any part of your
body. Do not expose your hair, clothes, jewellery, etc. to the suction
inlet and suction components of the pool/spa.
For further information please contact your retailer.
Register your product on our internet website:
•Be the first to be informed of our latest product innovations and
promotions.
• Help us continuously improve the quality of our products.
www.zodiac-poolcare.com
Introduction
Congratulations on the purchase of your new Zodiac® MX™ 8 automatic pool cleaner. Manufactured using
proven Zodiac® technology, the Zodiac® MXTM 8 is designed and manufactured for easy installation, and
years of carefree operation. Before installing the cleaner, please take a few moments to become familiar
with its components and to review the items listed under Important Information.
Like most mechanical devices, the Zodiac® MXTM 8 requires periodic adjustments, routine maintenance, and the
replacement of certain hardworking parts. Be sure to have the Zodiac® MXTM 8 checked occasionally by
your local Zodiac® dealer.
Always insist on genuine Zodiac® replacement parts. Non-Zodiac® parts are not made to our specifications.
They may have an adverse effect on the operation of your Zodiac® MXTM 8 or may even damage it.
EN
Remark: If your pool is fitted with a variable speed filtration pump it is essential that you set it to its maximum
power when using your hydraulic suction cleaner in order to ensure an optimal operating flow. If necessary use
the flow tester supplied with the cleaner.
Zodiac® MXTM 8 Complete Cleaner
1.
2.
3.
4.
5.
6.
7.
8.
9.
Cleaner Body
Automatic Flow Adjustment™ Valve
Valve Cuff
Twist-Lock 45 Degree Elbow Extended
Flow Gauge
Quick Connector
Hose Float
45 Degree Elbow
Twist-Lock Hose Section (12 x 1 m)
1
2
4
3
10
6
7
5
6 5 4 3 2 1 0
8
0 1 2 3 4 5 6
9
Read owner’s manual
completely before
operating the cleaner.
Do not operate
outside of the pool.
Remove cleaner before
entering the pool.
Do not let children play
with cleaner.
Installation
Prepare the Pool
1. Manually vacuum the pool, and make sure the pool filter and pump basket are clean.
2. Close the pool main drain line.
3. Aim the return line fittings downwards.
11
Assemble the Hose
1 Hose
Section
The hose uses easy twist-lock connectors. Push
and twist the connector on each hose section until they
lock into position with a clicking sound. The hose cuffs have 3 connection positions. Any of the 3 positions
are sufficient for an air-tight seal.
1. Connect enough hoses to reach the farthest point from the
skimmer or
vacuum point you are using and then add one
Skimmer or
Float 9”
more section
of hose.
If your pool length
isHose
greater
than 11 m,
Dedicated
Suction
from Cleaner Head
Cleaner
Line
you can purchase additional hoses. Contact your retailer.
2. Place the quick connector at the end of the first hose section
which has the float on it. Ensure that the float is positioned at a
distance of 23 cm from the quick connector.
3. Connect the first hose section with the float to the robot.
Skimmer or
Dedicated Suction
Cleaner Line
Hose Float 9” from
Cleaner Head
m
23 c
Skimmer or
Dedicated Suction
Cleaner Line
Hose Float about 23 cm
from Cleaner Head
Hose Float about 23 cm
from Cleaner Head
free form
Quick Connector
+ robot
1 Hose
Section
rectangular
Skimmer or
Dedicated Suction
Cleaner Line
Connect the Hose
Turn on the filtration system and fill the hose with water by
placing the end in front of a return inlet until it is full of water.
Hose Float about 23 cm
TurnHead
off the pump.
from Cleaner
To connect to a dedicated suction line
Hose
Quickor
Connector
vacuum1Section
point:
+ robot
1. Twist lock the male end of the hose into the large end of
the 45° elbow.
Valve Cuff
Hose
Elbow with
Twist-lock
Suction inlet
2. Connect the elbow to the valve cuff and to the dedicated
suction inlet.
3. Angle the elbow upward towards the water surface.
To connect to a skimmer:
The Automatic Flow Adjustment™ valve must always be
used in single skimmer installations.
12
Quick Connector
+ robot
Hose Float about 23 cm
from Cleaner Head
Skimmer or
Dedicated Suction
Cleaner Line
1 Hose
Section
1 Hose
Quick Connector
Section
+ robot
Skimmer or
Dedicated Suction
Cleaner Line
1 Hose
Section
FlowKeeper
Adjustment
The valve regulates flow to ensure the pool pump and cleaner run properly. It is pre-set at the factory to
optimize the performance of the cleaner, but offers three settings to adjust the flow.
The lower the setting number, the lower the flow. To adjust, pull the handle and move setting up or down.
The red tab can be used to open the valve and stop the cleaner.
EN
If the pool has more than one skimmer, connect the hose to the one closest to the pump.
The parts used to connect the hose, and the sequence in which
they are installed depends on the type of skimmer. Choose the
fitting combination that best suits the skimmer to complete the
connection.
1. Remove the skimmer basket.
2. Connect the Automatic Flow Adjustment Valve with the
valve cuff and the 45° Elbow. Then, connect this complete
assembly with the arrow pointing down towards the skimmer
pipe. Connect the assembly of hoses.
45 Elbow
FlowKeeper
Valve
Valve Cuff
Test and Adjust for Proper Flow
6 5 4 3 2 1 0
0 1 2 3 4 5 6
Disconnect the cleaner head and attach the Flow Tester.
Keep the Flow Tester under water and have someone turn
on the pump.
Verify that the red indicator in the Flow Tester (viewed from the side) is at the Number 3 setting. All these
operations must be carried out under water so that the pump does not take in air.
If necessary, use the valves in the pool equipment area to adjust the flow.
•
For skimmer connections on pools with one skimmer, flow is automatically regulated by the
Automatic Flow Adjustmentr™ Valve. The red indicator should be at the proper setting.
•
For skimmer connections on pools with more than one skimmer, leave the valve for the skimmer
connected to the hose open and slowly close the other until the proper setting is reached.
•
For dedicated suction line connections, leave the vacuum line open to the cleaner and slowly close
the skimmer line until the flow is at the proper setting.
If flow is in the low range (0-2):
• Check and clean the pool filter and baskets if necessary.
• Verify that valves controlling the suction lines are in the correct position.
If flow is in the high range (4-6):
• Verify that valves controlling the suction lines are in the correct position.
• Lower the flow setting on the Flow Adjustment Valve. The automatic flow adjustment valve is
pre-set in the factory to number 3, the most suitable position for European pools. For an optimal
performance from your cleaner, you could move the valve between first to third position.
13
Connect the Cleaner
1 Hose
WARNING
Section
To avoid serious injury, make sure to turn off the suction pump for the cleaner.
Do not expose your hair, loose clothing, jewelry, etc. to the open end of the hose.
Turn off the pump. Keeping the hose underwater, remove the
Flow Tester. Skimmer or
Hose Float 9”
Dedicated Suction
Cleaner
1. SubmergeCleaner
the cleaner
and fill it withfrom
water.
Head
Line
2. When bubbles stop coming from the cleaner, connect the
hose by pushing the Quick Connector into the cleaner.
3. Allow the cleaner to sink to the bottom of the pool.
m
23 c
4.Turn on the pool pump and begin cleaning.
Skimmer or
Dedicated Suction
Cleaner Line
Hose Float 9” from
Cleaner Head
Operation and Routine Maintenance
The Zodiac® MX™ 8 switches on/off
with the pool filtration pump, vacuuming and cleaning all surfaces
1 Hose
randomly throughout the pool. TheSection
climbing ability of the cleaner is dependent on the pool’s shape and
available water flow. If Zodiac® MXTM 8 is not climbing your walls, ensure the flow is correct by using the
Flow Tester. Also, ensure the pools surface is not covered with algae as this slippery surface will affect
the cleaner’s traction.
During each cleaning cycle, the cleaner travels both forward and backwards, and pivots to the right and
left. The power scrubbers underneath the cleaner create a downwards force for climbing and stability as
well as directing debris into the cleaner mouth.
Emptying the Pump Basket
For the Zodiac® MX™ 8 to operate at optimum efficiency, empty the pump basket regularly. The more
debris in the pool, the more often the pump basket should be cleared. Zodiac® offers an in-line leaf basket
which will stop solid debris before it enters the pump basket. See your Zodiac® dealer for details.
Backwashing the Pool Filter
Always disconnect the Zodiac® MX™ 8 from the pool wall before cleaning or backwashing the pool filter.
After cleaning or backwashing, let the filtration system run for at least five minutes to flush out the suction
lines before re-connecting the cleaner.
Adding Chemicals to the Pool
Remove the cleaner from the pool for at least 4 hours when adding chemicals.
Storage and Winterizing
Never store the Zodiac® MX™ 8 in direct sunlight. When storing for the winter, drain all the water from the
cleaner (freeze damage is not covered by the warranty). Remove all connectors and adapters from the
dedicated suction line/vacuum point or skimmer. When storing the cleaner, even for short periods, do not
coil the hose as the hose may develop a memory which can affect cleaner performance. Disassemble the
hoses and lay them flat and straight.
14
Removing Debris from the Drive Motor
EN
WARNING
To avoid serious injury, make sure that the cleaner is disconnected from the hose and that the suction pump used for the
cleaner is turned off prior to starting the following operation.
Latch Release
Button
1) Push the latch release button on the top of the cleaner.
2) Rotate the top assembly back until it clicks into an upward
position.
3) Look in the drive motor and remove debris that is present.
4) If needed, slowly push drive motor paddles forward and/
or backwards to move debris that is stuck to an accessible
position then remove it. When moving the paddles, make sure
the cleaner tracks are allowed to move freely as they will turn
as the drive motor paddles rotate.
5) Close the top of the drive motor and ensure the latch clicks
in place.
Cleaner Vacuum Modes
The Zodiac® MXTM 8 Pool Cleaner is designed with 2 vacuum options:
1. Small debris cleaning mode: For vacuuming smaller and heavy debris, such as, sand, silt and small
stones. The pool cleaner is sent from the factory in this mode.
2. Large debris cleaning mode: For vacuuming large debris, such as, leaves.
WARNING
To avoid serious injury, make sure that the cleaner is disconnected from the hose and the
suction pump used for the cleaner is turned off prior to starting this operation.
To convert the pool cleaner to the large debris
cleaning mode:
Rear edge
Inlet Adapter
1. Grasp the yellow inlet adapter and insert
a finger into the adapter hole, as shown
below.
2. Lift up the rear edge of the inlet adapter and
then pull it out of the vacuum inlet.
Front edge
To convert the cleaner back to the small debris
cleaning mode (original from factory):
1. Place the yellow inlet adapter in the vacuum
inlet of the pool cleaner. Push down on the
yellow inlet adapter until both the front and rear
edges click into place.
Front of cleaner
Cleaner with the
inlet removed
15
Troubleshooting
If you experience a problem with your Zodiac® MX™ 8, please follow the troubleshooting steps below to rectify
any performance problems. If further assistance is required, contact your retailer.
ProblemSolution
Cleaner does not move or moves slowly.
• Confirm that the main drain is closed.
• Use Flow Tester to verify correct flow.
• Backwash filter and empty pump basket. • Check for debris trapped in the drive motor. See the
section “Remove the debris from the motor”.
• Remove the yello adaptor from the inlet mouth. See
section “Cleaner vacuum modes”.
• Check for air in system. If water level in pump basket
drops or you see excessive air bubbles in the pump
basket or coming from the return lines, there is air in the
system. Check hose connections, tighten all fittings at
pump and check o-ring at pump basket for wear.
• Check that the cleaner is not clogged with debris.
Cleaner’s pattern of movement
does not cover entire pool.
• Use Flow Tester to verify correct flow.
• Ensure return line fittings are directed downwards.
• Make sure there are no kinks in the hoses and that they
are not coiled. Lay in sun to straighten if necessary. Is
your hose long enough: add hose sections if necessary.
• Verify correct hose float positioning.
• Observe cleaner for 5 plus minutes and ensure that each
drive track is periodically reversing direction.
• Confirm proper hose length.
Cleaner gets stuck at steps.
• Observe cleaner for more than five minutes and ensure
that each drive track is periodically reversing direction.
• Ensure the swivel on top of the cleaner rotates freely.
• Use Flow Tester to verify correct flow.
• Confirm correct hose length. Shorten if necessary.
Cleaner won’t climb walls.
• Using Flow Tester as guide, increase flow to cleaner.
• Verify correct hose float positioning.
Cleaner spends too much time on the walls.
•Using Flow Tester as guide, reduce flow to the second
setting.
• Verify correct hose float position.
Cleaner riding on its side.
•Verify correct hose float position.
For further information please contact your retailer.
16
Zodiac® MX™ 8 Parts Diagram
1
EN
27
3
2
6
29
28
6 5 4 3 2 1 0
8
7
0 1 2 3 4 5 6
31
9
6
10
11
11
32
10
12
17
16
13
14
30
6
18
11
15
19
11
6
14
20
21
22
6
24
11
23
6
19
11
18
17
25
25
26b
26
No.Description
Qty.
1 R-KIT, MX8 HOSE FLOAT
1
2 R-KIT, Clip-On Hose Adaptor1
3 R-KIT, MX8 TOP COVER W/SWIVEL ASSEMBLY
1
6 R-KIT, SCREW, M4x12mm, PHILLIPS #2 PAN HEAD
16
7 R-KIT, MX8 Middle Drive Motor Housing1
8 R-KIT, MX8 COVER LATCH
1
9 R-KIT, MX8 BODY PANEL - RIGHT (B)
1
10 R-KIT, MX8 DRIVE SHAFT ASSEMBLY
2
11 R-KIT, BEARING, (WHEEL & ENGINE)
10
12R-KIT, MX8 Drive Motor Assembly1
13R-KIT, MX8 Lower Drive Motor Housing- Side A & Side B 1
14 R-KIT, SCREW, THREAD FORMING,
#6-18 7/8in TYPE A, PHILLIPS #2 PAN HEAD
2
15 R-KIT, MX8 BODY PANEL - REAR (D)
1
16R-KIT, MX8 Reversing Assembly- Side B1
17 R-KIT, MX8 TRACK
2
No.Description
Qty.
18 R-KIT, MX8 WHEEL PIN
4
19 R-KIT, MX8 WHEEL
4
20R-KIT, MX8 Reversing Assembly- Side A1
21 R-KIT, MX8 BODY PANEL - LEFT (A)
1
22 R-KIT, MX8 CHASSIS ASSEMBLY
1
23 R-KIT, MX8 LOWER BODY HOUSING
1
24 R-KIT, MX8 BODY PANEL - FRONT (C)
1
25 R-KIT, MX8 SCRUBBER ASSEMBLY
2
26 R-KIT, MX8 INLET ASSEMBLY
1
26b R-KIT, MX8 REGULAR OPENING
1
27 R-KIT, TWIST LOCK HOSE - 1 METER, BLUE/GRAY 12
28R-KIT, Automatic Flow Adjustment Valve1
29R-KIT, Flow Tester1
30 R-KIT, IN-GROUND VALVE CUFF
1
31 R-KIT, TWIST-LOCK 45 DEG ELBOW, EXTENDED
1
32 R-KIT, 45 DEG ELBOW
1
17