1
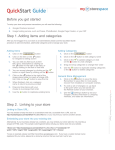
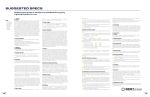
PHEEGOH
USER'S MANUAL
Http://www.pheegoh.com
1
TABLE OF CONTENT
Page
Introduction
3
Why Pheegoh?
3
Setting Up Your Store
4
Managing Multiple Stores
4
Your Admin Menu
4
I have Created My Store. What Next ?
5
Adding Product Attributes
11
Portfolio
12
Promo Coupons
13
Receiving And Addressing Orders
14
Homepage Banners and Store Logos
15
The Affiliate Program
16
2
INTRODUCTION
Pheegoh.com is a portal where business owners can create and host their online stores and receive
orders without delay, keeping their businesses open 24 hours a day, 365 days a year. It also serves as
an online mall for buyers to shop from each of the stores.
The portal features a much more personalized effect for each seller, giving the appearance of a
personal website as it hosts the complete basic features of a professional e-commerce website.
Why Pheegoh?
Pheegoh offers a complete content management system that gives the store owner full
administrative access to make any change on his/ her web store through its very flexible portal. A
few noted benefits are listed below:
•
•
•
•
•
•
•
•
•
•
•
•
•
•
•
•
•
•
•
•
•
It takes less than 2 minutes to set up.
No technical or design experience required.
No maintenance burden or hosting costs.
Secure data in the hands of well grounded professionals.
24/7 customer service to put you through.
Responsive Design (i.e it is accessible from any device - tabs, pc or mobile).
Unlimited upload limit (No quota to hard drive space consumed).
No transaction fee.
unlimited number of products (No quota to number of items in store).
Generate promo and discount codes.
Create social links for store-front.
Broadcast messaging to registered customers (Useful for store news and updates).
Declare delivery parameters (including COD, Home delivery and Park delivery options).
Change store theme.
Manage inventory (item categories & attributes, extra images).
Automatic stock update and alerts.
Upload homepage sliders/banners and logo.
Set store information (FAQ, Delivery info, Terms & conditions, 'About us' page, Contact
Page).
Store front displays store owner's phone and BBM Pin on every page of the store.
Email alerts (for both store owners and their customers).
Easy subscription process in form of bank transfer, subscription code or online payment.
3
SETTING UP YOUR STORE FRONT
Setting up your store is easy. Your store will appear as a subdirectory on Pheegoh's portal
(i.e www.pheegoh.com/yourStoreName) so we suggest that you keep your store links short
and simple for it to remain easily accessible to your customers.
An example is www.pheegoh.com/kemiBeads (where the store link is 'kemiBeads').
Managing Multiple Stores
A user can create more than one store under one account. This is a very useful feature for
individuals who earn a living from managing the online presence of various stores and this can be
achieved without any interference. This means Mr. X can actually sell products for Store A, Store B
and Store C while all three stores pay Mr. X an agreed fee for helping them sell their products.
Your Admin Menu
•
•
•
•
•
•
•
MY STORES - This showcases all stores listed under your account.
ADD NEW STORE - This is a link leading to a form to add an extra store to your account.
LOG OUT- A link to log out your current account.
HELP - This menu links you to (a) download product manual, (b)Pheegoh contact page.
DASHBOARD - The dashboard is an overall glance of all the events in your store. It alerts the
store owner about pending orders, subscription status, items running out of stock, tips,
recent orders, most viewed items, and most sold items.
SUBSCRIBE - This menu leads the store owner to make necessary payments to keep the
store running.
MODULES - The modules menu envelopes a number of other links that serve as the
administrator / site owner's tools. These 'tools' are described below:
1. Add New Item (To add a new item / product to your store).
2. Stock Inventory (A list of all your products).
3. Homepage banner (Upload or change your store homepage banner. The homepage
banner is a landscape-sized image that covers the full width of the screen, usually
meant to convey a message or used as some form of advertisement on the store).
4. Store Logo (Upload a logo that represents your business).
5. Item Categories (Create categories to group your products and make them found
easily in your store).
6. Delivery Settings - This is where you declare which states your business deliver
items to, cash on delivery options and the prices of home or park delivery.
7. Promo Coupons - Generate coupon codes to offer discount to your registered
customers.
4
•
8. Store Information - All your store details such as delivery information, FAQ, terms
and conditions, what your store is about, phone numbers, social links etc can be
stored and modified here.
9. Store theme - Switch your store theme to a color that matches your brand.
10. Customers- This menu links you to your list of registered customers. You can also
send a broadcast message to all your customers here.
11. Orders - This menu links you to all orders made on your store. This is where you take
the orders and update their process status in order to keep the buyer informed.
12. Portfolio - This menu links you to the option of creating an online portfolio for your
services.
ACCOUNT - The Account menu links you to either reset your password or log out of your
admin portal.
I HAVE CREATED MY STORE. WHAT NEXT?
After setting up your store, it immediately goes live (i.e it becomes accessible to any visitor that
knows your store link). Delivery parameters are automatically generated on your behalf for all states
but you may edit delivery costs for each state or else it will be assumed to be free by your buyers.
(Navigate to MODULES >DELIVERY SETTINGS).
If your store settings are incomplete, , your store-front (i.e the part visible to visitors/customers) will
remain in maintenance mode until you set at least one parameter and update your store
information. Keep in mind that visitors don't have access to your admin portal. They can't see your
admin content and they can only access your store-front.
(Store front with no delivery parameter or missing necessary store information will be automatically
switched to maintenance mode)
5
Step 1 - Select A Store To Manage
Your first step will be to click on <Manage Store> to navigate to your admin dashboard. Here you will
find alerts notifying you about your subscription status as well as a request to submit details for your
store information and delivery parameters.
(Sample dashboard with notifications)
6
Step 2 - Update Store Information
Your store information is very crucial as it reflects your details to all your customers and site visitors
alike. Since customers may likely contact you for enquiries, the store information section helps you
to deal with all aspects in this area. This section also stores your bank information which is displayed
to your buyers during purchase.
Fill up the fields and click 'save'.
(Store information page)
7
Step 3 - Add Delivery Parameters
This module saves you a lot of time spent on explaining delivery charges based on location to
customers. Navigate to MODULES > DELIVERY SETTINGS, click on 'edit settings' button to edit the
delivery information then fill the fields with how much you wish to charge for both park or home
delivery in each state. You can also choose which states to accept cash on delivery, which has been
disabled by default.
If the delivery pattern does not fully work for you, you can insert your own additional information in
the field below. This information will be displayed to buyers during checkout and also available on
your storefront's delivery information page.
8
Step 4 - Add Product Categories
Each of your products must belong to a category. This helps your products to be properly indexed
and your customers can easily find them.
You can navigate to this page through MODULES > ITEM CATEGORIES
9
STEP 5 - ADD NEW ITEMS TO STORE
Now that you have your categories in place, you can proceed by uploading your products. Add your
product name and other details of the product , then select the item's image from your system or
device.
Make use of clear images preferably with white background. Make sure the size is as low as possible
within its best quality.
Keep in mind that the higher the size (in kilobytes) of your image, the slower your page loads.
When adding new items, try as much as possible to be descriptive with your item names. Avoid using
short, vague names or titles. Descriptive titles will give your audience a better understanding of the
product at a glance. This will also be an advantage when visitors stumble upon your products online.
For example, if you sell hair extensions (weavon), avoid using a product name like "weavon for
sale". Instead, use a more descriptive name like "Remy Brazilian Hair".
10
Adding Product Attributes
Sometimes you may wish to add a more descriptive feature to distinguish your products in situations
where one item has more than one possible feature or attribute (e.g color, size, volume etc). Adding
an attribute enables the buyer to pick a choice out of your given list. Therefore, after saving your
"Remy Brazilian Hair", simply add an attribute from the preview page. So your attribute for "Remy
Brazilian Hair" can be "Size 16 - Black". Select the quantity available for that attribute and click on
'Save Attribute' to attach your new attribute to your product.
On this same page, you can add more images of that same product. Please keep the upload size
limitations and impact of uploading 'heavier' images in mind.
11
Portfolio
This module comes to use if you also offer services and you want a gallery to showcase your works /
projects. This comes in handy for designers, makeup artists, architects and many other fields of
work. Add new by going through MODULES > PORTFOLIO
12
Promo Coupons
This module enables you to offer discounts to your customers. Your promo coupons can be in 3
forms:
1. Discount on all items:- This method offers a given percentage off the total cost of all items
bought.
2. Discount based on purchase range:- This implies that the customer's cart must have a total
cost up to the provided range before the discount code can be valid when applied.
3. Discount based on category:- This kind of discount is focused on the store owners' choice.
The discount will be applied to only that given category if it exists in the buyer's cart.
Your promo codes will become invalid as soon as the declared expiry date has been reached.
To create coupon codes, navigate to MODULES > PROMO COUPONS
13
Receiving and Addressing Orders
When customers place their orders, an email alert will be sent to you to notify you about a new
order. Another mail is sent to the customer to acknowledge that you have received the mail.
You can address orders by directly linking pending orders from your dashboard or notifications. After
viewing the order, you may place a call to the customer to re-confirm the order and then update the
progress by changing order status. This action will automatically mail your buyer with that status of
his/her purchase.
14
Homepage Banners and Store Logos
Banners and logos give your business or store a much more professional outlook, thus making it
easier for your customers to trust you. We strongly recommend you upload your banner and logo
for your store to look much more welcoming to the eye of visitors.
Here's what the store-front will look like after uploading a banner:
15
The Affiliate Program
The affiliate program is not limited to store owners alone. The program pays you for encouraging
people to create their online stores on our website. This program does not require any fees and is
quite easy to set up.
A very interesting feature of this program is, not only does a subscription fetch you 10%, but that
same subscriber will keep fetching you 10% every time he/she subscribes.
After setting up your affiliate account, an affiliate wallet is created for you. This is where all your
discounts get saved until you have earned enough to transfer to your real bank account (at least
N3,000).
As an affiliate, you can view subscribers with both expiring and expired accounts who signed up
through your link in order to remind them to re-subscribe.
(a sample affiliate inventory)
We do hope you find this documentation helpful. For further questions and enquiry, send a mail to
[email protected]
16