1
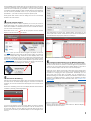
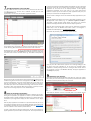
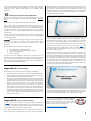
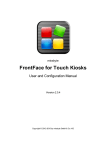
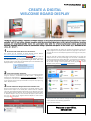
FrontFace for Public Displays Quick Start Tutorial CREATE A DIGITAL WELCOME BOARD DISPLAY The digital signage software FrontFace for Public Displays is the perfect solution for implementing an easy-to-use digital welcome board in your office, lobby or reception area to automatically greet your visitors with a personalized welcome message. An integrated calendar stores the appointment data while the software automatically shows personalized welcome messages with the names of your visitors during a specified time period on the screen (e.g. “Welcome to our office, Mr. Miller!”). 1 Download and Install the Free Trial Version: First, please visit the FrontFace for Public Displays product Website http://www.mirabyte.com/en/products/frontface-for-publicdisplays/download.html and click on the button in order to download the free trial version of FrontFace for Public Displays. Once you have downloaded the setup package frontface-pd-trial.exe to your PC, please execute it and select the installation option “Full installation (incl. Display Assistant)” in the setup wizard. 2 Launch the Display Assistant: 3 Create a Welcome Playlist with a Placeholder Text: Now a dialog appears that allows you to define the properties of this new playlist page: For this sample, please choose the page layout “Full Screen” and press OK. You can still modify the properties of that page at a later point, if needed. Once you press OK, another dialog appears which allows you to select the display content for the newly created page. You can choose to add different content types like images, videos, Web pages, a weather forecast or PDF files. For a sample welcome message for visitors, please select “Text” and click OK. In order to design a more sophisticated, visually appealing sample welcome screen, please see Appendix B of this tutorial. Once the software has been installed, please launch the Display Assistant using the shortcut in the Windows Start Menu (Start > All Programs > FrontFace for Public Displays > FrontFace Display Assistant) and click on “New Project” at the welcome screen of the application. Then select a location in your local file system where you would like to save your new project (e.g. select “My Documents”). Since you have created a new, empty project in the Display Assistant, a new playlist named “Playlist 1” has already been created under the “Playlists” menu item of the Display Assistant. Please click on the “Playlists” menu item and then double click the “Playlist 1” item to change the name of that playlist to “Welcome Playlist.” Once you have renamed the playlist, please click on the + icon above the list “Pages in Welcome Playlist” in order to add a new page to that playlist. Now you can enter your welcome message and apply typical formatting as used by common text processing applications. E.g. you can enter this text: Welcome to our Office, $$NAME$$! 1 The word NAME with the double dollar sign at the beginning and at the end is a so-called “placeholder” that will be replaced at runtime by the name of the visitor who is to be welcomed (e.g. “Mr. Miller”). The syntax for placeholders in FrontFace for Public Displays is always a double dollar sign at the beginning and the end of the placeholder name. It is up to you how you name your placeholders — just make sure that you keep this specific syntax! 3 Finally, please click on OK to close the dialog and to return to the Display Assistant main user interface. 4 2 1 Create a Default Playlist: During the times when no visitor is expected, you can use your screen to display other things such as general information about your company, the latest news headlines or a weather forecast. In order to enable this feature, you must create a second playlist: Please click on the + icon Playlist” as the name for this above the list of playlists and enter “Default new playlist. This configuration will display your “Default Playlist” permanently on the screen. If you click on the tab “Timer Preview” you can see that the playlist is now scheduled for every day from 0:00 am to 11:59 pm. As in step 3 above, you can now add some pages to the playlist. You can use any of the supported content types and formats like images, text, videos or even your company Web page. FrontFace for Public Displays offers many possibilities to partition the screen and to create great looking playlists. We recommend that you play around a bit and review the user manual or watch the video tutorials on the FrontFace product Website to get familiar with the software. At any time you can show a preview of your playlist to see how it will appear on the screen by clicking on the “Preview” button. 6 5 Switch over to the ”Events” tab and add a new event source. Please select “Calendar” here as event source in order to use the integrated calendar of FrontFace for managing the visitor appointments. Alternatively, you can select other event sources here (if installed). E.g. the integration of a Microsoft Exchange or Lotus Notes calendar is possible with an event source plugin that is available separately. – Please see the FrontFace for Public Displays product Website for more information about other available event source plugins. Activate the Scheduling: Once you have created the two playlists (one for the welcome message and the other one for the default display during the time when no visitors are expected), you now have to define when which playlist is to be shown on the screen. Configure an Event Source for the Welcome Message: In order to automatically run the “Welcome Playlist” for welcoming visitors, the event source feature of FrontFace is used. We regard the appearance of a visitor as an “event” which will cause the “Default Playlist” to stop and to start the “Welcome Playlist” with the name of the visitor displayed. Click on the “Scheduling” menu item of the Display Assistant and activate the scheduler by selecting “Scheduling Enabled” . You now see the contents of the tab “Timers”. Make sure that your “Default Playlist” is configured here for non-stop playback. To do this, the timer has to be of the type “Daily” (1), the start date has to be either today or any date in the past (2) and, of course, your “Default Playlist” has to be assigned to this timer (3). Once you add the new event source, please select the “Welcome Playlist” as the playlist for this event source. 2 7 Add Appointments to the Calendar: In order to allow the event source to fire events, please click on the button . You now see a calendar in which you can add appointments. You can add, edit or delete appointments here: in the preview mode of the Display Assistant placeholders are not substituted and event sources do not fire events! The scenario of running the player application on the same PC as the Display Assistant is also regularly supported by FrontFace, but in most cases it is not a very useful choice because it requires you to shut down the player application every time you update your content with the Display Assistant! So here is how to configure and run the FrontFace Player Application on your local PC: Open the Windows File Explorer and create a new folder somewhere on your PC (Right click > New > Folder), e.g. “c:\content update folder\”. This folder is called “Content Update Folder” and serves as an interface between the Display Assistant and the FrontFace Player Application. Once you have created that folder, please start the application “FrontFace Player Setup” from the Windows Start Menu (“Start > All Programs > FrontFace for Public Displays > FrontFace Player Setup”). Now select the previously created “Content Update Folder”: Please click on “Add Appointment” and enter the start and end date/time of the appointment. The subject is only for your internal reference and has no further meaning. We recommend you fill in the name of the visitor here. By clicking on the + button you can now define the placeholder values for this appointment. Select the $$NAME$$ placeholder from the list and enter the name of the visitor in the field “Value,” e.g. “Mr. Miller”. Finally click on OK. Once you press OK a black screen appears with a message telling you that no content has been published yet. At this point the FrontFace Player Application is already running but there is nothing to show. Please click on the ^button to return to the Windows Desktop. The player application is now configured properly. 9 Please note that the start and end time of the appointment do reflect the time window during which the welcome message will be shown. Thus this is not the actual appointment time! If the actual appointment is from 3:00 pm to 4:00 pm, you could enter 2:50 pm as start time and 3:10 pm as end time. This allows your visitor to see the welcome message, even if he/she arrives a bit earlier or later than expected. When he/she leaves at 4:00 pm, he/she will not see the message anymore but the “Default Playlist”. 8 Setup of the Player Application: Publishing your Project: Now head back to the Display Assistant and select the menu item “Player PCs.” Here you must enter the path to the previously created Content Update Folder for the already created “Player PC 1” as well: Then select the “Publish” menu item and finally click on the “Publish” button: Until now you have only used the Display Assistant to configure your project. During normal operation your playlists are shown by the FrontFace Player Application which is typically installed and executed on a separate PC that is connected to your large format display (this PC is referred to as the “Player PC”!). How the player application is installed on a separate PC and how you set up the connection between the PC with the Display Assistant and the Player PC is explained in the PDF user manual for FrontFace and in the video tutorials that are available on the FrontFace product Website. In order to show how the welcome playlist works, we will now configure the player application on your local PC as a sample case. This is required because 3 Once the publishing process has finished, your content (playlists, content files) and the required information (schedules, event data, etc.) have been transferred into the Content Update Folder for the FrontFace Player Application. 10 your welcome page (e.g. use PowerPoint or Word) and make sure to take the following factors into account: First, the page orientation should match with your screen (e.g. 16:9 landscape) and, in the middle of that layout, there should be enough space for the welcome message text. Also, the background should not have too much contrast because otherwise the welcome text message may be difficult to read. Starting the FrontFace Player Application: Now start the FrontFace Player Application once again but this time, use the shortcut ”Start > All Programs > FrontFace for Public Displays > FrontFace Player“. You will now see your “Default Playlist” playing on the screen. Now you need to wait until an appointment becomes due. As soon as the system clock of your PC reaches the time of the appointment from the calendar, the “Welcome Playlist” is shown with the personalized welcome message for the visitor. As soon as the appointment is “over”, the player application returns to the “Default Playlist” again until the next appointment becomes due. You can exit the FrontFace Player Application at any time by pressing ^on the keyboard in order to make changes to your project or the calendar data in the Display Assistant. Important: Please remember to publish your project again (see step 9) after you make any changes and before restarting the FrontFace Player Application. Only then will the changes be transferred to the player application. This also mirrors the basic workflow in production use: 1. 2. 3. 4. Open the project in the Display Assistant Go to ”Scheduling > Events“ and open the calendar Add or edit appointments Publish the project A restart of the player application is of course not necessary because in production use the player application is running on a separate PC and will pick up any changes automatically at runtime. After you have published your project you can exit the Display Assistant because all the required data has been transferred to the player application. Once you finish your design, simply print it (e.g. in PowerPoint) using the FrontFace Print2Screen Printer, which is also installed by the FrontFace setup wizard. In the Display Assistant, you get a notification that a new (virtual) “printout” has been received and that it can now be used in a playlist. Double click on the playlist page that you have created during step 3 and change the page layout to “Overlay (Center)”. This layout allows you to place two content objects (the background artwork you just created and the welcome text) over each other. Your welcome text message now appears in the middle of that page. In the background you can display the background artwork you imported using Print2Screen by selecting the “Print2Screen” content type in the dialog where you select which content type you would like to add. Make sure that you set the stretching of the Print2Screen content to “Proportional” or “Proportional Fill”. Finally, you must click once again on the content object with the welcome text message in order to set its background color to “transparent” to make sure that the background artwork is fully visible through the text. You can use the preview feature to check how the page looks: Appendix A: Troubleshooting If something does not work as expected, please check the following: Is the system clock of your system set correctly (check date AND time!)? Have you entered the same Content Update Folder both in the Display Assistant and in the FrontFace Player Application? Let’s says you have created an appointment in the calendar which starts at 3:00 pm and ends at 3:15 pm. Now it is 3:05 pm but when you start the player application you only see the “Default Playlist”. Why? Since the event source system of FrontFace is used to trigger the “Welcome Playlist,” the actual event is fired at the point in time when the appointment is due (start date/time). In this case the event was in the past and does not fire any more. So if you start the player application at a later point in time, any events from the past will not cause any effect. This behavior is different to the scheduling when using “Timers” where a playlist is also started if the starting point of the timer is in the past (e.g. at 0:00 am). That is also why your “Default Playlist” gets started at any time during the day! Appendix B: Tips on Content Creation In step 3 you have only created a very simplistic playlist page with the welcome text message on it. During production use it is desirable to have a more visually attractive design of the welcome page that matches with your corporate identity (CI) and may also include your logo. Instead of using Print2Screen to import the background artwork, you can also use any normal image file (JPG/PNG) or even a video. So you can create very unique and visually appealing designs for your digital welcome board! If you have any technical questions regarding FrontFace for Public Displays or the “Sample Welcome Board” use case presented in this tutorial, please contact our free technical support. Simply visit our Website to learn how you can contact us: http://www.mirabyte.com/en/support/ This is, of course, also possible with the trial version of FrontFace and can be done very easily: Use an application of your choice to create the design for 4