1
Portable
Series
For Use with CipherLab BASIC Compiler
BASIC Programming
Guide
Version 3.05.16
Printed on 10 April, 2007
Copyright Notice
Copyright © 2007 CIPHERLAB CO., LTD.
All rights reserved
The software contains proprietary information of CIPHERLAB CO., LTD.; it is provided under a license
agreement containing restrictions on use and disclosure and is also protected by copyright law. Reverse
engineering of the software is prohibited.
Due to continued product development this information may change without notice. The information and
intellectual property contained herein is confidential between CIPHERLAB and the client and remains the
exclusive property of CIPHERLAB CO., LTD. If you find any problems in the documentation, please
report them to us in writing. CIPHERLAB does not warrant that this document is error-free.
No part of this publication may be reproduced, stored in a retrieval system, or transmitted in any form or by
any means, electronic, mechanical, photocopying, recording or otherwise without the prior written
permission of CIPHERLAB CO., LTD.
For product consultancy and technical support, please contact your local sales representative. Also, you may
visit our web site for more information.
The CipherLab logo is a registered trademark of CIPHERLAB CO., LTD.
Other product name mentioned in this manual may be trademarks or registered trademarks of their
respective companies and are hereby acknowledged.
The editorial use of these names is for identification as well as to the benefit of the owners, with no intention
of infringement.
CIPHERLAB CO., LTD.
Website: http://www.cipherlab.com
Revision History
Version
Release Date
3.05.16
Apr. 10, 2007
Notes
New: 5.21.2 Network Configuration – WPA-related parameters
New: Appendix I – Symbology Parameter Table I: UPC-E1 Triple Check (Index
No. 148)
3.05.15
Mar. 01, 2007
New: 5.5.1 ON POWER_ON GOSUB
New: 5.8 SR176 is supported
Modified: 5.19.1 & 5.21.2 PPP LoginName[20] changed to LoginName[39]
New: Appendix VI – Cradle commands
3.05.14
Sep. 15, 2006
New: Macro PDF417 supported
Updated: section 5.7.2 Code Type – Symbology Mapping Table II
Updated: Appendix I – Symbology Parameter Table II
3.05.13
Aug. 14, 2006
Modified: Modified: Format of Device ID (5.6.2) for 8300
Modified: section 5.8 RFID supported on 8300
3.05.12
Aug. 09, 2006
Modified: section 5.8.2 Data format of READ_COM$(4) – starts from Byte 1
Modified: Format of Device ID (5.6.2) for 8300 H/W 4.0
Modified: VIBRATOR() for 8300 H/W 4.0
New: SYSTEM_INFORMATION$(9) for RFID Version
Modified: section 5.8 RFID Reader
New: GET_RFID_KEY(), SET_RFID_KEY()
New: 5.19 IR/RS-232 Networking to include PPP & Ethernet connection
Modified: START TCPIP(6)
3.05.11
June 07, 2006
READER_CONFIG() for 8300 with Long Range Laser scan engine
3.05.10
June 05, 2006
New: BACKLIT()
Modified: Appendix II – minor changes
3.05.09
May 17, 2006
Modified: 5.9 Keyboard
WEDGE_READY()
Wedge,
SEND_WEDGE(),
SET_WEDGE(),
New: 5.9.3 Wedge Emulator
Modified: 5.20.6 Bluetooth - Wedge Emulator via SPP
3.05.08
May 11, 2006
Company name changed to CIPHERLAB CO., LTD. since April 2006
New: BIT_OPERATOR() in section 5.1
Modified: VIBRATOR() for 8300, H/W version is 4
3.05.07
Mar. 15, 2006
Modified: Appendix I ~ V
New: support Bluetooth HID on 8000
3.05
Feb. 21, 2006
New: Customize Serial Number/Device ID
New: SYSTEM_INFORMATION$()
Modified: CHANGE_SPEED for 711/8100/8000/8300 only
Modified: LED()
Modified: FUNCTION_TOGGLE()
Modified: coordinate system of LCD
Modified: SELECT_FONT()
Modified: font files renamed for 8000/8300
Modified: port mapping
Modified: SET_COM_TYPE() - 7 Acoustic/GSM_Modem
Modified: SET_COM() with Acoustic Settings for 8000Modified: support 2 MB
flash on 8000/8500
Modified: “PPP via IR” default baud rate for modem cradle is 57600
Modified: GSM read data format
Modified: String limit 255 bytes instead of 250 bytes (4.1.1, 4.2.1, 5.21.1)
New: READER_CONFIG() to support 2D, (Extra) Long Range Laser
Modified: CODE_TYPE()
Modified: READER_SETTING()
Modified: LCD_CONTRAST() for 8500
Modified: LOCATE()
Modified: RFID
Modified: MENU()
3.04
Nov. 18, 2005
Remove 720
New: Screenshots of Compiler's menus
New: Code type GTIN (87)
New: READER_SETTING index 86, 87
New: PPP via IR/RS-232
Modified: COM port mapping, GET_SCREENITEM,
SET_NET_PARAMETER, START TCPIP
Updated: indexing for Net Configuration and Net Status
SET_COM,
i
Contents
Copyright Notice
II
Revision History
III
CHAPTER 1 Introduction
1
CHAPTER 2 Development Environment
3
2.1 Directory Structure .................................................................................................................................3
2.1.1 BC Directory ............................................................................................................................3
2.1.2 DOWNLOAD Directory ..........................................................................................................4
2.2 System Requirements .............................................................................................................................6
2.3 BASIC Run-time Engine ........................................................................................................................6
2.4 Development Flow..................................................................................................................................7
2.4.1 Download Run-time Engine .....................................................................................................7
2.4.2 Edit and Compile the BASIC Program.....................................................................................8
2.4.3 Download the BASIC Object Files...........................................................................................8
CHAPTER 3 Using CipherLab BASIC Compiler
9
3.1 File Menu..............................................................................................................................................10
3.2 Edit Menu .............................................................................................................................................12
3.3 Configure Menu....................................................................................................................................14
3.4 Compile Menu ......................................................................................................................................16
3.5 Help Menu ............................................................................................................................................18
CHAPTER 4 Basics of the CipherLab BASIC Language
19
4.1 Constants...............................................................................................................................................19
4.1.1 String ......................................................................................................................................19
4.1.2 Numeric ..................................................................................................................................19
4.2 Variables ...............................................................................................................................................20
4.2.1 Variable Names and Declaration Characters ..........................................................................20
4.2.2 Array Variables ......................................................................................................................20
4.3 Expression and Operators .....................................................................................................................21
4.3.1 Assignment Operator..............................................................................................................21
4.3.2 Arithmetic Operator................................................................................................................22
4.3.3 Relational Operator.................................................................................................................22
4.3.4 Logical Operator.....................................................................................................................23
ii
Contents
4.4 Operator Precedence .............................................................................................................................23
4.5 Labels....................................................................................................................................................23
4.6 Subroutines ...........................................................................................................................................24
4.7 Programming Style ...............................................................................................................................26
CHAPTER 5 BASIC Commands
27
5.1 General Commands...............................................................................................................................29
5.2 Commands for Decision Structures ......................................................................................................33
5.3 Commands for Looping Structures .......................................................................................................37
5.4 Commands for String Processing..........................................................................................................39
5.4.1 Combining Strings..................................................................................................................39
5.4.2 Comparing Strings..................................................................................................................39
5.4.3 Getting the Length of a String ................................................................................................40
5.4.4 Searching for Strings ..............................................................................................................40
5.4.5 Retrieving Part of Strings .......................................................................................................41
5.4.6 Converting for Strings ............................................................................................................43
5.4.7 Creating Strings of Repeating Characters...............................................................................46
5.5 Commands for Event Trapping.............................................................................................................47
5.5.1 Event Triggers ........................................................................................................................47
5.5.2 Lock and Unlock ....................................................................................................................57
5.6 System Commands ...............................................................................................................................59
5.6.1 General ...................................................................................................................................59
5.6.2 Format of Device ID...............................................................................................................65
5.7 Barcode Reader Commands..................................................................................................................68
5.7.1 General ...................................................................................................................................68
5.7.2 Code Type ..............................................................................................................................73
5.7.3 Reader Settings .......................................................................................................................77
5.8 RFID Reader Commands......................................................................................................................79
5.8.1 Virtual COM...........................................................................................................................80
5.8.2 Data Format ............................................................................................................................80
5.8.3 RFID Authentication ..............................................................................................................81
5.9 Keyboard Wedge Commands ...............................................................................................................83
5.9.1 Definition of the WedgeSetting Array....................................................................................83
5.9.2 Composition of Output String ................................................................................................87
5.9.3 Wedge Emulator .....................................................................................................................89
5.10 Buzzer Commands..............................................................................................................................92
5.11 Vibrator Commands............................................................................................................................94
5.12 Calendar and Timer Commands .........................................................................................................95
5.13 LED Command ...................................................................................................................................98
5.14 Keypad Commands.............................................................................................................................99
5.14.1 General .................................................................................................................................99
5.14.2 ALPHA Key .......................................................................................................................102
5.14.3 FN Key ...............................................................................................................................104
5.15 LCD Commands ...............................................................................................................................105
5.15.1 Properties............................................................................................................................105
5.15.2 Cursor .................................................................................................................................108
5.15.3 Display................................................................................................................................110
5.15.4 Clear ...................................................................................................................................113
5.15.5 Image ..................................................................................................................................114
5.15.6 Graphics..............................................................................................................................117
5.15.7 Fonts ...................................................................................................................................120
Contents
iii
5.16 Touch Screen Commands .................................................................................................................123
5.17 Battery Commands ...........................................................................................................................127
5.18 Communication Ports .......................................................................................................................129
5.18.1 Port Mapping ......................................................................................................................129
5.18.2 Receive & Transmit Buffers...............................................................................................129
5.18.3 RS-232, Serial IR and IrDA Communications ...................................................................134
5.19 IR / RS-232 Networking ...................................................................................................................139
5.19.1 PPP via IR / RS-232 ...........................................................................................................139
5.19.2 Ethernet via IR....................................................................................................................141
5.20 RF Communications .........................................................................................................................142
5.20.1 RF Models & Specifications...............................................................................................142
5.20.2 RF System Requirements ...................................................................................................143
5.20.3 RF Topology & Roaming ...................................................................................................144
5.20.4 RF System Deployment......................................................................................................145
5.20.5 RF Terminal Properties ......................................................................................................147
5.20.6 RF Base Properties .............................................................................................................151
5.20.7 RF Example ........................................................................................................................158
5.21 Wireless Communications ................................................................................................................159
5.21.1 Wireless Models .................................................................................................................159
5.21.2 Network Configuration.......................................................................................................162
5.21.3 Initialization & Termination ...............................................................................................165
5.21.4 Network Status ...................................................................................................................167
5.21.5 WLAN (802.11b)................................................................................................................170
5.21.6 Bluetooth ............................................................................................................................180
5.21.7 GSM/GPRS ........................................................................................................................191
5.22 File Manipulation..............................................................................................................................199
5.22.1 DAT Files ...........................................................................................................................199
5.22.2 DBF Files and IDX Files ....................................................................................................206
5.22.3 Error Code ..........................................................................................................................213
5.23 Memory Commands .........................................................................................................................214
5.23.1 Flash ...................................................................................................................................214
5.23.2 SRAM.................................................................................................................................216
5.24 Debugging Commands .....................................................................................................................217
5.25 Reserved Host Commands................................................................................................................219
APPENDIX I Reader Settings
223
Symbology Parameter Table I ..................................................................................................................223
Symbology Parameter Table II .................................................................................................................229
APPENDIX II Symbology Parameters
237
Scan Engine, CCD or Laser......................................................................................................................238
Codabar .........................................................................................................................................238
Code 2 of 5 Family ........................................................................................................................238
Code 39..........................................................................................................................................241
Code 93..........................................................................................................................................241
Code 128/EAN-128 .......................................................................................................................242
Italian/French Pharmacode ............................................................................................................242
MSI................................................................................................................................................242
Negative Barcode ..........................................................................................................................243
Plessey ...........................................................................................................................................244
RSS Family....................................................................................................................................244
Telepen ..........................................................................................................................................245
iv
Contents
UPC/EAN Families .......................................................................................................................246
Scan Engine, 2D or (Extra) Long Range Laser.........................................................................................249
Codabar .........................................................................................................................................249
Code 2 of 5 ....................................................................................................................................250
Code 39..........................................................................................................................................251
Code 93..........................................................................................................................................252
Code 128........................................................................................................................................253
MSI................................................................................................................................................253
RSS Family....................................................................................................................................254
UPC/EAN Families .......................................................................................................................255
2D Scan Engine Only ...............................................................................................................................259
1D Symbologies ............................................................................................................................259
Composite Codes...........................................................................................................................260
2D Symbologies ............................................................................................................................262
APPENDIX III Scanner Parameters
265
Scan Mode ................................................................................................................................................265
Comparison of Scan Modes...........................................................................................................266
Read Redundancy .....................................................................................................................................268
Time-Out ..................................................................................................................................................269
APPENDIX IV Run-Time Error Table
271
APPENDIX V Debugging Messages
273
APPENDIX VI Cradle Commands
283
Select Modem (=Ethernet)........................................................................................................................284
Select RS-232 ...........................................................................................................................................284
Get Version Information...........................................................................................................................285
Unknown Command .................................................................................................................................285
Index
287
1
CHAPTER 1
Introduction
The CipherLab BASIC Compiler provides users with a complete programming
environment to develop application programs for the CipherLab terminals in the BASIC
language. The Windows-based Basic Compiler comes with a menu-driven interface to
simplify software development and code modifications. Many system configurations, such
as COM port properties and database file settings can be set up in the menus. Using this
powerful programming tool to get rid of lengthy coding, users can develop an application to
meet their own needs efficiently.
This manual is meant to provide detailed information about how to use the BASIC
Compiler to write application programs for the CipherLab portable terminals. It is
organized in five chapters giving outlines as follows:
Chapter 1
"Introduction" - gives a brief on this manual.
Chapter 2 "Development Environment" - gives a concise introduction about the Basic
Compiler, the development flow for applications, and the BASIC Compiler Run-time
Engines.
Chapter 3 "Using CipherLab BASIC Compiler" - gives a tour of the programming
environment of the BASIC Compiler.
Chapter 4 "Basics of CipherLab BASIC Language" - discusses the specific
characteristics of the CipherLab BASIC Language.
Chapter 5 "BASIC Commands" - discusses all the supported BASIC functions and
statements. More than 200 BASIC functions and statements are categorized according
to their functions, and discussed in details.
The CipherLab BASIC Compiler has been modified and improved since its first release in
November 1997. Users can refer to RELEASE.TXT for detailed revision history.
2
BASIC Programming Guide For Use with CipherLab BASIC Compiler
Chapter 2 Development Environment
3
CHAPTER 2
Development Environment
In This Chapter
2.1 Directory Structure ...................................................... 3
2.2 System Requirements .................................................. 6
2.3 BASIC Run-time Engine ............................................. 6
2.4 Development Flow....................................................... 7
2.1 Directory Structure
The CipherLab BASIC Compiler Kit contains two directories, namely, BC and
DOWNLOAD. The purposes and contents of each directory are listed below.
To set up the BASIC programming environment on your PC, simply copy these two
directories from the CD-ROM to your local hard disk.
2.1.1 BC Directory
This directory contains the BASIC Compiler and the BASIC programs.
BC.exe:
The BASIC Compiler program.
BC.chm:
The on-line help file for the BASIC Compiler.
Synload.exe:
The download program for downloading the Basic object files
(.syn and .ini) to the CipherLab terminals.
Release.txt:
The revision history of the BASIC compiler.
Samples:
Include BASIC source files (.bas), initialization files (.ini) and
BASIC object files (.syn) of the sample programs.
4
BASIC Programming Guide For Use with CipherLab BASIC Compiler
2.1.2 DOWNLOAD Directory
This directory contains download utilities, the BASIC Run-time Engines and font files.
Download.exe: The download utility to download the Motorola S format object file
(.shx) to the CipherLab terminals via RS-232 or standard IrDA port.
IRLoad.exe: The download utility to download the Motorola S format object file (.shx)
to the CipherLab terminals via Serial IR Transceiver.
BASIC Run-time Engines:
BC711.shx
// English version
System font
// Japanese version
Need to download font file
// Korean version
Need to download font file
// Russian version
Font included
// Simplified Chinese
Need to download font file
// Simplified Chinese
Need to download font file
BC8100.shx
BC711-JP.shx
BC8100-JP.shx
BC711-KR.shx
BC8100-KR.shx
BC711-RU.shx
BC8100-RU.shx
BC711-SC.shx
BC8100-SC.shx
BC711-SD.shx
BC8100-SD.shx
BC711-TC.shx
// Traditional Chinese version Need to download font file
BC8100-TC.shx
BC8000.shx
// 8000 generic version
Need to download font file
BC8300.shx
// 8300 generic version
Need to download font file
Font-jp.shx
// Japanese
Font size: 16x16 (4 lines)
Font-kr.shx
// Korean
Font size: 16x16 (4 lines)
Font-sc.shx
// Simplified Chinese
Font size: 16x16 (4 lines)
Font-sd.shx
// Simplified Chinese
Font size: 12x12 (4 lines)
Font-tc.shx
// Traditional Chinese
Font size: 16x16 (4 lines)
Font files
711, 8100 Series
Chapter 2 Development Environment
5
8000, 8300 Series
Font_8x00_Hebrew.shx
Font size: 6x8 or 8x16
Font_8x00_Japanese.shx
Font size: 16x16 (4 lines)
Font_8x00_Japanese12.shx
Font size: 6x12 or 12x12 (5 lines)
Font_8x00_Korean.shx
Font size: 16x16 (4 lines)
Font_8x00_Korean12.shx
Font size: 6x12 or 12x12 (5 lines)
Font_8x00_Nordic.shx
Font size: 6x8 or 8x16
Font_8x00_Polish.shx
Font size: 6x8 or 8x16
Font_8x00_Russian.shx
Font size: 6x8 or 8x16
Font_8x00_SChinese.shx
Font size: 16x16 (4 lines)
Font_8x00_SChinese12.shx
Font size: 6x12 or 12x12 (5 lines)
Font_8x00_TChinese.shx
Font size: 16x16 (4 lines)
Font_8x00_TChinese12.shx
Font size: 6x12 or 12x12 (5 lines)
Font_8x00_Multi_Language.shx
Font size: 6x8 or 8x16
8500 Series
Font8500-Jp.shx
// Japanese
Font size: 16x16 (9 lines)
Font8500-Kr.shx
// Korean
Font size: 16x16 (9 lines)
Font8500-Sc.shx
// Simplified Chinese
Font size: 16x16 (9 lines)
Font8500-Sc12.shx
// Simplified Chinese
Font size: 6x12 or 12x12 (12 lines)
Font8500-Tc.shx
// Traditional Chinese
Font size: 16x16 (9 lines)
Font8500-Tc12.shx
// Traditional Chinese
Font size: 6x12 or 12x12 (12 lines)
Font8500-Multi-Language. // Multilanguage
shx
Font size: 6x8 or 8x16
6
BASIC Programming Guide For Use with CipherLab BASIC Compiler
2.2 System Requirements
Before you install the CipherLab BASIC Compiler, it is necessary to check that your PC
meets the following minimum requirements:
Items
Requirements
CPU
Pentium 75MHz
Operating System
Windows 95/98/2000/NT/XP
Minimum RAM
16 MB
Minimum Hard Disk Space
20 MB
Note: Any terminal being programmed will need to have a minimum 128KB RAM.
2.3 BASIC Run-time Engine
The BASIC Run-time Engines work as interpreters of the BASIC commands. The
CipherLab terminals have to be loaded with the BASIC Run-time Engines to run the BASIC
programs. Each model of terminal has its own Run-time Engine to drive its specific
hardware features. The Run-time Engines are named as "BCxxx.shx", where "BCxxx" is
the model number of the target terminal. For example, "BC711.shx" is the BASIC Run-time
for 711.
The BASIC Run-time also provides the capabilities for user to configure the terminal. With
the Run-time Engine loaded, the terminal can be set to the "System Mode". In the "System
Mode", user can set up the system settings such as the system clock and update the user
program and so on. The System Menu presented in the "System Mode" varies for different
models of terminals. For detailed functions of the System Menu, please refer to the user
manual of the terminal.
Note: The System Menu is launched by pressing three keys simultaneously: [7], [9], and
the POWER key
Chapter 2 Development Environment
7
2.4 Development Flow
Developing a BASIC program for the CipherLab terminal is as simple as counting 1-2-3.
There are three steps:
Step 1 - Download the BASIC Run-time to the target terminal.
Step 2 - Edit and compile the BASIC program.
Step 3 - Download the BASIC object file to the target terminal.
2.4.1 Download Run-time Engine
The BASIC Run-time Engines are programs being loaded on the CipherLab terminals to
execute the BASIC object files. They must exist in the terminals before the BASIC object
files are downloaded. To download the Run-time Engine (and/ or any other programs), the
target terminal needs to be set to the "Download Mode" first to receive the new program.
There are two ways to enter the "Download Mode": one is from the System Menu, and the
other is from the Kernel Menu. For details of how to download a program, please refer to
the terminal's user manual.
Note: After the battery pack is re-installed, the Kernel Menu can be launched by pressing
three keys simultaneously: [1], [7], and the POWER key
After the target terminal is set to the "Download Mode" and the connection to the host PC is
properly established, user can run one of the programs on the host PC to download the
BASIC Run-time or any other .shx files to the terminal:
Download.exe
(for RS-232/IrDA interface)
IRLoad.exe
(for Cradle-IR interface)
ProgLoad.exe
(for RS-232/IrDA, Cradle-IR or TCP/IP)
After the Run-time Engine is downloaded successfully, the message "Ready for BASIC
Download" will be shown on the display of the terminal.
8
BASIC Programming Guide For Use with CipherLab BASIC Compiler
2.4.2 Edit and Compile the BASIC Program
The BASIC Compiler, bc.exe, comes with a text editor where users can edit their BASIC
programs. Please refer to the next chapter for general information of the operation.
By default, the text being edited with the editor would be saved as a BASIC source file
(.bas). The system settings defined in the Configuration Menu, including "Target Machine",
COM port settings, transaction file settings, DBF settings and barcode settings, would be
saved as a system initialization file (.ini) with the same name when the .bas file is saved. The
.ini file should be treated as part of the BASIC program, and should be included when the
BASIC program is distributed.
If the BASIC program compiles without any errors, a BASIC object file (.syn) with the same
name is generated. The .ini file and the .syn file are the two files to be downloaded to the
terminal. The .ini file contains the system settings, while the .syn file contains the BASIC
object code.
2.4.3 Download the BASIC Object Files
Use the BASIC Compiler or the standalone BASIC download utility, Synload.exe, to
download a compiled BASIC program. Synload.exe provides only the download function of
the BASIC Compiler, that is, it cannot be used to view or edit any BASIC code.
Both the .ini and .syn files must be downloaded to the target terminal. Be careful that if the
.ini file is missing, the BASIC Compiler will download the default settings instead. In this
case, it may cause errors during execution. In contrast to the BASIC Compiler, Synload.exe
will not process the downloading if the .ini file is missing, and an error message will be
shown on the display.
After the BASIC object file is downloaded, the target terminal will reboot itself to execute
the BASIC program. If any run-time error occurs, an error message will be shown on the
display. Please refer to Appendix II for a list of run-time errors. If the program is not
running as desired, modify the BASIC source code and download it to the target terminal
again.
9
CHAPTER 3
Using CipherLab BASIC Compiler
The CipherLab BASIC Compiler looks like a traditional Windows environment application
that supports file management, text editing, and some other functions to simplify the
BASIC program development. There are five menus on the menu bar, and each menu
provides several commands/items.
File Menu
Edit Menu
Configure Menu
Compile Menu
Help Menu
This chapter discusses the function and operation of each command/item.
In This Chapter
3.1 File Menu..................................................................... 10
3.2 Edit Menu .................................................................... 12
3.3 Configure Menu........................................................... 14
3.4 Compile Menu ............................................................. 16
3.5 Help Menu ................................................................... 18
10
BASIC Programming Guide For Use with CipherLab BASIC Compiler
3.1 File Menu
Six commands are provided on this menu.
Command
New
To Do...
Function
Operation
To create a new BASIC program.
Click "File" on the menu bar and select "New".
For the same function, press hot key CTRL+ N or click the
[New] icon on the tool bar.
Open
Function
To open an existing BASIC program.
Operation
Click "File" on the menu bar and select "Open".
For the same function, press hot key CTRL+ O or click the
[Open] icon on the tool bar.
Save
Function
To save the current editing BASIC program.
Operation
Click "File" on the menu bar and select "Save".
For the same function, press hot key CTRL+ S or click the
[Save] icon on the tool bar.
Save As
Function
To save the current editing BASIC program with a new name.
Operation
Click "File" on the menu bar and select "Save As". Enter a
new name in the pop-up window. Then click the [Save] button
to save this program with the new file name.
Chapter 3 Using CipherLab BASIC Compiler
Print
Function
To print the current editing BASIC program.
Operation
Click "File" on the menu bar and select "Print".
11
For the same function, press hot key CTRL+ P or click the
[Print] icon on the tool bar.
Exit
Function
To quit the BASIC Compiler.
Operation
Click "File" on the menu bar and select "Exit".
For the same function, press hot key ALT+ F4.
12
BASIC Programming Guide For Use with CipherLab BASIC Compiler
3.2 Edit Menu
Seven commands are provided here to facilitate the editing of the BASIC source code.
Command
Undo
To Do...
Function
Operation
To abort the previous editing command or action.
Click "Edit" on the menu bar and select "Undo".
For the same function, press hot key CTRL+ Z or click the
[Undo] icon on the tool bar.
Cut
Function
To cut a paragraph off the text and place it on the clipboard.
The paragraph will be removed.
Operation
Drag the cursor to select the paragraph to be cut off. This
paragraph will be highlighted (in a reverse color). Click "Edit"
on the menu bar and select "Cut".
For the same function, press hot key CTRL+ X or click the
[Cut] icon on the tool bar.
Copy
Function
To copy a paragraph from the text to the clipboard.
Operation
Drag the cursor to select the paragraph to be copied. This
paragraph will be highlighted (in a reverse color). Click
"Edit" on the menu bar and select "Copy".
For the same function, press hot key CTRL+ C or click the
[Copy] icon on the tool bar.
Chapter 3 Using CipherLab BASIC Compiler
Paste
13
Function
To paste a paragraph from the clipboard into the text. This
paragraph will be inserted to the text.
Operation
Move the cursor to the insertion point where the paragraph
will be inserted, and left-click the mouse. Click "Edit" on the
menu bar and select "Paste".
For the same function, press hot key CTRL+ V or click the
[Paste] icon on the tool bar.
Delete
Function
To delete a paragraph from the text. This paragraph will not
be placed on the clipboard.
Operation
Drag the cursor to select the paragraph to be deleted. This
paragraph will be highlighted (in a reverse color). Click "Edit"
on the menu bar and select "Delete".
For the same function, press the Del key.
Select All
Function
To select all the contents of the text.
Operation
Click "Edit" on the menu bar and select "Select All". All the
contents will be highlighted (in a reverse color).
For the same function, press hot key CTRL+ A.
Find
Function
To find a specific letter, symbol, word, or paragraph in the
text.
Operation
Click "Edit" on the menu bar and select "Find". In the pop-up
window, enter the key word to be found in the text. Then,
click the [Find] button to start searching.
For the same function, press hot key CTRL+ F or click the
[Find] icon on the tool bar.
14
BASIC Programming Guide For Use with CipherLab BASIC Compiler
3.3 Configure Menu
Seven items are provided here for user to define the system settings.
The "Configure Transaction Files" and "Create DBF Files" items provide the option of
"Share file space with other applications". The 8000/8300/8500 series terminals support
multiple applications, but only one of them is active; this setting option allows different
applications share the same files.
Command
To Do…
Target
Machine
Master
ID
Card
Primary COM
Port Setting
Function
To set the type of the target machine.
Operation
Click “Configure” on the menu bar and select “Target
Machine”. Then scroll through the drop-down menu in the
pop-up window to set the target machine. The selection of the
target machine will affect the number of transaction files, the
available baud rate of the COM port.
Function
To define the ID of the master setup card.
Operation
Click “Configure” on the menu bar and select “Master Card
ID”. Type the new card ID in the field in the pop-up window.
(This feature is only valid for stationary terminals, such as
models 201/510/520.)
Function
To set the properties of the primary COM port.
Operation
Click “Configure” on the menu bar and select “Primary COM
Port Setting”. Select the desired settings for each property in
the pop-up window.
Chapter 3 Using CipherLab BASIC Compiler
15
Secondary
COM
Port
Setting
Function
To set the properties of the secondary COM port.
Operation
Click "Configure" on the menu bar and select "Secondary
COM Port Setting". Select the desired settings for each
property in the pop-up window.
Configure
Transaction
Files
Function
To define the transaction files (up to 6) to be used and the data
length for each transaction file.
Once the data length is defined, the system will reserve space
for the program. If the space is larger than needed, it would be
a waste. On the other hand, when space is insufficient, data
will be truncated to fit in.
“Share file space with other applications” is enabled by
default, which means the same transaction file will not be
deleted after new program is downloaded. If disabled, user
can get larger file system size.
Create
Files
Barcode
Setting
DBF
Operation
Click "Configure" on the menu bar and select "Configure
Transaction Files". In the pop-up window, check the box to
enable the use of a transaction file, and type the data length for
each enabled transaction file.
Function
To define the DBF files (up to 5) to be used and the IDX files
for each DBF file.
Operation
Click "Configure" on the menu bar and select "Create DBF
Files". In the pop-up window, type the total record length for
each DBF file and define the offset and length for the IDX
files.
Function
To configure the system parameters for barcode symbologies
and scanner performance.
Operation
Click "Configure" on the menu bar and select "Barcode
Setting". In the pop-up window, check the box to enable the
decodability of the target terminal for a particular barcode
symbology. For the description of each barcode setting, please
refer to Appendix I.
Note: When exiting the BASIC Compiler or opening another file, if the current file has not
been changed but the barcode settings have been changed, user will be asked
whether to save the current file or not.
16
BASIC Programming Guide For Use with CipherLab BASIC Compiler
3.4 Compile Menu
Three commands are provided on this menu.
Command
Syntax
checking
Compile
To Do...
Function
To check the syntax of the BASIC program.
Operation
Click "Compile" on the menu bar and select "Syntax
checking". In the case of any syntax error in the BASIC
program, the "Output" window pops up to show the line
numbers and display the relevant syntax error message.
Function
To compile the BASIC program.
Operation
Click "Compile" on the menu bar and select "Compile".
For the same function, click the "Compile" icon on the tool
bar.
In the case of any syntax or compiling error, the "Output"
window pops up to display the error messages. If the
compilation is successfully done, the message "Build
successfully, do you want to download the program?" will be
shown on the screen. Click the [Yes] button if you want to
download the program. (Refer to the "Download" command
for downloading operation.)
Chapter 3 Using CipherLab BASIC Compiler
Download
17
Function
To download a compiled BASIC program to the target
terminal.
Operation
Click "Compile" on the menu bar and select "Download". In
the pop-up window, select the BASIC object file (.syn) to be
downloaded, and then click [Open]. Select the correct COM
port properties and then click [OK] to download.
(For 711, user may select to download the BASIC program
via Serial IR transceiver.)
Note that the associated system initialization file (.ini) has to
be in the same directory as the BASIC object file is;
otherwise, the default system settings will be downloaded
instead.
18
BASIC Programming Guide For Use with CipherLab BASIC Compiler
3.5 Help Menu
Three commands are provided on this menu.
Command
Contents
Index
About
To Do...
Function
To display a table of contents for the BASIC online
documentation.
Operation
Click "Help" on the menu bar and select "Contents". The
online help file will be opened. Click on any topic for more
detailed information.
Function
To display the help file index.
Operation
Click "Help" on the menu bar and select "Index". The online
help file will be opened. Type a string for searching or directly
click on the listed index entry for viewing further information.
Function
To display the ownership and version of the program.
Note that the version information is necessary when tracing a
programming problem.
Operation
Click "Help" on the menu bar and select "About". The pop-up
message box declares the ownership and version information
of the program.
19
CHAPTER 4
Basics of the CipherLab BASIC Language
In This Chapter
4.1 Constants ..................................................................... 19
4.2 Variables...................................................................... 20
4.3 Expression and Operators ............................................ 21
4.4 Operator Precedence.................................................... 23
4.5 Labels........................................................................... 23
4.6 Subroutines .................................................................. 24
4.7 Programming Style ...................................................... 26
4.1 Constants
Constants are the actual values that BASIC uses during execution. There are two types of
constants:
String
Numeric
4.1.1 String
A string constant is a sequence of up to 255 alphanumeric characters or symbols enclosed in
a pair of double quotation marks.
"Hello"
"$20,000.00"
"12 students"
4.1.2 Numeric
Numeric constants include positive and negative numbers. Numeric constants in BASIC
cannot contain commas. There are three types of numeric constants that can be used in the
CipherLab BASIC Compiler:
20
BASIC Programming Guide For Use with CipherLab BASIC Compiler
Integer Constants:
Whole numbers between - 32,768 and + 32,767. No decimal
point.
Real Number Constants:
Positive or negative real numbers, that is, numbers that contain a
decimal point, such as 5.34 or - 10.0.
Long Integer Constants:
Whole numbers between - 2,147,483,648 and + 2,147,483,647.
4.2 Variables
Variables are symbols used to represent data items, such as numerical values or character
strings that are used in a BASIC program. The value of a variable may be assigned
explicitly and can be changed during the execution of a program. Be aware that the value of
a variable is assumed to be undefined until a value is assigned to it.
4.2.1 Variable Names and Declaration Characters
The following are the rules for variable names and declaration characters:
A variable name must begin with a letter (A to Z).
The remaining characters can be letters, numbers, and/or underscores.
The last character can be one of these type declaration characters:
% integer
: 2 bytes
(- 32,768 to + 32,767)
& long
: 4 bytes
(- 2,147,483,648 to + 2,147,483,647)
! real number
: 4 bytes
$ string
: 255 bytes
nothing (default)
: 2 bytes
(- 32,768 to + 32,767)
The variable name cannot be a BASIC reserved word.
Only 4 types of variables are supported. The maximum number of variables is 1,000.
Variable names are not case-sensitive.
4.2.2 Array Variables
An array is a group or table of values referenced by the same variable name.
Chapter 4 Basics of the CipherLab BASIC Language
21
Each element in an array is referenced by an array variable that is subscripted with an
integer or an integer expression.
An array variable name has as many dimensions as there are subscripts in the array. For
example,
A(12)
: would reference a value in a one-dimension array.
T(2,5)
: would reference a value in a two-dimension array.
... and so on.
Each element in an array is referenced by an array variable that is subscripted with an
integer or an integer expression. For example,
DIM IntegerA%(20)
: declares an integer array with 20 elements.
DIM StringB$(100)
: declares a string array with 100 elements.
DIM RealC!(10)
: declares an integer array with 10 elements.
DIM Tb(5,5)
: declares a two-dimension integer array with 5x5
elements.
ArrayD(i+1,j)
: The elements of an array are subscripted with an integer
expression.
The first element of an array is subscripted with 1.
In the CipherLab BASIC language, the maximum number of dimensions for an array is
2, and, up to 32,767 elements per dimension is allowed while compiling.
4.3 Expression and Operators
An expression may be a string or numeric constant, or a variable, or it may be a combination
of constants and variables with operators to produce a single value.
Operators perform mathematical or logical operations. The operators provided by the
CipherLab BASIC Compiler may be divided into four categories, namely, Assignment
Operator, Arithmetic Operators, Relational Operators, and Logical Operators.
4.3.1 Assignment Operator
The CipherLab BASIC Compiler supports an assignment operator: "=".
22
BASIC Programming Guide For Use with CipherLab BASIC Compiler
For example,
Length% = 100
PI! = 3.14159
Company$ = "CipherLab Co., Ltd."
4.3.2 Arithmetic Operator
The arithmetic operators are:
Operator
Operation
Sample Expression
^
Exponentiation
A% = 9^3
-
Negation (unary)
A% = -B%
*
Multiplication
A! = B! * C!
\
Division (integer)
A% = B! \ C!
/
Division (real)
A! = B! / C!
+
Addition
A% = B% + C%
-
Subtraction
A% = B% - C%
MOD
Modulo arithmetic
A% = B% MOD C%
4.3.3 Relational Operator
Relational operators are used to compare two values. The result of the comparison is either
"True" or "False". This result may then be used to make a decision regarding program flow.
Operator
Operation
Sample Expression
=
Equality
A% = B%
<>
Inequality
A% <> B%
><
Inequality
A! >< B!
>
Greater than
A% > B!
<
Less than
A! < B!
>=
Greater than or equal to
A% >= B%
<=
Less than or equal to
A% <= B%
Chapter 4 Basics of the CipherLab BASIC Language
23
4.3.4 Logical Operator
Logical operators perform tests on multiple relations and Boolean operations. The logical
operator returns a bit-wise result which is either "True" (not zero) or "False" (zero). In an
expression, logical operations are performed after arithmetic and relational operations.
Operator
Operation
Sample Expression
NOT
Logical negation
IF NOT (A% = B%)
AND
Logical and
IF (A% = B%) AND (C% = D%)
OR
Inclusive or
IF (A% = B%) OR (C% = D%)
XOR
Exclusive or
IF (A% = B%) XOR (C% = D%)
4.4 Operator Precedence
The precedence of BASIC operators affects the evaluation of operands in expressions.
Expressions with higher precedence operators are evaluated first. The precedence of
BASIC operators is listed below in the order of precedence from highest to lowest. Where
several operators appear together, they have equal precedence.
Order of Precedence
Type of Operation
Symbol
Highest
Arithmetic - Exponentiation
^
Arithmetic - Multiplication, Division,
Modulo
*, \, /, MOD
Arithmetic - Addition, Subtraction
+, -
Relational
=, <>, >, <, >=, <=
Logical
AND, NOT, OR, XOR
Assignment
=
Lowest
4.5 Labels
Line labels are used to represent some special lines in the BASIC program. They can be
either integer numbers or character strings.
24
BASIC Programming Guide For Use with CipherLab BASIC Compiler
A valid integer number for the line label is in the range of 1 to 32,767.
A character string label can have up to 49 characters. (If the string label has more than
49 characters, it will be truncated to 49 characters long.)
The maximum number of labels is 1,000.
Note: The maximum compilable lines are 12,000. (trial version: 1,000 lines)
A character string label that precedes a program line must have a colon ":" between the label
and the program line, but it is not necessary for an integer label. For example,
GOTO 100
...
100
PRINT "This is an integer label."
...
GOTO Label2
...
Label2:
PRINT "This is a character string label."
4.6 Subroutines
A subroutine is a set of instructions given a particular name or a line label. Users can
simplify their programming by breaking programs into smaller logical subroutines. A
subroutine will be executed when being called by a GOSUB command. For example,
ON KEY(1)GOSUB KeyF1
...
KeyF1:
PRINT "F1 is pressed."
RETURN
The command RETURN marks the end of the subroutine and tells the processor to return to
the caller. A subroutine has to be appended at the end of the main BASIC program.
Chapter 4 Basics of the CipherLab BASIC Language
25
A subroutine can be defined with or without a pair of brackets. For example,
SUB Subroutine1( )
...
PRINT "Subroutine1 is executed."
END SUB
...
SUB Subroutine2
...
PRINT "Subroutine2 is executed."
END SUB
Since all the variables in the CipherLab BASIC program are treated as global variables,
passing arguments to subroutines is meaningless and enclosing arguments in the brackets of
the subroutines will lead to a syntax error while compiling.
A subroutine in BASIC can be recursive, which means it can call itself or other subroutines
that in turn call the first subroutine. The following sample program contains a recursive
subroutine - Factorial, to calculate the value of n! ("n factorial").
PRINT "Please enter a number (1 - 13):"
INPUT N%
FactResult! = 1
Fact% = N%
GOSUB Factorial
PRINT N%, "! = ", FactResult
Loop:
GOTO Loop
Factorial:
IF Fact% < 1 THEN RETURN
FactResult! = FactResult! * Fact%
Fact% = Fact% -1
GOSUB Factorial
RETURN
26
BASIC Programming Guide For Use with CipherLab BASIC Compiler
4.7 Programming Style
The following are the guidelines used in writing programs in this manual, including the
sample program. These guidelines are recommended for program readability, but they are
not compulsory.
Reserved words and symbolic constants appear in uppercase letters:
PRINT "Portable Terminal Demo Program"
BEEP(800,30,0,5,800,15,0,5,800,15)
Variable names are in lowercase with an initial capital letter. If variable names are
combined with more than one part, other capital letters may be used to make it easier to
read:
ProcessFlag% = 0
Temp$ = GET_RECORD$(3,1)
Line labels are used instead of line numbers:
ON READER(2) GOSUB GetSlotReader
27
CHAPTER 5
BASIC Commands
This chapter provides detailed descriptions of the commands supported by the CipherLab
BASIC Compiler. In addition to the commands commonly used in traditional versions of
BASIC, a number of commands that deal with specific hardware features of the CipherLab
portable terminals are supported. These commands are within user's BASIC programs to
perform a wide variety of tasks, such as communications, LCD, buzzer, scanner, file
manipulation, etc. They are categorized and described in this chapter by their functions or
the resources they work on.
Some commands are postfixed with a dollar sign, $, which means a string is returned with
the command. The compiler will accept these commands with or without the dollar sign.
However, the dollar sign will be postfixed to these commands in this manual and the sample
program.
The description for each BASIC command consists of five parts, Purpose, Syntax, Remarks,
Example and See Also, which are further described below.
Purpose
The purpose of the command is briefly explained.
Syntax
According to the following conventions, the command syntax is described.
CAPS
: BASIC keywords are indicated by capital letters.
Italics
: Items in Italics represent variable information to be supplied by user.
[]
: Square brackets indicate optional parameters.
{}
necessary.
: Braces indicate an item may be repeated as many times as
|
: Vertical bar indicates alternative option.
Remarks
Additional information regarding correct command usage is provided.
28
BASIC Programming Guide For Use with CipherLab BASIC Compiler
Example
Various ways of using the statement are presented, including applicable and
unusual modes of operation.
See Also
List of related commands is provided, if there is any.
Note: The types of terminals that support a specified BASIC command are listed to the
right of the title bar of the command.
In This Chapter
5.1 General Commands ..................................................... 29
5.2 Commands for Decision Structures ............................. 33
5.3 Commands for Looping Structures.............................. 37
5.4 Commands for String Processing ................................ 39
5.5 Commands for Event Trapping ................................... 47
5.6 System Commands ...................................................... 59
5.7 Barcode Reader Commands ........................................ 68
5.8 RFID Reader Commands............................................. 79
5.9 Keyboard Wedge Commands ...................................... 83
5.10 Buzzer Commands..................................................... 92
5.11 Vibrator Commands................................................... 94
5.12 Calendar and Timer Commands ................................ 95
5.13 LED Command.......................................................... 98
5.14 Keypad Commands.................................................... 99
5.15 LCD Commands ........................................................ 105
5.16 Touch Screen Commands .......................................... 123
5.17 Battery Commands .................................................... 127
5.18 Communication Ports ................................................ 129
5.19 IR / RS-232 Networking............................................ 139
5.20 RF Communications .................................................. 142
5.21 Wireless Communications ......................................... 159
5.22 File Manipulation ...................................................... 199
5.23 Memory Commands .................................................. 214
5.24 Debugging Commands .............................................. 217
5.25 Reserved Host Commands......................................... 219
Chapter 5 BASIC Commands
29
5.1 General Commands
This section describes commands that are not confined to any specific hardware features.
ABS
Purpose
To return the absolute value of a numeric expression.
Syntax
A = ABS(N)
Remarks
"A" is a numeric variable to be assigned to the absolute value of a numeric
expression.
"N" is a numeric expression; it can be an integer or a real number.
Example
TimeDifference% = ABS(Time1% - Time2%)
BIT_OPERATOR
Purpose
To perform bit-wise operations of integers or long integers.
Syntax
C = BIT_OPERATOR(operator%, A, B)
Remarks
"C" is an integer (C%) or long integer variable (C&) to be assigned to the result.
"operator%" is an integer variable, indicating the bit-wise operator.
Operator%
Meaning
1
bit-wise AND
2
bit-wise OR
3
bit-wise XOR
"A" is an integer (A%) or long integer variable (A&), indicating the 1st operand.
"B" is an integer (B%) or long integer variable (B&), indicating the 2nd operand.
Example
Result& = BIT_OPERATOR(2, 1100, 1000)
Purpose
To specify the maximum value of variable subscripts and to allocate storage
accordingly.
Syntax
DIM Array (range {,range}) {, Array(range {,range})}
Remarks
"Array" is an array variable.
DIM
"range" can be an integer or an integer expression.
30
BASIC Programming Guide For Use with CipherLab BASIC Compiler
The DIM statement sets all the elements of the specified arrays to an initial value of
zero or empty string.
Note that the maximum allowable number of dimensions for an array is 2.
Example
DIM A(10), B%(20), C$(30,10)
GOSUB
Purpose
To call a specified subroutine.
Syntax
GOSUB SubName|SubLabel
Remarks
"SubName" is the name of a subroutine.
"SubLabel" is the line label of a subroutine.
Example
GOSUB DoIt
...
GOSUB Done
...
SUB DoIt( )
PRINT "Now I've done it!"
END SUB
...
Done:
PRINT "Now I've done it!"
RETURN
GOTO
Purpose
To branch out unconditionally to a specified line number of line label from the
normal program sequence.
Syntax
GOTO LineNumber|LineLabel
Remarks
"LineNumber" is the integer number in front of a program line.
"LineLabel" is the string label of a program line.
Example
Loop:
GOTO Loop
INT
Purpose
To return the largest integer that is less than or equal to the given numeric
expression.
Chapter 5 BASIC Commands
Syntax
A% = INT(N)
Remarks
"A%" is an integer variable to be assigned to the result.
31
"N" is a numeric expression.
Example
A% = INT(-2.86)
' A% = -3
B% = INT(2.86)
' B% = 2
REM
Purpose
To insert explanatory remarks in a program.
Syntax
REM remark
' remark
Remarks
"remark" may be any sequence of characters.
The BASIC compiler will ignore whatever follows the REM or ' until end of the
line.
Example
REM This is a comment.
' This is a comment.
SET_PRECISION
Purpose
To set the precision of the decimal points for printing real number expressions.
Syntax
SET_PRECISION(N%)
Remarks
"N%" is a numeric expression in the range of 0 to 6.
The precision is set to two digits by default.
Example
PI! = 3.14159
PRINT "PI = ", PI!
' result: PI = 3.14 (by default)
SET_PRECISION(6)
PRINT "PI = ", PI!
' result: PI = 3.141590
SET_PRECISION(2)
PRINT "PI = ", PI!
' result: PI = 3.14
SGN
Purpose
To return an indication of the mathematical sign (+ or -) of a given numeric
expression.
Syntax
A% = SGN(N)
Remarks
"A%" is an integer variable to be assigned to the result.
32
BASIC Programming Guide For Use with CipherLab BASIC Compiler
A%
Meaning
1
N>0
0
N=0
-1
N<0
"N" is a numeric expression.
Example
A% = SGN(100)
' A% = 1
B% = SGN(-1.5)
' B% = -1
Chapter 5 BASIC Commands
33
5.2 Commands for Decision
Structures
Based on the value of an expression, decision structures cause a program to take one of the
following two actions:
To execute one of several alternative statements within the decision structure itself.
To branch to another part of the program outside the decision structure.
In CipherLab BASIC, decision-making is handled by the IF...THEN...[ELSE...][ENDIF] and
ON...GOSUB|GOTO... statement. The IF...THEN...[ELSE...][ENDIF] statement can be used
anywhere the ON...GOSUB|GOTO... statement can be used. The major difference between the
two statements is that ON...GOSUB|GOTO... evaluates a single expression, and then executes
different statements or branches to different parts of the program based on the result. On the
contrary, a block IF...THEN...[ELSE...][ENDIF] can evaluate completely different expressions.
Moreover, the expression given in the ON expression GOSUB|GOTO... statement must be
evaluated by a number in the range 1 to 255, while the expression in
IF...THEN...[ELSE...][ENDIF] statement can only be evaluated as a TRUE or FALSE
condition.
The IF...THEN...[ELSE...][ENDIF] statement can be nested up to 10 levels.
IF ... THEN ... [ELSE...]
Purpose
To provide a decision structure for single-line conditional execution.
Syntax
IF condition THEN action1 [ELSE action2]
Remarks
"condition" is a logical expression.
"action" is a BASIC statement.
Example
IF Data1% > Data2% THEN Temp% = Data1% ELSE Temp% = Data2%
IF ... THEN ... {ELSE IF...} [ELSE...] END IF
Purpose
To provide a decision structure for multiple-line conditional execution.
Syntax
IF condition1 THEN
Statementblock1
{ELSE IF condition2 THEN
Statementblock2}
34
BASIC Programming Guide For Use with CipherLab BASIC Compiler
[ELSE
StatementblockN]
END IF
Remarks
"condition" is a logical expression.
"Statementblock" can be multiple lines of BASIC statements.
Example
IF LEFT$(String1$,1) = "A" THEN
PRINT "String1 is led by A."
ELSE IF LEFT$(String1$,1) = "B" THEN
PRINT "String1 is led by B."
ELSE
PRINT "String1 is not led by A nor B."
END IF
IF ... THEN ... END IF
Purpose
To provide a decision structure for a conditional execution with multiple lines of
actions.
Syntax
IF condition1 THEN
action1
action2
...
END IF
Remarks
"condition" is a logical expression.
"action" is a BASIC statement.
Example
IF Data1% > Large% THEN
BEEP(800,30)
Large% = Data1%
PRINT "Current Largest Number is ", Data1%
END IF
ON ... GOSUB ...
Purpose
To call one of the several specified subroutines depending on the value of the
expression.
Syntax
ON N GOSUB SubName|SubLabel {, SubName|SubLabel}
Chapter 5 BASIC Commands
Remarks
35
"N" is a numeric expression that is rounded to an integer. The value of N determines
which subroutine is to be called. If the value of N is 0, or greater than the number of
routines listed, the interpreter will continue with the next executable statement.
"SubName" is the name of a subroutine.
"SubLabel" is the line label of a subroutine.
Example
PRINT "Input a number (1-9):"
INPUT Num%
CLS
ON Num% GOSUB 100, 100, 100, 200, 200, 300, 400, 400, 400
...
100
PRINT "Number 1-3 is input."
RETURN
200
PRINT "Number 4-5 is input."
RETURN
300
PRINT "6 is input."
RETURN
400
PRINT "Number 7-9 is input."
RETURN
...
ON ... GOTO ...
Purpose
To branch to one of several specified Line Labels depending on the value of an
expression.
Syntax
ON N GOTO LineLabel {, LineLabel}
Remarks
"N" is a numeric expression which is rounded to an integer. The value of N
determines which line label in the list will be used for branching. If the value N is 0,
or greater than the number of line labels listed, the interpreter will continue with the
next executable statement.
"LineLabel" is the string label of a program line.
Example
PRINT "Input a number (1-9):"
INPUT Num%
CLS
36
BASIC Programming Guide For Use with CipherLab BASIC Compiler
ON Num% GOTO 100, 100, 200, 200, 300, 400, 400, 400
...
100
PRINT "Number 1-3 is input."
GOTO 500
200
PRINT "Number 4-5 is input."
GOTO 500
300
PRINT "6 is input."
GOTO 500
400
PRINT "Number 7-9 is input."
500
...
Chapter 5 BASIC Commands
37
5.3 Commands for Looping Structures
Looping structures repeat a block of statements, either for a specified number of times or
until a certain condition is matched. In CipherLab BASIC, two kinds of looping structures,
FOR...NEXT and WHILE...WEND can be used. The command EXIT can be used as an
alternative to exit from both FOR...NEXT and WHILE...WEND loops.
Both FOR...NEXT and WHILE...WEND statements can be nested up to 10 levels.
EXIT
Purpose
To provide an alternative exit for looping structures, such as FOR...NEXT and
WHILE...WEND statements.
Syntax
EXIT
Remarks
EXIT can appear anywhere within the loop statement.
Example
DataCount% = TRANSACTION_COUNT
FOR Counter% = 1 TO DataCount%
Data$ = GET_TRANSACTION_DATA$(Counter%)
HostCommand$ = READ_COM$(1)
IF HostCommand$ = "STOP" THEN EXIT
WRITE_COM(1,Data$)
NEXT
FOR ... NEXT
Purpose
To repeat the execution of a block of statements for a specified number of times.
Syntax
FOR N% = startvalue TO endvalue [STEP step]
[Statement Block]
NEXT [N%]
Remarks
"N%" is an integer variable to be used as a loop counter.
"startvalue" is a numeric expression which is the initial value for the loop counter.
"endvalue" is a numeric expression which is the final value for the loop counter.
"step" is a numeric expression to be used as an increment/decrement of the loop
counter The "step" is 1 by default.
If the loop counter ever reaches or beyond the endvalue, the program execution
continues to the statement following the NEXT statement. The Statement block will
be executed again otherwise.
38
BASIC Programming Guide For Use with CipherLab BASIC Compiler
Example
DataCount% = TRANSACTION_COUNT
FOR Counter% = 1 TO DataCount%
Data$ = GET_TRANSACTION_DATA$(Counter%)
WRITE_COM(1,Data$)
NEXT
WHILE ... WEND
Purpose
To repeat the execution of a block of statements while a certain condition is TRUE.
Syntax
WHILE condition
[Statement Block]
WEND
Remarks
If the "condition" is true, loop statements are executed until the WEND statement is
encountered. Then the program execution returns to the WHILE statement and
checks the condition again. If it is still true, the process will be repeated. Otherwise,
the execution continues with the statement following the WEND statement.
Example
WHILE TRANSACTION_COUNT > 0
Data$ = GET_TRANSACTION_DATA$(1)
WRITE_COM(1,Data$)
DEL_TRANSACTION_DATA(1)
WEND
Chapter 5 BASIC Commands
39
5.4 Commands for String Processing
This section describes BASIC commands used to manipulate sequences of ASCII
characters known as strings. In CipherLab BASIC, strings are always variable length, from
null to a maximum of 250.
5.4.1 Combining Strings
Two strings can be combined with the plus operator " +". The string following the plus
operator is appended to the string preceding the plus operator. For example,
...
Data$ = DATE$ + TIME$ + EmployeeID$
SAVE_TRANSACTION(Data$)
...
5.4.2 Comparing Strings
Two strings can be compared with the relational operators, see section 4.3.3. A single
character is greater than another character if its ASCII value is greater. For example, the
ASCII value of the letter "B" is greater than the ASCII value of the letter "A", so the
expression "B" > "A" is true.
When comparing two strings, BASIC looks at the ASCII values of corresponding
characters. The first character where the two strings differ determines the alphabetical order
of the strings. For example, the strings "aaabaa" and "aaaaaaaa" are the same up to the
fourth character in each, "b" and "a". Since the ASCII value of "b" is larger than that of "a",
the expression "aaabaa" > "aaaaaaaa" is true.
If there is no difference between the corresponding characters of two strings and they are
the same length, then the two strings are equal. If there is no difference between the
corresponding characters of two strings, but one of the strings is longer, the longer string is
greater than the shorter string. For example, "abc" = "abc" and "aaaaaaaa" > "aaaaa" are
both true expressions.
Leading and trailing blank spaces are significant in comparing strings. For example, the
string " abc" is less than the string "abc" since a blank space is less than an "a"; on the other
hand, the string "abc " is greater than the string "abc".
40
BASIC Programming Guide For Use with CipherLab BASIC Compiler
5.4.3 Getting the Length of a String
LEN
Purpose
To return the length of a string.
Syntax
A% = LEN(X$)
Remarks
"A%" is an integer variable to be assigned to the result.
"X$" may be a string variable, string expression, or string constant.
Note that non-printing characters and blanks are counted.
Example
String1$ = "abcde "
A% = LEN(String1$)
'A% = 6, including the blank
5.4.4 Searching for Strings
Searching for a string inside another one is one of the most common string-processing tasks.
INSTR is provided for this task.
INSTR
Purpose
To search if one string exists inside another one.
Syntax
A% = INSTR([N%,] X$, Y$)
Remarks
"A%" is an integer variable to be assigned to the result.
"N%" is a numeric expression in the range of 1 to 255. Optional offset N sets the
position for starting the search.
"X$", "Y$" may be a string variable, string expression, or string constant.
If Y$ is found in X$, INSTR returns the position of the first occurrence of Y$ in X$,
from the starting point.
If N is larger than the length of X$ or if X$ is null, of if Y$ cannot be found, INSTR
returns 0.
If Y$ is null, INSTR returns N (or 1 if N is not specified).
Example
String1$ = "11025John Thomas, Accounting Manager"
String2$ = ","
EmployeeName$ = MID$(String1$, 6, INSTR(String1$, String2$) - 6)
' the employee's name starts at the sixth character
Chapter 5 BASIC Commands
41
5.4.5 Retrieving Part of Strings
Several commands are provided to take strings apart by returning pieces of a string, from
the left side, or the right side, or the middle of the target string.
LEFT$
Purpose
To retrieve a given number of characters from the left side of the target string.
Syntax
A$ = LEFT$(X$, N%)
Remarks
"A$" is a string variable to be assigned to the result.
"X$" may be a string variable, string expression, or string constant.
"N%" is a numeric expression in the range of 0 to 255.
If N is larger than the length of X$, the entire string (X$) is returned.
If N is zero, the null string (with lenght 0) is returned.
Example
String1$ = "11025John Thomas, Accounting Manager"
EmployeeID$ = LEFT$(String1$, 5)
MID$
Purpose
To retrieve a given number of characters from anywhere of the target string.
Syntax
A$ = MID$(X$, N%[, M%])
Remarks
"A$" is a string variable to be assigned to the result.
"X$" may be a string variable, string expression, or string constant.
"N%" and "M%" are numeric expressions in the range of 0 to 255.
This command returns a string of length M characters from X$ beginning with the
Nth character.
If M is omitted, or if there are fewer than M characters to the right of the Nth
character, all the characters beginning with the Nth character to the rightmost are
returned.
If M is equal to zero, or if N is greater than the length of X$, then MID$ returns a
null string.
Example
String1$ = "11025John Thomas, Accounting Manager"
String2$ = ","
EmployeeName$ = MID$(String1$, 6, INSTR(String1$, String2$) - 6)
' the employee's name starts at the sixth character
42
BASIC Programming Guide For Use with CipherLab BASIC Compiler
RIGHT$
Purpose
To retrieve a given number of characters from the right side of the target string.
Syntax
A$ = RIGHT$(X$, N%)
Remarks
"A$" is a string variable to be assigned to the result.
"X$" may be a string variable, string expression, or string constant.
"N%" is a numeric expression in the range of 0 to 255.
If N is larger than the length of X$, the entire string is returned.
If N is zero, the null string (with length 0) is returned.
Example
String1$ = "11025John Thomas, Accounting Manager"
String2$ = ","
Title$ = RIGHT$(String1$, LEN(String1$) - INSTR(String1$, String2$))
TRIM_LEFT$
Purpose
To return a copy of a string with leading blank spaces stripped away.
Syntax
A$ = TRIM_LEFT$(X$)
Remarks
"A$" is a string variable to be assigned to the result.
"X$" is a string variable that may contain some space characters at the beginning.
Example
S1$ = TRIM_LEFT$(" Hello World!")
' S1$ = "Hello World!"
TRIM_RIGHT$
Purpose
To return a copy of a string with trailing blank spaces stripped away.
Syntax
A$ = TRIM_RIGHT$(X$)
Remarks
"A$" is a string variable to be assigned to the result.
"X$" is a string variable that may contain some space characters at the end.
Example
S2$ = TRIM_RIGHT$("Hello World! ") ' S2$ = "Hello World!"
Chapter 5 BASIC Commands
43
5.4.6 Converting for Strings
Several commands are available for converting strings to uppercase or lowercase letters, as
well as converting strings to numbers, and vice versa.
ASC
Purpose
To return the decimal value for the ASCII code for the first character of a given
string.
Syntax
A% = ASC(X$)
Remarks
"A%" is an integer variable to be assigned to the result.
"X$" is a string variable, consisting of characters.
Example
A% = ASC("John Thomas")
Purpose
To return the character for a given ASCII value.
Syntax
A$ = CHR$(N%)
Remarks
"A$" is a string variable to be assigned to the result.
' A% = 74
CHR$
"N%" is a numeric expression in the range of 0 to 255.
Example
A$ = CHR$(65)
Purpose
To return a string that represents the hexadecimal value (base 16) of the decimal
argument.
Syntax
A$ = HEX$(N%)
Remarks
"A$" is a string variable to be assigned to the result.
' A$ = "A"
HEX$
"N%" is a numeric expression in the range of 0 to 2,147,483,647; it is rounded to an
integer before HEX$(N%) is evaluated.
Example
A$ = HEX$(140)
' A$ = "8C"
LCASE$
Purpose
To return a copy of a string in which all uppercase letters will be converted to
lowercase letters.
Syntax
A$ = LCASE$(X$)
44
BASIC Programming Guide For Use with CipherLab BASIC Compiler
Remarks
"A$" is a string variable to be assigned to the result.
"X$" may be a string variable, string expression, or string constant.
Example
String1$ = "John Thomas"
String2$ = LCASE$(String1$)
' String2$ = "john thomas"
OCT$
Purpose
To convert a decimal numeric expression to a string that represents the value of the
numeric expression in octal notation.
Syntax
A$ = OCT$(N%)
Remarks
"A$" is a string variable to be assigned to the result.
"N%" is a numeric expression in the range 0 to 2,147,483,647; it is rounded to an
integer before OCT$(N%) is evaluated.
Example
A$ = OCT$(24)
Purpose
To convert a numeric expression to a string.
Syntax
A$ = STR$(N%)
Remarks
"A$" is a string variable to be assigned to the result.
' A$ = "30"
STR$
"N%" is a numeric expression.
Example
String$ = STR$(123)
UCASE$
Purpose
To return a copy of a string in which all lowercase letters will be converted to
uppercase letters.
Syntax
A$ = UCASE$(X$)
Remarks
"A$" is a string variable to be assigned to the result.
"X$" may be a string variable, string expression, or string constant.
Example
String1$ = "John Thomas"
String2$ = UCASE$(String1$)
' String2$ = "JOHN THOMAS"
VAL
Purpose
To return the numeric value of a string expression in long integer form.
Syntax
A& = VAL$(X$)
Chapter 5 BASIC Commands
Remarks
45
"A&" is an integer or long integer variable to be assigned to the result.
"X$" is a string that includes numeric characters. If the first character is not
numeric, this command returns 0. The command VAL will strip leading blanks,
tabs, and linefeeds from the argument string. The return numeric value is in the
range of - 2,147,483,648 to 2,147,483,647.
Example
ON HOUR_SHARP GOSUB
OnHourAlarm
...
OnHourAlarm:
Hour% = VAL(LEFT$(TIME$,2))
FOR Counter% = 1 TO Hour%
BEEP(800,50)
WAIT(200)
NEXT
RETURN
VALR
Purpose
To convert a string expression to a real number.
Syntax
A! = VALR(X$)
Remarks
"A!" is a real number variable to be assigned to the result.
"X$" is a string that includes numeric characters. The precision of the converted
result is governed by the command SET_PRECISION.
Example
A! = VALR("123.45")
PRINT "A = ", A!
...
REM A = 123.45
46
BASIC Programming Guide For Use with CipherLab BASIC Compiler
5.4.7 Creating Strings of Repeating Characters
STRING$
Purpose
To return a string containing the specified number of the requested character.
Syntax
A$ = STRING$(N%, J%)
A$ = STRING$(N%, X$)
Remarks
"A$" is a string variable to be assigned to the result.
"N%" is a numeric expression in the range of 0 to 255, indicating the number of a
character.
"J%" is a numeric expression in the range of 0 to 255, indicating the ASCII code of
a character.
"X$" may be a string variable or string constant.
Example
IDX_LENGTH% = 20
Data$ = Name$ + STRING$(IDX_LENGTH% - LEN(Name$)," ")
ADD_RECORD$(1,Data$)
' padding with space if the length of Name$ is less than IDX_LENGTH%
Chapter 5 BASIC Commands
47
5.5 Commands for Event Trapping
An event is an action recognized by the terminal, such as a function keystroke is detected
(KEY event), a signal is received from the serial port (COM event), and so on. There are
two ways to detect the occurrence of an event and reroute the program control to an
appropriate subroutine: polling and trapping.
With event polling, the BASIC program explicitly checks for any event that happens at a
particular point in its execution. For example, the following statements cause the program
to loop back and forth until any key being pressed by user:
Loop:
KeyData$ = INKEY$
IF KeyData$ = "" THEN GOTO Loop
...
Polling is useful when the occurrence of an event is predictable in the flow of the program.
But if the time of the occurrence of an event is not predictable, trapping becomes the better
alternative because the program will not be paused by the looping statements. For example,
the following statements cause the program rerouting to the Key_F1 subroutine when the
key F1 is pressed at anytime.
ON KEY(1) GOSUB Key_F1
...
Key_F1:
...
This section describes a variety of events that the CipherLab BASIC can trap as well as the
related commands.
5.5.1 Event Triggers
Below are 10 different events that can be trapped.
1. COM Event: a signal is received from the COM port.
48
BASIC Programming Guide For Use with CipherLab BASIC Compiler
2. ESC Event: the ESC key is pressed.
3. HOUR_SHARP Event: the system time is on the hour.
4. KEY Event: a function key is pressed.
5. MINUTE_SHARP Event: the system time is on the minute.
6. READER Event: a barcode data is decoded.
7. TCPIP Event: any data packet is received via TCP/IP.
8. TIMER Event: a time-out condition of an activated timer.
9. TOUCHSCREEN Event: a touchable item is activated by selecting.
10. POWER_ON Event: the POWER key is pressed after powering off the terminal.
OFF ALL
Purpose
To terminate all the event triggers.
Syntax
OFF ALL
Remarks
To resume the event trigger, call ON event GOSUB...
Example
ON READER(1) GOSUB BcrData_1
ON READER(2) GOSUB BcrData_2
ON KEY(1) GOSUB KeyData_1
...
IF BACKUP_BATTERY < BATTERY_LOW% THEN
OFF ALL
BEEP(2000,30)
CLS
PRINT "Backup Battery needs to be replaced!"
Loop:
GOTO Loop
END IF
...
See Also
OFF COM, OFF ESC, OFF HOUR_SHARP, OFF KEY, OFF MINUTE_SHARP,
OFF READER, OFF TCPIP, OFF TIMER, OFF TOUCHSCREEN
OFF COM
Purpose
To terminate "COM Event Trigger".
Syntax
OFF COM(N%)
Chapter 5 BASIC Commands
Remarks
To resume the event trigger, call ON COM... GOSUB...
"N%" is an integer variable, indicating the COM port.
Example
N%
Available on terminals:
1~2
711, 8100, 8000, 8300
1~4
8500
ON COM(1) GOSUB HostCommand
...
HostCommand_1:
OFF COM(1) REM disable the trapping during data processing.
...
ON COM(1) GOSUB HostCommand
RETURN
See Also
ON COM... GOSUB...
OFF ESC
Purpose
To terminate "ESC Event Trigger".
Syntax
OFF ESC
Remarks
To resume the event trigger, call ON ESC GOSUB...
Example
ON ESC GOSUB Key_Esc
...
Key_Esc:
OFF ESC
...
ON ESC GOSUB Key_Esc
RETURN
See Also
ON ESC GOSUB...
OFF HOUR_SHARP
Purpose
To terminate "HOUR_SHARP Event Trigger".
Syntax
OFF HOUR_SHARP
Remarks
To resume the event trigger, call ON HOUR_SHARP GOSUB...
Example
OFF HOUR_SHARP
See Also
ON HOUR_SHARP GOSUB...
49
50
BASIC Programming Guide For Use with CipherLab BASIC Compiler
OFF KEY
Purpose
To terminate "FUNCTION KEY Event Trigger".
Syntax
OFF KEY(number%)
Remarks
To resume the event trigger, call ON KEY... GOSUB...
"number%" is an integer variable in the range of 1 to 12 (1 to 9 for 711), indicating
a function key of the keypad.
Example
ON KEY(1) GOSUB On_Shift
ON KEY(2) GOSUB Off_Shift
...
On_Shift:
OFF KEY
Mode$ = "IN"
GOSUB Process
ON KEY(1) GOSUB On_Shift
RETURN
...
See Also
ON KEY... GOSUB...
OFF MINUTE_SHARP
Purpose
To terminate "MINUTE_SHARP Event Trigger".
Syntax
OFF MINUTE_SHARP
Remarks
To resume the event trigger, call ON MINUTE_SHARP GOSUB...
Example
OFF MINUTE_SHARP
See Also
ON MINUTE_SHARP GOSUB...
OFF READER
Purpose
To terminate "READER Event Trigger".
Syntax
OFF READER(N%)
Remarks
To resume the event trigger, call ON READER... GOSUB...
"N%" is an integer variable, indicating the reader port (usually 1 for portable
terminals).
Example
ON READER(1) GOSUB BcrData_1
Chapter 5 BASIC Commands
51
...
BcrData_1:
OFF READER(1)
BEEP(2000,5)
Data$ = GET_READER_DATA$(1)
CLS
PRINT Data$
...
See Also
ON READER... GOSUB...
OFF TCPIP
8000, 8300, 8500
Purpose
To terminate "TCP/IP Event Trigger".
Syntax
OFF TCPIP
Remarks
To resume the event trigger, call ON TCPIP GOSUB...
Example
OFF TCPIP
See Also
ON TCPIP GOSUB...
OFF TIMER
Purpose
To terminate "TIMER Event Trigger".
Syntax
OFF TIMER(N%)
Remarks
To resume the event trigger, call ON TIMER... GOSUB...
"N%" is an integer variable in the range of 1 to 5, indicating the timer ID.
Example
ON TIMER(1,200) GOSUB ClearScreen
' TIMER(1) = 2 sec
...
ClearScreen:
OFF TIMER(1)
CLS
RETURN
See Also
ON TIMER... GOSUB...
OFF TOUCHSCREEN
Purpose
To terminate "TOUCHSCREEN Event Trigger".
Syntax
OFF TOUCHSCREEN
8500
52
BASIC Programming Guide For Use with CipherLab BASIC Compiler
Remarks
To resume the event trigger, call ON TOUCHSCREEN GOSUB...
Example
OFF TOUCHSCREEN
See Also
ON TOUCHSCREEN GOSUB...
ON COM ... GOSUB ...
Purpose
To activate "COM Event Trigger".
Syntax
ON COM(N%) GOSUB SubName|SubLabel
Remarks
When data is received from the COM port, a specific subroutine will be executed.
"N%" is an integer variable, indicating the COM port.
N%
Available on terminals:
1~2
711, 8100, 8000, 8300
1~4
8500
"SubName|SubLabel" is the name or line label of a subroutine.
Example
ON COM(1) GOSUB HostCommand
...
HostCommand_1:
OFF COM(1)
...
ON COM(1) GOSUB HostCommand
RETURN
See Also
Communication Ports commands, OFF COM
ON ESC GOSUB ...
Purpose
To activate "ESC Event Trigger".
Syntax
ON ESC GOSUB SubName|SubLabel
Remarks
When the ESC key is pressed, a specific subroutine will be executed.
"SubName|SubLabel" is the name or line label of a subroutine.
Example
ON ESC GOSUB Key_Esc
...
Key_Esc:
OFF ESC
...
ON ESC GOSUB Key_Esc
Chapter 5 BASIC Commands
53
RETURN
See Also
Keypad commands, OFF ESC
ON HOUR_SHARP GOSUB ...
Purpose
To activate "HOUR_SHARP Event Trigger".
Syntax
ON HOUR_SHARP GOSUB SubName|SubLabel
Remarks
When the system time is on the hour, a specific subroutine will be executed.
"SubName|SubLabel" is the name or line label of a subroutine.
Example
...
ON HOUR_SHARP GOSUB OnHourAlarm
...
OnHourAlarm:
CurrentTime$ = TIME$
Hour% = VAL(LEFT$(CurrentTime$,2))
FOR I = 1 TO Hour%
BEEP(800,10,0,10)
WAIT(100)
NEXT
RETURN
See Also
Calendar & Timer commands, OFF HOUR_SHARP
ON KEY ... GOSUB ...
Purpose
To activate "FUNCTION KEY Event Trigger".
Syntax
ON KEY(number%) GOSUB SubName|SubLabel
Remarks
When a function key is pressed, a specific subroutine will be executed.
"number%" is an integer variable in the range of 1 to 12 (1 to 9 for 711), indicating
a function key of the keypad.
"SubName|SubLabel" is the name or line label of a subroutine.
Example
ON KEY(1) GOSUB On_Shift
ON KEY(2) GOSUB Off_Shift
...
On_Shift:
Mode$ = "IN"
RETURN
54
BASIC Programming Guide For Use with CipherLab BASIC Compiler
Off_Shift:
Mode$ = "OUT"
RETURN
See Also
Keypad commands, OFF KEY
ON MINUTE_SHARP GOSUB ...
Purpose
To activate "MINUTE_SHARP Event Trigger".
Syntax
ON MINUTE_SHARP GOSUB SubName|SubLabel
Remarks
When the system time is on the minute, a specific subroutine will be executed.
"SubName|SubLabel" is the name or line label of a subroutine.
Example
...
ON MINUTE_SHARP GOSUB CheckTime
...
CheckTime:
CurrentTime$ = TIME$
Hour% = VAL(MID$(CurrentTime$,3,2))
IF Hour% = 30 THEN GOSUB HalfHourAlarm
RETURN
...
HalfHourAlarm:
BEEP(800,30)
WAIT(100)
RETURN
See Also
Calendar & Timer commands, OFF MINUTE_SHARP
ON POWER_ON GOSUB ...
Purpose
To activate "POWER_ON Event Trigger".
Syntax
ON POWER_ON GOSUB SubName|SubLabel
Remarks
When the POWER key is pressed again after powering off the terminal, a specific
subroutine will be executed.
"SubName|SubLabel" is the name or line label of a subroutine.
Example
ON POWER_ON GOSUB RESUME_ON
MAIN1:
…
Chapter 5 BASIC Commands
55
ON POWER_ON GOSUB RESUME_ON
MAIN1:
…
LOCATE 8, 1
PWR_INDEX1&=PWR_INDEX&
PRINT “[POWER ON]”, PWR_INDEX1&
MAIN2:
IF PWR_INDEX& > PWR_INDEX1& THEN
GOTO MAIN1
END IF
…
GOTO MAIN2
RESUME_ON:
PWR_INDEX&=PWR_INDEX&+1
WAIT (100)
RETURN
See Also
ON READER ... GOSUB ...
Purpose
To activate "READER Event Trigger".
Syntax
ON READER(N%) GOSUB SubName|SubLabel
Remarks
When data is received from the reader port, a specific subroutine will be executed.
"N%" is an integer variable, indicating the reader port (usually 1 for portable
terminals).
"SubName|SubLabel" is the name or line label of a subroutine.
Example
ON READER(1) GOSUB BcrData_1
...
BcrData_1:
OFF READER(1)
BEEP(2000,5)
Data$ = GET_READER_DATA$(1)
...
See Also
General Reader commands, OFF READER
56
BASIC Programming Guide For Use with CipherLab BASIC Compiler
ON TCPIP GOSUB...
8000, 8300, 8500
Purpose
To activate "TCP/IP Event Trigger".
Syntax
ON TCPIP GOSUB SubLabel
Remarks
When data is received from any TCP/IP connection or some error is taking place, a
specific subroutine will be executed.
"SubLabel" is the line label of a subroutine.
The GET_TCPIP_MESSAGE routine is used to identify the status of TCP/IP
connections.
Example
ON TCPIP GOSUB TCPIP_Trigger
...
TCPIP_Trigger:
MSG = GET_TCPIP_MESSAGE
...
See Also
OFF TCPIP, TCP/IP Networking commands
ON TIMER ... GOSUB ...
Purpose
To activate "TIMER Event Trigger".
Syntax
ON TIMER(N%, duration%) GOSUB SubName|SubLabel
Remarks
When the system runs out of the time duration specified by user, a specific
subroutine will be executed.
Up to five timers can be set in a BASIC program. Be sure the timer IDs are
different. Otherwise, the latter created timer will overwrite the former one.
"N%" is an integer variable in the range of 1 to 5, indicating the ordinal number of
timer.
"duration%" is an integer variable, indicating a specified period of time in units of
10 ms.
"SubName|SubLabel" is the name or line label of a subroutine.
Example
ON TIMER(1, 200) GOSUB ClearScreen
...
ClearScreen:
OFF TIMER(1)
CLS
RETURN
See Also
Calendar & Timer commands, OFF TIMER
' TIMER(1) = 2 sec
Chapter 5 BASIC Commands
57
ON TOUCHSCREEN GOSUB...
8500
Purpose
To activate "TOUCHSCREEN Event Trigger".
Syntax
ON TOUCHSCREEN GOSUB SubName|SubLabel {, SubName|SubLabel}
Remarks
When the touch screen is enabled, a specific subroutine will be executed.
"SubName|SubLabel" is the name or line label of a subroutine.
Example
ON TOUCHSCREEN GOSUB CHECK_FUN
...
CHECK_FUN:
NO% = GET_SCREENITEM
RETURN
See Also
OFF TOUCHSCREEN, Touch Screen commands
5.5.2 Lock and Unlock
Event trapping could be nested. If the event triggers are activated in a BASIC program, it is
possible that an event-driven subroutine can be interrupted by any upcoming events.
Normally, the new event would be processed first. In some cases where we don't want the
event-driven subroutine to be interrupted by other events, the commands LOCK and
UNLOCK can be used to hold off new events.
LOCK
Purpose
To hold all the activated event triggers until they are released by UNLOCK.
Syntax
LOCK
Remarks
This command can prevent nesting of event triggers. All the activated event triggers
will be disabled until UNLOCK is called.
Example
ON READER(1) GOSUB BcrData_1
ON READER(2) GOSUB BcrData_2
...
BcrData_1:
LOCK
BEEP(2000,5)
Data$ = GET_READER_DATA$(1)
GOSUB AddNewData
UNLOCK
RETURN
58
BASIC Programming Guide For Use with CipherLab BASIC Compiler
...
BcrData_2:
BEEP(2000,5)
Data$ = GET_READER_DATA$(2)
GOSUB AddNewData
RETURN
In this example, the BASIC program can trap the READER(1) and READER(2)
events and reroute to the subroutines BcrData_1 and BcrData_2 respectively. In
BcrData_1, the command LOCK disables all the activated event triggers so that the
subroutine BcrData_1 will not be interrupted by a new upcoming READER(1)
and/or READER(2) event. On the other hand, since LOCK is not called in
BcrData_2, any new coming READER(1) and READER(2) event will interrupt the
ongoing BcrData_2, and therefore, may affect the expected results.
See Also
UNLOCK
UNLOCK
Purpose
To release all the activated event triggers held by LOCK.
Syntax
UNLOCK
Remarks
This command resumes event processing.
Example
Refer to the command LOCK.
See Also
LOCK
Chapter 5 BASIC Commands
59
5.6 System Commands
This section describes the system commands, such as the commands to change the CPU
running speed, get the device ID, and/or restart the system.
5.6.1 General
AUTO_OFF
Purpose
To set a specified period of time for the system to automatically shut down user's
program as long as there is no operation in the interval.
Syntax
AUTO_OFF(N%)
Remarks
"N%" is an integer variable, indicating a specified period of time in units of 1
second. If the time interval is set to zero, this function will be disabled.
Example
AUTO_OFF(30)
' auto off after 30 seconds
AUTO_OFF(0)
' disable the AUTO OFF function
See Also
POWER_ON, RESTART
CHANGE_SPEED
711, 8100, 8000, 8300
Purpose
To change the CPU running speed.
Syntax
CHANGE_SPEED(N%)
Remarks
When the system is not heavy loaded, e.g. waiting for data input, it is suggested to
change the CPU running speed to a lower level to reduce the power consumption.
"N%" is an integer variable in the range of 1 to 5, indicating the CPU running speed.
Example
N%
Meaning
1
Sixteenth speed
2
Eighth speed
3
Quarter speed
4
Half speed
5
Full speed
CHANGE_SPEED(3)
60
BASIC Programming Guide For Use with CipherLab BASIC Compiler
DEVICE_ID$
Purpose
To get the serial number of the terminal.
Syntax
A$ = DEVICE_ID$
Remarks
This command is to be replaced by SYSTEM_INFORMATION$.
"A$" is a string variable to be assigned to the result. That is, a string of the terminal's
serial number will be returned.
Such information can be checked in the System Menu> Information> S/N.
Example
PRINT "S/N:", DEVICE_ID$
GET_LANGUAGE
8000, 8300, 8500
Purpose
To retrieve the font/language setting.
Syntax
A% = GET_LANGUAGE
Remarks
"A%" is an integer variable to be assigned to the result.
A%
Meaning
Code Page
0
System font
---
1
Traditional Chinese font
Big-5, 16x16 dots
2
Simplified Chinese font
GB code, 12x16 dots
3
Simplified Chinese font
GB code, 16x16 dots
4
Korean font
---
5
Japanese font
---
6
Hebrew font
---
7
Polish font
---
8
Russian font
---
9
Traditional Chinese font
Big-5, 12x12 dots
10
Reserved
---
11
Simplified Chinese font
GB code, 12x12 dots
12
Japanese font
12x12 dots
16
English
MS-DOS Code page 437
17
Canadian French
MS-DOS Code page 863
18
Hebrew
MS-DOS Code page 862
19
Multilingual Latin I
MS-DOS Code page 850
20
Nordic
MS-DOS Code page 865
21
Portuguese
MS-DOS Code page 860
22
Cyrillic (Russian)
Windows Code page 1251
Chapter 5 BASIC Commands
61
23
Latin II (Slavic)
MS-DOS Code page 852
24
Central European, Latin II (Polish)
Windows Code page 1250
25
Turkish
MS-DOS Code page 857
26
Latin II (Slovak)
---
27
Windows 1250
---
28
ISO-28592 (Latin 2)
ISO 8859-2
29
IBM-LATIN II
---
30
Greek
MS-DOS Code page 737
31
Latin I
Windows Code page 1252
32
Greek
Windows Code page 1253
Example
language% = GET_LANGUAGE
See Also
SET_LANGUAGE
GET_TARGET_MACHINE$
Purpose
To get the model number of the target terminal.
Syntax
A$ = GET_TARGET_MACHINE$
Remarks
"A$" is a string variable to be assigned to the result. That is, a string of the terminal's
model number will be returned.
Example
A$ = GET_TARGET_MACHINE
IF (A$ = "711") THEN
...
ELSE IF (A$ = "8000") THEN
...
ELSE IF (A$ = "8300") THEN
...
END IF
MENU
Purpose
To create a menu.
Syntax
A% = MENU(Item$)
Remarks
"A%" is an integer variable to be assigned to the result.
It is the ordinal number of the menu item that user has selected. If the ESC key is
pressed to cancel the operation, it will return 0.
"Item$" is a string variable, indicating the menu items that are separated and ended
by carriage return (CR, 0x0d).
62
BASIC Programming Guide For Use with CipherLab BASIC Compiler
This command lets user select an item by using (1) the UP/DOWN arrow keys, and
then the ENTER key to confirm the selection, or (2) the shortcut keys.
Note that the following features are for the 8000/8300/8500 series only Shortcut key: & (It is restricted to only one character next to &.)
Menu title: @ (The title can be put anywhere in the menu string.)
Display the Up/Down arrow icons
Example
Below is an illustrative example:
MENU_STR$ = "1 INFORMATION" + CHR$(13)
MENU_STR$ = MENU_STR$ + "@SYSTEM MENU" + CHR$(13)
MENU_STR$ = MENU_STR$ + "&2 SETTINGS" + CHR$(13)
MENU_STR$ = MENU_STR$ + "&3 TESTS" + CHR$(13)
MENU_STR$ = MENU_STR$ + "4 LOAD PROGRAM" + CHR$(13)
MENU_STR$ = MENU_STR$ + "&5 BLUETOOTH MENU" + CHR$(13)
...
S% = MENU(MENU_STR$)
...
POWER_ON
Purpose
To determine whether to restart or resume the program upon powering on.
Syntax
POWER_ON(N%)
Remarks
"N%" can be 0 or 1.
N%
Meaning
0
Resume
1
Restart
Example
POWER_ON(0)
See Also
AUTO_OFF, RESTART
' set to resume mode
Chapter 5 BASIC Commands
63
RESTART
Purpose
To restart the system.
Syntax
RESTART
Remarks
This command will terminate the execution of the BASIC program and restart it.
Example
HostCommand$ = READ_COM$(1)
...
IF HostCommand$ = "RESTART" THEN
RESTART
ELSE
...
See Also
AUTO_OFF, POWER_ON
SET_LANGUAGE
8000, 8300, 8500
Purpose
To select which language is to be used for the multi-language font file.
Syntax
SET_LANGUAGE(N%)
Remarks
Note that this command will fail if the multi-language font file does not exist.
"N%" is an integer variable in the range of 16 to 32.
N%
Meaning
Code Page
16
English
MS-DOS Code page 437
17
Canadian French
MS-DOS Code page 863
18
Hebrew
MS-DOS Code page 862
19
Multilingual Latin I
MS-DOS Code page 850
20
Nordic
MS-DOS Code page 865
21
Portuguese
MS-DOS Code page 860
22
Cyrillic (Russian)
Windows Code page 1251
23
Latin II (Slavic)
MS-DOS Code page 852
24
Central European, Latin II (Polish)
Windows Code page 1250
25
Turkish
MS-DOS Code page 857
26
Latin II (Slovak)
---
27
Windows 1250
Windows 1250
28
ISO-28592 (Latin 2)
ISO-28592 (Latin 2)
29
IBM-LATIN II
---
64
BASIC Programming Guide For Use with CipherLab BASIC Compiler
30
Greek
MS-DOS Code page 737
31
Latin I
Windows Code page 1252
32
Greek
Windows Code page 1253
Example
SET_LANGUAGE (17)
See Also
GET_LANGUAGE, SELECT_FONT
' select French
SYSTEM_INFORMATION$
Purpose
To collect information on components, either hardware or software.
Syntax
A$ = SYSTEM_INFORMATION$(index%)
Remarks
"A$" is a string variable to be assigned to the result.
"index%" is an integer variable, indicating a specific category of information.
Example
index%
Meaning
1
Library Version
: C library
2
BASIC Version
: BASIC runtime
3
Kernel Version
4
Hardware Version
5
Manufacture Date
6
Serial Number
7
Original Serial Number
8
Device Type
9
RFID Version
: modular components in hardware
LIBVER$=SYSTEM_INFORMATION$(1)
PRINT "Library :",LIBVER$
SYSTEM_PASSWORD
Purpose
To set the password protection for entering the System Menu.
Syntax
SYSTEM_PASSWORD(A$)
Remarks
"A$" is a string constant or variable, representing the password.
Example
SYSTEM_PASSWORD("12345")
VERSION
Purpose
To write version information to the system.
Chapter 5 BASIC Commands
Syntax
VERSION(A$)
Remarks
"A$" is a string variable, indicating program name, date, etc.
65
This command is used to write information of program version to the system. Such
information can be checked in the System Menu> Information> USR.
Note that this command must be on the first line of the program; otherwise, it will
be ignored. The string for version information cannot exceed 15 characters.
Example
VERSION("CipherBASIC 2.0") ...
5.6.2 Format of Device ID
Being one category of system information, the device type is displayed as "xxx0", where
each is a digit from 0 to 9. The last digit (“0”) is reserved for future use. It is also referred to
as “Device ID”.
Digits:
x
x
x
x
Types:
Reader Module
Wireless Module
Others:
Reserved
8000: Battery type
8100: Battery type
8300: CCD/Laser
8500: RFID module
8000 Series
Device Type
Meaning
0xxx
No reader
1xxx
CCD scan engine
2xxx
Laser scan engine
x0xx
No wireless module
x4xx
802.11b module
x5xx
Bluetooth module
x6xx
Acoustic coupler module
xx0x
2*AAA Alkaline battery
xx1x
Rechargeable Li-ion battery
66
BASIC Programming Guide For Use with CipherLab BASIC Compiler
8100 Series
Device Type
Meaning
0xxx
No reader
1xxx
CCD scan engine
2xxx
Laser scan engine
x0xx
No wireless module
x1xx
433 MHz module
x2xx
2.4 GHz module
xx0x
2*AAA Alkaline battery
xx1x
Rechargeable Li-ion battery
8300 Series
For hardware version 4.0, when the first digit is “2”, it may refer to CCD or Laser
scan engine. You will need to check the fourth digit: “1” for CCD, “0” for Laser.
Device Type
Meaning
0xxx
No reader
1xxx
CCD scan engine (Not applicable to H/W version 4.0)
2xxx
Laser scan engine
CCD or Laser scan engine (for H/W version 4.0)
4xxx
Long Range Laser scan engine
x0xx
No wireless module
x1xx
433 MHz module
x2xx
2.4 GHz module
x4xx
802.11b module
x5xx
Bluetooth module
x8xx
802.11b + Bluetooth
xx0x
No RFID
xx1x
RFID module
xxx0
None
xxx1
CCD scan engine* (for H/W version 4.0)
Chapter 5 BASIC Commands
8500 Series
Device Type
Meaning
0xxx
No reader
1xxx
CCD scan engine
2xxx
Laser scan engine
3xxx
2D scan engine
4xxx
Long Range Laser scan engine
5xxx
Extra Long Range Laser scan engine
x0xx
No wireless module
x3xx
GSM/GPRS + Bluetooth
x4xx
802.11b + Bluetooth
x5xx
Bluetooth module only
x7xx
802.11b + GSM/GPRS + Bluetooth
xx0x
No RFID
xx1x
RFID module
67
68
BASIC Programming Guide For Use with CipherLab BASIC Compiler
5.7 Barcode Reader Commands
The CipherLab terminals are able to read barcode data from the reader ports. This section
describes the BASIC commands that are related to the reader ports of the terminals.
Commands for triggering the READER event: OFF READER(1), ON READER(1) GOSUB...
The reader module supports a number of scan engines to meet your needs:
CCD scan engine
Laser scan engine
Long Range Laser scan engine
(available for the 8300/8500 series)
Extra Long Range Laser scan engine (available for the 8500 series only)
2D scan engine
(available for the 8500 series only)
Note: (1) CCD and Laser scan engines support 9 scan modes. (2) 2D and (Extra) Long
Range Laser scan engines support Laser and Aiming modes only.
5.7.1 General
To enable barcode decoding capability in the system, the first thing is that the scanner port
must be initialized by calling ENABLE READER(). After the scanner port is initialized, call
ON READER(1) GOSUB to trigger the barcode decoding event.
For CCD or Laser scan engine, the barcode decoding routines consist of 5 functions:
ENABLE READER(),GET_READER_DATA$(), DISABLE READER(), OFF READER(1), ON
READER(1) GOSUB.
For 2D or (Extra) Long Range Laser scan engine, it is necessary to enable new settings
by calling READER_CONFIG() before decoding.
Note: (1) When 2D barcode data exceeds 255 bytes, it cannot be received completely in a
string. You need to repeatedly call GET_READER_DATA$() to receive data until
there is no data left out. (2) Because the length of each record in the DBF file is
limited to 250 bytes, this index sequential file structure cannot be applied when
dealing with 2D data that is longer than 250 bytes.
DISABLE READER
Purpose
To disable the reader ports of the terminal.
Syntax
DISABLE READER(N%)
Remarks
"N%" is an integer variable, indicating the reader port; it is 1 for portable terminals.
Chapter 5 BASIC Commands
Example
DISABLE READER(1)
See Also
ENABLE READER, GET_READER_DATA$
69
ENABLE READER
Purpose
To enable the reader ports of the terminal.
Syntax
ENABLE READER(N%)
Remarks
"N%" is an integer variable, indicating the reader port; it is 1 for portable terminals.
The reader ports are disabled by default. To enable barcode decoding function, the
reader ports have to be enabled by ENABLE READER.
Example
ENABLE READER(1)
ON READER(1) GOSUB Bcr_1
...
Bcr_1:
Data$ = GET_READER_DATA$(1)
RETURN
See Also
DISABLE READER, GET_READER_DATA$, OFF READER, ON READER
GOSUB..., READER_CONFIG, READER_SETTING
GET_READER_DATA$
Purpose
To get data that is read from a specified reader port.
Syntax
A$ = GET_READER_DATA$(N%)
Remarks
Usually, ON READER GOSUB... is used to trap the event that data is transmitted to
the terminal through the reader port, and then GET_READER_DATA$ is used in a
subroutine to get the reader data.
"A$" is a string variable to be assigned to the result.
"N%" is an integer variable, indicating the reader port; it is 1 for portable terminals.
Example
ENABLE READER(1)
ON READER(1) GOSUB Bcr_1
...
Bcr_1:
Data$ = GET_READER_DATA$(1)
RETURN
See Also
DISABLE READER, ENABLE_READER, OFF READER, ON READER
GOSUB...
70
BASIC Programming Guide For Use with CipherLab BASIC Compiler
READER_CONFIG
8300, 8500
Purpose
To enable new settings on the scan engine after calling READER_SETTING().
Syntax
READER_CONFIG
Remarks
For new reader settings to take effect on any of the following readers, it is necessary
to call this routine.
2D scan engine (8500 only)
Long Range Laser scan engine (8300/8500)
Extra Long Range Laser scan engine (8500 only)
Example
See sample code below.
See Also
ENABLE_READER, READER_SETTING
Chapter 5 BASIC Commands
71
Sample Code
READER_SETTING(5,0)
READER_SETTING(132,0)
READER_CONFIG
' enable the new settings for 2D
' or Long Range Laser engines
ENABLE READER(1)
' enable the reader
ON READER(1) GOSUB G_Reader_Data
CLS
GOSUB MainScreen
MainLoop:
Data$ = GET_READER_DATA$(1)
IF LEN(Data$) <> 0 THEN
GOSUB MainScreen
END IF
WAIT(10)
GOTO MainLoop
' check if there are valid data
' for power saving
MainScreen:
CLS
CodeLEN% = LEN(Data$)
PRINT " Reader Testing"
PRINT "CODE TYPE:"
PRINT CodeType$
PRINT "Code Length:", CodeLEN%
PRINT "Count:", Count%
PRINT "Data:", Data$
GetMoreData:
Data$ = GET_READER_DATA$(1)
IF LEN(Data$) <> 0 THEN
' check if there are more data
' if yes, meaning totally the
' data is longer than 255 bytes
' (must be 2D code)
CodeLEN% = CodeLEN%+LEN(Data$)
PRINT Data$
GOTO GetMoreData
END IF
LOCATE 4,1
PRINT "Code Length:", CodeLEN%
RETURN
G_Reader_Data:
BEEP(4000,8)
Count% = Count% +
IF CODE_TYPE = 65
CodeType$ =
ELSE IF CODE_TYPE
CodeType$ =
ELSE IF CODE_TYPE
CodeType$ =
ELSE IF CODE_TYPE
CodeType$ =
1
THEN
"Code 39"
= 66 THEN
"Italian Pharmacode"
= 67 THEN
"CIP 39"
= 68 THEN
"Industrial 25"
72
BASIC Programming Guide For Use with CipherLab BASIC Compiler
ELSE IF CODE_TYPE
CodeType$ =
ELSE IF CODE_TYPE
CodeType$ =
ELSE IF CODE_TYPE
CodeType$ =
ELSE IF CODE_TYPE
CodeType$ =
ELSE IF CODE_TYPE
CodeType$ =
ELSE IF CODE_TYPE
CodeType$ =
ELSE IF CODE_TYPE
CodeType$ =
ELSE IF CODE_TYPE
CodeType$ =
ELSE IF CODE_TYPE
CodeType$ =
ELSE IF CODE_TYPE
CodeType$ =
ELSE IF CODE_TYPE
CodeType$ =
ELSE IF CODE_TYPE
CodeType$ =
ELSE IF CODE_TYPE
CodeType$ =
ELSE IF CODE_TYPE
CodeType$ =
ELSE IF CODE_TYPE
CodeType$ =
ELSE IF CODE_TYPE
CodeType$ =
ELSE IF CODE_TYPE
CodeType$ =
ELSE IF CODE_TYPE
CodeType$ =
ELSE IF CODE_TYPE
CodeType$ =
ELSE IF CODE_TYPE
CodeType$ =
END IF
RETURN
= 69 THEN
"Interleave 25"
= 70 THEN
"Matrix 25"
= 71 THEN
"Codabar"
= 72 THEN
"Code 93"
= 73 THEN
"Code 128"
= 74 THEN
"UPCE"
= 75 THEN
"UPCE with Addon 2"
= 76 THEN
"UPCE with Addon 5"
= 77 THEN
"EAN 8"
= 78 THEN
"EAN 8 with Addon 2"
= 79 THEN
"EAN 8 with Addon 5"
= 80 THEN
"EAN13"
= 81 THEN
"EAN13 with Addon 2"
= 82 THEN
"EAN13 with Addon 5"
= 83 THEN
"MSI"
= 84 THEN
"Plessey"
= 85 THEN
"EAN 128"
= 87 THEN
"GTIN"
= 90 THEN
"Telepen"
= 91 THEN
"RSS"
Chapter 5 BASIC Commands
5.7.2 Code Type
The following tables list the values of the CodeType variable.
Symbology Mapping Table I
Code Type
Symbology
Supported by Scan Engine
65 (A)
Code 39
CCD, Laser
66 (B)
Italian Pharmacode
CCD, Laser
67 (C)
CIP 39 (= French Pharmacode)
CCD, Laser
68 (D)
Industrial 25
CCD, Laser
69 (E)
Interleaved 25
CCD, Laser
70 (F)
Matrix 25
CCD, Laser
71 (G)
Codabar (NW7)
CCD, Laser
72 (H)
Code 93
CCD, Laser
73 (I)
Code 128
CCD, Laser
74 (J)
UPC-E0 / UPC-E1
CCD, Laser
75 (K)
UPC-E with Addon 2
CCD, Laser
76 (L)
UPC-E with Addon 5
CCD, Laser
77 (M)
EAN-8
CCD, Laser
78 (N)
EAN-8 with Addon 2
CCD, Laser
79 (O)
EAN-8 with Addon 5
CCD, Laser
80 (P)
EAN-13 / UPC-A
CCD, Laser
81 (Q)
EAN-13 with Addon 2
CCD, Laser
82 (R)
EAN-13 with Addon 5
CCD, Laser
83 (S)
MSI
CCD, Laser
84 (T)
Plessey
CCD, Laser
85 (U)
EAN-128
CCD, Laser
86 (V)
Reserved
---
87 (W)
Reserved
---
88 (X)
Reserved
---
89 (Y)
Reserved
---
90 (Z)
Telepen
CCD, Laser
73
74
BASIC Programming Guide For Use with CipherLab BASIC Compiler
91 ( [ )
RSS-14
CCD, Laser
92 ( \ )
Reserved
---
93 ( ] )
Reserved
---
Symbology Mapping Table II
Code Type
Symbology
Supported by Scan Engine
65 (A)
Code 39
2D, (Extra) Long Range Laser
66 (B)
Code 32 (= Italian Pharmacode)
2D, (Extra) Long Range Laser
67 (C)
N/A
---
68 (D)
N/A
---
69 (E)
Interleaved 25
2D, (Extra) Long Range Laser
70 (F)
N/A
---
71 (G)
Codabar (NW7)
2D, (Extra) Long Range Laser
72 (H)
Code 93
2D, (Extra) Long Range Laser
73 (I)
Code 128
2D, (Extra) Long Range Laser
74 (J)
UPC-E0
2D, (Extra) Long Range Laser
75 (K)
UPC-E with Addon 2
2D, (Extra) Long Range Laser
76 (L)
UPC-E with Addon 5
2D, (Extra) Long Range Laser
77 (M)
EAN-8
2D, (Extra) Long Range Laser
78 (N)
EAN-8 with Addon 2
2D, (Extra) Long Range Laser
79 (O)
EAN-8 with Addon 5
2D, (Extra) Long Range Laser
80 (P)
EAN-13
2D, (Extra) Long Range Laser
81 (Q)
EAN-13 with Addon 2
2D, (Extra) Long Range Laser
82 (R)
EAN-13 with Addon 5
2D, (Extra) Long Range Laser
83 (S)
MSI
2D, (Extra) Long Range Laser
84 (T)
N/A
---
85 (U)
EAN-128
2D, (Extra) Long Range Laser
86 (V)
Reserved
---
87 (W)
Reserved
---
88 (X)
Reserved
---
89 (Y)
Reserved
---
90 (Z)
Reserved
---
91 ( [ )
RSS-14
2D, (Extra) Long Range Laser
Chapter 5 BASIC Commands
75
92 ( \ )
RSS Limited
2D, (Extra) Long Range Laser
93 ( ] )
RSS Expanded
2D, (Extra) Long Range Laser
94 (^)
UPC-A
2D, (Extra) Long Range Laser
95 ( _ )
UPC-A Addon 2
2D, (Extra) Long Range Laser
96 (' )
UPC-A Addon 5
2D, (Extra) Long Range Laser
97 (a )
UPC-E1
2D, (Extra) Long Range Laser
98 (b )
UPC-E1 Addon 2
2D, (Extra) Long Range Laser
99 (c )
UPC-E1 Addon 5
2D, (Extra) Long Range Laser
100 (d )
TLC-39 (TCIF Linked Code 39)
2D
101 (e )
Trioptic (Code 39)
2D, (Extra) Long Range Laser
102 (f )
Bookland (EAN)
2D, (Extra) Long Range Laser
103 (g )
Code 11
2D
104 (h )
Code 39 Full ASCII
2D, (Extra) Long Range Laser
105 (i )
IATA* (25)
2D, (Extra) Long Range Laser
106 (j )
Discrete 25 (= Industrial 25)
2D, (Extra) Long Range Laser
107 (k )
PDF417
2D
108 (l )
MicroPDF417
2D
109 (m )
Data Matrix
2D
110 (n )
Maxicode
2D
111 (o )
QR Code
2D
112 (p )
US Postnet
2D
113 (q)
US Planet
2D
114 (r )
UK Postal
2D
115 (s )
Japan Postal
2D
116 (t )
Australian Postal
2D
117 (u )
Dutch Postal
2D
118 (v )
Composite Code
2D
119 (w )
Macro PDF417
2D
120 (x )
Macro MicroPDF417
2D
Note: IATA stands for International Air Transport Association, and this barcode type is
used on flight tickets.
76
BASIC Programming Guide For Use with CipherLab BASIC Compiler
CODE_TYPE
Purpose
To get the type of symbology being decoded upon a successful scan.
Syntax
A% = CODE_TYPE
Remarks
"A%" is an integer variable to be assigned to the result.
Refer to the above table for code types.
Example
...
CheckCodeType:
IF CODE_TYPE = 65 THEN
BcrType$ = "Code 39"
ELSE IF CODE_TYPE = 66 THEN
BcrType$ = "Italian Pharmacode"
...
END IF
PRINT "Code Type:", BcrType$
RETURN
See Also
GET_READER_SETTING, READER_SETTING
Chapter 5 BASIC Commands
77
5.7.3 Reader Settings
Refer to Appendix I for two tables that describe the details of the reader settings.
Table I is for the use of CCD or Laser scan engine.
Table II is for the use of 2D or (Extra) Long Range Laser scan engine.
Note: For 2D or (Extra) Long Range Laser scan engine, it is necessary to call
READER_CONFIG() to enable new settings.
For specific symbology parameters, refer to Appendix II.
For scanner parameters, refer to Appendix III.
GET_READER_SETTING
Purpose
To get the value of a specified parameter of the barcode settings.
Syntax
A% = GET_READER_SETTING(N%)
Remarks
"A%" is an integer variable to be assigned to the result.
"N%" is an integer variable, indicating the index number of a parameter. (cf.
READER_SETTING)
Example
Setting1% = GET_READER_SETTING(1)
IF Setting1% = 1 THEN
PRINT "Code 39 readability is enabled."
ELSE
PRINT "Code 39 readability is disabled."
END IF
See Also
CODE_TYPE, READER_SETTING
READER_SETTING
Purpose
To set the value of a specified parameter of the barcode settings.
Syntax
READER_SETTING(N1%, N2%)
Remarks
A set of parameters called barcode settings determines how the decoder will decode
the barcode data. The initial values of the barcode settings are given by the Barcode
Settings Window of the BASIC Compiler. User can reset the values by calling
READER_SETTING in a BASIC program. Refer to Appendix I/II/III for details of
the settings.
"N1%" is an integer variable, indicating the index number of a parameter.
"N2%" is an integer variable, indicating the value to be set to a parameter.
78
BASIC Programming Guide For Use with CipherLab BASIC Compiler
Example
READER_SETTING(1,1)
See Also
CODE_TYPE, GET_READER_SETTING, READER_CONFIG
' Code 39 readability is enabled.
Chapter 5 BASIC Commands
79
5.8 RFID Reader Commands
For the 8300/8500 series, it provides an optional RFID reader that can coexist with the
barcode reader, if there is any.
The RFID reader supports read/write operations depending on the tags. The supported
labels include ISO 15693, Icode®, ISO 14443A, and ISO 14443B.
Note: Before programming, you should study the specifications of RFID tags.
Currently, the performance of some tags has been confirmed, and the results are listed
below. ( for features supported)
Tag Type
UID only
Read Page
Write Page
-
-
-
-
SRF55V02P
-
-
SRF55V02S
-
-
SRF55V10P
-
-
TAG_ISO14443A
Mifare Standard 1K
Mifare Standard 4K
Mifare Ultralight
Mifare DESFire
Mifare S50
SLE44R35
SLE66R35
TAG_SR176
SRIX 4K
SR176
TAG_ISO15693
ICODE SLI
TI Tag-it HF-I
ICODE
ICODE
Note: These are the results found with RFID module
SYSTEM_INFORMATION$(9) to find out version information.
version
1.0;
use
80
BASIC Programming Guide For Use with CipherLab BASIC Compiler
5.8.1 Virtual COM
The algorithm for programming the RFID reader simply follows the commands related to
COM ports. The virtual COM port for RFID is defined as COM4. Thus,
OPEN_COM(4)
: enable the RFID module
CLOSE_COM(4)
: disable the RFID module
A$ = READ_COM$(4)
: read data from an RFID tag
WRITE_COM(4)
: write data to an RFID tag
ON COM (4) GOSUB... and OFF COM (4)
5.8.2 Data Format
Before reading and writing operations, the parameters of RFID must be specified.
The settings of format are described below.
Parameter
Description
TagType&
Bit 31 ~ 6
Bit 5
Reserved.
ISO
SR176
14443B
Bit 4
Bit 3
Bit 2
Bit 1
Bit 0
ISO
14443A
Icode
Tagit
ISO
15693
start%
Specify the starting byte of data for the read/write operation.
MaxLen% Read:
Specify the maximum data length (1~255).
Set 0 so that it reads UID data only.
Write: Reserved. (Any integer value is acceptable.)
When an RFID tag is read, the data string includes Tag Type, UID, and Data. The data
format for READ_COM$(4) is as follows.
Byte 1
Tag Type: TAG_ISO15693
’V’
TAG_Tagit
’T’
TAG_Icode
’I’
TAG_MifareISO14443A
’M’
TAG_SR176
’S’
TAG_ISO14443B
’Z’
Byte 2 ~ 18
Byte 19 ~ xx
Tag UID (SN)
Data
Chapter 5 BASIC Commands
SET_RFID_READ
81
8300, 8500
Purpose
To set the reading parameters of RFID.
Syntax
SET_RFID_READ(TagType&, start%, MaxLen%)
Remarks
The RFID reader cannot read until the parameters are specified.
Example
SET_RFID_READ(1,0,20)
' read tag type ISO 15693
...
' starting from byte 0 of data
...
' data length 20 bytes
A$ = READ_COM$(4)
See Also
CLOSE_COM, OPEN_COM, READ_COM$, SET_RFID_WRITE,
WRITE_COM
SET_RFID_WRITE
8300, 8500
Purpose
To set the writing parameters of RFID.
Syntax
SET_RFID_WRITE(TagType&, start%, MaxLen%)
Remarks
The RFID reader cannot write until the parameters are specified.
Example
OPEN_COM(4)
SET_RFID_WRITE(63,6,32)
' all supported tag types are enabled
...
' write starting from byte 6 of data
...
' any value for data length
WRITE_COM(4,W_STR$)
See Also
CLOSE_COM, OPEN_COM, READ_COM$, SET_RFID_READ, WRITE_COM
5.8.3 RFID Authentication
GET_RFID_KEY
8300, 8500
Purpose
To get the security key of some specific tags.
Syntax
A$ = GET_RFID_KEY(TagType %)
Remarks
This function is used to get the security key for some specific tags, such as Mifare
Standard 1K/4K and SLE66R35 tags.
"A$" is a string variable to be assigned to the result.
82
BASIC Programming Guide For Use with CipherLab BASIC Compiler
"TagType%" is an integer variable, indicating a specific tag type that the security
key is applied to.
Example
MKEY$ = GET_RFID_KEY(4)
See Also
SET_RFID_KEY
' get the security key for MifareISO14443A
tags
SET_RFID_KEY
8300, 8500
Purpose
To set the security key of some specific tags.
Syntax
SET_RFID_KEY(TagType%, KeyString$, KeyType%)
Remarks
This function is used to set security key for some specific tags, such as Mifare
Standard 1K/4K and SLE66R35 tags.
"TagType%" is an integer variable, indicating a specific tag type that the security
key is applied to.
TagType%
Meaning
1
TAG_ISO15693
2
TAG_Tagit
3
TAG_Icode
4
TAG_MifareISO14443A
5
TAG_SR176
6
TAG_ISO14443B
"KeyString$" is a string variable, indicating the security key you set.
"KeyType%" is an integer variable, indicating a specific key type.
KeyType%
Meaning
1
KEYA (Key A)
2
KEYB (Key B)
Example
SET_RFID_KEY(4, “111111111111”, ' set security key (KEY A) for
1)
MifareISO14443A tags
See Also
GET_RFID_KEY
Chapter 5 BASIC Commands
83
5.9 Keyboard Wedge Commands
If equipped with keyboard wedge interface, the following portable terminals can send data
to the host through the wedge interface by calling SEND_WEDGE().
711 series
8300 series
Note: For other wedge application, refer to the comparison table in 5.9.3 Wedge Emulator.
SEND_WEDGE() is governed by a set of parameters called WedgeSetting$. The command
SET_WEDGE is used to configure these parameters.
5.9.1 Definition of the WedgeSetting Array
WedgeSetting$ is a 3-element character array passed to SET_WEDGE to describe the
characteristics of the keyboard wedge interface. In a BASIC program, WedgeSetting$ can
be defined as follows.
WedgeSetting$ = Wedge_1$ + Wedge_2$ + Wedge_3$
The functions of the parameters Wedge_1$, Wedge_2$, and Wedge_3$ are described in the
following subsections.
Parameter
Bit
Description
Wedge_1$
7-0
KBD / Terminal Type
Wedge_2$
7
1: Enable capital lock auto-detection
0: Disable capital lock auto-detection
Wedge_2$
6
1: Capital lock on
0: Capital lock off
Wedge_2$
5
1: Ignore alphabets' case
0: Alphabets are case-sensitive
Wedge_2$
4-3
00: Normal
10: Digits are at lower position
11: Digits are at upper position
Wedge_2$
2-1
00: Normal
10: Capital lock keyboard
11: Shift lock keyboard
84
BASIC Programming Guide For Use with CipherLab BASIC Compiler
Wedge_2$
0
1: Use numeric keypad to transmit digits
0: Use alpha-numeric key to transmit digits
Wedge_3$
7-0
Inter-character delay
1st Element: KBD / Terminal Type
The first element determines which type of keyboard wedge is applied. The possible
value is listed as follows.
Value
Terminal Type
Value
Terminal Type
0
Null (Data Not Transmitted)
21
PS55 002-81, 003-81
1
PCAT (US)
22
PS55 002-2, 003-2
2
PCAT (FR)
23
PS55 002-82, 003-82
3
PCAT (GR)
24
PS55 002-3, 003-3
4
PCAT (IT)
25
PS55 002-8A, 003-8A
5
PCAT (SV)
26
IBM 3477 TYPE 4
6
PCAT (NO)
27
PS2-30
7
PCAT (UK)
28
Memorex Telex 122 Keys
8
PCAT (BE)
29
PCXT
9
PCAT (SP)
30
IBM 5550
10
PCAT (PO)
31
NEC 5200
11
PS55 A01-1
32
NEC 9800
12
PS55 A01-2
33
DEC VT220, 320, 420
13
PS55 A01-3
34
Macintosh (ADB)
14
PS55 001-1
35
Hitachi Elles
15
PS55 001-81
36
Wyse Enhance KBD (US)
16
PS55 001-2
37
NEC Astra
17
PS55 001-82
38
Unisys TO-300
18
PS55 001-3
39
Televideo 965
19
PS55 001-8A
40
ADDS 1010
20
PS55 002-1, 003-1
For example, if the terminal type is PCAT (US), then the first element of the
WedgeSetting$ can be defined as follows.
Wedge_1$ = CHR$(1)
Chapter 5 BASIC Commands
85
2nd Element
Capital Lock Auto-Detection
When "Capital Lock Auto-Detection" is enabled, the command SEND_WEDGE can
automatically detect the capital lock status of keyboard when the keyboard type
selected is PCAT (all available languages), PS2-30, PS55, or Memorex Telex. If this is
the case, SEND_WEDGE will ignore the capital lock status setting and perform
auto-detection when transmitting data.
When "Capital Lock Auto-Detection" is disabled, SEND_WEDGE will transmit
alphabets according to the setting of the capital lock status.
If the keyboard type selected is not one among PCAT, PS2-30, PS55, and Memorex
Telex, SEND_WEDGE will transmit the alphabets according to the setting of the capital
lock status, even though the auto-detection setting is enabled.
To enable "Capital Lock Auto-Detection", add 128 to the value of the second element
of WedgeSetting$ (Wedge_2$).
Capital Lock Status Setting
In order to send alphabets with correct case (upper or lower case), the command
SEND_WEDGE must know the capital lock status of keyboard when transmitting data.
Incorrect capital lock setting will result in different letter case (for example, 'A'
becomes 'a', and 'a' becomes 'A').
To set "Capital Lock ON", add 64 to the value of the second element of WedgeSetting$
(Wedge_2$).
Alphabets’ Case
The setting of this bit affects the way the command SEND_WEDGE transmits alphabets.
SEND_WEDGE can transmit alphabets according to their original case (case-sensitive)
or just ignore it. If ignoring case is selected, SEND_WEDGE will always transmit
alphabets without adding shift key.
To set "Ignore Alphabets Case", add 32 to the value of the second element of
WedgeSetting$ (Wedge_2$).
Digits’ Position
This setting can force the command SEND_WEDGE to treat the position of the digit
keys on the keyboard differently. If this setting is set to upper, SEND_WEDGE will add
shift key when transmitting digits. This setting will be effective only when the
keyboard type selected is PCAT (all available language), PS2-30, PS55, or Memorex
Telex. However, if the user chooses to send digits using numeric keypad, this setting is
meaningless.
To set "Lower Position", add 16 to the value of the second element of WedgeSetting$
(Wedge_2$).
To set "Upper Position", add 24 to the value of the second element of WedgeSetting$
(Wedge_2$).
86
BASIC Programming Guide For Use with CipherLab BASIC Compiler
Shift / Capital Lock Keyboard
This setting can force the command SEND_WEDGE to treat the keyboard type to be a
shift lock keyboard or a capital lock keyboard. This setting will be effective only when
the keyboard type selected is PCAT (all available languages), PS2-30, PS55, or
Memorex Telex.
To set "Capital Lock", add 4 to the value of the second element of WedgeSetting$
(Wedge_2$).
To set "Shift Lock", add 6 to the value of the second element of WedgeSetting$
(Wedge_2$).
Digit Transmission
This setting instructs the command SEND_WEDGE which group of keys is used to
transmit digits, whether to use the digit keys on top of the alphabetic keys or use the
digit keys on the numeric keypad.
To set "Use Numeric Keypad to Transmit Digits", add 2 to the value of the second
element of WedgeSetting$ (Wedge_2$).
Note: DO NOT set “Digits’ Position” and “Shift/Capital Lock Keyboard” unless you are
certain to do so.
3rd Element: Inter-Character Delay
A millisecond inter-character delay, in the range of 0 to 255, can be added before
transmitting each character. This is used to provide some response time for PC to
process keyboard input.
For example, to set the inter-character delay to be 10 millisecond, the third element
of the WedgeSetting$ can be defined as follows.
Wedge_3$ = CHR$(10)
Chapter 5 BASIC Commands
87
5.9.2 Composition of Output String
The keyboard wedge character mapping is shown below. Each character in the output string
is translated by this table when the command SEND_WEDGE transmits data.
00
0
10
20
30
40
50
60
70
F2
SP
0
@
P
`
p
1
INS
F3
!
1
A
Q
a
q
2
DLT
F4
“
2
B
R
b
r
3
Home
F5
#
3
C
S
c
s
4
End
F6
$
4
D
T
d
t
5
Up
F7
%
5
E
U
e
u
6
Down
F8
&
6
F
V
f
v
7
Left
F9
‘
7
G
W
g
w
8
BS
F10
(
8
H
X
h
x
9
HT
F11
)
9
I
Y
i
y
A LF
F12
*
:
J
Z
j
z
B
Right
ESC
+
;
K
[
k
{
C
PgUp
Exec
,
<
L
\
l
|
CR*
-
=
M
]
m
}
D CR
E
PgDn
.
>
N
^
n
~
F
F1
/
?
O
_
o
Dly
80
Note: (1) Dly: Delay 100 millisecond (2) ~ : Digits of numeric keypad
(3) CR*: Enter key on the numeric keypad
The command SEND_WEDGE not only can transmit simple characters as above, but also
provides a way to transmit combination key status, or even direct scan codes. This is done
by inserting some special command codes in the output string. A command code is a
character whose value is between 0xC0 and 0xFF.
0xC0 : Indicates that the next character is to be treated as scan code. Transmit it as it is, no
translation required.
0xC0 | 0x01 : Send next character with Shift key.
0xC0 | 0x02 : Send next character with Left Ctrl key.
88
BASIC Programming Guide For Use with CipherLab BASIC Compiler
0xC0 | 0x04 : Send next character with Left Alt key.
0xC0 | 0x08 : Send next character with Right Ctrl key.
0xC0 | 0x10 : Send next character with Right Alt key.
0xC0 | 0x20 : Clear all combination status key after sending the next character.
For example, to send [A] [Ctrl-Insert] [5] [scan code 0x29] [Tab] [2] [Shift-Ctrl-A] [B]
[Alt-1] [Alt-2-Break] [Alt-1] [Alt-3], the following characters are inserted into the string
supplied to the command SEND_WEDGE.
0x41, 0xC2, 0x01, 0x35, 0xC0, 0x29, 0x09, 0x32, 0xC3, 0x41, 0x42, 0xC4,
0x31
0xE4, 0x32, 0xC4, 0x31, 0xC4, 0x33
Note: (1) The scan code 0x29 is actually a space for PCAT, Alt-12 is a form feed
character, and Alt-13 is an Enter.
(2) The break after Alt-12 is necessary, if omitted the characters will be treated as
Alt-1213 instead of Alt-12 and Alt-13.
The following instructions can be called in the BASIC program to send the above string
through the keyboard wedge interface.
...
Data_1$ = CHR$(65) + CHR$(194) + CHR$(1) + CHR$(53) + CHR$(192) +
CHR$(41)
Data_2$ = CHR$(9) + CHR$(50) + CHR$(195) + CHR$(65) + CHR$(66)
Data_3$ = CHR$(196) + CHR$(49) + CHR$(228) + CHR$(50) + CHR$(196) +
CHR$(49)
Data_4$ = CHR$(196) + CHR$(51)
DataString$ = Data_1$ + Data_2$ + Data_3$ + Data_4$
SEND_WEDGE (DataString$)
...
Chapter 5 BASIC Commands
89
5.9.3 Wedge Emulator
CipherLab has developed the wedge emulator program “Serial to Keyboard Converter” for
the 8000/8300/8500 series.
The “Serial to Keyboard Converter” program lets users convert data to keyboard input via
IR/IrDA/RS-232 in general wedge functions, such as SEND_WEDGE, SET_WEDGE, and
WEDGE_READY. This utility helps develop a keyboard key in application without any serial
port input function. It supports multiple regions, i.e., an application can make use of this
tool for varying keyboard layout.
Alternatively, you may apply Bluetooth SPP or HID for wedge applications on the
Bluetooth-enabled terminals. Refer to section 5.20.6 Bluetooth for examples.
Wedge Options
Available Functions
Remarks
Keyboard Wedge
Interface
WedgeSetting$ array, SEND_WEDGE,
SET_WEDGE, WEDGE_READY
711/8300
Wedge Emulator via
IR/IrDA/RS-232
OPEN_COM, SET_COM, SET_COM_TYPE,
CLOSE_COM, SEND_WEDGE, SET_WEDGE,
WEDGE_READY
8000/8300/8500
Wedge Emulator via
Bluetooth SPP
SEND_WEDGE, SET_WEDGE,
WEDGE_READY
8061/8360/8500
Bluetooth HID
WedgeSetting$ array, OPEN_COM, SET_COM,
SET_COM_TYPE, CLOSE_COM,
GET_NET_STATUS, WRITE_COM
8061/8360/8500
90
BASIC Programming Guide For Use with CipherLab BASIC Compiler
SEND_WEDGE
Purpose
To send data to the host via keyboard wedge interface.
Syntax
SEND_WEDGE(DataString$)
Remarks
"DataString$" is the data string to be sent via the keyboard wedge interface.
Example
...
DataString$ = CHR$(9) + "TESTING" +
CHR(9)
' [Tab] + "TESTING" + [Tab]
SEND_WEDGE (DataString$)
...
See Also
SET_WEDGE, WEDGE_READY
SET_WEDGE
Purpose
To configure the keyboard wedge interface.
Syntax
SET_WEDGE(WedgeSetting$)
Remarks
"WedgeSetting$" is a 3-element character array describing the characteristics of the
keyboard wedge interface.
Example
...
Wedge_1$ = CHR$(1)
' terminal type: PCAT(US)
Wedge_2$ = CHR$(1)
' auto-detection disabled, capital lock off, case-sensitive
' use numeric keypad to transmit digits
Wedge_3$ = CHR$(5)
' inter-char-delay: 5 ms
WedgeSetting$ = Wedge_1$ + Wedge_2$ + Wedge_3$
SET_WEDGE(WedgeSetting$)
SEND_WEDGE (DataString$)
...
See Also
SEND_WEDGE, WEDGE_READY
WEDGE_READY
Purpose
To check if the keyboard wedge cable is well connected and ready to send data.
Syntax
state% = WEDGE_READY
Remarks
"state%" is an integer variable to be assigned to the result.
Chapter 5 BASIC Commands
state%
Meaning
0
Not ready
1
Ready
91
Note that it takes approximately 110 ms to detect the status of the keyboard wedge
connection. Therefore, for continuous and fast data transmission, simply call this
function once. DO NOT call this function repeatedly.
Example
IF (WEDGE_READY = 1) THEN
...
SEND_WEDGE (DATA$)
...
END IF
See Also
SEND_WEDGE, SET_WEDGE
92
BASIC Programming Guide For Use with CipherLab BASIC Compiler
5.10 Buzzer Commands
This section describes the commands related to the buzzer.
BEEP
Purpose
To specify a beep sequence of how a buzzer works.
Syntax
BEEP(freq%, duration% {, freq%, duration%})
Remarks
"freq%" is an integer variable, indicating the value of beep frequency (Hz).
Suggested frequency for the buzzer ranges from 1 kHz to 6 kHz.
"duration%" is an integer variable, indicating the value of beep duration, which is
specified in units of 10 milliseconds.
Up to eight frequency-duration pairs can be assigned in a beep sequence. If the
value of the frequency is 0, the buzzer will not sound during the time duration.
Example
ON READER(1) GOSUB BcrDATA_1
...
BcrData_1:
BEEP(2000, 10, 0, 10, 2000, 10)
...
RETURN
See Also
STOP BEEP
STOP BEEP
Purpose
To terminate the beep sequence.
Syntax
STOP BEEP
Remarks
The STOP BEEP statement terminates the beep immediately if there is a beep
sequence in progress.
Example
BEEP(2000,0)
ON KEY(1) GOSUB StopBeep
PRINT "Press F1 to stop the buzzer."
...
StopBeep:
STOP BEEP
RETURN
Chapter 5 BASIC Commands
See Also
BEEP
93
94
BASIC Programming Guide For Use with CipherLab BASIC Compiler
5.11 Vibrator Commands
This section describes the command related to the vibrator. This function is currently
supported on the 8300/8500 series.
Note: For the 8300 series, the hardware version must be 4.
VIBRATOR
8300, 8500
Purpose
To set the vibrator.
Syntax
VIBRATOR(mode%)
Remarks
"mode%" is an integer variable, indicating the state of the vibrator.
mode%
Meaning
0
Off
1
On
Once the vibrator is enabled by VIBRATOR(1), the terminal will start vibrating
until the vibrator is set off by VIBRATOR(0).
Example
VIBRATOR(1)
' turn on the vibrator
Chapter 5 BASIC Commands
95
5.12 Calendar and Timer Commands
This section describes the commands related to the calendar and timer. The system date and
time are maintained by the calendar chip, and they can be retrieved from or set to the
calendar chip by the commands DATE$ and TIME$. A backup rechargeable battery keeps the
calendar chip running even when the power is turned off.
Commands for triggering the HOUR_SHARP event, the MINUTE_SHARP event, and the
TIMER event: OFF HOUR_SHARP, OFF MINUTE_SHARP, OFF TIMER, ON HOUR_SHARP
GOSUB..., ON MINUTE_SHARP GOSUB..., and ON TIMER GOSUB...
Up to five timers can be set by the command ON TIMER... GOSUB... for the "TIMER Event
Trigger".
Note: The system time variable TIMER is maintained by CPU timers and has nothing to
do with this calendar chip. Accuracy of this time variable depends on the CPU clock
and is not suitable for precise time manipulation. Besides, it is reset to 0 upon
powering up (as a cold start).
DATE$
Purpose
To set or to get the current date.
Syntax
DATE$ = X$
Y$ = DATE$
Remarks
DATE$ = X$, to set the current date.
"X$" is a string variable in the form of "yyyymmdd".
Y$ = DATE$, to get the current date, in the form of "yyyymmdd".
"Y$" is a string variable to be assigned to the result.
Note that the BASIC Compiler and its Run-time Engines do not check the format
and contents of the string to be assigned to DATE$. User is obliged to check the
format and contents.
Example
DATE$ = "20000103"
' set the system date to 2000/01/03
Today$ = DATE$
' assign the current date to Today$
PRINT Today$
' Today$ = "20000103"
...
See Also
DAY_OF_WEEK, TIME$
96
BASIC Programming Guide For Use with CipherLab BASIC Compiler
DAY_OF_WEEK
Purpose
To get the day of the week.
Syntax
A% = DAY_OF_WEEK
Remarks
"A%" is an integer variable to be assigned to the result.
A value of 1 to 7 represents Monday to Sunday respectively.
Example
ON DAY_OF_WEEK GOSUB 100, 200, 300, 400, 500, 600, 700
...
100
PRINT "Today is Monday."
RETURN
200
PRINT "Today is Tuesday."
RETURN
300
PRINT "Today is Wednesday."
RETURN
...
See Also
DATE$, TIME$
Purpose
To set or to get the current time.
Syntax
TIME$ = X$
TIME$
Y$ = TIME$
Remarks
TIME$ = X$, to set the current time.
"X$" is a string variable in the form of "hhmmss".
Y$ = TIME$, to get the current time, in the form of "hhmmss".
"Y$" is a string variable to be assigned to the result.
The BASIC Compiler and its Run-time Engines do not check the format and
contents of the string to be assigned to TIME$. User is obliged to check the format
and contents.
Example
TIME$ = "112500"
' set the system time to 11:25:00
CurrentTime$ = TIME$
' assign the current to CurrentTime$
PRINT CurrentTime$
' CurrentTime$ = "112500"
...
See Also
DATE$, DAY_OF_WEEK
Chapter 5 BASIC Commands
97
TIMER
Purpose
To return the number of seconds elapsed since the terminal is powered on.
Syntax
A& = TIMER
Remarks
"A&" is a long integer variable to be assigned to the result.
Note that the TIMER is a read-only function. The system timer cannot be set by this
command.
Example
StartTime& = TIMER
...
Loop:
IF EndTime& <> TIMER THEN
EndTime& = TIMER
TimerElapsed& = EndTime& - StartTime&
CLS
PRINT TimerElapsed&
IF TimerElapsed& > 100 THEN GOTO NextStep
END IF
GOTO Loop
NextStep:
...
See Also
OFF TIMER, ON TIMER GOSUB...
Purpose
To put the system on hold for a specified duration. In the interval, the system will be
running in a rather low power consumption mode.
Syntax
WAIT(duration%)
Remarks
"duration%" is a positive integer variable, indicating the time duration for a hold.
This argument is specified in units of 5 milliseconds.
WAIT
When the application is waiting for events in a loop, the power consumption will be
dramatically reduced by calling this function.
Note that WAIT is more efficient than CHANGE_SPEED.
Example
PRINT "CipherLab BASIC"
WAIT (200)
See Also
CHANGE_SPEED
' the system is on hold for 1 second
98
BASIC Programming Guide For Use with CipherLab BASIC Compiler
5.13 LED Command
The LED can be used to indicate terminal status, for example, "Good Read" or "No Good"
when scanning a barcode.
LED
Purpose
To specify the LED lighting behavior.
Syntax
LED(number%, mode%, duration%)
Remarks
"number%" is a positive integer variable, indicating the LED color.
Value
Meaning
1
Red LED in use
2
Green LED in use
"mode%" is an integer variable, indicating the digital output mode. The values of
the mode and their interpretation are listed below.
Value
Meaning
0
Turn off the LED for the specific duration and
then turn on.
1
Turn on the LED for the specific duration and
then turn off.
2
Flash the LED for a specific duration repeatedly.
The flashing period equals 2Xduration.
"duration%" is an integer variable, specifying a period of time in units of 10
milliseconds. A value of 0 in this argument will keep the LED in the specific state
indefinitely.
Example
ON READER(1) GOSUB BcrData_1
...
BcrData_1:
BEEP(2000,5)
LED(2, 1, 5)
Data$ = GET_READER_DATA$(1)
...
' GOOD READ LED for 520
Chapter 5 BASIC Commands
99
5.14 Keypad Commands
All the CipherLab portable terminals provide a built-in keypad for data input. This section
describes the commands related to the keypad operation.
Commands for triggering the ESC event and the KEY event: OFF ESC, OFF KEY, ON ESC
GOSUB..., ON KEY GOSUB...
5.14.1 General
CLR_KBD
Purpose
To clear the keyboard buffer.
Syntax
CLR_KBD
Remarks
By calling this function, data queuing in the keyboard buffer will be cleared.
Example
CLR_KBD
ON KEY(1) GOSUB KeyData_1
...
See Also
INKEY$, PUTKEY
INKEY$
Purpose
To read one character from the keyboard buffer and then remove it.
Syntax
X$ = INKEY$
Remarks
"X$" is a string variable to be assigned to the character read.
It can be used with menu operation to detect a shortcut key being pressed, or with
touch screen operation to detect a touched item.
Example
...
PRINT "Initialize System (Y/N)?"
Loop:
KeyData$ = INKEY$
IF KeyData$ = "" THEN
GOTO Loop
ELSE IF KeyData$ = "Y" THEN
100
BASIC Programming Guide For Use with CipherLab BASIC Compiler
GOTO Initialize
...
See Also
CLR_KBD, PUTKEY
Purpose
To take user input from the keypad and store it in a variable.
Syntax
INPUT variable
Remarks
"variable" is a numeric or string variable that will receive the input data. The data
entered must match the data type of the variable.
INPUT
When the input task is properly ended with the ENTER key being pressed, the data
string will be stored in a variable. Otherwise, press the ESC key to abort the task,
and the string will be cleared.
Example
INPUT String$
' input a string variable
PRINT String$
INPUT Number%
' input a numeric variable
PRINT Number%
INPUT_MODE
Purpose
To set the display mode of the input data.
Syntax
INPUT_MODE(mode%)
Remarks
"mode%" is an integer variable, indicating the input mode.
Example
mode%
Meaning
0
Nothing will be displayed on the LCD.
1
The input characters will be displayed on the LCD. (default)
2
"*" will be displayed instead of the input characters. Usually, it is
applied for password input.
LOCATE 1,1
INPUT_MODE(1)
INPUT Login$
LOCATE 2,1
INPUT_MODE(2)
INPUT Password$
Chapter 5 BASIC Commands
101
KEY_CLICK
Purpose
To enable/disable the key click sound.
Syntax
KEY_CLICK(status%)
Remarks
"status%" is an integer variable, indicating the key click status.
status%
Meaning
Applicable to Models
0
Disable (mute)
All
1
Enable
711, 8100
1~5
Each represents a different tone
8000, 8300, 8500
The key click is enabled by default.
Example
KEY_CLICK(0)
' disable the key click
PUTKEY
8500
Purpose
To put one character to the keyboard buffer.
Syntax
PUTKEY(N%)
Remarks
"N%" is an integer variable, indicating the ASCII code of a character.
It provides the capability of simulating the keypad operation. For example, it can be
implemented with touch screen operation. The key value of a touched item, which
is designed as a key on the screen by SET_SCREENITEMS, can be put to the
keyboard buffer by using PUTKEY, and then be detected by using INKEY$.
Example
PUTKEY(27)
See Also
CLR_KBD, INKEY$
' put [ESC] key value to the buffer
102
BASIC Programming Guide For Use with CipherLab BASIC Compiler
5.14.2 ALPHA Key
By default, the input mode is numeric and can be modified by the ALPHA key. When the
ALPHA key is pressed, it will take turns to show alphabet and numeric for the same
keystroke. For example, the "2ABC" key can generate "2", "A", "B", and "C" by turns.
Note: For the 8500 series, the ALPHA key is available on the 24-key terminal only.
ALPHA_LOCK
Purpose
To set the ALPHA state for input mode.
Syntax
ALPHA_LOCK(status%)
Remarks
"status%" is an integer variable, indicating the alpha-input status.
Example
I
status%
Default Input
ALPHA State
711/8100
0
Numeric mode
Unlocked
711/8100
1
Alpha mode
Locked
711/8100
2
Numeric mode
Locked
II
status%
Default Input
ALPHA State
8000/8300/8500
0
Numeric mode
Unlocked
8000/8300/8500
1
Alpha mode, upper case
Unlocked
8000/8300/8500
2
Numeric mode
Locked
8000/8300/8500
3
Alpha mode, lower case
Unlocked
8000 only
4
Function mode
Unlocked
8000/8300/8500
5
Alpha mode, upper case
Locked
8000/8300/8500
6
Alpha mode, lower case
Locked
8000 only
7
Function mode
Locked
ALPHA_LOCK(1)
...
See Also
GET_ALPHA_LOCK
GET_ALPHA_LOCK
Purpose
To get information of the ALPHA state for input mode.
Syntax
A% = GET_ALPHA_LOCK
Remarks
"A%" is an integer variable to be assigned to the result.
Chapter 5 BASIC Commands
Example
Alpha_lock% = GET_ALPHA_LOCK
See Also
ALPHA_LOCK
103
104
BASIC Programming Guide For Use with CipherLab BASIC Compiler
5.14.3 FN Key
The function (FN) key serves as a modifier key.
1. To enable this modifier key, press the function (FN) key on the keypad, and the status
icon “ ” will be displayed on the terminal screen.
2. Now press another key to get the value of key combination (say, F1), and then the status
icon will go off. That is, this modifier key can work one time only.
3. To get the value of another key combination modified by the function (FN) key, repeat
the above steps.
However, on condition that the function (FN) key is enabled and FUNCTION_TOGGLE() is
called to lock it, this modifier key can work as many times as desired.
For the 8500 series, it offers two more options for FUNCTION_TOGGLE(), i.e. this modifier
key can be treated as a general key and its key value be stored in a buffer.
FUNCTION_TOGGLE
8300, 8500
Purpose
To set the state of the FN (function) toggle.
Syntax
FUNCTION_TOGGLE(status%)
Remarks
"status%" is an integer variable, indicating the state of the function toggle.
Example
status%
Meaning
0
Unlocked (default)
1
Locked
2
Unlocked, with key value stored in keyboard buffer (8500 only)
3
Locked, with key value stored in keyboard buffer (8500 only)
FUNCTION_TOGGLE(1)
' lock the function toggle
Chapter 5 BASIC Commands
105
5.15 LCD Commands
The liquid crystal display (LCD) on the portable terminals is FSTN graphic display. For
different models, it varies slightly in the display capability due to the size of LCD panel.
Model
711, 8100, 8300
8000
8500
Display Capability
128 x 64 dots
100 x 64 dots
160 x 160 dots
Top_Left
(0, 0)
(0, 0)
(0, 0)
Bottom_Right
(127, 63)
(99, 63)
(159, 159)
A coordinate system is used for the cursor movement routines to determine the cursor
location, i.e. (x, y) indicates the column and row position of cursor. The coordinates given
to the top left point is (1, 1), while those of the bottom right point depends on the size of
LCD and font. For displaying a graphic, the coordinate system is on dot (pixel) basis.
5.15.1 Properties
Contrast: Level 1 ~ 8. It is set to level 5 by default.
Backlight: It is turned off by default. The shortcut key [FN] + [Enter] can be used as a
toggle.
BACK_LIGHT_DURATION
Purpose
To specify how long the backlight will last once the terminal is turned on.
Syntax
BACK_LIGHT_DURATION(N%)
Remarks
"N%" is an integer variable, indicating a period of time in units of 1 second.
Example
BACK_LIGHT_DURATION(20)
See Also
BACKLIT, LCD_CONTRAST, SET_VIDEO_MODE
' backlight lasts for 20 seconds
BACKLIT
Purpose
To set the LCD backlight.
Syntax
BACKLIT(state%)
Remarks
"state%" is an integer variable, indicating a specific state (luminosity level) of the
LCD backlight.
106
BASIC Programming Guide For Use with CipherLab BASIC Compiler
Model
state%
Meaning
711
0
BACKLIT_OFF
1
BACKLIT_LO
2
BACKLIT_MED
3
BACKLIT_HI
0
BACKLIT_OFF
1
BACKLIT_LO
0
BACKLIT_OFF
1
BACKLIT_VERY_LO
2
BACKLIT_LO
3
BACKLIT_MED
4
BACKLIT_HI
8100/8000/8300
8500
Example
BACKLIT(1)
See Also
BACK_LIGHT_DURATION
' turn on LCD backlight; at very low
luminosity on 8500
LCD_CONTRAST
Purpose
To set the contrast level of the LCD.
Syntax
LCD_CONTRAST(N%)
Remarks
"N%" is an integer variable, indicating the contrast level in the range of 1 to 8. The
higher value, the stronger contrast.
Example
LCD_CONTRAST(4)
See Also
BACK_LIGHT_DURATION, SET_VIDEO_MODE
' set the LCD contrast to level 4 (medium
contrast)
SET_VIDEO_MODE
Purpose
To set the display mode of the LCD.
Syntax
SET_VIDEO_MODE(mode%)
Remarks
"mode%" is an integer variable, indicating the display mode.
mode%
Meaning
0
VIDEO_NORMAL
1
VIDEO_REVERSE
Chapter 5 BASIC Commands
Example
SET_VIDEO_MODE(1)
PRINT "CipherLab terminals"
See Also
107
' this string will be printed in reverse
mode
BACK_LIGHT_DURATION, LCD_CONTRAST
108
BASIC Programming Guide For Use with CipherLab BASIC Compiler
5.15.2 Cursor
CURSOR
Purpose
To turn on/off the cursor indication on the LCD.
Syntax
CURSOR(status%)
Remarks
"status%" is an integer variable, indicating the cursor status.
status%
Meaning
0
The cursor indication is off.
1
The cursor indication is on.
Example
CURSOR(0)
See Also
CURSOR_X, CURSOR_Y, LOCATE
CURSOR_X
Purpose
To get the x coordinate of the current cursor position.
Syntax
X% = CURSOR_X
Remarks
"X%" is an integer variable to be assigned to the column position of the cursor.
Example
ON READER(1) GOSUB BcrData_1
...
BcrData_1:
BEEP(2000,5)
Data$ = GET_READER_DATA$(1)
Pre_X% = CURSOR_X
Pre_Y% = CURSOR_Y
Locate 8, 1
PRINT Data$
Locate Pre_Y%, Pre_X%
RETURN
See Also
CURSOR, CURSOR_Y, LOCATE
CURSOR_Y
Purpose
To get the y coordinate of the current cursor position.
Chapter 5 BASIC Commands
109
Syntax
"Y%" = CURSOR_Y
Remarks
"Y%" is an integer variable to be assigned to the row position of the cursor.
Example
ON READER(1) GOSUB BcrData_1
...
BcrData_1:
BEEP(2000,5)
Data$ = GET_READER_DATA$(1)
Pre_X% = CURSOR_X
Pre_Y% = CURSOR_Y
Locate 8, 1
PRINT Data$
Locate Pre_Y%, Pre_X%
RETURN
See Also
CURSOR, CURSOR_X, LOCATE
LOCATE
Purpose
To move the cursor to a specified location on the LCD.
Syntax
LOCATE row%, col%
Remarks
"row%" is an integer variable, indicating the new row position of the cursor.
"col%" is an integer variable, indicating the new column position of the cursor.
Depending on the following elements, the maximum values for row and column are
limited:
The printing of characters in the icon area, which is determined by
ICON_ZONE_PRINT().
The size of LCD.
The font file in use.
For the 8500 series, the y coordinate cannot be over 18 with font size 6x8 and
ICON_ZONE_PRINT(0) is given.
Example
LOCATE 1,1
See Also
CURSOR, CURSOR_X, CURSOR_Y
' move the cursor to the top left of the
LCD
110
BASIC Programming Guide For Use with CipherLab BASIC Compiler
5.15.3 Display
FILL_RECT
Purpose
To fill a rectangular area on the LCD.
Syntax
FILL_RECT(x%, y%, size_x%, size_y%)
Remarks
"x%", "y%" are integer variables, indicating the x, y coordinates of the upper left
point of the rectangular area.
"size_x%" is an integer variable, indicating the width of the rectangle in pixels.
"size_y%" is an integer variable, indicating the height of the rectangle in pixels.
Example
FILL_RECT(1,1,20,20)
See Also
CLR_RECT
ICON_ZONE_PRINT
Purpose
To enable or disable the printing of characters in the icon area.
Syntax
ICON_ZONE_PRINT(status%)
Remarks
"status%" an integer variable, indicating the printing status of the icon area.
status%
Meaning
0
The printing in the icon area is disabled (default).
1
The printing in the icon area is enabled.
The icon zone refers to an area on the LCD that is reserved for showing status icon,
such as the battery icon, alpha icon, etc. By default, the icon zone cannot show
characters and is accessed by graphic commands only.
Display of 128x64 dots
The icon zone occupies the right-most 8x64 dots. When
ICON_ZONE_PRINT is enabled, the display can show up to 8 lines * 21
characters for 6x8 font, or 4 lines * 16 characters for 8x16 font.
Display of 100x64 dots
The icon zone occupies the right-most 4x64 dots. Yet, 4 pixels' width cannot
hold one character. Therefore, even when ICON_ZONE_PRINT is enabled,
the display remains to show up to 8 lines * 16 characters for 6x8 font, or 4
lines * 12 characters for 8x16 font.
Display of 160x160 dots
The icon zone occupies the bottom line, which may be 160x8 for 6x8 font or
160x16 for 8x16 font. When ICON_ZONE_PRINT is enabled, the display
can show up to 19 lines * 26 characters for 6x8 font, or 9 lines * 20 characters
for 8x16 font.
Chapter 5 BASIC Commands
111
For any of the above displays, when ICON_ZONE_PRINT is enabled, the entire
screen will be erased after calling CLS.
Note that the system may still show the status icons in this icon area, even though
ICON_ZONE_PRINT is enabled. This is because these status icons are constantly
maintained by the system, and they may override the printing of characters from
time to time.
Example
ICON_ZONE_PRINT(1)
See Also
PRINT
Purpose
To display data on the LCD.
Syntax
PRINT expression[{,|;[expression]}]
Remarks
"expression" may be numeric or string expression.
' allow the printing of the icon area
PRINT
The position of each printed item is determined by the punctuation used to separate
items in the list. In the list of expression, a comma causes the next character to be
printed after the last character with a blank space. A semicolon causes the next
character to be printed immediately after the last character. If the list of expressions
terminates without a comma or semicolon, a carriage return is printed at the end of
the line.
Example
LOCATE 1,1
PRINT String$(20,"")
' clear the whole line
LOCATE 1,1
A=5
PRINT A, "square is "; A*A
See Also
CLS, ICON_ZONE_PRINT
WAIT_HOURGLASS
8000, 8300, 8500
Purpose
To show a moving hourglass on the LCD.
Syntax
WAIT_HOURGLASS(x%, y%, type%)
Remarks
Call this function constantly to maintain its functionality. Five different patterns of
an hourglass take turns to show on the LCD indicating the passage of time. The time
factor is decided through programming but no less than two seconds.
"x%", "y%" are integer variables, indicating the x, y coordinates of the upper left
point of a hourglass.
"type%" is an integer variable, indicating the size of a hourglass.
type%
Meaning
1
24 x 23 pixels
112
BASIC Programming Guide For Use with CipherLab BASIC Compiler
2
Example
8 x 8 pixels
WAIT_HOURGLASS(68,68,1)
' show a 24 x 23 pixels hourglass at
(68,68)
Chapter 5 BASIC Commands
113
5.15.4 Clear
CLR_RECT
Purpose
To clear a rectangular area on the LCD.
Syntax
CLR_RECT(x%, y%, size_x%, size_y%)
Remarks
"x%", "y%" are integer variables, indicating the x, y coordinates of the upper left
point of the rectangular area.
"size_x%" is an integer variable, indicating the width of the rectangle in pixels.
"size_y%" is an integer variable, indicating the height of the rectangle in pixels.
Example
CLR_RECT(1,1,20,20)
See Also
CLS, FILL_RECT
Purpose
To clear everything on the LCD.
Syntax
CLS
Remarks
After running this command, whatever is being shown on the LCD will be erased
and the cursor will be move to (1,1).
CLS
Example
ON TIMER(1,200) GOSUB ClearScreen
...
ClearScreen:
OFF TIMER(1)
CLS
RETURN
See Also
CLR_RECT, PRINT
' TIMER(1) = 2 second
114
BASIC Programming Guide For Use with CipherLab BASIC Compiler
5.15.5 Image
The command SHOW_IMAGE can be used to display images on the LCD. User needs to
allocate a string variable to store the bitmap data of the image. This string begins with the
top row of pixels. Each row begins with the left-most pixels. Each bit of the bitmap
represents a single pixel of the image. If the bit is set to 1, the pixel is marked, and if it is 0,
the pixel is unmarked. The 1st pixel in each row is represented by the least significant bit of
the 1st byte in each row. If the image is wider than 8 pixels, the 9th pixel in each row is
represented by the least significant bit of the 2nd byte in each row.
The following is an example to show our company logo, and the string variable "icon$" is
used for storing its bitmap data.
icon_1$=
chr$(0)+chr$(0)+chr$(0)+chr$(0)+chr$(248)+chr$(255)+chr$(7)
icon_2$= chr$(0)+chr$(0)+chr$(0)+chr$(0)+chr$(8)+chr$(0)+chr$(4)
icon_3$=
chr$(0)+chr$(0)+chr$(0)+chr$(0)+chr$(254)+chr$(255)+chr$(5)
icon_4$=
chr$(0)+chr$(0)+chr$(0)+chr$(0)+chr$(254)+chr$(255)+chr$(5)
icon_5$=
chr$(0)+chr$(0)+chr$(0)+chr$(0)+chr$(254)+chr$(255)+chr$(5)
icon_6$=
chr$(192)+chr$(3)+chr$(0)+chr$(0)+chr$(250)+chr$(255)+chr$(5)
icon_7$=
chr$(96)+chr$(214)+chr$(201)+chr$(59)+chr$(250)+chr$(142)+chr$(5)
icon_8$=
chr$(48)+chr$(80)+chr$(74)+chr$(72)+chr$(122)+chr$(109)+chr$(5)
icon_9$=
chr$(16)+chr$(80)+chr$(74)+chr$(72)+chr$(122)+chr$(109)+chr$(5)
icon_10$=
chr$(16)+chr$(208)+chr$(249)+chr$(59)+chr$(186)+chr$(139)+chr$(5)
icon_11$=
chr$(48)+chr$(84)+chr$(72)+chr$(24)+chr$(58)+chr$(104)+chr$(5)
Chapter 5 BASIC Commands
115
icon_12$=
chr$(96)+chr$(86)+chr$(72)+chr$(40)+chr$(186)+chr$(107)+chr$(5)
icon_13$=
chr$(192)+chr$(83)+chr$(200)+chr$(75)+chr$(130)+chr$(139)+chr$(5)
icon_14$=
chr$(0)+chr$(0)+chr$(0)+chr$(0)+chr$(254)+chr$(255)+chr$(7)
icon_15$=
chr$(0)+chr$(0)+chr$(0)+chr$(0)+chr$(254)+chr$(255)+chr$(1)
icon_16$=
chr$(0)+chr$(0)+chr$(0)+chr$(0)+chr$(254)+chr$(255)+chr$(1)
show_image(2, 0, 56, 1, icon_1$)
show_image(2, 1, 56, 1, icon_2$)
show_image(2, 2, 56, 1, icon_3$)
show_image(2, 3, 56, 1, icon_4$)
show_image(2, 4, 56, 1, icon_5$)
show_image(2, 5, 56, 1, icon_6$)
show_image(2, 6, 56, 1, icon_7$)
show_image(2, 7, 56, 1, icon_8$)
show_image(2, 8, 56, 1, icon_9$)
show_image(2, 9, 56, 1, icon_10$)
show_image(2, 10, 56, 1, icon_11$)
show_image(2, 11, 56, 1, icon_12$)
show_image(2, 12, 56, 1, icon_13$)
show_image(2, 13, 56, 1, icon_14$)
show_image(2, 14, 56, 1, icon_15$)
show_image(2, 15, 56, 1, icon_16$)
…
GET_IMAGE
Purpose
To read a bitmap pattern or capture signature from a rectangular area on the LCD.
Syntax
DataCount% = GET_IMAGE(file_index%, x%, y%, size_x%, size_y%)
Remarks
"DataCount%" is an integer variable to be assigned to the result; it is the total data
count stored in the specified transaction file.
"file_index%" is an integer variable in the range of 1 to 6, indicating which
transaction file is to store the bitmap data.
"x%", "y%" are integer variables, indicating the x, y coordinates of the upper left
point of the rectangular area.
116
BASIC Programming Guide For Use with CipherLab BASIC Compiler
"size_x%" is an integer variable, indicating the width of the rectangle in pixels.
"size_y%" is an integer variable, indicating the height of the rectangle in pixels.
Example
GET_IMAGE(3,12,32,60,16)
See Also
GET_TRANSACTION_DATA$, GET_TRANSACTION_DATA_EX$,
SET_SIGNAREA, SHOW_IMAGE
SHOW_IMAGE
Purpose
To put a bitmap pattern to a rectangular area on the LCD.
Syntax
SHOW_IMAGE(x%, y%, size_x%, size_y%, image$)
Remarks
"x%", "y%" are integer variables, indicating the x, y coordinates of the upper left
point of the rectangular area.
"size_x%" is an integer variable, indicating the width of the rectangle in pixels.
"size_y%" is an integer variable, indicating the height of the rectangle in pixels.
"image$" is a string variable, containing the bitmap data of the image.
Example
icon$ = chr$(0)+chr$(0)+chr$(0)+chr$(0)+chr$(254)+chr$(255)+chr$(1)
show_image(2, 0, 56, 1, icon$)
See Also
GET_IMAGE
Chapter 5 BASIC Commands
117
5.15.6 Graphics
Factors to Monochrome Graphics
A monochrome graphic has three factors:
Key Factor
Functions
Parameter
Value
Meaning
Video Display Mode
SET_VIDEO_MODE
mode%
0
Normal mode
1
Reverse mode
-1
DOT_REVERSE
LINE
0
DOT_CLEAR
PUT_PIXEL
1
DOT_MARK
0
SHAPE_NORMAL
1
SHAPE_FILL
CIRCLE
Pixel State
mode%
RECTANGLE
CIRCLE
Shape State
type%
RECTANGLE
Pixel State
DOT_MARK
DOT_CLEAR
DOT_REVERSE
Shape State
SHAPE_FILL
SHAPE_NORMAL
CIRCLE
8500
Purpose
To draw a circle on the LCD.
Syntax
CIRCLE(cx%, cy%, r%, type%, mode%)
Remarks
"cx%", "cy%" are integer variables, indicating the x, y coordinates of the center of a
circle.
"r%" is an integer variable, indicating the radius of a circle in pixels.
"type%" is an integer variable, indicating the type of a circle.
type%
Meaning
0
SHAPE_NORMAL (= hollow)
1
SHAPE_FILL (= solid)
118
BASIC Programming Guide For Use with CipherLab BASIC Compiler
"mode%" is an integer variable, indicating the state of a pixel.
mode%
Meaning
-1
DOT_REVERSE
0
DOT_CLEAR
1
DOT_MARK
Example
CIRCLE(80,120,8,1,1)
See Also
CLS, LINE, PUT_PIXEL, RECTANGLE
' draw a solid circle centered at (8,120)
with radius of 8 pixels
LINE
8500
Purpose
To draw a line on the LCD.
Syntax
LINE(x1%, y1%, x2%, y2%, mode%)
Remarks
"x1%", "y1%" are integer variables, indicating the x, y coordinates of where a line
starts.
"x2%", "y2%" are integer variables, indicating the x, y coordinates of where a line
ends.
"mode%" is an integer variable, indicating the state of a pixel.
Example
See Also
mode%
Meaning
-1
DOT_REVERSE
0
DOT_CLEAR
1
DOT_MARK
LINE(10,10,120,10,1)
' draw a horizontal line
LINE(80,120,10,10,1)
' draw an oblique line
CIRCLE, CLS, PUT_PIXEL, RECTANGLE
PUT_PIXEL
8500
Purpose
To mark a pixel (or a dot) on the LCD.
Syntax
PUT_PIXEL(x%, y%, mode%)
Remarks
"x%", "y%" are integer variables, indicating the x, y coordinates of a pixel.
"mode%" is an integer variable, indicating the state of a pixel.
mode%
Meaning
-1
DOT_REVERSE
0
DOT_CLEAR
Chapter 5 BASIC Commands
1
119
DOT_MARK
Example
PUT_PIXEL(80,120,1)
See Also
CIRCLE, CLS, LINE, RECTANGLE
' mark a pixel at (80,120)
RECTANGLE
8500
Purpose
To draw a rectangle on the LCD.
Syntax
RECTANGLE(x1%, y1%, x2%, y2%, type%, mode%)
Remarks
"x1%", "y1%" are integer variables, indicating the x, y coordinates of where a
diagonal starts.
"x2%", "y2%" are integer variables, indicating the x, y coordinates of where a
diagonal ends.
"type%" is an integer variable, indicating the type of a circle.
type%
Meaning
0
SHAPE_NORMAL (= hollow)
1
SHAPE_FILL (= solid)
"mode%" is an integer variable, indicating the state of a pixel.
Example
See Also
mode%
Meaning
-1
DOT_REVERSE
0
DOT_CLEAR
1
DOT_MARK
RECTANGLE(10,20,80,100,1,1)
' draw a rectangle
RECTANGLE(10,100,80,20,1,1)
' same rectangle as above
CIRCLE, CLS, LINE, PUT_PIXEL
120
BASIC Programming Guide For Use with CipherLab BASIC Compiler
5.15.7 Fonts
Font Size
Basically, the portable terminals provide two size options for the system font: 6x8
and 8x16. The LCD will show 6x8 alphanumeric characters by default.
These options are also applicable to other alphanumerical font files (for single byte
languages), such as the multi-language font file and Hebrew/Nordic/Polish/Russian
font files.
In addition to the system font, the terminals support a number of font files as
specified in section 2.1.2. Available font sizes depend on which font file is
downloaded to the terminal.
Single-byte
Double-byte
Font Files
Custom Font Size
SetFont Options
System font (default)
N/A
FONT_6X8, FONT_8X16
Multi-language font file
N/A
FONT_6X8, FONT_8X16
Others: He, Nd, Po, Ru
N/A
FONT_6X8, FONT_8X16
Tc, Sc, Jp, Kr
16X16
FONT_6X8, FONT_8X16
Tc12, Sc12, Jp12, Kr12
True 12X12
FONT_6X12, FONT_12X12
Display Capability
Varying by the display size and the font size of alphanumerics, the display
capability can be viewed by lines and characters as follows.
Model #
711, 8100,
8300
8000
8500
Alphanumerical Font
Display Capability
Size in dots
Characters
Lines
Icon Area
6x8
20 per line
8
Last column (8x64)
8x16
15 per line
4
Last column (8x64)
6x8
16 per line
8
Last column (4x64)
8x16
12 per line
4
Last column (4x64)
6x8
26 per line
19
Last row (160x8)
8x16
20 per line
9
Last row (160x16)
Note: For the 8500 series, it can display up to 20 (or 10) lines when the icon area is not
available for displaying the battery icon, etc. (i.e. ICON_ZONE_PRINT enabled)
Chapter 5 BASIC Commands
121
Multi-language Font File
This font file may include English (default), French, Hebrew, Latin, Nordic,
Portuguese, Turkish, Russian, Polish, Slavic, Slovak, etc. To display in any of these
languages except English, you need to call SET_LANGUAGE to specify the language
by region.
Special Font Files
Fonts with file name specifying Tc12 (Traditional Chinese), Sc12 (Simplified
Chinese), Jp12 (Japanese), or Kr12 (Korean) are referred to as the special font files.
This is because their font size for alphanumeric characters must be determined by
SELECT_FONT, either 6x12 or 12x12. Otherwise, the characters cannot be displayed
properly.
SELECT_FONT
Purpose
To select a font size for the LCD to display alphanumeric characters properly.
Syntax
SELECT_FONT(font%)
Remarks
"font%" is an integer variable, indicating the font size.
font%
Meaning
1
Font size 6x8
2
Font size 8x16
3
---
(Reserved)
4
Font size 6x12
(for font files Tc12, Sc12, Jp12, Kr12)
5
Font size 12x12
(for font files Tc12, Sc12, Jp12, Kr12)
Single-byte Characters:
For single-byte characters (system, multi-language, etc.), simply assign either
6X8 or 8X16.
16x16 double-byte Characters:
You may assign 6x8 or 8x16 to display alphanumeric characters.
12x12 Double-byte Characters (for the 8000/8300/8500 series):
If you assign 6x12, the font size for single byte characters will be 6x12, while it
will still take 12x12 for double-byte characters (Tc12, Sc12, Jp12, Kr12). It
thus provides flexibility in displaying alphanumeric.
However, for Japanese Katakana, you have to assign 12x12; otherwise, the
cursor position will be misplaced.
122
BASIC Programming Guide For Use with CipherLab BASIC Compiler
Example
See Also
SELECT_FONT(2)
' set font size 8x16
SELECT_FONT(4)
' set font size 6x12 for alphanumeric
SELECT_FONT(5)
' set font size 12x12 for alphanumeric
GET_LANGUAGE, SET_LANGUAGE
Chapter 5 BASIC Commands
123
5.16 Touch Screen Commands
For the 8500 series, the liquid crystal display (LCD) is also a touch screen when it is
initialized by ENABLE_TOUCHSCREEN.
Commands for triggering the TOUCHSCREEN event: OFF TOUCHSCREEN, ON
TOUCHSCREEN GOSUB...
Signature Capture
User may use the stylus to write anything directly on a specific area of the LCD,
which is defined by SET_SIGNAREA. Then the signature can be captured by
GET_IMAGE.
Touchable Items
Graphic items can be designed to simulate a key operation when being touched, e.g.
a calculator. Patterns of the graphic items can be designed and displayed on the
LCD by SHOW_IMAGE. Then, these items can be utilized and detected by
GET_SCREENITEM.
If the display mode for a selected item is set to ITEM_REVERSE by
SET_SCREENITEMS, the item will be displayed in a reverse color once it is touched.
On the contrary, if it is set to ITEM_NORMAL, there will be no changes happening
to the item once it is touched.
Example: Touch Screen Test
*** Signature Capture Area ***
' ENABLE_TOUCHSCREEN
SET_SIGNAREA(5, 5, 155, 120)
RECTANGLE(5, 5, 155, 120, 0, 1)
*********** Buttons ***********
RECTANGLE(5, 125, 75, 145, 0, 1)
RECTANGLE(85, 125, 155, 145, 0, 1)
ITEMSTR$= CHR$(5)+ CHR$(125)+CHR$(70)+CHR$(20)+CHR$(13)
ITEMSTR$= ITEMSTR$+CHR$(85)+ CHR$(125)+CHR$(70)+CHR$(20)
+CHR$(13)
124
BASIC Programming Guide For Use with CipherLab BASIC Compiler
SET_SCREENITEMS(1, 2, ITEMSTR$)
ON TOUCHSCREEN GOSUB GetTouch
GetTouch:
A%= GETSCREENITEM
IF A%=1 THEN
PRINT “OK”
ELSE IF A%=2 THEN
PRINT “CLEAR”
END IF
LOOP:
GOTO LOOP
DISABLE_TOUCHSCREEN
8500
Purpose
To disable the touch screen.
Syntax
DISABLE_TOUCHSCREEN
Remarks
To restart the touch screen function, ENABLE_TOUCHSCREEN must be called.
Example
DISABLE_TOUCHSCREEN
See Also
ENABLE_TOUCHSCREEN, GET_SCREENITEM, SET_SCREENITEMS,
SET_SIGNAREA
ENABLE_TOUCHSCREEN
Purpose
To enable the touch screen.
Syntax
ENABLE_TOUCHSCREEN
Remarks
The touch screen won't work until it is initialized by this command.
8500
Chapter 5 BASIC Commands
125
Example
ENABLE_TOUCHSCREEN
See Also
DISABLE_TOUCHSCREEN, GET_SCREENITEM, OFF TOUCHSCREEN,
ON TOUCHSCREEN GOSUB..., SET_SCREENITEMS, SET_SIGNAREA
GET_SCREENITEM
8500
Purpose
To detect and return an item number when an item is selected.
Syntax
A% = GET_SCREENITEM
Remarks
"A%" is an integer variable assigned to the result.
This function has to be called constantly to maintain its functionality.
The number of a selected item will be returned.
When no item is detected, it will return 0.
Example
TouchItem% = GET_SCREENITEM
See Also
DISABLE_TOUCHSCREEN, ENABLE_TOUCHSCREEN, OFF
TOUCHSCREEN, ON TOUCHSCREEN GOSUB..., SET_SCREENITEMS,
SET_SIGNAREA
SET_SCREENITEMS
8500
Purpose
To specify the size and display mode of the touchable items.
Syntax
SET_SCREENITEMS(mode%, total_item%, item$)
Remarks
The pattern of a touched item is designed by using the command SHOW_IMAGE.
It may be a graphic icon, button or key.
"mode%" is an integer variable, indicating the display mode when an item is
touched.
mode%
Meaning
0
ITEM_NORMAL (A touched item will be displayed normally.)
1
ITEM_REVERSE (A touched item will be displayed in a reverse
color.)
"total_item%" is an integer variable, indicating the amount of items.
"item$" is a string variable, containing the size information of items.
User needs to allocate a string variable to store the size information of each item.
item$
Meaning
x%, y%
the x, y coordinates of the upper left point of an item
size_x%
the width of an item in pixels
size_y%
the height of an item in pixels
126
BASIC Programming Guide For Use with CipherLab BASIC Compiler
Example
ITEMSTR$ = CHR$(5) + CHR$(125) + CHR$(70) + CHR$(20) + CHR$(13)
ITEMSTR$ = ITEMSTR$ + CHR$(85) + CHR$ (125) + CHR$(70) + CHR$(20)
+ CHR$(13)
SET_SCREENITEMS(1,2,ITEMSTR$)
See Also
DISABLE_TOUCHSCREEN, ENABLE_TOUCHSCREEN,
GET_SCREENITEM, OFF TOUCHSCREEN, ON TOUCHSCREEN GOSUB...,
SET_SIGNAREA, SHOW_IMAGE
SET_SIGNAREA
8500
Purpose
To define a signature capture area.
Syntax
SET_SIGNAREA(UppLeft_x%, UppLeft_y%, LowRight_x%, LowRight_y%)
Remarks
Once the signature capture area is defined, user may use the stylus to freely write
or draw on the touch screen.
Note that signature capture is only valid when the writing doesn't exceed the
specified area.
"UppLeft_x%" and "UppLeft_y%" are integer variables, indicating the x, y
coordinates of the upper left point of an area.
"LowRight_x%" and "LowRight_y%" are integer variables, indicating the x, y
coordinates of the lower right point of an area.
Example
SET_SIGNAREA(8,8,150,100)
See Also
DISABLE_TOUCHSCREEN, ENABLE_TOUCHSCREEN,
GET_SCREENITEM, SET_SCREENITEMS, GET_IMAGE
Chapter 5 BASIC Commands
127
5.17 Battery Commands
This section describes the commands related to the battery power.
BACKUP_BATTERY
Purpose
To get the voltage level of the backup battery.
Syntax
A% = BACKUP_BATTERY
Remarks
"A%" is an integer variable to be assigned to the result. That is, the voltage level of
the backup battery is returned in units of milli-volt (mV).
The backup battery is used to retain data in SRAM and keep the real-time clock and
calendar running, even when the power is off. The backup battery would be
considered as "Battery Low" when the BACK_BATTERY is lower than 2900 mV.
That means the SRAM and the calendar chip may lose their data at any time
thereafter, if the battery is not recharged or replaced.
Example
CheckBackupBattery:
IF BACKUP_BATTERY < BATTERY_LOW% THEN
BEEP(2000,30)
CLS
PRINT "Backup Battery needs to be replaced!"
Loop:
GOTO Loop
END IF
See Also
MAIN_BATTERY
MAIN_BATTERY
Purpose
To get the voltage level of the main battery.
Syntax
A% = MAIN_BATTERY
Remarks
"A%" is an integer variable to be assigned to the result. That is, the voltage level of
the main battery is returned in units of milli-volt (mV).
The main battery is the power source for the system operation. The main battery
would be considered as "Battery Low" when the MAIN_BATTERY is lower than
3400 mV (or 2200 mV for alkaline battery on 8001). That means the basic
operations may still be running, but some functions that consume high power may
be disabled.
128
BASIC Programming Guide For Use with CipherLab BASIC Compiler
Example
BATTERY_LOW% = 3400
CheckMainBattery:
IF MAIN_BATTERY < BATTERY_LOW% THEN
BEEP(2000,30)
CLS
PRINT "Main Battery needs to be recharged!"
Loop:
GOTO Loop
END IF
See Also
BACKUP_BATTERY
Chapter 5 BASIC Commands
129
5.18 Communication Ports
There are at least two communication ports on each terminal, namely COM1 and COM2.
Before using the COM ports, user has to call SET_COM_TYPE to specify which
communication type is to be used: RS-232, Serial IR, IrDA, RF, Bluetooth
(SPP/DUN/HID), or GSM.
Note: SET_COM_TYPE is not applicable to RFID (COM 4).
5.18.1 Port Mapping
The following table shows the mapping of the communication ports.
Model#
COM1
COM2
COM3
COM4
711
RS-232
Serial IR, IrDA
N/A
N/A
8000
Serial IR, IrDA
Acoustic Coupler,
N/A
N/A
N/A
N/A
Bluetooth
8100
RS-232
8300
RS-232, Serial IR, IrDA RF, Bluetooth
N/A
N/A
8500
Serial IR, IrDA
GSM
RFID
RF
Bluetooth
Note: The Bluetooth profiles supported on the 8000/8300/8500 series include SPP, DUN,
and HID.
The same command set is provided for the above interface: OPEN_COM, CLOSE_COM,
READ_COM$, and WRITE_COM
Commands for triggering the COM event: OFF COM, ON COM GOSUB...
5.18.2 Receive & Transmit Buffers
Receive Buffer
A 256 byte FIFO buffer is allocated for each port. The data successfully received is
stored in this buffer sequentially (if any error occurs, e. g. framing, parity error, etc.,
the data is simply discarded). However, if the buffer is already full, the incoming
data will be discarded and an overrun flag is set to indicate this error.
130
BASIC Programming Guide For Use with CipherLab BASIC Compiler
Transmit Buffer
The system does not allocate any transmit buffer. It simply records the pointer of the
string to be sent. The transmission stops when a null character (0x00) is
encountered. The application program must allocate its own transmit buffer and not
to modify it during transmission.
The rest communication-related commands are grouped by different communication types
and described separately in the following sections.
CLOSE_COM
Purpose
To terminate communication and disable a specified COM port.
Syntax
CLOSE_COM(N%)
Remarks
"N%" is an integer variable, indicating which COM port is to be disabled.
Example
CLOSE_COM(2)
See Also
OPEN_COM, READ_COM$, SET_COM_TYPE, WRITE_COM
OPEN_COM
Purpose
To enable a specified COM port and initialize communication.
Syntax
OPEN_COM(N%)
Remarks
"N%" is an integer variable, indicating which COM port is to be enabled.
Example
OPEN_COM(1)
See Also
CLOSE_COM, OFF COM, ON COM GOSUB..., READ_COM$,
SET_COM_TYPE, WRITE_COM
READ_COM$
Purpose
To read data from a specified COM port.
Syntax
A$ = READ_COM$(N%)
Remarks
"A$" is a string variable to be assigned to the data.
"N%" is an integer variable, indicating from which COM port the data is to be read.
If the receive buffer is empty, an empty string will be returned.
Example
ON COM(1) GOSUB HostCommand
...
Chapter 5 BASIC Commands
131
HostCommand:
Cmd$ = READ_COM$(1)
CmdIdentifier$ = LEFT$(Cmd$,1)
DBFNum% = VAL(MID$(Cmd$,2,1))
IDFNum% = VAL(MID$(Cmd$,3,1))
CardID$ = RIGHT$(Cmd$,LEN(Cmd$)-3)
IF CmdIdentifier$ = "-" THEN
DEL_RECORD(DBFNum%,IDFNum%)
ELSE
...
See Also
CLOSE_COM, OFF COM, ON COM GOSUB..., OPEN_COM,
SET_COM_TYPE, WRITE_COM
SET_COM
Purpose
To set parameters for a specified COM port.
Syntax
SET_COM(N%, Baudrate%, Parity%, Data%, Handshake%)
Remarks
This command needs to be called BEFORE opening a COM port. However, it is
not necessary for RF, GSM, and RFID.
This command also serves Bluetooth configuration for SPP, DUN, HID, and
Wedge.
Parameters
Values
Remarks
N%
1 or 2
Indicates which COM port is to be set.
Baudrate%
1: 115200 bps
Specifies the baud rate of the COM port.
2: 76800 bps*
3: 57600 bps
4: 38400 bps
5: 19200 bps
For acoustic coupler setting, 1 ~ 4 is
used to indicate its volume (low to
high).
6: 9600 bps
7: 4800 bps*
8: 2400 bps*
* (asterisk): Not applicable to Serial IR.
Parity%
1: None
Specifies the parity of the COM port.
2: Odd
3: Even
4: Cradle
commands
Refer to Appendix VI for cradle commands.
132
BASIC Programming Guide For Use with CipherLab BASIC Compiler
1: 7 data bits
Data%
Specifies the data bits of the COM port.
2: 8 data bits
Handshake%
Specifies the method of flow control
for direct RS-232.
1: None
2: CTS/RTS
Set 1 for Serial IR or IrDA.
3: XON/XOFF
For the 8000/8300 series, to disable
Reserved Host Commands, add 16 to
the value of Handshake%. (see table
below)
4: Wedge
For the 8300 series, to enable URPower
5V, add 32 to the value of
Handshake%. (see table below)
For acoustic coupler, 5 ~ 9 is used to
indicate the character delay for 2 stop
bits.
5 ~ 9: 2 stop
bits
5 for 0 character delay;
6 for 1 character delay;
7 for 3 characters delay;
8 for 5 characters delay;
9 for 10 characters delay.
Example
Value
Handshake%
Reserved Host Commands
URPower 5V
1
None
Enabled
Disabled
17
(=1+16)
Disabled
Disabled
33
(=1+32)
Enabled
Enabled
49
(=1+16+32)
Disabled
Enabled
2...
CTS/RTS
Same options
Same options
3...
XON/XOFF
Same options
Same options
4...
Wedge Emulator
Same options
Same options
SET_COM(1,1,1,2,1) ' COM1, 115200, None, 8, No handshake
SET_COM(1,1,1,2,17) ' COM1, 115200, None, 8, No handshake, Reserved Host
Commands disabled
SET_COM(1,1,1,2,33) ' COM1, 115200, None, 8, No handshake, URPower 5V
enabled
SET_COM(1,1,1,2,49) ' COM1, 115200, None, 8, No handshake,Reserved Host
Commands disabled, URPower 5V enabled
See Also
CLOSE_COM, OPEN_COM, READ_COM$, SET_COM_TYPE,
WRITE_COM
Chapter 5 BASIC Commands
133
SET_COM_TYPE
Purpose
To assign the communication type to a specified COM port.
Syntax
SET_COM_TYPE(N%, type%)
Remarks
"N%" is an integer variable, indicating which COM port (1~3) is to be set.
"type%" is an integer variable, indicating the type of interface.
type%
Meaning
1
Direct RS-232
2
N/A
3
Serial IR (via IR transceiver)
4
Standard IrDA
5
RF, Bluetooth (SPP/DUN/HID)
6
GSM_SMS
7
Acoustic Coupler (8000) or
GSM_Modem (8500)
This function needs to be called BEFORE opening a COM port. However, it is not
necessary for RFID. Note that the COM port mapping is different for each model of
terminal, and a COM port may not support all the communication types.
Example
SET_COM_TYPE(1,3)
See Also
CLOSE_COM, OPEN_COM, READ_COM$, SET_COM, WRITE_COM
' set COM1 of 8300 to serial IR
communication
WRITE_COM
Purpose
To send a string to the host through a specified COM port.
Syntax
WRITE_COM(N%, A$)
Remarks
"N%" is an integer variable, indicating which COM port the data is to be sent to.
"A$" is a string variable, representing the string to be sent.
Example
ON READER(1) GOSUB BcrData_1
...
BcrData_1:
BEEP(2000,5)
Data$ = GET_READER_DATA$(1)
WRITE_COM(1, Data$)
...
See Also
CLOSE_COM, OPEN_COM, READ_COM$, SET_COM_TYPE
134
BASIC Programming Guide For Use with CipherLab BASIC Compiler
5.18.3 RS-232, Serial IR and IrDA Communications
RS-232 Parameters
Baud Rate:
115200, 76800, 57600, 38400, 19200, 9600, 4800, 2400
Data Bits:
7 or 8
Parity:
Even, Odd, or None
Stop Bit:
1
Flow Control:
RTS/CTS, XON/XOFF, or None
Serial IR Parameters
Baud Rate:
115200, 57600, 38400, 19200, 9600
Data Bits:
8
Parity:
Even, Odd, or None
Stop Bit:
1
Flow Control:
None
IrDA Parameters
Baud Rate:
115200, 76800, 57600, 38400, 19200, 9600, 4800, 2400
Data Bits:
7 or 8
Parity:
Even, Odd, or None
Stop Bit:
1
Flow Control:
None
Note: For IrDA settings, parameters are required for compatibility in coding. In fact, they
are “don’t care” parameters.
COM_DELIMITER
Purpose
To change delimiter of sending and receiving string for a specified COM port.
Syntax
COM_DELIMITER(N%, C%)
Remarks
The default COM_DELIMITER is 0x0d.
"N%" is an integer variable, indicating which COM port is to be set.
"C%" is an integer variable, representing the ASCII code of the delimiter character,
in the range of 0 to 255. If it is negative, no delimiter will be applied.
Example
COM_DELIMITER(1,13)
' use RETURN as delimiter
COM_DELIMITER(1,10)
' use Line Feed as delimiter
Chapter 5 BASIC Commands
IRDA_STATUS
135
711, 8000, 8300, 8500
Purpose
To check the IrDA connection status or transmission status.
Syntax
A% = IRDA_STATUS(N%)
Remarks
"A%" is an integer variable to be assigned to the result.
"N%" is an integer variable, indicating the action to take.
N%
Meaning
0
To check IrDA connection status.
When A% = 0, it means the IrDA connection is disabled.
When A% = 1, it means the IrDA connection is enabled.
1
To check whether data being transmitted successfully or not.
A% is the length of string (delimiters are included).
Example
CLS
SET_COM_TYPE(2,4)
' set COM2 of 711 as IrDA port
OPEN_COM(2)
Loop1:
IF (IRDA_STATUS(0) = 1) THEN
' check connection
BEEP(4400,5)
ELSE
GOTO Loop1
END IF
WRITE_COM(2, "My Data")
IF (IRDA_STATUS(1) = 7) THEN
PRINT "Write OK"
ELSE
PRINT "Write NG"
END IF
CLOSE_COM(2)
See Also
IRDA_TIMEOUT
' check transmission
136
BASIC Programming Guide For Use with CipherLab BASIC Compiler
IRDA_TIMEOUT
711, 8000, 8300, 8500
Purpose
To set the timeout for IrDA connection.
Syntax
IRDA_TIMEOUT(N%)
Remarks
"N%" is an integer variable in the range of 1 to 8, indicating a specified period of
time.
N%
Meaning
1
3 sec
2
8 sec
3
12 sec
4
16 sec
5
20 sec
6
25 sec
7
30 sec
8
40 sec
Example
IRDA_TIMEOUT(7)
See Also
IRDA_STATUS
' set timeout to 30 seconds
Flow Control
To avoid data loss, three options of flow control are supported and done by
background routines.
1. None: Flow control is disabled.
2. RTS/CTS: RTS now stands for Ready for Receiving instead of Request To Send, while
CTS for Clear To Send. The two signals are used for hardware flow control.
Transmit
Transmission is allowed only when the CTS signal is asserted. If the CTS signal
is negated (= de-asserted) and later becomes asserted again, the transmission is
automatically resumed by background routines. However, due to the UART
design (on-chip temporary transmission buffer), up to five characters might be
sent after the CTS signal is de-asserted.
Receive
The RTS signal is used to indicate whether the storage of receive buffer is free
or not. If the receive buffer cannot take more than 5 characters, the RTS signal is
de-asserted, and it instructs the sending device to halt the transmission. When its
receive buffer becomes enough for more than 15 characters, the RTS signal
becomes asserted again, and it instructs the sending device to resume
transmission.
Chapter 5 BASIC Commands
137
As long as the buffer is sufficient (may be between 5 to 15 characters), the
received data can be stored even though the RTS signal has just been negated.
3. XON/XOFF: Instead of using RTS/CTS signals, two special characters are used for
software flow control, i.e. XON (hex 11) and XOFF (hex 13). XON is used to
enable transmission while XOFF to disable transmission.
Transmit
When the port is opened, the transmission is enabled. Then every character
received is examined to see if it is normal data or flow control codes. If an
XOFF is received, transmission is halted. It is resumed later when XON is
received. Just like the RTS/CTS control, up to two characters might be sent after
an XOFF is received.
Receive
The received characters are examined to see if it is normal data (which will be
stored to the receive buffer) or a flow control code (set/reset transmission flag
but not stored). If the receive buffer cannot take more than 5 characters, an
XOFF control code is sent. When the receive buffer becomes enough for more
than 15 characters, an XON control code will be sent so that the transmission
will be resumed. As long as the buffer is sufficient (may be between 5 to 15
characters), the received data can be stored even when in XOFF state.
If receiving and transmitting are concurrently in operation, the XON/XOFF
control codes might be inserted into normal transmit data string. When using
this method, make sure that both sides feature the same control methodology;
otherwise, dead lock might happen.
Note: Flow control is only applicable to the direct RS-232 COM port, which is usually
assigned as COM 1.
GET_CTS
711, 8100, 8300
Purpose
To get CTS level on the direct RS-232 port.
Syntax
A% = GET_CTS(N%)
Remarks
"A%" is an integer variable to be assigned to the result.
A%
Meaning
0
Negated (= in the "space" state)
1
Asserted (= in the "mark" state)
"N%" is an integer variable, indicating on which COM port to get CTS level.
Example
A% = GET_CTS(1)
See Also
SET_RTS
138
BASIC Programming Guide For Use with CipherLab BASIC Compiler
SET_RTS
711, 8100, 8300
Purpose
To set RTS level on the direct RS-232 port.
Syntax
SET_RTS(N1%, N2%)
Remarks
"N1%" is an integer variable, indicating on which COM port to set RTS level.
"N2%" is an integer variable, indicating the RTS state.
N2%
Meaning
0
Negated (= in the "space" state)
1
Asserted (= in the "mark" state)
Example
SET_RTS(1,1)
See Also
GET_CTS
' set COM1 RTS to the "mark" state
Chapter 5 BASIC Commands
139
5.19 IR / RS-232 Networking
5.19.1 PPP via IR / RS-232
PPP, short for Point-to-Point Protocol, is a method of connecting a terminal to the Internet
over serial links. PPP sends the computer's TCP/IP packets to a server that puts them onto
the Internet.
PPP Connection via IR
It is supported on the 8000/8300/8500 series when making use of the proprietary
modem cradle. For baud rate setting, any value other than 57600 bps (default) must
be configured through the DIP switch of the IR control board.
Note: For the 8000/8300 series, the version of IR control board on the modem cradle must
be greater than SV3.01.
140
BASIC Programming Guide For Use with CipherLab BASIC Compiler
PPP Connection via RS-232
It is supported on the 8300 series only (direct RS-232).
Example of PPP Connection
Follow the same programming flow of WLAN (802.11b) Example.
Before calling START TCPIP(4) or START TCPIP(5), the following parameters of PPP
must be specified.
Index
Configuration Item
Remarks
-70
70
PPP_DIALUPPHONE [20]
Phone number of ISP
-71
71
PPP_LOGINNAME [39]
Login user name of ISP
-72
72
PPP_LOGINPASSWORD [20]
Login password of ISP
-73
73
PPP_BAUDRATE (cf.
SET_COM)
Baud rate matching modem cradle or modem
Note: For baud rate values of IR or RS-232, see the baud rate parameter in SET_COM.
Chapter 5 BASIC Commands
141
5.19.2 Ethernet via IR
It is supported on the 8000/8300/8500 series when making use of the proprietary Ethernet
cradle.
Example of Ethernet Connection
If you configure the Ethernet cradle to work in Transparent mode, follow the same
programming flow of WLAN (802.11b) Example.
Refer to the Ethernet Cradle manual for more information on the working modes.
142
BASIC Programming Guide For Use with CipherLab BASIC Compiler
5.20 RF Communications
This section describes the BASIC functions and statements related to Radio Frequency
communications. These commands are for the use of some specific models as shown below.
5.20.1 RF Models & Specifications
Below are the two types of RF communications and their specifications. A base refers to a
base station, either for Narrow Band (433 MHz) or Spread Spectrum (2.4 GHz).
RF Product Family
Narrow Band
Terminal
8110
Base Station
3510
Spread Spectrum
8310
8150
3550
Narrow Band (also referred to as 433 MHz RF)
Frequency Range:
433.12 ~ 434.62 MHz
Data Rate:
9600 bps
Programmable Channels:
4
Coverage:
200 meters line-of-sight
Max. Output Power:
10 mW (10 dbm)
Spread Spectrum:
None
Modulation:
FSK (Frequency Shift Keying)
Spread Spectrum (also referred to as 2.4 GHz RF)
Frequency Range:
2.4000 ~ 2.4835 GHz, unlicensed ISM Band
Data Rate:
19200 bps
Programmable Channels:
6
Coverage:
1000 meters line-of-sight
Max. Output Power:
100 mW
Spread Spectrum:
Frequency Hopping Spread Spectrum (FHSS)
Modulation:
GFSK
Frequency Control:
Direct FM
Note: All specifications are subject to change without prior notice.
8350
Chapter 5 BASIC Commands
143
5.20.2 RF System Requirements
Basics
Base to Host:
RS-232 connection
Base Baud Rate:
Up to 115,200 bps
Base to Base:
RS-485 connection
Number of Bases per System:
Maximum 16
433 MHz RF System
Number of Terminals per Base:
Maximum 15
Number of Terminals per System:
Maximum 45
2.4 GHz RF System
Number of Terminals per Base:
Maximum 99
Number of Terminals per System:
Maximum 99
IDs and Groups
An ID to a terminal or a base is like a name to a person. Each terminal/base in the
same RF system must have a unique ID so that the system will work properly.
For the 433 MHz RF system, up to 45 terminals and 16 bases can be supported by
one system. The valid ID ranges from 1 to 45 for terminals, and 1 to 16 for bases. To
support all 45 terminals, the 433 MHz RF bases need to be configured to 3 groups.
Each group, as well as each base, can support up to 15 terminals.
Base IDs (433 MHz):
01 ~ 16
Terminal IDs (433 MHz):
01 ~ 45
(3 groups: 01 ~ 15 supported by Group 1 bases
16 ~ 30 supported by Group 2 bases
31 ~ 45 supported by Group 3 bases)
For the 2.4 GHz RF system, up to 99 terminals and 16 bases can be supported by
one system, and they all belong to one group. The valid ID ranges from 1 to 99 for
terminals, and 1 to 16 for bases.
Base IDs (2.4 GHz):
01 ~ 16
Terminal IDs (2.4 GHz):
01 ~ 99
144
BASIC Programming Guide For Use with CipherLab BASIC Compiler
5.20.3 RF Topology & Roaming
You may need to install more than one base station to cover the most of your working floor
so that you can move around and stay connected all the time. There is one simple rule: two
adjacent bases must not use the same channel.
The following are several types of deployment for the 433 MHz RF system. Each circle
represents the area covered by one base, and the number inside the circle refers to the
channel of the base. The square in dashed line represents the working floor.
Chapter 5 BASIC Commands
145
By default, a terminal can automatically switch to a different channel depending on its
location. This is called "roaming". If the terminal is set to be able to auto search available
channels nearby, whenever it cannot find the base that it is registered to, it will change its
channel and try to connect to another base inside the system.
With this auto-switching capability, the virtual working area for one terminal is not
restricted to the coverage one base, but to the overall coverage of the whole system.
5.20.4 RF System Deployment
Before deploying an RF system, these tasks need to be carried out: site survey and planning,
installation, and testing.
Site Survey & Planning
Below are the guidelines for site surveying and planning:
Test the base station's coverage
The coverage may be affected by several environmental factors, such as:
- Background noise from other equipment.
- Interference from other RF systems nearby.
- Shielding by metallic or concrete structures of the building.
- Humidity and other wave absorption materials.
Estimate the number of base stations as needed
Estimate the number of terminals as needed
Determine the base station's deployment topology
Installation
If possible, always install the RF base close to the center of the working floor to
deliver better coverage. For the antenna to access as much free space as possible,
install the base to a higher position.
146
BASIC Programming Guide For Use with CipherLab BASIC Compiler
Testing
Select the maximum output power (10 dbm) to test the transmission coverage and
response time. Then try out each channel to get the best performance. If the
coverage satisfies your needs, repeat the above procedure with lower output power.
The benefits in using lower output power are:
to conserve battery power
to reduce the possibility of interference to other RF systems
The power consumption for sending and receiving is about 60 mA and 25 mA
maximum, respectively. The five tunable output power settings are:
10 dbm (10.0 mW)
5 dbm (3.16 mW)
4 dbm (2.51 mW)
0 dbm (1.00 mW)
-5 dbm (0.32 mW)
Chapter 5 BASIC Commands
147
5.20.5 RF Terminal Properties
Below are the RF properties on terminal.
433 MHz Terminal Properties (8110, 8310)
Channel:
1~4
ID:
1 ~ 45
Timeout:
1 ~ 99 seconds (duration of retries for sending data)
Output Power:
1 ~ 5 levels (10, 5, 4, 0, -5 dbm)
Auto Search:
0 ~ 99 seconds (automatically search for available channel when the
connection to the current channel is lost)
2.4 GHz Terminal Properties (8150, 8350)
Channel:
1~6
ID:
1 ~ 99
Timeout:
1 ~ 99 seconds (duration of retries for sending data)
Output Power:
1 level (64 mW)
Auto Search:
0 ~ 99 seconds (automatically search for available channel when the
connection to the current channel is lost)
CHECK_RF_BASE
8110, 8310, 8150, 8350
Purpose
To check if the terminal is connected to a base.
Syntax
A% = CHECK_RF_BASE
Remarks
"A%" is an integer variable to be assigned to the result.
Example
A%
Meaning
0
No base found.
1
Base is present.
IF (CHECK_RF_BASE = 1) THEN
...
END IF
See Also
SEARCH_RF_CHANNEL
CHECK_RF_SEND
Purpose
To check if data has been sent successfully or not.
8110, 8310, 8150, 8350
148
BASIC Programming Guide For Use with CipherLab BASIC Compiler
Syntax
A% = CHECK_RF_SEND
Remarks
"A%" is an integer variable to be assigned to the result.
Example
A%
Meaning
0
Fail to send.
1
Sent successfully.
RESEND:
WRIT_COM(2, A$)
IF (CHECK_RF_SEND = 0) THEN
GOTO RESEND
END IF
See Also
GET_RF_CHANNEL
Purpose
To get the channel number assigned to the terminal.
Syntax
A% = GET_RF_CHANNEL
Remarks
"A%" is an integer variable to be assigned to the result.
Example
channel% = GET_RF_CHANNEL
See Also
SET_RF_CHANNEL
GET_RF_ID
8110, 8310, 8150, 8350
8110, 8310, 8150, 8350
Purpose
To get the terminal ID.
Syntax
A% = GET_RF_ID
Remarks
"A%" is an integer variable to be assigned to the result.
Example
Id% = GET_RF_ID
See Also
SET_RF_ID
GET_RF_POWER
8110, 8310, 8150, 8350
Purpose
To get the level of the RF output power. (applicable to 433 MHz only)
Syntax
A% = GET_RF_POWER
Remarks
"A%" is an integer variable to be assigned to the result.
Example
level% = GET_RF_POWER
See Also
SET_RF_POWER
Chapter 5 BASIC Commands
SEARCH_RF_CHANNEL
149
8110, 8310, 8150, 8350
Purpose
To automatically search for available channels when not being connected to a base
for a specific period of time
Syntax
SEARCH_RF_CHANNEL(N%)
Remarks
"N%" is an integer variable, indicating a specified period of time in units of 1
second.
Example
SEARCH_RF_CHANNEL(10)
See Also
CHECK_RF_BASE, SET_RF_CHANNEL, SET_RF_TIMEOUT
SET_RF_CHANNEL
8110, 8310, 8150, 8350
Purpose
To set the channel of the terminal.
Syntax
SET_RF_CHANNEL(N%)
Remarks
"N%" is an integer variable, indicating the specified channel for the terminal.
N%
Meaning
1~4
Channels available for 433 MHz.
1~6
Channels available for 2.4 GHz.
Example
SET_RF_CHANNEL(1)
See Also
GET_RF_CHANNEL, SEARCH_RF_CHANNEL
SET_RF_ID
8110, 8310, 8150, 8350
Purpose
To set the terminal ID.
Syntax
SET_RF_ID(N%)
Remarks
"N%" is an integer variable, indicating the ID of the terminal.
N%
Meaning
1 ~ 45
IDs available for 433 MHz.
1 ~ 99
IDs available for 2.4 GHz.
Example
SET_RF_ID(1)
See Also
GET_RF_ID
SET_RF_POWER
Purpose
To set the RF output power. (applicable to 433 MHz only)
Syntax
SET_RF_POWER(N%)
8110, 8310, 8150, 8350
150
BASIC Programming Guide For Use with CipherLab BASIC Compiler
Remarks
"N%" is an integer variable, indicating the power level of the terminal.
N%
Meaning
1
10 dbm
2
5 dbm
3
4 dbm
4
0 dbm
5
-5 dbm
Example
SET_RF_POWER(2)
See Also
GET_RF_POWER
SET_RF_TIMEOUT
8110, 8310, 8150, 8350
Purpose
To set a period of time for attempting to send data.
Syntax
SET_RF_TIMEOUT(N%)
Remarks
"N%" is an integer variable, indicating a specified period of time in units of 1
second.
If set to 0, it will be determined by the system.
Example
SET_RF_TIMEOUT(5)
See Also
SEARCH_RF_CHANNEL
Chapter 5 BASIC Commands
151
5.20.6 RF Base Properties
The RF terminals must communicate with the RF base stations. Below are the RF properties
on base stations.
433 MHz Base Properties (3510)
Mode:
1 - standalone, 2 - slave, 3 - master
Channel:
1~4
ID:
01 ~ 16
Group:
1~3
Timeout:
1 ~ 99 seconds (duration of retries for sending data)
Output Power:
1 ~ 5 levels (10, 5, 4, 0, -5 dbm)
Baud Rate:
115200, 57600, 38400, 19200, 9600
2.4 GHz Base Properties (3550)
Mode:
1 - standalone, 2 - slave, 3 - master
Channel:
1~6
ID:
01 ~ 16
Group:
1
Timeout:
1 ~ 99 seconds (duration of retries for sending data)
Output Power:
1 level (100 mW)
Baud Rate:
115200, 57600, 38400, 19200, 9600
Note: If more than two base stations are connected together, the one connected to the host
computer needs to be set to master mode, while the rest to slave mode.
RS-232 Host Commands Set
Automatically Update Status: @AT
Purpose
To update information of bases and terminals automatically.
Note that there will be no return of @BSbbgc if only one base exists.
Syntax
@AT\r
Return
@BSbbgc...\r (bbgc may repeat)
bb: Base ID (01 ~ 16)
g: Group number (1 ~ 3)
RF Base
152
BASIC Programming Guide For Use with CipherLab BASIC Compiler
c: Channel number (1 ~ 4)
@TMbbtt…\r (tt may repeat)
bb: Base ID (01 ~ 16)
tt: Terminal ID (01 ~ 45)
Broadcast Data: @BC
Purpose
RF Base
To broadcast data to all registered bases.
Note that all bases are connected via RS-485 as a daisy chain; therefore, data may
not be sent to all registered bases if any of them fails.
Syntax
@BC...ddd...\r
Return
None
List Base Station: @BS
Purpose
To get information of bases, such as their groups and channels.
Syntax
@BS\r
Return
@BSbbgc...\r (bbgc may repeat)
RF Base
bb: Base ID (01 ~ 16)
g: Group number (1 ~ 3)
c: Channel number (1 ~ 4)
Set / Get Channel: @CH
Purpose
To set or get the Base's channel.
Syntax
@CHbbc\r
RF Base
bb: Base ID (01 ~ 16)
c: New channel (1 ~ 4); set 0 to get the Base's channel.
Return
@CHbbCoCn\r
bb: Base ID (01 ~ 16)
Co: Original channel (1 ~ 4)
Cn: New channel (1 ~ 4)
Send Data to Terminal: @DT
Purpose
To send data to the terminal.
RF Base
Chapter 5 BASIC Commands
Syntax
153
@DTttdd...\r
tt: Terminal ID (01 ~ 45)
dd: Data string
Return
@Oktt\r (succeed)
@NGtt\r (fail)
@WTtt\r (busy; data will be sent later)
Receive Data from Terminal: @DT
Purpose
To receive data from the terminal.
Syntax
@DTbbttdd...\r
RF Base
(Received bb: Base ID (01 ~ 16)
)
tt: Terminal ID (01 ~ 45)
dd: Data string
Command / Format Error: @ER
Purpose
RF Base
If the command or data being sent to the Base is incorrect, the Base returns
@ER\r.
Set / Get Group: @GP
Purpose
To set or get the Base's group.
Syntax
@GPbbg\r
RF Base (433 MHz only)
bb: Base ID (01 ~ 16)
g: New group (1 ~ 3); set 0 to get the Base's group.
Return
@GPbbGoGn\r
bb: Base ID (01 ~ 16)
Go: Original group (1 ~ 3)
Gn: New group (1 ~ 3)
Header of Data Packets: @HD
Purpose
RF Base
To enable or disable the header of a data packet. By default, the data received will
be prefixed with “@DTbbtt”, where bb refers to Base ID and tt refers to Terminal
ID. If the header is disabled, there will be no prefix at all.
154
BASIC Programming Guide For Use with CipherLab BASIC Compiler
Syntax
@HDbbc\r
bb: Base ID (01 ~ 16)
c: set 0 to disable the header; set 1 to enable the header (default: enable)
Return
@HDbbCoCn\r
bb: Base ID (01 ~ 16)
Co: Original setting (1~ 4)
Cn: New setting (1 ~ 4)
Change ID: @ID
RF Base
Purpose
To change the Base ID.
Syntax
@IDbbBB\r
bb: Original Base ID (01 ~ 16)
BB: New Base ID (01 ~ 16)
Return
@IDbbBB\r
bb: Original Base ID (01 ~ 16)
BB: New Base ID (01 ~ 16)
Set / Get Mode: @ME
RF Base
Purpose
To set or get the Base's mode.
Syntax
@MEbbm\r
bb: Base ID (01 ~ 16)
m: Base mode (1 ~ 3); set 0 to get the Base's mode.
Return
m
Meaning
0
Get info
1
Standalone
2
Slave
3
Master
@MEbbmomn\r
bb: Base ID (01 ~ 16)
mo: Original mode (1 ~ 3)
mn: New mode (1 ~ 3)
Chapter 5 BASIC Commands
Change Output Power: @PW
Purpose
To change the Base's output power.
Syntax
@PWbbp\r
155
RF Base (433 MHz only)
bb: Base ID (01 ~ 16)
p: Power level (1 ~ 5); set 0 to get the Base's output power.
Return
p
Meaning
0
Get info
1
10 dbm
2
5 dbm
3
4 dbm
4
0 dbm
5
-5 dbm
@PWbbPoPn\r
bb: Base ID (01 ~ 16)
Po: Original power level (1 ~ 5)
Pn: New power level (1 ~ 5)
Set Base Quiet: @QT
RF Base
Purpose
To enable or disable the message (“@Oktt\r”, “@NGtt\r”, “@WTtt\r”) generation
of the Base when sending data to the terminal.
Syntax
@QTbbs\r
bb: Base ID (01 ~ 16)
s: set 0 for responsive; set 1 for quiet (i.e. no message)
Return
@QTbbSoSn\r
bb: Base ID (01 ~ 16)
So: Original state
Sn: New state
RS-232 Baud Rate: @SP
Purpose
To change the RS-232 baud rate setting of the Base.
Note that the connection has to be restarted with new setting.
RF Base
156
BASIC Programming Guide For Use with CipherLab BASIC Compiler
Syntax
@SPbbs\r
bb: Base ID (01 ~ 16)
s: Baud rate setting
s
Meaning
115200 Baud rate in bps
57600
38400
19200
9600
4800
2400
1200
Return
None
List Terminal: @TM
Purpose
To list terminals that are registered to the Base or bases.
Syntax
@TMbb\r
RF Base
bb: Base ID (01 ~ 16); set 00 for all bases.
Return
@TMbbtt…\r (tt repeat)
bb: Base ID (01 ~ 16)
tt: Terminal ID (01 ~ 45)
Transmission Timeout: @TO
Purpose
To set or get the timeout setting.
Syntax
@TObbtt\r
bb: Base ID (01 ~ 16)
tt: Timeout setting (01 ~ 99 sec); set 00 to get the current timeout.
Return
@TObbttTT\r
bb: Base ID (01 ~ 16)
tt: Original timeout (01 ~ 99 sec)
TT: New timeout (01 ~ 99 sec)
RF Base
Chapter 5 BASIC Commands
Update Program: @UP
Purpose
To enter the download mode for updating the Base program.
Syntax
@UPbb\r
157
RF Base
bb: Base ID (01 ~ 16)
Return
@UPbb\r
bb: Base ID (01 ~ 16)
The Base is ready for downloading new program after returning this message.
158
BASIC Programming Guide For Use with CipherLab BASIC Compiler
5.20.7 RF Example
Set COM port (SET_COM_TYPE):
Assign COM2 to RF communication, i.e. SET_COM_TYPE (2, 5).
Open COM port (OPEN_COM):
To initialize the RF module and set up connection, call OPEN_COM (2).
Set COM delimiter:
For example, use carriage return (0x0d) as the string delimiter by calling
COM_DELIMITER (2, 13).
Data transmission:
To transmit data, call WRITE_COM (2, A$).
To receive data, call A$ = READ_COM$ (2).
Close COM port (CLOSE_COM):
To disable the RF module, call CLOSE_COM (2).
Chapter 5 BASIC Commands
159
5.21 Wireless Communications
This section describes the commands related to wireless network configuration.
WLAN
stands for
IEEE 802.11b
PAN
stands for
Personal Area Networking Profile of Bluetooth
SPP
stands for
Serial Port Profile of Bluetooth
DUN
stands for
Dial-Up Networking Profile of Bluetooth for
connecting a Modem
DUN-GPRS
stands for
Dial-Up Networking Profile of Bluetooth for
activating a mobile's GPRS
HID
stands for
Human Interface Device Profile of Bluetooth
GSM
stands for
Global System for Mobile Communications
GPRS
stands for
General Packet Radio Service
5.21.1 Wireless Models
These commands are for the use of the following models.
Wireless Product Family
Terminal
Bluetooth
WLAN (802.11b)
Bluetooth + 802.11b
GSM/GPRS
8061
8071
8330
8590
8360
8370
8570
(based on 8500 or
8570)
3570
N/A
N/A
8500
Access Point 3560
Note: Refer to the previous section for port mapping of Bluetooth and GSM.
160
BASIC Programming Guide For Use with CipherLab BASIC Compiler
IEEE 802.11b
IEEE 802.11b is an industrial standard for Wireless Local Area Networking
(WLAN), which enables wireless communications over a long distance.
The speed of the connection between wireless devices will vary with range and
signal quality. To maintain a reliable connection, the 802.11b system automatically
fallback from 11 Mbps to 5.5, 2 or 1 Mbps as range increases or signal quality
decreases.
802.11b Specification
Frequency Range:
2.4 ~ 2.5 GHz
Data Rate:
11, 5.5, 2, 1 Mbps auto-fallback
Connected Devices:
1 for ad-hoc mode (No AP)
Multiple for infrastructure mode (AP required)
Protocol:
IP/TCP/UDP
Coverage:
250 meters line-of-sight
Max. Output Power:
100 mW
Spread Spectrum:
DSSS
Modulation:
DBPSK (1 Mbps), DQPSK (2 Mbps), CCK (11 Mbps)
Standard:
IEEE 802.11b, interoperable with Wi-Fi devices
Note: All specifications are subject to change without prior notice.
Chapter 5 BASIC Commands
161
Bluetooth
Serial Port Profile (SPP) is for ad-hoc networking, without going through any
access point.
Dial-Up Networking Profile (DUN) makes use of a Bluetooth modem or mobile
phone as a wireless modem.
Also, it can be used to activate the GPRS functionality on a mobile phone.
Human Interface Device Profile (HID) allows a terminal to work as an input device,
i.e. keyboard, for a host computer.
Personal Area Networking Profile (PAN) makes use of Bluetooth Network
Encapsulation Protocol (BNEP) for IP networking over Bluetooth.
Access points (AP) are required. Use the same commands as for 802.11b - TCP/IP
networking.
Bluetooth Specification
Frequency Range:
2.4 ~ 2.5 GHz
Data Rate:
433 kbps
Connected Devices:
1 for DUN mode
Up to 7 for SPP or PAN mode (AP required)
Profiles:
SPP, DUN, HID, PAN
Coverage:
Class 1: 250 meters line-of-sight (8061/8360)
Class 2: 10 meters line-of-sight (8330/8500)
Max. Output Power:
100 mW (Class 1)
10 mW (Class 2)
Spread Spectrum:
FHSS
Modulation:
GFSK
Standard:
Bluetooth version 1.1
Note: All specifications are subject to change without prior notice.
162
BASIC Programming Guide For Use with CipherLab BASIC Compiler
5.21.2 Network Configuration
Before bringing up (initializing) the network, some related parameters must be configured.
These parameters are kept by the system during normal operations and power on/off cycles.
The parameters can be accessed through the System Menu or an application program (via
GET_NET_PARAMETER$, SET_NET_PARAMETER).
Note: The parameters will be set back to the default values when updating kernel.
Index
Configuration Item
Default
Setup
String
REMOTE_IP (string)
Read only
GET_NET_
SET_NET_
PARAMETER PARAMETER
0~3
-1
1
LOCAL_IP (string)
0.0.0.0
-2
2
SUBNET_MASK (string)
0.0.0.0
-3
3
DEFAULT_GATEWAY (string) 0.0.0.0
-4
4
DNS_SERVER (string)
0.0.0.0
-5
5
LOCAL_NAME [33]
S/N
-6
6
SS_ID [33]
---
-7 to -10
7 to 10
WEP_KEY_1~4 [14]
---
-11
11
DHCP_ENABLE
Enable
-12
12
AUTHEN_ENABLE
Open
-13
13
WEP_LEN
128 bits
-14
14
SYSTEM_SCALE
Medium
-15
15
DEFAULT_WEP_KEY
1
DOMAIN_NAME [129]
Read only
-16
-17
17
WEP_ENABLE
Disable
-18
18
EAP_ENABLE
Disable
-19
19
EAP_ID [33]
---
-20
20
EAP_PASSWORD [33]
---
-21
21
POWER_SAVE_ENABLE
Enable
-22
22
PREAMBLE
Long
-23
MAC_ID [6]
Read only
-24
BT_MACID [6]
Read only
WLAN SPP
DUN PAN
Chapter 5 BASIC Commands
-25
25
BT_REMOTE_NAME [20]
---
-26
26
BT_SECURITY
Disable
-27
27
BT_PIN_CODE [16]
---
-28
28
BT_BROADCAST_ON
Enable
-29
29
BT_POWER_SAVE_ON
Enable
-30
30
ADHOC
Disable
FIRMWARE_VERSION [4]
Read only
-31
-32
32
BT_GPRS_APNAME [20]
---
-33
33
WPA_ENABLE
Disable
-34
34
WPA_PASSPHRASE [64]
---
-40 to -47
40 to 47
BT_FREQUENT_DEVICE 1~8 ---
Index
Configuration Item
GET_NET_
SET_NET_
PARAMETER PARAMETER
-60
Default
Setup
String
GPRS
GSM_SERVICE_CENTER [21] Read only
-61
61
GSM_PIN_CODE [9]
---
-62
62
GPRS_AP [21]
---
GSM_NET [21]
Read only
GSM_MODEM_DIAL_NUM
[21]
---
Configuration Item
Default
Setup
String
-63
-64
GSM
163
64
Index
GET_NET_
SET_NET_
PARAMETER PARAMETER
-70
70
PPP_DIALUPPHONE [20]
---
-71
71
PPP_LOGINNAME [39]
---
-72
72
PPP_LOGINPASSWORD [20]
---
-73
73
PPP_BAUDRATE (cf.
SET_COM)
1
PPP
Note: The number in a pair of square brackets indicates the length of a string, e.g.
GPRS_AP [21] means the maximum length of the string for remote IP address is 21
characters.
164
BASIC Programming Guide For Use with CipherLab BASIC Compiler
GET_NET_PARAMETER$
8000, 8300, 8500
Purpose
To get network settings.
Syntax
A$ = GET_NET_PARAMETER$(index%)
Remarks
"A$" is a string variable to be assigned to the result.
"index%" is an integer variable, indicating a specific configuration item by index
number.
Error Code
Meaning
0
Normal status: connection is open
3000
Invalid index number
3004
Connection is closed
3012
Never run START TCPIP
Example
NetSetting$ = GET_NET_PARAMETER$(0)
See Also
SET_NET_PARAMETER, SOCKET_IP, TCP_ERR_CODE
SET_NET_PARAMETER
8000, 8300, 8500
Purpose
To configure network settings.
Syntax
SET_NET_PARAMETER(index%, A$)
Remarks
Note that it is not necessary to configure the setting every time.
"index%" is an integer variable, indicating a specific configuration item by index
number.
"A$" is a string variable indicating the network setting to be configured.
A$
Setup string
(Boolean type)
"Enable" / "Disable"
Authentication
"Open" / "Share"
WEP Key Length
"64 bits" / "128 bits"
System Scale
"Low" / "Medium" / "High"
Preamble Type
"Short" / "Long" / "Both"
WPA Pass Phrase
8 ~ 63 characters
For indexes 5 ~ 10, 19, 20, 25, 27, 32, you may simply input an empty string to clear
settings.
Example
See Also
SET_NET_PARAMETER (1, "192.168.1.241") ' set local IP
SET_NET_PARAMETER (11, "Disable")
' disable DHCP
SET_NET_PARAMETER (12, "Share")
' set authentication "Share Key"
GET_NET_PARAMETER$, IP_CFG, TCP_ERR_CODE
Chapter 5 BASIC Commands
165
5.21.3 Initialization & Termination
After the networking parameters are properly configured, an application program can call
START TCPIP to initialize any wireless module (802.11b, Bluetooth, or GSM/GPRS) and
networking protocol stack. The wireless modules will not be powered until START TCPIP is
called.
Model No.
START TCPIP (N%)
Remarks
All
START TCPIP (4)
Enables PPP connection via IR (Modem Cradle)
START TCPIP (6)
Enables Ethernet connection via IR (Ethernet Cradle)
START TCPIP
Enables Bluetooth (PAN)
START TCPIP (3)
Enables mobile’s GPRS functionality via Bluetooth (DUN)
8071
START TCPIP
Enables 802.11b (WLAN)
8330
START TCPIP
Enables 802.11b (WLAN)
8061
START TCPIP (0)
8360
8370
8500
START TCPIP (1)
Enables Bluetooth (PAN)
START TCPIP (3)
Enables mobile’s GPRS functionality via Bluetooth (DUN)
START TCPIP (5)
Enables PPP connection via direct RS-232 (to a generic modem)
START TCPIP
Enables Bluetooth (PAN)
START TCPIP (3)
Enables mobile’s GPRS functionality via Bluetooth (DUN)
START TCPIP (5)
Enables PPP connection via direct RS-232 (to a generic modem)
START TCPIP
Enables 802.11b (WLAN)
START TCPIP (5)
Enables PPP connection via direct RS-232 (to a generic modem)
START TCPIP
Enables 802.11b (WLAN)
START TCPIP (0)
START TCPIP (1)
Enables Bluetooth (PAN)
START TCPIP (2)
Enables GPRS
START TCPIP (3)
Enables mobile’s GPRS functionality via Bluetooth (DUN)
When an application program needs to stop using the network, STOP TCPIP must be called
to shut down the network as well as the modules (so that power can be saved). To enable the
network again, START TCPIP must be called again.
Note: Any previous network connection and data will be lost after calling STOP TCPIP.
166
BASIC Programming Guide For Use with CipherLab BASIC Compiler
START TCPIP
8000, 8300, 8500
Purpose
To enable TCP/IP communication.
Syntax
START TCPIP
START TCPIP(N%)
Remarks
This routine is used to perform general initialization. It must be the first network
function call, and cannot be called again unless STOP TCPIP has been called.
"N%" is an integer variable, indicating which wireless module is to be used.
N%
Meaning
0
802.11b (default)
1
Bluetooth (PAN)
2
GPRS
3
Mobile's GPRS via Bluetooth (DUN)
4
PPP Connection via IR
5
PPP Connection via RS-232
6
Ethernet Connection via IR
Example
START TCPIP
See Also
OFF TCPIP, ON TCPIP GOSUB..., STOP TCPIP, TCP_ERR_CODE, TCP_OPEN
STOP TCPIP
' this is hardware-dependent
8000, 8300, 8500
Purpose
To disable TCP/IP communication.
Syntax
STOP TCPIP
Remarks
Example
STOP TCPIP
See Also
START TCPIP, TCP_OPEN
Chapter 5 BASIC Commands
167
5.21.4 Network Status
Once the network has been initialized, there is some status information can be retrieved
from the system. It will be periodically updated by the system. User program must explicitly
call GET_NET_STATUS to get the latest status.
Index
Configuration Item
Return Value
2
3
WLAN_State:
connection state
0
Disabled
1
Connected
WLAN_Quality:
0 to 10
Very poor
link quality
10 to 15
Poor
15 to 30
Fair
30 to 50
Good
50 to 80
Very good
0 to 30
Weak
WLAN_Signal:
signal strength level 30 to 60
Moderate
60 to 120 Strong
4
5
WLAN_Noise:
1
Weak
noise Level
2 to 3
Moderate
4 to 5
Strong
WLAN_Channel:
1 ~ 11
current channel no.
6
DUN_
DUN-
Modem GPRS
GET_NET_
STATUS
1
WLAN SPP
WLAN_TxRate:
1
1 Mbps
transmit rate
2
2 Mbps
4
5.5 Mbps
8
11 Mbps
16
6 Mbps
32
9 Mbps
48
12 Mbps
64
18 Mbps
80
24 Mbps
96
36 Mbps
112
48 Mbps
128
54 Mbps
PAN
168
BASIC Programming Guide For Use with CipherLab BASIC Compiler
7
8
9
Index
NET_IPReady:
-1
Error*
terminal IP status
0
Not ready
1
Ready
BT_State:
connection state
0
Disabled
1
Connected
BT_Signal:
-10 to -6
Weak
RSSI signal level
-6 to 5
Moderate
5 to 30
Strong
Configuration Item
Return Value
GSM_state:
connection state
0
Disabled
1
Connected
GSM
GPRS
GET_NET_
STATUS
10
11
12
GSM_RSSIQuality: 0
-113 dbm or less
RSSI signal level
1
-111 dbm
2
-109 dbm
(3 ~ 29)
... (+2 dbm per increment)
30
-53 dbm
31
-51 dbm or greater
99
Not known or not detectable
GSM_PINstate:
0
Disabled
PIN code status
1
PIN code required
Note: If GET_NET_STATUS(7) returns -1, it means an abnormal break occurs during
PPP, DUN-GPRS, or GPRS connection. Such disconnection may be caused by the
terminal being out of range, improperly turned off, etc.
GET_NET_STATUS
8000, 8300, 8500
Purpose
To get network status.
Syntax
A% = GET_NET_STATUS(index%)
Remarks
Note that it is necessary to define the DNS server IP before running this command.
"A%" is an integer variable to be assigned to the result.
"index%" is an integer variable indicating a specific configuration item by index
number.
Example
nQuality = GET_NET_STATUS(2)
See Also
GET_WLAN_STATUS, TCP_ERR_CODE
' check communication quality
Chapter 5 BASIC Commands
GET_WLAN_STATUS
169
8000, 8300, 8500
Purpose
To get network status.
Syntax
A% = GET_WLAN_STATUS(index%)
Remarks
This command is to be replaced by GET_NET_STATUS.
Example
nQuality = GET_WLAN_STATUS (2)
See Also
GET_NET_STATUS, TCP_ERR_CODE
' check communication quality
170
BASIC Programming Guide For Use with CipherLab BASIC Compiler
5.21.5 WLAN (802.11b)
Here are the BASIC functions and statements related to TCP/IP networking.
Commands for triggering the TCPIP event: OFF TCPIP, ON TCPIP GOSUB...
DNS_RESOLVER
8000, 8300, 8500
Purpose
To get the remote IP address by remote name.
Syntax
IP$ = DNS_RESOLVER(A$)
Remarks
Note that it is necessary to define the DNS server IP before running this command.
"IP$" is a string variable to be assigned to the result.
"A$" is a string variable, indicating a specific remote name.
Example
GetIP$ = DNS_RESOLVER ("www.cipherlab.com")
See Also
TCP_ERR_CODE
GET_TCPIP_MESSAGE
8000, 8300, 8500
Purpose
To get the message of TCPIP event trigger.
Syntax
A% = GET_TCPIP_MESSAGE
Remarks
This command can also be called in normal program to detect the TCP/IP status by
polling method. Once it is fetched, the message will be cleared by the system.
When entering TCPIP event trigger, the first thing is to call this routine so that the
trigger message will be cleared out.
"A%" is an integer variable to be assigned to the result.
A%
Meaning
4000
Connection #0 overflow
4001
Connection #1 overflow
4002
Connection #2 overflow
4003
Connection #3 overflow
4013
Abnormal break during connection
4014
Networking initialization error
4015
Port initialization error
4020
Connection #0: connected
4021
Connection #1: connected
4022
Connection #2: connected
Chapter 5 BASIC Commands
Example
4023
Connection #3: connected
4040
Connection #0: disconnected
4041
Connection #1: disconnected
4042
Connection #2: disconnected
4043
Connection #3: disconnected
4060
Connection #0: data is coming
4061
Connection #1: data is coming
4062
Connection #2: data is coming
4063
Connection #3: data is coming
4080
IP is ready
171
ON TCPIP GOSUB TCPIP_Trigger
...
TCPIP_Trigger:
MSG% = GET_TCPIP_MESSAGE
...
See Also
OFF TCPIP, ON TCPIP GOSUB..., TCP_OPEN
IP_CFG or IP_CONFIGURE
8000, 8300, 8500
Purpose
To configure the TCP/IP setting.
Syntax
IP_CFG(index%, IP$) or IP_CONFIGURE(index%, IP$)
Remarks
This command is to be replaced by SET_NET_PARAMETER.
Note that it is not necessary to configure the setting every time.
"index%" is an integer variable, indicating a specific configuration item.
"IP$" is a string variable indicating the IP address that is to be configured.
Example
See Also
IP_CFG (1, "192.168.1.241")
' set local IP
IP_CFG (2, "255.255.255.0")
' set IP of subnet mask
IP_CFG (3, "192.168.1.250")
' set IP of default gateway
IP_CFG (4, "168.95.1.1")
' set IP of DNS server
SET_NET_PARAMETER, TCP_ERR_CODE
NCLOSE
8000, 8300, 8500
Purpose
To close a TCP/IP connection.
Syntax
NCLOSE(N%)
Remarks
"N%" is an integer variable in the range of 0 to 3, indicating the connection number.
172
BASIC Programming Guide For Use with CipherLab BASIC Compiler
Example
NCLOSE (0)
See Also
NREAD$, NWRITE, TCP_ERR_CODE, TCP_OPEN
NREAD$
8000, 8300, 8500
Purpose
To read data from a TCP/IP connection.
Syntax
A$ = NREAD$(N%)
Remarks
"A$" is a string variable to be assigned to the result.
"N%" is an integer variable in the range of 0 to 3, indicating the connection number.
Example
A$ = NREAD$ (0)
See Also
NCLOSE, NWRITE, OFF TCPIP, ON TCPIP GOSUB..., SOCKET_HAS_DATA,
TCP_ERR_CODE, TCP_OPEN
NWRITE
8000, 8300, 8500
Purpose
To write data to a TCP/IP connection.
Syntax
NWRITE (N%, A$)
Remarks
"N%" is an integer variable in the range of 0 to 3, indicating the connection number.
"A$" is a string variable, representing the string to be sent to the connection.
Example
NWRITE (0, "Hello")
See Also
NCLOSE, NREAD$, SOCKET_CAN_SEND, TCP_ERR_CODE, TCP_OPEN
SOCKET_CAN_SEND
8000, 8300, 8500
Purpose
To check if data can be sent.
Syntax
A% = SOCKET_CAN_SEND(N%, L%)
Remarks
"A%" is an integer variable to be assigned to the result.
A%
Meaning
0
Normal - data can be sent
3000
Invalid connection number
3004
Connection is closed
3007
Cannot send data
3012
Never run START TCPIP
"N%" is an integer variable in the range of 0 to 3, indicating the connection number.
"L%" is an integer variable, indicating the length of data.
Example
A% = SOCKET_CAN_SEND (0, 10)
Chapter 5 BASIC Commands
See Also
173
NCLOSE, NWRITE, TCP_ERR_CODE, TCP_OPEN
SOCKET_HAS_DATA
8000, 8300, 8500
Purpose
To check if data is available.
Syntax
A% = SOCKET_HAS_DATA(N%)
Remarks
"A%" is an integer variable to be assigned to the result.
A%
Meaning
0
Normal - data in buffer.
3000
Invalid connection number
3004
Connection is closed
3005
No data
3012
Never run START TCPIP
"N%" is an integer variable in the range of 0 to 3, indicating the connection number.
Example
A% = SOCKET_HAS_DATA(0)
See Also
NCLOSE, NREAD$, OFF TCPIP, ON TCPIP GOSUB..., TCP_ERR_CODE,
TCP_OPEN
SOCKET_IP
8000, 8300, 8500
Purpose
To get network settings.
Syntax
A$ = SOCKET_IP(port%)
Remarks
This command is to be replaced by GET_NET_PARAMETER$.
Example
NetSetting$ = SOCKET_IP(0)
See Also
GET_NET_PARAMETER$, TCP_ERR_CODE
SOCKET_OPEN
8000, 8300, 8500
Purpose
To check if the remote end of connection is open.
Syntax
A% = SOCKET_OPEN(N%)
Remarks
"A%" is an integer variable to be assigned to the result.
A%
Meaning
0
Normal - connection is open
3000
Invalid connection number
3004
Connection is closed
174
BASIC Programming Guide For Use with CipherLab BASIC Compiler
3012
Never run START TCPIP
"N%" is an integer variable in the range of 0 to 3, indicating the connection number.
Example
ConnectState% = SOCKET_OPEN(0)
See Also
TCP_ERR_CODE, TCP_OPEN
TCP_ERR_CODE
8000, 8300, 8500
Purpose
To check the result after running any command related to TCP/IP (except STOP
TCPIP).
Syntax
A% = TCP_ERR_CODE
Remarks
"A%" is an integer variable to be assigned to the result, indicating an error
description.
If a routine is working normally, the return value will be 0 in general. However, it
will return "N%"(the connection number) for TCP_OPEN and "1 ~ 255"(the length
of data being read) for NREAD$.
A%
Meaning
0
Normal
3000
Invalid connection number
3001
Connection is already opened.
3002
Undefined local port in server mode
3003
Undefined remote port in client mode
3004
Connection is closed.
3005
No data received in buffer
3006
Data is too long.
3007
Networking is busy or data is too long.
3008
Data transmission error
3009
Hardware initialization failure
3010
START TCPIP has already been running. Need to run STOP TCPIP.
3011
All connections are unavailable.
3012
Never run START TCPIP
-10
Parameter error
-11
Host is not reachable.
-12
Time out
-13
Hardware failure
-14
Protocol error
-15
No buffer space
-16
Invalid connection block
Chapter 5 BASIC Commands
-17
Invalid pointer argument
-18
Operation would block.
-19
Message is too long.
-20
Protocol unavailable
-30
Unknown remote name
-31
DNS protocol error (package class)
-32
DNS protocol error (package type)
-33
Remote name too long (more than 38 characters)
175
Example
ERR% = TCP_ERR_CODE
See Also
DNS_RESOLVER, GET_NET_PARAMETER$, GET_NET_STATUS,
GET_WLAN_STATUS, IP_CFG, NCLOSE, NREAD$, NWRITE, OFF TCPIP,
ON TCPIP GOSUB... SOCKET_CAN_SEND, SOCKET_HAS_DATA,
SOCKET_IP, SOCKET_OPEN, START TCPIP, TCP_OPEN,
SET_NET_PARAMETER
TCP_OPEN
8000, 8300, 8500
Purpose
To open a TCP/IP connection.
Syntax
TCP_OPEN(N%, IP$, RP%, LP%, {Protocol%}, {Delimiter%})
Remarks
Note that the function must be called before using any socket read/write commands.
"N%" is an integer variable in the range of 0 to 3, indicating the connection number.
"IP$" is a string variable, indicating the IP address of the remote port. If it is set to
"0.0.0.0", the connection will become server mode and the LP% must be defined.
"RP%" is an integer variable, indicating the port number of the remote port, which
is to be connected. If it is 0 (=none), any remote port is available. However, it has to
be set to 0 when in server mode.
"LP%" is an integer variable, indicating the port number of the local port. If it is 0
(=none), the port number will be defined by the system. However, it has to be set to
0 when in client mode.
Server mode
Client mode
N%
0~3
0~3
IP$
"0,0,0,0"
Required
RP%
0
Required
LP%
Required
0
"Protocol%" is an integer variable, indicating the networking protocol in use. This
parameter is optional and it is set to 0 by default (using TCP/IP protocol). If it is set
to 1, the system will use UDP/IP protocol.
"Delimiter%" is an integer variable, indicating whether to transmit the delimiter or
not. This parameter is optional and it is set to 0x0d (Carriage Return) by default.
176
BASIC Programming Guide For Use with CipherLab BASIC Compiler
The valid values range from 0 to 255. If it is set to -1, the system will not transmit
any delimiter.
Example
TCP_OPEN (0, "0.0.0.0", 0, 23)
TCP_OPEN (1, "0.0.0.0", 0, 24)
TCP_OPEN (2, "0.0.0.0", 0, 25, 1)
TCP_OPEN (3, "0.0.0.0", 0, 26, 0, 59)
See Also
GET_TCPIP_MESSAGE, NCLOSE, NREAD$, NWRITE, OFF TCPIP, ON
TCPIP GOSUB..., SOCKET_CAN_SEND, SOCKET_HAS_DATA,
SOCKET_OPEN, START TCPIP, STOP TCPIP, TCP_ERR_CODE
Chapter 5 BASIC Commands
177
WLAN Example
Network Configuration:
Generally, network configuration has to be done in advance by calling
GET_NET_PARAMETER$ and SET_NET_PARAMETER.
Initialization of Networking Protocol Stack & Wireless Module:
The wireless module, such as of 802.11b, Bluetooth or GSM/GPRS, will not be
powered until START TCPIP is called.
Model#
WLAN
PAN
GPRS
DUN-GPRS
8061
---
START TCPIP
---
START
TCPIP(3)
8360
---
START TCPIP
---
START
TCPIP(3)
8071
START TCPIP
---
---
---
8370
START TCPIP
---
---
---
8330
START TCPIP
START
TCPIP(0)
START
TCPIP(1)
---
START
TCPIP(3)
8500
START TCPIP
START
TCPIP(0)
START
TCPIP(1)
START
TCPIP(2)
START
TCPIP(3)
Note: For IR/RS-232 networking, use START TCPIP(4) for PPP via IR, START TCPIP(5) for
PPP via RS-232, and START TCPIP(6) for Ethernet via IR.
Network Status:
GET_TCPIP_MESSAGE
The START TCPIP routine does the first stage of the initialization process, and it will
generate a system task to finish the rest of the process. When START TCPIP returns, the
initialization process might not have been done yet. Therefore, it is necessary for the
application program to check whether the status is "IP is ready" by calling
GET_TCPIP_MESSAGE or GET_NET_STATUS before it proceeds to perform any networking
operations.
GET_NET_STATUS
When initialization error occurs for PPP, DUN-GPRS, or GPRS connection,
GET_NET_STATUS(7) will return -1.
Once the initialization process is done, the network status can be retrieved from the system.
It will be periodically updated by the system. The application program must explicitly call
GET_NET_STATUS to get the latest status.
178
BASIC Programming Guide For Use with CipherLab BASIC Compiler
Open a Connection:
TCP_OPEN
Before reading and writing to the remote host, a connection must be established (opened).
Call TCP_OPEN to open a connection. The application program needs to define a connection
number (0~3), so that it can identify a particular connection in subsequent calls to other
TCP/IP stack routines.
GET_TCPIP_MESSAGE
It is necessary for the application to check whether the status of the particular connection is
"connected" by calling GET_TCPIP_MESSAGE before it proceeds to perform any read/write
operations. Once the value of 4013 is returned (i.e. connection is dropped abnormally, say,
the terminal is shut down accidentally or by the AUTO_OFF timer), user program has to
specify its own handling method. For example, if you wish to reconnect, simply call START
TCPIP again.
Data Transmission
SOCKET_CAN_SEND
Before sending data to the network, call SOCKET_CAN_SEND to check if there is enough
buffer size to write out the data immediately. It also can be used to check if the data being
sent is more than 4 packets when there is no response from the remote host. Then, call
NWRITE to send data on the network.
SOCKET_HAS_DATA
Before receiving data from the network, call SOCKET_HAS_DATA to check if there is data in
the buffer. Then, call NREAD$ to receive data on the network.
Note: In case of an abnormal break during PPP, DUN-GPRS, or GPRS connection,
GET_TCPIP_MESSAGE will return 4013 while GET_NET_STATUS(7) will
return -1.
Useful Functions:
There are other routines for obtaining additional information or setting control for a
connection.
SOCKET_OPEN, SOCKET_HAS_DATA, etc.
To check the connection status by polling method.
GET_NET_PARAMETER$
To get the networking configuration and the remote site IP address.
TCP_ERR_CODE
To get the operation result after calling any TCPIP routines.
Chapter 5 BASIC Commands
179
TCPIP Event Trigger
ON TCPIP GOSUB... and OFF TCPIP are used to get higher working performance. Once
the TCPIP event occurs, it is necessary for the application program to check the trigger type
by getting the value of the GET_TCPIP_MESSAGE routine.
Close a Connection:
Call NCLOSE to terminate a particular connection when the application program
does not use it any more.
Termination of Networking Protocol Stack & Wireless Module:
When the application program wishes to stop using the network, call STOP TCPIP to
terminate networking and shut down the power to the module so that it can save
power. To enable the network again, it is necessary to call START TCPIP again.
Note: After calling STOP TCPIP, any previous network connection and data will be lost.
180
BASIC Programming Guide For Use with CipherLab BASIC Compiler
5.21.6 Bluetooth
For the 8x60 series, it makes use of the pairing procedure to keep record of the latest
connected device(s) for different modes, regardless of authentication enabled or not. This is
so-called "Frequent Device List".
Coverage of Frequent Device List
PAN mode
Up to eight access points are listed for roaming purpose
SPP mode
Only one device is listed for quick connection
DUN mode
Only one device is listed for quick connection
HID mode
Only one device is listed for quick connection
Once the pairing procedure is completed and the list is generated successfully, next time the
terminal will automatically connect to the listed device(s) without going through the pairing
procedure.
To complete the pairing procedure, it consists of two steps: (1) to discover the Bluetooth
devices in range, and (2) to page one of them that provides a particular service. These are
handled by BT_INQUIRY$ and BT_PAIRING respectively.
BT_INQUIRY$
8061, 8360, 8500
Purpose
To discover any available Bluetooth devices in range.
Syntax
A$ = BT_INQUIRY$
Remarks
It takes about 20 seconds to get the Bluetooth device information of whomever in
range. The string contains address (12 bytes) and name (20 bytes) of the devices.
Note that there might be many devices concatenated together, each occupying 32
bytes.
Information regarding the Bluetooth devices in range will be put in the format of
MENU() string as shown below:
Chapter 5 BASIC Commands
Example
181
...
MENU_STR$ = BT_INQUIRY$
I% = MENU(MENU_STR$)
...
See Also
BT_PAIRING
BT_PAIRING
8061, 8360, 8500
Purpose
To check if the discovered device can provide a specific type of service, and (if
required), the PIN code for authentication is matching.
Syntax
A% = BT_PAIRING(addr$, type%)
Remarks
"A%" is an integer variable to be assigned to the result.
A%
Meaning
1
Pairing successfully
0
Service unavailable or wrong PIN code
"addr$" is a string variable, indicating the address of the Bluetooth device.
"type%" is an integer variable, indicating a specific type of service.
type%
Meaning
1
PAN (AP required)
3
SPP
4
DUN
It will try to pair with any Bluetooth device that has the specific type of service. If
authentication is enabled, then correct PIN code will be required for setting up the
Link Key. Once the pairing procedure is completed, the MAC ID of the remote
device will be recorded in the "Frequent Device List" for quick connection in the
future.
Example
...
MENU_STR$ = BT_INQUIRY$
I% = MENU(MENU_STR$)
DEVICE$ = MID$(MENU_STR$, 1+32*(I%-1), 32)
R% = BT_PAIRING(DEVICE$,3)
...
See Also
BT_INQUIRY$
182
BASIC Programming Guide For Use with CipherLab BASIC Compiler
Frequent Device List
Get Frequent Device List
The length of Frequent Device List by calling GET_NET_PARAMETE$ is 83
characters:
LIST$ = GET_NET_PARAMETER$(-40)
The first character of Frequent Device List is the service type that the device is
engaged. Currently, there are four types that have been defined:
Service Type
In Frequent Device List
1
PAN
Max. 8 devices are recorded
…
(= AP mode, access points are required.)
3
SPP
Only 1 device is recorded
4
DUN
Only 1 device is recorded
5
HID
Only 1 device is recorded
(to be continued…)
Note: If bit 7 = 1, it means that this device is currently connected.
After the service type, from the second to the 13th character stands for the string of
MAC ID.
The next property after MAC ID is Device Name, which consists of up to 20 characters
and ends with a delimiter code "\r".
The next property after Device Name is PIN code, which consists of up to 17
characters and ends with a delimiter code "\r".
The last property of Frequent Device List is Link Key, which is normally generated
when the pairing procedure is completed. This unique Link Key is applied to the
specific device connection only. Once the connection is renewed with a different
device, a new Link Key will be generated
Length Property
Char
1
Service
Type
1
132
2 ~ 13
MAC ID
12
"0"
14 ~ 33 Device
Name
20
"M" "Y"
""
"N" "A" "M" "E"
34 ~ 50 PIN Code 17
"1"
"2"
"3"
"4"
\r
51 ~ 83 Link Key
"1"
"2"
"4"
"F"
"5"
33
"0"
"D" "0"
"1"
"7"
"3"
"0"
"1"
"2"
"3"
\r
0
............
0
0
..........................................
0
"3"
..........................................
\r
Note: Make sure to put “\r” as a delimiter for Device Name, PIN Code, and Link Key.
"4"
Chapter 5 BASIC Commands
Sample code:
FREQ_DEV$ = ""
CLS
FOR K% = 1 TO 8
FDL$ = ""
FDL$ = GET_NET_PARAMETER$(-39-K%)
IF MID$(FDL$,1,1)<>CHR$(0) THEN
DEV$ = MID$(FDL$,14,20)
MAC_ID$ = MID$(FDL$,2,12)
MACHINE$ = MID$(FDL$,1,1)
FREQ_DEV$ = FREQ_DEV$+DEV$
FREQ_MAC$ = FREQ_MAC$+MAC_ID$
FREQ_MC$ = FREQ_MC$+MACHINE$
END IF
NEXT K%
I% = MENU(FREQ_DEV$)
183
184
BASIC Programming Guide For Use with CipherLab BASIC Compiler
Set Frequent Device List
To enable quick connection to a specific device without going through the inquiry and
pairing procedure, a user-definable Frequent Device List can be set up by calling
SET_NET_PARAMETER. If there is an existing Frequent Device List generated from the
inquiry and pairing procedure, it then may be partially or overall updated by this, and vice
versa.
There are five fields: Service Type, MAC ID, Device Name, PIN Code, and Link Key.
If authentication is disabled, you only need to specify the first three fields. Otherwise,
the PIN code field needs to be specified for generating Link Key.
Sample code (1):
' setting up a DUN Frequent Device List without authentication
' by calling SET_NET_PARAMETER:
...
FDL$ = CHR$(4+128)+"00d017401234"+"TestDev."+CHR$(13)
SET_NET_PARAMETER(40,FDL$)
...
Sample code (2):
' setting up a SPP Frequent Device List with authentication
' (needs PIN code) by calling SET_NET_PARAMETER:
...
FDL$
=
CHR$(3+128)+"00d017401234"+"TestDev."+CHR$(13)+"1234"+CHR$(1
3)
SET_NET_PARAMETER(40,FDL$)
...
Chapter 5 BASIC Commands
185
Bluetooth Examples
To determine which application to initialize, use the second parameter of SET_COM
(N%, Baudrate%, Parity%, Data%, Handshake%).
To initialize Bluetooth SPP Master, call SET_COM (2,4,1,1,1).
To initialize Bluetooth SPP Slave, call SET_COM (2,1,1,1,1).
To initialize Bluetooth DUN, call SET_COM (2,5,1,1,1).
To initialize Bluetooth HID, call SET_COM (2,6,1,1,1).
Parameters
Values
Remarks
#1 (N%)
2
Indicates Bluetooth COM port is to be set.
#2
1: 115200 bps
(Baudrate%)
2: 76800 bps
The baud rate setting is NOT applicable to
Bluetooth.
3: 57600 bps
4: 38400 bps
5: 19200 bps
6: 9600 bps
Simply assign 1 for SPP Slave;
4 for SPP Master;
5 for DUN;
6 for HID.
7: 4800 bps
8: 2400 bps
#3
1: None
(Parity%)
2: Odd
3: Even
The parity setting is NOT applicable to
Bluetooth.
Simply assign 1 for Bluetooth.
4: Cradle commands
#4
1: 7 data bits
(Data%)
2: 8 data bits
The data bits setting is NOT applicable to
Bluetooth.
Simply assign 1 for Bluetooth.
#5
1: None
(Handshake%)
2: CTS/RTS
3: XON/XOFF
4: Wedge Emulator
The handshake setting is NOT applicable to
Bluetooth.
Simply assign 1 for Bluetooth
SPP/DUN/HID, or assign 4 for Bluetooth
Wedge Emulator.
186
BASIC Programming Guide For Use with CipherLab BASIC Compiler
SPP
Call SET_COM_TYPE (2, 5) to set COM2 to Bluetooth communication.
To initialize Bluetooth SPP Master, call SET_COM (2,4,1,1,1).
To initialize Bluetooth SPP Slave, call SET_COM (2,1,1,1,1).
Call OPEN_COM (2) to initialize the Bluetooth module and set up connection.
Call GET_NET_STATUS (8) to detect if connection is completed. For example,
LOOP003:
IF GET_NET_STATUS(8) = 0 THEN GOTO LOOP003
BEEP(4400,4)
CLS
PRINT "Connect OK"
Call WRITE_COM (2) and READ_COM$ (2) to transmit and receive data respectively.
Call GET_NET_STATUS (8) to detect if connection is maintained. For example,
IF GET_NET_STATUS(8) = 0 THEN
BEEP(3300,4)
CLOSE_COM(2)
END IF
Call CLOSE_COM (2) to terminate communication and shut down the Bluetooth
module.
Wedge Emulator via SPP
Instead of making use of the keyboard wedge interface, the “Serial to Keyboard
Converter” program lets users convert data to keyboard input via Bluetooth SPP in
general wedge functions, such as SEND_WEDGE, SET_WEDGE, and
WEDGE_READY. That is, users can upgrade a normal wedge application to a
“wireless” wedge application.
Refer to section 5.9.3 Wedge Emulator.
The “Serial to Keyboard Converter” program helps develop a keyboard key in
application without any serial port input function. It supports multiple regions, i.e.,
an application can make use of this tool for varying keyboard layout.
All you need to do is to modify a few codes as shown below.
Note: Alternatively, you may apply Bluetooth HID for wedge application on the
Bluetooth-enabled terminals.
Chapter 5 BASIC Commands
187
SET_COM(N%, Baudrate%, Parity%, Data%, Handshake%) - To set the wedge
emulation flag, use the last parameter regarding hardware handshake setting.
SET_COM_TYPE(2,5)
SET_COM(2,1,1,1,4)
OPEN_COM(2)
And then, use the normal wedge functions to send data.
SET_COM_TYPE(2,5)
SET_COM(2,1,1,1,4)
OPEN_COM(2)
CLS
PRINT "Wait to Connect"
LOOP000:
IF WEDGE_READY = 0 THEN GOTO LOOP000
BEEP(4400,4)
CLS PRINT "OK! Try to Send"
LOOP:
KeyData$ = INKEY$
IF KeyData$ = "" THEN GOTO LOOP
IF KeyData$ = "0" THEN
IF WEDGE_READY = 1 THEN
PRINT "READY"
ELSE
PRINT "NOT READY"
END IF
ELSE IF KeyData$ = "1" THEN
SEND_WEDGE("Hello")
ELSE IF KeyData$ = "2" THEN
PRINT "Hello"
END IF
GOTO LOOP
188
BASIC Programming Guide For Use with CipherLab BASIC Compiler
HID
Bluetooth HID makes use of the WedgeSetting$ array to govern the HID operations.
All definitions of WedgeSetting$ remain the same, except that HID supports only 11
keyboard types, which is provided by Wedge_1$.
Setting Value
Terminal Type
0
Null (Data Not Transmitted)
1
PCAT (US)
2
PCAT (FR)
3
PCAT (GR)
4
PCAT (IT)
5
PCAT (SV)
6
PCAT (NO)
7
PCAT (UK)
8
PCAT (BE)
9
PCAT (SP)
10
PCAT (PO)
11
IBM A01-02 (Japanese OADG109)
Note: Wedge_3$ can be ignored for an inter-character delay is not applicable to Bluetooth
HID.
Set WedgeSetting$.
Call SET_COM_TYPE (2, 5) to set COM2 to Bluetooth communication.
Call SET_COM (2,6,1,1,1) to initialize Bluetooth HID.
Call OPEN_COM (2) to initialize the Bluetooth module and set up connection.
Call GET_NET_STATUS (8) to detect if connection is completed. For example,
LOOP003:
IF GET_NET_STATUS(8) = 0 THEN GOTO LOOP003
BEEP(4400,4)
CLS
PRINT "Connect OK"
When there is a host device recorded in the Frequent Device List, the terminal will
automatically connect to it. If the connection fails, the terminal will try again. If it
fails for the second time, the terminal will wait 7 seconds for another host to initiate
a connection. If still no connection is established, the terminal will repeat the above
operation.
Chapter 5 BASIC Commands
189
When there is no device recorded in the Frequent Device List, the terminal simply
must wait for a host device to initiate a connection.
Note: As an HID input device (keyboard), the terminal must wait for a host to initiate a
connection. Once the HID connection is established, the host device will be
recorded in the Frequent Device List identified as HID Connection.
Call WRITE_COM (2, *data) to transmit data.
Call GET_NET_STATUS (8) to detect if connection is maintained. For example,
IF GET_NET_STATUS(8) = 0 THEN
BEEP(3300,4)
CLOSE_COM(2)
END IF
Call CLOSE_COM (2) to terminate communication and shut down the Bluetooth
module.
DUN
Call SET_COM_TYPE (2, 5) to set COM2 to Bluetooth communication.
Call SET_COM (2,5,1,1,1) to initialize Bluetooth DUN.
Call OPEN_COM (2) to initialize the Bluetooth module and set up connection.
Call GET_NET_STATUS (8) to detect if connection is completed. For example,
LOOP003:
IF GET_NET_STATUS(8) = 0 THEN GOTO LOOP003
BEEP(4400,4)
CLS
PRINT "Connect OK"
Call WRITE_COM (2) and READ_COM$ (2) to transmit and receive data respectively.
Call GET_NET_STATUS (8) to detect if connection is maintained. For example,
IF GET_NET_STATUS(8) = 0 THEN
BEEP(3300,4)
CLOSE_COM(2)
END IF
Call CLOSE_COM (2) to terminate communication and shut down the Bluetooth
module.
190
BASIC Programming Guide For Use with CipherLab BASIC Compiler
PAN
Follow the same programming flow of WLAN (802.11b) Example.
Note: Only one wireless network interface can be used at a time: 802.11b or PAN
DUN-GPRS
To activate the GPRS functionality on a mobile phone via the built-in Bluetooth
dial-up networking technology, follow the same programming flow of WLAN
(802.11b) Example.
Before calling START TCPIP(3), the following parameters of DUN-GPRS must be
specified.
Index
-32
32
Configuration Item
Remarks
BT_GPRS_APNAME [20]
Name of Access Point for DUN-GPRS
Chapter 5 BASIC Commands
191
5.21.7 GSM/GPRS
This section describes the BASIC functions and statements related to GSM/GPRS.
Currently, these commands are for the use of the 8500 series.
GSM_CHANGE_PIN
8500
Purpose
To change the PIN code.
Syntax
A% = GSM_CHANGE_PIN(old$, new$)
Remarks
This command cannot be executed while the GSM/GPRS module is running. The
old PIN string must be the password of facility. In this case, the new PIN code can
be adopted and the remaining attempt counter of PIN will be reset to 3. If the old
code is wrong, not only the password cannot be changed successfully, but also the
counter will be decremented by 1.
"A%" is an integer variable assigned to the result.
A%
Meaning
1
PINCODE_PASSED
0
INVALID_PINCODE
-1
MODULE_RUNNING
-2
HARDWARE_ERR
-5
CONNECT_TIMEOUT
Example
GSM_CHANGE_PIN(PIN1$,PIN2$)
See Also
GSM_CHECK_PIN, GSM_SET_PINLOCK
' to change PIN code from PIN1 to PIN2.
GSM_CHECK_PIN
8500
Purpose
To verify the PIN code.
Syntax
A% = GSM_CHECK_PIN(pin$)
Remarks
This command cannot be executed while the GSM/GPRS module is running. If the
input code is the correct PIN code, the remaining attempt counter of PIN is reset to
3. If the old code is wrong, the counter will be decremented by 1.
"A%" is an integer variable assigned to the result.
A%
Meaning
2
PINCODE_UNNECESSARY
1
PINCODE_PASSED
0
INVALID_PINCODE
192
BASIC Programming Guide For Use with CipherLab BASIC Compiler
-1
MODULE_RUNNING
-2
HARDWARE_ERR
-6
PUK_REQUIRED
Example
GSM_CHECK_PIN(PIN1$)
See Also
GSM_CHANGE_PIN, GSM_SET_PINLOCK
' to verify whether the PIN code is PIN1
or not
GSM_SET_PINLOCK
8500
Purpose
To set the PIN code lock.
Syntax
A% = GSM_SET_PINLOCK(pin$, mode%)
Remarks
This command cannot be executed while the GSM/GPRS module is running. If the
PIN code lock is already enabled (or disabled), one further enabling (or disabling)
execution does not take effect.
For an unlocking process, the correct PIN code is required. Otherwise, the
execution will fail and the remaining attempt counter of PIN will be decremented
by 1. For a locking process, the old PIN code used before unlocking is required.
Otherwise, the execution will fail and the counter will be decremented by 1.
"A%" is an integer variable assigned to the result.
A%
Meaning
1
PINCODE_PASSED
0
INVALID_PINCODE
-1
MODULE_RUNNING
-2
HARDWARE_ERR
-3
PINALREADY_LOCKED
-4
PINALREADY_UNLOCKED
-5
CONNECT_TIMEOUT
mode%
Meaning
0
Disable
1
Enable
Example
GSM_SET_PINLOCK(PIN1$,1)
See Also
GSM_CHANGE_PIN, GSM_CHECK_PIN
' to lock the PIN code
Chapter 5 BASIC Commands
193
GPRS Example
To establish a connection to the content server connected to the internet, follow the
same programming flow of WLAN (802.11b) Example. Only client-initiated
connection is supported.
Before calling START TCPIP(2), the following parameters of DUN-GPRS must be
specified.
Index
Configuration Item
Remarks
-61
61
GSM_PIN_CODE [9]
PIN Code for GSM/GPRS
-62
62
GPRS_AP [21]
Name of Access Point for GPRS
Note: A client-initiated connection occurs when the connection is established in response
to a request from the client.
GSM Example
Data services of GSM, including SMS (Short Message Service) and data call, are
provided for receiving and sending data. They are performed via a virtual COM
port, namely, COM3. The communication type, GSM_SMS and GSM_Modem,
which are for SMS and data call respectively, should be assigned by calling
SET_COM_TYPE before use.
The GSM_SMS supports uncompressed PDU (Protocol Description Unit) message
mode. It can handle both 7-bit default alphabet and 8-bit data. In addition,
concatenated messages are also supported.
Call SET_NET_PARAMETER
ModemDialNum[], and so on.
to
set
variables,
such
as
PINCode[],
It is recommended that the correct PIN code should be initialized before opening the
GSM port. This is because the PIN code will be taken as a password to activate the
SIM card. Therefore, incorrect PIN code during initialization will result in wasting
one attempt of PIN entry. If you fail the PIN entry three times, the procedure of PIN
code entry will be locked.
Call SET_COM_TYPE (3, 6) to set COM3 for SMS (GSM_SMS).
Or call SET_COM_TYPE (3, 7) to set COM3 for data call (GSM_Modem).
Call OPEN_COM (3) to initialize the GSM/GPRS module. The initialization takes
about 10 seconds.
An antenna icon representing the GSM operation will be displayed, and it keeps
flashing until OPEN_COM (3) is completed.
194
BASIC Programming Guide For Use with CipherLab BASIC Compiler
For GSM_SMS only, once the procedure is completed, the signal strength bar will
be displayed next to the antenna icon, and it will be updated every five seconds. The
level of the signal strength bar ranges from 0 to 5.
The value of the PIN code will be fetched as a password required for initializing the
operation.
Refer to the PIN/PUK procedure for handling PINCode[] errors. New PIN code
re-entry and PUK unblock operation are furnished.
Once the PIN code check is passed, PINCode[] will be updated with appropriate
value.
After OPEN_COM (3) is completed, relevant information will be obtained, such as
SMServiceCenter[], NET[], and PINstatus.
Note: The POWER key will be disabled during connection process. Yet the [ESC] key is
provided for being able to abort the PIN code check while connecting. A
countermeasure, such as a time-out check, is recommended to prevent from waiting
infinitely.
Call WRITE_COM (3, A$) and READ_COM$ (3) to transmit and receive data
respectively.
Call CLOSE_COM (3) to terminate communication and shut down the GSM/GPRS
module.
Chapter 5 BASIC Commands
195
READ_COM$ data format
For SMS service, the data format for single messages and concatenated messages is
different.
The short messages will be removed from the SIM card after being read out.
If it is necessary to save the received data, data storage structure like a DAT or DBF
file is recommended.
Message Type
Single Message
Concatenated Message
Using 7-bit default alphabet
total length ≤ 160 characters
total length > 160 characters
Using 8-bit
total length ≤ 140 octets
total length > 140 octets
Using 16-bit
total length ≤ 70 characters
total length > 70 characters
Single Message:
The diagram below shows the data format for a single message received by calling
READ_COM$. The data length is the number of octets of data.
Example:
20050401140506+32<0x0d><0x0a>+886920123456<0x0d><0x0a><0x0A>Hello
Hello
Concatenated Message
The whole data will be separated into several sections.
The diagram below shows the data format for a concatenated message received by
calling READ_COM$. The data length is the number of octets of data.
Example:
196
BASIC Programming Guide For Use with CipherLab BASIC Compiler
#<0x40><0x02><0x02><0x0d><0x0a>20050401140506+32<0x0d><0x0a>+886
920123456<0x0d><0x0a><0x0A>HelloHello
WRITE_COM data format
For sending a message, the maximum length is limited to 255 characters.
For long messages (see Message Type - Concatenated Message above), data will be
sent successfully by using NWRITE_COM, and then each message will be separated
into sections intentionally.
The data format for sending a message is as shown below. Example:
0920123456<0x0d><0x0a><0x0A>HelloHello
Chapter 5 BASIC Commands
PIN/PUK Procedure
197
198
BASIC Programming Guide For Use with CipherLab BASIC Compiler
Chapter 5 BASIC Commands
199
5.22 File Manipulation
This section describes the commands related to file manipulation. There are two different
types of file structures supported in CipherLab BASIC.
DAT Files
DBF Files and IDX Files
5.22.1 DAT Files
This one has a sequential file structure, which is much like the ordinary sequential file but is
modified to support FIFO structure. We call this type of file as DAT file. Because DAT files
are usually used to store transaction data, they are also referred to as Transaction files.
Note: (1) The length of each record in the transaction file is limited to 255 bytes.
(2) For portable terminals, a BASIC program can have up to 6 transaction files.
DEL_TRANSACTION_DATA
Purpose
To remove a block of transaction data from the default transaction file.
Syntax
DEL_TRANSACTION_DATA(N%)
Remarks
This command will only have an effect on the first (default) transaction file.
"N%" is an integer variable, determining how many transaction records to be
deleted and how to delete.
If "N%" is a positive integer, the specified number of records will be deleted from
the top of the transaction file 1, i.e. the oldest records will be deleted.
If "N%" is a negative integer, the specified number of records will be deleted from
the bottom of the transaction file 1, i.e. the latest records will be deleted.
Example
...
PRINT "Discard the latest transaction? (Y/N)"
...
Loop:
KeyData$ = INKEY$
IF KeyData$ = "" THEN
GOTO Loop
ELSE IF KeyData$ = "Y" THEN
DEL_TRANSACTION_DATA(-1)
200
BASIC Programming Guide For Use with CipherLab BASIC Compiler
END IF
...
See Also
DEL_TRANSACTION_DATA_EX, EMPTY_TRANSACTION
DEL_TRANSACTION_DATA_EX
Purpose
To remove a block of transaction data from a specified transaction file.
Syntax
DEL_TRANSACTION_DATA_EX(file%, N%)
Remarks
"file%" is an integer variable in the range of 1 to 6, indicating which transaction file
the command is to affect. The command DEL_TRANSACTION_DATA_EX(1,
N%) works the same as the command DEL_TRANSACTION_DATA(N%).
"N%" is an integer variable, determining how many transaction records to be
deleted and how to delete.
If "N%" is a positive integer, the specified number of records will be deleted from
the top of the transaction file 1, i.e. the oldest records will be deleted.
If "N%" is a negative integer, the specified number of records will be deleted from
the bottom of the transaction file 1, i.e. the latest records will be deleted.
Example
...
PRINT "Discard the latest transaction? (Y/N)"
...
Loop:
KeyData$ = INKEY$
IF KeyData$ = "" THEN
GOTO Loop
ELSE IF KeyData$ = "Y" THEN
DEL_TRANSACTION_DATA_EX(TransFile%, -1)
END IF
...
See Also
DEL_TRANSACTION_DATA, EMPTY_TRANSACTION_EX
EMPTY_TRANSACTION
Purpose
To remove all the transaction data from the default transaction file.
Syntax
EMPTY_TRANSACTION
Remarks
This command will only have an effect on the first (default) transaction file.
Note that if this function is called at the beginning of the program, data will be
deleted after the battery is replaced or the System Menu is launched.
Chapter 5 BASIC Commands
Example
201
...
PRINT "Remove all the transaction data? (Y/N)"
...
Loop:
KeyData$ = INKEY$
IF KeyData$ = "" THEN
GOTO Loop
ELSE IF KeyData$ = "Y" THEN
EMPTY_TRANSACTION
END IF
...
See Also
DEL_TRANSACTION_DATA, EMPTY_TRANSACTION_EX
EMPTY_TRANSACTION_EX
Purpose
To remove all the transaction data from a specified transaction file.
Syntax
EMPTY_TRANSACTION_EX(file%)
Remarks
"file%" is an integer variable in the range of 1 to 6, indicating which transaction file
the command is to affect. The command EMPTY_TRANSACTION_EX(1) works
the same as the command EMPTY_TRANSACTION.
Note that if this function is called at the beginning of the program, data will be
deleted after the battery is replaced or the System Menu is launched.
Example
EMPTY_TRANSACTION_EX(6)
See Also
DEL_TRANSACTION_DATA_EX, EMPTY_TRANSACTION
GET_TRANSACTION_DATA$
Purpose
To read a transaction record from the default transaction file.
Syntax
A$ = GET_TRANSACTION_DATA$(N%)
Remarks
"A$" is a string variable to be assigned to the transaction data.
"N%" is an integer variable, indicating the ordinal number of the record to be read
from the first transaction file.
Example
...
WHILE (TRANSACTION_COUNT > 0)
TransactionData$ = GET_TRANSACTION_DATA$(1)
WRITE_COM(1, TransactionData$)
DEL_TRANSACTION_DATA(1)
202
BASIC Programming Guide For Use with CipherLab BASIC Compiler
WEND
See Also
GET_TRANSACTION_DATA_EX$, SAVE_TRANSACTION,
UPDATE_TRANSACTION
GET_TRANSACTION_DATA_EX$
Purpose
To read a transaction record from a specified transaction file.
Syntax
A$ = GET_TRANSACTION_DATA_EX$(file%, N%)
Remarks
"A$" is a string variable to be assigned to the transaction data.
"file%" is an integer variable in the range of 1 to 6, indicating which transaction file
to access. The command GET_TRANSACTION_DATA_EX$(1,1) works the
same as the command GET_TRANSACTION_DATA$(1).
"N%" is an integer variable, indicating the ordinal number of the record to be read
from the first transaction file.
Example
...
WHILE (TRANSACTION_COUNT > 0)
TransactionData$ = GET_TRANSACTION_DATA_EX$(TransFile%,1)
WRITE_COM(1, TransactionData$)
DEL_TRANSACTION_DATA_EX(TransFile%,1)
WEND
See Also
GET_TRANSACTION_DATA$, SAVE_TRANSACTION_EX,
UPDATE_TRANSACTION_EX
SAVE_TRANSACTION
Purpose
To save (append) a transaction record to the default transaction file.
Syntax
SAVE_TRANSACTION(data$)
Remarks
"data$" is a string variable, representing the string to be saved in the first (default)
transaction file.
Example
ON READER(1) GOSUB BcrData_1
...
BcrData_1:
Data$ = GET_READER_DATA$(1)
PRINT Data$
SAVE_TRANSACTION(Data$)
IF GET_FILE_ERROR <> 0 THEN PRINT "Transaction not saved."
RETURN
Chapter 5 BASIC Commands
See Also
203
GET_TRANSACTION_DATA$, SAVE_TRANSACTION_EX,
UPDATE_TRANSACTION
SAVE_TRANSACTION_EX
Purpose
To save (append) a transaction record to a specified transaction file.
Syntax
SAVE_TRANSACTION_EX(file%, data$)
Remarks
"file%" is an integer variable in the range of 1 to 6, indicating which transaction file
to access. The command SAVE_TRANSACTION_EX(1,data$) works the same as
the command SAVE_TRANSACTION(data$).
"data$" is a string variable, representing the string to be saved in the specified
transaction file.
Example
ON READER(1) GOSUB BcrData_1
...
BcrData_1:
BEEP(2000,5)
Data$ = GET_READER_DATA$(1)
PRINT Data$
SAVE_TRANSACTION_EX(TransFile%,Data$)
IF GET_FILE_ERROR <> 0 THEN PRINT "Transaction not saved."
RETURN
See Also
GET_TRANSACTION_DATA_EX$, SAVE_TRANSACTION,
UPDATE_TRANSACTION_EX
TRANSACTION_COUNT
Purpose
To get the total number of transaction records saved in the first (default) transaction
file.
Syntax
A% = TRANSACTION_COUNT
Remarks
"A%" is an integer variable to be assigned to the result.
Example
...
DataCount:
DataCount% = TRANSACTION_COUNT
CLS
PRINT DataCount%, "Transaction data is saved."
RETURN
...
See Also
TRANSACTION_COUNT_EX
204
BASIC Programming Guide For Use with CipherLab BASIC Compiler
TRANSACTION_COUNT_EX
Purpose
To get the total number of transaction records saved in a specified transaction file.
Syntax
A% = TRANSACTION_COUNT_EX(file%)
Remarks
"A%" is an integer variable to be assigned to the result.
"file%" is an integer variable in the range of 1 to 6, indicating which transaction file
to access. The command TRANSACTION_COUNT_EX(1) works the same as the
command TRANSACTION_COUNT.
Example
...
DataCount_1:
DataCount% = TRANSACTION_COUNT_EX(1)
CLS
PRINT DataCount%, "Data in transaction file 1."
RETURN
...
See Also
TRANSACTION_COUNT
UPDATE_TRANSACTION
Purpose
To update a transaction record in the first (default) transaction file.
Syntax
UPDATE_TRANSACTION(N%, data$)
Remarks
"N%" is an integer variable, indicating the ordinal number of the transaction record
to be updated.
"data$" is a string variable, representing the character string to replace the old data.
Example
...
UpdateTransaction:
UPDATE_TRANSACTION(Num%, NewData$)
RETURN
...
See Also
GET_TRANSACTION_DATA$, SAVE_TRANSACTION,
UPDATE_TRANSACTION_EX
UPDATE_TRANSACTION_EX
Purpose
To update a transaction record in a specified transaction file.
Syntax
UPDATE_TRANSACTION_EX(file%, N%, data$)
Chapter 5 BASIC Commands
Remarks
205
"file%" is an integer variable in the range of 1 to 6, indicating which transaction file
to access. The command UPDATE_TRANSACTION_EX(1, N%, data$) works the
same as the command UPDATE_TRANSACTION(N%, data$).
"N%" is an integer variable, indicating the ordinal number of the transaction record
to be updated.
"data$" is a string variable, representing the character string to replace the old data.
Example
...
UpdateTransaction_1:
UPDATE_TRANSACTION_EX(1, Num%, NewData$)
RETURN
...
See Also
GET_TRANSACTION_DATA_EX$, SAVE_TRANSACTION_EX,
UPDATE_TRANSACTION
206
BASIC Programming Guide For Use with CipherLab BASIC Compiler
5.22.2 DBF Files and IDX Files
This one is an index sequential file structure. Table look-up and report generation is easily
supported by using index sequential file routines. There are actually two types of files
associated with this file structure, namely, DBF files and IDX files.
A DBF file has a fixed record length structure. This is the file that stores the data records
(members), whereas, the associated IDX files are the files that keep the information of the
position of each record stored in the DBF file. Yet, such index files are re-arranged (sorted)
according to some specific key values. In addition to the IDX files that are explicitly created
by user, the BASIC run-time maintains a default IDX file which keeps the original data
sequence.
Data records are not manipulated directly from the DBF file but rather through its
associated IDX files. The value of file pointers of the IDX files (index pointers) does not
represent the address of the data records stored in the DBF file. It indicates the sequence
number of a specific data record in the IDX file.
A library would be a good example to illustrate how DBF and IDX files work. When you
are trying to find a specific book in a library, you always start from the index. The book can
be found by looking into the index categories of book title, writer, publisher, ISBN number,
etc. All these index entries are sorted in ascending order for easy lookup according to some
specific information of books (book title, writer, publisher, ISBN number, etc.) When the
book is found in the index, it will tell you where the book is actually stored.
As you can see, the books kept in the library are analogous to the data records stored in the
DBF file, and, the various index entries are just its associate IDX files. Some information
(book title, writer, publisher, ISBN number, etc.) in the data records is used to create the
IDX files.
Note: (1) The length of each record in the DBF file is limited to 250 bytes.
(2) For portable terminals, a BASIC program can have up to 5 DBF files. Each DBF
file can have up to 3 associated IDX files, and each of them is identified by its key
(index) number. The valid key numbers are from 1 to 3.
ADD_RECORD
Purpose
To add a record to a specified DBF file.
Syntax
ADD_RECORD(file%, data$)
Remarks
"file%" is an integer variable in the range of 1 to 5, indicating which DBF file to be
accessed.
"data$" is a string variable, representing the character string which user intends to
add to the specified DBF file.
Chapter 5 BASIC Commands
Example
207
ON COM(1) GOSUB HostCommand
...
HostCommand:
Cmd$ = READ_COM$(1)
CmdIdentifier$ = LEFT$(Cmd$, 1)
DBFNum% = VAL(MID$(Cmd$, 2, 1))
CardID$ = RIGHT$(Cmd$, LEN(Cmd$)-2)
IF CmdIdentifier$ = "+" THEN
ADD_RECORD(DBFNum%, CardID$)
ELSE
...
See Also
DEL_RECORD
DEL_RECORD
Purpose
To delete the record pointed by the file pointer in a specified DBF file.
Syntax
DEL_RECORD(file% [,index%])
Remarks
"file%" is an integer variable in the range of 1 to 5, indicating which DBF file to be
accessed.
"index%" is an integer variable in the range of 1 to 3, indicating which IDX file to
be accessed. If it is not specified, then the default IDX file which keeps the original
data sequence will be used.
For example, if DBF 1 contains four records: 011-231, 120-117, 043-010, 067-150.
The key (index) of the first associate IDX file is defined as starting at position 1
with length of 3, and the key (index) of the second associate IDX file is defined as
starting at position 5 with length of 3. All the file pointers of the DBF file and IDX
files are currently pointing to the last record.
DBF 1
IDX 1
IDX 2
011-231
011-231
043-010
120-117
043-010
120-117
043-010
067-150
067-150
067-150
120-117
011-231
Then, DEL_RECORD(1) will delete 067-150, DEL_RECORD(1,1) will delete
120-117, DEL_RECORD(1,2) will delete 011-231.
Example
ON COM(1) GOSUB HostCommand
...
HostCommand:
Cmd$ = READ_COM$(1)
208
BASIC Programming Guide For Use with CipherLab BASIC Compiler
CmdIdentifier$ = LEFT$(Cmd$, 1)
DBFNum% = VAL(MID$(Cmd$, 2, 1))
IDXNum% = VAL(MID$(Cmd$, 3, 1))
CardID$ = RIGHT$(Cmd$, LEN(Cmd$)-3)
IF CmdIdentifier$ = "-" THEN
DEL_RECORD(DBFNum%, IDXNum%)
ELSE
...
See Also
ADD_RECORD, EMPTY_FILE
EMPTY_FILE
Purpose
To remove all the records from a specified DBF file.
Syntax
EMPTY_FILE(file%)
Remarks
"file%" is an integer variable in the range of 1 to 5, indicating which DBF file to be
accessed.
Note that if this function is called at the beginning of the program, data will be
deleted after the battery is replaced or the System Menu is launched.
Example
ON COM(1) GOSUB HostCommand
...
HostCommand:
Cmd$ = READ_COM$(1)
CmdIdentifier$ = LEFT$(Cmd$, 1)
DBFNum% = VAL(MID$(Cmd$, 2, 1))
IDXNum% = VAL(MID$(Cmd$, 3, 1))
CardID$ = RIGHT$(Cmd$, LEN(Cmd$)-3)
IF CmdIdentifier$ = "!" THEN
EMPTY_FILE(DBFNum%)
ELSE
...
See Also
DEL_RECORD
FIND_RECORD
Purpose
To search for records in a specified DBF file that matches the key string with
respect to a specified IDX.
Syntax
A% = FIND_RECORD(file%, index%, key$)
Chapter 5 BASIC Commands
Remarks
209
"A%" is an integer variable to be assigned to the result.
"file%" is an integer variable in the range of 1 to 5, indicating which DBF file to be
accessed.
"index%" is an integer variable in the range of 1 to 3, indicating which IDX file to
be accessed.
"key$" is a string variable, representing the character string which indicates the
matching string to be found.
If any record member in the DBF file matches the key string with respect to the IDX
file, FIND_RECORD will return 1, and the file pointer of the IDX file will point to
the first record with the matching string.
If there is no match, the file pointer will point to the first record whose index value
is greater than the vale of "key$".
Example
ON COM(1) GOSUB HostCommand
...
HostCommand:
Cmd$ = READ_COM$(1)
CmdIdentifier$ = LEFT$(Cmd$, 1)
DBFNum% = VAL(MID$(Cmd$, 2, 1))
IDXNum% = VAL(MID$(Cmd$, 3, 1))
CardID$ = RIGHT$(Cmd$, LEN(Cmd$)-3)
IF CmdIdentifier$ = "?" THEN
IF FIND_RECORD(DBFNum%, IDXNum%, CardID$) = 1 THEN
PRINT "Data is found in DBF.", DBFNum%
ELSE
PRINT "Data is not found in DBF.", DBFNum%
END IF
ELSE
...
GET_RECORD$
Purpose
To get a record in a specified DBF file, which the file pointer of a specified IDX file
is pointing to.
Syntax
A$ = GET_RECORD(file% [,index%])
Remarks
"A$" is a string variable to be assigned to the result.
"file%" is an integer variable in the range of 1 to 5, indicating which DBF file to be
accessed.
210
BASIC Programming Guide For Use with CipherLab BASIC Compiler
"index%" is an integer variable in the range of 1 to 3, indicating which IDX file to
be accessed. If it is not specified, the default IDX file which keeps the original data
sequence will be used.
Example
ON COM(1) GOSUB BcrData_1
...
BcrData_1:
BEEP(2000,5)
ID$ = GET_READER_DATA$(1)
IF FIND_RECORD(DBFNum%, IDXNum%, ID$) = 1 THEN
Data$ = GET_RECORD$(DBFNum%, IDXNum%)
Item$ = MID$(Data$, LEN(Data$)-IDLeng%-ItemLeng%)
Note$ = RIGHT$(Data$, LEN(Data$)-IDLeng%-ItemLeng%)
LOCATE 1,1
PRINT "ID
:", Data$
LOCATE 2,1
PRINT "Item :", Item$
LOCATE 3,1
PRINT "Note :", Note$
ELSE
...
See Also
UPDATE_RECORD
GET_RECORD_NUMBER
Purpose
To get the ordinal number of the record pointed to by the file pointer of a specified
DBF file and IDX file.
Syntax
A% = GET_RECORD_NUMBER(file% [,index%])
Remarks
"A%" is an integer variable to be assigned to the number.
"file%" is an integer variable in the range of 1 to 5, indicating which DBF file to be
accessed.
"index%" is an integer variable in the range of 1 to 3, indicating which IDX file to
be accessed. If it is not specified, the default IDX file which keeps the original data
sequence will be used.
Example
A% = GET_RECORD_NUMBER(1,1)
MOVE_TO
Purpose
To move the file pointer, of a specified DBF and IDX files, to a specified position.
Chapter 5 BASIC Commands
211
Syntax
MOVE_TO(file% [,index%], record_number%)
Remarks
"file%" is an integer variable in the range of 1 to 5, indicating which DBF file to be
accessed.
"index%" is an integer variable in the range of 1 to 3, indicating which IDX file to
be accessed. If it is not specified, the default IDX file which keeps the original data
sequence will be used.
"record_number%" is a positive integer variable, indicating the ordinal number of
the record where the file pointer is moved to.
Example
MOVE_TO(1,1,20)
See Also
MOVE_TO_NEXT, MOVE_TO_PREVIOUS
MOVE_TO_NEXT
Purpose
To move the file pointer, of a specified DBF and IDX files, one record forward.
Syntax
MOVE_TO_NEXT(file% [,index%])
Remarks
"file%" is an integer variable in the range of 1 to 5, indicating which DBF file to be
accessed.
"index%" is an integer variable in the range of 1 to 3, indicating which IDX file to
be accessed. If it is not specified, the default IDX file which keeps the original data
sequence will be used.
Example
MOVE_TO_NEXT(1,1)
See Also
MOVE_TO, MOVE_TO_PREVIOUS
MOVE_TO_PREVIOUS
Purpose
To move the file pointer, of a specified DBF and IDX files, one record backward.
Syntax
MOVE_TO_PREVIOUS(file% [,index%])
Remarks
"file%" is an integer variable in the range of 1 to 5, indicating which DBF file to be
accessed.
"index%" is an integer variable in the range of 1 to 3, indicating which IDX file to
be accessed. If it is not specified, the default IDX file which keeps the original data
sequence will be used.
Example
MOVE_TO_PREVIOUS(1,1)
See Also
MOVE_TO, MOVE_TO_NEXT
RECORD_COUNT
Purpose
To get the total number of the records in a specified DBF file.
Syntax
A% = RECORD_COUNT(file%)
212
BASIC Programming Guide For Use with CipherLab BASIC Compiler
Remarks
"A%" is an integer variable to be assigned to the result.
"file%" is an integer variable in the range of 1 to 5, indicating which DBF file to be
accessed.
Example
TotalRecord_1% = RECORD_COUNT(1)
UPDATE_RECORD
Purpose
To update the record, which the file pointer of a specified DBF and IDX files is
pointing to.
Syntax
UPDATE_RECORD(file%, index%, data$)
Remarks
"file%" is an integer variable in the range of 1 to 5, indicating which DBF file to be
accessed.
"index%" is an integer variable in the range of 1 to 3, indicating which IDX file to
be accessed. If it is not specified, the default IDX file which keeps the original data
sequence will be used.
"data$" is a string variable, representing the character string to replace the old data.
Example
ON COM(1) GOSUB HostCommand
...
HostCommand:
Cmd$ = READ_COM$(1)
CmdIdentifier$ = LEFT$(Cmd$, 1)
DBFNum% = VAL(MID$(Cmd$, 2, 1))
IDXNum% = VAL(MID$(Cmd$, 3, 1))
CardID$ = RIGHT$(Cmd$, LEN(Cmd$)-3)
IF CmdIdentifier$ = "&" THEN
UPDATE_RECORD(DBFNum%, IDXNum%, CardID$)
ELSE
...
See Also
GET_RECORD$
Chapter 5 BASIC Commands
213
5.22.3 Error Code
The command GET_FILE_ERROR returns the error code, which is a number that indicates
the result of the last file manipulation. A value other than 0 indicates error.
GET_FILE_ERROR
Purpose
To get the error code of the previous file manipulation command.
Syntax
A% = GET_FILE_ERROR
Remarks
"A%" is an integer variable to be assigned to the result.
If there is no error, it returns 0.
If it returns a value other than 0, possible error code and its interpretation will be
listed as follows.
Error Code
Interpretation
10
No free memory for file extension.
For other types of error, e.g. invalid file ID, it will cause a run-time error.
Example
...
ADD_RECORD(1,Data$)
IF (GET_FILE_ERROR = 10) THEN
ErrorMessage$ = "No free file space."
END IF
...
214
BASIC Programming Guide For Use with CipherLab BASIC Compiler
5.23 Memory Commands
This section describes the commands related to the flash memory and SRAM, where the
Program Manager and File System reside respectively.
The terminal has at least 1 MB flash memory for program storage and up to 4 MB SRAM
for data storage. However, the flash memory also serves to store crucial user data, such as
the application settings. One memory bank with specific address 0xF60000 ~ 0xF6FFFF is
reserved for this purpose.
Note: Currently, only the 8000/8500 series has 2 MB flash memory.
5.23.1 Flash
The flash memory is divided into a number of memory banks, and each bank is 64 KB.
If 1 MB, it is divided into 16 banks. (711/8100/8300)
If 2 MB, it is divided into 32 banks. (8000/8500)
The kernel itself takes 2 banks, and the system reserves 1 bank (0xF60000 ~ 0xF6FFFF) for
data storage, such as the application settings. The rest banks are available for storing user
programs as well as font files.
Because the flash memory is non-volatile, it needs to be erased before writing to the same
bank, 0xF60000 ~ 0xF6FFFF. This memory bank is further divided into 256 records,
numbering from 1 ~ 256 and each with length limited to 255 bytes.
Note: The flash memory can only be erased on a bank basis, that is, all the records stored
in 0xF60000 ~ 0xF6FFFF will be gone.
FLASH_READ$
Purpose
To read a data string from the memory bank 0xF60000 ~ 0xF6FFFF.
Syntax
A$ = FLASH_READ$(N%)
Remarks
"A$" is a string variable to be assigned to the result.
"N%" is an integer variable in the range of 1 to 256, indicating the ordinal number
of the record.
Example
A$ = FLASH_READ$(3)
See Also
FLASH_WRITE
' read the 3rd record
Chapter 5 BASIC Commands
215
FLASH_WRITE
Purpose
To write a data string to the memory bank 0xF60000 ~ 0xF6FFFF.
Syntax
A% = FLASH_WRITE(N%, A$)
Remarks
Up to 256 records can be saved.
"A%" is an integer variable to be assigned to the result.
A%
Meaning
1
Write flash memory successfully.
-1
The BASIC program is too large; no free flash memory available.
-2
Error command for erasing the flash memory.
-3
The given index is out of the range.
-4
Fail to write (probably flash memory is not erased yet or something
goes wrong).
"N%" is an integer variable in the range of 1 to 256, indicating the ordinal number
of the record.
"A$" is a string variable, representing the data string to be saved.
Before writing data to any used record, it is necessary to use the following
command to erase the memory bank first:
err% = FLASH_WRITE(0,"ERASE")
Note that the record number must be 0, and the string must be "ERASE".
After erasing the whole memory bank, you can then write data to it by one record at
a time. Be aware that whenever you need to write data to any used record, the whole
memory bank needs to be erased; otherwise, this command will fail.
Example
err% = FLASH_WRITE(1, "data number#1)
...
err% = FLASH_WRITE(256, "data number#256)
See Also
FLASH_READ$
ROM_SIZE
Purpose
To get the size of the whole flash memory in kilo-bytes.
Syntax
A% = ROM_SIZE
Remarks
"A%" is an integer variable to be assigned to the result.
Example
PRINT "Flash size = ", ROM_SIZE
See Also
FREE_MEMORY, RAM_SIZE
216
BASIC Programming Guide For Use with CipherLab BASIC Compiler
5.23.2 SRAM
The File System keeps user data in SRAM, which is maintained by the backup battery.
However, data loss may occur during low battery condition or when the battery is drained. It
is necessary to upload data to a host computer before putting away the terminal.
FREE_MEMORY
Purpose
To get the size of free data memory (SRAM) in bytes.
Syntax
A& = FREE_MEMORY
Remarks
"A&" is a long integer variable to be assigned to the result.
Example
PRINT "Free memory = ", FREE_MEMORY
See Also
RAM_SIZE, ROM_SIZE
RAM_SIZE
Purpose
To get the size of the whole data memory (SRAM) in kilo-bytes.
Syntax
A% = RAM_SIZE
Remarks
"A%" is an integer variable to be assigned to the result.
Example
PRINT "SRAM size = ", RAM_SIZE
See Also
FREE_MEMORY, ROM_SIZE
Chapter 5 BASIC Commands
217
5.24 Debugging Commands
The command START_DEBUG will write the activities happening on the system to a
specified COM port. It is very useful when user needs to monitor the system or diagnose a
problem.
When START_DEBUG is executed, the system will send a series of messages to a specified
COM port until the command STOP_DEBUG is executed. The following is a list of the debug
messages received when running a sample BASIC program.
Note: Please refer to Appendix III for a description of the debug messages.
*
L(7), T(0)
ADD_RECORD(1,"10001 Justin Jan
08300930113013001130150018002000")
* L(42), T(0)
ON_NET(316)
*
L(8), T(0)
*
L(9), T(0)
ON_ENQUIRY(128)
ASGN(2)
...
*
L(10), T(0)
ASGN(3)
*
*
*
ASGN("CipherLab 510")
* L(70), T(0)
L(12), T(0)
GOTO(68)
ASGN("510AC_100.BAS")
...
L(13), T(0)
EVENT(16)
* L(79), T(1)
ARY(1)
* L(80), T(1)
L(39), T(0)
SET_COM(1,1,1,2,1)
L(40), T(0)
OPEN_COM(1)
...
*
* L(69), T(0)
L(25), T(0)
...
*
L(68), T(0)
* L(69), T(0)
ASGN("OKGood Morning! ")
*
* GOTO(68)
L(11), T(0)
...
*
* L(43), T(0)
L(41), T(0)
START_NETWORK
OFF_READER(1)
* L(81), T(1)
OFF_READER(2)
* L(82), T(1)
CLS
* L(83), T(1)
HIDE_CALENDAR
* L(84), T(1)
BEEP(...)
218
BASIC Programming Guide For Use with CipherLab BASIC Compiler
START_DEBUG
Purpose
To start the debug function.
Syntax
START_DEBUG(N%, Baudrate%, Parity%, Data%, Handshake%)
Remarks
Parameters
Values
Remarks
N%
1 or 2
Indicates which COM port is to be set.
Baudrate%
1: 115200 bps
Specifies the baud rate of the COM port.
2: 76800 bps
3: 57600 bps
4: 38400 bps
5: 19200 bps
6: 9600 bps
7: 4800 bps
8: 2400 bps
Parity%
1: None
Specifies the parity of the COM port.
2: Odd
3: Even
Data%
1: 7 data bits
Specifies the data bits of the COM port.
2: 8 data bits
Handshake%
1: None
2: CTS/RTS
Specifies the method of flow control for the
COM port.
3: XON/XOFF
If a certain COM port has been used in the BASIC program, it is better to use
another COM port for debugging to avoid conflicts.
Example
START_DEBUG (1,1,1,2,1)
' use COM1 to send debug messages
' the COM port properties are 115200,
None, 8, No handshake
See Also
STOP_DEBUG
STOP_DEBUG
Purpose
To terminate the debug function.
Syntax
STOP_DEBUG
Remarks
This is the counter command of START_DEBUG.
Example
STOP_DEBUG
See Also
START_DEBUG
Chapter 5 BASIC Commands
219
5.25 Reserved Host Commands
There are some commands reserved for the host computer to read/remove data of the
transaction file, or to adjust the system time. User's BASIC program does not need to do any
processing because these tasks will be processed by the background routines of the BASIC
run-time.
Note: Each reserved command is ended with a carriage return, which can be changed by
COM_DELIMITER. If any format error occurs, the terminal would return "NAK".
CLEAR
Purpose
To erase data of a specified transaction file.
Syntax
A$ = CLEAR
A$ = CLEAR file%
Remarks
The command CLEAR will clear data of the first transaction file, which is the
default one.
"A$" is a string variable to be assigned to the result.
A$
Meaning
OK
The command is processed successfully.
NAK
Any format error occurs.
"file%" is an integer variable in the range of 1 to 6, indicating which transaction file
is to be erased.
Example
CLEAR3
See Also
REMOVE
Purpose
To read the top most record of a specified transaction file.
Syntax
A$ = READ
' to delete data of the 3rd transaction file
READ
A$ = READ file%
Remarks
The command READ will read the top most record of the first transaction file,
which is the default one.
"A$" is a string variable to be assigned to the result; it may be the desired data string
if the command is successfully processed.
Otherwise, it may have one of the values as follows:
220
BASIC Programming Guide For Use with CipherLab BASIC Compiler
A$
Meaning
OVER
There is no data in the transaction file.
NAK
Any format error occurs.
"file%" is an integer variable in the range of 1 to 6, indicating of which transaction
file the record is to be read.
Example
READ1
' to read a record from the first
transaction file
REMOVE
Purpose
To delete one record from the top of a specified transaction file.
Syntax
A$ = REMOVE
A$ = REMOVE file%
Remarks
The command REMOVE will delete one record from the top of the first transaction
file, which is the default one.
"A$" is a string variable to be assigned to the result.
A$
Meaning
NEXT
The command is processed successfully.
OVER
There is no more data.
NAK
Any format error occurs.
"file%" is an integer variable in the range of 1 to 6, indicating of which transaction
file the record is to be deleted.
Example
REMOVE2
See Also
CLEAR
Purpose
To get the current system time.
Syntax
A$ = TR
Remarks
"A$" is a string variable to be assigned to the result, which is in the form of
"yyyymmddhhnnss".
' to delete a record from the 2nd
transaction file
TR
Otherwise, it returns NAK for any format error.
Example
TR
See Also
TW
Chapter 5 BASIC Commands
TW
Purpose
To set new system time.
Syntax
A$ = TWyyyymmddhhnnss
Remarks
"A$" is a string variable to be assigned to the result.
A$
Meaning
OK
The command is processed successfully.
NAK
Any format error occurs.
Format of system time:
yyyy:
4 digits for year
mm:
2 digits for month
dd:
2 digits for day
hh:
2 digits for hour, in 24-hour format
nn:
2 digits for minute
ss:
2 digits for second
Example
TW20050520103000
See Also
TR
' set system time as 2005/May
20/10:30:00
221
222
BASIC Programming Guide For Use with CipherLab BASIC Compiler
223
APPENDIX I
Reader Settings
Symbology Parameter Table I
No. (N1%)
Values and Description (N2%)
Scan Engine
1
0: Disable Code 39
CCD, Laser
1: Enable Code 39
2
0: Disable Italian Pharmacode
CCD, Laser
1: Enable Italian Pharmacode
3
0: Disable CIP 39 (= French Pharmacode)
CCD, Laser
1: Enable CIP 39
4
0: Disable Industrial 25
CCD, Laser
1: Enable Industrial 25
5
0: Disable Interleaved 25
CCD, Laser
1: Enable Interleaved 25
6
0: Disable Matrix 25
CCD, Laser
1: Enable Matrix 25
7
0: Disable Codabar (NW7)
CCD, Laser
1: Enable Codabar (NW7)
8
0: Disable Code 93
CCD, Laser
1: Enable Code 93
9
0: Disable Code 128 / EAN-128
CCD, Laser
1: Enable Code 128 / EAN-128
10
0: Disable UPC-E
CCD, Laser
1: Enable UPC-E
11
0: Disable UPC-E Addon 2
CCD, Laser
1: Enable UPC-E Addon 2
12
0: Disable UPC-E Addon 5
1: Enable UPC-E Addon 5
CCD, Laser
224
BASIC Programming Guide For Use with CipherLab BASIC Compiler
13
0: Disable EAN-8
CCD, Laser
1: Enable EAN-8
14
0: Disable EAN-8 Addon 2
CCD, Laser
1: Enable EAN-8 Addon 2
15
0: Disable EAN-8 Addon 5
CCD, Laser
1: Enable EAN-8 Addon 5
16
0: Disable EAN-13 / UPC-A
CCD, Laser
1: Enable EAN-13 / UPC-A
17
0: Disable EAN-13/UPC-A Addon 2
CCD, Laser
1: Enable EAN-13/UPC-A Addon 2
18
0: Disable EAN-13/UPC-A Addon 5
CCD, Laser
1: Enable EAN-13/UPC-A Addon 5
19
0: Disable MSI
CCD, Laser
1: Enable MSI
20
0: Disable Plessey
CCD, Laser
1: Enable Plessey
21
Reserved
---
22
0: DO NOT transmit Code 39 Start/Stop Character
CCD, Laser
1: Transmit Code 39 Start/Stop Character
23
0: DO NOT verify Code 39 Check Digit
CCD, Laser
1: Verify Code 39 Check Digit
24
0: DO NOT transmit Code 39 Check Digit
CCD, Laser
1: Transmit Code 39 Check Digit
25
0: Standard Code 39
CCD, Laser
1: Full ASCII Code 39
26
0: DO NOT transmit Italian Pharmacode Check Digit
CCD, Laser
1: Transmit Italian Pharmacode Check Digit
27
0: DO NOT transmit CIP 39 Check Digit
CCD, Laser
1: Transmit CIP 39 Check Digit
28
0: DO NOT verify Interleaved 25 Check Digit
CCD, Laser
1: Verify Interleaved 25 Check Digit
29
0: DO NOT transmit Interleaved 2 Check Digit
CCD, Laser
1: Transmit Interleaved 25 Check Digit
30
0: DO NOT verify Industrial 25 Check Digit
1: Verify Industrial 25 Check Digit
CCD, Laser
Appendix I Reader Settings
31
0: DO NOT transmit Industrial 25 Check Digit
225
CCD, Laser
1: Transmit Industrial 25 Check Digit
32
0: DO NOT verify Matrix 25 Check Digit
CCD, Laser
1: Verify Matrix 25 Check Digit
33
0: DO NOT transmit Matrix 25 Check Digit
CCD, Laser
1: Transmit Matrix 25 Check Digit
34
Select Interleaved 25 Start/Stop Pattern
CCD, Laser
0: Use Industrial 25 Start/Stop Pattern
1: Use Interleaved 25 Start/Stop Pattern
2: Use Matrix 25 Start/Stop Pattern
35
Select Industrial 25 Start/Stop Pattern
CCD, Laser
0: Use Industrial 25 Start/Stop Pattern
1: Use Interleaved 25 Start/Stop Pattern
2: Use Matrix 25 Start/Stop Pattern
36
Select Matrix 25 Start/Stop Pattern
CCD, Laser
0: Use Industrial 25 Start/Stop Pattern
1: Use Interleaved 25 Start/Stop Pattern
2: Use Matrix 25 Start/Stop Pattern
37
Select Codabar Start/Stop Character
CCD, Laser
0: abcd/abcd
1: abcd/tn*e
2: ABCD/ABCD
3: ABCD/TN*E
38
0: DO NOT transmit Codabar Start/Stop Character
CCD, Laser
1: Transmit Codabar Start/Stop Character
39
MSI Check Digit Verification
CCD, Laser
0: Single Modulo 10
1: Double Modulo 10
2: Modulo 11 and Modulo 10
40
MSI Check Digit Transmission
CCD, Laser
0: Last Check Digit is NOT transmitted
1: Both Check Digits are transmitted
2: Both Check Digits are NOT transmitted
41
0: DO NOT transmit Plessey Check Digits
1: Transmit Plessey Check Digits
CCD, Laser
226
BASIC Programming Guide For Use with CipherLab BASIC Compiler
42
0: No conversion
CCD, Laser
1: Convert Standard Plessey to UK Plessey
43
0: No conversion
CCD, Laser
1: Convert UPC-E to UPC-A
44
0: No conversion
CCD, Laser
1: Convert UPC-A to EAN-13
45
0: No conversion
CCD, Laser
1: Enable ISBN Conversion
46
0: No conversion
CCD, Laser
1: Enable ISSN Conversion
47
0: DO NOT transmit UPC-E Check Digit
CCD, Laser
1: Transmit UPC-E Check Digit
48
0: DO NOT transmit UPC-A Check Digit
CCD, Laser
1: Transmit UPC-A Check Digit
49
0: DO NOT transmit EAN-8 Check Digit
CCD, Laser
1: Transmit EAN-8 Check Digit
50
0: DO NOT transmit EAN-13 Check Digit
CCD, Laser
1: Transmit EAN-13 Check Digit
51
0: DO NOT transmit UPC-E System Number
CCD, Laser
1: Transmit UPC-E System Number
52
0: DO NOT transmit UPC-A System Number
CCD, Laser
1: Transmit UPC-A System Number
53
0: No conversion
CCD, Laser
1: Convert EAN-8 to EAN-13
54
Reserved
---
55
0: Disable Negative Barcode
CCD, Laser
1: Enable Negative Barcode
56
0: No Read Redundancy for Scanner Port 1
CCD, Laser
1: One Time Read Redundancy for Scanner Port 1
2: Two Times Read Redundancy for Scanner Port 1
3: Three Times Read Redundancy for Scanner Port 1
57
(Not for portable terminals.)
58
0: Industrial 25 Code Length Limitation in Fixed Length Format CCD, Laser
1: Industrial 25 Code Length Limitation in Max/Min Length
Format
---
Appendix I Reader Settings
227
59
Industrial 25 Max Code Length / Fixed Length 1
CCD, Laser
60
Industrial 25 Min Code Length / Fixed Length 2
CCD, Laser
61
0: Interleaved 25 Code Length Limitation in Fixed Length
Format
CCD, Laser
1: Interleaved 25 Code Length Limitation in Max/Min Length
Format
62
Interleaved 25 Max Code Length / Fixed Length 1
CCD, Laser
63
Interleaved 25 Min Code Length / Fixed Length 2
CCD, Laser
64
0: Matrix 25 Code Length Limitation in Fixed Length Format
CCD, Laser
1: Matrix 25 Code Length Limitation in Max/Min Length Format
65
Matrix 25 Max Code Length / Fixed Length 1
CCD, Laser
66
Matrix 25 Min Code Length / Fixed Length 2
CCD, Laser
67
0: MSI 25 Code Length Limitation in Fixed Length Format
CCD, Laser
1: MSI 25 Code Length Limitation in Max/Min Length Format
68
MSI Max Code Length / Fixed Length 1
CCD, Laser
69
MSI Min Code Length / Fixed Length 2
CCD, Laser
70
Scan Mode for Scanner Port 1
CCD, Laser
0: Auto Off Mode
1: Continuous Mode
2: Auto Power Off Mode
3: Alternate Mode
4: Momentary Mode
5: Repeat Mode
6: Laser Mode
7: Test Mode
8: Aiming Mode
71
(Not for portable terminals.)
---
72
Scanner Time-out Duration in seconds for Scanner Port 1:
applicable to Aiming mode, Laser mode, Auto Off mode, and
Auto Power Off mode.
CCD, Laser
73
(Not for portable terminals.)
---
74
0: Disable RSS Limited
CCD, Laser
1: Enable RSS Limited
75
0: Disable RSS Expanded
CCD, Laser
1: Enable RSS Expanded
76
0: Disable RSS-14
1: Enable RSS-14
CCD, Laser
228
BASIC Programming Guide For Use with CipherLab BASIC Compiler
77
0: DO NOT transmit RSS-14 Code ID
CCD, Laser
1: Transmit RSS-14 Code ID
78
0: DO NOT transmit RSS-14 Application ID
CCD, Laser
1: Transmit RSS-14 Application ID
79
0: DO NOT transmit RSS-14 Check Digit
CCD, Laser
1: Transmit RSS-14 Check Digit
80
0: DO NOT transmit RSS Limited Code ID
CCD, Laser
1: Transmit RSS Limited Code ID
81
0: DO NOT transmit RSS Limited Application ID
CCD, Laser
1: Transmit RSS Limited Application ID
82
0: DO NOT transmit RSS Limited Check Digit
CCD, Laser
1: Transmit RSS Limited Check Digit
83
0: DO NOT transmit RSS Expanded Code ID
CCD, Laser
1: Transmit RSS Expanded Code ID
84
0: Disable original Telepen
CCD, Laser
1: Enable original Telepen (Numeric)
85
0: Disable Telepen
CCD, Laser
1: Enable Telepen
86
0: Enable UPC-E0
CCD, Laser
1: Enable UPC-E1 / UPC-E0
87
0: Disable GTIN
CCD, Laser
1: Enable GTIN
88~147
N/A
---
148
0: Disable UPC-E1 Triple Check
CCD, Laser
1: Enable UPC-E1 Triple Check
Appendix I Reader Settings
229
Symbology Parameter Table II
Note: Those marked with asterisks (*) are further explained in each symbology of
Appendix II.
No. (N1%)
Values and Description (N2%)
Scan Engine
1
0: Disable Code 39
2D, (Extra) Long
Range
1: Enable Code 39
2
0: Disable Code 32 (= Italian Pharmacode)
1: Enable Code 32
2D, (Extra) Long
Range
3
N/A
---
4
N/A
---
5
0: Disable Interleaved 25
2D, (Extra) Long
Range
1: Enable Interleaved 25
6
N/A
---
7
0: Disable Codabar (NW7)
2D, (Extra) Long
Range
1: Enable Codabar (NW7)
8
0: Disable Code 93
1: Enable Code 93
9
0: Disable Code 128
1: Enable Code 128
10
0: Disable UPC-E0 (depends)
1: Enable UPC-E0*
13
0: Disable EAN-8 (depends)
1: Enable EAN-8*
16
0: Disable EAN-13 (depends)
1: Enable EAN-13*
11 or 12 or
14 or 15 or
17 or 18 or
107 or 109
0: Disable Only Addon 2 & 5 of UPC & EAN Families
(It requires "ALL" of the indexes to be set 0.)
2D, (Extra) Long
Range
2D, (Extra) Long
Range
2D, (Extra) Long
Range
2D, (Extra) Long
Range
2D, (Extra) Long
Range
2D, (Extra) Long
Range
1: Enable Only Addon 2 & 5 of UPC & EAN Families*
(It requires "ANY" of the indexes to be set 1.)
19
0: Disable MSI
1: Enable MSI
20
N/A
2D, (Extra) Long
Range
---
230
BASIC Programming Guide For Use with CipherLab BASIC Compiler
21
Reserved
---
22
N/A
---
23
0: DO NOT verify Code 39 Check Digit
2D, (Extra) Long
Range
1: Verify Code 39 Check Digit
24
0: DO NOT transmit Code 39 Check Digit
1: Transmit Code 39 Check Digit
25
0: Standard Code 39
1: Full ASCII Code 39
2D, (Extra) Long
Range
2D, (Extra) Long
Range
26
N/A
---
27
N/A
---
28
N/A
---
29
0: DO NOT transmit Interleaved 25 Check Digit
2D, (Extra) Long
Range
1: Transmit Interleaved 25 Check Digit
30
N/A
---
31
N/A
---
32
N/A
---
33
N/A
---
34
N/A
---
35
N/A
---
36
N/A
---
37
N/A
---
38
0: DO NOT transmit Codabar Start/Stop Character
2D, (Extra) Long
Range
1: Transmit Codabar Start/Stop Character
39
MSI Check Digit Verification
0: Single Modulo 10
2D, (Extra) Long
Range
1: Double Modulo 10
2: Modulo 11 and Modulo 10
40
MSI Check Digit Transmission
0: Last Check Digit is NOT transmitted
2D, (Extra) Long
Range
1: Both Check Digits are transmitted
2: Both Check Digits are NOT transmitted
41
N/A
---
42
N/A
---
43
0: No conversion
2D, (Extra) Long
Range
1: Convert UPC-E0 to UPC-A
Appendix I Reader Settings
231
44
N/A
---
45
N/A
---
46
N/A
---
47
0: DO NOT transmit UPC-E0 Check Digit
2D, (Extra) Long
Range
1: Transmit UPC-E0 Check Digit
48
0: DO NOT transmit UPC-A Check Digit
1: Transmit UPC-A Check Digit
2D, (Extra) Long
Range
49
N/A
---
50
N/A
---
51
0: DO NOT transmit UPC-E0 System Number
2D, (Extra) Long
Range
1: Transmit UPC-E0 System Number
52
0: DO NOT transmit UPC-A System Number
1: Transmit UPC-A System Number
53
0: No conversion
1: Convert EAN-8 to EAN-13
2D, (Extra) Long
Range
2D, (Extra) Long
Range
54
N/A
---
55
N/A
---
56
N/A
---
57
(Not for portable terminals.)
---
58
N/A
---
59
N/A
---
60
N/A
---
61
0: Interleaved 25 Code Length Limitation in Fixed Length
Format
2D, (Extra) Long
Range
1: Interleaved 25 Code Length Limitation in Max/Min Length
Format
62
Interleaved 25 Max Code Length / Fixed Length 1
2D, (Extra) Long
Range
63
Interleaved 25 Min Code Length / Fixed Length 2
2D, (Extra) Long
Range
*(Length1 must be greater than Length2)
64
N/A
---
65
N/A
---
66
N/A
---
67
0: MSI 25 Code Length Limitation in Fixed Length Format
2D, (Extra) Long
Range
1: MSI 25 Code Length Limitation in Max/Min Length Format
232
BASIC Programming Guide For Use with CipherLab BASIC Compiler
68
MSI Max Code Length / Fixed Length 1
2D, (Extra) Long
Range
69
MSI Min Code Length / Fixed Length 2
2D, (Extra) Long
Range
*(Length1 must be greater than Length2)
70
Scan Mode for Scanner Port 1
8: Aiming Mode
(Extra) Long
Range
Any value (0~15) other than 8: Laser Mode (= aiming beam
disabled)
71
N/A
---
72
N/A
---
73
N/A
---
74
N/A
---
75
N/A
---
76
N/A
---
77
N/A
---
78
N/A
---
79
N/A
---
80
N/A
---
81
N/A
---
82
N/A
---
83
N/A
---
84
N/A
---
85
N/A
---
86
N/A
---
87
N/A
---
88
0: Code 39 Length Limitation in Fixed Length Format
2D, (Extra) Long
Range
1: Code 39 Length Limitation in Max/Min Length Format
89
Code 39 Max Code Length / Fixed Length1
2D, (Extra) Long
Range
90
Code 39 Min Code Length / Fixed Length2
2D, (Extra) Long
Range
*(Length1 must be greater than Length2)
91
0: DO NOT transmit UPC-E1 System Number
1: Transmit UPC-E1 System Number
92
0: DO NOT transmit UPC-E1 Check Digit
1: Transmit UPC-E1 Check Digit
2D, (Extra) Long
Range
2D, (Extra) Long
Range
Appendix I Reader Settings
93
233
0 : Disable UCC/EAN Code 128 Emulation Mode for UCC/EAN 2D
Composite Code
1 : Enable UCC/EAN Code 128 Emulation Mode for UCC/EAN
Composite Code
94
0: Disable TCIF Linked Code 39
2D
1: Enable TCIF Linked Code 39
95
0: No conversion
1: Convert UPC-E1 to UPC-A
96
0: Disable Code 11
2D, (Extra) Long
Range
2D
1: Enable Code 11
97
0: Disable Bookland EAN
1: Enable Bookland EAN*
2D, (Extra) Long
Range
(Index No. 16 is required to be 1.)
98
0: Disable Discrete 25 (= Industrial 25)
1: Enable Discrete 25
99
0: Disable ISBT 128
1: Enable ISBT 128
100
0: Disable Trioptic Code 39
1: Enable Trioptic Code 39
101
0: Disable UCC/EAN-128
1: Enable UCC/EAN-128
102
0: No conversion
1: Convert RSS to UPC/EAN
103
0: Disable RSS Expanded
1: Enable RSS Expanded
104
0: Disable RSS Limited
1: Enable RSS Limited
105
0: Disable RSS-14
1: Enable RSS-14
106
0: Disable UPC-A (depends)
1: Enable UPC-A*
108
0: Disable UPC-E1 (depends)
1: Enable UPC-E1*
2D, (Extra) Long
Range
2D, (Extra) Long
Range
2D, (Extra) Long
Range
2D, (Extra) Long
Range
2D, (Extra) Long
Range
2D, (Extra) Long
Range
2D, (Extra) Long
Range
2D, (Extra) Long
Range
2D, (Extra) Long
Range
2D, (Extra) Long
Range
234
BASIC Programming Guide For Use with CipherLab BASIC Compiler
11 or 12 or
14 or 15 or
17 or 18 or
107 or 109
0: Disable Only Addon 2 & 5 of UPC & EAN Families
(It requires "ALL" of the indexes to be set 0.)
2D, (Extra) Long
Range
1: Enable Only Addon 2 & 5 of UPC & EAN Families*
(It requires "ANY" of the indexes to be set 1.)
110
0: UPC Never Linked
2D
1: UPC Always Linked*
2: Autodiscriminate UPC Composite
111
0: Disable Composite CC-A/B
2D
1: Enable Composite CC-A/B
112
0: Disable Composite CC-C
2D
1: Enable Composite CC-C
113
0: Code 93 Length Limitation in Fixed Length Format
1: Code 93 Length Limitation in Max/Min Length Format
2D, (Extra) Long
Range
114
Code 93 Max Code Length / Fixed Length1
2D, (Extra) Long
Range
115
Code 93 Min Code Length / Fixed Length2
2D, (Extra) Long
Range
*(Length1 must be greater than Length2)
116
0: Code 11 Length Limitation in Fixed Length Format
2D
1: Code 11 Length Limitation in Max/Min Length Format
117
Code 11 Max Code Length / Fixed Length1
2D
118
Code 11 Min Code Length / Fixed Length2
2D
*(Length1 must be greater than Length2)
119
0: Discrete 25 Length Limitation in Fixed Length Format
1: Discrete 25 Length Limitation in Max/Min Length Format
2D, (Extra) Long
Range
120
Discrete 25 Max Code Length / Fixed Length1
2D, (Extra) Long
Range
121
Discrete 25 Min Code Length / Fixed Length2
2D, (Extra) Long
Range
*(Length1 must be greater than Length2)
122
0: Codabar Length Limitation in Fixed Length Format
1: Codabar Length Limitation in Max/Min Length Format
2D, (Extra) Long
Range
123
Codabar Max Code Length / Fixed Length1
2D, (Extra) Long
Range
124
Codabar Min Code Length / Fixed Length2
2D, (Extra) Long
Range
*(Length1 must be greater than Length2)
125
0: DO NOT transmit US Postal Check Digit
1: Transmit US Postal Check Digit
2D
Appendix I Reader Settings
126
0: Disable Maxicode
235
2D
1: Enable Maxicode
127
0: Disable Data Matrix
2D
1: Enable Data Matrix
128
0: Disable QR Code
2D
1: Enable QR Code
129
0: Disable US Planet
2D
1: Enable US Planet
130
0: Disable US Postnet
2D
1: Enable US Postnet
131
0: Disable MicroPDF417
2D
1: Enable MicroPDF417
132
0: Disable PDF417
2D
1: Enable PDF417
133
0: Disable MicroPDF417 Code 128 Emulation
2D
1: Enable MicroPDF417 Code 128 Emulation
134
0: Disable Japan Postal
2D
1: Enable Japan Postal
135
0: Disable Australian Postal
2D
1: Enable Australian Postal
136
0: Disable Dutch Postal
2D
1: Enable Dutch Postal
137
0: Disable UK Postal Check Digit
2D
1: Enable UK Postal Check Digit
138
0: Disable UK Postal
2D
1: Enable UK Postal
139
0: Disable Joint Configuration
1: Enable Joint Configuration of No Addon, Addon 2 & 5 for Any
Member of UPC/EAN Families*
140
0: DO NOT verify Interleaved 25 Check Digit
1: Verify Interleaved 25 USS Check Digit
2D, (Extra) Long
Range
2D, (Extra) Long
Range
2: Verify Interleaved 25 OPCC Check Digit
141
0: Disable UPC-A System Number & Country Code
1: Enable UPC-A System Number & Country Code
142
0: Disable UPC-E0 System Number & Country Code
1: Enable UPC-E0 System Number & Country Code
2D, (Extra) Long
Range
2D, (Extra) Long
Range
236
BASIC Programming Guide For Use with CipherLab BASIC Compiler
143
0: Disable UPC-E1 System Number & Country Code
1: Enable UPC-E1 System Number & Country Code
144
0: No conversion
1: Convert Interleaved 25 to EAN-13*
145
Scanner time-out duration in seconds for Aiming mode
0: No time-out
2D, (Extra) Long
Range
2D, (Extra) Long
Range
(Extra) Long
Range
1 ~ 255 (sec): Aiming time-out
146
Macro PDF Transmit / Decode Mode
2D
0: Passthrough all symbols
1: Buffer all symbols / Transmit Macro PDF when complete
2: Transmit any symbol in set / No particular order
147
0: Disable Macro PDF Escape Characters
2D
1: Enable Macro PDF Escape Characters
148
N/A
---
237
APPENDIX II
Symbology Parameters
The CipherLab data terminals support the decodability of a number of barcode
symbologies.
The BASIC Compiler provides a menu-driven interface to configure the decodability of
these barcode symbologies, as well as the scanner behavior. The "Barcode Setting" window
lets user check the box in front of a barcode type to enable the decodability of this barcode
symbology. For some of the supported barcode symbologies, user may click the
"Configure" button to do more configurations, such as enable/disable the checksum
verification.
This appendix describes associated symbology parameters.
238
BASIC Programming Guide For Use with CipherLab BASIC Compiler
Scan Engine, CCD or Laser
Codabar
No. (N1%)
Values and Description (N2%)
Scan Engine
7
0: Disable Codabar (NW7)
CCD, Laser
1: Enable Codabar (NW7)
37
Select Codabar Start/Stop Character
CCD, Laser
0: abcd/abcd
1: abcd/tn*e
2: ABCD/ABCD
3: ABCD/TN*E
38
0: DO NOT transmit Codabar Start/Stop Character
CCD, Laser
1: Transmit Codabar Start/Stop Character
Select Start/Stop Character
User can select no start/stop characters or one of the four different start/stop character pairs, i.e.
abcd/abcd, abcd/tn*e, ABCD/ABCD, and ABCD/TN*E, to be included in the data being
transmitted.
Transmit Start/Stop Character
This parameter specifies whether the start/stop characters are included in the data being
transmitted.
Code 2 of 5 Family
Industrial 25
No. (N1%)
Values and Description (N2%)
Scan Engine
4
0: Disable Industrial 25
CCD, Laser
1: Enable Industrial 25
30
0: DO NOT verify Industrial 25 Check Digit
CCD, Laser
1: Verify Industrial 25 Check Digit
31
0: DO NOT transmit Industrial 25 Check Digit
1: Transmit Industrial 25 Check Digit
CCD, Laser
Appendix II Symbology Parameters
35
Select Industrial 25 Start/Stop Pattern
239
CCD, Laser
0: Use Industrial 25 Start/Stop Pattern
1: Use Interleaved 25 Start/Stop Pattern
2: Use Matrix 25 Start/Stop Pattern
58
0: Industrial 25 Code Length Limitation in Fixed Length Format CCD, Laser
1: Industrial 25 Code Length Limitation in Max/Min Length
Format
59
Industrial 25 Max Code Length / Fixed Length 1
CCD, Laser
60
Industrial 25 Min Code Length / Fixed Length 2
CCD, Laser
Verify Check Digit
If this parameter is enabled, the terminal will perform checksum verification when decoding
barcodes. If the checksum is incorrect, the barcode will not be accepted.
Transmit Check Digit
If this parameter is enabled, the checksum character will be included in the data being transmitted.
Select Start/Stop Pattern
This parameter provides the readability of all 2 of 5 symbology variants. For example, flight tickets
actually use an Industrial 2 of 5 barcode but with Interleaved 2 of 5 start/stop. In order to read this
barcode, the start/stop selection parameter of Industrial 2 of 5 should be set to "Interleaved 25".
Length Qualification
Because of the weak structure of the 2 of 5 barcodes, it is possible to make a "short scan" error. To
prevent the "short scan" error, user can define the "Length Qualification" settings to ensure that the
correct barcode is read by qualifying the allowable code length. The barcode can be qualified by
"Fixed Length" or "Max/Min Length".
If "Fixed Length" is selected, up to 2 fixed lengths can be specified.
If "Max/Min Length" is selected, the maximum length and the minimum length must be
specified. The terminal will only accept those barcodes with lengths that fall between
max/min lengths specified.
Interleaved 25
Refer to Industrial 25.
No. (N1%)
Values and Description (N2%)
Scan Engine
5
0: Disable Interleaved 25
CCD, Laser
1: Enable Interleaved 25
28
0: DO NOT verify Interleaved 25 Check Digit
1: Verify Interleaved 25 Check Digit
CCD, Laser
240
BASIC Programming Guide For Use with CipherLab BASIC Compiler
29
0: DO NOT transmit Interleaved 2 Check Digit
CCD, Laser
1: Transmit Interleaved 25 Check Digit
34
Select Interleaved 25 Start/Stop Pattern
CCD, Laser
0: Use Industrial 25 Start/Stop Pattern
1: Use Interleaved 25 Start/Stop Pattern
2: Use Matrix 25 Start/Stop Pattern
61
0: Interleaved 25 Code Length Limitation in Fixed Length
Format
CCD, Laser
1: Interleaved 25 Code Length Limitation in Max/Min Length
Format
62
Interleaved 25 Max Code Length / Fixed Length 1
CCD, Laser
63
Interleaved 25 Min Code Length / Fixed Length 2
CCD, Laser
Matrix 25
Refer to Industrial 25.
No. (N1%)
Values and Description (N2%)
Scan Engine
6
0: Disable Matrix 25
CCD, Laser
1: Enable Matrix 25
32
0: DO NOT verify Matrix 25 Check Digit
CCD, Laser
1: Verify Matrix 25 Check Digit
33
0: DO NOT transmit Matrix 25 Check Digit
CCD, Laser
1: Transmit Matrix 25 Check Digit
36
Select Matrix 25 Start/Stop Pattern
CCD, Laser
0: Use Industrial 25 Start/Stop Pattern
1: Use Interleaved 25 Start/Stop Pattern
2: Use Matrix 25 Start/Stop Pattern
64
0: Matrix 25 Code Length Limitation in Fixed Length Format
CCD, Laser
1: Matrix 25 Code Length Limitation in Max/Min Length Format
65
Matrix 25 Max Code Length / Fixed Length 1
CCD, Laser
66
Matrix 25 Min Code Length / Fixed Length 2
CCD, Laser
Appendix II Symbology Parameters
241
Code 39
No. (N1%)
Values and Description (N2%)
Scan Engine
1
0: Disable Code 39
CCD, Laser
1: Enable Code 39
22
0: DO NOT transmit Code 39 Start/Stop Character
CCD, Laser
1: Transmit Code 39 Start/Stop Character
23
0: DO NOT verify Code 39 Check Digit
CCD, Laser
1: Verify Code 39 Check Digit
24
0: DO NOT transmit Code 39 Check Digit
CCD, Laser
1: Transmit Code 39 Check Digit
25
0: Standard Code 39
CCD, Laser
1: Full ASCII Code 39
Transmit Start/Stop Character
This parameter specifies whether the start/stop characters are included in the data being
transmitted.
Verify Check Digit
If this parameter is enabled, the terminal will perform checksum verification when decoding
barcodes. If the checksum is incorrect, the barcode will not be accepted.
Transmit Check Digit
If this parameter is enabled, the checksum character will be included in the data being transmitted.
Full ASCII Code 39
If this parameter is enabled, the terminal will support Code 39 Full ASCII that includes all the
alphanumeric and special characters.
Code 93
No. (N1%)
Values and Description (N2%)
Scan Engine
8
0: Disable Code 93
CCD, Laser
1: Enable Code 93
242
BASIC Programming Guide For Use with CipherLab BASIC Compiler
Code 128/EAN-128
No. (N1%)
Values and Description (N2%)
Scan Engine
9
0: Disable Code 128 / EAN-128
CCD, Laser
1: Enable Code 128 / EAN-128
Italian/French Pharmacode
No. (N1%)
Values and Description (N2%)
Scan Engine
2
0: Disable Italian Pharmacode
CCD, Laser
1: Enable Italian Pharmacode
3
0: Disable CIP 39 (= French Pharmacode)
CCD, Laser
1: Enable CIP 39
26
0: DO NOT transmit Italian Pharmacode Check Digit
CCD, Laser
1: Transmit Italian Pharmacode Check Digit
27
0: DO NOT transmit CIP 39 Check Digit
CCD, Laser
1: Transmit CIP 39 Check Digit
Transmit Check Digit
If this parameter is enabled, the checksum character will be included in the data being transmitted.
Note: Share the Transmit Start/Stop Character setting with Code 39.
MSI
No. (N1%)
Values and Description (N2%)
Scan Engine
19
0: Disable MSI
CCD, Laser
1: Enable MSI
39
MSI Check Digit Verification
0: Single Modulo 10
1: Double Modulo 10
2: Modulo 11 and Modulo 10
CCD, Laser
Appendix II Symbology Parameters
40
MSI Check Digit Transmission
243
CCD, Laser
0: Last Check Digit is NOT transmitted
1: Both Check Digits are transmitted
2: Both Check Digits are NOT transmitted
67
0: MSI 25 Code Length Limitation in Fixed Length Format
CCD, Laser
1: MSI 25 Code Length Limitation in Max/Min Length Format
68
MSI Max Code Length / Fixed Length 1
CCD, Laser
69
MSI Min Code Length / Fixed Length 2
CCD, Laser
Verify Check Digit
User can select one of the three kinds of checksum calculations, i.e., Single Modulo 10, Double
Modulo 10, and Modulo 11 & 10, to verify the MSI barcodes. If the checksum character is
incorrect, the barcode will not be accepted.
Transmit Check Digit
This parameter specifies how the checksum is to be transmitted. User can select from “Last digit
not transmitted”, “Transmitted”, and “Last 2 digits not transmitted”.
Length Qualification
Because of the weak structure of the MSI barcodes, it is possible to make a "short scan" error. To
prevent the "short scan" error, user can define the "Length Qualification" settings to insure that the
correct barcode is read by qualifying the allowable code length. The barcode can be qualified by
"Fixed Length" or "Max/Min Length".
If "Fixed Length" is selected, up to 2 fixed lengths can be specified.
If "Max/Min Length" is selected, the maximum length and the minimum length must be
specified. The terminal will only accept MSI barcodes with lengths that fall between max/min
lengths specified.
Negative Barcode
No. (N1%)
Values and Description (N2%)
Scan Engine
55
0: Disable Negative Barcode
CCD, Laser
1: Enable Negative Barcode
244
BASIC Programming Guide For Use with CipherLab BASIC Compiler
Plessey
No. (N1%)
Values and Description (N2%)
Scan Engine
20
0: Disable Plessey
CCD, Laser
1: Enable Plessey
41
0: DO NOT transmit Plessey Check Digits
CCD, Laser
1: Transmit Plessey Check Digits
42
0: No conversion
CCD, Laser
1: Convert Standard Plessey to UK Plessey
Transmit Check Digits
If this parameter is enabled, the checksum characters (two characters) will be transmitted together
with data.
Convert to UK Plessey
If this parameter is enabled, the terminal will change each occurrence of the character 'A' to
character 'X' in the code.
RSS Family
No. (N1%)
Values and Description (N2%)
Scan Engine
74
0: Disable RSS Limited
CCD, Laser
1: Enable RSS Limited
75
0: Disable RSS Expanded
CCD, Laser
1: Enable RSS Expanded
76
0: Disable RSS-14
CCD, Laser
1: Enable RSS-14
77
0: DO NOT transmit RSS-14 Code ID
CCD, Laser
1: Transmit RSS-14 Code ID
78
0: DO NOT transmit RSS-14 Application ID
CCD, Laser
1: Transmit RSS-14 Application ID
79
0: DO NOT transmit RSS-14 Check Digit
CCD, Laser
1: Transmit RSS-14 Check Digit
80
0: DO NOT transmit RSS Limited Code ID
1: Transmit RSS Limited Code ID
CCD, Laser
Appendix II Symbology Parameters
81
0: DO NOT transmit RSS Limited Application ID
245
CCD, Laser
1: Transmit RSS Limited Application ID
82
0: DO NOT transmit RSS Limited Check Digit
CCD, Laser
1: Transmit RSS Limited Check Digit
83
0: DO NOT transmit RSS Expanded Code ID
CCD, Laser
1: Transmit RSS Expanded Code ID
Transmit Code ID
If this parameter is enabled, the default Code ID (“]e0”) will be included in the data being
transmitted.
Transmit Application ID
If this parameter is enabled, the Application ID will be included in the data being transmitted.
Transmit Check Digit
If this parameter is enabled, the check digit will be included in the data being transmitted.
Telepen
No. (N1%)
Values and Description (N2%)
Scan Engine
84
0: Disable original Telepen
CCD, Laser
1: Enable original Telepen (Numeric)
85
0: Disable Telepen
CCD, Laser
1: Enable Telepen
Original Telepen (Numeric)
If this parameter is enabled, the terminal will support Telepen in numeric numbers only.
If this parameter is disabled, the terminal will support Telepen in full ASCII code. AIM Telepen
(Full ASCII) includes all the alphanumeric and special characters.
246
BASIC Programming Guide For Use with CipherLab BASIC Compiler
UPC/EAN Families
EAN-8
No. (N1%)
Values and Description (N2%)
Scan Engine
13
0: Disable EAN-8
CCD, Laser
1: Enable EAN-8
14
0: Disable EAN-8 Addon 2
CCD, Laser
1: Enable EAN-8 Addon 2
15
0: Disable EAN-8 Addon 5
CCD, Laser
1: Enable EAN-8 Addon 5
49
0: DO NOT transmit EAN-8 Check Digit
CCD, Laser
1: Transmit EAN-8 Check Digit
53
0: No conversion
CCD, Laser
1: Convert EAN-8 to EAN-13
Transmit Check Digit
If this parameter is enabled, the checksum character will be included in the data being transmitted.
Convert EAN-8 to EAN-13
If this parameter is enabled, the read EAN-8 barcode will be expanded into EAN-13, and the next
processing will follow the parameters configured for EAN-13.
EAN-13
No. (N1%)
Values and Description (N2%)
Scan Engine
16
0: Disable EAN-13/UPC-A
CCD, Laser
1: Enable EAN-13/UPC-A
17
0: Disable EAN-13/UPC-A Addon 2
CCD, Laser
1: Enable EAN-13/UPC-A Addon 2
18
0: Disable EAN-13/UPC-A Addon 5
CCD, Laser
1: Enable EAN-13/UPC-A Addon 5
45
0: No conversion
CCD, Laser
1: Enable ISBN Conversion
46
0: No conversion
1: Enable ISSN Conversion
CCD, Laser
Appendix II Symbology Parameters
50
0: DO NOT transmit EAN-13 Check Digit
247
CCD, Laser
1: Transmit EAN-13 Check Digit
Convert EAN-13 to ISBN
If this parameter is enabled, the read EAN-13 barcode starting with 978 or 979 will be converted to
ISBN.
Convert EAN-13 to ISSN
If this parameter is enabled, the read EAN-13 barcode starting with 977 will be converted to ISSN.
Transmit Check Digit
If this parameter is enabled, the checksum character will be included in the data being transmitted.
GTIN
No. (N1%)
Values and Description (N2%)
Scan Engine
87
0: Disable GTIN
CCD, Laser
1: Enable GTIN
UPC-A
No. (N1%)
Values and Description (N2%)
Scan Engine
44
0: No conversion
CCD, Laser
1: Convert UPC-A to EAN-13
48
0: DO NOT transmit UPC-A Check Digit
CCD, Laser
1: Transmit UPC-A Check Digit
52
0: DO NOT transmit UPC-A System Number
CCD, Laser
1: Transmit UPC-A System Number
Convert UPC-A to EAN-13
If this parameter is enabled, the read UPC-A barcode will be expanded into EAN-13, and the next
processing will follow the parameters configured for EAN-13.
Transmit Check Digit
If this parameter is enabled, the checksum character will be included in the data being transmitted.
Transmit System Number
If this parameter is enabled, the system number will be included in the data being transmitted.
248
BASIC Programming Guide For Use with CipherLab BASIC Compiler
UPC-E
No. (N1%)
Values and Description (N2%)
Scan Engine
10
0: Disable UPC-E
CCD, Laser
1: Enable UPC-E
11
0: Disable UPC-E Addon 2
CCD, Laser
1: Enable UPC-E Addon 2
12
0: Disable UPC-E Addon 5
CCD, Laser
1: Enable UPC-E Addon 5
43
0: No conversion
CCD, Laser
1: Convert UPC-E to UPC-A
47
0: DO NOT transmit UPC-E Check Digit
CCD, Laser
1: Transmit UPC-E Check Digit
51
0: DO NOT transmit UPC-E System Number
CCD, Laser
1: Transmit UPC-E System Number
86
0: Enable UPC-E0
CCD, Laser
1: Enable UPC-E1 / UPC-E0
148
0: Disable UPC-E1 Triple Check
CCD, Laser
1: Enable UPC-E1 Triple Check
Convert UPC-E to UPC-A
If this parameter is enabled, the read UPC-E barcode will be expanded into UPC-A, and the next
processing will follow the parameters configured for UPC-A.
Transmit Check Digit
If this parameter is enabled, the checksum character will be included in the data being transmitted.
Transmit System Number
If this parameter is enabled, the system number will be included in the data being transmitted.
UPC-E1 Triple Check
If this parameter is enabled, the terminal will read the same UPC-E1 barcode three times to make a
valid reading. This is helpful when the barcode is defaced and requires more attempts to read it
successfully.
Appendix II Symbology Parameters
249
Scan Engine, 2D or (Extra) Long
Range Laser
Codabar
No. (N1%)
Values and Description (N2%)
Scan Engine
7
0: Disable Codabar (NW7)
2D, (Extra) Long
Range
1: Enable Codabar (NW7)
38
0: DO NOT transmit Codabar Start/Stop Character
1: Transmit Codabar Start/Stop Character
122
0: Codabar Length Limitation in Fixed Length Format
1: Codabar Length Limitation in Max/Min Length Format
2D, (Extra) Long
Range
2D, (Extra) Long
Range
123
Codabar Max Code Length / Fixed Length1
2D, (Extra) Long
Range
124
Codabar Min Code Length / Fixed Length2
2D, (Extra) Long
Range
*(Length1 must be greater than Length2)
Transmit Start/Stop Character
This parameter specifies whether the start/stop characters are included in the data being
transmitted.
Length Qualification
The barcode can be qualified by “Fixed Length” or “Max/Min Length”. The length of a barcode
refers to the number of characters (i.e. human readable characters), including check digit(s) it
contains.
If “Fixed Length” is selected, up to 2 fixed lengths can be specified.
If “Max/Min Length” is selected, the maximum length and the minimum length must be
specified. The terminal will only accept those barcodes with lengths that fall between
max/min lengths specified.
Note: When it is configured to use Fixed Length format, Length1 must be greater than
Length2. Otherwise, the format will be converted to Max/Min Length Format, and
Length1 becomes Min. Length while Length2 becomes Max. Length. In either
length format, when both of the values are configured to 0, it means no limit in
length.
250
BASIC Programming Guide For Use with CipherLab BASIC Compiler
Code 2 of 5
Discrete 25
No. (N1%)
Values and Description (N2%)
Scan Engine
98
0: Disable Discrete 25 (= Industrial 25)
2D, (Extra) Long
Range
1: Enable Discrete 25
119
0: Discrete 25 Length Limitation in Fixed Length Format
1: Discrete 25 Length Limitation in Max/Min Length Format
2D, (Extra) Long
Range
120
Discrete 25 Max Code Length / Fixed Length1
2D, (Extra) Long
Range
121
Discrete 25 Min Code Length / Fixed Length2
2D, (Extra) Long
Range
*(Length1 must be greater than Length2)
Length Qualification
Because of the weak structure of the 2 of 5 barcodes, it is possible to make a “short scan” error. To
prevent the “short scan” error, user can define the “Length Qualification” settings to ensure that the
correct barcode is read by qualifying the allowable code length. Refer to Codabar.
Interleaved 25
No. (N1%)
Values and Description (N2%)
Scan Engine
5
0: Disable Interleaved 25
2D, (Extra) Long
Range
1: Enable Interleaved 25
29
0: DO NOT transmit Interleaved 25 Check Digit
1: Transmit Interleaved 25 Check Digit
61
0: Interleaved 25 Code Length Limitation in Fixed Length
Format
2D, (Extra) Long
Range
2D, (Extra) Long
Range
1: Interleaved 25 Code Length Limitation in Max/Min Length
Format
62
Interleaved 25 Max Code Length / Fixed Length 1
2D, (Extra) Long
Range
63
Interleaved 25 Min Code Length / Fixed Length 2
2D, (Extra) Long
Range
*(Length1 must be greater than Length2)
140
0: DO NOT verify Interleaved 25 Check Digit
1: Verify Interleaved 25 USS Check Digit
2: Verify Interleaved 25 OPCC Check Digit
2D, (Extra) Long
Range
Appendix II Symbology Parameters
144
0: No conversion
1: Convert Interleaved 25 to EAN-13*
251
2D, (Extra) Long
Range
Transmit Check Digit
If this parameter is enabled, the checksum character will be included in the data being transmitted.
Length Qualification
Because of the weak structure of the 2 of 5 barcodes, it is possible to make a “short scan” error. To
prevent the “short scan” error, user can define the “Length Qualification” settings to insure that the
correct barcode is read by qualifying the allowable code length. Refer to Codabar.
Verify Check Digit
If this parameter is enabled, the terminal will perform checksum verification when decoding
barcodes. If the checksum is incorrect, the barcode will not be accepted.
Convert to EAN-13
Interleaved 25 barcode must have a leading zero and a valid EAN-13 check digit.
Note: “Convert Interleaved 25 to EAN-13” cannot be enabled unless its checksum
verification is disabled (=0).
Code 39
No. (N1%)
Values and Description (N2%)
Scan Engine
1
0: Disable Code 39
2D, (Extra) Long
Range
1: Enable Code 39
2
0: Disable Code 32 (= Italian Pharmacode)
1: Enable Code 32
23
0: DO NOT verify Code 39 Check Digit
1: Verify Code 39 Check Digit
24
0: DO NOT transmit Code 39 Check Digit
1: Transmit Code 39 Check Digit
25
0: Standard Code 39
1: Full ASCII Code 39
88
0: Code 39 Length Limitation in Fixed Length Format
1: Code 39 Length Limitation in Max/Min Length Format
89
Code 39 Max Code Length / Fixed Length1
2D, (Extra) Long
Range
2D, (Extra) Long
Range
2D, (Extra) Long
Range
2D, (Extra) Long
Range
2D, (Extra) Long
Range
2D, (Extra) Long
Range
252
BASIC Programming Guide For Use with CipherLab BASIC Compiler
90
Code 39 Min Code Length / Fixed Length2
*(Length1 must be greater than Length2)
100
0: Disable Trioptic Code 39
1: Enable Trioptic Code 39*
2D, (Extra) Long
Range
2D, (Extra) Long
Range
Verify Check Digit
If this parameter is enabled, the terminal will perform checksum verification when decoding
barcodes. If the checksum is incorrect, the barcode will not be accepted.
Transmit Check Digit
If this parameter is enabled, the checksum character will be included in the data being transmitted.
Note: “Verify Check Digit” must be enabled so that the check digit can be left out when it
is preferred not to transmit the check digit.
Full ASCII Code 39
If this parameter is enabled, the terminal will support Code 39 Full ASCII that includes all the
alphanumeric and special characters.
Length Qualification
Refer to Codabar.
Code 93
No. (N1%)
Values and Description (N2%)
Scan Engine
8
0: Disable Code 93
2D, (Extra) Long
Range
1: Enable Code 93
113
0: Code 93 Length Limitation in Fixed Length Format
1: Code 93 Length Limitation in Max/Min Length Format
2D, (Extra) Long
Range
114
Code 93 Max Code Length / Fixed Length1
2D, (Extra) Long
Range
115
Code 93 Min Code Length / Fixed Length2
2D, (Extra) Long
Range
*(Length1 must be greater than Length2)
Length Qualification
Refer to Codabar.
Appendix II Symbology Parameters
253
Code 128
No. (N1%)
Values and Description (N2%)
Scan Engine
9
0: Disable Code 128
2D, (Extra) Long
Range
1: Enable Code 128
ISBT 128
ISBT 128 is a variant of Code 128 used in the blood bank industry.
No. (N1%)
Values and Description (N2%)
Scan Engine
99
0: Disable ISBT 128
2D, (Extra) Long
Range
1: Enable ISBT 128
UCC/EAN-128
No. (N1%)
Values and Description (N2%)
Scan Engine
101
0: Disable UCC/EAN-128
2D, (Extra) Long
Range
1: Enable UCC/EAN-128
MSI
No. (N1%)
Values and Description (N2%)
Scan Engine
19
0: Disable MSI
2D, (Extra) Long
Range
1: Enable MSI
39
MSI Check Digit Verification
0: Single Modulo 10
1: Double Modulo 10
2: Modulo 11 and Modulo 10
2D, (Extra) Long
Range
254
BASIC Programming Guide For Use with CipherLab BASIC Compiler
40
MSI Check Digit Transmission
0: Last Check Digit is NOT transmitted
2D, (Extra) Long
Range
1: Both Check Digits are transmitted
2: Both Check Digits are NOT transmitted
67
0: MSI 25 Code Length Limitation in Fixed Length Format
1: MSI 25 Code Length Limitation in Max/Min Length Format
2D, (Extra) Long
Range
68
MSI Max Code Length / Fixed Length 1
2D, (Extra) Long
Range
69
MSI Min Code Length / Fixed Length 2
2D, (Extra) Long
Range
*(Length1 must be greater than Length2)
Verify Check Digit
User can select one of the three kinds of checksum calculations, i.e., Single Modulo 10, Double
Modulo 10, and Modulo 11 & 10, to verify the MSI barcodes. If the checksum character(s) is
incorrect, the barcode will not be accepted.
Transmit Check Digit
This parameter specifies how the checksum is to be transmitted. User can select from “Last digit
not transmitted”, “Transmitted”, and “Last 2 digits not transmitted”.
Length Qualification
Because of the weak structure of the MSI barcodes, it is possible to make a "short scan" error. To
prevent the "short scan" error, user can define the "Length Qualification" settings to ensure that the
correct barcode is read by qualifying the allowable code length. Refer to Codabar.
RSS Family
No. (N1%)
Values and Description (N2%)
Scan Engine
102
0: No conversion
2D, (Extra) Long
Range
1: Convert RSS to UPC/EAN
103
0: Disable RSS Expanded
1: Enable RSS Expanded
104
0: Disable RSS Limited
1: Enable RSS Limited
105
0: Disable RSS-14
1: Enable RSS-14
2D, (Extra) Long
Range
2D, (Extra) Long
Range
2D, (Extra) Long
Range
Appendix II Symbology Parameters
255
Convert RSS to UPC/EAN
If this parameter is enabled, the RSS barcodes will be converted to UPC/EAN. This only applies to
RSS-14 and RSS Limited barcodes not decoded as part of a Composite barcode.
(1) When enabled, the leading “010” will be stripped from these barcodes and a “0” will be
encoded as the first digit; this will convert RSS barcodes to EAN-13.
(2) For barcodes beginning with two or more zeros but not six zeros, this option will strip the
leading “0010” and report the barcode as UPC-A. The UPC-A Preamble setting that
transmits the system character and country code applies to such converted barcodes. Note
that neither the system character nor the check digit can be stripped.
UPC/EAN Families
The UPC/EAN families include No Addon, Addon 2, and Addon 5 for the following
symbologies:
UPC-E0
UPC-E1
UPC-A
EAN-8
EAN-13
Bookland EAN (for ISBN)
For any member belonging to the UPC/EAN families, Index No. 139 is used to decide the
joint configuration of No Addon, Addon 2, and Addon 5. Other parameters are listed below.
No. (N1%)
Values and Description (N2%)
Scan Engine
43
0: No conversion
2D, (Extra) Long
Range
1: Convert UPC-E0 to UPC-A
47
0: DO NOT transmit UPC-E0 Check Digit
1: Transmit UPC-E0 Check Digit
48
0: DO NOT transmit UPC-A Check Digit
1: Transmit UPC-A Check Digit
51
0: DO NOT transmit UPC-E0 System Number
1: Transmit UPC-E0 System Number
52
0: DO NOT transmit UPC-A System Number
1: Transmit UPC-A System Number
2D, (Extra) Long
Range
2D, (Extra) Long
Range
2D, (Extra) Long
Range
2D, (Extra) Long
Range
256
BASIC Programming Guide For Use with CipherLab BASIC Compiler
53
0: No conversion
1: Convert EAN-8 to EAN-13
91
0: DO NOT transmit UPC-E1 System Number
1: Transmit UPC-E1 System Number
92
0: DO NOT transmit UPC-E1 Check Digit
1: Transmit UPC-E1 Check Digit
95
0: No conversion
1: Convert UPC-E1 to UPC-A
141
0: Disable UPC-A System Number & Country Code
1: Enable UPC-A System Number & Country Code
142
0: Disable UPC-E0 System Number & Country Code
1: Enable UPC-E0 System Number & Country Code
143
0: Disable UPC-E1 System Number & Country Code
1: Enable UPC-E1 System Number & Country Code
2D, (Extra) Long
Range
2D, (Extra) Long
Range
2D, (Extra) Long
Range
2D, (Extra) Long
Range
2D, (Extra) Long
Range
2D, (Extra) Long
Range
2D, (Extra) Long
Range
Convert UPC-E0/UPC-E1 to UPC-A
If this parameter is enabled, the read UPC-E0/UPC-E1 barcode will be expanded into UPC-A, and
the next processing will follow the parameters configured for UPC-A.
Convert EAN-8 to EAN-13
If this parameter is enabled, the read EAN-8 barcode will be expanded into EAN-13, and the next
processing will follow the parameters configured for EAN-13.
Transmit Check Digit
If this parameter is enabled, the checksum character will be included in the data being transmitted.
Transmit System Number
If this parameter is enabled, the system number will be included in the data being transmitted.
Joint Configuration
No. (N1%)
Values and Description (N2%)
Scan Engine
139
0: Disable Joint Configuration
2D, (Extra) Long
Range
1: Enable Joint Configuration of No Addon, Addon 2 & 5 for Any
Member of UPC/EAN Families
Appendix II Symbology Parameters
257
If Index No. 139 for joint configuration is set 1, the parameters of Table I can be
configured separately. It depends on which member of the families needs to be enabled.
If Index No. 139 for Joint Configuration is set 0, then
- When "ANY" of the indexes of Table II is set 1, only Addon 2 & 5 of the whole
UPC/EAN families are enabled. (= Disable No Addon)
- When "ALL" of the indexes of Table II are set 0, only No Addon is enabled that is
further decided by Table I.
When
Results in
Index No. 139
Index No. listed in
Table I
Index No. listed in No Addon
Table II
Addon 2 & 5
=1
=1
N/A
Enabled
Enabled
=1
=0
N/A
Disabled
Disabled
=0
N/A
Any = 1
Disabled*(All)
Enabled *(All)
=0
=1
All = 0
Enabled
Disabled*(All)
=0
=0
=0
Disabled
Disabled*(All)
Note: The result marked with "All" indicates it occurs with the whole UPC/EAN families.
Table I
No. (N1%)
Values and Description (N2%)
Scan Engine
10
0: Disable UPC-E0 (depends)
2D, (Extra) Long
Range
1: Enable UPC-E0*
13
0: Disable EAN-8 (depends)
1: Enable EAN-8*
16
0: Disable EAN-13 (depends)
1: Enable EAN-13*
97
0: Disable Bookland EAN
1: Enable Bookland EAN*
2D, (Extra) Long
Range
2D, (Extra) Long
Range
2D, (Extra) Long
Range
(Index No. 16 for EAN-13 is required to be 1.)
106
0: Disable UPC-A (depends)
1: Enable UPC-A*
108
0: Disable UPC-E1 (depends)
1: Enable UPC-E1*
2D, (Extra) Long
Range
2D, (Extra) Long
Range
258
BASIC Programming Guide For Use with CipherLab BASIC Compiler
Note: (1) Index No. 139 = 1: No Addon, Addon 2, Addon 5 of the symbology are enabled.
(2) Index No. 139 = 0 (and all the indexes in Table II below must be set 0): Only No
Addon of the symbology is enabled.
Table II
No. (N1%)
Values and Description (N2%)
Scan Engine
11 or 12 or
14 or 15 or
17 or 18 or
107 or 109
0: Disable Only Addon 2 & 5 of UPC & EAN Families
2D, (Extra) Long
Range
(It requires "ALL" of the indexes to be set 0.)
1: Enable Only Addon 2 & 5 of UPC & EAN Families*
(It requires "ANY" of the indexes to be set 1.)
Appendix II Symbology Parameters
259
2D Scan Engine Only
In addition to those symbologies described previously, the 2D scan engine supports the
following symbologies:
1D Symbologies
Code 11
No. (N1%)
Values and Description (N2%)
Scan Engine
96
0: Disable Code 11
2D
1: Enable Code 11
116
0: Code 11 Length Limitation in Fixed Length Format
2D
1: Code 11 Length Limitation in Max/Min Length Format
117
Code 11 Max Code Length / Fixed Length1
2D
118
Code 11 Min Code Length / Fixed Length2
2D
*(Length1 must be greater than Length2)
Length Qualification
The barcode can be qualified by “Fixed Length” or “Max/Min Length”. The length of a barcode
refers to the number of characters (i.e. human readable characters), including check digit(s) it
contains.
If "Fixed Length" is selected, up to 2 fixed lengths can be specified.
If "Max/Min Length" is selected, the maximum length and the minimum length must be
specified. The terminal will only accept those barcodes with lengths that fall between
max/min lengths specified.
Note: When it is configured to use Fixed Length format, Length1 must be greater than
Length2. Otherwise, the format will be converted to Max/Min Length Format, and
Length1 becomes Min. Length while Length2 becomes Max. Length. In either
length format, when both of the values are configured to 0, it means no limit in
length.
260
BASIC Programming Guide For Use with CipherLab BASIC Compiler
Postal Code Family
No. (N1%)
Values and Description (N2%)
Scan Engine
125
0: DO NOT transmit US Postal Check Digit
2D
1: Transmit US Postal Check Digit
129
0: Disable US Planet
2D
1: Enable US Planet
130
0: Disable US Postnet
2D
1: Enable US Postnet
134
0: Disable Japan Postal
2D
1: Enable Japan Postal
135
0: Disable Australian Postal
2D
1: Enable Australian Postal
136
0: Disable Dutch Postal
2D
1: Enable Dutch Postal
137
0: Disable UK Postal Check Digit
2D
1: Enable UK Postal Check Digit
138
0: Disable UK Postal
2D
1: Enable UK Postal
Transmit Check Digit
If this parameter is enabled, the check digit will be included in the data being transmitted.
Composite Codes
CC-A/B/C
No. (N1%)
Values and Description (N2%)
Scan Engine
111
0: Disable Composite CC-A/B
2D
1: Enable Composite CC-A/B
112
0: Disable Composite CC-C
1: Enable Composite CC-C
2D
Appendix II Symbology Parameters
261
TLC-39
No. (N1%)
Values and Description (N2%)
Scan Engine
94
0: Disable TCIF Linked Code 39
2D
1: Enable TCIF Linked Code 39
UPC Composite
No. (N1%)
Values and Description (N2%)
Scan Engine
110
0: UPC Never Linked
2D
1: UPC Always Linked*
2: Autodiscriminate UPC Composite
Select UPC Composite Mode
UPC barcode can be "linked" with a 2D barcode during transmission as if they were one barcode.
There are three options for these barcodes:
UPC Never Linked - To transmit UPC barcodes regardless of whether a 2D barcode is
detected.
UPC Always Linked - To transmit UPC barcodes and the 2D portion.
Autodiscriminate UPC Composite - To transmit UPC barcodes, as well as the 2D portion if
present.
Note: If "UPC Always Linked" is enabled, either CC-A/B or CC-C must be enabled.
Otherwise, it will not transmit even there are UPC barcodes.
UCC/EAN Composite Code
No. (N1%)
Values and Description (N2%)
93
0 : Disable UCC/EAN Code 128 Emulation Mode for UCC/EAN 2D
Composite Code
1 : Enable UCC/EAN Code 128 Emulation Mode for UCC/EAN
Composite Code
Scan Engine
262
BASIC Programming Guide For Use with CipherLab BASIC Compiler
2D Symbologies
Data Matrix
No. (N1%)
Values and Description (N2%)
Scan Engine
127
0: Disable Data Matrix
2D
1: Enable Data Matrix
Maxicode
No. (N1%)
Values and Description (N2%)
Scan Engine
126
0: Disable Maxicode
2D
1: Enable Maxicode
PDF417
No. (N1%)
Values and Description (N2%)
Scan Engine
131
0: Disable MicroPDF417
2D
1: Enable MicroPDF417
132
0: Disable PDF417
2D
1: Enable PDF417
133
0: Disable MicroPDF417 Code 128 Emulation
2D
1: Enable MicroPDF417 Code 128 Emulation
(Index No. 131 for MicroPDF417 is required to be 1.)
146
Macro PDF Transmit / Decode Mode
2D
0: Passthrough all symbols
1: Buffer all symbols / Transmit Macro PDF when complete
2: Transmit any symbol in set / No particular order
147
0 : Disable Macro PDF Escape Characters
1 : Enable Macro PDF Escape Characters
2D
Appendix II Symbology Parameters
263
MicroPDF417 Code 128 Emulation
If Code 128 Emulation is enabled, these MicroPDF417 barcodes are transmitted with one of the
following prefixes:
]C1 if the first codeword is 903-907, 912, 914, 915
]C2 if the first codeword is 908 or 909
]C0 if the first codeword is 910 or 911
If disabled, they are transmitted with one of the following prefixes:
]L3 if the first codeword is 903-907, 912, 914, 915
]L4 if the first codeword is 908 or 909
]L5 if the first codeword is 910 or 911
Macro PDF Transmit / Decode Mode
Macro PDF is a special feature for concatenating multiple PDF symbols into one file, known as
Macro PDF417 or Macro MicroPDF417.
There are three options for handling Macro PDF decoding:
Passthrough all symbols – to transmit and decode all Macro PDF symbols and perform no
processing. In this mode, the host is responsible for detecting and parsing the Macro PDF
sequences.
Buffer all symbols / Transmit Macro PDF when complete – to transmit all decoded data from
an entire Macro PDF sequence only when the entire sequence is scanned and decoded. If the
decoded data exceeds the limit of 50 symbols, no transmission because the entire sequence was
not scanned!
Transmit any symbol in set / No particular order – to transmit data from each Macro PDF
symbol as decoded, regardless of the sequence. When selecting this mode, Transmit Control
Header is enabled.
Macro PDF Escape Characters
When enabled, it uses the backlash “\” as an Escape character for systems that can process
transmissions containing special data sequences. It will format special data according to the Global
Label Identifier (GLI) protocol, which only affects the data portion of a Macro PDF symbol
transmission. The Control Header, if enabled, is always sent with GLI formatting.
QR Code
No. (N1%)
Values and Description (N2%)
Scan Engine
128
0: Disable QR Code
2D
1: Enable QR Code
264
BASIC Programming Guide For Use with CipherLab BASIC Compiler
265
APPENDIX III
Scanner Parameters
This appendix describes associated scanner parameters.
Scan Mode
Index 70 is used to define a scan mode that best suits the requirements of a specific
application.
Index 72 or 145 is used to define a scanner timeout, if necessary.
9 scan modes are supported on CCD or Laser scan engine. See the comparison table
below.
Only Laser and Aiming modes are supported on (Extra) Long Range Laser scan engine.
When in aiming mode, it will generate an aiming dot once you press the trigger key. The
aiming dot will not go off until it times out or you press the trigger key again to start
scanning.
No. (N1%)
Values and Description (N2%)
Scan Engine
70
Scan Mode for Scanner Port 1
CCD, Laser
0: Auto Off Mode
1: Continuous Mode
2: Auto Power Off Mode
3: Alternate Mode
4: Momentary Mode
5: Repeat Mode
6: Laser Mode
7: Test Mode
8: Aiming Mode
70
Scan Mode for Scanner Port 1
8: Aiming Mode
Any value (0~15) other than 8: Laser Mode (= aiming beam
disabled)
(Extra) Long
Range
266
BASIC Programming Guide For Use with CipherLab BASIC Compiler
Comparison of Scan Modes
Scan Mode
ON
OFF
Press Release Press Barcode Timeout
Always Press Hold
trigger trigger trigger trigger trigger being
twice
once
read
once
Continuous mode
Test mode
Repeat mode
Momentary mode
Alternate mode
Aiming mode
Laser mode
Auto Off mode
Auto Power Off mode
Continuous Mode
The reader is always scanning, but only one decoding is allowed for the same barcode. That is,
to read (i.e. scan and decode) the same barcode multiple times, the barcode has to be taken
away and replaced for new scanning.
Several modes have been developed based on this mode.
Test Mode
The reader is always scanning for testing purpose.
Comparing to the Continuous mode, it will decode repeatedly even with the same barcode
without re-approaching.
Repeat Mode
This mode is most useful when the same barcode is to be read many times. When the scan trigger is
pressed within one second after a successful reading, the same data will be re-transmitted without
actually reading the barcode. Such re-transmission can be activated as many times as needed, as
long as the time interval between each triggering does not exceed one second.
The reader is always scanning.
It will decode once for the same barcode and allow for re-transmission when triggering within
one second.
Momentary Mode
Hold down the scan trigger to start scanning.
The scanning continues until the trigger is released.
Appendix III Scanner Parameters
267
Alternate Mode
Press the scan trigger to start scanning.
The scanning continues until the trigger is pressed again.
Aiming Mode
This mode best applies when two barcodes are printed too close to each other. It is necessary to
take aim first to make sure the correct barcode will be scanned.
Press the scan trigger to aim at a barcode. Within one second, press the trigger again to decode
the barcode.
The scanning continues until one of the events happens:
(1) A barcode is read.
(2) The preset timeout expires.
Note: The system global variable AIMING_TIMEOUT can be used to change the default
one-second timeout interval for aiming. The unit for this variable is 5 ms.
Laser Mode
This mode is most often used on laser scanners.
Hold down the scan trigger to start scanning.
The scanning continues until one of the events happens:
(1) A barcode is read.
(2) The preset timeout expires.
(3) The trigger is released.
Auto Off Mode
This is the default mode.
The reader will start to scan once the scan trigger is pressed.
The scanning continues until one of the events happens:
(1) A barcode is read.
(2) The preset timeout expires.
Auto Power Off Mode
The reader will start to scan once the scan trigger is pressed.
The scanning continues until one of the events happens:
(1) The preset timeout expires.
Comparing to the Auto Off mode, the reader continues to scan whenever there is a successful
reading of barcode because its timeout period re-counts.
268
BASIC Programming Guide For Use with CipherLab BASIC Compiler
Read Redundancy
This parameter is used to specify the level of reading security. User has to compromise
between reading security and decoding speed.
No. (N1%)
Values and Description (N2%)
Scan Engine
56
0: No Read Redundancy for Scanner Port 1
CCD, Laser
1: One Time Read Redundancy for Scanner Port 1
2: Two Times Read Redundancy for Scanner Port 1
3: Three Times Read Redundancy for Scanner Port 1
No Redundancy:
If "No Redundancy" is selected, one successfully decoded barcode will make the
reading valid and induce the "READER Event".
One/Two/Three Times:
If "Three Times" is selected, it will take a total of four consecutive successful decodings
of the same barcode to make the reading valid.
The higher the reading security is (that is, the more redundancy user selects), the slower
the reading speed gets.
Appendix III Scanner Parameters
269
Time-Out
These parameters are used to limit the maximum scanning time interval for a specific scan
mode. The time interval is specified in units of second, ranging from 0 to 255. It is set 10
seconds by default.
CCD or Laser scan engine:
- Aiming mode
- Laser mode
- Auto Off mode
- Auto Power Off mode
(Extra) Long Range Laser scan engine: Aiming mode only.
No. (N1%)
Values and Description (N2%)
Scan Engine
72
Scanner Time-out Duration in seconds for Scanner Port 1:
applicable to Aiming mode, Laser mode, Auto Off mode, and
Auto Power Off mode.
CCD, Laser
145
Scanner time-out duration in seconds for Aiming mode
(Extra) Long
Range
0: No time-out
1 ~ 255 (sec): Aiming time-out
270
BASIC Programming Guide For Use with CipherLab BASIC Compiler
271
APPENDIX IV
Run-Time Error Table
Error Code
Explanation
1
Unknown operator
2
Operand count mismatch
3
Type mismatch
4
Can't perform type conversion
5
No available temp string
6
Illegal operand
7
Not an L-value
8
Float error
9
Bad array subscript
10
Unknown function
11
Illegal function call
12
Return without GOSUB
272
BASIC Programming Guide For Use with CipherLab BASIC Compiler
273
APPENDIX V
Debugging Messages
Debugging messages indicate the activities happening on the system. The common
debugging messages are listed as follows.
Message
Explanation
ABS(N)
Indicating the command ABS is processed.
ADD(N1%,N2%)
Indicating an addition is processed.
ADD_RECORD(file%,data$)
Indicating the command ADD_RECORD is processed.
ALPHA_LOCK(status%)
Indicating the command ALPHA_LOCK is processed.
AND
Indicating the logical operation AND is processed.
ARY(N%)
Indicating an N-element array is declared.
ASC(X$)
Indicating the command ASC is processed.
ASGN(A)
Indicating that the value A is assigned to the variable. A could be
an integer, long integer, character, string, or any type.
AUTO_OFF(N%)
Indicating the command AUTO_OFF is processed. N% is the
assigned time interval.
BACK_LIGHT_DURATION(N%) Indicating the command BACK_LIGHT_DURATION is
processed. N% is the assigned time interval.
BACKLIT(state%)
Indicating the command BACKLIT is processed.
BACKUP_BATTERY
Indicating the command BACKUP_BATTERY is processed.
BEEP(...)
Indicating the command BEEP is processed.
BIT_OPERATOR(…)
Indicating the command BIT_OPERATOR is processed.
BT_INQUIRY$
Indicating the command BT_INQUIRY$ is processed.
BT_PAIRING(addr$,type%)
Indicating the command BT_PAIRING is processed.
CHANGE_SPEED(N%)
Indicating the command CHANGE_SPEED is processed. N% is
the selection of the speed.
CHECK_RF_BASE
Indicating the command CHECK_RF_BASE is processed.
CHECK_RF_SEND
Indicating the command CHECK_RF_SEND is processed.
CHR$(N%)
Indicating the command CHR is processed.
CIRCLE(...)
Indicating the command CIRCLE is processed.
CLOSE_COM(N%)
Indicating the command CLOSE_COM is processed. N% is the
number of the COM port.
CLR_KBD
Indicating the command CLR_KBD is processed.
274
BASIC Programming Guide For Use with CipherLab BASIC Compiler
CLR_RECT(...)
Indicating the command CLR_RECT is processed.
CLS
Indicating the command CLS is processed.
CODE_TYPE
Indicating the command CODE_TYPE is processed.
COM_DELIMITER(N%,C%)
Indicating the command COM_DELIMITER is processed.
CURSORX
Indicating the command CURSOR_X is processed.
CURSORY
Indicating the command CURSOR_Y is processed.
DATE$
Indicating the system date is inquired.
DATE$(X$)
Indicating the system date is updated. X$ is the new system date.
DAY_OF_WEEK
Indicating the command DAY_OF_WEEK is processed.
DEL_RECORD(file%[,index%])
Indicating the command DEL_RECORD is processed.
DEL_TRANSACTION_DATA(N
%)
Indicating the command DEL_TRANSACTION_DATA is
processed. N% is the number of records to be deleted.
DEL_TRANSACTION_DATA_E Indicating the command DEL_TRANSACTION_DATA_EX is
X(file%,N%)
processed.
DISABLE_READER(N%)
Indicating the command DISABLE READER is processed. N%
is the number of the reader port.
DISABLE_TOUCHSCREEN
Indicating the command DISABLE_TOUCHSCREEN is
processed.
DIV(N1%,N2%)
Indicating a division is processed.
DNS_RESOLVER(A$)
Indicating the command DNS_RESOLVER is processed.
EMPTY_FILE(file%)
Indicating the command EMPTY_FILE is processed. file% is the
number of the DBF file.
EMPTY_TRANSACTION
Indicating the command EMPTY_TRANSACTION is
processed.
EMPTY_TRANSACTION_EX(fil Indicating the command EMPTY_TRANSACTION_EX is
e%)
processed. file% is the number of the transaction file.
ENABLE_READER(N%)
Indicating the command ENABLE READER is processed. N% is
the number of the reader port.
ENABLE_TOUCHSCREEN
Indicating the command ENABLE TOUCHSCREEN is
processed.
EQU? (N1%,N2%)
Indicating the decision "IF N1% = N2%" is processed.
EVENT(0)
Indicating the "COM(1) EVENT" happens.
EVENT(1)
Indicating the "COM(2) EVENT" happens.
EVENT(2)
Indicating the "COM(3) EVENT" happens.
EVENT(3)
Reserved.
EVENT(4)
Reserved.
EVENT(5)
Reserved.
EVENT(6)
Reserved.
Appendix V Debugging Messages
275
EVENT(7)
Reserved.
EVENT(8)
Reserved.
EVENT(9)
Indicating the "TIMER(1) EVENT" happens.
EVENT(10)
Indicating the "TIMER(2) EVENT" happens.
EVENT(11)
Indicating the "TIMER(3) EVENT" happens.
EVENT(12)
Indicating the "TIMER(4) EVENT" happens.
EVENT(13)
Indicating the "TIMER(5) EVENT" happens.
EVENT(14)
Indicating the "ON MINUTE EVENT" happens.
EVENT(15)
Indicating the "ON HOUR EVENT" happens.
EVENT(16)
Indicating the "READER(1) EVENT" happens.
EVENT(17)
Indicating the "READER(2) EVENT" happens.
EVENT(18)
Indicating the "FUNCTION(1) EVENT" happens.
EVENT(19)
Indicating the "FUNCTION(2) EVENT" happens.
EVENT(20)
Indicating the "FUNCTION(3) EVENT" happens.
EVENT(21)
Indicating the "FUNCTION(4) EVENT" happens.
EVENT(22)
Indicating the "FUNCTION(5) EVENT" happens.
EVENT(23)
Indicating the "FUNCTION(6) EVENT" happens.
EVENT(24)
Indicating the "FUNCTION(7) EVENT" happens.
EVENT(25)
Indicating the "FUNCTION(8) EVENT" happens.
EVENT(26)
Indicating the "FUNCTION(9) EVENT" happens.
EVENT(27)
Indicating the "FUNCTION(10) EVENT" happens.
EVENT(28)
Indicating the "FUNCTION(11) EVENT" happens.
EVENT(29)
Indicating the "FUNCTION(12) EVENT" happens.
EVENT(30)
Reserved.
EVENT(31)
Indicating the "ESC EVENT" happens.
EXP(N1%,N2%)
Indicating an exponentiation is processed.
FALSE?(N%)
Indicating the "IF" statement or the "WHILE" statement is
processed.
FILL_RECT(...)
Indicating the command FILL_RECT is processed.
FIND_RECORD(...)
Indicating the command FIND_RECORD is processed.
FLASH_READ$(N%)
Indicating the command FLASH_READ$ is processed.
FLASH_WRITE(N%,A$)
Indicating the command FLASH_WRITE is processed.
FREE_MEMORY
Indicating the command FREE_MEMORY is processed.
FUNCTION_TOGGLE(status%)
Indicating the command FUNCTION_TOGGLE is processed.
276
BASIC Programming Guide For Use with CipherLab BASIC Compiler
GE? (N1%,N2%)
Indicating the decision "IF N1% >= N2%" is processed.
GET_ALPHA_LOCK
Indicating the command GET_ALPHA_LOCK is processed.
GET_CTS(N%)
Indicating the command GET_CTS is processed. N% is the
number of the COM port.
GET_DEVICE_ID
Indicating the command DEVICE_ID is processed.
GET_FILE_ERROR
Indicating the command GET_FILE_ERROR is processed.
GET_IMAGE
Indicating the command GET_IMAGE is processed.
GET_LANGUAGE
Indicating the command GET_LANGUAGE is processed.
GET_NET_PARAMETER$(index Indicating the command GET_NET_PARAMETER$ is
%)
processed.
GET_NET_STATUS(index%)
Indicating the command GET_NET_STATUS is processed.
GET_READER_DATA$(N%)
Indicating the command GET_READER_DATA$ is processed.
N% is the number of the reader port.
GET_READER_SETTING(N%)
Indicating the command GET_READER_SETTING is
processed. N% is the setting number.
GET_RECORD$(file%[,index%])
Indicating the command GET_RECORD$ is processed.
GET_RECORD_NUMBER(file%[ Indicating the command GET_READER_NUMBER is
,index%])
processed.
GET_RF_CHANNEL
Indicating the command GET_RF_CHANNEL is processed.
GET_RF_ID
Indicating the command GET_RF_ID is processed.
GET_RF_POWER
Indicating the command GET_RF_POWER is processed.
GET_RFID_KEY(TagType%)
Indicating the command GET_RFID_KEY is processed.
GET_SCREENITEM
Indicating the command GET_SCREENITEM is processed.
GET_TARGET_MACHINE$
Indicating the command GET_TARGET_MACHINE$ is
processed.
GET_TCPIP_MESSAGE
Indicating the command GET_TCPIP_MESSAGE is processed.
GET_TRANSACTION_DATA$(
N%)
Indicating the command GET_TRANSACTION_DATA is
processed. N% is the ordinal number of the record to be read.
GET_TRANSACTION_DATA_E Indicating the command GET_TRANSACTION_DATA_EX is
X$(file%,N%)
processed.
GOSUB(N%)
Indicating the program branches to a subroutine. N% is the line
number of the first line of the subroutine.
GOTO(N%)
Indicating the program branches to line number N%.
GSM_CHANGE_PIN(old$,new$)
Indicating the command GSM_CHANGE_PIN is processed.
GSM_CHECK_PIN(pin$)
Indicating the command GSM_CHECK_PIN is processed.
GSM_SET_PINLOCK(pin$,mode Indicating the command GSM_SET_PINLOCK is processed.
%)
GT? (N1%,N2%)
Indicating the decision "IF N1% > N2%" is processed.
Appendix V Debugging Messages
277
HEX$(N%)
Indicating the command HEX$ is processed.
ICON_ZONE_PRINT(status%)
Indicating the command ICON_ZONE_PRINT is processed.
INKEY$(A$)
Indicating the command INKEY is processed.
INPUT
Indicating the command INOUT is processed.
INPUT_MODE(mode%)
Indicating the command INPUT_MODE is processed.
INSTR([N%,] X$,Y$)
Indicating the command INSTR is processed.
INT(N%)
Indicating the command INT is processed.
IRDA_STATUS(N%)
Indicating the command IRDA_STATUS is processed. N% is the
connection or transmission status.
IRDA_TIMEOUT(N%)
Indicating the command IRDA_TIMEOUT is processed. N% is
the assigned time interval.
KEY_CLICK(status%)
Indicating the command KEY_CLICK is processed.
L(N%)
Indicating the line number being executed.
LCASE$(X$)
Indicating the command LCASE$ is processed.
LCD_CONTRAST(N%)
Indicating the command LCD_CONTRAST is processed. N% is
the contrast level in the range of 1 ~ 8.
LE? (N1%,N2%)
Indicating the decision "IF N1% <= N2%" is processed.
LED(...)
Indicating the command LED is processed.
LEFT$(X$,N%)
Indicating the command LEFT$ is processed.
LEN(X$)
Indicating the command LEN is processed.
LINE(...)
Indicating the command LINE is processed.
LOCATE(N1%,N2%)
Indicating the command LOCATE is processed.
LOCK
Indicating the command LOCK is processed.
LT? (N1%,N2%)
Indicating the decision "IF N1% < N2%" is processed.
MAIN_BATTERY
Indicating the command MAIN_BATTERY is processed.
MENU(Item$)
Indicating the command MENU is processed.
MID$(X$,N%[ ,M%])
Indicating the command MID$ is processed.
MOD(N1%,N2%)
Indicating a modulo operation is processed.
MOVE_TO(file%[,index%],record Indicating the command MOVE_TO is processed. file% is the
_number%)
number of the DBF file; index% is the number of the IDX file;
record_number% is the record number to move to.
MOVE_TO_NEXT(file%[,index% Indicating the command MOVE_TO_NEXT is processed.
])
MOVE_TO_PREVIOUS(file%[,in Indicating the command MOVE_TO_PREVIOUS is processed.
dex%])
MUL(N1%,N2%)
Indicating a multiplication is processed.
278
BASIC Programming Guide For Use with CipherLab BASIC Compiler
NEG (N1%)
Indicating a negation is processed.
NEQ? (N1%,N2%)
Indicating the decision "IF N1% <> N2%" is processed.
NCLOSE(N%)
Indicating the command NCLOSE is processed. N% is the
connection number.
NOT
Indicating the logical operation NOT is processed.
NREAD$(N%)
Indicating the command NREAD$ is processed. N% is the
connection number.
NWRITE(N%,A$)
Indicating the command NWRITE is processed.
OCT$(N%)
Indicating the command OCT$ is processed.
OFF_ALL
Indicating the command OFF ALL is processed.
OFF_COM(N%)
Indicating the command OFF COM is processed. N% is the
number of the COM port.
OFF_ESC
Indicating the command OFF ESC is processed.
OFF_HOUR_SHARP
Indicating the command OFF HOUR_SHARP is processed.
OFF_KEY(number%)
Indicating the command OFF KEY is processed.
OFF_MINUTE_SHARP
Indicating the command OFF MINUTE_SHARP is processed.
OFF_READER(N%)
Indicating the command OFF READER is processed. N% is the
number of the reader port.
OFF_TCPIP
Indicating the command OFF TCPIN is processed.
OFF_TIMER(N%)
Indicating the command OFF TIMER is processed. N% is the
number of the timer.
OFF_TOUCHSCREEN
Indicating the command OFF TOUCHSCREEN is processed.
ON_COM(N1%,N2%)
Indicating the command ON COM GOSUB is called. N1% is the
umber of the COM port; N2% is the line number of the
subroutine to branch to.
ON_ESC(N%)
Indicating the command ON ESC GOSUB is called. N% is the
line number of the subroutine to branch to.
ON_GOSUB(N%)
Indicating the command ON GOSUB is called. N% is the line
number of the subroutine to branch to.
ON_GOTO(N%)
Indicating the command ON GOTO is called. N% is the line
number of the subroutine to branch to.
ON_HOUR_SHARP(N%)
Indicating the command ON HOUR_SHARP GOSUB is called.
N% is the line number of the subroutine to branch to.
ON_KEY(N%)
Indicating the command ON KEY GOSUB is called. N% is the
line number of the subroutine to branch to.
ON_MINUTE_SHARP(N%)
Indicating the command ON MINUTE_SHARP GOSUB is
called. N% is the line number of the subroutine to branch to.
ON_POWER_ON(N%)
Indicating the command ON POWER_ON GOSUB is called.
N% is the line number of the subroutine to branch to.
Appendix V Debugging Messages
279
ON_READER(N1%,N2%)
Indicating the command ON READER GOSUB is called. N1% is
the number of the reader port; N2% is the line number of the
subroutine to branch to.
ON_TCPIP(N%)
Indicating the command ON TCPIP GOSUB is called. N% is the
line number of the subroutine to branch to.
ON_TIMER(N1%,N2%)
Indicating the command ON TIMER GOSUB is called.
ON_TOUCHSCREEN(N%)
Indicating the command ON TOUCHSCREEN GOSUB is
called. N% is the line number of the subroutine to branch to.
OPEN_COM(N%)
Indicating the command OPEN_COM is processed. N% is the
number of the COM port.
OR
Indicating the logical operation OR is processed.
POWER_ON(N%)
Indicating the command POWER_ON is processed. N% is the
value of the setting.
PRINT(A$)
Indicating the command PRINT is processed.
PUT_PIXEL(...)
Indicating the command PUT_PIXEL is processed.
PUTKEY(N%)
Indicating the command PUTKEY is processed.
RAM_SIZE
Indicating the command RAM_SIZE is processed.
READ_COM$(N%)
Indicating the command READ_COM$ is processed. N% is the
number of the COM port.
READER_CONFIG
Indicating the command READER_CONFIG is processed.
READER_SETTING(N1%,N2%)
Indicating the command READER_SETTING is processed.
N1% is the setting number; N2% is the value of the setting.
RECORD_COUNT(file%)
Indicating the command RECORD_COUNT is processed.
RECTANGLE(...)
Indicating the command RECTANGLE is processed.
RESTART
Indicating the command RESTART is processed.
RETURN(N%)
Indicating the command RETURN is processed. N% is the line
number to return, if it is not null.
RIGHT$(X$,N%)
Indicating the command RIGHT$ is processed.
ROM_SIZE
Indicating the command ROM_SIZE is processed.
SAVE_TRANSACTION(data$)
Indicating the command SAVE_TRANSACTION is processed.
SAVE_TRANSACTION_EX(file
%,data$)
Indicating the command SAVE_TRANSACTION_EX is
processed.
SEARCH_RF_CHANNEL(N%)
Indicating the command SEARCH_RF_CHANNEL is
processed. N% is the assigned time interval.
SELECT_FONT(font%)
Indicating the command SELECT_FONT is processed.
SEND_WEDGE(DataString$)
Indicating the command SEND_WEDGE is processed.
SET_COM(...)
Indicating the command SET_COM is processed.
SET_COMM_TYPE(N%,type%)
Indicating the command SET_COMM_TYPE is processed.
280
BASIC Programming Guide For Use with CipherLab BASIC Compiler
SET_CURSOR(status%)
Indicating the command CURSOR is processed.
SET_LANGUAGE(N%)
Indicating the command SET_LANGUAGE is processed. N% is
the setting of language.
SET_NET_PARAMETER(index% Indicating the command SET_NET_PARAMETER is processed.
,A$)
SET_PRECISION(N%)
Indicating the command SET_PRECISION is processed. N% is
the numeric precision.
SET_RF_CHANNEL(N%)
Indicating the command SET_RF_CHANNEL is processed. N%
is the channel.
SET_RF_ID(N%)
Indicating the command SET_RF_ID is processed. N% is the ID.
SET_RF_POWER(N%)
Indicating the command SET_RF_POWER is processed. N% is
the power level.
SET_RF_TIMEOUT(N%)
Indicating the command SET_RF_TIMEOUT is processed. N%
is the assigned time interval.
SET_RFID_KEY(...)
Indicating the command SET_RFID_KEY is processed.
SET_RFID_READ(...)
Indicating the command SET_RFID_READ is processed.
SET_RFID_WRITE(...)
Indicating the command SET_RFID_WRITE is processed.
SET_RTS(N1%,N2%)
Indicating the command SET_RTS is processed. N1% is the
number of the COM port; N2% is the RTS status.
SET_SCREENITEMS(...)
Indicating the command SET_SCREENITEMS is processed.
SET_SIGNAREA(...)
Indicating the command SET_SIGNAREA is processed.
SET_VIDEO_MODE(mode%)
Indicating the command SET_VIDEO_MODE is processed.
SET_WEDGE(WedgeSetting$)
Indicating the command SET_WEDGE is processed.
SHOW_IMAGE(...)
Indicating the command SHOW_IMAGE is processed.
SIGN(N%)
Indicating the command SGN is processed.
SOCKET_CAN_SEND(...)
Indicating the command SOCKET_CAN_SEND is processed.
SOCKET_HAS_DATA(N%)
Indicating the command SOCKET_HAS_DATA is processed.
N% is the connection number.
SOCKET_OPEN(N%)
Indicating the command SOCKET_OPEN is processed. N% is
the connection number.
START TCPIP
Indicating the command START TCPIP is processed.
STOP_BEEP
Indicating the command STOP BEEP is processed.
STOP TCPIP
Indicating the command STOP TCPIP is processed.
STR$(N%)
Indicating the command STR$ is processed.
STRING$(...)
Indicating the command STRING$ is processed.
SUB(N1%,N2%)
Indicating a subtraction is processed.
SYSTEM_INFORMATION$(inde Indicating the command SYSTEM_INFORMATION$ is
x%)
processed.
Appendix V Debugging Messages
281
SYSTEM_PASSWORD(A$)
Indicating the command SYSTEM_PASSWORD is processed.
A$ is the character string to be written as the password.
T(N%)
Indicating the stack's level. When the program branches to a
subroutine, the stack's level increases 1; when the program
returns, the stack's level decreases 1. It can be used to check if the
"stack overflow" problem happens.
TCP_ERR_CODE
Indicating the command TCP_ERR_CODE is processed.
TCP_OPEN(...)
Indicating the command TCP_OPEN is processed.
TIME$
Indicating the system time is inquired.
TIME$(X$)
Indicating the system time is updated. X$ is the new system time.
TIMER
Indicating the command TIMER is processed.
TRANSACTION_COUNT
Indicating the command TRANSACTION_COUNT is
processed.
TRANSACTION_COUNT_EX(fil Indicating the command TRANSACTION_COUNT_EX is
e%)
processed.
TRIM_LEFT$(X$)
Indicating the command TRIM_LEFT$ is processed.
TRIM_RIGHT$(X$)
Indicating the command TRIM_RIGHT$ is processed.
UCASE$(X$)
Indicating the command UCASE$ is processed.
UNLOCK
Indicating the command UNLOCK is processed.
UPDATE_RECORD(...)
Indicating the command UPDATE_RECORD is processed.
UPDATE_TRANSACTION(N%,d Indicating the command UPDATE_TRANSACTION is
ata$)
processed.
UPDATE_TRANSACTION_EX(.. Indicating the command UPDATE_TRANSACTION_EX is
.)
processed.
VAL(X$)
Indicating the command VAL is processed.
VALF(X$)
Indicating the command VALR is processed.
VERSION(A$)
Indicating the command VERSION is processed. A$ is the
character string to be written as the version information.
VIBRATOR(mode%)
Indicating the command VIBRATOR is processed.
WAIT(duration%)
Indicating the command WAIT is processed.
WAIT_HOURGLASS(...)
Indicating the command WAIT_HOURGLASS is processed.
WEDGE_READY
Indicating the command WEDGE_READY is processed.
WRITE_COM(N%,A$)
Indicating the command WRITE_COM is processed.
XOR
Indicating the logical operation XOR is processed.
282
BASIC Programming Guide For Use with CipherLab BASIC Compiler
283
APPENDIX VI
Cradle Commands
Through programming the terminal, you can use cradle commands to control the Cradle.
To determine whether cradle commands are applied, use the third parameter of
SET_COM (N%, Baudrate%, Parity%, Data%, Handshake%).
To determine which type of cradle to control, use the second parameter of SET_COM
(N%, Baudrate%, Parity%, Data%, Handshake%).
Parameters
Values
Remarks
#1 (N%)
1 or 2
Indicates which COM port is to be set.
#2
1: 115200 bps
(Baudrate%)
3: 57600 bps
4: 38400 bps
5: 19200 bps
6: 9600 bps
Unless you have changed the baud rate
setting via the DIP switch onboard, assign 1
for Ethernet Cradle because its factory
setting is 115200 bps.
Unless you have changed the baud rate
setting via the DIP switch onboard, assign 3
for Modem Cradle because its factory
setting is 57600 bps.
#3
1: None
The parity setting is NOT applicable.
(Parity%)
2: Odd
Simply assign 4.
3: Even
4: Cradle commands
#4
1: 7 data bits
The data bits setting must be 8 bits.
(Data%)
2: 8 data bits
Assign 2.
#5
1: None
The handshake setting is NOT applicable.
(Handshake%)
2: CTS/RTS
Simply assign 1.
3: XON/XOFF
4: Wedge Emulator
Note: Baud rate will be reset to the DIP switch setting whenever you plug or unplug the
RS-232 cable.
284
BASIC Programming Guide For Use with CipherLab BASIC Compiler
For example,
Call SET_COM_TYPE (1, 3) to set COM1 to Serial IR communication.
To enable the issuing of cradle commands to the Ethernet Cradle, call SET_COM (1, 1, 4,
2, 1)
Call OPEN_COM(1) to initialize the connection over COM1.
Issue a cradle command listed below. For example,
Sendbase$ = “#vErSiOn?”
Call WRITE_COM(1, Sendbase$)
…
Select Modem (=Ethernet)
After issuing the command, the baud rate of the cradle will be reset to the DIP switch
setting.
Cradle Command
Response
#mOdEm<CR>
#DONE<CR>
Note: For the Ethernet Cradle, the command "Select Modem" is actually means "Select
Ethernet" because the modem board has been replaced by the Ethernet board.
Select RS-232
After issuing the command, the baud rate of the cradle will be reset to the DIP switch
setting.
Cradle Command
Response
#SeRiAl<CR>
#DONE<CR>
= OK
#CABLE!<CR>
= No RS-232 cable detected!
Note: Baud rate will be reset to the DIP switch setting whenever you plug or unplug the
RS-232 cable.
Appendix VI Cradle Commands
Get Version Information
You can retrieve the version of IR board.
Cradle Command
Response
#vErSiOn?<CR>
#Ver03.20<CR>
Note: There will be no response if the IR board version is no later than v3.00!
Unknown Command
Cradle Command
Response
(Unknown)
#NAK<CR>
285
286
BASIC Programming Guide For Use with CipherLab BASIC Compiler
287
Index
@
@AT • 151
@BC • 152
@BS • 152
@CH • 152
@DT • 152
@ER • 153
@GP • 153
@HD • 153
@ID • 154
@ME • 154
@PW • 155
@QT • 155
@SP • 155
@TM • 156
@TO • 156
@UP • 157
A
ABS • 29
ADD_RECORD • 206
ALPHA_LOCK • 102
ASC • 43
AUTO_OFF • 59
B
BACK_LIGHT_DURATION • 105
BACKLIT • 105
BACKUP_BATTERY • 127
BEEP • 92
BIT_OPERATOR • 29
BT_INQUIRY$ • 180
BT_PAIRING • 181
C
CHANGE_SPEED • 59
CHECK_RF_BASE • 147
CHECK_RF_SEND • 147
CHR$ • 43
CIRCLE • 117
CLEAR • 219
CLOSE_COM • 130
CLR_KBD • 99
CLR_RECT • 113
CLS • 113
CODE_TYPE • 76
COM_DELIMITER • 134
CURSOR • 108
CURSOR_X • 108
CURSOR_Y • 108
D
DATE$ • 95
DAY_OF_WEEK • 96
DEL_RECORD • 207
DEL_TRANSACTION_DATA • 199
DEL_TRANSACTION_DATA_EX • 200
DEVICE_ID$ • 60
DIM • 29
DISABLE READER • 68
DISABLE_TOUCHSCREEN • 124
DNS_RESOLVER • 170
E
EMPTY_FILE • 208
EMPTY_TRANSACTION • 200
EMPTY_TRANSACTION_EX • 201
ENABLE READER • 69
ENABLE_TOUCHSCREEN • 124
EXIT • 37
F
FILL_RECT • 110
FIND_RECORD • 208
FLASH_READ$ • 214
FLASH_WRITE • 215
FOR ... NEXT • 37
FREE_MEMORY • 216
FUNCTION_TOGGLE • 104
G
GET_ALPHA_LOCK • 102
GET_CTS • 137
GET_FILE_ERROR • 213
GET_IMAGE • 115
288
Index
GET_LANGUAGE • 60
GET_NET_PARAMETER$ • 164
GET_NET_STATUS • 168
GET_READER_DATA$ • 69
GET_READER_SETTING • 77
GET_RECORD$ • 209
GET_RECORD_NUMBER • 210
GET_RF_CHANNEL • 148
GET_RF_ID • 148
GET_RF_POWER • 148
GET_RFID_KEY • 81
GET_SCREENITEM • 125
GET_TARGET_MACHINE$ • 61
GET_TCPIP_MESSAGE • 170
GET_TRANSACTION_DATA$ • 201
GET_TRANSACTION_DATA_EX$ • 202
GET_WLAN_STATUS • 169
GOSUB • 30
GOTO • 30
GSM_CHANGE_PIN • 191
GSM_CHECK_PIN • 191
GSM_SET_PINLOCK • 192
H
HEX$ • 43
I
ICON_ZONE_PRINT • 110
IF ... THEN ... [ELSE...] • 33
IF ... THEN ... {ELSE IF...} [ELSE...] END IF •
33
IF ... THEN ... END IF • 34
INKEY$ • 99
INPUT • 100
INPUT_MODE • 100
INSTR • 40
INT • 30
IP_CFG or IP_CONFIGURE • 171
IRDA_STATUS • 135
IRDA_TIMEOUT • 136
K
KEY_CLICK • 101
L
LCASE$ • 43
LCD_CONTRAST • 106
LED • 98
LEFT$ • 41
LEN • 40
LINE • 118
LOCATE • 109
LOCK • 57
M
MAIN_BATTERY • 127
MENU • 61
MID$ • 41
MOVE_TO • 210
MOVE_TO_NEXT • 211
MOVE_TO_PREVIOUS • 211
N
NCLOSE • 171
NREAD$ • 172
NWRITE • 172
O
OCT$ • 44
OFF ALL • 48
OFF COM • 48
OFF ESC • 49
OFF HOUR_SHARP • 49
OFF KEY • 50
OFF MINUTE_SHARP • 50
OFF READER • 50
OFF TCPIP • 51
OFF TIMER • 51
OFF TOUCHSCREEN • 51
ON ... GOSUB ... • 34
ON ... GOTO ... • 35
ON COM... GOSUB... • 52
ON ESC GOSUB... • 52
ON HOUR_SHARP GOSUB... • 53
ON KEY... GOSUB... • 53
ON MINUTE_SHARP GOSUB... • 54
ON POWER_ON... GOSUB... • 54
ON READER... GOSUB... • 55
ON TCPIP GOSUB... • 56
ON TIMER... GOSUB... • 56
ON TOUCHSCREEN GOSUB... • 57
OPEN_COM • 130
P
POWER_ON • 62
PRINT • 111
PUT_PIXEL • 118
PUTKEY • 101
Index
R
RAM_SIZE • 216
READ • 219
READ_COM$ • 130
READER_CONFIG • 70
READER_SETTING • 77
RECORD_COUNT • 211
RECTANGLE • 119
REM • 31
REMOVE • 220
RESTART • 63
RIGHT$ • 42
ROM_SIZE • 215
S
SAVE_TRANSACTION • 202
SAVE_TRANSACTION_EX • 203
SEARCH_RF_CHANNEL • 149
SELECT_FONT • 121
SEND_WEDGE • 90
SET_COM • 131
SET_COM_TYPE • 133
SET_LANGUAGE • 63
SET_NET_PARAMETER • 164
SET_PRECISION • 31
SET_RF_CHANNEL • 149
SET_RF_ID • 149
SET_RF_POWER • 149
SET_RF_TIMEOUT • 150
SET_RFID_KEY • 82
SET_RFID_READ • 81
SET_RFID_WRITE • 81
SET_RTS • 138
SET_SCREENITEMS • 125
SET_SIGNAREA • 126
SET_VIDEO_MODE • 106
SET_WEDGE • 90
SGN • 31
SHOW_IMAGE • 116
SOCKET_CAN_SEND • 172
SOCKET_HAS_DATA • 173
SOCKET_IP • 173
SOCKET_OPEN • 173
START TCPIP • 166
START_DEBUG • 218
STOP BEEP • 92
STOP TCPIP • 166
STOP_DEBUG • 218
STR$ • 44
STRING$ • 46
SYSTEM_INFORMATION$ • 64
SYSTEM_PASSWORD • 64
T
TCP_ERR_CODE • 174
TCP_OPEN • 175
TIME$ • 96
TIMER • 97
TR • 220
TRANSACTION_COUNT • 203
TRANSACTION_COUNT_EX • 204
TRIM_LEFT$ • 42
TRIM_RIGHT$ • 42
TW • 221
U
UCASE$ • 44
UNLOCK • 58
UPDATE_RECORD • 212
UPDATE_TRANSACTION • 204
UPDATE_TRANSACTION_EX • 204
V
VAL • 44
VALR • 45
VERSION • 64
VIBRATOR • 94
W
WAIT • 97
WAIT_HOURGLASS • 111
WEDGE_READY • 90
WHILE ... WEND • 38
WRITE_COM • 133
289


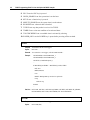
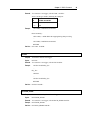
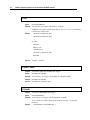

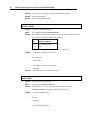


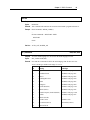
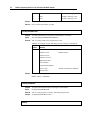


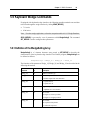


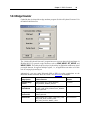


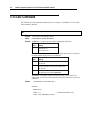


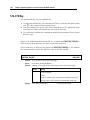


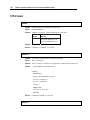

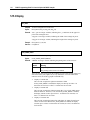


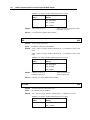
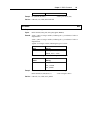


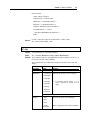
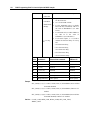
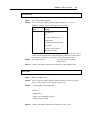
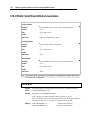


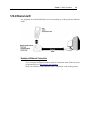
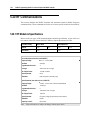

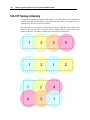


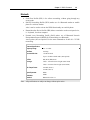


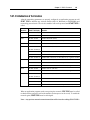
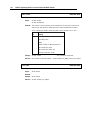
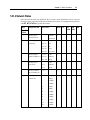
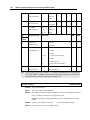

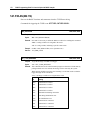


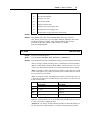

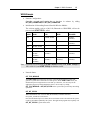
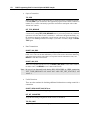


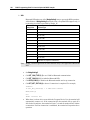
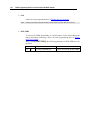

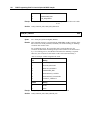


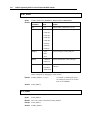

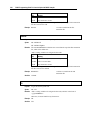
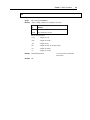


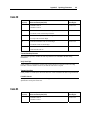

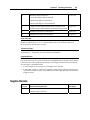

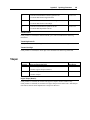


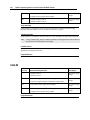
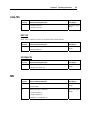
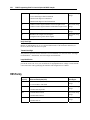

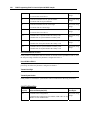

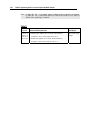


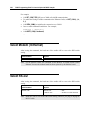


![[U7.03.12] Opérateur CALC_MISS](http://vs1.manualzilla.com/store/data/006357487_1-413b91a56b9ee589daef913d78cb3821-150x150.png)

![「住まいるダイヤル」の相談事例より-[PDF形式]](http://vs1.manualzilla.com/store/data/006572548_2-9f0835c757303c20d651bc9fedecd22c-150x150.png)