1
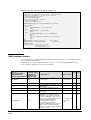
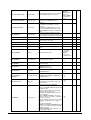
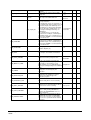
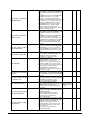
All rights reserved by Daimler and Renault
Release 5.9.1
Installation &
Administration Guide
Contact
T-Systems International GmbH
Project Delivery Center Engineering
Fasanenweg 5
D-70771 Leinfelden-Echterdingen
Germany
T-Systems Hotline:
Tel: +49 (0711) 972-43001
Fax: +49 (0711) 972-41715
E-Mail : [email protected]
Internet: https://servicenet.t-systems.com/sam
Manual History
Version
1.0
1.0.1
1.0.2
2.0
2.1
3.0
4.0
4.1
5.0
5.1
5.2
5.3
5.4
5.5
5.6
5.7
5.7.3
5.8
5.9
5.9.1
Date
August 2002
September 2002
November 2002
February 2003
May 2003
August 2003
April 2004
July 2004
August 2004
October 2004
March 2005
September 2005
March 2006
August 2006
March 2007
March 2008
September 2008
August 2009, April 2010
September 2010, March 2011
May 2011
This edition obsoletes all previous editions.
Trademarks
CATIA is a registered trademark of Dassault Systems.
The SAM PDM GUI described in this manual is based on PDMconnect by PDTec.
PDMconnect is a registered trademark of PDTec.
Java is a registered trademark of Sun Microsystems.
Names of other products mentioned in this manual are used only for identification
purpose and may be trademarks of their companies.
Preface
About this Guide
This guide provides installation and configuration information for the STEP Assembly
Manager. Before using this guide, be sure you understand CATIA administration and
the relevant operating systems.
Related Documents
The following manuals contain information about usage and customizing of the STEP
Assembly Manager:
Manual Title
STEP Assembly Manager User’s Manual
Release
5.9
Changes in SAM 5.9.1 Compared to the Previous Version
•
•
The name of the subdirectory for the SAM CMI CATIA V5 module is
“samcatv5_r19_97v25” for V5 R19.
There is a new environment variable:
SAM_USE_ORIGINAL_V5_INSTANCE_NAME, see table of SAM configuration
variables at the end of the manual.
Changes in SAM 5.9.0 Compared to the Previous Version
•
•
•
•
CATIA V4 is not supported by SAM 5.9.
SAM 5.8 is the last SAM version for CATIA V4.
The operating systems supported by SAM 5.9 are Windows and Solaris.
AIX and HP-UX will be supported only if required.
The name of the subdirectory for the SAM CMI CATIA V5 module is
“samcatv5_r19_97v24” for V5 R19.
There is a new environment variable:
SAM_CMI_ENABLE_EDUFLAG_CHECK, see table of SAM configuration variables at
the end of the manual.
Changes in SAM 5.8 Compared to the Previous Version
•
•
CATIA V5 R19 is supported.
Java runtime environment version 1.5 or higher is required, instead of Java
version 1.4 or higher.
SAM Installation & Administration Guide
i
•
•
The name of the subdirectory for the SAM CMI CATIA V5 module is
“samcatv5_r19_95V06” for V5 R19.
There is a new environment variable for the SAM “Delete PDM Context“
functionality:
SAM_ENABLE_DELETEPDMCONTEXT, see table of SAM configuration variables at
the end of the manual.
Changes in SAM 5.7.3 Compared to the Previous Version
•
•
•
LICMAN 1.2 is no longer supported. SAM 5.7.3 requires LICMAN 2.0.
As LICMAN 2.0 for AIX requires AIX version 5.1 or higher, AIX version 4 is no
longer supported.
The name of the subdirectory for the SAM CMI CATIA V5 module is
“samcatv5_r16_93v01” for V5 R16 and “samcatv5_r18_93v01” for R18.
Changes in SAM 5.7.0 Compared to the Previous Version
•
•
•
•
•
•
CATIA V5R18 is additionally supported.
Java runtime environment version 1.4 or higher is required, instead of Java
version 1.2 or higher.
The name of the subdirectory for the SAM CMI CATIA V5 module is
“samcatv5_r16_92v20” for V5 R16 and “samcatv5_r18_92v20” for R18.
The SAM installation packages contain LICMAN 2.0 installation packages and
the LICMAN 2.0 manual.
New SAM license files will be delivered for LICMAN 2.0. For new SAM license
files, you need to install LICMAN 2.0 and work in “LICMAN 1.2 compatibility
mode” (see LICMAN 2.0 manual). However, SAM can still work with an
existing LICMAN 1.2 installation with a valid SAM license file for LICMAN 1.2.
Settings in SAM configuration files both for CATIA V4 and for V5 installation
are pre-set for LICMAN 1.2 compatibility mode.
Changes in SAM 5.6.0 Compared to the Previous Version
•
•
•
•
•
ii
Overview
SAM 5.6 additionally supports CATIA V5 – 64 Bit on Windows – 64 Bit
platform.
SAM for IRIX is no longer supported.
The name of the subdirectory for the SAM CMI CATIA V5 module is
“samcatv5_r16_90v16”.
There are new settings to control for future releases of SAM for CATIA V4
whether to work with LICMAN version 1.2 or LICMAN version 2.0. However,
for SAM 5.6.0 for CATIA V4, these settings must be set to LICMAN 1.2:
Environment variable SAM_USE_LICMAN12=1, and setting ”{use_licman12} 1“
in samdefault.obj, see table of SAM configuration variables at the end of the
manual. The setting in samdefault.obj overrides the environment variable
SAM_USE_LICMAN12.
These settings are not required for SAM for CATIA V5.
There is a new environment variable for the SAM “Update Part in SAM PDM“
functionality:
SAM_ENABLE_UPDATEGEO, see table of SAM configuration variables at the end
of the manual.
SAM Installation & Administration Guide
•
•
•
There is a new environment variable for the SAM “Creates/Attaches an
Archive“ functionality (relevant for the GDG view only):
SAM_ENABLE_ATTARCHIVECMD, see table of SAM configuration variables at the
end of the manual.
There is a new environment variable to suppress a validation message during
sub-compositions loading (relevant for the GDG view only, FPE i3181):
SAM_CMI_REPLACE_WRONG_PRD_AUTO, see table of SAM configuration variables
at the end of the manual.
There is a new feature to declare “virtual paths” for SAM for CATIA V5, see
chapter “Defining virtual paths for file selection boxes”.
SAM Installation & Administration Guide
iii
Table of Contents
CHAPTER 1....................................................................................................................9
OVERVIEW ....................................................................................................................9
SYSTEM AND SOFTWARE REQUIREMENTS ......................................................................9
SHIPMENT .....................................................................................................................9
DOCUMENTATION ..........................................................................................................9
LOADING THE SOFTWARE FROM CD-ROM ...................................................................10
CHAPTER 2..................................................................................................................11
INSTALLATION FOR CATIA V5......................................................................................11
LOADING SAM SOFTWARE FOR UNIX FROM CD-ROM .................................................11
SAM INSTALLATION FOR UNIX ....................................................................................11
SAM INSTALLATION FOR W INDOWS .............................................................................17
SAM CMI CATIA V5 MODULE .....................................................................................17
DEFINING VIRTUAL PATHS FOR FILE SELECTION BOXES ..................................................18
SAM LICENSES ...........................................................................................................19
CATIA V5 LICENSES ...................................................................................................19
DIRECTORIES ..............................................................................................................20
FILES ..........................................................................................................................20
README:.................................................................................................................20
data/CMIConfiguration.xml : ......................................................................20
data/sam_filetype.txt : ...............................................................................20
doc/WHATSNEW.txt: ...........................................................................................20
config/samcatiaenv.txt: ..............................................................................20
sam5_batch_export_sample.sh: ...................................................................20
sam5_batch_import_sample.sh: ...................................................................20
samcatstart.sh: ...............................................................................................20
$HOME/xmap : .......................................................................................................21
CHAPTER 3..................................................................................................................22
ADAPTATIONS FOR CATIA V5......................................................................................22
JAVA RUNTIME ENVIRONMENT ......................................................................................22
DEFINING APPLICATIONS FOR NON CATIA FILES ...........................................................22
ACTIVATING CHECK-OUT FACILITY ................................................................................23
SAM BATCH TOOL FOR STEP IMPORT AND EXPORT ......................................................24
SAM CONFIGURATION VARIABLES ...............................................................................26
SAM Installation & Administration Guide
v
CHAPTER 1
Overview
System and Software Requirements
CATIA V5 and JAVA with following versions on following operating systems:
Operating System:
CATIA V5 – 32 Bit:
CATIA V5 – 64 Bit:
JAVA runtime environment:
AIX (on request)
HP-UX (on request)
Solaris / SunOS
Windows
For Windows – 64 Bit only
5.1 – 5.3
11
2.6 / 7 / 8 / 10
XP / Windows 7
V5R19
V5R19
1.5 or higher (32 Bit JAVA for
both CATIA V5 – 32 Bit and
CATIA V5 – 64 Bit)
As for CATIA V5 installation, a complete CATIA V5 level P2 installation is required. It is not sufficient to install
only the CATIA V5 modules that are necessary for an “MD2" or "HD2" CATIA V5 license.
Shipment
The software is available on the Internet or will be delivered on a CD-ROM containing the following parts:
SAM for CATIA V5R19 - UNIX platform independent part
(necessary for all UNIX platforms)
SAM_5.x.x_V5R19_NOARCH.tgz
SAM for CATIA V5R19 - AIX specific part (on request)
SAM_5.x.x_V5R19_AIX.tgz
SAM for CATIA V5R19 - HP-UX specific part (on request)
SAM_5.x.x_V5R19_HP-UX.tgz
SAM for CATIA V5R19 - SunOS specific part
SAM_5.x.x_V5R19_SunOS.tgz
SAM for CATIA V5R19 (32 Bit) for Windows
SAM_5xx_V5R19_Windows.zip
SAM for CATIA V5R19 (64 Bit) for Windows
SAM_5xx_V5R19_Win_B64.zip
SAM installation manual – English
sam_inst_5x_en.pdf
SAM installation manual – German
sam_inst_5x_de.pdf
Note: The generic version index 5xx has to be replaced by the actual version index, e.g. 590.
Documentation
The documentation consists of two parts:
Manual Title
Release
STEP Assembly Manager User’s Manual
5.9
STEP Assembly Manager Installation & Administration Guide
5.9.1
SAM Installation & Administration Guide
9
Loading the Software from CD-ROM
The following steps describe how to mount the SAM software CD-ROM.
Under UNIX, log in as root user to a host with a CD-ROM drive. If your host does not have a CD-ROM drive, log
into another host that is NFS-accessible to the installation host.
(If necessary) Create a mount-point directory for the CD-ROM:
# mkdir /cdrom
Place the SAM CD-ROM in the drive. On Solaris hosts, the volume manager mounts the CD-ROM
automatically, so you can skip the next step.
Mount the CD-ROM:
Note: CD-ROM device names vary from host to host. Thus, you may need to adjust the mount command listed
below.
Architecture
Mnemonic
Mount Command
Solaris
solaris2
Not necessary
HP-UX
hpux
mount –o cdcase –F cdfs –r/dev/dsk/c3d0s2 /cdrom
AIX
aix
mount –o ro –v cdrfs /dev/cd0 /cdrom
If the CD-ROM drive is not on the installation host, use NFS facilities to export the CD-ROM drive’s mount point
from its host, and mount it on the installation host. For example:
On the host with the CD-ROM drive:
# exportfs –i –o ro /cdrom
On the installation host:
# mount drive-host:/cdrom /cdrom
Now you can run the installation scripts as described in the following chapters.
10
Overview
Guide
SAM Installation & Administration
CHAPTER 2
Installation for CATIA V5
The T-Systems SAM module extends the CATIA V5 functionality to handle assembly structures and to
exchange them via STEP.
You should perform the following steps with your CATIA system administrator. The SAM module includes all of
the supported platform data in a compressed file. Thus, you should choose an installation location for all CATIA
V5 workstations.
Note: Each time the environment files are modified, CATIA must be restarted to take the changes into account.
Loading SAM Software for UNIX from CD-ROM
In the following example sections it is supposed that the software will be installed in the directory /catia.
Log in as the CATIA administrator (e.g. catadm ):
# su – catadm
Change to any temporary installation directory:
# cd /tmp
Unpack the compressed files for the UNIX platform independent part (necessary for all UNIX platforms) and the
UNIX platform specific parts.
Example: For an installation for CATIA V5R19, for both AIX and HP-UX, unpack the platform independent part,
the AIX specific part and the HP-UX specific part:
# cat SAM_5.x.x_V5R19_NOARCH.tgz | gzip -d | tar xvf # cat SAM_5.x.x_V5R19_AIX.tgz
| gzip -d | tar xvf # cat SAM_5.x.x_V5R19_HP-UX.tgz | gzip -d | tar xvf Unpacking these compressed files creates a new directory SAM_5.x.x in the current temporary installation
location.
Note:
The generic version index 5.x.x has to be replaced by the actual version index, e.g. 5.9.0.
SAM Installation for UNIX
After you have successfully transferred the installation files to your installation host; the following steps
configure your installation and install the software to your destination.
Change to the temporary installation directory:
# cd SAM_5.x.x/install_V5/unix
SAM Installation & Administration Guide
11
Start installation shell script:
# ./install.sh
The install.sh shell script asks you for some installation paths and copies the files to the target directory.
Here you can decide which architectures you want to install. The supported platforms are listed in chapter
“System and Software Requirements” on page 9.
After confirming the list of installation decisions, the installation process will be started.
Sample output from install.sh:
12
Installation for CATIA V5
Guide
SAM Installation & Administration
*********************************************************
*
*
* 1. Step:
Configuration
*
*
*
*********************************************************
You can interrupt with cntr-C or continue with Return
*********************************************************
*
*
* Installation Directory
*
*
*
*********************************************************
Default [/home/user/sam_5.9.0]: /catia/sam_5.9.0
*********************************************************
*
*
*
Select SAM CATIA V5 Modul
*
*
*
* Type the number of the SAM CATIA V5 Modul
*
* corresponding to your CATIA V5 Release.
*
* e.g. SAMCATV5_R19_VXXX fits to CATIA V5 Release 19
*
*
*
*********************************************************
1) Samcatv5_r19_97v24
2) exit
SAM CATIA V5 modul: 1
Installation directory of standard CATIA.
Type the full path or hit return to accept the default.
[/usr/DassaultSystemes/B19]
/apps/catia/B19
*********************************************************
*
*
* Environment file of standard CATIA
*
* Type the full path or
*
* hit return to accept the default.
*
*
*
*********************************************************
[/CATEnv/CATIA.V5R19.B19.txt]
/CATEnv/CATIA_P3.V5R19.B19.txt
*********************************************************
* The SAM CATIA V5 Module needs a local directory to
*
* perform the file exchange between the SAM Interface
*
* and CATIA. This directory is located in the $HOME
*
* directory of each user, e.g. if you want to use
*
* $HOME/xmap then type xmap. Make sure this
*
* directory exists for every user.
*
*********************************************************
[xmap]
SAM Java Setup
==============
SAM requires java (Java Development Kit) or jre (Java Runtime Environment)
version 1.5 or newer installed on your computer.
To set up Java for SAM please go through the following list:
1. Check if Java or Jre is already installed on your computer.
Try to execute
java -version
or
jre -version
2. If java or jre is available and the version is 1.5 or newer
set the SAM_JAVA variable to the full path where the java or jre
executable is installed.
SAM_JAVA=[/usr/bin/java]
3. If java or jre are not installed, download either the
Java Runtime Environment (JRE) or the Java Software Development Kit (JDK)
from your system vendors web-site and install it.
SAM Installation & Administration Guide
13
*********************************************************
* SAM CATIA V5 Module Installation
*
*
* 2. Step:
Installation
*
*
*
*********************************************************
*
*
* If you are not sure if all settings are correct
*
* (see below) this is your last chance to interrupt
*
* the installation and make corrections in config.env: *
*
*
*********************************************************
*
* Installation dir
: /catia/sam_5.9.0
* CMI exchange map
: $HOME/xmap
* CATIA V5 environment : /CATEnv/CATIA_P3.V5R19.B19.txt
*
*********************************************************
You can interrupt with cntr-C or continue with Return
For which architecture do you wish to make this installation?
type one of the following or enter for all:
aix_a hpux_b :
. . . . . . . . . . . . . . . . . . . . . . . . . . . . . . . . . . . . . .
Generating new environment files
. . . . . . . . . . . . . . . . . . . . . . . . . . . . . . . . . . . . . ..
Do you wish to install the license manager
now y/n: [y]
. . . . . . . . . . . . . . . . . . . . . . . . . . . . . . . . . . . . . .
*********************************************************
*
*
*
SAM CATIA V5 Installation finished
*
*
*
*********************************************************
*
*
* SAM License:
*
* See "Order SAM" at
*
* http://www.t-systems-des.com/sam
*
* Copy the licenses (clients) file to
*
* /catia/sam_5.9.0/samcatv5_r19_97v24/licman/data
*
*
* You can start CATIA V5 with the script
*
* samcatstart.sh
*
* in the installation directory
*
* /catia/sam_5.9.0/samcatv5_r19_97v24
*
*
* For more information refer to the file
*
* /catia/sam_5.9.0/README
*
*
*********************************************************
After the installation is finished successfully, you may remove the temporary SAM_5.x.x directory.
The installation shell script install.sh generates a README file and a shell script samcatstart.sh to
start CATIA V5 with SAM.
Sample listing of README:
14
Installation for CATIA V5
Guide
SAM Installation & Administration
*********************************************************
*
*
*
SAM CATIA V5 README
*
*
*
*********************************************************
1. Contact
2. Licensing
3. Adapting SAM CATIA V5
1. Contact
T-Systems International GmbH
Fasanenweg 5
70771 Leinfelden-Echterdingen
Germany
http://servicenet.t-systems.com/sam
[email protected]
2. Licensing
See "Order SAM" at
http://www.t-systems-des.com/sam
For more information refer to:
/catia/sam_5.9.0/licman/doc/licman20.pdf
3. Adapting CMI CATIA V5
You can start CATIA V5 with one of the following script:
/catia/sam_5.9.0/samcatv5_r19_97v24/samcatstart.sh
The start script usees the file samcatiaenv.txt to get the
CATIA V5 environment.
Environment file:
/catia/sam_5.9.0/samcatv5_r19_97v24/config/samcatiaenv.txt
Change of the CMI CATIA environment:
If you change the CMI CATIA environment please provide the
changes to the environment file.
/catia/sam_5.9.0/samcatv5_r19_97v24/config/samcatiaenv.txt
Sample listing of samcatstart.sh:
SAM Installation & Administration Guide
15
#!/usr/bin/ksh -f
#########################################################################
#
#
# Example start script to start CATIA V5 with SAM Module
#
#
#
#########################################################################
# directory of the CMI CATIA V5 installation
SAM_INSTDIR=/catia/sam_5.9.0/samcatv5_r19_97v24
# directory of the CATIA V5 installation
SAM_CATINSTDIR=/apps/catia/B19
# name of the CATIA environment
SAM_CATENVNAME=samcatiaenv.txt
# CATIA architecture
SAM_CMI_OS=`${SAM_CATINSTDIR}/GetOSDS`
# choose architecture
case `uname` in
AIX)
SAM_OS="AIX"
;;
HP-UX)
SAM_OS="HP-UX"
;;
SunOS)
SAM_OS="SunOS"
;;
esac
export SAM_OS
# launch licman
/catia/sam_5.9.0/samcatv5_r19_97v24/licman/licman20 lld
# this path is essentiell to find some libraries
SAM_LIBDIR=/catia/sam_5.9.0/etc/${SAM_OS}
export SAM_LIBDIR
# this path is essentiell to find some scripts (dshgui_find.sh etc.)
SAM_SCRIPTDIR=/catia/sam_5.9.0/data
export SAM_SCRIPTDIR
SAM_BINDIR=/catia/sam_5.9.0/bin/${SAM_OS}
export SAM_BINDIR
# set language of SAM window
SAM_LANGUAGE=en
export SAM_LANGUAGE
# set java bin
SAM_JAVA=/usr/bin/java
export SAM_JAVA
# set default view
#SAM_DEFAULT_VIEW=smaragd/sam
#export SAM_DEFAULT_VIEW
# set UMASK of SAM working files
SAM_UMASK="`umask`"
export SAM_UMASK
# set check-out locking file
# SAM_CHECKOUT_FILE=/catia/sam_5.9.0/data/sam_checkout_file
# export SAM_CHECKOUT_FILE
# set configuration file defining applications to open non CATIA files
SAM_FILETYPE_FILE=/catia/sam_5.9.0/data/sam_filetype.txt
export SAM_FILETYPE_FILE
#
#
#
#
define SAM checkout lock server
example: host myhost, port number 12007
SAM_LOCK_SERVER=myhost:12007
export SAM_LOCK_SERVER
# start directory for SAM PDM GUI file selection box
SAM_STARTDIR=/catia/sam_5.9.0/data
16
Installation for CATIA V5
Guide
SAM Installation & Administration
export SAM_STARTDIR
# run SAM PDM GUI in CATIA V5 mode
SAM_CATIA_VERSION=5
export SAM_CATIA_VERSION
CNEXTOUTPUT=CONSOLE
export CNEXTOUTPUT
#SAM_CMI_DEBUG=ON
#export SAM_CMI_DEBUG
#SAM_CONNECTPORT=12345
#export SAM_CONNECTPORT
#CMI_DISABLE_HIDESHOW=ON
#export CMI_DISABLE_HIDESHOW
#CMI_ENABLE_USEROOTASCMIWORKBENCH=ON
#export CMI_ENABLE_USEROOTASCMIWORKBENCH
#CMI_ENABLE_SINGLEPARTMODUS_READ=ON
#export CMI_ENABLE_SINGLEPARTMODUS_READ
# launch CATIA V5
CMD=${SAM_CATINSTDIR}/${SAM_CMI_OS}/code/command/catstart
$CMD -env ${SAM_CATENVNAME} -direnv ${SAM_INSTDIR}/config
SAM Installation for Windows
Unpack the ZIP file from the installation medium. For each supported CATIA release, there is a ZIP file that
contains the complete SAM package for Windows for this CATIA release. The ZIP file contains an EXE file, e.g.
SAM_V5R19.exe for CATIA V5R19.
Run this EXE file to start the installation procedure. This does not require administrator rights.
The installation procedure asks you for:
The top-level installation folder for SAM
The main folder of your CATIA V5 installation (must already exist), e.g.
C:\Program Files\Dassault Systemes\B19
The path of your Java Virtual Machine EXE file (must already exist), e.g.
C:\WINNT\system32\jview.exe
The SAM "exchange map" folder (must already exist and have write permission). When loading CATIA files,
SAM copies the files at first into the "exchange map" folder and then loads them from there into CATIA.
Example:
C:\xmap
The installation procedure creates a file start_samcatia.bat in the directory samcatv5_rxx_vyyy
that can be called to start CATIA with SAM.
If the LICMAN license manager is not already installed on your computer, please install LICMAN as described
in the LICMAN manual (see subdirectory pdfdoc). The LICMAN installation package is in subdirectory
licman. Log in as administrator for LICMAN installation.
Note: If you want to unpack *.tgz archives with SAM STEP import or pack with SAM STEP export, SAM
requires that the commands "tar" and "gzip" are available in the path.
Under Windows, this requirement is not fulfilled by default.
However, there are some free UNIX tools for Windows available on the Internet e. g. at
http://unxutils.sourceforge.net/ (link UnxUtils.zip).
SAM CMI CATIA V5 Module
SAM for CATIA V5 uses the CATIA module of CMI for CATIA V5.
The installation shell script generates a declaration file "samcatiaenv.txt" where some CATIA
environment variables are set which are relevant for the SAM/CMI CATIA V5 module.
Sample listing of samcatiaenv.txt:
SAM Installation & Administration Guide
17
!---------------------------------------------------------! DASSAULT SYSTEMES - V5 ENVIRONMENT FILE
!---------------------------------------------------------! MODE : Global
! TYPE : Interactif
!---------------------------------------------------------CATEnvironment=/apps/catia/B19/$OSDS
CATInstallPath=/tmp/sam_5.9.0/samcatv5_r19_97v24/$OSDS:/apps/catia/B19/$OSDS
PATH=/tmp/sam_5.9.0/samcatv5_r19_97v24/$OSDS/code/bin:/apps/catia/B19/$OSDS/
code/bin:/apps/catia/B19/$OSDS/code/command:$PATH
LIBPATH=/tmp/sam_5.9.0/samcatv5_r19_97v24/$OSDS/code/bin:/apps/catia/B19/$OS
DS/code/bin:$LIBPATH
LD_LIBRARY_PATH=/tmp/sam_5.9.0/samcatv5_r19_97v24/$OSDS/code/bin:/apps/catia
/B19/$OSDS/code/bin:$LD_LIBRARY_PATH
LD_LIBRARYN32_PATH=/tmp/sam_5.9.0/samcatv5_r19_97v24/$OSDS/code/bin:/apps/ca
tia/B19/$OSDS/code/bin:$LD_LIBRARYN32_PATH
SHLIB_PATH=/tmp/sam_5.9.0/samcatv5_r19_97v24/$OSDS/code/bin:/apps/catia/B19/
$OSDS/code/bin:$SHLIB_PATH
CATICPath=/tmp/sam_5.9.0/samcatv5_r19_97v24/$OSDS/code/productIC:/apps/catia
/B19/$OSDS/code/productIC
CATCommandPath=/tmp/sam_5.9.0/samcatv5_r19_97v24/$OSDS/code/command:/apps/ca
tia/B19/$OSDS/code/command
CATDictionaryPath=/tmp/sam_5.9.0/samcatv5_r19_97v24/$OSDS/code/dictionary:/a
pps/catia/B19/$OSDS/code/dictionary
CATDocView=/apps/catia/B19/$OSDS/doc
CATReffilesPath=/apps/catia/B19/$OSDS/reffiles
CATFontPath=/apps/catia/B19/$OSDS/resources/fonts
CATGalaxyPath=/apps/catia/B19/$OSDS/resources/galaxy
CATGraphicPath=/tmp/sam_5.9.0/samcatv5_r19_97v24/$OSDS/resources/graphic/ico
ns:/tmp/sam_5.9.0/samcatv5_r19_97v24/$OSDS/resources/graphic:/apps/catia/B19
/$OSDS/resources/graphic:/apps/catia/B19/$OSDS/resources/graphic/icons:/apps
/catia/B19/$OSDS/resources/graphic/figures:/apps/catia/B19/$OSDS/resources/g
raphic/splashscreens:/apps/catia/B19/$OSDS/resources/graphic/symbols:/apps/c
atia/B19/$OSDS/resources/graphic/textures
CATMsgCatalogPath=/tmp/sam_5.9.0/samcatv5_r19_97v24/$OSDS/resources/msgcatal
og:/apps/catia/B19/$OSDS/resources/msgcatalog
CATFeatureCatalogPath=/apps/catia/B19/$OSDS/resources/featurecatalog
CATDefaultCollectionStandard=/apps/catia/B19/$OSDS/resources/standard
CATStartupPath=/apps/catia/B19/$OSDS/startup
CATW3ResourcesPath=/apps/catia/B19/$OSDS/docs
USER_HOME=$HOME
CATReferenceSettingPath=
CATUserSettingPath=\$USER_HOME/CATSettings
CATCollectionStandard=
CATTemp=\$USER_HOME/CATTemp
CATMetasearchPath=/tmp
CATW3PublishPath=/tmp
CATSharedWorkbookPath=/tmp
CATErrorLog=\$USER_HOME/CATTemp/error.log
CATReport=\$USER_HOME/CATReport
CATDisciplinePath=
JAVA_HOME_aix_a=
JAVA_HOME_irix_a=
JAVA_HOME_hpux_b=
JAVA_HOME_solaris_a=
JAVA_HOME=\$JAVA_HOME_$OSDS
CLASSPATH_JDBC_aix_a=
CLASSPATH_JDBC_irix_a=
CLASSPATH_JDBC_hpux_b=
CLASSPATH_JDBC_solaris_a=
CLASSPATH=\$CLASSPATH_JDBC_$OSDS:$CLASSPATH
SAM_CMIXMAP=$HOME/xmap
The directory declared by $SAM_CMIXMAP is the "exchange map" directory. It has to exist and must have
write permission for every user. When loading CATIA files, SAM copies the files at first into the "exchange
map" directory and then loads them from there into CATIA.
Defining virtual paths for file selection boxes
You can define “virtual paths” for directories that you can choose in SAM-PDM file selection boxes, e. g. for the
file selection box at SAM "STEP Import".
Virtual paths are declared in the “config.ini” file in the “data” subdirectory.
Syntax:
18
Installation for CATIA V5
Guide
SAM Installation & Administration
V_PATH.name.XXXX = <description>
V_PATH.path.XXXX = <path>
XXXX is the key and must be unique.
Example (see sample paragraph in config.ini):
#
#
#
#
#
#
V_PATH.name.1=My Parts
V_PATH.path.1=C:/parts
V_PATH.name.2=My Products
V_PATH.path.2=C:/products
V_PATH.name.AA=My other Products
V_PATH.path.AA=C:\\products
For Windows directories, you can use the slash or backslash as separation character. Backslash characters
must be written twice, see example above.
If there is a declaration of virtual paths, the SAM-PDM file selection boxes will have additional buttons:
OK: to start the file selection dialog with the chosen virtual path,
DEFAULT: to start the file selection dialog with the SAM installation directory,
START_DIR: to start the file selection dialog with the directory defined by the environment variable
SAM_STARTDIR.
SAM Licenses
The use of SAM is controlled by the license manager LICMAN which is part of the delivery. There are two
different license types: Network licenses (floating) and nodelock licenses.
For a detailed description of the license manager, please refer to the LICMAN manual
sam_5.x.x/pdfdoc/licman20.pdf.
The following statements in the shell script samcatstart.sh listed above are relevant for LICMAN:
# launch licman
/catia/sam_5.9.0/samcatv5_r19_97v24/licman/licman20 lld
The statement "licman20 lld" starts the LICMAN "local license daemon". This statement may be
commented out if the "local license daemon" is already running.
Note:
If the LICMAN license manager has already been installed for some other T-Systems software, then this
existing LICMAN installation can also be used for SAM. You only need to adapt the LICMAN environment
variables in your SAM installation according to your existing LICMAN installation (see shell script ini.env (CATIA
V4) or samcatstart.sh (CATIA V5)).
CATIA V5 Licenses
The SAM CATIA V5 module needs CATIA V5 licenses for the following CATIA V5 workbenches:
•
Product Structure (or Assembly Design)
•
Part Design
•
Drafting
For this, e.g. an "MD2" or "HD2" CATIA V5 license is sufficient.
Note:
As for CATIA V5 installation, a complete CATIA V5 level P2 installation is required. It is not sufficient to install
only the CATIA V5 modules that are necessary for an “MD2" or "HD2" CATIA V5 license.
SAM Installation & Administration Guide
19
Directories
The SAM standard installation directory tree consists of the following directories:
bin/
:
SAM PDM executables.
data/
:
Java files, shell scripts and declaration files.
doc/
:
The latest information about the product.
etc/
:
SAM PDM libraries.
examples/
:
Some example STEP file packages with referenced CATIA files.
pdfdoc/
:
SAM user and installation manuals and LICMAN manuals.
samcatv5_rxx_vy Declaration file "samcatiaenv.txt" where some CATIA environment
yy/config
: variables are set which are relevant for the SAM/CMI CATIA V5 module.
samcatv5_rxx_vy SAM CMI CATIA V5 module files.
yy/<your OS> :
samcatv5_rxx_vy LICMAN files.
yy/licman
:
Note:
The generic CATIA V5 release index "rxx" has to be replaced by the actual release index, e.g. "r19". The
generic index "vyyy" has to be replaced by the actual version index of the CMI CATIA V5 module, e.g. "97v24".
Files
The following section describes some important files and their meaning.
README:
General information about licensing and further declaration files and shell scripts.
data/CMIConfiguration.xml :
This configuration file contains the list of part types for Synchronize/Update.
data/sam_filetype.txt :
This configuration file, declared by the shell variable $SAM_FILETYPE_FILE, defines the association
between a file type and an application for non CATIA files.
doc/WHATSNEW.txt:
This file lists the changes of the SAM versions. There are new features and bug-fixes.
config/samcatiaenv.txt:
Declaration file where some CATIA environment variables are set which are relevant for the SAM/CMI CATIA
V5 module.
sam5_batch_export_sample.sh:
This file is a sample shell script to perform SAM STEP export with CATIA V5 files in batch mode.
sam5_batch_import_sample.sh:
This file is a sample shell script to perform SAM STEP import with CATIA V5 files in batch mode.
samcatstart.sh:
This file is a sample shell script to start CATIA V5 with SAM.
20
Installation for CATIA V5
Guide
SAM Installation & Administration
$HOME/xmap :
This directory is a local UNIX directory in the user’s home directory. On each CATIA V5 workstation an
exchange map must exist with write permission. When loading CATIA files, SAM copies the files at first into the
"exchange map" directory and then loads them from there into CATIA. Each user should have an own
exchange map.
SAM Installation & Administration Guide
21
CHAPTER 3
Adaptations for CATIA V5
This chapter describes declarations and adaptations that are relevant for CATIA V5.
Java runtime environment
SAM requires java (Java Development Kit) or jre (Java Runtime Environment)
version 1.5 or newer installed on your computer.
To set up Java for SAM, please set the environment variable SAM_JAVA (see shell script
ini.env (CATIA V4) or samcatstart.sh (CATIA V5)).
To get the right values please go through the following list:
1. Check if Java or Jre is already installed on your computer. Try to execute
java –version
or
jre –version
2. If java or jre is available, set the SAM_JAVA variable to the full path name of the
java or jre executable file, e.g.
SAM_JAVA=/usr/bin/java
3. If java or jre are not installed, download either the Java Runtime Environment
(JRE) or the Java Software Development Kit (JDK) from your system vendors
web-site and install it.
Note: For Windows, the SAM installation procedure asks for the path of the Java
executable file and sets the environment variable SAM_JAVA respectively.
Defining applications for non CATIA files
If you open the context menu for a non CATIA file in the SAM structure browser window, it will show the entries
"Open File", "Copy File" and "Update File".
With "Open File", you can start an application that is associated with this file type.
The association between a file type and an application is defined by the configuration file declared by the shell
variable $SAM_FILETYPE_FILE, by default data/sam_filetype.txt.
Syntax:
<file type (GDG or Smaragd view document type)> <application (UNIX command)>
Example listing of data/sam_filetype.txt:
# list of types for Smaragd and GDG
# Syntax:
# filetype application
# Editable Text files
22
Adaptations for CATIA V5
Guide
SAM Installation & Administration
EditText emacs
# Non-Editable Text
NoEdText xterm -e more
# Platform Independent Binary File
# IndepBin
# Platform Dependent Binary File
# OsDepBin
# Acrobat Files (Smaragd Only)
j0Pdf acrobat
# IGES files (Smaragd Only)
j0IGES xterm -e more
# STEP files (Smaragd Only)
j0STEP xterm -e more
# VDA files (Smaragd Only)
j0VDA xterm -e more
# VDS files (Smaragd Only)
j0VDS xterm -e more
# HPGL files (Smaragd Only)
# x0HPGL
# Report Files (Smaragd Only)
Report xterm -e more
# HTML Files (Smaragd Only)
HtmlFile netscape
# CATIA V5 Model (Smaragd Only)
# j0CatPrt
# CATIA V5 Drawing (Smaragd Only)
# j0CatDrw
# Exp File (Smaragd Only)
ExpFile xterm -e more
# Quality Data File (GDG Only)
RCQ xterm -e more
# JT File (GDG Only)
# JT
# ACF File (GDG Only)
# ACF
# TIFF File (GDG Only)
# TIFF
# RosOvl (GDG Only)
# RosOvl
# CAR (GDG Only)
# CAR
# Euclid 3D File (GDG Only)
# E3D
# CATIA V4 Template (GDG Only)
# x0CTTemp
#
#
#
#
#
Microsoft Word Files
Smaragd:
j0Word
GDG:
Word
#
#
#
#
Microsoft Word Template (Smaragd Only)
j0WorTem
Microsoft Excel Files (Smaragd Only)
j0Excel
# Microsoft Excel Template (Smaragd Only)
# j0ExcTem
# Microsoft PowerPoint Files (Smaragd Only)
# j0PPT
# Microsoft Powerpoint Template (Smaragd Only)
# j0PPTTem
# Microsoft Project Files (Smaragd only)
# j0Projt
Activating check-out facility
SAM has an optional check-out facility so that the user can check in and check out models and files in the SAM
structure browser.
If you want to activate the check-out facility, there are 2 alternative methods:
SAM Installation & Administration Guide
23
Method a) Central locking file:
The check-out facility can be activated by declaring a central locking file by the shell variable
$SAM_CHECKOUT_FILE. In this case, SAM will create this locking file if it does not already exist, and each
time a user performs a check-out operation, SAM will write a respective line into this file. In a local computer
network, this locking file should be on a network directory mounted by NFS, so that all computers in the
network running SAM have the same check-out status information.
Advantage of this method: Easy administration.
Disadvantage of this method: If many concurrent SAM processes in the computer network are accessing the
central locking file, then there may be problems resulting from file access conflicts.
Method b) Locking server process:
Alternatively, the check-out facility can be activated by starting a locking server process on a computer in your
local network. In this case, you have to declare the locking server by the shell variable $SAM_LOCK_SERVER,
and you have to start the locking server process on one computer in your network, before running SAM on any
computer in the network. As the locking server process has to be restarted in case of a reboot, it may be useful
to add the command to start the locking server process into the boot procedure of this computer.
The shell variable $SAM_LOCK_SERVER defines a computer (host) and a socket port for communication in
the network. This shell variable must have the same value for all computers in the network running SAM.
Syntax: SAM_LOCK_SERVER=<host>:<port> where :<port> is optional.
Declaring the locking server by $SAM_LOCK_SERVER has higher priority than $SAM_CHECKOUT_FILE
(alternative method with central locking file, see above).
The locking server process is started by the shell script data/sam_lock_server.sh. An example how
to call this shell script for a CATIA V4 installation is given in doc/sam_lock_server_sample.sh.
Example listing of doc/sam_lock_server_sample.sh:
#!/bin/ksh
# set java environment
. /catia/sam_5.9.0/data/ini.env
PATH=/catia/sam_5.9.0/data:$PATH;
if test -z "$SAM_LOCK_SERVER" ; then
echo
echo
echo
echo
exit
"
"
"
"
The SAM checkout lock server is not defined."
To use the checkout server please set"
SAM_LOCK_SERVER=<host>:<port> in the file"
/catia/sam_5.9.0/data/ini.env"
fi
PORT=`echo $SAM_LOCK_SERVER |cut -f2 -d:`
CMD="/catia/sam_5.9.0/data/sam_lock_server.sh $PORT"
# start the locking server
$CMD > /tmp/sam_lock_server.log
Advantage of this method: Reliability also in case of many concurrent SAM processes in the computer
network.
Disadvantage of this method: As it has to be made sure that the locking server process is always running on
one computer in the network, administration is more complex.
SAM batch tool for STEP import and export
STEP import and export can be done in interactive mode using the SAM GUI.
In addition, SAM provides a batch tool for STEP import and export.
A batch STEP import process is started by the shell script data/sam_batch_import.sh.
USAGE: sam_batch_import.sh <step-file> (-overwrite | -nooverwrite)
[-merge <sam-file>] -map <map-name>
[-o <output-file>] [-log <log-file>]
An example how to call this shell script for a CATIA V4 installation is given in
doc/sam_batch_import_sample.sh.
An example how to call this shell script for a CATIA V5 installation is given in
sam5_batch_import_sample.sh.
For CATIA V5, the parameter -map <map-name> has to be replaced by -dir <directory>.
Example listing of doc/sam_batch_import_sample.sh:
24
Adaptations for CATIA V5
Guide
SAM Installation & Administration
#!/bin/ksh
# According to the architecture this is an catia start script example.
# First edit your USRENV.dcls, see description in help.txt.
. /catia/sam_5.9.0/data/get_arch.sh
echo "ARCHITECTURE=$THISARCH"
# please correct this path if necessary.
. /catia424/prod/START.env
. /catia/sam_5.9.0/data/ini.env
STEPLIB=$STEPLIB:/catia/sam_5.9.0/etc/$THISARCH; export STEPLIB
case "$THISARCH" in
HP-UX )
SHLIB_PATH=$STEPLIB;
export SHLIB_PATH;
break ;;
AIX )
LIBPATH=$STEPLIB;
export LIBPATH;
break ;;
SunOS )
LD_LIBRARY_PATH=$STEPLIB; export LD_LIBRARY_PATH;
break ;;
*)
echo ""
echo "This architecture ($THISARCH) is not supported !!"
echo ""
break ;;
esac
CATDEC=$CATDEC:/catia/sam_5.9.0/data;
PATH=/catia/sam_5.9.0/data:$PATH:$STEPLIB;
export CATDEC
export PATH
#cd $HOME/catiav4
sam_batch_import.sh /tmp/my_step_file.stp \
-overwrite \
-map MY_CATIA_MODEL_DIRECTORY \
-o /tmp/my_batch_sam_file.sma \
-log /tmp/sam_batch_imp.log
A batch STEP export process is started by the shell script data/sam_batch_export.sh.
USAGE: sam_batch_export.sh <sam-file> <output-dir>
[-o <step-output-file>] [-log <log-file>]
An example how to call this shell script for a CATIA V4 installation is given in
doc/sam_batch_export_sample.sh.
An example how to call this shell script for a CATIA V5 installation is given in
sam5_batch_export_sample.sh.
SAM Installation & Administration Guide
25
Example listing of doc/sam_batch_export_sample.sh:
#!/bin/ksh
# According to the architecture this is an catia start script example.
# First edit your USRENV.dcls, see description in help.txt.
. /catia/sam_5.9.0/data/get_arch.sh
echo "ARCHITECTURE=$THISARCH"
# please correct this path if necessary.
. /catia424/prod/START.env
. /catia/sam_5.9.0/data/ini.env
STEPLIB=$STEPLIB:/catia/sam_5.9.0/etc/$THISARCH; export STEPLIB
case "$THISARCH" in
HP-UX )
SHLIB_PATH=$STEPLIB;
export SHLIB_PATH;
break ;;
AIX )
LIBPATH=$STEPLIB;
export LIBPATH;
break ;;
SunOS )
LD_LIBRARY_PATH=$STEPLIB; export LD_LIBRARY_PATH;
break ;;
*)
echo ""
echo "This architecture ($THISARCH) is not supported !!"
echo ""
break ;;
esac
CATDEC=$CATDEC:/catia/sam_5.9.0/data;
PATH=/catia/sam_5.9.0/data:$PATH:$STEPLIB;
export CATDEC
export PATH
#cd $HOME/catiav4
sam_batch_export.sh /tmp/my_sam_file.sma /tmp \
-o my_batch_out.stp \
-log /tmp/sam_batch_exp.log
SAM Configuration Variables
The following table lists the SAM configuration variables (environment variables, see shell script ini.env (CATIA
V4) or samcatstart.sh (CATIA V5)).
For CATIA V4, some of the configuration variables can also be set in the file data/samdefault.obj
where the syntax is different from the environment variables.
Name of
Name of
Configuration Flag
Environment Variable
(samdefault.obj
Short Description
(CATIA V4: ini.env)
.samcatiarc.obj)
(CATIA V5: samcatstart.sh)
(CATIA V4 only)
SAM_DEBUG
debug
SAM_BINDIR
-
SAM_SCRIPTDIR
-
SAM_EXCHANGEMAP
exchangemap
SAM_EXMAPDLNAME
exchange_dlname
SAM_TMPAXIS
tmpaxis
26
Adaptations for CATIA V5
Guide
Relevant Relevant
Possible Values for CATIA for CATIA
0 - no debug
66 - full debug
set a debug level
path to the executables of SAM installation
V4
V5
X
X
X
path to the scripts and configuration files of
X
SAM installation
Directory where CATIA V4 saves the
X
TMPAXIS model
logical map name which is related to the
X
exchange map
Use a start model "TMPAXIS".
If TMPAXIS is used, it will be the active
model when an assembly is loaded into
CATIA. If no TMPAXIS is used, one of the
models in the assembly will be the active
0 - no start model
model when loading into CATIA.
1 - use a start
X
For working with assemblies, it is
model
recommended to use TMPAXIS.
Switching off TMPAXIS can be useful for
loading a single model into CATIA by
SAM, as this single model will immediately
be the active model.
X
SAM Installation & Administration
If there is no
TMPAXIS
MODEL (MAP)
logical CATIA V4 map where the template
defined the
X
for the TMPAXIS model is searched
INITIAL_MODEL
of CATIA V4 is
used
CATIA V4 map directory where the
template for the TMPAXIS model is
X
searched
Template for the TMPAXIS model:
the CATIA V4 model without ".model"
extension.
A template for TMPAXIS may be useful
X
e.g. when working with inch models if the
INITIAL_MODEL of CATIA is a millimeter
model.
Position from which a CATIA V4 model
name is displayed in CATIA V4 status field.
X
Useful for names longer than 32 characters
SAM_TMPAXISDLNAME
tmpaxis-dlname
SAM_TMPAXISDSNAME
tmpaxis-dsname
SAM_TMPAXISNAME
tmpaxis-name
SAM_NAMETYP
modelnametype
SAM_LOGF
logfile
Name of the file were the log should go.
X
SAM_HELPERTOOL
helper
Name of the installed helper application
(xpdf, netscape, acroread)
X
SAM_HELPFILE
alias
Name of the online help file
X
SAM_CATIAVER
catiaversion
to set the current CATIA V4 version
X
project
Defines the name of the current CATIA V4
project
X
SAM_PROJECT
SAM_WPMODUS
wpmodus
Default workplane modus
0 - assembly
1 - default
workplane
X
2 - geometry
3 - multiselection
SAM_GEOPOS
geoposallowed
Geometry position support
0 - off
1 - on
SAM_APPDEF
-
SAM_RCFILE
-
SAM_REFRESH
autorefresh
Refresh the current CATIA V4 session after 0 - off
a SAM READ action
1 - on
X
SAM_ASSEMBLY_
SYMMETRY
assembly-symmetry
allow MOD POS->MOVE->SYMMETRY for 0 - off
assembly positions
1 - on
X
SAM_SETUPSTAT
setupstatus
reads configuration flags from
samdefault.obj at any module entry only
used for debug
X
name of the SAM configuration file (default
is samdefault.obj)
path and name of the user specific
configuration file (e.g.
$HOME/.samcatiarc.obj)
X
X
X
0 – off
1 – on
SAM supports CATIA V4 MERGE
SAM_MERGE
merge-support
SAM Installation & Administration Guide
- Support of MERGE->MERGE functionality
with SAM models:
1. Store model A (SAM or not) in CATIA
tmp buffer (with treasure box).
2. Activate the SAM model B you want to
merge model A in.
3. Go to MERGE->MERGE to merge the
model. The name of model B is changed to 0 - off
1 - on
the name of model A.
4. Go into SAM module. The name of SAM
model B is changed back to its original
name.
5. Update model B with
UPDATE->ACTIVE/ALL/GEOMETRY. Both
geometries of model A and B are updated
in SAM as model B.
Set SAM_MERGE/{merge-support} to 1 to
activate merge support.
X
27
SAM_LICMAN_START
license-startscript
SAM_LLD_AUTOSTART
lld-autostart
startsam
sam_maplist_file
license manager start script - default is
licman20
start local license daemon at first SAM
startup time
Start script of the SAM JAVA GUI
licman20
X
0 – off
1 – on
X
Default:
runsam.sh
X
Maplist file and additional parameters to
the script “startsam”.
The "maplist file" can be used to define a
list of CATIA maps that are allowed to store
the models imported at "STEP import". If
no "maplist file" is defined, then all CATIA
maps are allowed at "STEP import". See -m <maplist-file>
X
also chapter: Defining CATIA maps for
-d <start-dir>
STEP import.
The "start directory" is used in the file
selection boxes at "Open", "STEP Import"
and "STEP export". If no "start directory" is
defined, then $HOME is used instead in the
file selection boxes.
The "start directory" is used in the file
selection boxes at "Open", "STEP Import"
and "STEP export". If no "start directory" is
defined, then $HOME is used instead in the
file selection boxes.
SAM_STARTDIR
-
SAM_LANGUAGE
-
Set language of the SAM window.
Default is English (en).
SAM_JAVA
-
See chapter: Java runtime environment
SAM_JAVA_PARAMS
-
Define max. memory usage for Java
SAM_DEFAULT_VIEW
X
X
X
X
X
X
-
Use the selected view as default view,
accepting STEP files of any origin.
This requires a special license code.
smaragd/sam
If this variable is not set, SAM will detect
the proper view depending on the STEP file
origin.
X
X
SAM_LIBDIR
-
Library path of needed by the java
application
X
X
SAM_FILETYPE_FILE
-
Configuration file defining association
between non CATIA file type and
application program
X
X
SAM_CHECKOUT_FILE
-
Central locking file for check-out facility
X
X
SAM_LOCK_SERVER
-
Computer (host) and optionally port where
<host>:<port>
check-out lock server is running
X
X
SAM_CATIA_VERSION
-
SAM_CONNECTPORT
-
28
Adaptations for CATIA V5
Guide
en, fr
X
-Xmx256M
-Xmx1024M
For a CATIA V5 installation, the setting
must be "SAM_CATIA_VERSION=5",
5
otherwise the SAM PDM GUI does not
work in CATIA V5.
TCP/IP port for communication between
SAM CATIA V5 module and SAM PDM
GUI. You do not need to set this variable
unless there is a problem with the TCP/IP
connection.
X
X
SAM Installation & Administration
CMI_ENABLE_USEROOTAS
CMIWORKBENCH
CMI_ENABLE_SINGLEPAR
TMODUS_READ
SAM_CMI_ENABLE_UPDAT
EPOSITIONDIALOG
CMI_DISABLE_HIDESHOW -
SAM_CMIXMAP
-
SAM_ENABLE_SYNCHRON
IZECMD
SAM_CMI_ENABLE_VALIDA
TE_BEFORE_UPD
CMI_CONFIGURATION_FIL
E
SAM_CMI_DISABLE_ONEM
ODELINSTPERPARENT
SAM_CMI_ENABLE_UNIQU
EPARENTRULE
SAM Installation & Administration Guide
In case of the environment variable setting
"CMI_ENABLE_USEROOTASCMIWORKB
ENCH=ON" there will be in the CATIA V5
options
(Tools/Options/General/Compatibility/CMI)
an additional checkbox "Use existing
Product as temporary CMI Workbench
Product". If you activate this checkbox and ON
the checkbox "Use one temporary product
window for all CMI Workbench contents",
then SAM will add the structure from the
SAM PDM GUI to the already existing
product structure in CATIA, if there is
already a CATIA product structure existing
that was not loaded by SAM.
In case of the environment variable setting
"CMI_ENABLE_SINGLEPARTMODUS_RE
AD=ON" there will be in the CATIA V5
options
(Tools/Options/General/Compatibility/CMI)
ON
an additional checkbox "Single Part
Modus". If you activate this checkbox, then
SAM will load each CATPart from the SAM
PDM GUI in a single CATIA Part Design
workbench window (without CATProduct
structure).
In case of the environment variable setting
"SAM_CMI_ENABLE_UPDATEPOSITION
DIALOG=ON" the user can select at the
ON
"Update SAM PDM" operation which of the
changed transformation matrices are to be
saved.
In case of the environment variable setting
"CMI_ DISABLE_HIDESHOW =ON" the
ON
"Hide/Show" switch in the CATIA
specification tree will not be active.
The directory declared by
$SAM_CMIXMAP is the "exchange map"
directory. It has to exist with write
permission for every user. When loading
CATIA files, SAM copies the files at first
into the "exchange map" directory and then
loads them from there into CATIA.
SAM_CMIXMAP is declared in the
declaration file "samcatiaenv.txt" located in
the directory "config".
In case of the environment variable setting
"SAM_ENABLE_SYNCHRONIZECMD=ON
ON
" the "Synchronize/Update" functionality will
be active.
The environment variable setting
"SAM_CMI_ENABLE_VALIDATE_BEFOR
ON
E_UPD=ON" is mandatory for the
"Synchronize/Update" functionality.
The environment variable setting
"CMI_CONFIGURATION_FILE=$SAM_SC $SAM_SCRIPTD
RIPTDIR/CMIConfiguration.xml" is
IR/CMIConfigurat
mandatory for the "Synchronize/Update"
ion.xml
functionality.
In case of the environment variable setting
"SAM_CMI_DISABLE_ONEMODELINSTP
ERPARENT=ON" the
"Synchronize/Update" functionality
ON
supports multiple CATPart instances.
This setting is recommended for
"Synchronize/Update".
In case of the environment variable setting
"SAM_CMI_ENABLE_UNIQUEPARENTRU
LE=ON" at "Synchronize/Update" a
CATPart that is used by more than one
CATProduct will be created only once in a ON
primary folder and linked to other folders
where necessary.
This setting is recommended for
"Synchronize/Update".
X
X
X
X
X
X
X
X
X
X
29
SAM_SYNC_CATALOG_DIR -
SAM_ENABLE_UPDATEGE
O
SAM_ENABLE_ATTARCHIV
ECMD
SAM_CMI_REPLACE_WRO
NG_PRD_AUTO
SAM_ENABLE_DELETEPD
MCONTEXT
SAM_CMI_ENABLE_EDUFL
AG_CHECK
SAM_USE_ORIGINAL_V5_I
NSTANCE_NAME
30
Adaptations for CATIA V5
Guide
If the environment variable
“SAM_SYNC_CATALOG_DIR” points to a <CATIA
directory that contains CATIA catalogue
catalogue
parts, "Synchronize/Update" will handle
directory>
these parts as read-only and deactivated.
In case of the environment variable “SAM_
ENABLE_UPDATEGEO=ON” the “Update
ON
Part in SAM PDM” functionality will be
active.
In case of the environment variable “SAM_
ATTARCHIVECMD=ON” the
“Creates/Attaches an Archive” functionality ON
will be active (relevant for the GDG view
only).
In case of the environment variable
“SAM_CMI_REPLACE_WRONG_PRD_AU
TO=ON” a validation message during subON
compositions loading will be suppressed
(relevant for the GDG view only, FPE
i3181).
In case of the environment variable
“SAM_DELETEPDMCONTEXT=ON” the
ON
“Delete PDM Context” functionality will be
active.
In case of the environment variable
“SAM_CMI_ENABLE_EDUFLAG_CHECK
=ON”, CATIA files cannot be saved in SAM ON
if it is detected that they were created with
a CATIA education license.
In case of the environment variable
“SAM_USE_ORIGINAL_V5_INSTANCE_N
ON
AME=ON”, the original CATIA V5 instance
names are kept at “Synchronize SAM”.
X
X
X
X
X
X
X
SAM Installation & Administration