1
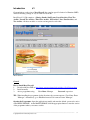
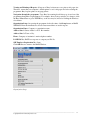
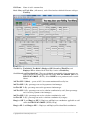
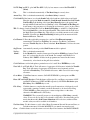
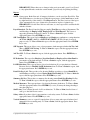
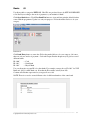
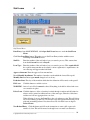
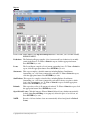
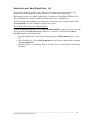
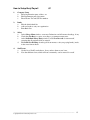
Beryl Payroll
for Windows
User Manual
Gateway Pictures Ltd.
Software Division
21 Standfast Street, Kokomlemle
P. O. Box AN 12243
Accra, GHANA
Tel.: +233 24 438 3009
http://www.gatewaypicturesltd.com/index_files/Software.htm
Email: mailto:[email protected]?subject=BGS_Response
___________________________________________________________________________________________________
1
Contents
#1
Introduction
3
#2
Salary
5
#3
Banks
9
#4
Staff loans
10
#5
Archives
12
#6
Data Security
14
#7
How to Setup
15
___________________________________________________________________________________________________
Copyright 2000-2014 © Gateway Pictures Ltd.
2
Introduction
#1
Congratulations on choosing of Beryl Payroll, the complete payroll solution for Ghanaian SME's.
This user-friendly package, is easy to learn in a few hours.
Beryl Payroll 11.5.0 comprises—Salaries, Banks, Staff Loans, Payroll Archive, First Tier
Archive, Second Tier Archive, Third Tier Archive, SSF Archive, Prov. Fund Archive, and
Tax Archive. All these modules or sections are integrated to each other.
Main Window
General
How to Install Beryl Payroll:
1.
Download the free MSI at: http://www.gatewaypicturesltd.com/index_files/Software.htm
2
Install normally
3.
Access programme using:
User Name: Manager
Password: supervisor
TIP: When installing the programme for the first time, the systems requests a User Name. Enter
"Manager". Alternatively, go to Edit>Preferences>User name and enter "Manager".
Opening the Programme: Open the application normally and enter the default password to arrive
at the MAIN WINDOW. At the MAIN WINDOW click the appropriate button to enter the section
of the programme where you want to work in.
___________________________________________________________________________________________________
Copyright 2000-2014 © Gateway Pictures Ltd.
3
Viewing and Printing of Reports: All reports of Beryl software are set to print on A4 paper size.
Therefore, ensure that your computer’s default printer is set for A4 paper size before starting the
programme. Beryl reports prints on any page printer.
Navigation through the programme: Users Beryl Accounting should always go in and out of the
programme through the assigned buttons. For example, when closing a window, it is better to click
the Beryl Close button or press ENTER key, as the case may be, instead of clicking the Windows
close button.
Organization Setup: On opening the programme for the first time, click Setup button on MAIN
WINDOW. Enter the information as shown. Data entered here are used in reports.
Organization Name: Company or organization name.
Address Line 1: Street Address or P. O. Box number.
Address Line 2: Town or City.
Phone: Company or institution’s main telephone number.
PAYE File No.: PAYE not corporate or company tax File No.
SSF Employer Registration No.: Same.
Click OK button to return to the MAIN Window.
Organization Setup
___________________________________________________________________________________________________
Copyright 2000-2014 © Gateway Pictures Ltd.
4
Salary
#2
From the MAIN WINDOW, click Open Salaries button to reach the Salary Menu.
Salary Menu
NOTE: Before starting to use this software for the first time, ensure that Beryl Payroll Setup
(page 3) is completed. Also Update Banks and create New Banks (page 8) to suit your purposes.
Click Salary Update button. A dialogue box will appear to check whether you have printed all
reports and filed your Payroll for the last month. This is to ensure that monthly data are properly
recorded and filed for reference purposes. If you are using Payroll for the first time, just click OK.
Otherwise, click CANCEL, which returns you to Payroll Menu where you may print reports and
file the month’s payroll.
Enter Receipts: Click button to enter Receipt No. and Date for payments of deductions for
Income Tax, 1st Tier, 2nd Tier, etc. made for current month's pay, before Filing
and processing of the following month's pay.
Beryl Payroll offers nine fixed Deductions and six user-definable Deductions (D1 to D6:Medical
Insurance may also be changed). There are also seven fixed Allowances and four user-definable
Allowances (A1 to A4). At the Payroll Menu, define your additional Deductions and Allowances
as the case may be, before entering data. It is advisable to be consistent in the use of user-definable
Deductions and Allowances.
In addition there are two Tax Relief fields. Tax Relief, Employee SSF deductions (Second Tier
and Third Tier) and Employee PF, reduce the Taxable Pay before the calculation of Tax.
At the Individual Salary Entry window, click New Record button. This creates a new payroll
record for an individual. Click Delete Record to delete an individual's pay record.
Staff No.:
This is an automatic serially set number starting from 1001. It is not changeable and
a deleted number cannot be reused.
___________________________________________________________________________________________________
Copyright 2000-2014 © Gateway Pictures Ltd.
5
Full Name:
Name of staff—surname first.
Basic Salary and Total Allow. (Allowances), total of fixed and user defined Allowance add up to
Total Pay.
Taxable Pay: Tax Relief 1, Tax Relief 2, Employee SSF (Second and Third Tier) and
Employee PF are deducted from Total Pay to arrive at Taxable Pay.
Social Security and Provident Fund:. These are calculated automatically, if rate percentages are
entered. NOTE: Select the applicable SSF Group: ACT 766 GROUP (18.5%) or
PNDCL 247 GROUP (17.5%). Select NONE for none permanent staff or casual
labour.
3rd Tier SSF % (Maxi) : - preset at 16.5%, the current maximum allowed by law.
2nd Tier SSF % (P):- percentage rate used in payment to fund manager.
1st Tier SSF % (P):- percentage rate used in payment to fund manager.
3rd Tier SSF % (C):- percentage rate used to calculate contribution by staff. (Same percentage
rate is used for payment to fund manager.)
2nd Tier SSF % (C):- percentage rate used to calculate contribution by staff.
1st Tier SSF % (C):- percentage rate used to calculate contribution by company.
Emp'yee. SSF % and Emp'yer. SSF %: Employee and Employer contributions applicable to staff
still in the PNDCL 247 GROUP (17.5%) Group.
Emp'yee PF % and Emp'yer PF% :- Employee and Employer Provident Fund contributions.
___________________________________________________________________________________________________
Copyright 2000-2014 © Gateway Pictures Ltd.
6
NOTE: Emp'yee PF %, plus 3rd Tier SSF % (C), by law, must not exceed 3rd Tier SSF %
(Maxi).
Tax:
This is calculated automatically, if Tax Rate Setup is correctly done.
Annual Pay: This is calculated automatically, when Basic Salary is entered.
Click Bank ID (blue button) to select the Bank Code of the bank into which salary would paid.
Enter the appropriate Bank Account No., Bank Branch, Branch Sort Code. Bank
List Heading is the heading of the letter Beryl Payroll prints to the paying bank
through which all bank transfers for Net Pay is done. Edit Bank List Heading pulldown menu to suit your purpose, following the set format (no_space_in_the_names).
TIP: To change a batch of Bank ID's from one Bank List Heading to another is a simple matter.
First click Bank ID to select the desired Bank ID. Then click inside the field below
the Bank ID and press Enter key. This will give you all the current records on that
Bank ID. Select the new Bank List Heading from the pull-down menu and click
Paste to All button. That's all.
Car Element %. Enter the applicable percentage for a staff and Car Element Amount is
automatically calculated on Total Pay. In contrast to Tax Relief, Car Element
increases Taxable Pay before Tax is calculated. Rent Element % follows the same
pattern.
Staff Loans: Automatically entered provided Staff Loans module is updated.
Net Pay:
This is calculated automatically.
Month.:
In the Month field, enter the current payroll month in dd/MM/yyyy format. Check
that “dd” is always the first day of the month. For example enter 01/02/13 for
February 2013. NOTE: All dates in the programme are entered in this format.
Alternatively, select date from the pull-down calendar.
Click Find button to find and update a particular record of a staff. Press ENTER key to exit
Total Allo. 1 and Total Allo. 2: Total Allowances 1 aggregates all allowances included in Taxable
Pay. Total Allowances 2 aggregates all allowances taxed separately and not
included in Taxable Pay. User-definable allowance, A4 is reserved for tax-exempt
allowance.
Go to Menu: Click Close button to return to SALARY WINDOW to print reports and File
Salary.
Enter SSF and PAYE Receipts: Click this button to Receipts Nos. and Dates on payment of SSF
and PAYE deduction to SSNIT and IRS respectively. NOTE: Do this before you
File Salary. Press ENTER key to exit.
File Salary:
Click this button to complete the month’s payroll transaction. A dialogue box will
appear with a warning to remind you about what needs to be done before filing.
Click CANCEL to either print reports or enter receipts/dates or other data;
otherwise click OK button to File Salary.
WARNING: The system will prevent you from skipping to File Salary a month's
salary. You won't also be able to file a month's salary twice. Note that failing to file
means that the month's Staff Loans deductions will not be done, neither will the
month's salary records be available in all Archives.
Tax Rate Setup: Use this feature to easily adjust Ghana Government Personal Income tax Rates, as
and when announced. Note that MONTHLY, not annual, rates must be used.
Close: Click this button to end the current session in Payroll and return to the MAIN WINDOW.
___________________________________________________________________________________________________
Copyright 2000-2014 © Gateway Pictures Ltd.
7
IMPORTANT: Where there are no changes in the previous month’s payroll, you’ll need
to only update Month, to make the current month’s payroll ready for printing and filing.
Reports.
NOTE: Some reports, Bank Lists and all statutory deductions, can be saved into Excel files. First
click View button to view the report. When the report pauses, click Cancel button (at the
top right hand side of the window). Click Export button. The Excel version of the report
opens automatically for you to format it for presentation, in place of printed copy.
IMPORTANT: Save the Excel file in a new name, as a new export will overwrite the file
with the old name.
Payroll Analysis: The Payroll Analysis Report compiles Total Pay according to Department. The
main headings are Employer SSF, Employer PF and Total Expense. This serves as
supporting document for Payroll Journals. To View or Print this report, click the
appropriate button. Press ENTER key to exit.
SSF Contribution: This report lists both Employee and Employer contributions, sorting them into
ACT 766 GROUP (18.5%) or PNDCL 247 GROUP (17.5%) Groups for records
purposes only. To View or Print this report, click the appropriate button. Press ENTER
key to exit.
SSF Payment: This report allows you to select payment to fund managers whether 1st Tier, 2nd
Tier, or PNDCL 247 Group. To View or Print this report, click the appropriate button.
Press ENTER key to exit
3rd Tier SSF : To View or Print this report, click the appropriate button. Press ENTER key to
exit
PF Deductions: The report lists Employee Provident Fund and Employer Provident Fund for
presentation to the fund manager. To View or Print this report, click the appropriate
button. Press ENTER key to exit.
PAYE Deductions: This report produces a list of tax deductions. It is a reproduction of Internal
Revenue Service’s Monthly PAYE Deductions form. To View or Print this report, click
the appropriate button. Press ENTER key to exit.
Detail Net Pay 1 & 2: These produce a list showing Net Pay according to selected Bank ID (1)
and Net Pay according to selected Paying Bank List Heading (2). To View or Print this
report, click the appropriate button. Press ENTER key to exit.
Summary Net Pay: This produces a summary list showing current Bank List Heading Net Pay.
To View or Print this report, click the appropriate button. Press ENTER key to exit
Medical Insurance: The report produces a list showing Insurance deductions. To View or Print,
click the appropriate button. Press ENTER key to exit. (You may the change heading to
suit other purposes.)
Staff Loans: View or Prints the total of all loan deductions. To View or Print, detailed loans of
staff, go to the Staff Loans section.
Salary Advice: It produces slips for presentation to each salary earner. To View or Print, click the
appropriate button. Press ENTER key to exit.
Vertical Summary: serves as a payroll journal where all every entry and report is balanced and
summarized for accounting entry. To View or Print, click the appropriate button. Press
ENTER key to exit.
___________________________________________________________________________________________________
Copyright 2000-2014 © Gateway Pictures Ltd.
8
Banks
#3
Use this module to categorize NET PAY. Here ID's are produced for use by NET PAY REPORTS
to list Net Pay according to the mode of payment to your institution's Bank.
Click Open Bank button. Click View Bank List button to view and later print the default list that
comes with the programme. Update it to suit your purposes. Follow the method below to do your
category.
Bank Menu
Click Bank Entry button to enter data. Follow the method below to do your category. Of course,
there are only two modes of payment—Cash and Cheque. But the cheques may be paid to several
different banks.
ID “100”
ID “101”
ID “102”
— Cash
— Strait Bank
— Myself Bank
Use your discretion to enter ID’s for other banks. For example you may choose ID “103” for XYZ
Bank and “104” for ABC Bank, etc. Note that the ID continues serially from 103.
Continue till all banks represented on your payroll are coded.
NOTE: There is no need to create different codes for different branches of the same bank.
___________________________________________________________________________________________________
Copyright 2000-2014 © Gateway Pictures Ltd.
9
Staff Loans
4
Staff Loans Menu
Data Entry: from MAIN WINDOW, click Open Staff Loans button to reach the Staff Loan
Menu.
Click New Loan Entry button. This takes you to Staff Loan Entry window with the cursor
remaining in the Staff No. field.
Staff No.:
Enter the number of the staff whose loan you wand to process. This extracts data
from both Current Records in Payroll.
Loan Type: Enter the number of the staff whose loan you wand to process. This required field
has a pull-down menu that can be edited to suit an organisation’s requirements. An
error message will appear when left blank.
Approved Amount: Enter the approved loan amount here.
No. of Monthly Installment: The number of months over the which the loan will be repaid.
Monthly Interest: Interest per month charged on loan, if any.
Deduction Start: First day of the month in which the first deduction will be made on the payroll.
File Loan:
Click this button to end this session.
WARNING: Once a loan is filed it cannot be edited. If anything, it should be deleted and a new
one created in its place.
Delete Loan: Click this button to delete a loan that is retired through complete and full refund or
when a staff is granted an additional loan of the same type, where the old balance
and the new loan are aggregated into one loan.
When deleting a loan, use the Loan No. as the only reference point. This will delete
all records referring to that loan. An error message will appear when deleting a loan
with and outstanding balance. Note that all records of deleted loans are kept in
Deleted Loans.
New Refund Entry: Click this button and follow the instructions to enter a full or part cash
refund of a loan. This will be treated as though it was a normal loan deduction.
___________________________________________________________________________________________________
Copyright 2000-2014 © Gateway Pictures Ltd.
10
Reports
From STAFF LOAN MENU click Open Loan Reports button. This takes you to STAFF LOANS
REPORTS MENU.
Deductions: The Deductions Report compiles a list of current staff loan deductions for monthly
entries in the Payroll. To View or Print this report, click the appropriate button.
Press ENTER key to exit.
Loans:
The Loans Report compiles a list of current outstanding loans. To View or Print this
report, click the appropriate button. Press ENTER key to exit.
Statements: This report compiles a detailed statement, including Balance, Installments
Outstanding, etc. of all loans contracted by each staff. To View or Print this report,
click the appropriate button. Press ENTER key to exit.
Staff Debtors: This report also compiles a detailed lists, including Balance, Installments
Outstanding, etc. of all loans contracted by each staff. It shows at a glance, which
loan is due for retirement, etc. To View or Print this report, click the appropriate
button. Press ENTER key to exit.
Refunds:
This report show a list of all current cash refunds. To View or Print this report, click
the appropriate button. Press ENTER key to exit
Open Deleted Loans: Click this button to View or Print all deleted loans, whether automatically
deleted during Payroll Filing or one purposely deleted in place of an old loan, etc.
Press ENTER key to exit.
NOTE:
Records of all zero-balance loans are automatically deleted and placed in Deleted
Loans.
___________________________________________________________________________________________________
Copyright 2000-2014 © Gateway Pictures Ltd.
11
Archives
#5
NOTE: Monthly Payroll records that are not Filed will not appear in any Archive Reports.
Payroll Archive
Refer to page 7, (Salary) for details on Payroll Archive reports.
1st Tier Archive
1stTier Archive Menu
From the MAIN WINDOW, click Open 1st Tier Archive button to reach the First Tier Archive
Menu.
Enter Receipts: Click this button to enter records of receipts for 1st Tier payment to the Fund
Manager. This is for payments done after Filing of current month's pay, or for
possible correction of errors in receipt records.
Reports
Staff Annual Report: This report lists 1st Tier SSF Payments, sorted by Deduction Year and
Contribution Month. To View or Print this report, click the appropriate button. Press
ENTER key to exit.
Staff Summary Report: This is the same as the Staff Annual Report but sorted only by
Deduction Year.
Company Report: This provides a detail report to statutory bodies and pension fund managers,
deductions, receipts and receipt dates.
TIP: Staff reports should printed either as PDF soft copies or hard copies for all staff annually.
___________________________________________________________________________________________________
Copyright 2000-2014 © Gateway Pictures Ltd.
12
In respect of 2nd Tier Archive, 3rd Tier Archive, SSF Archive (for PNDCL 247 Social Security
option), Prov. Fund and Inc. Tax Archive, follow the same procedure for 1st Tier Archive to
access all the other Archive reports and to Enter receipts.
___________________________________________________________________________________________________
Copyright 2000-2014 © Gateway Pictures Ltd.
13
Security of your Beryl Payroll files
#6
Power failures, hardware problems, and other factors can damage your programme files. In its
simplest form, backing up means copying your file(s) to another disk for safekeeping.
Many backup systems are available on the market—external drives, Flash Disks, DVD's etc. Just
drag your Beryl Payroll folder, from My Documents Folder into your backup drive.
You'll also need to install adequate power protection systems and set up a routine method to back
up Beryl Payroll files. This is imperative for the safety of data.
How to Reinstall Beryl Payroll from Back-up Files
Reinstalling Beryl Payroll from the your original Windows Installer setup file, does not come with
your previously entered Beryl Payroll data. Therefore, you'll have to reinstall from the Beryl
Payroll backup drive. Follow these steps:
•
•
•
Drag the "Beryl Payroll" folder from your back-up drive to My Documents folder on your
PC.
Open "Beryl Payroll" folder in My Documents folder and create a shortcut of the executable
file, Beryl Payroll.exe.
Drag the shortcut to your desktop. That's it. You are ready to re-roll, with all your backed up
data intact.
___________________________________________________________________________________________________
Copyright 2000-2014 © Gateway Pictures Ltd.
14
How to Setup Beryl Payroll
#7
1.
Company Setup
a.
Enter Organization name, address, etc
b.
Edit Departments pull-down menu
c.
Enter Income Tax and SSF file numbers
2.
Banks
a.
Edit the default bank list
b.
Add new banks to suit your organization
c.
Print Bank List
3.
Salary
a.
At the Salary Menu window, create new Deductions and Allowances headings, if any.
b.
Check that Tax Rate is correct, according to government current rates.
c.
At the Individual Salary Entry window, create New Records for current staff,
ensuring that all required fields are entered.
d.
Edit Bank List Heading, from the pull-down menu, to suit your paying bank(s) needs,
in the exact format shown.
4.
Staff Loans
a.
Get the list of Staff Loan balances, if any, and use them as new loans.
b.
Note that different loans, which will run concurrently, can be entered for a staff.
___________________________________________________________________________________________________
Copyright 2000-2014 © Gateway Pictures Ltd.
15