1
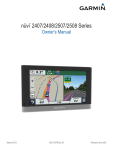
nüvi® 295W owner’s manual © 2010 Garmin Ltd. or its subsidiaries All rights reserved. Except as expressly provided herein, no part of this manual may be reproduced, copied, transmitted, disseminated, downloaded or stored in any storage medium, for any purpose without the express prior written consent of Garmin. Garmin hereby grants permission to download a single copy of this manual onto a hard drive or other electronic storage medium to be viewed and to print one copy of this manual or of any revision hereto, provided that such electronic or printed copy of this manual must contain the complete text of this copyright notice and provided further that any unauthorized commercial distribution of this manual or any revision hereto is strictly prohibited. Information in this document is subject to change without notice. Garmin reserves the right to change or improve its products and to make changes in the content without obligation to notify any person or organization of such changes or improvements. Visit the Garmin Web site (www.garmin. com) for current updates and supplemental information concerning the use and operation of this and other Garmin products. Garmin®, the Garmin logo, and nüvi® are trademarks of Garmin Ltd. or its subsidiaries, registered in the USA and other countries. nüMaps Guarantee™ is a trademarkof Garmin Ltd. or its subsidiaries. These trademarks may not be used without the express permission of Garmin. Microsoft®, Microsoft® Word, Excel®, and PowerPoint® are registered trademarks of Microsoft Corporation in the United States and/or other countries. Mac® is a registered trademark of Apple Computer, Inc., registered in the U.S. and other countries. microSD™ is a trademark of SanDisk or its subsidiaries. Panoramio™ is a trademark of Google Inc. Wi-Fi® is a registered mark of the Wi-Fi Alliance. Adobe® is a registered trademark of Adobe Systems Incorporated in the United States and/or other countries. Linux® is the registered trademark of Linus Torvalds in the U.S. and other countries. Other trademarks and trade names are those of their respective owners. MPEG Layer-3 audio coding technology licensed from Fraunhofer® IIS and Thomson®. Introduction Introduction The nüvi 295W is a multi-media device with integrated navigation and services. Contacting Garmin Product Support® Contact Garmin Product Support if you have any questions while using your device. Go to www.garmin .com/support, or call (913) 397.8200 or (800) 800.1020. Registering Your Device Help us better support you by completing our online registration today: • Go to http://my.garmin.com. • Keep the original sales receipt, or a photocopy, in a safe place. nüvi 295W Owner’s Manual Updating the Software Go to www.garmin.com/support. nüMaps Guarantee™ To receive one free map update (if available), register your device at www.garmin.com/support within 60 days of acquiring satellites while driving with your device. You are not eligible for the free map update if you register by phone or wait longer than 60 days after the first time you acquire satellites while driving with your device. For more information, go to www.garmin.com/numaps. Buying Additional Maps 1. Go to www.garmin.com. 2. Click Maps. i Table of Contents Table of Contents Introduction........................... i Contacting Garmin Product Support®. ...................................i Registering Your Device...............i Updating the Software..................i nüMaps Guarantee™....................i Buying Additional Maps................i Getting Started..................... 1 Device Features......................... 1 Setting Up the Device................. 2 Using the Home Screen............. 6 Orienting the Screen.................. 6 Status and Notification Icons...... 7 Turning the Device On and Off............................................ 8 Tips and Shortcuts...................... 8 Using the Touchscreen............... 8 Arranging Shortcuts.................... 8 Using the On-screen Keyboard.................................. 9 ii About the Headphones............... 9 Acquiring Satellites................... 10 Changing Audio Settings.......... 10 About the Automatic Screen Lock........................................11 Getting Help..............................11 Finding Destinations......... 12 Finding Your Present Location................................. 12 Changing the Search Area....... 13 About Points of Interest............ 13 Working with Found Locations................................ 14 Setting a Home Location.......... 15 Finding Local Businesses......... 15 Finding an Address................... 16 About Saved Locations............ 16 Viewing Recently Found Locations................................ 18 Finding Cities............................ 19 Navigating with Photos............. 19 Entering Coordinates................ 19 nüvi 295W Owner’s Manual Table of Contents Finding Intersections................ 20 About Extras............................. 20 About the Map Pages........ 21 Browsing the Map..................... 21 Navigating in Driving Mode...... 22 Viewing Trip Information........... 24 Navigating in Walking Mode..... 25 About Custom Routes.............. 25 Viewing Your Trip Log............... 27 Using E-mail....................... 28 Adding an E-mail Account........ 28 Viewing an E-mail Message..... 28 Sending an E-mail Message.... 29 Searching a Folder................... 31 Managing E-mail Settings........ 31 Managing Your Contacts.......... 32 Browsing the Web............. 35 Using the Web Browser............ 35 Setting Your Browser Home Page....................................... 36 nüvi 295W Owner’s Manual Adding a Web Page as a Bookmark............................... 36 Viewing Your Web Page History.................................... 36 Changing Browser Settings...... 37 Playing Music.................... 38 Music Player File Types............ 38 Playing a Song......................... 38 Changing the Music Player View....................................... 39 About Playlists.......................... 39 Searching the Music Player...... 40 Taking and Viewing Pictures.............................. 41 Taking a Picture........................ 41 About Picture File Types........... 41 Viewing Pictures....................... 42 Viewing a Slideshow................. 42 Deleting Pictures...................... 42 Sharing Pictures....................... 42 Setting the Wallpaper............... 43 iii Table of Contents Starting a Route to a Picture.... 43 Organizing Your Life......... 44 Using the Calendar................... 44 Checking the Weather Forecast................................. 45 Using the Clock........................ 46 Using the Converter................. 48 Using the Calculator................. 49 Using Notes.............................. 49 About the Checklist.................. 50 Connecting with Other Devices............................... 52 About File Transfer Mode......... 52 About Wi-Fi............................... 52 Customizing Your Device................................. 54 General Device Settings........... 54 Security Settings...................... 54 Date and Time Settings............ 55 Audio Settings.......................... 55 Navigation Settings.................. 56 iv Application Settings.................. 57 Display Settings........................ 57 Viewing Software Information............................. 58 Restoring Settings.................... 58 Clearing All User Data.............. 58 Appendix............................ 59 About Satellite Signals............. 59 Battery Information................... 59 Mounting on Your Dashboard............................. 60 Removing the Device, Cradle, and Mount................. 61 Resetting the Device................ 61 Caring for Your Device............. 62 Specifications........................... 62 Troubleshooting........................ 64 Index................................... 65 nüvi 295W Owner’s Manual Getting Started Getting Started Warning See the Important Safety and Product Information guide in the product box for product warnings and other important information. Device Features ➊microSD™ card slot (under cap) ➊ ➋Contacts (for the cradle) ➌Mini-USB connector ➋ ➍Power key ➎Headphone/audio out ➍ ➎ ➏ connector ➏Volume up/down keys ➐Camera key ➌ NOTE: The headphone/audio out connector must be used with either the Garmin 2.5 mm to 3.5 mm adapter or the Garmin stereo headset with microphone. nüvi 295W Owner’s Manual ➐ 1 Getting Started Setting Up the Device 1. Install the memory card (optional) (page 2). 2. Install the battery (page 2). 3. Charge the battery (page 3). 4. Mount the device (page 4). 5. Acquire satellites (page 10). 6. Add an e-mail account (optional) (page 28). Installing the Memory Card You can store files, such as MP3s and JPEGs, on a memory card in your device (optional). 1. Open the cap over the memory card slot. 2. Insert the memory card in the memory slot with the gold contacts facing toward the device screen. 2 Installing the Battery 1. Press down firmly on the battery cover. 2. Slide the battery cover off the back of the device. Battery cover 3. Locate the lithium‑ion battery that came in the product box. 4. Locate the metal contacts on the end of the lithium‑ion battery. nüvi 295W Owner’s Manual Getting Started 5. Insert the battery so that the metal contacts on the battery match up with the metal contacts inside the battery compartment. Battery 6. Slide the battery cover onto the back of the device. nüvi 295W Owner’s Manual Charging the Battery Notice Your device will not charge if the temperature has exceeded 113°F (45°C). If the device is mounted in the windshield, remove it from the mount and place it somewhere out of direct sunlight to allow the battery to charge. NOTE: To ensure optimal performance, you should charge the battery for at least four hours before using the device on battery power for the first time. If you completely discharge the battery, recharge it for at least 20 minutes before turning on your device. 3 Getting Started • Use the vehicle power cable connected to the cradle, with the device in the cradle (preferred) (page 4). • Use the vehicle power cable connected directly to the device. • Use the USB cable connected to a computer. • Use the battery charger accessory • Use the AC power adapter accessory. TIP: For more information about accessories, go to http://buy.garmin .com. Mounting the Device Warning This product contains a lithium-ion battery. To prevent the possibility of personal injury or product damage caused by battery exposure to extreme heat, remove the device from the vehicle when exiting or store it out of direct sunlight. Notice Before mounting the device, see the Important Safety and Product Information guide for information about laws pertaining to windshield mounting. Tip: For information about removing the device from the mount, see page 61. 4 nüvi 295W Owner’s Manual Getting Started 1. Plug the vehicle power cable into the power connector. Suction cup arm Cradle Vehicle power cable 2. Remove the clear plastic from the suction cup. 3. Clean and dry your windshield and the suction cup with a lint-free cloth. 4. Place the suction cup on the windshield. 5. Flip the lever back, toward the windshield. 6. Snap the cradle onto the suction cup arm. nüvi 295W Owner’s Manual Lever 7. Fit the gold contacts on the side of your device into the cradle. 8. Tilt the device back until it snaps into the cradle. 9. Plug the other end of the vehicle power cable into a power outlet in your vehicle. 5 Getting to Know Your Device Using the Home Screen ➋ ➊ ➊Touch a shortcut icon in the scrolling menu to start an application. Touch and drag the bar to scroll through all of the shortcuts. ➋Touch to find and navigate to a location. ➌Touch to view the map. ➌ Orienting the Screen Rotate the device to view in horizontal (wide-screen) or vertical (portrait) mode. 6 nüvi 295W Owner’s Manual Getting to Know Your Device Status and Notification Icons Icon Description An alarm is set. Wi-Fi® connectivity. This icon appears when the device is using Wi-Fi. Time of day. The time is based on the location of the device or the selected time zone. GPS satellite strength. The more colored bars that appear, the stronger the satellite signal. If there is no satellite signal or the device is in simulator mode, a red “X” appears. Battery charge level (page 59). External power is connected, and the battery is charging. External power is connected, and the device is fully charged. Data transfer activity. nüvi 295W Owner’s Manual 7 Getting to Know Your Device Turning the Device On and Off Press and hold the Power key. Tips and Shortcuts • Touch to return to the previous screen. • Touch and hold from any screen to return to the Home screen. • Touch and to see more choices. Quickly tap these buttons to scroll faster. • Touch and hold or to scroll slowly. to view a menu • Touch of options for the screen or application. 8 Using the Touchscreen • Touch and drag your finger to slowly scroll the screen. • Scroll the screen both vertically and horizontally, when available. • Touch, drag, and quickly remove your finger (flick the screen) to quickly scroll the screen. • Touch the screen to stop scrolling. Arranging Shortcuts You can change the order of shortcuts in the scrolling menu. 1. From the scrolling menu, touch Settings > Applications > Main Menu Order. 2. Touch an item. 3. Touch . nüvi 295W Owner’s Manual Getting to Know Your Device Using the On-screen Keyboard A keyboard appears when you need to enter text. • • • • • • • Touch a key to enter text. Touch to backspace. Touch to shift. Touch to turn on caps lock. Touch to turn off caps lock. Touch to close the keyboard. Touch to display numbers and symbols. • Touch or to display additional symbols. • Touch to display an alphabetic keyboard. • Touch the text or numbers on the screen to insert a cursor. nüvi 295W Owner’s Manual Using Text Completion The device includes a text-completion feature that recognizes words you are typing. 1. Begin typing a word. The closest match appears in blue. 2. Continue typing. The text-completion words may change or disappear. 3. Touch Auto to accept a word. About the Headphones You can use wired headphones to listen to audio. Connecting the Headphones Connect the 2.5 mm headset connector to the audio-out connector on the device. 9 Getting to Know Your Device Acquiring Satellites Before you can navigate with your device, you must acquire satellites. Acquiring satellite signals can take a few minutes. 1. Turn on your device. 2. If necessary, go outdoors to an open area, away from tall buildings and trees. Changing Audio Settings You can change the audio settings for certain features, such as navigation and media. Changing the Volume Press the Volume Up or Volume Down key. 10 Muting the Device 1. Press the Volume Up or Volume Down key. 2. Touch Mute. When the device is set to mute, appears when the screen is locked. Setting the Device to Vibrate You can set the device to vibrate to indicate new e-mail messages as well as calendar and clock alarms. 1. From the scrolling menu, touch Settings > Audio > Vibrate. 2. Touch an option. Tip: You can set the device to only vibrate when the volume has been muted. 3. Touch OK. When the device is set to vibrate, appears when the screen is locked. nüvi 295W Owner’s Manual Getting to Know Your Device About the Automatic Screen Lock The device automatically locks if you do not use it for a specified amount of time. If the device is in the mount with external power, the screen will not automatically lock. Manually Locking the Device Press the Power key. Unlocking the Device 1. Quickly press the Power key, if necessary. 2. Double-tap . nüvi 295W Owner’s Manual Adjusting the Screen Timeout Length 1. From the scrolling menu, touch Settings > Display > Auto Lock. 2. Touch a time. 3. Touch OK. Getting Help 1. From the scrolling menu, touch Tools > Help. 2. Touch a topic. 11 Finding Destinations Finding Destinations Your device provides several different categories you can use to find destinations. Before you can find destinations, you must acquire satellites (page 10). Finding Your Present Location You can use the Where Am I? page to view information about your location. This is a helpful feature if you need to tell emergency personnel your location. From the scrolling menu, touch Tools > Where Am I?. Tip: You can also open the Where Am I? page by touching the vehicle icon on the map. 12 Sending Your Location in an E-mail Message Before you can send your location in an e-mail message, you must create an e-mail account (page 28). 1. From the scrolling menu, touch Tools > Where Am I? > > Save Location. 2. Enter a name for the location. 3. Touch Done. 4. From the Home screen, touch Where To? > Favorites > All Categories. 5. Touch your location. > Send Location. 6. Touch 7. Touch To. 8. Add a recipient. 9. Touch Done. 10.Touch Message. 11.Enter a message. 12.Touch Done > Send. nüvi 295W Owner’s Manual Finding Destinations Changing the Search Area By default, your device finds locations near your present location. You can also search for a location near a different city, near your current route, or near your destination. 1. From the Home screen, touch Where To? > > Near. 2. Touch an option. About Points of Interest The detailed maps loaded in your device contain points of interest, such as restaurants, hotels, and auto services. Finding by Category 1. From the Home screen, touch Where To? > Points of Interest. 2. Touch a category. 3. Touch a subcategory, if necessary. Tip: To narrow the search, touch Spell, enter the text, and touch Done. A list of items near your location appears. 4. Touch an item. Finding by Spelling the Name 1. From the Home screen, touch Where To? > Points of Interest > Spell Name. 2. Enter all or part of the name. 3. Touch an item. nüvi 295W Owner’s Manual 13 Finding Destinations Working with Found Locations ➊ ➋ ➌ After you find a location, several options appear. ➊Touch to view the location on the map. ➋Touch to save the location or to send the location in an e-mail message. ➌Touch to create a route to the location. 14 Starting a Route to a Location 1. Find a location. 2. Touch Go!. 3. Touch a navigation mode, if necessary. Sending a Location in an E-mail Message Before you can send a location in an e-mail message, you must create an e-mail account (page 28). 1. 2. 3. 4. 5. 6. 7. 8. Find a location. Touch > Send Location. Touch To. Add a recipient. Touch Done. Touch Message. Enter a message. Touch Done > Send. nüvi 295W Owner’s Manual Finding Destinations Setting a Home Location You can save a home location and quickly generate a route to it. 1. From the Home screen, touch Where To? > Home. 2. Select an option. Starting a Route to Your Home Before you can create a route to your home location, you must set your home location (page 15). Touch Where To? > Home > Go!. nüvi 295W Owner’s Manual Finding Local Businesses Before you can use this service, you must have a Wi-Fi connection (page 52). This service is not available in all areas. You can search for local businesses by spelling the name of a location or by spelling the name of a category, like “salon” or “coffee.” 1. From the Home screen, touch Where To? > Local Search. 2. Select an option: • Touch Spell Name to enter a search term. • Touch an item to search by category. 3. Touch an item. 15 Finding Destinations Finding an Address NOTE: Depending on the version of the built-in map data on your device, the button names and the order of steps could be different from the following steps. 1. From the Home screen, touch Where To? > Address. 2. If necessary, change the state, the country, or the province. 3. Touch Search All. TIP: You can touch Spell City to search by city or postal code. Not all map data provides postal code searching. 4. Enter the number for the address. 5. Touch Done. 6. Enter the street name. 7. Touch Done. 8. Touch the street, if necessary. 16 9. Touch the city, if necessary. 10.Touch the address, if necessary. About Saved Locations You can save and edit locations and assign them to categories. Saving a Location 1. Find a location. 2. Touch > Save. The location is saved. Saving Your Location 1. From the Home screen, touch View Map. 2. Touch the vehicle icon. 3. Touch > Save Location. 4. If necessary, enter a name, and touch Done. 5. Touch OK. The location is saved. nüvi 295W Owner’s Manual Finding Destinations Creating Categories When you save a location, it is automatically assigned to a category. You can create your own categories to help organize your saved locations. 1. From the Home screen, touch Where To? > Favorites. 2. Touch a category. 3. Touch an item. 4. Touch > Edit > Change Categories > New. 5. Enter a name for the category. 6. Touch Done. Assigning a Saved Location to a Category 1. From the Home screen, touch Where To? > Favorites. 2. Touch a category. 3. Touch an item. 4. Touch > Edit > Change Categories. nüvi 295W Owner’s Manual 5. Touch the categories to assign to this location. Finding a Saved Location Before you can find a saved location, you must save at least one location (page 16). 1. From the Home screen, touch Where To? > Favorites. 2. Touch a category. Tip: To narrow the search, touch Spell, enter the text, and touch Done. 3. Touch an item. Editing a Saved Location 1. From the Home screen, touch Where To? > Favorites. 2. Touch a category. 3. Touch an item. 4. Touch > Edit. 17 Finding Destinations Deleting a Saved Location 1. From the Home screen, touch Where To? > Favorites. 2. Touch a category. 3. Touch an item. 4. Touch > Edit > > Delete > Yes. About the Last Position Feature If you are receiving satellite signals when you remove the device from the cradle, your last position is saved automatically. When your last position is saved, appears on the map. Viewing Recently Found Locations Your device stores the last 50 locations you have found. 1. From the Home screen, touch Where To? > Recently Found. 2. Touch a location. Clearing the Recently Found List Touch Where To? > Recently Found > > Clear > Yes. The list of recently found locations is cleared. These locations are not deleted from the map data. Starting a Route to Your Last Position Touch Where To? > Favorites > All Categories > Last Position > Go!. 18 nüvi 295W Owner’s Manual Finding Destinations Finding Cities 1. From the Home screen, touch Where To? > Cities. 2. Select an option: • Touch a city. • Touch Spell. 3. Touch an item. Navigating with Photos Before you can use this feature, you must have a Wi-Fi connection (page 52). This service is not available in all areas. Photographs contain information about the location where the photograph was taken. You can use this information to navigate to locations and landmarks shown in photographs. nüvi 295W Owner’s Manual 1. From the Home screen, touch Where To? > Panoramio™ Photos. A list of photographs from nearby locations appears. 2. Touch a photograph. Entering Coordinates If you know the geographic coordinates of your destination, you can use your device to navigate there. This feature can be especially helpful when geocaching. 1. From the Home screen, touch Where To? > Coordinates. 2. Touch a cardinal-direction button to change the direction. 3. Touch a field to enter the latitude and longitude data. 4. Touch Next. 19 Finding Destinations Changing the Map Coordinate Format 1. From the Home screen, touch Where To? > Coordinates > Format. 2. Touch a format. 3. Touch OK. Finding Intersections 1. From the Home screen, touch Where To? > Intersections. 2. If necessary, touch Change State/ Country to change the state, the country, or the province. 3. Touch Search All. 4. Enter all or part of the name of the first street. 5. Touch the street. 20 6. Repeat steps 6 and 7 to find the second street. 7. Touch the intersection, if necessary. About Extras You can download additional content for your device, such as customized points of interest and travel guides, from www.garmin.com/extras. Finding Extras Before you can use extras, you must add them to your device. NOTE: Purchase fees and subscription fees may apply. 1. From the Home screen, touch Where To? > Extras. 2. Touch a category. nüvi 295W Owner’s Manual About the Map Pages About the Map Pages You can use the map to navigate to your destination or to view your location. The vehicle icon displays your position on the map. You can view your trip log, which is the path you have traveled. The trip log appears as a blue-green line on the map (page 27). You can see detailed map information only for areas for which you have maps loaded on your device. A speed limit icon may appear as you travel on major roadways. nüvi 295W Owner’s Manual NOTICE The speed limit icon feature is for information only and does not replace the driver’s responsibility to abide by all posted speed limit signs and to use safe driving judgment at all times. Garmin will not be responsible for any traffic fines or citations that you may receive for failing to follow all applicable traffic laws and signs. Browsing the Map 1. From the Home screen, touch View Map. 2. Touch anywhere on the map. 21 About the Map Pages 3. Select an option: • Touch and drag to view different parts of the map. • Touch and to zoom in and out. As you zoom out, the map changes to a digital elevation map showing the contours of the area. • Zoom far out to view a globe. TIP: You can touch and drag to spin the globe. • Touch to rotate the map. • Touch to view the map in two dimensions. • Touch to view the map in three dimensions. • Touch anywhere on the map. An arrow points to the location. • Touch for more options. 22 Navigating in Driving Mode Before you can navigate with your device, you must acquire satellites (page 10). 1. Find a location (page 12). 2. Touch Go!. The device creates a route to the location and opens the map. Your route is marked with a magenta line. As you travel, your device guides you to your destination with voice prompts, arrows on the map, and directions at the top of the map. If you deviate from the original route, your device recalculates the route and provides new directions. nüvi 295W Owner’s Manual About the Map Pages Using Map Navigation Tools ➊ ➋ ➌ ➎ ➊ ➋ ➌ ➍ ➎ ➍ ➎ Touch to view the next turn. Touch to view the route details. Touch to zoom in and zoom out. Touch for present location information. Touch to view trip information. Viewing the Entire Route on the Map 1. While navigating a route, touch the text bar on the top of the map. 2. Touch Show Map. The map appears with your route marked with a magenta line. nüvi 295W Owner’s Manual Viewing Route Details You can view all of the turns for your route and the distance between turns. 1. While navigating a route, touch the text bar on the top of the map. 2. Touch a turn on the list to view details for the turn. Viewing the Next Turn You can view the next turn on the map and the distance and time left before you reach the turn. 1. While navigating a route, touch the text bar on the top of the map. 2. Touch a turn on the list. 3. Touch and to see more turns in the route. 23 About the Map Pages Adding Via Points to the Active Route 1. While navigating a route, touch > Where To?. 2. Search for an intermediate location. 3. Touch Go! > Add As a Via Point. Taking a Detour While navigating a route, you can use detours to avoid obstacles ahead of you, such as construction zones. Viewing Trip Information 1. While navigating a route, touch . 2. From the scrolling menu, touch Detour. If your active route is the only reasonable option, the device might not calculate a detour. Stopping the Route 1. While navigating a route, touch 2. From the scrolling menu, touch Stop. 24 Avoiding Road Features 1. From the scrolling menu, touch Settings > Navigation > Automobile > Avoidances. 2. Select the check boxes to indicate the road features to avoid. 3. Touch OK. From the map, touch Speed. The trip information displays a compass, your speed, and other helpful statistics about your trip. . nüvi 295W Owner’s Manual About the Map Pages Resetting the Trip Information 1. From the map, touch Speed > . 2. Touch an item to reset. Navigating in Walking Mode 1. Remove the device from the mount. 2. Find a location (page 12). 3. Touch Go! > No. Using the Compass to Navigate 1. From the map, touch Speed. As you travel, the compass rotates to indicate your direction of travel. 2. Move in a circle until the arrow points at the bug indicator. NOTE: The bug indicator is the inverted triangle at the top of the compass, which indicates your heading. 3. Continue traveling in this direction, toward your destination. nüvi 295W Owner’s Manual Calibrating the Compass 1. From the Home screen, touch View Map > Speed > > Calibrate Compass. 2. Follow the on-screen instructions. About Custom Routes You can plan and save custom routes that include multiple via points. Planning and Saving a Route 1. Touch Where To? > Routes > New Route > OK. 2. Find a start location. 3. Touch Select > OK. 4. Find a destination. 5. Touch Select The route is automatically saved. 25 About the Map Pages Adding Via Points to a Custom Route Before you can add a via point to a custom route, you must plan and save at least one route (page 25). 1. Touch Where To? > Routes. 2. Touch a route. 3. Touch View Map > Add Via Points > Add Via Point. 4. Search for an intermediate location. 5. Touch Select. 6. Touch Add Via Point to add other via points to the route, if necessary. 7. Touch to save the route. 26 Editing a Custom Route Before you can edit a custom route, you must plan and save at least one route (page 25). 1. Touch Where To? > Routes. 2. Touch a route. 3. Edit the route: • Touch > Change Name. • Touch View Map, and select an option: ◦◦ Touch Add Via Point (see page 26). ◦◦ Touch Reorder to move a location down or up in the route. > Remove Points ◦◦ Touch to delete a via point. ◦◦ Touch > Optimally Reorder Points to automatically reorder the via points. nüvi 295W Owner’s Manual About the Map Pages Deleting a Custom Route 1. Touch Where To? > Routes. 2. Touch a route. 3. Touch >Delete > Yes. Viewing Your Trip Log Starting to Navigate a Custom Route Before you can navigate a custom route, you must plan and save at least one route (page 25). 1. From the scrolling menu, touch Settings > Navigation. 2. Select Automobile or Pedestrian. 3. Touch Trip Log > Show > OK. As you travel, the trip log appears on the map. 1. Touch Where To? > Routes. 2. Touch a route. 3. Touch Go!. nüvi 295W Owner’s Manual You can record the path you travel (called a trip log) and display it as a blue-green line on the map. Clearing the Trip Log From the scrolling menu, touch Settings > Navigation > > Clear Trip Log. 27 Using E-mail Using E-mail Adding an E-mail Account Before you can send or receive e-mail messages, you must have a Wi-Fi connection (page 52). The device can automatically configure account information for some e-mail accounts. If additional information is required, the device prompts you to enter the required information. Contact your e-mail account provider for configuration information. 1. From the scrolling menu, touch E-mail > Add Account. 2. Enter the e-mail address. 3. Touch Done. 4. Enter the password. 28 5. Touch Done. 6. If necessary, enter accountconfiguration information from your service provider. 7. Touch Save. Viewing an E-mail Message Before you can send or receive e-mail messages, you must have a Wi-Fi connection (page 52). 1. From the scrolling menu, touch E-mail. 2. Touch > Check E-mail to check for new e-mail messages, if necessary. 3. Touch an e-mail message. nüvi 295W Owner’s Manual Using E-mail 4. Select an option: • Touch to view the location information, if available. • Touch to open the attachment, if available. • Touch Reply to compose a reply to the sender. • Touch Reply All to compose a reply to the sender and all other recipients. • Touch Forward to send the e-mail to another recipient. > Delete to delete the • Touch e-mail. • Touch > Mark Unopened to display the e-mail as unopened in your inbox. • Touch > Maximum Mailbox Size to select the maximum size for the mailbox. nüvi 295W Owner’s Manual Sending an E-mail Message Before you can send or receive e-mail messages, you must have a Wi-Fi connection (page 52). 1. From the scrolling menu, touch E-mail > Compose. 2. Touch To. 3. Select an option: • Touch Use Keyboard to enter a recipient. • Touch Add Contact to select a contact. 4. Touch Subject. 5. Enter a subject. 29 Using E-mail 6. Touch Attachments to add an attachment (optional): • Touch Contact, and touch a contact. • Touch Email, and touch an e-mail. • Touch Music, touch a category and subcategory, and touch a song. • Touch Location, find a location (page 12), and touch Select. • Touch Picture, touch a picture, and touch Select. 7. Touch Message. 8. Enter the message. 9. Touch for more options: • Touch Set Importance, touch an importance level, and touch OK. • Touch Save to Drafts. • Touch Send Later. 30 10.Touch Send. About E-mail Attachments You can view the following types of e-mail attachments: • • • • • • • • • • • • Microsoft® Word Excel® PowerPoint® Adobe® PDF HTML Plain text JPEG GIF PNG BMP WMF EMF nüvi 295W Owner’s Manual Using E-mail Viewing an E-mail Attachment 1. Open an e-mail message (page 28). 2. Touch . 3. Select an option: • Touch and to zoom in and out. • Touch the arrows to view the next page and the previous page. Searching a Folder Note: This feature searches only the headers of messages, not the message text. 1. From the scrolling menu, touch E-mail. 2. Select an option: • Touch > Change Folder to search a different folder. • Touch > Search Current Folder to search the folder. nüvi 295W Owner’s Manual 3. Enter the search text. 4. Touch Done. Changing Folders 1. From the scrolling menu, touch E-mail. > Change Folder. 2. Touch 3. Touch a folder. Managing E-mail Settings Setting an E-mail Signature You can set an e-mail signature for each e-mail account. 1. From the scrolling menu, touch Settings > Applications > E-mail. 2. Touch an account. 3. Touch Edit Account Settings > SMTP Settings > Signature. 4. Enter a signature. 5. Touch Done. 31 Using E-mail Setting the Default E-mail Account The default e-mail account is used for sending mail from the device. 1. From the scrolling menu, touch Settings > Applications > E-mail > > Default Account. 2. Touch an account. 3. Touch OK. 32 Managing Your Contacts Adding a Contact 1. From the scrolling menu, touch Contacts > . 2. Touch an item. 3. Enter the information. 4. Touch Done or OK > . Searching for a Contact 1. From the scrolling menu, touch Contacts. 2. Touch and drag the contact list. nüvi 295W Owner’s Manual Using E-mail Editing and Deleting Contacts Editing a Contact 1. From the scrolling menu, touch Contacts. 2. Touch a contact. 3. Touch > Edit Contact. 4. Touch an item. 5. Edit the information. 6. Touch . Adding a Picture for a Contact 1. From the scrolling menu, touch Contacts. 2. Touch a contact. > Edit Contact. 3. Touch 4. Touch the picture placeholder. nüvi 295W Owner’s Manual 5. Select an option: • Touch > Take a Picture to take a picture using the device camera. • Touch a saved picture. 6. Touch or to size the picture. 7. Touch Select. Changing a Picture for a Contact 1. From the scrolling menu, touch Contacts. 2. Touch a contact. 3. Touch > Edit Contact. 4. Touch the picture. 5. Touch Choose Picture, touch a picture, and touch Select. 6. Touch . 33 Using E-mail Assigning a Location to a Contact 1. From the scrolling menu, touch Contacts. 2. Touch a contact. 3. Touch > Edit Contact. 4. Touch an address field. 5. Touch Search for location?. 6. Find a location (page 12). 7. Touch Select > . Starting a Route to a Contact 1. From the scrolling menu, touch Contacts. 2. Touch a contact. 3. Touch Go! 4. If necessary, touch an address field to enter a location. 5. Find a location (page 12). 6. Touch Select > Go!. Deleting a Contact 1. From the scrolling menu, touch Contacts. 2. Touch a contact. > Delete > Yes. 3. Touch 34 nüvi 295W Owner’s Manual Browsing the Web Browsing the Web Before you can access Web browser features, you must have a Wi-Fi connection (page 52). 1. From the scrolling menu, touch Web Browser > . 2. Enter a URL. 3. Touch Done. Using the Web Browser Before you can access Web browser features, you must have a Wi-Fi connection (page 52). nüvi 295W Owner’s Manual • Touch to zoom in on the center of the screen. • Touch to zoom out from the center of the screen. • Touch to return to the Home screen. • Touch to refresh the Web page. • Touch to stop loading the Web page. • Touch to enter a URL. • Touch to return to the previous Web page in your history. • Touch > Forward to go to the next Web page in your history. • Touch and drag the screen to scroll the Web page. • Touch links, text-entry boxes, and other interactive items to activate them. 35 Browsing the Web Setting Your Browser Home Page 1. From the scrolling menu, touch Settings > Applications > Browser > Home Page. 2. Enter a URL. 3. Touch Done. Adding a Web Page as a Bookmark Before you can access Web browser features, you must have a Wi-Fi connection (page 52). 1. Open the Web page to save. > Bookmarks > Add 2. Touch Current Page > Done. Removing a Web Page from Bookmarks 1. From the scrolling menu, touch Web Browser > > Bookmarks > > Delete. 2. Select the Web page to remove. 3. Touch Delete. Viewing a Bookmarked Web Page 1. From the scrolling menu, touch Web Browser > > Bookmarks. 2. Touch a Web page to view in the browser. Viewing Your Web Page History Before you can access Web browser features, you must have a Wi-Fi connection (page 52). 1. From the scrolling menu, touch Web Browser > > History. 36 nüvi 295W Owner’s Manual Browsing the Web 2. Touch a Web page to view in the browser. Sharing a URL Before you can access Web browser features, you must have a Wi-Fi connection (page 52). 1. From the scrolling menu, touch Web Browser > . 2. Enter a URL. 3. Touch Done. 4. Touch > Email To. 5. Touch To. 6. Select an option: • Touch Use Keyboard to enter a recipient. • Touch Add Contact to select a contact. 7. Touch Subject. 8. Enter a subject. nüvi 295W Owner’s Manual 9. Touch Attachments to add an attachment (optional). 10.Touch Message. 11.Enter the message. 12.Touch Send. Changing Browser Settings 1. From the scrolling menu, touch Settings > Applications > Browser. 2. Change browser settings: • Touch JavaScript > On > OK to allow JavaScript. • Touch Accept Cookies > Yes > OK to enable cookies. • Touch Cookies > Yes > OK to clear cookies. • Touch History > Yes > OK to clear the browser history. • Touch Cache > Yes > OK to clear the browser cache. 37 Playing Music Playing Music Music Player File Types The music player supports MP3 and FLAC file types. You can place music files anywhere on the device internal storage or anywhere on the memory card. All supported music files on your device are displayed in the Music Player. Playing a Song Before playing songs or creating playlists, you must transfer music files to your device (page 52). 1. From the scrolling menu, touch Music Player > . 2. Touch a category and subcategory, if necessary. 3. Touch a song. 38 The music player plays the selected song and the following songs. Thomson MPEG Layer-3 Information Supply of this product does not convey a license nor imply any right to distribute content created with this product in revenue-generating broadcast systems (terrestrial, satellite, cable and/or other distribution channels), streaming applications (via internet, intranets and/or other networks), other content distribution systems (pay-audio or audio-ondemand applications and the like) or on physical media (compact discs, digital versatile discs, semiconductor chips, hard drives, memory cards and the like). An independent license for such use is required. For details, please visit http://mp3licensing.com. nüvi 295W Owner’s Manual Playing Music Changing the Music Player View About Playlists While playing a song, you can change the music player view: ➊ ➋ ➌ ➊Touch to view the track, the cover art, and other information. ➋Touch to view the playlist. ➌Touch to browse the music library without stopping the music. nüvi 295W Owner’s Manual A playlist is a list of songs that can be saved. The playlist appears on the playlist screen of the music player. You can also create and save playlists for future playback. Creating a Playlist 1. From the scrolling menu, touch Music Player > > Playlists > New Playlist. 2. Touch a category and subcategory, if necessary. 3. Select the check box next to each song to add to the playlist. 4. Touch OK. > Rename to rename the 5. Touch playlist (optional). 39 Playing Music Playing a Playlist 1. From the scrolling menu, touch Music Player > Playlists. 2. Touch a playlist. 3. Touch a song to begin playing the playlist. Editing a Playlist 1. From the scrolling menu, touch Music Player > > Playlists. 2. Touch a playlist. 3. Touch . 4. Select an option: • Touch Save, enter the name, and touch Done. • Touch Add Songs, touch a category and subcategory, select the songs, and touch OK. • Touch Remove Songs, select the songs, and touch OK. 40 Deleting a Playlist 1. From the scrolling menu, touch Music Player > > Playlists. 2. Touch the playlist to delete. 3. Touch . 4. Touch Remove Playlist > Yes. Searching the Music Player 1. From the scrolling menu, touch Music Player > > All > . 2. Enter all or part of the song, the album, or the artist. TIP: To begin a new search, touch > . 3. Touch the song. nüvi 295W Owner’s Manual Taking and Viewing Pictures Taking and Viewing Pictures Note: If it is not already removed, remove the plastic film from the camera lens before using the camera. A green box appears on the screen. Your device focuses on the object inside the box. Taking a Picture 1. Press the Camera key. 2. Touch > Accept to assign a GPS location to the photo (optional). NOTE: The device must be receiving GPS signals to assign a GPS location to the photo (page 10). 3. Press the Camera key halfway to focus on the object. nüvi 295W Owner’s Manual 4. Press and hold the Camera key until you hear the camera click. The picture is saved. About Picture File Types Your device supports the following file types for pictures: JPEG, PNG, and BMP For more information on copying files from your computer to your device, see page 52. 41 Taking and Viewing Pictures Viewing Pictures 1. From the scrolling menu, touch Camera > . 2. Touch a picture. 3. Touch the arrows to view additional pictures. Viewing a Slideshow From the scrolling menu, touch Camera > > > Slideshow. Deleting Pictures 1. From the scrolling menu, touch Camera > > > Delete Pictures?. 2. Touch the pictures to delete. 3. Touch Delete > Yes. 42 Sharing Pictures 1. From the scrolling menu, touch Camera > . 2. Touch a picture. 3. Touch Share. 4. Touch To. 5. Select an option: • Touch Use Keyboard to enter a recipient. • Touch Add Contact to select a contact. 6. Touch Subject. 7. Enter a subject. 8. Touch Message. 9. Enter the message. 10.Touch Send. nüvi 295W Owner’s Manual Taking and Viewing Pictures Setting the Wallpaper The wallpaper image appears when the device is locked. 1. From the scrolling menu, touch Camera > . 2. Touch a picture. 3. Touch > Set as Wallpaper. 4. Set the picture for portrait mode: • Touch and drag to move the picture. • Touch and to adjust the zoom level. • Touch to rotate the picture. 5. Touch Set Portrait. nüvi 295W Owner’s Manual 6. Set the picture for landscape mode: • Touch and drag to move the picture. • Touch and to adjust the zoom level. • Touch to rotate the picture. 7. Touch Set Landscape. Starting a Route to a Picture You can route to pictures that have GPS location information (page 41). 1. From the scrolling menu, touch Camera > . 2. Touch a photo. When GPS location information is saved, appears for the photo. 3. Touch > > Go!. 43 Organizing Your Life Organizing Your Life Using the Calendar 1. From the scrolling menu, touch Calendar. 2. Complete an action: • Touch or to change the month. • Touch New to add an event. • Touch Today to view the present day. • Touch Agenda to view the daily calendar and upcoming appointments. • Touch Month to view the monthly calendar. The present day is circled in red. • Touch an appointment to view details. 44 Creating an Appointment 1. From the scrolling menu, touch Calendar. 2. Touch the date of the appointment. 3. Touch New. 4. Complete an action: • Touch Subject, enter a subject, and touch Done. • Touch Location, and select an option: ◦◦ Touch Enter Location Name, enter the address or location name, and touch Done. ◦◦ Touch Select Location, find a location, touch the location, and touch Select. nüvi 295W Owner’s Manual Organizing Your Life • Select the duration of the appointment: ◦◦ Touch All Day to create an all-day appointment. ◦◦ Select a start and end time. • Touch Reminder, touch a reminder time, and touch OK. • Touch Repeat, select how often the appointment recurs, and touch OK. • Touch Notes, enter the notes, and touch Done. 5. Touch Save. Starting a Route to an Appointment If the appointment has location information, you can start a route to the location. See page 44 to set a location for an appointment. 1. From the scrolling menu, touch Calendar. nüvi 295W Owner’s Manual 2. Touch the appointment. 3. Touch > Go!. Checking the Weather Forecast CAUTION The weather information provided through this product is subject to service interruptions and may contain errors, inaccuracies, or outdated information, and consequently should not be relied upon exclusively. Always use common sense while driving or navigating, and check alternate weather information sources prior to making safety-related decisions. You acknowledge and agree that you shall be solely responsible for use of the weather information and all decisions made with respect to driving or navigating in unsafe weather conditions. 45 Organizing Your Life Before you can use this feature, you must have a Wi-Fi connection (page 52). This service is not available in all areas. 1. From the scrolling menu, touch Weather. The device displays the local weather conditions and a six-day forecast. 2. Touch a day to view a detailed forecast for that day. Viewing the Weather Forecast in Other Cities 1. From the scrolling menu, touch Weather > > Weather Near > A Different City > OK. 2. Enter the city name. 3. Touch Done. 4. Touch the city. 5. Touch Select. 46 Viewing the Weather Forecast for a Favorite Location 1. From the scrolling menu, touch Weather > > Weather Near > A Favorite > OK. 2. Touch an option. 3. Touch the location. 4. Touch Select. Using the Clock For information on manually changing the time or the time zone, see page 55. Changing a City in the Time List The device displays time information for your location and three other cities. nüvi 295W Owner’s Manual Organizing Your Life 1. From the scrolling menu, touch Tools > Clock > Clock. 2. Touch the city to replace. 3. Enter all or part of a city name. 4. Touch Done. 5. Touch the city. 6. Touch Select. Setting an Alarm 1. From the scrolling menu, touch Tools > Clock > Alarm > Add Alarm. 2. Select an alarm time. 3. Touch OK. 4. Select a ringer (optional). 5. Touch OK. 6. Select how often the alarm should repeat. 7. Touch OK. 8. Touch Save. nüvi 295W Owner’s Manual Managing Alarms • Touch an alarm, and touch Disabled > Yes to disable the alarm while retaining the settings. • Touch an alarm, and touch Disabled > No to enable the alarm. • Touch an alarm, and touch > Delete > Yes to delete an alarm. • When the alarm sounds, touch Snooze to hear the alarm again in 10 minutes. • When the alarm sounds, touch Dismiss to turn off the alarm. Viewing the World Map From the scrolling menu, touch Tools > Clock > World Map. The map displays areas of daylight and night across the world. 47 Organizing Your Life Touch OK. Touch a unit of measurement. Touch the unit type. Touch OK. Touch a number. Enter the number of units to be converted. 10.Touch OK. 11.To clear the number of units, touch > Clear (optional). Using the Stop Watch 1. From the scrolling menu, touch Tools > Clock > Stop Watch. 2. Touch Start to start the timer. 3. Touch Lap/Split to record the lap time and the split time (optional). 4. Touch Stop to stop the timer. 5. Touch the Lap and Split times to view details (optional). 6. Touch Reset to reset the timer. 4. 5. 6. 7. 8. 9. Using the Converter Setting Conversion Rates Manually 1. From the scrolling menu, touch Tools > Converter. 2. Touch the button under Convert. 3. Touch Currency > OK. 4. Touch > Custom. Converting Units 1. From the scrolling menu, touch Tools > Converter. 2. Touch the button under Convert. 3. Touch the type of items to be converted. 48 nüvi 295W Owner’s Manual Organizing Your Life 5. Touch the currency for which the conversion rate is being set. 6. Touch OK. 7. Touch the conversion rate to change. 8. Enter a new conversion rate. 9. Touch OK. 10.Repeat steps 7 through 9 to set the conversion rate for the other currency, if necessary. 11.Touch Save. Using the Calculator From the scrolling menu, touch Tools > Calculator. nüvi 295W Owner’s Manual Using Notes Creating a Note 1. From the scrolling menu, touch Tools > Notes. 2. Touch New. 3. Enter the note. 4. Touch Done. Editing a Note 1. From the scrolling menu, touch Tools > Notes. 2. Touch a note. 3. Touch Edit. 4. Edit the note. 5. Touch Done. 49 Organizing Your Life Deleting a Note 1. From the scrolling menu, touch Tools > Notes. 2. Touch a note. 3. Touch > Delete > Yes. About the Checklist Sending a Note as an E-mail Message 1. From the scrolling menu, touch Tools > Notes. 2. Touch a note. 3. Touch > Send. 4. Send your e-mail message (page 29). Creating a Checklist 1. From the scrolling menu, touch Tools > Checklist. 2. Touch New Checklist. 3. Enter the name. 4. Touch Done. 5. Touch Add/Remove Items > New Item. 6. Enter the name of the item. 7. Touch Done. 50 You can use the checklist to track bill payments, groceries, travel, and vehicle maintenance. You can also create new checklists. nüvi 295W Owner’s Manual Organizing Your Life Deleting a Checklist 1. From the scrolling menu, touch Tools > Checklist. 2. Select an option: • Touch > Reset > Yes to delete all created checklists. • Touch > Delete Checklists, select the checklists to delete, and touch Delete Checklists > Yes. Using Checklists 1. From the scrolling menu, touch Tools > Checklist. 2. Touch a checklist. 3. Select an option: • Select the check boxes to indicate the items to appear on your checklist. • Touch > Check All to select all of the items on the checklist. nüvi 295W Owner’s Manual > Clear All Checks • Touch to clear all of the items on the checklist. • Touch Add/Remove Items > New Item, enter the name of the item, and touch Done. • Touch Add/Remove Items > > Delete Items, select the items to delete, and touch Delete > Yes. • Touch > Rename to rename the checklist (optional). 51 Connecting with Other Devices Connecting with Other Devices About File Transfer Mode Notice If you are not sure about the purpose of a file, do not delete the file. Your device memory contains important system files that should not be deleted. Be especially cautious of files located in folders entitled “Garmin.” File transfer mode is also referred to as USB mass storage mode. Use file transfer mode to add files to the device. Transferring Files You can transfer files, such as MP3s and JPEGs, to your device. 1. Insert the memory card (page 2). 2. Connect the mini-USB cable to the connector on the bottom of the device (not the cradle). 52 3. Connect the cable to your computer. 4. Touch Yes to switch to mass storage mode. 5. Double-click the My Computer icon (Windows® computers) or the mounted-volume icon (Mac® computers) on your computer. Two additional drives (volumes) appear in the list of drives on your computer. One is the internal memory of the device. The other is the memory card. 6. Copy and paste the files to transfer into the appropriate folders in the new drives. About Wi-Fi You can connect to the Internet using a Wi-Fi connection. Before you can use Wi-Fi, you must be in a Wi-Fi coverage area (Wi-Fi hotspot). A Wi-Fi connection is required to use e-mail, Web browser, and weather services. nüvi 295W Owner’s Manual Connecting with Other Devices Wi-Fi hotspot charges may apply. Connecting to a Wi-Fi Network 1. From the scrolling menu, touch Settings > System > Wi-Fi > Wi-Fi Off > On > OK. The device searches for Wi-Fi networks. 2. Select a network. NOTE: indicates networks that require an encryption key. 3. If necessary, enter an encryption key. 4. Touch Connect. After you have connected to a Wi-Fi network, the device remembers the network for future use. These networks appear in the network list even when they are out of range. nüvi 295W Owner’s Manual Adding a Network You can add non-broadcasting networks or other networks that your device does not automatically detect. 1. From the scrolling menu, touch Settings > System > Wi-Fi > > Add > Network Name. 2. Enter a network. 3. Touch Done. 4. Enter the network information as appropriate. 5. Touch OK. Removing a Network 1. From the scrolling menu, touch Settings > System > Wi-Fi. 2. Touch the network. 3. Enter the network encryption key, if necessary. 4. Touch > Forget This Network. 53 Customizing Your Device Customizing Your Device General Device Settings From the scrolling menu, touch Settings > System > General. • Distance Units—sets the units of measure for distance. • Temperature Units—sets the units of measure for temperature. • Safe Mode—prevents you from entering data when your vehicle is in motion. • GPS Simulator—simulates GPS functions, including simulating routes, when you are not receiving GPS signals. 54 • Connected Services Feedback— allows Garmin to collect your speed, your direction, and your location information, and share it with strategic partners and service providers. Note: When you use Wi-Fi, your device automatically sends the collected data. Security Settings Creating a PIN to Unlock the Screen When security is turned on, you must enter a PIN to unlock the device. 1. From the scrolling menu, touch Settings > System > Security > Off > On > OK. 2. Follow the on-screen instructions to create a PIN. nüvi 295W Owner’s Manual Customizing Your Device If you forget your PIN, contact Product Support. Your device can be unlocked, but all personal information is erased in the process (page 58). Language Settings Note: Changing the language does not change the language of map data, such as street names or user-entered data. From the scrolling menu, touch Settings > System > Language. • Voice—sets the language for spoken instructions. • Text—sets the language for all onscreen text. • Keyboard—sets the language for the characters on the keyboard. TIP: Touch to search the list of languages or to preview the keyboard. nüvi 295W Owner’s Manual Date and Time Settings From the scrolling menu, touch Settings > System > Date/Time. • Date Format—sets the date format. • Time Format—sets the time format to 12-Hour, 24-Hour, or UTC. • Time Zone Selection—allows you to select a time zone manually. Audio Settings From the scrolling menu, touch Settings > Audio. • Vibrate—sets the vibrate mode. • Sounds—allows you to select tones for e-mail, the calendar, and the clock, and allows you to select to play a tone when you touch the screen. 55 Customizing Your Device • Mixer—allows you to adjust the volume levels for navigation and music. • Proximity Points—sets proximity alerts. NOTE: When you are within a certain distance of a point of interest or driving a certain speed near a point of interest, your device can provide visual and audio alerts. Before you can use proximity alerts, you must load proximity points from www.garmin.com /extras. • Audio Boost—allows you to bypass the audio voltage limit of 150 mV. 56 Navigation Settings You can use different navigation settings for Automobile (Driving) and Pedestrian (Walking) usage modes. Automobile and Pedestrian Navigation Settings From the scrolling menu, touch Settings > Navigation > Automobile or Pedestrian. • Route Preference—sets the preference for calculating routes. • Map Detail—sets the level of detail on the map. NOTE: More detail may result in slower map drawing. • Map View—sets the perspective of the map. ◦◦ Track Up displays the map in two dimensions (2-D) with your direction of travel at the top. nüvi 295W Owner’s Manual Customizing Your Device ◦◦ North Up displays the map in 2-D with North at the top. ◦◦ 3-D displays the map in three dimensions, with Track Up orientation (default). • Avoidances—allows you to select the types of roads and maneuvers the device should attempt to avoid when creating routes. NOTE: This setting is available for Automobile (Driving) mode only. • Vehicle—changes the icon that represents your position on the map. • Trip Log—displays the path of your travels on the map. Viewing Map Information From the scrolling menu, touch Settings > Navigation > > Map Info. A list of installed maps appears. nüvi 295W Owner’s Manual Note: Clear the check box next to a map to disable the map. Application Settings Changing the Main Menu Order 1. Touch Settings > Applications > Main Menu Order. 2. Touch an item to move. 3. Touch a position in the list where the item should be placed. 4. Touch . Display Settings From the scrolling menu, touch Settings > Display. • Brightness—changes the brightness of the screen. TIP: Decreasing the brightness can save battery power. 57 Customizing Your Device • Color Mode—sets a light background (Daytime), a dark background (Nighttime), or automatically switches between the two based on the sunrise time and sunset time for your location (Auto). • Auto Lock—sets the screen to automatically shut off if the device is inactive for the selected length of time. TIP: Decreasing the auto lock time can save battery power. • Screen Shot—allows you to take a picture of the device screen. Viewing Software Information From the scrolling menu, touch Settings > > About. 58 Restoring Settings From the scrolling menu, touch Settings > > Restore. Clearing All User Data notice This process restores all settings to factory defaults and removes all user data. Any items that you have saved on your device, such as Saved Locations, photos, and contacts, are erased. Map data is not erased. Deleted information cannot be recovered. From the scrolling menu, touch Settings > > Master Clear. nüvi 295W Owner’s Manual Appendix Appendix About Satellite Signals in the upper-left corner of the status bar indicates the strength of the GPS signal. When at least one of the lines is green, your device has acquired satellite signals. The more green lines, the stronger the GPS signal. If the device is not receiving GPS signals, appears. For troubleshooting information about acquiring satellites, see page 64. Viewing Detailed GPS Signal Information From the scrolling menu, touch Tools > Where Am I? > > Satellite Info. nüvi 295W Owner’s Manual Battery Information in the status bar indicates the status of the internal battery. To increase the accuracy of the battery gauge, fully discharge the battery and then fully charge it. Do not unplug the device until it is totally charged. Maximizing the Battery Life • From the scrolling menu, touch Settings > Display > Brightness to turn down the backlight. • From the scrolling menu, touch Settings > Display > Auto Lock to reduce the timeout length. • Do not leave your device in direct sunlight. • Avoid prolonged exposure to excessive heat. 59 Appendix Replacing the Battery WARNING Do not use a sharp object to remove the battery. A sharp object may puncture the battery, which may present a risk of fire, chemical burn, electrolyte leak, and/or injury. Only use the correct battery type. Using an incorrect battery may present a risk of explosion. Notice Contact your local waste disposal department for information on properly disposing of the battery and device. If you need to replace the battery in the device, use the lithium-ion battery, Garmin Part Number: 010-11212-14. For more information on purchasing a replacement battery, go to http://buy.garmin.com. 60 Mounting on Your Dashboard Notice The permanent mounting adhesive is extremely difficult to remove after it is installed. A mounting disk is included in some device packages. Use the mounting disk to mount your device to the dashboard and comply with certain state and local regulations. 1. Clean and dry the dashboard where you are placing the disk. 2. Remove the backing from the adhesive on the bottom of the disk. 3. Place the disk on the dashboard. 4. Remove the clear plastic cover from the top of the disk. nüvi 295W Owner’s Manual Appendix 5. Place the suction cup mount on top of the disk. 6. Flip the lever down (toward the disk). Removing the Device, Cradle, and Mount Removing the Device from the Cradle 1. Press the release button on the bottom of the cradle. 2. Tilt the device forward. Removing the Cradle from the Mount 1. Turn the cradle to the right or left. 2. Apply pressure until the socket on the cradle releases the ball on the mount. nüvi 295W Owner’s Manual Removing the Suction Cup Mount from the Windshield 1. Flip the lever on the suction cup mount toward you. 2. Pull the tab on the suction cup toward you. Resetting the Device WARNING Do not use a sharp object to remove the battery. A sharp object may puncture the battery which may present a risk of fire, chemical burn, electrolyte leak, and/or injury. If the device stops functioning, you may need to reset the device. 1. Press and hold the Power key to turn off the device. 2. Press and release the Power key to turn on the device. 3. If necessary, remove and replace the battery (page 59). 61 Appendix Caring for Your Device • Avoid dropping your device. • Avoid operating your device in high-shock and high-vibration environments. • Do not expose the device to water. Contact with water can cause this device to malfunction. • Do not store the device where prolonged exposure to extreme temperatures can occur, because it can cause permanent damage. • Never use a hard or sharp object to operate the touchscreen, or damage may result. • To help avoid theft, remove the device and mount from sight when not in use. • Remove the residue on the windshield left by the suction cup. 62 Specifications Physical size (W × H × D): 2.29 × 4.41 × 0.57 in. (58.1 × 112 × 14.6 mm) Weight: 4.83 oz. (137 g) Display: 3.5 in. diagonal, 272 × 480 pixels; WQVGA display with white backlight and touchscreen Case: Not waterproof (IP51) Operating Temperature range: from 5°F to 131°F (from -15°C to 55°C) Charging Temperature range: from 32°F to 113°F (from 0°C to 45°C) Connector: Mini-USB for power or computer, 2.5 mm audio for headphones Battery type: User-replaceable 1200 mAh lithium-ion battery nüvi 295W Owner’s Manual Appendix Battery life: Approximately 3 hours of navigation time; 300–600 hours of standby time, depending on usage and settings Charge time: Approximately 3 hours Power input: DC vehicle power using vehicle power cable, or DC input using mini-USB connector Usage: 3 W max. GPS receiver: High-sensitivity Acquisition times*: Warm: <1 sec. Cold: <38 sec. Factory Reset: <45 sec. *Average acquisition times for a stationary receiver with a clear view of the sky. nüvi 295W Owner’s Manual Other connectivity: Wi-Fi, mini-USB 2.0 Operating System: Linux™ Camera/Photos: 3.0 MP camera Data storage: Internal memory; data stored indefinitely Computer interface: Plug-and-play USB mass storage Audio out: 2.5 mm 63 Appendix Troubleshooting Issue/Question How can I acquire satellite signals? The device will not turn on. The device will not charge. Which files can I delete? 64 Solution Verify that the GPS simulator is off. Ensure that the GPS has enough time to initialize. When the GPS is turned on for the first time, it may take a few minutes to initialize. Charge the battery (page 3). Replace the battery (page 60). Replace the fuse in the vehicle power cable. As a safety precaution in high-temperature environments, the device will suspend charging and use battery power. If the device is mounted in a vehicle, remove the device from the mount and place it out of direct sunlight. Do not delete necessary files. In mass storage mode, do not delete or format the original directories, such as Garmin and Documents. Do not delete files for which you do not know the purpose. nüvi 295W Owner’s Manual Index Index Symbols 12-hour time format 55 2-D map view 57 24-hour time format 55 3-D map view 57 A about the software 58 accessories 4 accounts, e-mail 28 additional maps i addresses, searching for 16 alarms managing 47 setting 47 application settings 57 appointments adding 44 routing to 45 arm, suction cup 5 attachments, e-mail 29, 30, 31 nüvi 295W Owner’s Manual audio settings 55 volume 10 audio out 63 automatic screen lock 11 automobile mode 56 avoiding road features 24, 57 B backlight. See brightness battery 3 charging 3 cover 2 discharging 3 information 59 installing 2 life 59 removing 60 replacing 60 BMP 41 bookmarks 36 brightness 57, 59 browser buttons 35 features 35 home page 36 settings 37 browsing the Web 35 businesses 15. See also points of interest button. See key; See keys C calculator 49 calendar 44–45 settings 57 camera key 1 care of the device 62 categories for locations 17–18 searching 13 checklists 50–51 creating 50 deleting 51 using 51 cities 19 65 Index clearing user data 58 clock 46–48, 55 alarms, managing 47 alarms, setting 47 setting 55 stop watch 48 compass 25 calibrating 25 connector headphone/audio out 1 mini-USB 1 contacting Garmin i contacts 32–34 adding 32 assigning location information 34 deleting 33–34 editing 33–34 for the cradle 1 navigating to 34 pictures for 33 routes to 34 searching for 32 conversion rates 48–49 66 converting currency 48–49 units 48 coordinates 19 changing the format 20 entering 19 cradle 5 currency 48–49 custom routes 25 adding via points 26 deleting 27 editing 26 navigating 27 planning 25 deleting all user data 58 files 52, 64 destinations. See locations; See points of interest detours 24 device care 62 digital elevation map 22 display settings 57 documents, transferring 52 driving mode 56 driving route settings 56–57 D dashboard, mounting the device 60 data, entering 9 date and time settings 55 date format 55 daytime screen background 58 E e-mail 28–34 accounts 28 attachments 31 folders 31 location information 29 new messages 28 sending messages 29 sending pictures 42 nüvi 295W Owner’s Manual Index sending URLs 37 signatures 31–34 viewing messages 28 working with messages 28–29 emergency assistance 12 entering data 9 exchange rates 48–49 extras 20 F favorites, Web page. See bookmarks features, device 1 files deleting 64 transferring 52 file transfer mode 52 file types media gallery 41 music 38 finding locations. See searching for locations folders, e-mail 31 nüvi 295W Owner’s Manual found locations 14 routes to 14 sending 14 home page, Web browser 36 home screen, device 6 G general device settings 54 geocaching 19 globe view 22 going home 15 GPS acquiring satellites 59 signal information, viewing 59 simulator 54 guarantee, new maps i I icons 7 information, trip 24 intersections 20 H headphone/audio out connector 1 headphones 9, 63 headset 63 help file 11 history, Web page 36 home location 15 J JPEG 41 K key camera 1 power 1 keyboard 9 keys, volume up/down 1 L language settings 55 last position 18 lever, suction cup 5 list, recently found 18 lithium-ion battery 60 local search 15, 16 67 Index location, your 16 locations 14–20. See also points of interest categories for 17–18 deleting 18 editing 17 finding 17 for contacts 34 saving 16 sending 14 starting a route 14 locking the device 11 settings 55 M main menu, customizing 57 maps additional i buttons 21 contours 22 entire route 23 following routes 22 information about 57 68 introductory information 21 next turn 23 options 21–22 route details 23 settings for 56–57 updating i zooming in and out 22, 23 map view 56 2-D 57 3-D 57 north up 57 track up 56 master clear 58 maximum speed, resetting 25 memory card installing 2 slot 1 transferring files 52 menu, customizing 57 messages, e-mail 29 microSD card installing 2 slot 1 transferring files 52 mini-USB connector 1 money exchange rates 48 mounting on the windshield 4–5 on your dashboard 60 removing 61 music 38–40 files, storing 38 file types 38 playing 38 playlists 39 searching for 40 N navigation settings 56 new maps i next turn 23 nighttime screen background 58 nüvi 295W Owner’s Manual Index notes 49–50 creating 49 deleting 50 e-mail and 50 editing 49 nüMaps Guarantee i O obstacles, avoiding 24 on-screen keyboard 9 on and off, turning the device 8 orienting the screen 6 P parking spot. See last position pedestrian mode 25, 56 photos 19. See also pictures pictures 41 deleting 42 file types 41 for contacts 33–34 location information 43 nüvi 295W Owner’s Manual routes to 43 screen shots 58 sending in e-mail messages 42 taking 41 viewing 42 viewing slideshows 42 places. See locations; See points of interest playlists 39 creating 39 deleting 40 editing 40 playing 40 PNG 41 points of interest 13. See also locations power cable, vehicle 5 power key 1 product support i R recently found list, clearing 18 recently found locations 16 registration i removing the device, cradle, and mount 61 resetting device 61 trip information 25 restoring settings 58 rotating the screen 6 routes adding via points to 24 appointments and 45 contacts and 34 custom 25 details 23 editing 26 entire 23 following 22 home 15 last position and 18 locations and 14 pictures and 43 planning 26 stopping 24 walking 25 69 Index S safe mode 54 satellite information, viewing 59 satellites, acquiring 10 satellite signals, about 59 saved locations 16 categories for 17–18 deleting 18 editing 17 finding 17 saving your present location 16 screen backlight. See screen brightness brightness 57 color mode 58 lock 11 orienting 6 timeout 11 using the touchscreen 8 screen shots 58 70 scrolling menu, customizing 57 searching for locations addresses and 16 categories and 13 favorites 17 home 15 local search 15 points of interest 13 recently found 18 satellites and 10 spelling the name 13 Where Am I? 12 search location, default 13 security settings 54 sending e-mail 28 locations 14 settings 54–58 application 57 audio 55–56 date and time 55 display 57 general 54 language 55 menu order 57 navigation 56–57 restoring 58 security 54–55 shortcuts 8 signals 59 signatures, e-mail 31 simulation mode 54 slideshow 42 software information 58 songs lists 39–40 playing 38 specifications 62 speed limit 21 spelling a point of interest 13 stop watch 48 storing the device 62 suction cup arm 5 lever 5 support i surfing the Web 35 nüvi 295W Owner’s Manual Index T temperature charging 3, 62 operating 62 settings 54 text completion 9 theft, avoiding 62 time, setting 55 time format 12-hour 55 24-hour 55 UTC 55 timeout, screen 59 tips 8 touchscreen, using 8 transferring files 52 trip information 24 trip log 27 turning on and off 8 turns 23–24 U units of measure 54 nüvi 295W Owner’s Manual updating maps i software i URLs entering 35 sending 37 USB mass storage mode 52 user data, deleting 58 UTC time format 55 V vehicle power cable 5 vehicle route. See driving route via points 24 vibrate mode 55 volume up/down keys 1 W walking mode 25, 56 walking route settings 56 wallpaper 43 weather forecast 45 for a favorite location 46 for other cities 46 Web browser buttons 35 features 35 home page 36 settings 37 Web page bookmarks 36 history 36 Where Am I? 12 Wi-Fi 52–53 adding a network 53 connecting to a network 53 removing a network 53 world map 47 Z zooming 22, 23, 31 71 © 2010 Garmin Ltd. or its subsidiaries Garmin International, Inc. 1200 East 151st Street, Olathe, Kansas 66062, USA Garmin (Europe) Ltd. Liberty House, Hounsdown Business Park, Southampton, Hampshire, SO40 9LR UK Garmin Corporation No. 68, Jangshu 2nd Road, Sijhih, Taipei County, Taiwan www.garmin.com July 2010 Part Number 190-01218-00 Rev. B Printed in Taiwan