1
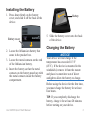
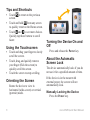
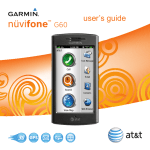
nüvi® 295W
quick start manual
Device Features
‹ Warning
See the Important Safety and Product Information guide in the product box for
product warnings and other important information.
➊microSD™ card slot (under cap)
➊
➋Contacts (for the cradle)
➌Mini-USB connector
➍Power key
➎Headphone/audio out
➋
connector
NOTE: The connector must
be used with the Garmin
2.5 mm to 3.5 mm adapter
or the Garmin stereo headset
with microphone.
➏Volume up/down keys
➐Camera key
➍
➎
➏
➌
➐
nüvi 295W Quick Start Manual
Installing the Battery
1. Press down firmly on the battery
cover, and slide it off the back of the
device.
Battery cover
2. Locate the lithium‑ion battery that
came in the product box.
3. Locate the metal contacts on the end
of the lithium‑ion battery.
4. Insert the battery so that the metal
contacts on the battery match up with
the metal contacts inside the battery
compartment.
Battery
5. Slide the battery cover onto the back
of the device.
Charging the Battery
Notice
Your device will not charge if the
temperature has exceeded 113°F
(45°C). If the device is mounted in the
windshield, remove it from the mount
and place it somewhere out of direct
sunlight to allow the battery to charge.
Before using the device for the first time,
you must charge the battery for at least
four hours.
TIP: If you completely discharge the
battery, charge it for at least 20 minutes
before turning on your device.
nüvi 295W Quick Start Manual
• Use the vehicle power cable
connected to the cradle, with the
device in the cradle (preferred)
(page 4).
• Use the vehicle power cable
connected directly to the device.
• Use the USB cable connected to a
computer.
• Use the battery charger accessory.
• Use the AC power adapter accessory.
TIP: For more information about
accessories, go to www.garmin.com.
Mounting the Device
Notice
Before mounting the device, see
the Important Safety and Product
Information guide for information about
laws pertaining to windshield mounting.
1. Plug the vehicle power cable into the
power connector.
Cradle
Vehicle
power
cable
2. Remove the clear plastic from the
suction cup.
3. Clean and dry your windshield and
the suction cup with a lint-free cloth.
4. Place the suction cup on the
windshield.
5. Flip the lever back, toward the
windshield.
nüvi 295W Quick Start Manual
6. Snap the cradle onto the suction cup
arm.
Using the Home Screen
Suction cup arm
➋
Cradle
➊
Lever
7. Fit the gold contacts on the side of
your device into the cradle.
8. Tilt the device back until it snaps into
the cradle.
➌
➊Touch a shortcut icon in the
9. Plug the other end of the vehicle
power cable into a power outlet in
your vehicle.
scrolling menu to start an application
(page 6). Touch and drag the menu
to scroll through all of the shortcuts.
➋Touch to find and navigate to a
location.
➌Touch to view the map.
nüvi 295W Quick Start Manual
Tips and Shortcuts
• Touch to return to the previous
screen.
• Touch and hold from any screen
to quickly return to the Home screen.
• Touch and to see more choices.
Quickly tap these buttons to scroll
faster.
Using the Touchscreen
• Touch and drag your finger to slowly
scroll the screen.
• Touch, drag, and quickly remove
your finger (flick the screen) to
quickly scroll the screen.
• Touch the screen to stop scrolling.
Orienting the Screen
Rotate the device to view in
horizontal (wide-screen) or vertical
(portrait) mode.
Turning the Device On and
Off
Press and release the Power key.
About the Automatic
Screen Lock
The device automatically locks if you do
not use it for a specified amount of time.
If the device is in the mount with
external power, the screen will not
automatically lock.
Manually Locking the Device
Press the Power key.
nüvi 295W Quick Start Manual
Unlocking the Device
1. Quickly press the Power key, if
necessary.
2. Double-tap .
Adjusting the Screen Timeout
Length
1. From the scrolling menu, touch
Settings > Display > Auto Lock.
2. Select an option.
3. Touch OK.
Searching for Locations
The Where To? menu provides several
different categories you can use to
search for locations and destinations.
Acquiring Satellites
Before you can navigate with your
device, you must acquire satellites.
1. Turn on your device.
2. If necessary, go outdoors to an open
area, away from tall buildings and
trees.
nüvi 295W Quick Start Manual
Acquiring satellite signals can take a
few minutes.
Finding an Address
NOTE: Depending on the version of
the built-in map data on your device,
the button names and the order of steps
could be different from the steps below.
1. From the Home screen, touch Where
To? > Address.
2. If necessary, change the state, the
country, or the province.
3. Touch Spell City, enter the city or
postal code, and touch Done.
TIP: If you do not know the city or
postal code, touch Search All.
4. If necessary, select the city or postal
code in the list.
NOTE: Not all map data provides
postal code searching.
5. Enter the number of the address.
6. Touch Done.
7. Enter the street name.
8. Touch Done.
9. Select a street in the list, if necessary.
10.Touch the address, if necessary.
About Points of Interest
The detailed maps loaded in your
device contain points of interest, such as
restaurants, hotels, and auto services.
Finding by Category
1. From the Home screen, touch Where
To? > Points of Interest.
2. Touch a category.
3. Touch a subcategory, if necessary.
Tip: To narrow the search, touch
Spell, enter the text, and touch Done.
A list of items near your current
location appears.
4. Touch an item.
Finding by Spelling the Name
1. From the Home screen, touch Where
To? > Points of Interest > Spell
Name.
2. Enter all or part of the name.
3. Touch an item.
Finding with Local Search
A Wi-Fi® connection is required to use
this service. Businesses listed with Local
Search may include ratings based on user
reviews. Local Search is not available in
all areas.
1. From the Home screen, touch Where
To? > Local Search.
2. Select a category.
3. Select a location.
Setting a Home Location
You can save a home location and
quickly generate a route to it.
1. From the Home screen, touch Where
To? > Home.
2. Select an option.
nüvi 295W Quick Start Manual
Working with Found
Locations
➊
Following Your Route
Before you can navigate with your
device, you must acquire satellites
(page 7).
➋
➌
After you find a location, several options
appear.
➊Touch to view the location on the
map.
➋Touch to save the location or to send
the location in a location e-mail.
➌Touch to create a route to the
location.
After you find a location (page 7),
touch Go!.
The device creates a route to the
location and opens the map. Your
route is marked with a magenta line.
Using the Map
As you travel, your device guides you
to your destination with voice prompts,
arrows on the map, and directions at the
top of the map.
If you deviate from the original route,
your device recalculates the route and
provides new directions.
Note: You can see detailed map
information only for areas for which you
have maps loaded on your device.
nüvi 295W Quick Start Manual
Transferring Files
➊
➋
➎
➌
➎
➍
➊ Touch to view the route details.
➋ Touch to zoom in and zoom out.
➌ Touch for current location
information.
➍ Touch to return to the Home screen.
➎ Touch to view the trip computer.
Adding Via Points to the Active
Route
1. While navigating a route, touch >
Where To?.
2. Search for the extra via point.
3. Touch Go! > Add As a Via Point.
Taking a Detour
While navigating a route, touch
> Detour.
10
You can transfer files, such as MP3s and
JPEGs, to your device.
1. If necessary, insert a microSD card
into the memory card slot.
2. Connect the mini-USB cable to the
device.
3. Connect the other end of the cable to
your computer.
4. Touch Yes to change to mass storage
mode.
Two additional drives (volumes)
appear in the list of drives on your
computer. One is the available
storage in the internal memory of the
device. The other is the memory card
inserted into the device.
5. Double-click the My Computer
icon (Windows® computers) or
the mounted-volume icon (Mac®
computers) on your computer.
nüvi 295W Quick Start Manual
6. Copy and paste the files to transfer
(Windows computers), or click
and drag the files to the drive (Mac
computers).
Playing a Song
1. From the scrolling menu, touch
Music Player > .
2. Select a category.
3. Select an option:
• Select a song or playlist.
The selected song or playlist
begins playing.
• Touch > All Songs.
All the songs in the selected
category are added to the current
playlist.
nüvi 295W Quick Start Manual
Taking a Picture
1. Press the Camera key.
2. Press the Camera key halfway to
focus on the object.
A green box appears on the screen.
Your device focuses on the object
inside the box.
3. Press and hold the Camera key
until you hear the camera click. The
picture is saved.
11
About Wi-Fi®
You can connect to the Internet using
Wi-Fi. You must be in a Wi-Fi coverage
area (Wi-Fi hotspot) to use Wi-Fi. A WiFi connection is required to use e-mail,
Web browser, and weather services.
1. From the scrolling menu, touch
Settings > System > Wi-Fi > Wi-Fi
Off > On > OK.
2. Select a network.
NOTE: indicates networks that
require an encryption key.
3. If necessary, enter an encryption key.
4. Touch Done.
Using Help
Touch Tools > Help to view
information about using your device.
12
Product Registration
Help us better support you by completing
our online registration today. Go to
http://my.garmin.com. Keep the original
sales receipt, or a photocopy, in a safe
place.
nüMaps Guarantee™
To receive one free map update (if
available), register your device at
www.garmin.com/support within 60 days
of acquiring satellites while driving with
your device. You are not eligible for the
free map update if you register by phone
or wait longer than 60 days after the first
time you acquire satellites while driving
with your device.
Updating the Software
Go to www.garmin.com/support to
download the latest software update.
nüvi 295W Quick Start Manual
Contact Garmin
Contact Garmin Product Support if you
have any questions while using your
device. In the USA, go to www.garmin.
com/support, or contact Garmin USA
by phone at (913) 397.8200 or (800)
800.1020.
Health Precautions
Pacemakers and Other Medical
Devices
Studies have shown that there may be
a potential interaction between mobile
devices and normal pacemaker operation.
The pacemaker industry recommends
that people with pacemakers follow
these guidelines to minimize any risk of
interference with pacemaker operation:
• Always maintain a distance of 15 cm
(6 inches) between the pacemaker
and any mobile device that is turned
on.
• Store the device on the opposite side
of the pacemaker. Do not carry the
nüvi 295W Quick Start Manual
device in a breast pocket.
• If you think that interference may be
occurring, turn off the mobile device
immediately.
For other medical devices, consult with
your physician or the manufacturer to
determine if your mobile device may
interfere with the medical device, and to
determine any precautions that you can
take to avoid interference.
Avoiding Hearing Damage
You can permanently damage your
ears and lose hearing if you listen to
the earbuds, headphones, or headsets at
high volume. Turn the volume down.
The volume is typically too loud if you
cannot hear people speaking around you.
Limit the amount of time you listen at
high volume. If you experience ringing
in your ears or muffled speech, stop
listening and have your hearing checked.
13
Avoiding Repetitive Motion
You may experience occasional
discomfort in your hands, arms,
shoulders, neck, or other parts of your
body if you perform repetitive activities,
such as typing or playing games, on the
device. Take frequent breaks. If you
have discomfort while or after using the
device, stop using and see a physician.
Avoiding Seizures, Blackouts,
and Eyestrain
A very small percentage of people can
experience seizures or blackouts caused
by light flashes or patterns, such as while
watching videos or playing games. If
you have experienced, or have a family
history of, seizures or blackouts, consult
a physician before playing games or
watching videos on your device. Follow
these guidelines to reduce the risk of
blackouts, seizures, and eyestrain:
• Avoid prolonged use of and take
frequent breaks from using the
device.
14
• Hold the device away from your
eyes.
• Use the device in a well-lit room.
If you experience convulsions, eye or
muscle twitching, loss of awareness,
involuntary movement, or disorientation,
stop using the device and consult a
physician.
Radio Frequency Exposure/
Specific Absorption Rate
This device is a transmitter that uses its
antenna to send and receive low levels
of radio frequency (RF) energy for data
communications. When in portrait mode,
the Wi-Fi antenna is located to the right
of the camera lens on the back of the
device.
Regular review of scientific research
and studies has led to the formation
of international safety guidelines and
regulations regarding limiting exposure
to this RF energy. This product emits
RF energy below the published limits
when operating in its maximum output
nüvi 295W Quick Start Manual
power mode and when used with Garmin
authorized accessories. In normal
operation, the device will operate at even
lower output power modes, depending
on many factors including the absence of
external interference.
The RF exposure guidelines use a unit
of measurement known as the specific
absorption rate, SAR. The SAR limit
applicable to this device set by the FCC
is 1.6 watts per kilogram (W/kg).
This device has been tested and is
compliant with the FCC and IC RF
exposure guidelines for Wi-Fi operation.
For countries where this product is sold
outside the United States, this product
has been tested and is compliant to the
applicable RF exposure requirements of
the local regulatory authority.
802.11b.g: Head 0.089; Body 0.068
To be sure that your exposure to RF
energy does not exceed the FCC
guidelines, follow these precautions:
• Position the device antenna at least
15 mm (5/8 inch) from your body.
• Only use the device with Garmin
approved accessories. Only use
accessories that do not have metal
parts and that maintain at least 15
mm (5/8 inch) separation between the
device and your body.
This device has been tested and is in
compliance with international SAR
Exposure limits. The actual measured
values are as follows:
nüvi 295W Quick Start Manual
15
Troubleshooting
Problem/Question
Solution/Answer
The device will not
acquire satellites.
•
•
•
•
Verify that the GPS simulator is turned off.
From the scrolling menu, touch Settings > System > General >
GPS Simulator > Off.
Verify that you are receiving satellite signals. From the scrolling
menu, touch Tools > Where Am I? >
> Satellite Info.
Verify that the GPS antenna is unobstructed. You must be
outdoors or in a vehicle and have a clear view of the sky. Solid
materials (except untinted glass), buildings, and dense trees can
block satellite signals.
Allow the GPS enough time to initialize. When the GPS is turned
on for the first time, it may take a few minutes to initialize.
The device will not
turn on.
•
•
Charge the battery.
Replace the battery. See your owner’s manual for more
information.
The device will not
charge.
The battery might have exceeded the maximum charging temperature.
If the device is mounted, remove it from the mount and place it
somewhere out of direct sunlight.
Garmin® and nüvi® are trademarks of Garmin Ltd. or its subsidiaries, registered in the USA and other countries.
nüMaps Guarantee™ is a trademark of Garmin Ltd. or its subsidiaries. These trademarks may not be used without
the express permission of Garmin.
Mac® is a registered trademark of Apple Computer, Inc., registered in the U.S. and other countries. microSD™
is a trademark of SanDisk or its subsidiaries. Wi-Fi® is a registered mark of the Wi-Fi Alliance. Windows is a
registered trademark of Microsoft Corporation in the United States and other countries.
© 2010 Garmin Ltd. or its subsidiaries.
April 2010
Part Number 190-01218-01 Rev. B
Printed in U.S.