1
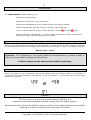
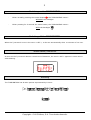
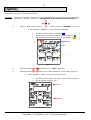
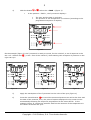
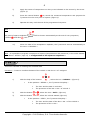
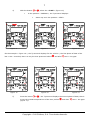
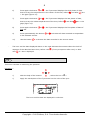
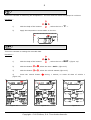
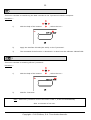
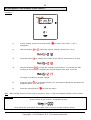
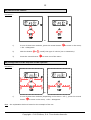
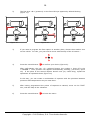
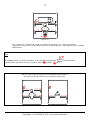
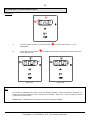
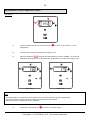
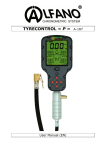
TYRECONTROL « PT » User Manual (EN) A-188 2 Introduction The TYRECONTROL « PT » allows you to : - Measure the air pressures - Adjust the air pressures (only to decrease) - Measure the temperatures on the surface of the tyres and the asphalt - Memorize these data until 495 sets for 5 vehicles, either 5x99 sets. 1 set = until 34 captures of data + Hour and Date « before - and after race » With the software "VISUALTYRE" : recover the data recorded for a better analysis and also bring a help to the configuration of your device Replacing the batteries Switch off the device before removing the used batteries to avoid all loss of data recorded. Insert the two new batteries into the device properly and make sure the terminals "+" and "-" are aligned correctly. Battery Type : 2 x AA Important : It is imperative to use quality batteries manufactured by reputed brands in order to prevent battery leakage into the device. A failure caused by the battery acid voids the warranty. Soft number and serial number of the Tyrecontrol When you switch on the Tyrecontrol, the screen displays the soft number below in the middle (2 numbers) and the serial number of the device on top (6 numbers : 3 on the left and 3 on the right) during some seconds. Caution The Tyrecontrol is a device of precision and, of this fact, it is sensitive to the electromagnetic currents coming from the engine ignition. Keep therefore the Tyrecontrol distant (minimum 50cm) of the engine ignition to avoid false readings or a device ‘freezing’ when the engine is running. Copyright 2005 Alfano, S.A. Tous droits réservés. 3 Switching on the TYRECONTROL - Either normally pressing the central button , the TYRECONTROL starts : WITHOUT the backlight. - Either pressing for 2 seconds the same button, the TYRECONTROL starts : WITH the backlight . Switching off the TYRECONTROL When the Tyrecontrol is not in the menu « OFF », it dies out automatically after 10 minutes of non use. Weak battery detection As soon as the Tyrecontrol detects a weak level of batteries, the word « BAT » appears in most menus while blinking. Working The TYRECONTROL has 8 main options represented by 8 icons : Copyright 2005 Alfano, S.A. Tous droits réservés. 4 This option consists in recording new data. Procedure : I want to record the pressures and the temperatures for the vehicle 3, with the n°079 assigned. (See menu « SETUP », page 12, « assignment of the numbers of the vehicles » 1) With the help of the buttons , select the icon « RECORD » (figure 1) In the position « RECORD », the Tyrecontrol displays : The hour and the date in real time The pressure in real time (allows a fast measure) The pressures of the last « Set » of the vehicle 1 Figure 1 2) With the button or select the icon « Vehi » (figure 2) 3) With the button or select the vehicle wanted (5 to the total) (figure 2) In the position « VEHI », the Tyrecontrol displays : The hour and the date of the last « Set » of the Vehicle 3 The pressures of this « Set » Figure 2 Copyright 2005 Alfano, S.A. Tous droits réservés. 5 4) With the button or , select the « FACE » (figure 3) In the position « FACE », the Tyrecontrol displays : The hour and the date in real time The pressure or the temperature in real time (according to the programmed sequence of capture) Figure 3 On the example (figure 3), the Tyrecontrol is ready to record, for the vehicle 3, a set of captures in the Set « 03 » before race right rear tyre. Figure 4 , (« Set » free of the vehicle 3) while starting with a capture of pressure on the Figure 5 Figure 6 5) Apply the mouthpiece of the Tyrecontrol on the valve of the tyre (figure 4) 6) Press the central button to record the measured pressure as well as the hour and the date of the moment, then, the point of capture displayed to the screen moves automatically following the sequence programmed in the menu SETUP. In the example (figure 5), the device positions itself on the measure of the temperature in the center of the left rear tyre. Copyright 2005 Alfano, S.A. Tous droits réservés. 6 7) Apply the sensor of temperature on the tyre as indicated on the screen by the arrow (figure 5). 8) to record the measured temperature and prepare the Press the central button Tyrecontrol on the next point of capture (Figure 6). 9) Operate this way until the end of the programmed sequence. Note : the point of capture asphalts « before and after 10) will be chosen automatically at the end of every sequence, race ». Since the hold of the temperature asphalts, the Tyrecontrol returns automatically to the menu « RECORD ». Note : it is possible to program a sequence of capture (temperatures and pressures) in the order desired (See Menu « SETUP » page 15, « configuration of the captures sequence ». This menu consists in recalling the recorded data. Procedure : I want to visualize the data of the vehicle 1 with the n° 117 assigned. 1) With the help of the buttons , select the icon « RECALL » (figure 8) In the position « RECALL », the Tyrecontrol displays : The hour and the date in real time The pressures of the last « Set » of vehicle 3 2) With the button or , select the icon « Vehi » (figure 9) 3) With the button or , select the vehicle wanted (figure 9) In the position « VEHI », the Tyrecontrol displays : The hour and the date of the last « Set » of the Vehicle 1 The pressures of this « Set » Copyright 2005 Alfano, S.A. Tous droits réservés. 7 4) With the button or , select the « FACE » (figure 10) In the position « CADRAN », the Tyrecontrol displays : Same way as in the position « VEHI » Figure 8 Figure 9 Figure 10 On the example « Figure 10 », the Tyrecontrol displays for the vehicle 1, the first phase of data of the last « Set » recorded, that is to say the tires pressures before Figure 11 5) and after race + the gaps. Figure 12 Press the button or Figure 13 : the Tyrecontrol displays the second phase of data, that is to say the outside temperatures of the tires, before (figure 11). and after Copyright 2005 Alfano, S.A. Tous droits réservés. race + the gaps 8 6) Press again the button or : the Tyrecontrol displays the third phase of data, that is to say the temperatures in the center of the tires, before + the gaps (figure 12). 7) Press again the button or - Press again the button first Set. or 9) Press systematically the button in the selected vehicle. 10) Use the button race : the Tyrecontrol displays the last phase of data, that is to say the inside temperatures of the tires, before gaps (figure 13). 8) and after and after race + the : the Tyrecontrol displays the first phase of data of or to browse all data recorded correspondent : to browse the data recorded in the inverse sense. The hour and the date displayed above on the right indicate the moment where the hold of captures of the data has been done, before race race (if not yet captures after race) or after of « Set » displayed. This menu consists in measuring the pressure. Procedure : , select the icon « P ». 1) With the help of the buttons 1) Apply the mouthpiece of the Tyrecontrol on the valve of the tyre. The hour and the date are displayed in real time. Copyright 2005 Alfano, S.A. Tous droits réservés. 9 This menu consists in measuring the temperature. The hour and the date are displayed in real time. Procedure : 1) With the help of the buttons , select the icon « 2) Apply the temperature sensor A481 on the tire. T° ». This menu consists in erasing the recorded data. Procedure : , select the icon « RST » (figure 14) 1) With the help of the buttons 2) With the button or , select the icon « Vehi » (figure 15) 3) With the button or , select the vehicle wanted (figure 15) 4) Press the central button (figure 16) Figure 14 during 1 second, to erase all data of vehicle 1 Figure 15 Copyright 2005 Alfano, S.A. Tous droits réservés. Figure 16 10 This menu consists in transferring the data recorded in the Tyrecontrol toward a computer. Procedure : , select the icon : 1) With the help of the buttons 2) Apply the interface IR-USB (the A421) on the Tyrecontrol. 3) The command of the function « download » is done from the software VISUALTYRE. This menu consists in switching off the Tyrecontrol. Procedure : 1) With the help of the buttons 2) Wait for 3 seconds. , select the icon : Note : when the Tyrecontrol is not in the menu « OFF », it dies out automatically after 10 minutes of non use. Copyright 2005 Alfano, S.A. Tous droits réservés. 11 SETUP These menus consist in configuring various parameters of the Tyrecontrol : 01) Assignment of the numbers of the vehicles « menu 01 » (page 12) 02) Regulating of the clock and the calendar « menu 02 » (page 13) 03) Choice of the unit Bar/PSI « menu 03 » (page 14) 04) Choice of the unit C°/F° « menu 04 » (page 14) 05) Choice of the vehicle « menu 05 » (page 15) 06) Configuration of the sequence of the captures « menu 06 » (page 15) 07) Calibration of the Pressure sensor « menu 07 » (page 18) 08) Calibration of the Temperature sensor « menu 08 » (page 19) Procedure to reach the SETUP : 1) The Tyrecontrol must be stopped. 2) during minimum 5 seconds, the Tyrecontrol starts in Press the central button the first menu SETUP : « Assignment of the numbers of the vehicles ». Procedure to browse the menus SETUP : Press the button or Procedure to leave the mode SETUP : 1) After the menu « Calibration of the Temperature sensor », 2) Press the central button on « EXIT », the Tyrecontrol starts in its normal working on mode « RECORD ». Copyright 2005 Alfano, S.A. Tous droits réservés. 12 01) Assignment of the numbers of the vehicles : Procedure : 1) In this window, press the central button disappears. 2) With the button 3) Press the button 4) With the buttons , modify the number of the vehicle. To activate the fast scrolling of the numbers, maintain the pressed button more than 1 second. or to enter in the menu, « Ent » , select the vehicle wanted, choice from 1 to 5, to modify the number of the vehicle, choice from 0 to 999, To assign a number to another vehicle : 5) Press the button to come back behind, you just need to repeat the operations as explained above from the line 2. 6) Press the central button to leave the menu. Note : After having come out of the menu, only the « Vehi 1 » with its assigned number will be visible. Important : - If the number of the vehicle 1 is adjusted on zero, when using the Tyrecontrol, the system won't permit to choose another vehicle. Copyright 2005 Alfano, S.A. Tous droits réservés. 13 02) Regulating of the clock and the calendar : Procedure : 1) In this window, press the central button disappears. to enter in the menu, « Ent » 2) With the buttons 3) Press the button 4) With the buttons , modify the minutes. To activate the fast scrolling of the numbers, maintain pressed more than 1 second. 5) Press the button 6) With the buttons , modify the day calendar, 7) Press the button to be able to modify the month, 8) With the buttons 9) Press the button 10) With the buttons 11) Press the button 12) Press the central button , modify the hour, to be able to modify the minutes, to be able to modify the day calendar, , modify the month, , to be able to modify the year, , modify the year, , to come back behind, , to come out of the menu. Copyright 2005 Alfano, S.A. Tous droits réservés. 14 03) Choice of the unit Bar/PSI : Procedure : OR 1) Owing one of these two windows, press the central button “Ent” disappears. 2) With the button 3) Press the central button or to enter in the menu, , modify the unit, to come out of the menu. 04) Choice of the unit °C/°F : Procedure : OU 1) In one these two windows, press the central button « Ent » disappears. 2) With the button 3) Press the central button or to enter in the menu, , modify the unit, to come out of the menu. Copyright 2005 Alfano, S.A. Tous droits réservés. 15 05) Choice of the vehicle : Procedure : ou 1) In one of these two windows, press the central button « Ent » disappears. 2) With the button 3) Press the central button or to enter in the menu, , modify the type of vehicle (Car or Motorbike) to come out of the menu. 06) Configuration of the sequence of the captures : Procedure : ou 1) In one of these two windows (depending on the menu « 05 »), press the central button to enter in the menu, « Ent » disappears. Note : the explanation below is based on the example of the car. Copyright 2005 Alfano, S.A. Tous droits réservés. 16 2) The first Icon « P » (pressure) on the front left tyre appears by default blinking (figure 17). Figure 17 Figure 18 Figure 19 3) If you want to program the first capture in another place, choose then another icon on the vehicle. For this, you just need to move with the help of the 4 buttons : 4) Press the central button to confirm your choice (figure 18). After confirmation, the icon « P » selected freezes, the number 1 show off in the « CADRAN ». Then, another icon appears automatically, blinking, (red arrow, figure 18). If the place of the second capture doesn't suit you, same thing, repeat the operations as explained above (figure 19). In this way, you can create a combination of captures with the priorities between pressures and temperatures as you want them. 5) After having programmed the points of captures as wanted, move on the “EXIT” icon, with the help of the 4 buttons. 6) Press the central button to leave the menu. Copyright 2005 Alfano, S.A. Tous droits réservés. 17 Figure 20 The « figure 20 » shows that 4 captures’ points of pressures + 4 captures’ points of temperatures have been programmed with the wanted priorities + the capture point of asphalt temperature. Note : In RECORD mode, the point of capture of the asphalt’s temperature automatically at the end of every sequence before and after will be chosen race. The two figures below represent the available capture places On the car (left side) and on the motorbike (right side) Copyright 2005 Alfano, S.A. Tous droits réservés. 18 07) Calibration of the Pressure sensor : Procedure : 1) In this window, press the central button disappears. 2) Press the central button menu (figure 23). Figure 21 to enter in the menu, « Ent » to calibrate the sensor of pressure and to leave the Figure 22 Note : - It is useful to calibrate the sensor when the FACE indicates a value of pressure whereas no pressure has been entered in the Tyrecontrol (example : figure 21). The mouthpiece of the Tyrecontrol must be free. - IMPORTANT : calibrate the Tyrecontrol with the mouthpiece FREE. Copyright 2005 Alfano, S.A. Tous droits réservés. 19 08) Calibration of the Temperature sensor : Procedure : to enter in the menu, « Ent » 1) In this window, press the central button disappears. 2) Connect the sensor of temperature (figure 23). 3) With the buttons , adjust the temperature in the « FRAME » so that the displayed temperature corresponds to a temperature of reference (figure 24). Figure 23 Figure 24 Note : - The temperature of reference must come from a precision device giving temperature. - The two sensors of these devices must be placed at the same place. - Wait that the two displayed values stabilize. 4) Press the central button to come out of the menu. Copyright 2005 Alfano, S.A. Tous droits réservés. 20 Warranty conditions All our devices have been subject to in-depth factory tests and are covered by a 24-month warranty against manufacturing defects. The warranty comes into force from the date of purchase. The date of purchase is the date stated on the invoice/till receipt given by the seller at the time of sale. The manufacturer undertakes to repair and replace free of charge any parts which have a manufacturing defect during the warranty period. Any defects which cannot be clearly attributed to the material or the manufacturer will be examined at one of our approved after-sales service centres and invoiced depending on the results. The warranty does not apply in cases of device opening, accidental damage, negligence or misuse, inappropriate or incorrect installation or failure to perform the installation in accordance with the instructions contained in the attention note and in events not associated with the rules of operation and use of the device. The warranty will become null and void in cases of repair or handling carried out by unauthorised third parties. Intervention under warranty does not entitle to the device replacement or warranty extension. Intervention under warranty is carried out at one of our approved after-sales service centres or at our head office. In the latter case, the item must reach our establishment postage paid, that is, transport costs shall be paid by the user. The manufacturer undertakes no responsibility for any damage to persons or goods caused by poor installation or incorrect use of the device. Product modifications Alfano SA applies a method of ongoing development. Consequently, Alfano SA reserves the right to make changes and improvements to any product described in this document without prior notice. Damages and responsibilities The products are used under the customer’s sole direction and responsibility and therefore damages suffered or caused by the products shall be borne by the customer. No compensation will be paid for removal of enjoyment, and ALFANO cannot be held responsible for the direct or indirect consequences of their use or rendering useless. ALFANO’s obligations are duty of care and not a performance obligation. Disposal The device must be disposed of with respect for environment. The chronometer and its accessories contain many plastic parts. When the chronometer or one of its accessories no longer functions, they must be dealt with according to the laws of the country. Used batteries must be disposed of in accordance with the regulations in force in your country. Copyright 2005 Alfano, S.A. Tous droits réservés. 21 ALFANO S.A. Rue de l’Industrie, 3b – 1400 NIVELLES (BELGIUM) www.alfano.com 28-05-2010 Copyright 2005 Alfano, S.A. Tous droits réservés.