1
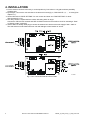
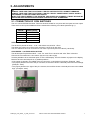
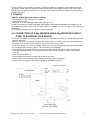
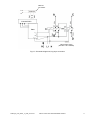
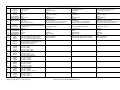
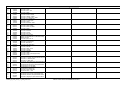
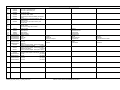
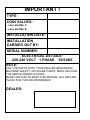
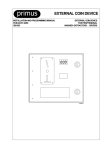
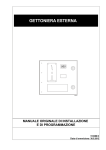
EXTERNAL COIN DEVICE ORIGINAL INSTALLATION AND PROGRAMMING MANUAL 505636 E Publication date: 17 Feb 2014 1. TABLE OF CONTENTS 1. TABLE OF CONTENTS .................................................................................................. 3 2. WARNINGS AND SYMBOLS ......................................................................................... 4 2.1. WARNINGS........................................................................................................................................4 2.2. EXTERNAL COIN DEVICE LABELS...................................................................................................4 3. USE OF THE EXTERNAL COIN DEVICE....................................................................... 5 3.1. COIN COUNTER (INTENDED FOR WASHING MACHINE) ECD 1.....................................................5 3.2. TIMER (INTENDED FOR DRYER) ECD 2 ..........................................................................................5 4. INSTALLATION .............................................................................................................. 6 5. ADJUSTMENTS.............................................................................................................. 7 5.1. CONNECTION OF COIN SWITCHES.................................................................................................7 5.2. COIN COUNTER (WASHING MACHINE) ...........................................................................................8 5.3. TIMER (DRYER).................................................................................................................................8 5.4. CONNECTION OF 6,5 kg WASHER TO EXTERNAL COIN DEVICE ........................................................9 5.6. CONNECTION OF 6/7 kg WASHER TO EXTERNAL COIN DEVICE ......................................................10 5.7. CONNECTION OF 9 kg DRYER TO EXTERNAL COIN DEVICE............................................................10 5.8. CONNECTION OF 6,5 kg DRYER TO EXTERNAL COIN DEVICE .........................................................10 6. TROUBLE SHOOTING AIDS........................................................................................ 12 6.1. COINS CAN’T BE INSERTED ..........................................................................................................12 6.2. LINKED APPLICANCE GETS NOT STARTED .................................................................................12 6.3. DISPLAY DOESN’T LIGHT UP OR NOT FULLY...............................................................................12 7. SPARE PARTS LIST .................................................................................................... 13 8. PUTTING “OUT OF SERVICE” .................................................................................... 17 8.2. MACHINE DISPOSAL ......................................................................................................................17 8.2.1 POSSIBILITY OF THE MACHINE DISPOSAL BY THE SPECIALIZED COMPANY .....................17 8.2.2 POSSIBILITY OF THE MACHINE LIQUIDATION BY OWN POTENTIAL.....................................17 505636_E_PUB_DATE_17_FEB_2014.DOC INSTALLATION AND PROGRAMMING MANUAL 3 2. WARNINGS AND SYMBOLS 2.1. WARNINGS This English version is the original version of this manual. Without this version, the instructions are incomplete. Before installation, operation and maintenance of the machine read carefully the complete instructions, i.e. this “Installation and programming manual”, “Installation, maintenance and user's manual”,“Programming manual” and “Spare parts manual”. The Programming manual and Spare parts manual are not delivered with a machine by default. You shall ask the supplier / manufacturer to obtain Programming manual and Spare parts manual. Follow the instruction written in manuals and keep the manuals in a proper place by the machine for later use. If any problems or failures occur which you do not understand, immediately contact your service man, dealer or manufacturer. CAUTION - IMPORTANT NOTE !!! ! READ THIS MANUAL CAREFULLY BEFORE USING THIS APPLIANCE. UNQUALIFIED INTERVENTION TO THIS APPLIANCE AND THE MACHINE MAY CAUSE SERIOUS BODILY INJURY AS WELL AS DAMAGE TO THE PARTS. ! DANGER !!! ALWAYS DISCONNECT THE ELECTRICAL POWER SUPPLY BY TAKING OUT OF MAIN PLUG FROM THE WALL SOCKET AND DISCONNECT WITH THE DISCONNECTING DEVICE THE LINKED APPLIANCE BEFORE SERVICING ! THIS IS YOUR PERSONAL SAFETY ! ! DANGER !!! TO ENSURE EVERYBODY’S SAFETY, OPERATIONS THAT REQUIRE THE APPLIANCE TO BE OPENED MUST BE CARRIED OUT BY QUALIFIED PERSONS WHO TAKE ALL THE NECESSARY MEASURES. AT THE END OF THESE OPERATIONS, THE APPLIANCE MUST BE RESTORED TO ITS ORIGINAL STATE. ! DANGER !!! TO ENSURE EVERYBODY’S SAFETY, BEFORE CONNECTING THE POWER SUPPLY OF THE EXTERNAL COIN DEVICE OR/AND THE LINKED APPLICANCE LOCK ALWAYS THE DOOR OF THE EXTERNAL COIN DEVICE AND VERIFY IF THE LINKED APPLIANCE IS RESTORED TO ITS ORIGINAL STATE. 2.2. EXTERNAL COIN DEVICE LABELS Danger, read and follow written instructions. Caution, dangerous electrical tension, electric devices 4 INSTALLATION AND PROGRAMMING MANUAL 505636_E_PUB_DATE_17_FEB_2014.DOC 3. USE OF THE EXTERNAL COIN DEVICE – The external coin device must be ordered as timer device or as coin counter device. – A single or double coin drop can be applied according to clients’ order. – Regularly remove the coins from the external coin device. Always disconnect the external coin device from the power supply! – DO NOT OIL THE COIN DROP MECHANISM ! 3.1. COIN COUNTER (INTENDED FOR WASHING MACHINE) ECD 1 The price to start the machine is shown on the LED display. When inserting a coin, the value of this coin is reduced from the value shown on the LED display. When enough coins are inserted, the value reaches 0. The coin counter will give an electrical “ready to start” contact to the linked appliance. The linked appliance will start after pushing the start button on the linked appliance control. The coin counter will reset automatically after some time or after disconnection of the power supply. 3.2. TIMER (INTENDED FOR DRYER) ECD 2 When inserting coins, the timer will give an electrical “ready to start” contact to the linked appliance and the available time is shown on the display. The linked appliance will start after pushing the start button on the linked appliance control. Time on the display is decreasing. Meanwhile new coins can be inserted and extra time will be added. When time becomes zero, the linked appliance stops. 505636_E_PUB_DATE_17_FEB_2014.DOC INSTALLATION AND PROGRAMMING MANUAL 5 4. INSTALLATION 1. Fix the external coin device securely in vertical position by four bolts on a dry place without possibility of getting wet. 2. By changes, connect the coin switches to the electronic board (fig.4., COIN VALUE 1,2, …, +5 Volts) (See chapter 5.1.). 3. Set the DIP switch “PRICE SETTING” for coin counter and timer and “TIME SETTING” for timer. (See chapters 5.2,5.3.). 4. The relay contact is a potential free contact with rating 250V ac 2(1)A. Connect the “RELAY NO” terminal and “RELAY COM” terminal to the machine circuit for activating a “Start” or “Ready to start” command. 5. Use the 250V ac already wired plug to connect the external coin device to the main supply of 208 - 240V ac. The wall socket must be fused with max 16A and leakage current breaker of 30 mA. 513 286 Fig.4. Coin counter EST200 and Timer T200 6 INSTALLATION AND PROGRAMMING MANUAL 505636_E_PUB_DATE_17_FEB_2014.DOC 5. ADJUSTMENTS ! DANGER! ALWAYS TAKE CARE THAT ELECTRICAL CABLES ARE PROTECTED AGAINST DAMAGING. ALWAYS TAKE CARE THAT ELECTRICAL CABLES CAN NOT CAUSE BODILY INJURY AS WELL AS DAMAGE TO THE PARTS AND APPLIANCES. WHEN THE CABLES NEEDS TO BE SHORTED, PROLONGED OR CHANGED, IT MUST BE DONE BY QUALIFIED SKILLED PERSON ACCORDING THE VALID LOCAL STANDARDS! 5.1. CONNECTION OF COIN SWITCHES The coin counter EST200 and timer T200 is a electronic board for one price with five inputs and one output. There are five coin inputs available and have standard the following coin values (see also fig.4.): COIN VALUE 1 2 3 4 5 Value of switch (Units) 010 020 025 050 100 COIN DROPS: 0,5 EURO AND 1 EURO The decimal is placed as follow : “4.00”, what means 100 units for 1 Euro. The same logic shows “0,50” Euro is 50 units and “1,00” Euro is 100 units. The coin switches has to be connected to coin value 4 (50 Units) and coin value 5 (100 Units). COIN DROPS : 0,20 EURO AND 0,50 EURO The decimal point is placed as follow : “4.00”. So “0.20” Euro is 20 units and “0.50” Euro is 50 units. Connect the coin switches to coin value 2 (20) and coin value 4 (50). It is also possible to show a decimal point on of the LED display. There is foreseen a jumper on the display board to have the decimal point on 3 possible positions : – If the jumper is placed in the middle of the pin connector, no decimal point is shown. (Example “999”) – The jumper placed on the left of the pin connector, there will be shown a decimal point next to the left digit. (Example “9.99”) – The jumper placed on the right of the pin connector, there will be shown a decimal point next to the middle digit . (Example “99.9”) Fig.5.1. 505636_E_PUB_DATE_17_FEB_2014.DOC INSTALLATION AND PROGRAMMING MANUAL 7 5.2. COIN COUNTER (WASHING MACHINE) Each DIP switch of the “PRICE SETTING” switch (See fig.4.) has a certain value, as mentioned in the following table: Number of switch 1 2 3 4 5 6 7 8 Value number 1 2 4 8 16 32 64 128 A value is selected by switching the switch to the “ON” position. The price is the product of the “PRICE SETTING” (1-255) and a predetermined value 5 ! The price lays between 5 and 1275 (1x5 to 255x5). Herein is 1 and 255 price settings value, 5 is standard value). EXAMPLE PRICE FOR ONE WASH: 4 EURO We keep in mind that we have three digits on the display, and we will display the amount 4 Euro like “4.00”. So we count for one unit on the display = “0.01” Euro. For the decimal point we have to place the jumper on the left side of the pin connector to shown a decimal point next to the left digit. (software independent). The price is determined by the DIP switch “PRICE SETTING” multiplied by a value 5. We calculate the PRICE SETTING we have to set : 400 units (4 Euro) / 5 = 80 We have to set the DIP switch “PRICE SETTING” on 80 : 0*1(DIP 1)+0*2(DIP 2)+0*4(DIP 3)+0*8(DIP 4)+1*16(DIP 5)+0*32(DIP 6)+1*64(DIP 7)+0*128(DIP 8) = 80 As we can see the DIP switches 5 and 7 of the “PRICE SETTING” must be placed on “1” or “ON”. The other DIP switches must be placed on “0” or “OFF”. PRICE FOR ONE WASH: 5 EURO Predetermined programmable value = 5 Price setting is 5.00 or 500/5 = 100 The number 100 can be composed as follows: 0*1(DIP 1)+0*2(DIP 2)+1*4(DIP 3)+0*8(DIP 4)+0*16(DIP 5)+1*32(DIP 6)+1*64(DIP 7)+0*128(DIP 8) = 100 Place the following DIP switches of the “PRICE SETTING” on “1” or “ON” : DIP 3, DIP 6, DIP 7. The other DIP switches are placed on OFF position. 5.3. TIMER (DRYER) Each DIP switch of the “PRICE SETTING” (See fig.4.) has a certain value, as mentioned in 5.2 coin counter. When this price is paid the dryer will start and this for a predetermined time set with DIP switch “TIME SETTING” as mentioned in the following table: Number of switch 1 2 3 4 5 6 7 8 8 Value number 1 2 4 8 16 32 64 128 INSTALLATION AND PROGRAMMING MANUAL 505636_E_PUB_DATE_17_FEB_2014.DOC You can now form any number for the time in minutes by making a combination of the values mentioned here above (1-255). A value is selected by switching the switch of the “TIME SETTING” to the “ON” position. Standard you can set a time between the 1 min and 255 minutes for the above set price. Extra payment is possible at any time. EXAMPLE TIME SET 4 MINUTES FOR A PRICE OF 1 EURO 1. Set the price on 1 Euro (see 5.2 Coin counter). 2. Set the time on 4 min. The time to set on the “TIME SETTING” switch (see fig.4.) is : 4 0*1(DIP 1)+0*2(DIP 2)+1*4(DIP 3)+0*8(DIP 4)+0*16(DIP 5)+0*32(DIP 6)+0*64(DIP 7)+0*128(DIP 8) = 4. For 4 minutes you have to pay 1 Euro and extra payment is possible, for 1 Euro you get 4 min more time on the display. For a 0,5 Euro extra payment you will get 2 minutes extra time. 5.4. CONNECTION OF 6,5kg WASHER AND 6,5kg DRYER WITH HEAT PUMP TO EXTERNAL COIN DEVICE – To connect the washer to the external coin device, use the already connected (2+1) cable coming from the external coin device. – Open the top cover of the washer and place the cable through the foreseen opening on the rear plate in the middle. If no hole with swivel is present, mount one that’s fit for the cable. – In the rear top side you will find a rectangle 6 pole connector (male and female). Remove the female with the wire bridge that is sitting in position 1 and 4. Remove the wire bridge. – If not present put on male faston’s on the wires of the cable coming from the External coin device that match with the female faston’ in the male connector and place them in position 1 and 4 of the female connector. – Place the earth in position 6. – Fix the female on the male connector and secure all new items. – Place everything in the original position before connecting to the power supply. – The time relay is preset from production to MODE C and TIME 5 minutes. electronic coin selector black COIN SENSORS black L1 N TIMER external power supply (220-240V / 1AC / 50-60Hz) 505636_E_PUB_DATE_17_FEB_2014.DOC INSTALLATION AND PROGRAMMING MANUAL 9 5.5. CONNECTION OF 6/7 kg WASHER TO EXTERNAL COIN DEVICE – To connect this washer to the external coin device you need to order model ECD 1. – To connect the washer to the external coin device, use the already connected (2+1) cable coming from the external coin device. – Open the top cover of the washer and place the cable through the foreseen opening on the rear plate. If no hole with swivel is present, mount one that’s fit for the cable. – If not present put on female faston’s on the wires of the cable coming from the External coin device that match with the male faston located on the program switch located on the rear of the machine. Connect one wire of the cable to the red and one to the green. Never put any voltage to these two (red and green) wires. Connect the earth wire to a earth point of the machine. More detailed connection information can be found on the electrical wiring diagram of the machine. – Secure all new items. – Place everything in the original position before connecting to the power supply. 5.6. CONNECTION OF 9 kg DRYER TO EXTERNAL COIN DEVICE – To connect this dryer to the external coin device you need to order model ECD 2. – To connect the dryer to the external coin device, use the already connected (3+1) cable coming from the external coin device. – Open the top cover of the dryer and place the cable through the foreseen opening on the rear plate. If no hole with swivel is present, mount one that’s fit for the cable. – Connect the earth wire to a earth point of the machine. – RT is an Timer relay. This relay is active for a certain time longer than the RL, this is necessary for the cooldown function and is standard set on 5 minutes. – Place everything in the original position before connecting to the power supply. 5.7. CONNECTION OF 6,5kg DRYER TO EXTERNAL COIN DEVICE, NOT APPLICABLE FOR 6,5kg DRYER WITH HEAT PUMP – To connect this dryer to the external coin device you need to order model ECD 2. – To connect the dryer to the external coin device, use the already connected (4+1) cable coming from the external coin device. – Open the top cover of the dryer and place the cable through the foreseen opening on the rear plate. If no hole with swivel is present, mount one that’s fit for the cable. – There is a relay with wires on the right rear side. Disconnect the black wire and two orange wires from the RB terminal of the relay. – Connect the disconnected black wire to the wires of the external coin device - AC wires (blue + gray). – Connect Wire B (black) to the RB terminal - relay coil. – Connect Wire D to the pair of the orange wires - electrical circuit of the motor. – Provide all the connections with suitable insulated connecting components. – Connect the earth wire to a earth point of the machine. – RT is an Timer relay. This relay is active for a certain time longer than the RL, this is necessary for the cooldown function and is standard set on 5 minutes. – Place everything in the original position before connecting to the power supply. 10 INSTALLATION AND PROGRAMMING MANUAL 505636_E_PUB_DATE_17_FEB_2014.DOC electronic coin selector L1 blue COIN SWITCHES grey black 12V DC black N black brown Timer external power supply (220-240V / 1AC / 50-60Hz) Fig.5.7. Schematic diagram 6,5 kg dryer connection 505636_E_PUB_DATE_17_FEB_2014.DOC INSTALLATION AND PROGRAMMING MANUAL 11 6. TROUBLE SHOOTING AIDS Before servicing always disconnect the power from supply source! Do not forget to lock the external coin device door after servicing or empty the coin box! 6.1. COINS CAN’T BE INSERTED COIN DROP SLOT IS PLUGED – clean slots of coin meter on dry way. – remove foreign objects from coin mechanism. COIN DROP SWITCH IS DEFECT – exchange damaged parts to identical purchased parts from your dealer/manufacturer. COIN BOX IS FULL – Empty the coin box in the external coin device. 6.2. LINKED APPLICANCE GETS NOT STARTED NOT SUFFICIENT NUMBER OF COIN FOR START SIGNAL – put right number of coins in the external coin device. COIN DROP SWITCH IS DEFECT – exchange damaged parts to identical purchased parts from your dealer/manufacturer. COIN COUNTER OR TIMER IS DEFECT – exchange damaged parts to identical purchased parts from your dealer/manufacturer. DEFECT OR BAD CONNECTION – check wire connection according “Connection diagram” delivered with appliance. 6.3. DISPLAY DOESN’T LIGHT UP OR NOT FULLY THE POWER OF THE EXTERNAL COIN DEVICE IS INTERRUPTED – carefully check source supply and supply cable of the external coin device. COIN COUNTER OR TIMER IS DEFECT – exchange damaged parts to identical purchased parts from your dealer/manufacturer. DISPLAY IS DEFECT – exchange damaged parts to identical purchased parts from your dealer/manufacturer. DEFECT OR BAD CONNECTION – check flat cable between coin drop counter or timer and display and his connection. 12 INSTALLATION AND PROGRAMMING MANUAL 505636_E_PUB_DATE_17_FEB_2014.DOC 7. SPARE PARTS LIST EXTERNAL COIN DEVICE 505636_E_PUB_DATE_17_FEB_2014.DOC INSTALLATION AND PROGRAMMING MANUAL 13 External coin device: drawing nr. 505545E 1 2 3 4 5 6 7 8 8 9 9 9 9 10 11 14 15 16 17 18 19 20 20 21 21 21 21 21 21 21 21 21 21 21 21 21 21 21 21 21 21 21 21 21 21 21 21 21 21 21 21 21 500184 535170 535172 100518 PRI610000041 100520 F01113500514 PRI543072072 PRI543073072 PRI610001028 549083 PRI231000038 PRI212000008 309084000306 310934000003 311679800003 PRI350000045 PRI350001045 102043 102044 516914 516913 102371 516639 100895 100896 101797 101450 516632 102407 102452 102546 100866 100867 100868 100869 100870 100871 100887 100888 516994 100891 100892 516921 101437 100893 100642 Coin box Cover of coinmeter Coinbox plate L plate Hinge Door latch Holder Plexi transparent Plexi red Coinbox lock Big nut, part of No. 9 Securing washer, part of No. 9 Nut M7, part of No. 9 Power supply 12V, applicable for electronic coin selector Supple bent washer Bolt M3x10 Bolt M3x6 Nut M3 Washer M3 Swievel Nut Timer board, applicable for washing machines Timer board, applicable for drying machines Coin meter “Unibel Tech”,applicable for high spin industrial washing machines 10kg / 25lb Coin meter “Unibel Tech”,applicable for high spin industrial washing machines 7kg / 18lb Coin meter for 5DKK + 10DKK Coin meter for 2DKK Coin meter for 5DKK Coin meter for 20DKK Coin meter for 1DKK + 5DKK Coin meter for 2DKK + 5DKK Coin meter for 2DKK + 10DKK Coin meter for 0,2EUR Coin meter for 1EUR + 0,2 EUR Coin meter for “SUN WASH” jeton Coin meter for “5K” jeton Coin meter for “7K” jeton Coin meter for “10K” jeton Coin meter for “12K” jeton Coin meter for “15K” jeton Coin meter for “D” jeton Coin meter for 1£ + 20PC Coin meter for 1£ + 50PC Coin meter for 20 pence Coin meter for 100YEN Coin meter for 500YEN + 100YEN Coin meter “Unibel Tech” 5K Coin meter for 0,25USD Coin meter for 1AUD Coin meter for 1AUD + 20C 505636_E_PUB_DATE_17_FEB_2014.DOC Boîte Couvercle Plaque de monnayeur Cornière Paumelle Encliquetage de la serrure Support Altuglas transparent Altuglas rouge Serrure du monnayeur Grande ècrou de la serrure, partie de la position 9 Rondelle de sécurité, partie de la position 9 Ecrou M7, partie de la position 9 Münzgerätkasten Deckel Münzgerätschach-tel Schild Münzgerät Winkelstück Türband Türschloßklinke Halter Durchsichtiges Plexi Rotes Plexi Schloß Münzgerät Türschloßmutter groß, Positionsbestandteil 9 Sicherungsscheibe, Positionsbestandteil 9 Mutter M7, Positionsbestandteil 9 Caja del monedero Tapa de la caja del autómata de monedas Rótulo del autómata de monedas Escuadra Bisagra Pestillo de la cerradura Sujetador Plexiglás transparente Plexiglás rojo Cerradura del autómata de monedas Tuerca grande de la cerradura, parte de la posición 9 Arandela de seguridad, parte de la posición 9 Tuerca, parte de la posición 9 Rondelle élastique coudé Vis M 3 x 10 Vis M 3 x 6 Ecrou M3 Rondelle M3 Traversé du cable Ecrou Carte du programmeur Carte du programmeur Unterlegscheibe federnd durchgebogen Schraube M 3 x 10 Schraube M 3 x 6 Mutter M3 Unterlegscheibe M3 Kabeldurchführung Mutter Programmatorplatte, gültig für Waschmaschinen Programmatorplatte, gültig für Trockenmaschinen Arandela elástica encorvada Tornillo M3x10 Tornillo M3x6 Tuerca M3 Arandela M3 Paso de cable Tuerca Lámina del programador Lámina del programador INSTALLATION AND PROGRAMMING MANUAL 14 External coin device: drawing nr. 505545D 21 21 21 21 21 21 21 21 21 21 21 21 21 21 21 21 21 21 21 21 21 21 21 21 21 21 21 21 21 21 21 21 21 21 21 21 21 21 21 21 21 21 21 21 21 21 21 21 21 21 21 21 516875 516950 100900 101499 101155 516967 101612 516969 516807 516977 100902 101536 101632 516737 529114 516980 516984 101535 101228 553007 516991 516992 516782 516999 529106 529108 101293 529109 529115 552952 102084 102473 100898 552951 556109 552998 529119 529124 534187 529113 529110 534289 534297 537775 537776 537778 556113 537779 556114 537787 537788 552901 Coin meter for 1AUD + 2AUD Coin meter for 1CHF Coin meter for 5ILS + 1ILS Coin meter for 5NOK Coin meter for 10NOK Coin meter for 5 NOK +10NOK Coin meter for 10NOK + 20NOK Coin meter for 1 TopMos jeton + 1BGN Coin meter for F10.3-W2000-19,2 Coin meter for 1 “Vendo” jeton Coin meter for 1EUR Coin meter for 0,50EUR + 1EUR Coin meter for 0,20EUR + 0,50EUR Coin meter for 1EUR + 2EUR Coin meter for 2EUR + 0,50EUR Coin meter for 2EUR Coin meter for 0,05EUR Coin meter for 0,50EUR Coin meter for 1 MYR Coin meter for 0,5 MYR Coin meter for 1 jeton Token Electronic coin meter EMP 500.12 v4, Moroccan currency Electronic coin meter Coin meter for jetons 7K + D Coin meter for 1 “Wascator” jeton Coin meter for 1 “Unibel” jeton Coin meter “Jeton Blanco” Coin meter for 10K “IPSO” jeton Coin meter for 50HUF + 100HUF Coin meter for 200HUF Coin meter for 10NT + 50NT Coin meter for 10TWD Coin meter for 500WON Coin meter for 1SGD Coin meter for 1SGD, (new Singapore dollar) Coin meter for 1TRY Coin meter for 1 jeton, without coining, jeton diamater 20 mm Coin meter for 1 “Volund” jeton, jeton diamater 22,5 mm Coin meter for 1 “Wascator” jeton Coin meter for 1 “Miele” jeton Coin meter for 1 jeton without coining, jeton diamater 26 mm Coin meter for three-groove jeton, jeton diamater 27mm Coin meter for three-groove jeton, jeton diamater 25mm Coin meter for jeton “D” and 2EUR Coin meter for jeton “7K” and 2EUR Coin meter for jeton “Milano Italy” Coin meter for “Flash wash” jeton Coin meter for 5PLN + 1 PLN Coin meter for 2PLN Coin meter for two-groove jeton, jeton diamater 27mm Coin meter for “A.S.A.R.D.” jeton, jeton diamater 25,8mm Coin meter for “Eagle” jeton, jeton diamater 25,98mm 505636_E_PUB_DATE_17_FEB_2014.DOC INSTALLATION AND PROGRAMMING MANUAL 15 External coin device: drawing nr. 505545D 21 21 21 21 21 21 21 21 21 21 21 21 21 21 22 23 24 25 26 27 28 43 44 45 46 47 48 - 516804 516638 553008 537825 516636 101586 537828 537859 537829 537913 102073 102072 102127 102087 102190 PRI326002004 310934240004 311679824004 321848140028 PRI346011007 PRI345015045 309084000410 521520 545212 521521 534755 PRI347001010 PRI347001011 PRI347003015 PRI347001015 PRI347002015 Coin meter for “7K Equipos Par Lavar” jeton Coin meter for “Lucky Winner” jeton Coin meter for “Butzi wash” jeton Coin meter for 20CZK Coin meter for 10CZK + 20CZK Coin meter for 1NZD + 2NZD Coin meter for jeton “Electrolux ASARD”, jeton diamater 22,3mm Coin meter for jeton “Laundromatic Belgium”, jeton diamater 22,3mm Coin meter for two-groove jeton “Carsen”, jeton diamater 22mm Coin meter for jeton “Asard Wascator”, jeton diamater 19,9mm Coin label, according to the coin meter Display flat cable Display Spacer M3x12x7 Display washer Support post Ø3,9 Distance post Ø4,9 Nut M4 Washer M4 Coin box Start relay Time relay Bolt M4x10 External coin meter complete - electric part for washing machines excluding 6,5 kg (stepper), (not shown) External coin meter complete - electric part for washing machines 6,5 kg (stepper), (not shown) External coin meter complete - electric part for drying machines (timer) (not shown) External coin meter complete - mechanical part , (not shown) Jeton 5K, (not shown) Jeton 7K, (not shown) Jeton 10K, (not shown) Jeton 12K, (not shown) Jeton 15K, (not shown) 505636_E_PUB_DATE_17_FEB_2014.DOC Ecrou M4 Rondelle M4 Armoire du monnayeur Vis M4x10 Flachkabel LED-Anzeige Distanzstück M3x12x7 Scheibe Anzeige Distanzstück Ø3.9 Distanzstück Ø4.9 Mutter M4 Unterlegscheibe M4 Münzgeratkasten Start-Relais Zeitrelais Schraube M4x10 INSTALLATION AND PROGRAMMING MANUAL Tuerca M4 Arandela M4 Caja del autómata de monedas Tornillo M4x0 16 8. PUTTING “OUT OF SERVICE“ ! DANGER! ALWAYS DISCONNECT THE ELECTRICAL POWER SUPPLY BY TAKING OUT OF MAIN PLUG FROM THE WALL SOCKET AND DISCONNECT WITH THE DISCONNECTING DEVICE THE LINKED APPLIANCE BEFORE PUTTING OUT OF SERVICE ! THIS IS YOUR PERSONAL SAFETY ! 1. Disconnect power and remove power supply cable. 2. Disconnect the linked appliance. 8.2. MACHINE DISPOSAL 8.2.1 POSSIBILITY OF THE MACHINE DISPOSAL BY THE SPECIALIZED COMPANY Information concerning the WEEE-directive (Waste Electrical and Electronic Equipment, for European Union member states only): – For the production of the machine that you have purchased, natural resources are being reclaimed and used. The machine can contain substances which are dangerous for health and environment. – When you dispose of your machine, to avoid spreading of these substances in our environment and to reduce the pressure on our natural resources, we encourage you to use the collection, reuse and recycle system of your region or country. These systems reuse or recycle most of the components. )“ invites you to make use of these systems. – The symbol “crossed out bin on wheels ( – If you wish more information concerning the systems for collection, reuse or recycling of disposed machines, you can take contact with the competent administration of your region or country (waste management). – You can also take contact with us for more information concerning the environmental performances of our products. – Please, consider that the WEEE directive is generally only valid for household machines. In some countries professional machines are added, in others not. Therefore the symbol ( ) may not be present. – Info for dealers: Due to the diversity of the national legislations, manufacturer can not take all the measures to be in accordance with all national legislations of each member state. We expect that each dealer who imports our appliances into a member state (and puts it on the market) takes the necessary steps to be in rule with the national legislation (as the directive requires). 8.2.2 POSSIBILITY OF THE MACHINE LIQUIDATION BY OWN POTENTIAL It is necessary to sort out the parts for metal, non-metal, glass, plastics etc, and bring them to recycle places. The sorted out materials has to be classified in waste groups. Offer the sorted waste to the company which is competent for further treatment. 505636_E_PUB_DATE_17_FEB_2014.DOC INSTALLATION AND PROGRAMMING MANUAL 17 IMPORTANT ! TYPE: COIN VALUES: - coin slot No.1: - coin slot No.2: INSTALLATION DATE: INSTALLATION CARRIED OUT BY: SERIAL NUMBER: ELECTRICAL DETAILS: 220-240 VOLT 1 PHASE 50/60HZ NOTE: ANY CONTACTS WITH YOUR DEALER REGARDING MACHINE SAFETY, OR SPARE PARTS, MUST INCLUDE THE ABOVE IDENTIFICATION. MAKE CERTAIN TO KEEP THIS MANUAL IN A SECURE PLACE FOR FUTURE REFERENCE. DEALER: