1
MS Dynamics AX Integration
User Manual
Project :
Author:
Company
Date
e-Con 4.2
Frans Zoeter
To-Increase B.V.
June 25, 2010
Document Information
Document number
Version
1
Status
Final
Title
Installation Manual MS Dynamics AX Integration
Subject
User Manual
Author
Frans Zoeter
Department
Development
Manager
Marijn van Poelje
Project
e-Con 4.2
Last saved
12/06/2007 16:52
Revision history
Version
Date
Status
Changes
1
01/06/2010
Final
Final version
© Copyright 2007 To-Increase B.V. All rights reserved.
The information in this document is subject to change without notice. No part of this document may be reproduced, stored
or transmitted in any form or by any means, electronic or mechanical, for any purpose, without the express written
permission of To-Increase B.V. To-Increase B.V. assumes no liability for any damages incurred, directly or indirectly, from
any errors, omissions or discrepancies between the software and the information contained in this document
©To-Increase B.V.
1
Table of Contents
Chapter
1.1
Chapter
2.1
2.2
2.3
2.4
Chapter
3.1
3.2
3.3
3.4
Chapter
4.1
1
Introduction ........................................................................................... 4
General Information ...................................................................................... 4
2
Installation Scenarios .............................................................................. 5
Schematic view of complex scenario ............................................................... 5
Dynamics AX Object Server & e-Con Server on the same computer. .................. 7
Dynamics AX Object Server & e-Con Server on different computers. .................. 8
Dynamics AX Server & e-Con Server on different computers using Citrix. ........... 9
3
General Installation Information ............................................................ 10
MS Dynamics AX2009 components ............................................................... 10
Migration for existing e-Con installations ....................................................... 10
Typical installation order of components ....................................................... 10
Message Queue .......................................................................................... 10
4
Installation of Dynamics AX Integration .................................................. 11
Copy the Application Files ............................................................................ 11
4.1.1
4.1.2
4.2
Setup the Dynamics AX environment for e-Con .............................................. 11
4.2.1
4.3
Import the Connectivity xpo files ........................................................... 11
Basic setup and initialization ........................................................................ 12
4.3.1
4.3.2
4.3.3
4.3.4
4.4
Copy labels and help files to the Axapta application folder........................ 11
Copy the client DLL‟s to the Axapta Client bin folder ................................ 11
Enable the configuration keys ................................................................ 12
Set up user group permissions ............................................................... 12
Make Connectivity accessible from the main menu .................................. 12
Run the Productivity Platform setup wizard ............................................. 13
Getting started............................................................................................ 13
4.4.1
4.4.2
4.4.3
4.4.4
4.4.5
Import the sample data ........................................................................ 13
Please read the documentation .............................................................. 13
Remember the on-line help ................................................................... 14
Change the default environment settings for AX ...................................... 14
Import and generate the e-Con metadata groups .................................... 15
Chapter 5
Setup Message Queue Properties. .......................................................... 16
5.1.1
5.1.2
5.1.3
Permissions (Windows 2003 or XP) ........................................................ 16
Permissions (Windows 2008 or Windows7) ............................................. 17
Best Practice ........................................................................................ 18
Chapter
6.1
6.2
Chapter
7.1
6
Deployment Model ................................................................................ 19
General ...................................................................................................... 19
Security issues ............................................................................................ 20
7
Application Server Batch Service ............................................................ 21
Introduction ............................................................................................... 21
©To-Increase B.V.
2
7.2
7.3
Chapter
8.1
8.2
8.3
8.4
Chapter
9.1
9.2
9.3
Create an Dynamics AX Batch Service ........................................................... 21
Trouble Shooting ........................................................................................ 23
8
How to create a new e-Con environment ................................................ 24
New e-Con environment .............................................................................. 24
New Queues ............................................................................................... 25
New web folder .......................................................................................... 26
New e-Con application server ....................................................................... 28
9
How to prevent merge xpo problems...................................................... 29
Introduction ............................................................................................... 29
The safe way to merge the xpo‟s .................................................................. 29
Table synchronization issues ........................................................................ 29
©To-Increase B.V.
3
Chapter 1
Introduction
This document provides a description of the installation procedure for the e-Con 4.2
integration with the Microsoft Dynamics AX2009 software. The e-Con 4.2 installation is
described in a separate installation manual for e-Con 4.2.
1.1 General Information
Read the system requirements before starting installation. The e-Con 4.2 version must be
properly installed before the Microsoft Dynamics AX2009 installation is started.
When installing on Microsoft Windows Terminal Server, the server must be in the "Install"
mode. Change the mode manually at the command prompt ("change user/install") or run
the setup from the control panel ("Add/Remove Programs").
©To-Increase B.V.
4
Chapter 2
Installation Scenarios
This chapter describes the most common installation scenarios.
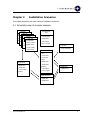
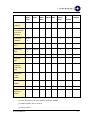
2.1 Schematic view of complex scenario
Client PC
Client PC
+ e-Con
Client PC
+ e-Con
modeler
Client PC
+ e-Con
modeler
+ Navision
Client PC
+ e-Con
modeler
+ Navision
client
+ Axapta client
modeler
+ Navision
client
+ IE 6.0 or higher
+ Navision
client
Modeler Clients:
client
Terminal server /
Citrix
+ e-Con modeler
+ Axapta client
+ .NET runtime
+ IE 6.0 or higher
e-Con Data
+ e-Con modeler
+ e-Con data folders
+ .NET runtime
e-Con server
+ IIS
+ e-Con server
+ e-Con XMLlicense
Axapta server
+ Axapta AOS
+ Axapta client
+ e-Con modeler
(optional)
+ MSMQ client
+ Axapta client
(preferred)
MSMQ server
+ .NET runtime
+ MSMQ server
+ IE 6.0 or higher
Application Server
+ Batch client
+ MSMQ client
©To-Increase B.V.
5
Axapta
e-Con
Axapta
MSMQ
e-Con
Terminal
Client
Client PC
Object
Server
Batch
Server
data
Server /
PC
configure
Citrix
modeler
Server
client
X
e-Con Server
installation
X
e-Con XML
license stored in
e-Con server
Web folder
e-Con Studio
installation
Axapta Object
Optional
(3)
X
X
X
X
(1)
X
Server
Dynamics AX
Client
Optional
Preferred
X
X
(1)
IIS available
X
X
e-Con data
folder
X
MSMQ
X
X
component
installed and
setup
.NET runtime
X
X
X
X
X
X
X
X
(2)
(2)
(2)
3.5 SP1
available
IE 6.0 or higher
available
XML6.0 (4)
Import e-Con
X
(2)
X
(2)
objects and
Initialize
(1) Optional installation of Dynamics AX client and e-Con Studio for testing purposes.
(2) Import can be done from every Dynamics AX client if available.
(3) Installed together with e-Con Server.
(4) Only for Axapta 3
©To-Increase B.V.
6
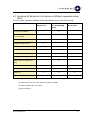
Based on this scenario a couple of other scenarios with combined servers can be
extracted. The most common scenarios are explained.
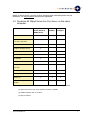
2.2 Dynamics AX Object Server & e-Con Server on the same
computer.
AOS & e-Con
Client PC
Client PC
Server & data &
modeler
configure
MSMQ Server
e-Con Server installation
X
e-Con XML license stored in e-
X
Con server Web folder
e-Con Studio installation
Dynamics AX Object Server
Dynamics AX Client
(3)
X
X
Preferred
Dynamics AX Batch Client
X
IIS available
X
e-Con data folder
X
MSMQ component installed
X
X
X
and setup
.NET runtime 3.5 SP1 available
X
X
IE 6.0 or higher available
X
X
X
XML6.0 (4)
X
X
X
(2)
(2)
(2)
Import e-Con objects and
Initialize
(1) Optional installation of Dynamics AX client and e-Con modeler for testing purposes.
(2) Import can be done from every Dynamics AX client if available.
(3) Installed together with e-Con Server.
(4) Only for Axapta 3
©To-Increase B.V.
7
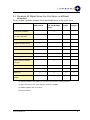
2.3 Dynamics AX Object Server & e-Con Server on different
computers.
The e-Con data, Dynamics AX Batch Server and MSMQ Server on the e-Con Server.
Dynamics AX
e-Con Server & e-
Client PC
Client PC
Object Server
Con data & MSMQ
modeler
configure
Server
e-Con Server installation
X
e-Con XML license stored in e-
X
Con server Web folder
e-Con Studio installation
Dynamics AX Object Server
Dynamics AX Client
Optional (1)
(3)
X
Preferred
X
X
Optional (1)
Dynamics AX Batch Client
X
IIS available
X
e-Con data folder
X
MSMQ component installed
X
X
and setup
.NET runtime 3.5 SP1 available
X
X
IE 6.0 or higher available
X
X
X
X
X
X
X
(2)
(2)
(2)
(2)
XML6.0 (4)
Import e-Con objects and
Initialize
(1) Optional installation of Dynamics AX client and e-Con modeler for testing purposes.
(2) Import can be done from every Dynamics AX client if available.
(3) Installed together with e-Con Server.
(4) Only for Axapta 3
©To-Increase B.V.
8
2.4 Dynamics AX Server & e-Con Server on different computers using
Citrix.
The e-Con data, Dynamics AX Batch Server and MSMQ Server on the e-Con Server.
Dynamics AX
e-Con Server & e-
Terminal
Object Server
Con data & MSMQ
Server/Citrix
Server
e-Con Server installation
X
e-Con XML license stored in e-Con
X
server Web folder
e-Con Studio installation
Optional (1)
Dynamics AX Object Server
Dynamics AX Client
(3)
X
Preferred
X
X
Optional (1)
Dynamics AX Batch Client available
X
IIS available
X
e-Con data folder
X
MSMQ component installed and
X
setup
.NET runtime 3.5 SP1 available
X
X
IE 6.0 or higher available
X
X
X
X
X
(2)
(2)
(2)
XML6.0 (4)
Import e-Con objects and Initialize
(1) Optional installation of Dynamics AX client and e-Con modeler for testing purposes.
(2) Import can be done from every Dynamics AX client if available.
(3) Installed together with e-Con Server.
(4) Only for Axapta 3
©To-Increase B.V.
9
Chapter 3
General Installation Information
3.1 MS Dynamics AX2009 components
See MS Dynamics AX installation CD for detailed information about installation of
Dynamics AX Object Server and Dynamics AX Client installation. The e-Con installation,
both Server and Modeler, will not check on the availability of Dynamics AX components,
e-Con will install components for all available e-Con integrations.
3.2 Migration for existing e-Con installations
When an earlier e-Con version is already in use a migration is needed. See the migration
documentation for detailed information.
3.3 Typical installation order of components
1.
Install a Dynamics AX Client.
2.
Import of Solution Center projects in the Dynamics AX environment.
3.
Import of Econ4.2 project in the Dynamics AX environment
4.
Link the Solution Center and e-Con menu to your Main Menu
3.4 Message Queue
On the e-Con Server computer the Message Queuing Component should be installed
before e-Con Server is installed. The e-Con installation will create two default Messages
Queues in the Private Queues; “navisionresponse4” and “navisionrequest4”. On
computers, e.g. Dynamics AX Batch Server or separate MSMQ Server, where the e-Con
Server installation is not performed but the Message Queues are needed they should be
created manually. See Message Queue Properties Setup chapter for more information.
©To-Increase B.V.
10
Chapter 4
Installation of Dynamics AX Integration
4.1 Copy the Application Files
4.1.1 Copy labels and help files to the Axapta application folder
Using Windows Explorer, go to the AX installation folder (the folder where this
document is located) and select the Setup\ files folder.
Press Ctrl+A to select the contents of the Application files folder and then press
Ctrl+C to copy these files.
Select the desired Axapta application folder (../Application/appl/standard for
example) and press Ctrl+V to paste the label files and help files into the
application folder.
4.1.2 Copy the client DLL‟s to the Axapta Client bin folder
Using Windows Explorer, go to the AX installation folder (the folder where this
document is located) and select the Setup\Application client folder.
Press Ctrl+A to select the contents of the Application client folder and then press
Ctrl+C to copy these files.
Select the desired Axapta Client bin folder (../Application/Axapta Client/Bin for
example) and press Ctrl+V to paste the DLL into the application folder.
The eConIcons DLL is used for the Dynamics AX modeler tree form and has to be
available on every e-Con modeler client. The TI.Common DLL and SharpZipLib DLL
are used zip/unzip the repository data (Models, Configurations etc) and have to be
available on every AX client that uses e-Con. The Solution Center‟s DysLibDax.DLL nas
to be copied to the AX Client and Server bin folders.
4.2 Setup the Dynamics AX environment for e-Con
The e-Con backend has to be installed on a Dynamics AX with individual Dynamics AX
AOT export files (.xpo files).
4.2.1 Import the Connectivity xpo files
The objects in the Dynamics AX AOT *.xpo export files can be imported into any layer.
However it is strongly recommended to use separate layers for e-Con and customer
modifications.
to open the Application Object Tree
On the main toolbar in Dynamics AX, click
(AOT).
In the AOT window toolbar, click
to open the Import form. Select the Delete
table and class members option and when importing into an empty layer then
select the Import with ID values option as well.
©To-Increase B.V.
11
First install Solution Center by importing the following XPO files in this order:
-
Solution_Center_*.xpo
Solution_Center_Integration_*.xpo
The Solution Center integration points to standard AX2009 by using the Show
details option in the Import form. Use the compare feature to merge the changes
into the AX application. The Solution Center Integration.xpo and the Solution
Center Integration Product xpo contain all specific elements of the product. The
Solution Center Integration.xpo furthermore contains all complete AX standard
elements with the modifications; the Solution Center Integration Standard xpo
only contains the modifications in the AX standard elements.
-
Solution_Center_Integration_*. xpo
Solution_Center_Integration_*_Product.xpo
Solution_Center_Integration_*_Standard.xpo
Contains all code of all elements
Contains all code of the product elements
Contains only the changes in the standard
Then import the ECon_Studio_ECon_4_2.xpo project from the Setup subfolder of
the AX installation folder.
Note : Class EConUtil uses the external TI.Common.DLL and might not be
compiled properly after the import; please check and recompile if necessary.
After the import, it is necessary to restart Dynamics AX due to modifications to the
Infolog class that can only take effect when a new Dynamics AX session starts.
4.3 Basic setup and initialization
4.3.1 Enable the configuration keys
On the Administration menu, click Setup/System, Configuration to open the
Configuration form.
Check that the ECon key is enabled.
Check that the Solution Center key is enabled.
Close the form to apply the new settings.
4.3.2 Set up user group permissions
On the Administration menu, click Setup, Security to open the User Group
Permissions form.
Select the Admin user group or create a new ECon user group and populate that
group with the users that will have full access to the Solution Center and e-Con
functionality.
Select the Permissions tab and set up the desired permissions to the ECon and the
Solution Center security keys for the selected user group.
Close the User Group Permissions form to apply the new setup.
4.3.3 Make Connectivity accessible from the main menu
There is only one manual merge action that is necessary before e-Con can be used. The
main menu must have a menu reference to the Solution Center menu and to the e-Con
menu. Instead of including the main menu in the export files, this approach is taken to
©To-Increase B.V.
12
ensure that previous modifications to the main menu are not overwritten when e-Con is
imported.
The Solution Center menu contains the full Productivity Platform functionality, which can
be used to build rich solutions with minimal or no impact on the underlying application
code.
to open the Application Object Tree
On the main toolbar in Dynamics AX, click
(AOT).
Go to Menus - MainMenu and add new menu references to the AppSolutionCenter
and EConMenu.
Save changes to the MainMenu and close the AOT window.
4.3.4 Run the Productivity Platform setup wizard
On the Solution Center menu, click Platform, Setup wizard. Note that the wizard
may take a while to appear because it first scans the entire application to see
which platform components are installed.
On the Welcome dialog box, click Next.
On the Register components dialog box, all installed components are displayed.
The Setup wizard will register all installed components and click Next.
On the Initialize components dialog box, the not-yet-initialized components are
displayed. Select the components that you want to initialize and click Next.
On the Metadata and actions dialog box, select the required options and click
Next.
On the Setup completed dialog box, the consequences of your selections in the
Setup wizard are summarized. Click Finish to start the setup.
4.4 Getting started
4.4.1 Import the sample data
On the Solution Center menu, click Platform, Import settings to import the XML files from
the Samples subfolder of the extracted installation folder. Note that the sample data
assumes the standard “Light Company” demo database and should not be imported into a
production database to prevent overwriting custom Connectivity settings.
4.4.2 Please read the documentation
On the Solution Center menu, click Views, Help to browse through the complete user
documentation. The SolutionCenter.chm file can also be browsed directly from the
HlpAppl folder within the Axapta application folder. A Windows shortcut to this file can be
very useful.
©To-Increase B.V.
13
4.4.3 Remember the on-line help
All Connectivity and platform forms have comprehensive on-line help in Dynamics AX.
Simply press F1 to see information regarding the purpose or function of fields, buttons,
etc.
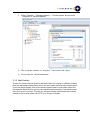
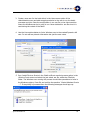
4.4.4 Change the default environment settings for AX
Open the e-Con Menu and go to “Setup” – “e-Con Setup”.
Open the e-Con Server Tab.
Fields on eCon Server tab
e-Con Server
The name of the e-Con Server. Normally this is the computer
name of the e-Con Server.
e-Con
Environment
The name of the environment used by e-Con during
configuration with all the e-Con specific setup information. See
section 8 of this document about this.
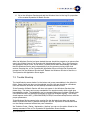
Open the default e-Con environment via <Edit Environment>.
When done the first time on the server or a client PC Microsoft Silverlight will be
installed. This is a client application that will be used to show the environment
settings.
After installation re-open the default e-Con environment via <Edit Environment>
Open “Data settings” – “MS Dynamics connection” (data.navision.connectionstring)
and copy the content of “Value”. Use ctrl-c!
Copy it to “Data settings” – “General connection” (data.connectionstring). Use ctrl-v!
©To-Increase B.V.
14
Set the “Studio settings” – “Platform” value from “wpf” to “iis”.
Save the changes and close the creen.
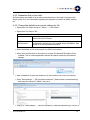
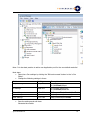
4.4.5 Import and generate the e-Con metadata groups
Open the e-Con Menu and go to “Setup” – “Metadata groups”.
Click the „Import metadata groups‟ button
Browse and select the file „eConMetadataGroups‟. This file can be found on the eCon product CD in the „Integration\Install\Setup\Application files‟ folder.
As a result the metadata groups will appear (see form Metadata groups in the e-Con
menu).
©To-Increase B.V.
15
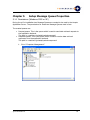
Chapter 5
Setup Message Queue Properties.
5.1.1 Permissions (Windows 2003 or XP)
During the e-Con installation two Message Queues are created to be used by the Axapta
Application Server. The permissions for these two Message Queues must be set.
The created queues are:
Request queue: This is the queue which is used to send data retrieval requests to
the application backend.
The path is <machine>\private$\navisionrequest4
Response queue: This is the queue which is used to receive data retrieval
responses from the application backend.
The path is <machine>\private$\navisionresponse4
1.
Go to “Computer Management”.
©To-Increase B.V.
16
2.
Select “Services and Applications” – “Message Queuing” – “Private Queues”
and go to the properties of “navisionrequest4”.
3.
Give in the tab “Security” to “everyone”, “Full Control” and “Apply”.
4.
Do the same for “navisionresponse4”.
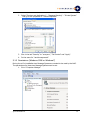
5.1.2 Permissions (Windows 2008 or Windows7)
During the e-Con installation two Message Queues are created to be used by the NAS.
The permissions for these two Message Queues must be set.
1. Go to “Computer Manage”.
©To-Increase B.V.
17
2.
Select “Features” – “Message Queuing” – “Private Queues” and go to the
properties of “navisionrequest4”.
3.
Give in the tab “Security” to “everyone”, “Full Control” and “Apply”.
4.
Do the same for “navisionresponse4”.
5.1.3 Best Practice
If the e-Con Server and the Dynamics AX Batch Client are running on different systems
then the read queue should always be on the local system while the send queue should
be on the remote system; that is the navisionrequest queue on the system where the
Dynamics AX Batch Client is running, the navisionresponse queue on the system where
the e-Con server is running. This way you will gain a better performance and it will be
possible to use a send queue over HTTP, e.g. through a firewall.
©To-Increase B.V.
18
Chapter 6
Deployment Model
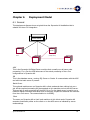
6.1 General
This deployment diagram shows a typical three-tier Dynamics AX installation that is
suitable for the e-Con integration.
e-Con Server
Client
Batch
Server
Axapta thin
client
e-Con Application Server
(Axapta client)
AOS
Axapta Object
Server
DB
SQL Server
AOS
This is the Dynamics AX Object Server machine that normally runs all server side
processing. For e-Con the AOS takes care of the actual processing of the e-Con
configurations in Dynamics AX.
DB
This is the database server, running SQL Server or Oracle. It communicates with the AOS
and with the batch server if present.
Batch Server
This optional machine can run Dynamics AX in client mode and does nothing but run a
job. All the required processing will be executed on this machine and not the AOS server.
This can help to ease some load off the AOS. For e-Con the batch server is used to run a
Platform Startup command that takes care of the query request for data that are retrieved
from the e-Con server. The communication is via MSMQ.
Client
The users run Dynamics AX on their local machines in thin client mode. Dynamics AX
executes functionality either on the client or on the AOS server as indicated by server
mode settings.
©To-Increase B.V.
19
6.2 Security issues
An e-Con user must have access to the e-Con Server to retrieve the e-Con settings and eCon models or configurations. The information is retrieved using web requests. The
configurations that are processed within the Dynamics AOS service are also retrieved with
web requests hence the user running the AOS must also have access to the e-Con server,
just like any other e-Con user.
For additional security information please refer to the e-Con 4.1 Security.doc that can be
found on the installation CD.
©To-Increase B.V.
20
Chapter 7 Application Server Batch Service
7.1 Introduction
This section in general describes how to run an Dynamics AX batch client as a Windows
service. Although Dynamics AX itself does not provide any tools to do so, it can be easily
achieved with some features from the Windows Resource Kit. The Resource Kits consist of
a number of printed books, tools, and references for your Windows OS and can be
obtained from CD or downloaded from the Microsoft website. The created Windows
Service will run the Dynamics AX executable ax32.exe.
7.2 Create an Dynamics AX Batch Service
1. Copy the Recource Kit executables instsrv.exe and srvany.exe to the Dynamics AX
client bin folder. Users running WindowsXP or Windows 2003 will find both
executables on the e-Con installation CD path ...\Install\Setup\WindowsService.
2. Use the Dynamics AX Configuration Utility to create a configuration that can be
used to run the batch client. For AX3 the user should be empty because the batch
service has to use a Windows logon. The startup command should be the id of the
Platform startup command. For the e-Con Application server this id equals the id
of the Application Server (normally eConServer after initialization of the e-Con
project)
©To-Increase B.V.
21
3. Create a new user for the batch client in the Users menu-option of the
Administration menu and add enough permission to the user to run the batch
processes and jobs. Save the configuration in an .axc file on the client machine
where the Windows service is going to run. Never delete this .axc file since it is
used during the restart of the batch.
4. Use the User options button to link a Windows user to the created Dynamics AX
user. Do not add any domain information but just the user name.
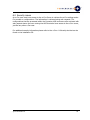
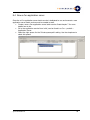
5. Run Install Client as Service in the Platform/Event monitoring menu-option in the
Solution Centre menu and select the just saved .axc file, select the Client\bin
folder. The Windows user running this process should have permission to write in
the Windows registry. Press Ok and confirm the question „Create Windows Service
…?‟. If everything is processed then the following messages should pop up:
©To-Increase B.V.
22
6. Go to the Windows Services and add the Windows User to the Log On properties
of the created Dynamics AX Batch Service.
After the Windows Service has been started the user should be present as an extra online
user in the Online Users of the Dynamics AX Administration menu. The e-Con Dynamics
AX Application Server in the e-Con menu / Periodic should start automatically. Be aware
that the Windows Service acts independently from the process running within that
service. Stopping the e-Con Dynamics AX Application Server will stop the Dynamics AX
process but not the Windows Service itself. Restart the Windows Service to start the eCon Dynamics AX Application Server again.
7.3 Trouble Shooting
The install batch process checks for the instsrv and srvany executables in the client bin
folder. Some checks are done on the selected .axc file; the user should be a Windows
user and therefore be blank and the startup command should be filled.
If the Dynamics AX Batch Service still does not appear in the Windows Services then
please retry. The instsrv and srvany executables run asynchronously which might give
unpredictable results. The installation can be repeated without any problem. Please check
if the Windows user has sufficient privileges to write the Windows registry. The service
should appear under HKEY_LOCALMACHINE/SYSTEM/CurrentControlSet/Services with the
proper parameters.
If the Windows Service seems to be running fine but the batch user does not appear
within Dynamics AX then try double clicking the .axc file. Dynamics AX should start and
run the startup command without any user interaction.
Via „Solution Center / Setup / Automation / Actions‟ you can run the action linked to the
startup command of the e-Con Dynamics AX Application Server directly.
©To-Increase B.V.
23
Chapter 8
How to create a new e-Con environment
IMPORTANT NOTE:
Using the DMI tool might be useful to create the different environments!
DMI will create the different environments with e-Con webfolders, settings and message
queues.
Not created by DMI are the NAV companies and NASses.
Below is a description of the manual creation of a new environment.
Normally there are three different e-Con environments, production, test and develop.
After installing e-Con there is one environment available the so called „default‟
environment. This section describes how to create other environments.
Basically the creation of a new environment exists of steps:
1. Make a new e-Con environment with his own datastore
2. Add new queues
3. Make a new e-Con web folder
4. Add a new application server batch service
In the next part these steps will be described more in detail.
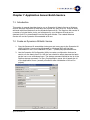
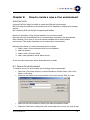
8.1 New e-Con environment
To create a new e-Con environment the next steps must be performed:
Open the e-Con Setup window, in the MS Dynamics AX Main Menu, click e-Con,
Setup, e-Con setup.
Enter the new name for the environment in the „environment‟ field, e.g. test.
Open the new environment by clicking the „Edit environment‟ button.
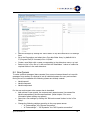
Select the „Data store‟ setting and enter a new data store in here, e.g. test as well.
©To-Increase B.V.
24
Save the changes by clicking the „Save‟ button on top and close the e-Con settings
form.
Go to the file explorer and select the e-Con data folder there, by default this is
„C:\Program Files\To-Increase\e-Con 4.1\Data‟.
Create a new folder with a name corresponding to the data store name, e.g. test.
Return to the „e-Con Set up‟ in AX and click the „Datafolders‟ button to create the
required folders in the new data store.
8.2 New Queues
To make sure that messages (data requests) from one environment doesn‟t mix up with
messages from another it‟s required to set up individual queues for every environment.
During the e-Con installation the following queues are already created:
Navisionpost4
Navisionrequest4
Navisionresponse4
For the new environment other queues has to be added.
Add minimal 2 new queues, the response and request queue. Use names like
Navisionrequest4test, Navisionresponse4test. (Read chapter 5 for more
information about settings up queues)
Open the e-Con settings by clicking the „Edit environment‟ button in the „e-Con
Setup‟.
Change the following settings according to the new queue names:
o In “Data settings” the “General connection”
o In “Data settings” – “MS Dynamics” the “MS Dynamics connection”
©To-Increase B.V.
25
Examples:
General connection old:
driver=Navision;server=localhost;requestqueue=VPC-ECON4AX4\private$\navisionrequest4;responsequeue=.\private$\navision{uniqueid}respo
nse4
General connection new:
driver=Navision;server=localhost;requestqueue=VPC-ECON4AX4\private$\navisionrequest4test;responsequeue=.\private$\navision{uniqueid}r
esponse4test
Save the settings.
8.3 New web folder
Windows Server 2003
To avoid that building of a model in one environment will interrupt the other environment
a separate .NetASP application domain must be created as well. This can be done by
duplicating the e-Con web folder and share.
Copy the e-Con web folder and give it a new name e.g. eConTest. (The e-Con web
folder is by default „C:\Program Files\e-Con 4.2\Web\‟
Create a web share for this folder and give it a new name e.g. eCon4Test (Make
sure that the security and permissions are according the original web folder)
Windows Server 2008
To avoid that building of a model in one environment will interrupt the other environment
a separate .NetASP application domain must be created as well. This can be done by
duplicating the e-Con web folder and share.
Copy the e-Con web folder and give it a new name e.g. eConTest. (The e-Con web
folder is by default „C:\Program Files\e-Con 4.2\Web\‟
Add a default website, via Add application on Default Web Site, for this folder and
give it a new name e.g. eCon4Test (Make sure that the security and permissions
are according the original web folder)
©To-Increase B.V.
26
Note: It is also best practice to add a new Application pool for the new default web site!
Next steps
Open the e-Con settings by clicking the „Edit environment‟ button in the „e-Con
Setup‟.
Change the following settings in there:
Folder
Setting
Example
Output settings
Output folder
C:\Program Files\e-Con
4.1\WebTest\Output
UI settings
Label URL
C:\Program Files\e-Con
4.1\WebTest\Labels.xml
Data settings
e-Con folder
C:\Program Files\e-Con 4.1\WebTest
Data settings
e-Con bin folder
C:\Program Files\WebTest\bin
Data settings
e-Con URL
http://localhost/econ4Test
Save the settings and exit them.
Generate the models.
©To-Increase B.V.
27
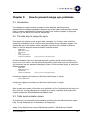
8.4 New e-Con application server
Since the e-Con application server batch service is dedicated to one environment a new
application server batch service must be created as well.
Create a new e-Con application server batch service. Read chapter 7 for more
details how to do.
Go to the application service form in AX, can be found in e-Con – periodic –
Application Server.
Select the right queue for the „Private queue path‟ setting. Use the dropdown to
select this queue.
©To-Increase B.V.
28
Chapter 9
How to prevent merge xpo problems
9.1 Introduction
The integration project contains a number of new elements that have strong
dependencies to standard application elements and a few system elements that normally
have no custom modifications. Especially the earlier AX versions (Axapta 3) might give
problems i.e. not able to run forms or compile etc.
9.2 The safe way to merge the xpo‟s
First import the solution center project itself, recompile 2 or 3 times, never mind the
remaining compilation errors. Continue with the solution center integration project. The
classes that are in the solution center integration xpo have to be merged in different
steps. In the first steps all classes should be imported except:
-
Application
ApplicationVersion
ClassFactory
Info
SysSetupFormRun
LedgerJournalEngine
(only if you are running AX3 sp3)
All other elements have to be imported and both projects should compile without any
errors now. From now on use the AX3sp3 integration project when you are running AX3
sp3, otherwise use the standard integration project. In the next step import or merge the
following classes:
-
Application
ApplicationVersion
ClassFactory
LedgerJournalEngine
(only if you are running AX3 sp3)
Compile the objects and restart your AX client. Next import or merge:
-
SysSetupFormRun
Compile the objects and restart your AX client. Next import or merge:
-
Info
After compile and restart of the client your application is fine. Continue with the import of
the e-Con xpo. If some classes give a compile error about a variable „actionType‟ then
compile forward the EConModelVersionCmdBase class.
9.3 Table synchronization issues
If you face any unrecoverable synchronization problems then the following action might
help. The sql statement can be executed in an Axapta job.
delete_From SQLDictionary where SQLDictionary.tabId != SQLDictionary.TableId
©To-Increase B.V.
29