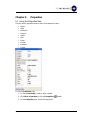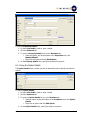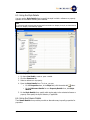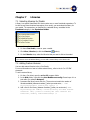
1
User Manual e-Con Studio
e-Con 3.5
Project :
Author:
Company
Date
e-Con 3.5
dtijssen
To-Increase B.V.
February 2, 2006
Document Information
Document number
Version
1
Status
Final
Title
User Manual e-Con Studio
Subject
e-Con 3.5
Author
dtijssen
Department
Development
Manager
Marijn van Poelje
Project
e-Con 3.5
Last saved
1/1/1601 1:00 AM
Revision history
Version
Date
Status
1
31-01-2006
Final
Changes
© Copyright 2005 To-Increase B.V. All rights reserved.
The information in this document is subject to change without notice. No part of this document may be reproduced, stored
or transmitted in any form or by any means, electronic or mechanical, for any purpose, without the express written
permission of To-Increase B.V. To-Increase B.V. assumes no liability for any damages incurred, directly or indirectly, from
any errors, omissions or discrepancies between the software and the information contained in this document
©To-Increase B.V.
1
Table of Contents
Chapter 1 Introduction ............................................................................................ 4
1.1
Purpose...................................................................................................... 4
Chapter 2 Projects .................................................................................................. 6
2.1
Creating New Projects ................................................................................. 6
2.2
Modifying Existing Projects........................................................................... 6
2.3
Using the Project Explorer............................................................................ 7
Chapter 3 Models.................................................................................................... 8
3.1
Creating New Models................................................................................... 8
3.2
Modifying Existing Models ............................................................................ 8
3.3
Setting up a Model Structure ........................................................................ 9
3.4
Model Structure Setup Possibilities...............................................................10
3.4.1 New Element..........................................................................................10
3.4.2 Copy Element or Structure.......................................................................10
3.4.3 Move Element or Structure ......................................................................10
3.4.4 Drag Element or Structure .......................................................................10
3.5
Setting up Columns ....................................................................................11
3.6
Entering Translations..................................................................................11
Chapter 4 Rules .....................................................................................................13
4.1
Setting up Rules.........................................................................................13
4.2
Rules Setup Possibilities ..............................................................................14
4.2.1 New Rule or Group .................................................................................14
4.2.2 Copy Rules or Groups .............................................................................14
4.2.3 Move Rules or Groups .............................................................................14
4.2.4 Drag Rules or Groups..............................................................................15
4.2.5 Rule Condition and Implication ................................................................15
4.3
Using the External Data Wizard ...................................................................15
4.4
Using the Expression Builder .......................................................................15
Chapter 5 Interfaces ..............................................................................................17
5.1
Setting up Interfaces ..................................................................................17
5.2
Generating Interface Models .......................................................................17
5.3
Setting up Supported Interfaces ..................................................................18
Chapter 6 Properties ..............................................................................................19
6.1
Using the Properties View ...........................................................................19
6.2
Using the Reference Details ........................................................................20
6.3
Using the Property Details...........................................................................20
6.4
Using the Option Details .............................................................................21
6.5
Using the Style Details ................................................................................22
6.6
Using the Column Details ............................................................................22
©To-Increase B.V.
2
Chapter 7 Libraries ................................................................................................24
7.1
Selecting Libraries for Models ......................................................................24
7.2
Adding Custom Libraries .............................................................................24
Chapter 8 Views ....................................................................................................25
8.1
Using the Project Explorer...........................................................................25
8.2
Using the Properties View ...........................................................................25
8.3
Using the Object Explorer ...........................................................................26
8.4
Using the Output View ................................................................................26
8.5
Using the Source View ................................................................................27
Chapter 9 Tools .....................................................................................................28
9.1
Building Models..........................................................................................28
9.2
Building Projects ........................................................................................28
9.3
Browsing Models ........................................................................................28
9.4
Generating Interface Models .......................................................................29
9.5
Import ......................................................................................................30
9.5.1 Importing Projects ..................................................................................30
9.5.2 Importing Models ...................................................................................31
9.5.3 Importing Templates...............................................................................31
9.5.4 Importing Configurations.........................................................................31
9.6
Export .......................................................................................................32
9.6.1 Exporting Projects ..................................................................................32
9.6.2 Exporting Models ....................................................................................32
9.6.3 Exporting Templates ...............................................................................32
9.6.4 Exporting Configurations .........................................................................33
9.7
Selecting Environments...............................................................................33
9.8
Modifying Environment Options ...................................................................34
9.9
Finding Text ..............................................................................................35
9.10 Replacing Text ...........................................................................................35
9.11 Hiding Views..............................................................................................36
9.12 e-Con Studio Shortcuts ...............................................................................37
©To-Increase B.V.
3
Chapter 1
Introduction
1.1 Purpose
The e-Con Studio is one of the most important components of e-Con. You use the e-Con
Studio to build and maintain your e-Con models. With the e-Con Studio, you can set up
and maintain:
• Projects.
You can manage the creation and maintenance of your e-Con models in projects.
• Models.
A model is the central part of e-Con. So, if you want to work with e-Con and the eCon Studio, you must create a model.
• A model's structure.
To get a working e-Con model, you must first set up the model's structure.
• Interfaces between models.
You can set up an interface to link two models to each other. In case of an
interface, you always have a main-model and a sub-model. On both the mainmodel and the sub-model, setup is required.
• Business rules.
To build an intelligent model, you must add business intelligence to the model.
Use rules to add the required intelligence to a model.
• Columns.
You can set up columns to determine the layout of your model's user interface.
• Translations.
If you want your model to support multiple languages, you must translate the
model's labels.
• The e-Con environment's settings.
You can select another environment or maintain the current environment's
settings.
• Which libraries apply for a model.
You can select which libraries apply for each model. You can also add custom
libraries to the e-Con Studio.
The e-Con Studio also provides you with the functionality to:
• Directly enter the properties, for most of the model's elements, in a Properties
view.
• Build projects or models.
• Browse a model for testing purposes only.
• Find and replace text.
• Import projects, models, templates or configurations.
• Export projects, models, templates or configurations.
©To-Increase B.V.
4
Important
The focus of the e-Con Studio documentation is on the stand-alone situation. You can however
also use (parts-of) the e-Con Studio documentation if you use e-Con based on Navision or Axapta.
If you use e-Con based on Navision or Axapta, you usually set up the following parts of the e-Con
Studio in Navision or Axapta:
• Projects
• Model
• Model structure
• Styles
• Translations
• Interfaces
©To-Increase B.V.
5
Chapter 2
Projects
2.1 Creating New Projects
You can manage the creation and maintenance of your models in projects.
Note
You can have but one project open at a time. If you create a new project, the currently open
project is closed. Also the open models that are related to the currently open project are closed.
Open models, that are not related to a project, are not closed.
If not everything you worked on in the currently open project is saved, and you create a new
project, you get a dialog box on which you can indicate which items you want to save.
To create a new project:
1. On the e-Con Studio, click File, New, Project (or click the New Project
button).
2. On the Project Explorer, select the newly created project.
3. Specify the project's properties.
4. Add models to the project. To add:
• A new model, right-click the project, and click Add New Model.
• An existing model, right-click the project, and click Add Existing Model.
2.2 Modifying Existing Projects
If you manage the maintenance of you models in projects, you can always modify the
projects.
Note
You can have but one project open at a time. If you open another project, the currently open
project is closed. Also the open models that are related to the currently open project are closed.
Open models, that are not related to a project, are not closed.
If not everything you worked on in the currently open project is saved, and you open another
project, you get a dialog box on which you can indicate which items you want to save.
To modify an existing project:
1. On the e-Con Studio, click File, Open, Project (or click the Open Project
button).
2. On the Project Explorer, select the project.
3. You can modify the project's properties.
4. You can add models to the project. To add:
• A new model, right-click the project, and click Add New Model.
• An existing model, right-click the project, and click Add Existing Model.
5. You can remove models from the project. To do so, on the Project Explorer,
right-click the model, and click Delete.
©To-Increase B.V.
6
2.3 Using the Project Explorer
Use the Project Explorer if you want to manage your models in projects.
To use the Project explorer:
1. On the e-Con Studio, click View, Project Explorer (or click the Project
button).
Explorer
2. On the Project Explorer, you can:
• Create new projects.
• Modify existing projects.
• Open the models that are related to the project. To do so, double-click the
models you want to open.
Note
To close a project, click File, Close Project.
©To-Increase B.V.
7
Chapter 3
Models
3.1 Creating New Models
If you want to work with the e-Con Studio, you must create a model. Add to each
model, at least the following:
• Model Structure
• Business rules
To create a new model:
1. On the e-Con Studio, click File, New, Model, or click the New Model
button.
2. Specify the model's name and other properties.
3. Set up the model's:
• Structure
• Rules
• Columns
• Interfaces
• Translations
Note
•
•
You can have several models open at the same time. Each model is displayed on a separate
tab.
You can also create models from the Project Explorer.
3.2 Modifying Existing Models
You can always modify existing models. If you modify an existing model, you can:
• Modify the model's current version.
• Create a new version of the model.
To modify an existing model:
1. On the e-Con Studio, click File, Open, Model (or click the Open Model
button).
2. On the Open Model dialog box, select the model you want to open.
3. If you want to:
• Modify the current version, click Open.
• Create a new version, enter new version number, and click Open.
4. You can modify the model's:
• Structure
• Rules
• Columns
• Interfaces
• Translations
©To-Increase B.V.
8
Note
•
•
•
You can have several models open at the same time. Each model is displayed on a separate
tab.
You can also open models from the Project Explorer.
You can only open older versions of a model from the SQL repository.
3.3 Setting up a Model Structure
If you want to work with e-Con models, you must at least add a structure to the models.
To set
1.
2.
3.
up a model structure:
On the e-Con Studio, create or open a model.
Click the Structure tab.
You can:
• Add a new element to the structure.
• Copy an element or (a part of) a structure from another model's structure
or within the current model's structure.
• Move an element or (a part of) a structure from another model's structure
or within the current model's structure.
• Drag an element or (a part of) a structure from another model's structure
or within the current model's structure.
4. Specify the added element's properties. You can do so on the Properties view or
for:
• References on the Reference Details form.
• Properties on the Property Details form.
• Options on the Option Details form.
©To-Increase B.V.
9
3.4 Model Structure Setup Possibilities
If you build a model structure, you can add:
• References to a class.
• Properties to a class.
• Classes to a reference.
• Options to a property.
3.4.1 New Element
To add a new:
• Reference to a class, right-click the class and click New Reference.
• Property to a class, right-click the class and click New Property.
• Class to a reference, right-click the reference and click New Class.
• Option to a property, right click the property and click New Option.
3.4.2 Copy Element or Structure
You can also copy (parts of) structures:
• From another model's structure to the current model's structure.
• To another position in the current model's structure.
To copy (parts of) structures, you can:
•
•
button and the Paste
button.
Use the Copy
Right-click the element and click Copy or Paste.
3.4.3 Move Element or Structure
You can also move (parts of) structures:
• From another model's structure to the current model's structure.
• To another position in the current model's structure.
To move (parts of) structures, you can:
•
•
button and the Paste
button.
Use the Cut
Right-click the element and click Cut or Paste.
3.4.4 Drag Element or Structure
You can also drag (parts of) structures between and within model structures. If you drag:
• (A part of) another model's structure to the current model's structure, the dragged
part is copied. In this case, you can only drag from the Object Explorer.
• A part of the current model's structure to another position in the current model's
structure, the dragged part is moved.
©To-Increase B.V.
10
3.5 Setting up Columns
In the e-Con Studio, you can set up columns. You can use columns to determine the
layout of your model's user interface. Before you add you model-specific columns, you
must always set up the following columns:
• Questions
• Answers
Important
A column must always refer to a reference or a property. So, if you set up a column, only enter a
reference Id or a property Id as the column's Id.
To set
1.
2.
3.
4.
5.
up a column:
On the e-Con Studio, create or open a model.
Click the Columns tab.
On the Columns tab, right-click, and click New Column.
Select the newly added column.
Specify the column's properties. You can do so on the Properties view or on the
Column Details form.
3.6 Entering Translations
If you want your model to support multiple languages, you must translate the labels of:
• References
• Properties
• Options
• Columns
Note
•
•
If you select one of the translatable elements in your model, and you open the Translations
tab, the element's label is displayed. You can translate the label or view the already existing
translations for the label.
For each label and language combination, you can enter but one translation. If you want to
have several different translations for a specific label, you must use different labels.
©To-Increase B.V.
11
To enter translations:
1. On the e-Con Studio, create or open a model.
2. Click the Translations tab.
3. Enter translations.
You can determine the language in which you browse a model, in the following ways:
• If you use e-Con on Navision or Axapta, determine the language in Navision or
Axapta.
• In the environment options, you can set the Configuration Language.
• If you use e-Con in a web environment, you can determine the language in the eCon model startup URL.
©To-Increase B.V.
12
Chapter 4
Rules
4.1 Setting up Rules
To build an intelligent model, you must add business intelligence to the model. Use rules
to add intelligence to a model.
You can, for example, add rules that determine:
• Determine which fields are displayed if a specific option is selected.
• Determine the default values of several fields if an item of a specific group is
entered.
• Read information from a sub-model.
• Write data to a sub-model.
©To-Increase B.V.
13
To set
1.
2.
3.
up rules:
On the e-Con Studio, create or open a model.
Click the Rules tab.
You can:
• Add a new rule or group to the model.
• Copy a rule or group of rules from another model or within the current
model.
• Move a rule or group of rules from another model or within the current
model.
• Drag a rule or group of rules from another model or within the current
model.
4. Select the added rule and specify the rule's properties. You can do so on the
Rules tab or on the Properties view.
5. To specify the rule's condition and implication, you can use the:
• External Data Wizard
• Expression Builder
4.2 Rules Setup Possibilities
•
•
Groups to group rules.
Rules to groups.
4.2.1 New Rule or Group
To manually add a new:
• Group, right-click on the group to which you want to add it, and click New
Group.
• Rule, right-click on the group to which you want to add it, and click New Rule.
4.2.2 Copy Rules or Groups
You can copy (groups of) rules:
• From another model to the current model.
• To another group in the current model.
To copy (groups of) rules, you can:
•
•
button and the Paste
button.
Use the Copy
Right-click the rule or group and click Copy or Paste.
4.2.3 Move Rules or Groups
You can move (groups of) rules:
• From another model to the current model.
• To another group in the current model.
To move (groups of) rules, you can:
•
•
Use the Cut
button and the Paste
button.
Right-click the rule or group and click Cut or Paste.
©To-Increase B.V.
14
4.2.4 Drag Rules or Groups
You can drag (groups of) rules between and within models. If you drag:
• (A group of) rules from another model to the current model, the dragged part is
copied. In this case, you can only drag from the Object Explorer.
• (A group of) rules from a group in the current model to another group in the
current model, the dragged part is moved.
4.2.5 Rule Condition and Implication
To make the setup of a rule's condition and implication easier, you can use the:
• External Data Wizard
• Expression Builder
4.3 Using the External Data Wizard
You can use the External Data Wizard as your guide to build rules with data functions.
As a result, both the condition and implication of the rule are filled.
Note
In the External Data Wizard, you can enter properties or options manually or by dragging them
from the Object Explorer.
To use
1.
2.
3.
4.
the External Data Wizard:
On the e-Con Studio, create or open a model.
Click the Rules tab.
Select a rule.
On the Properties view, click External Data Wizard.
4.4 Using the Expression Builder
You can use the Expression Builder to easily enter expressions in a rule's condition or
implication.
All expression categories and the related expressions are standard available, except for
the expressions in the Functional category. In the Functional category, only the eCon Core
expressions are standard available. You can, however, for each model, add functional
expressions. To add functional expressions to a model, select the appropriate library.
©To-Increase B.V.
15
To build expressions:
1. On the e-Con Studio, create or open a model.
2. On the Rules tab, select the rule to which you want an expression.
3. Select, in the condition or implication, the position where you want to add the
expression.
4. Click View, Expression Builder (or click the Expression Builder
button).
5. On the Expression Builder, select a category.
6. Select an expression from the selected category.
7. Click Copy.
As a result the expression is added to the selected position in the condition or implication.
©To-Increase B.V.
16
Chapter 5
Interfaces
5.1 Setting up Interfaces
You can set up an interface to link two models to each other. In case of an interface, you
always have a main-model and a sub-model. On both the main-model and the sub-model,
setup is required.
You can set up interfaces to:
• Read data from the sub-model in the main model.
• Write data from the main-model to the sub-model.
Set up rules to determine whether the interface reads or writes data.
To set up an interface:
1. On the e-Con Studio, create or open a main-model and a sub-model.
2. In the sub-model, specify which references and properties must be part of the
interface. To do so, on the Properties view, set the value of the Part of
interface field to True.
3. Generate the interface model for the sub-model.
4. Build the generated interface model.
5. Add the interface model to the sub-model's interfaces.
6. Build the sub-model.
7. In the main-model, create a reference that links to the interface model. To do so,
on the Properties view, enter the interface model's:
• Id in the Interface Model field.
• Version in the Interface Version field.
8. Build the main-model.
5.2 Generating Interface Models
If you want to use a model as sub-model of another model, you must create an interface
between these models. To be able to set up the interface, you must generate an interface
model from the sub-model.
If you generate an interface model from a model, all the model's references and
properties, for which the value of the Part of interface field is True, are added to the
interface model.
©To-Increase B.V.
17
To generate an interface model:
1. On the e-Con Studio, open the model from which you want to (re)generate an
interface model. Make sure the tab of the right model is displayed.
2. Click Tools, Generate Interface (or click the Generate Interface
button).
3. On the Generate Interface dialog box, you can:
• Regenerate an existing interface model. To do so, select the interface
model. In the Version field, you can specify whether you want to
regenerate another version of the interface model.
• Generate a new interface model. To do so, in the Model field, you can
change the interface model's default Id.
4. Click Generate.
Tip
Use for interface models the same name as for the models from which you generate the interface
models, but preceded with an I. For example, if you generate an interface model from the
Customer model, the interface model's Id is ICustomer.
5.3 Setting up Supported Interfaces
On the Interfaces tab, you can set up the interfaces that are supported by a model. To
set up an interface, you must link an interface model. The model, to which you link the
interface model, serves as sub-model.
You can specify several supported interface models for each sub-model. If you do so,
make sure that the interface models do not overlap. So, the interface models must have
different references and properties.
To set up a supported interface:
1. On the e-Con Studio, open the model to which you want to add an interface
model.
2. Click the Interfaces tab.
3. On the Interfaces tab, right-click, and click New Interface.
4. Select the newly added interface.
5. In the interface's properties, specify the interface model's Id and version.
©To-Increase B.V.
18
Chapter 6
Properties
6.1 Using the Properties View
You can use the properties view to enter the properties for each:
• Model
• Class
• Reference
• Property
• Option
• Rule
• Group
• Column
• Interface
• Project
To use the Properties view:
1. On the e-Con Studio, create or open a model.
2. Click View, Properties (or click the Properties
3. On the Properties view, specify the properties.
©To-Increase B.V.
button).
19
6.2 Using the Reference Details
The Reference Details form provides you with an alternative way to specify properties
for references.
To use
1.
2.
3.
the Reference Details:
On the e-Con Studio, create or open a model.
Click the Structure tab.
To open the Reference Details form, on the Structure tab:
• Select a reference, and at the bottom of the Properties view, click
Member Wizard.
• Right-click a reference and click Edit Member .
4. On the Reference Details form, specify the reference's properties.
6.3 Using the Property Details
The Property Details form provides you with an alternative way to specify properties for
properties.
©To-Increase B.V.
20
To use
1.
2.
3.
the Properties Details:
On the e-Con Studio, create or open a model.
Click the Structure tab.
To open the Property Details form, on the Structure tab:
• Select a property, and at the bottom of the Properties view, click
Member Wizard.
• Right-click a property and click Edit Member.
4. On the Property Details form, specify the property's properties.
6.4 Using the Option Details
The Option Details form provides you with an alternative way to specify properties for
options.
To use
1.
2.
3.
the Option Details:
On the e-Con Studio, create or open a model.
Click the Structure tab.
To open the Option Details form, on the Structure tab:
• Select an option, and at the bottom of the Properties view, click Option
Details.
• Right-click an option and click Edit Option.
4. On the Option Details form, specify the option's properties.
©To-Increase B.V.
21
6.5 Using the Style Details
You can use the Style Details form to specify the style in which a reference or property
appears on the model's resulting user interface.
Note
For references and properties that are derived from Navision or Axapta, the style, as determined in
Navision or Axapta, is automatically applied.
To use
1.
2.
3.
4.
the Style Details:
On the e-Con Studio, create or open a model.
Click the Structure tab.
Select a reference or a property.
Open the Style Details form. To do so, you can:
button.
On the Properties view, in the Style field, click the assist edit
On the Reference Details form or Property Details form, click Style
Wizard.
5. On the Style Details form, specify which styles apply to the selected reference or
property. Also specify the style's behavior, if applicable.
•
•
6.6 Using the Column Details
The Column Details form provides you with an alternative way to specify properties for
properties.
©To-Increase B.V.
22
To use
1.
2.
3.
the Properties Details:
On the e-Con Studio, create or open a model.
Click the Columns tab.
Select a column, and at the bottom of the Properties view, click Column
Wizard.
4. On the Column Details form, specify the column's properties.
©To-Increase B.V.
23
Chapter 7
Libraries
7.1 Selecting Libraries for Models
A library is a special Visual Basic DLL that contains one or more functional expressions. To
be able to use these functional expressions for a model, you must select the library for
your model. The expressions, as specified for a selected library, are added to the
Functional category in the Expression Builder.
To select a library for a model:
1. On the e-Con Studio, create or open a model.
2. Click View, Libraries (or click the Libraries
button).
3. On the Libraries view, select the libraries that you want to link to the model.
Note
If you want to use a self-defined library, you can add a custom library to the libraries list.
7.2 Adding Custom Libraries
You can add custom libraries to the e-Con Studio.
For more information on how to build a custom library, refer to the 'e-Con 3.5 SDK'
document.
To add a custom library:
1. On the e-Con client, open the e-Con 3.5 program folder.
2. In the Web folder, right-click the eCon.Modeler.exe.config file and open it in a
text editor (for example Notepad).
3. Increment the library count with one. The count must match the number of
libraries available (between brackets [] what you must enter): <add
key="LibraryCount" value="[new count]" />
4. Add a line for the library (between
key="Library[new number]"
extension .dll].[class in
functions, usually called
©To-Increase B.V.
brackets [] what you must enter): <add
value="[library dll name without
library dll that contains the
Functions]" />
24
Chapter 8
Views
8.1 Using the Project Explorer
Use the Project Explorer if you want to manage your models in projects.
To use the Project explorer:
1. On the e-Con Studio, click View, Project Explorer (or click the Project
Explorer
button).
2. On the Project Explorer, you can:
• Create new projects.
• Modify existing projects.
• Open the models that are related to the project. To do so, double-click the
models you want to open.
Note
To close a project, click File, Close Project.
8.2 Using the Properties View
You can use the properties view to enter the properties for each:
• Model
• Class
• Reference
• Property
• Option
• Rule
• Group
• Column
• Interface
• Project
To use the Properties view:
1. On the e-Con Studio, create or open a model.
2. Click View, Properties (or click the Properties
3. On the Properties view, specify the properties.
©To-Increase B.V.
button).
25
8.3 Using the Object Explorer
You can use the Object Explorer to display the structure and elements of all open
models.
You can also use the Object Explorer to drag (groups of) elements from one model to
another model. You can drag the following from the Object Explorer to the active model
in the Models pane:
• Parts of the model structure
• Rules
• Columns
• Interfaces
Note
If you drag elements from the Object Explorer to the active model, make sure that the
corresponding tab of the active model is displayed.
To use the Object Explorer:
1. On the e-Con Studio, create or open a model.
2. Click View, Object Explorer (or click the Object Explorer
button).
8.4 Using the Output View
Use the Output view to view the:
• Errors that you make if you set up rules.
• Result if you build a model.
©To-Increase B.V.
26
The following type of errors that you can make if you set up a rule are directly displayed
in the Output view:
• Syntax errors.
• Functions that are not known in the rule's context.
• Variables that are not known in the rule's context.
If you build a model, the following is displayed in the Output view:
• The output of the compiler (including errors if applicable).
• The build conclusions.
If errors are displayed, you can use the Source view to analyse the error.
8.5 Using the Source View
If you build a model, C# code is generated. Use the Source view to browse to C# code
that is generated for the model.
To use the Source view:
1. On the e-Con Studio, build a model.
2. If in the Output view errors are displayed, double-click on an error. The Source
view is opened at the position in the C# code where the error occurred.
3. If you double click on the C# code line in the Source view, the concerned rule on
the Rules tab is displayed.
4. Solve the error.
©To-Increase B.V.
27
Chapter 9
Tools
9.1 Building Models
To be able to browse or use the model, you must build it. If you build a model, the
model's XML file is converted to a DLL file in C# code.
To build a model:
1. On the e-Con Studio, open the model or click the model's tab.
2. Click Tools, Build (or click the Build
button).
As a result, the Output view is opened. In the Output view you can see whether the
model is build successfully.
9.2 Building Projects
You can build all models, that are linked to a project, at once. If you build a model, the
model's XML file is converted to a DLL file in C# code.
To build a project:
1. On the e-Con Studio, open the project.
button).
2. Click Tools, Build Project (or click the Build Project
As a result, the Output view is opened. In the Output view you can see whether all
models, that are linked to the project, are build successfully.
9.3 Browsing Models
You can browse the currently active model to test whether the model is working properly.
You can test whether the:
• Layout of the user interface appears correctly.
• Rules work properly.
Note
•
•
If you browse a model, it is automatically built.
If you browse a model from the e-Con Studio, you can not configure the model.
©To-Increase B.V.
28
To browse a model:
1. On the e-Con Studio, open the model or click the model's tab.
2. Click Tools, Browse (or click the Browse
button).
3. Test the model.
4. To close the browser, close the tab on which the browser is displayed.
9.4 Generating Interface Models
If you want to use a model as sub-model of another model, you must create an interface
between these models. To be able to set up the interface, you must generate an interface
model from the sub-model.
If you generate an interface model from a model, all the model's references and
properties, for which the value of the Part of interface field is True, are added to the
interface model.
©To-Increase B.V.
29
To generate an interface model:
1. On the e-Con Studio, open the model from which you want to (re)generate an
interface model. Make sure the tab of the right model is displayed.
2. Click Tools, Generate Interface (or click the Generate Interface
button).
3. On the Generate Interface dialog box, you can:
• Regenerate an existing interface model. To do so, select the interface
model. In the Version field, you can specify whether you want to
regenerate another version of the interface model.
• Generate a new interface model. To do so, in the Model field, you can
change the interface model's default Id.
4. Click Generate.
Tip
Use for interface models the same name as for the models from which you generate the interface
models, but preceded with an I. For example, if you generate an interface model from the
Customer model, the interface model's Id is ICustomer.
9.5 Import
9.5.1 Importing Projects
You can import all models, that are part of a project, at once.
Note
You can only import project files of type EPJ or ZIP.
To import a project:
1. On the e-Con Studio, click Tools, Import, Project.
2. On the Import Project dialog box, search for and select the project that you
want to import.
3. Click Open.
4. If the import file is of type:
• EPJ, the project is totally imported.
• ZIP, the Document Selection dialog box appears.
5. Select which parts of the project you want to import and click OK.
©To-Increase B.V.
30
9.5.2 Importing Models
You can easily import models that are exported from another e-Con environment.
Note
You can only import model files of type XML.
To import a model:
1. On the e-Con Studio, click Tools, Import, Model.
2. On the Import Model dialog box, search for and select the model that you want
to import.
3. Click Open.
9.5.3 Importing Templates
You can easily import templates that are exported from another e-Con environment. A
template is a configuration, with several fields filled, which you use as a default
configuration for a model.
Templates are separately stored from configurations. If you use a:
• SQL database, templates are stored with a different document type.
• File repository, templates are stored in the Templates folder.
Note
•
•
You can only import template files of type XML.
You can not configure a template from the e-Con Studio.
To import a template:
1. On the e-Con Studio, click Tools, Import, Template.
2. On the Import Template dialog box, search for and select the template that you
want to import.
3. Click Open.
9.5.4 Importing Configurations
You can easily import configurations that are exported from another e-Con environment.
Note
You can only import configuration files of type XML.
To import a configuration:
1. On the e-Con Studio, click Tools, Import, Configuration.
2. On the Import Configuration dialog box, search for and select the configuration
that you want to import.
3. Click Open.
©To-Increase B.V.
31
9.6 Export
9.6.1 Exporting Projects
You can export all models, that are part of a project, at once.
Note
You can only export projects to files of type EPJ or ZIP.
To export a project:
1. On the e-Con Studio, click Tools, Export, Project.
2. On the Export Project dialog box:
• Search for the folder in which you want to save the project file.
• Specify the project file's name and type in the File name field (you can
also keep the default name).
3. Click Save. If the project file's type is:
• EPJ, the project is directly exported and saved in the specified folder.
• ZIP, the Document Selection dialog box appears.
4. In the Document Selection dialog box, select which parts of the project you
want to export, and click OK. A message appears that indicates that and where
the file is created.
9.6.2 Exporting Models
You can easily export models to use them in another e-Con environment.
Note
You can only export models to files of type XML.
To export a model:
1. On the e-Con Studio, click Tools, Export, Model.
2. On the Export Model dialog box:
• Search for the folder in which you want to save the model file.
• Specify the model file's name (you can also keep the default name).
3. Click Save.
9.6.3 Exporting Templates
You can easily export templates that are you want to use in another e-Con environment.
A template is a configuration, with several fields filled, which you want to use as a kind of
default configuration for a model.
©To-Increase B.V.
32
Templates are separately stored from configurations. If you use a:
• SQL database, templates are stored with a different document type.
• File repository, templates are stored in the Templates folder.
Note
•
•
You can only export template files of type XML.
You can not configure a template from the e-Con Studio.
To export a template:
1. On the e-Con Studio, click Tools, Export, Template.
2. On the Export Template dialog box, select the template that you want to export.
3. Click Export.
9.6.4 Exporting Configurations
You can easily export configurations that you want to use in another e-Con environment.
Note
You can only export configuration files of type XML.
To export a configuration:
1. On the e-Con Studio, click Tools, Export, Configuration.
2. On the Export Configuration dialog box, search for and select the configuration
that you want to export.
3. Click Export.
9.7 Selecting Environments
If required, you can switch to another environment from the e-Con Studio.
To select an(other) environment:
1. On the e-Con Studio, click Tools, Environment (or click the Environment
button).
2. On the Select Environment dialog box specify the:
• Server
• Environment
3. Click OK.
Note
If not everything you worked on in the current environment is saved, and you select another
environment, you get a dialog box on which you can indicate which items you want to save.
©To-Increase B.V.
33
9.8 Modifying Environment Options
You can use the Options (Browse) tab, to modify the settings for each environment.
To modify an environment's options:
1. On the e-Con Studio, select the environment for which you want to modify the
options.
2. Click Tools, Options (or click the Options
button).
3. You can modify the following types of settings:
• General
• Advanced
• Administration
For more information on the options, refer to the 'e-Con 3.5 - Settings Description'
document.
©To-Increase B.V.
34
9.9 Finding Text
You can search for occurrences of a specified text.
To find text:
button).
1. On the e-Con Studio, click Edit, Find (or click the Find
2. On the Find dialog box, specify what, how and, where you want to search.
3. Click Find Next.
9.10 Replacing Text
You can search for and replace occurrences of a specified text.
To replace text:
1. On the e-Con Studio, click Edit, Replace (or click the Replace
button).
2. On the Replace dialog box, specify what, how and, where you want to replace.
3. Click:
• Find Next if you do not want to replace the found text.
• Replace if you want to replace the found text.
• Replace All if you want to replace all matching texts at once.
©To-Increase B.V.
35
9.11 Hiding Views
You can hide the following views of the e-Con Studio:
• Object Explorer
• Libraries
• Properties
• Project Explorer
• Source
• Output
To hide a view:
1. Open the view.
2. On the view's title bar, click the Hide
button. The view is hidden at the side
where it was displayed on the e-Con Studio.
3. To display a hidden view, click the corresponding button at one of the sides of the
e-Con Studio.
Note
To unhide a view, display the view, and click the Unhide
©To-Increase B.V.
button at the view's title bar.
36
9.12 e-Con Studio Shortcuts
Shortcut
CTRL+A
Description
CTRL+B
Build Model: builds the currently active model.
CTRL+C
Copy: copies the selection.
CTRL+E
Expression Builder: opens (or activates) the Expression Builder.
CTRL+F
Find: opens the Find dialog box on which you can specify what, how
and, where you want to search.
CTRL+H
Replace: opens the Replace dialog box on which you can specify
what, how, and where you want to replace.
CTRL+N
New Model: creates a new model.
CTRL+O
Open Model: opens the Open Model dialog box from which you
can select and open a model.
CTRL+S
Save: saves only the contents of the currently active pane or view.
The active pane or view is the one in which the cursor is located.
CTRL+V
Past: pasts the copied or cut selection to the selected position.
CTRL+X
Cut: cuts the selection.
CTRL+Z
Undo: cancels the latest change.
CTRL+SHIFT+B
Build Project: builds all (also the not open) models of the currently
active project.
CTRL+SHIFT+N
New Project: creates a new project.
CTRL+SHIFT+O
Open Project: opens the Open Project dialog box from which you
can select and open a project.
CTRL+SHIFT+S
Save All: saves the contents of all panes and views.
Del
F4
Delete: deletes the selected element.
F5
Browse: builds and opens the currently active model in the model
browser.
F8
Activate Object Explorer
F9
Activate Project Explorer
F11
Options: opens the e-Con environment's options.
©To-Increase B.V.
Select All: selects everything in a selected text or multi-line text field
that is editable.
Properties: opens the Properties view.
37