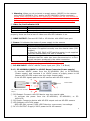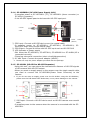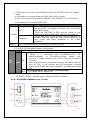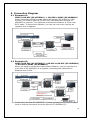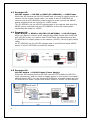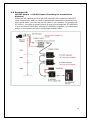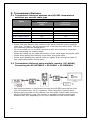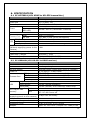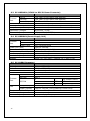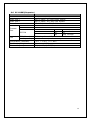
1
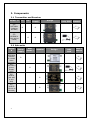
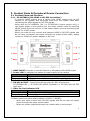
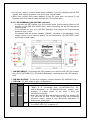
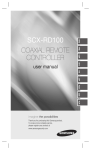
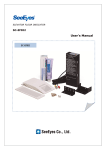
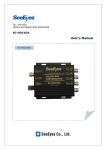
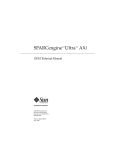
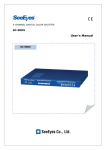
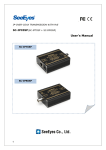
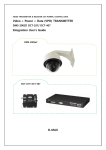
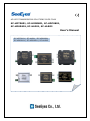
HD-SDI TRANSMISSION SOLUTIONS OVER COAX SC-HDT0801, SC-HDR0801, SC-HDP0801, SC-HDS0801, SC-HLR01, SC-HLR02 User's Manual SC-HDT0801 / SC-HLR01 / SC-HDR0801 SC-HDP0801 / SC-HDS0801 / SC-HLR02 Precaution and Safety Guidelines Please read this user’s manual thoroughly prior to use the unit for its easy and convenient use. • Do not install the product in the following places: extremely low or high temperature conditions; places exposed to rain, snow, or high humidity; places containing or exposed to oil and gas; places exposed to vibration and shock; places under direct sunlight or exposed to outdoor weather conditions; places exposed to radio waves (RF) or near to power lines. It may cause low performance or malfunction of the unit. • Do not disassemble the product or insert foreign objects. • The unit is subject to electric shock hazard. Be careful not to get an electric shock while using the device. • Please use only electrical safety approved power supply unit with electromagnetic compatibility. • Do not use and/or connect any devices inappropriate to the unit. It may cause malfunction of the unit or fire. • Use this product under temperature conditions only between - 10°C and +40°C. • Should be careful not to have the lines changed when connecting them. • Prior to turn on the device, check the cable insulation condition of the data cable, connected with external devices. • Before installing the product, check its voltage rate and then turn on the power. • Make sure to turn off the product prior to installation. • Do not subject the product to physical shock or exert excessive force to operate the product. • Do not use the device when any smoke or smell is produced from the unit. It may be subject to fire or electric shock. If any smoke or smell is produced, please turn off the unit and remove the power cable immediately, and contact your distributor to check the device properly. • If the power does not turn ON, please check whether the power cable is connected correctly or not. • Please note the transmission distance may vary depending on the cable quality and its loop resistance. Please refer to the transmission distance reference table per type of coaxial cable. • If the device does not work properly, please contact your distributor. 1 1. Introduction 1.1 Overview Using our HD-SDI transmission solutions, you can convert HDMI signals to HD-SDI signals and/or vice versa and transmit them over the coaxial cable. And also it is possible to supply power to the HD camera over 100m via the single coaxial cable. It is a cost effective solutions since you can transmit HDMI signals over coaxial cable longer distance, economical than other cabling solutions such as Fiber-optic or HDMI solutions. The transmitter, SC-HDT0801, converts and transmits HDMI signals to HD-SDI signals, while, the receiver, SC-HDR0801, converts and transmits HD-SDI signals to HDMI signals. If you want to extend the transmission distance, you can use the SC-HLR01, the repeater, or the SC-HDR0801 (Rx.). As sub-unit, there are also the SC-HDP0801 which can supply power to cameras with HD-SDI output, and the SC-HDS0801 which can supply power (48VDC) to the HD camera from a HD DVR with HD-SDI input. 1.2 Features HDMI (HD-SDI) signals & Power transmission over single coaxial cable Supply power to Megapixel camera under 8 Watt (12VDC type) over the single coaxial cable Convert and transmit HDMI signals to HD-SDI signals and vice versa over RG-6 max. 200m (HD: 1.485G), 130m (Full HD: 2.97G) For cameras with HD-SDI output, only need the SC-HDR0801 (Rx.) SC-HDR0801 (Rx.) able to use as a repeater No need of power wiring saving infrastructure cost under 30~50% Effective and economical cabling solutions compared with Fiber-optic, HDMI cabling Auto diagnosis of cable status for safer power supply Surge protection built-in transmitter Distance extension repeater: SC-HLR01 / SC-HLR02 1.3 HD Signals Standards SeeEyes HD-SDI transmission solutions are conformed with the SDI signals standards of the SMPTE(Society of Motion Picture and Television Engineers) The SDI (Serial Digital Interface) signals transmission system is the innovative transmission system with which it can transmit incompressible video signals over one single cable. As the SDI signals are digital signals, it is possible to transmit limitless distance without modification by equalizing and re-clocking at each certain distance. Also, since the signals are incompressible signals, there is no aging or delay of video signals caused by the compression. HD-SDI (SMPTE 292M) 1280 x 720p, 50/59.94/60 1920 x 1080i, 50/60 1920 x 1080p, 29.97/30 3G-SDI (SMPTE 424M) 1920 x 1080p, 50/59.94/60 2 2. Components 2.1 Transmitter and Receiver Model # Tx. SCHDT0801 O (HDMI to HD-SDI) SCHDR0801 Rx. Design Power code, PSU User’s Manual O O (HD-SDI to HDMI) Power Supply O 2.2 Sub-units Model # Camera PSU Power Repeater (48VDC ) Supply SCHDP0801 (48VDC to 12VDC down converter) O SCHDS0801 (Power Supply Unit) O SCHLR01 (HD-SDI to HDSDI) SCHLR02 (HD-SD to HD-SDI) 3 O O Design Power code, PSU User’s Manual 3. Product Parts & Peripheral Device Connection 3.1 Product Parts and Function 3.1.1 SC-HDT0801(1CH HDMI to HD-SDI transmitter) • It receives HDMI signals from a device with HDMI output such as HD camera or HD splitter, and transmits them over the coaxial cable after converting the HDMI signals to HD-SDI signals. • Using with the SC-HDR0801 (Rx.) or SC-HDS0801 (power supply unit), it can supply power to the camera over the single coaxial cable by receiving 48VDC power from the receiver or the power supply unit and converting the 48VDC to 12VDC power. • When you want to only convert and transmit HDMI to HD-SDI signals and do not want to transmit the power through the single coaxial cable, please connect a 12VDC/1A power adapter to the unit. ① ④ ② ⑤ ③ ⑥ ① HDMI INPUT: Connect to the HD Camera or HD splitter with HDMI output ② Power LED: It indicates the status of power supply to the camera LED Indicator Description ON Normal power supply Flash OCP(Over Current Protection), LVO(Low Voltage Out) ③ DC 12V OUTPUT: 12VDC power output for the camera (2Pin T.M Block) ④ HD-SDI OUTPUT: Connect the devices with HD-SDI input such as SC-HDR0801(Rx.) , SC-HLR01/SC-HLR02 (Repeater) or HD DVR with HD-SDI input port. ⑤ Video In/Out Indicator LED LED Indicator Description Yellow On Normal Operation (HDMI signals transmission) Green On Normal Operation (HD-SDI signals transmission) ⑥ DC INPUT: 12VDC ~ 48VDC power input port (3 Pin T. M Block) • Please connect an extra power adapter (12VDC ~ 48VDC), - When you want to send only HD-SDI signals and do not want to supply power through the same coaxial cable. - When the power supplied through the coaxial cable is not enough. 4 • You do not need to connect extra power adapter if you are sending the HD-SDI signals and supplying power over the single coaxial cable. • When you connect the power adapter to the DC input port, the power is not supplied over the coaxial cable through the SDI output port. 3.1.2 SC-HDR0801(1CH HD-SDI receiver) • It receives HD-SDI signals over the coaxial cable, and transmits them to HD monitor or HD DVR with HDMI input, after converting the HD-SDI signals to HDMI signals. • It is possible to use as a HD-SDI Repeater and extend the transmission distance max. 200m. • Connected with the power adapter (48VDC) included in the package, it can supply power to the camera and/or to the transmitter (SC-HDT0801) over the single coaxial cable. ① ② ③ ④ ⑤ ⑥ ⑦ ① HD-SDI INPUT: It receives HD-SDI signals from devices with HD-SDI output such as SC-HDT0801(Tx), SC-HLR01(Repeater), cameras with HD-SDI output port. ② HD-SDI OUTPUT: To use as a repeater, connect another SC-HDR0801 (Rx.) ③ DIP SW: DC 48V power supply configuration SW1 Not used Supplying 48V DC Power - When it is connected with SC-HDT0801(Tx), SCHLR01(Repeater) or SC-HDP0801(Power supply unit) properly, it supply power to the units if they are connected correctly. DIP ON - When the devices are connected correctly, the power LED SW SW2 (⑥) will turn on. But, if the devices are not connected correctly and/or there is any abnormal operation, it flickers the power LED. Not supplying DC 48V Power (Default mode) OFF - The power LED (⑥) is always on. 5 ※ Warning: When you do not want to supply power (48VDC) to the camera using the SC-HDR0801 (Rx.) and/or the SC-HDP0801 (Down converter), please make sure to turn the DIP Switch OFF. Please turn the DIP Switch On only if the the SC-HDP0801 or the SC-HDT0801 is connected to the camera. Otherwise, it may cause damage to the camera due to the over voltage. ④ Video In/Out Indicator LED LED Indicator Description Yellow On Normal Operation (HDMI signals transmission) Green On Normal Operation (HD-SDI signals transmission) When the transmission distance is too long or the cables are not connected properly, there can find a loss of video even the LED indicator is on. ⑤ HDMI OUTPUT: Connect HD DVR or HD Monitor with HDMI input port. ⑥ Power: It indicates the status of power supply to the camera LED Indicator Description ON • If the DIP_SW2 is ON and the LED is on, it indicates that the power is supplied correctly over the coaxial cable (SDI output). • Even the DIP_SW2 is OFF and the power is not supplied over the coaxial cable, the LED is turned on. Flickering • If the DIP_SW2 is ON and the LED is flickering, it indicates that the cable has been disconnected or a short circuit has been produced in the cable connection. Please check the DIP_S/W configuration (“③” )for the power. ⑦ DC 48V INPUT: 12VDC~48VDC Power input port (3Pin T. M Block) 3.1.3 SC-HDP0801(48VDC to 12VDC Down Converter Power supply) • It receives 48VDC power from the SC-HDR0801 (Rx) or SC-HDS0801 (Power supply) and converts it to 12VDC power to supply power to HD camera with HD-SDI output over the single coaxial cable. • It let HD-SDI signals pass to the HD camera with HD-SDI output. ② Coaxial cable ③ ① HD camera with HD-SDI output ④ ① SDI Output: Connect a HD-SDI device over the coaxial cable • It receives the power from the SC-HDS0801, SC-HDR0801, or SCHLR01/02. ② SDI Input: Connect a device with HD-SDI output such as HD-SDI camera ③ LED Indicator of DC12V power • RED LED ON: normal / RED LED Flickering: overcurrent, low voltage ④ DC 12V OUTPUT: Supply 12VDC power to the HD camera 6 3.1.4 SC-HDS0801 (DC 48V Power Supply Unit) • It supplies power to SC-HDT0801 (Tx.), SC-HDP0801 (down converter) or SC-HLR01 (repeater). • It let HD-SDI signals pass to devices with HD-SDI input port. ② ① Coaxial cable ③ ④ Power Adapter (48VDC) ① SDI Input: Connect a HD-SDI device over the coaxial cable • It supplies power to SC-HDP0801, SC-HDT0801, SC-HDR0801, SCHLR01/02 when using single coaxial cable. ② SDI Output: Connect a device with HD-SDI input such as HD-SDI DVR ③ LED Indicator of Power supply • ON: When the SC-HDP0801, SC-HDT0801, SC-HDR0801 or SC-HLR01/02 is connected correctly. • Flickering: abnormal connection (short circuit/disconnection) ④ DC 48V Input: Connect the power adapter (48VDC) ※ Please use only the power adapter provided with the package. 3.1.5 SC-HLR01 (HD-SDI to HD-SDI Repeater) • Using this unit, you can extend the transmission distance of HD-SDI signals of HD cameras with HD-SDI output. • When you want to supply power to the camera over the single coaxial cable, you need to connect the SC-HDP0801(Power Down Converter) to the camera. ※ If you do not want to supply power over the SC-HLR01 using the SC-HDP0801, please turn the DIP Switch OFF. Otherwise, it may cause damage to the camera. ① ④ ② ③ ⑤ ① SDI Input: Connect a HD-SDI device such as HD-SDI camera over coaxial cable • It supplies power to the camera when the camera is connected with the SCHDP0801. 7 ② SDI Output: Connect a HD-SDI device such as HD-SDI DVR over coaxial cable • It is possible to connect directly an SDI DVR or SDI monitor. • It can receive power from the SC-HDR0801, SC-HDP0801 or SC-HLR01/02. ③ LED Indicator of Power & SDI Input LED Indicator Description • If the DIP_SW2 is ON and the LED is on, it indicates that the power is supplied correctly over the coaxial ON cable (SDI output). • Even the DIP_SW2 is OFF and the power is not supplied over the coaxial cable, the LED is turned on. YELLOW • If the DIP_SW2 is ON and the LED is flickering, it indicates that the cable has been disconnected or a Flickering short circuit has been produced in the cable connection. GREEN On: It indicates the SDI signals are received correctly. ④ DIP SW: DC 48V power supply configuration SW1 Not used Supplying 48V DC Power - When it is connected with SC-HDT0801(Tx), SCHLR01(Repeater) or SC-HDP0801(Power supply unit) properly, it supply power to the units if they are connected DIP ON correctly. SW - When the devices are connected correctly, the Yellow LED will SW2 turn on. But, if the devices are not connected correctly and/or there is any abnormal operation, it flickers the power LED. Not supplying DC 48V Power (Default mode) OFF - The Yellow LED is always on. ⑤ DC Input port • DC INPUT: 12VDC ~ 48VDC power input port (3Pin T.M Block) 3.1.6 SC-HLR02: Repeater(1 in /2 out) ④ ① ② ⑤ ③ ⑥ 8 ① DC Input port • DC INPUT: 12VDC ~ 48VDC power input port (3Pin T.M Block) ② LED Indicator of Power & SDI Input LED Indicator Description • If the DIP_SW2 is ON and the LED is on, it indicates that the power is supplied correctly over the coaxial ON cable (SDI output). • Even the DIP_SW2 is OFF and the power is not supplied over the coaxial cable, the LED is turned on. YELLOW • If the DIP_SW2 is ON and the LED is flickering, it indicates that the cable has been disconnected or a Flickering short circuit has been produced in the cable connection. GREEN On: It indicates the SDI signals are received correctly. ③ SDI Input: Connect a HD-SDI device such as HD-SDI camera over coaxial cable • It supplies power to the camera when the camera is connected with the SCHDP0801. ④ DIP SW: DC 48V power supply configuration SW1 Not used Supplying 48V DC Power - When it is connected with SC-HDT0801(Tx), SCHLR01(Repeater) or SC-HDP0801(Power supply unit) properly, it supply power to the units if they are connected DIP ON correctly. SW - When the devices are connected correctly, the Yellow LED will SW2 turn on. But, if the devices are not connected correctly and/or there is any abnormal operation, it flickers the power LED. Not supplying DC 48V Power (Default mode) OFF - The Yellow LED is always on. ⑤ SDI Output: Connect a receiver or device with SDI input over the coaxial cable. Only the SDI signals are transmitted. • It is possible to connect directly an SDI DVR or SDI monitor. ⑥ SDI Output: Connect a HD-SDI device such as HD-SDI DVR over coaxial cable. • It is possible to connect directly an SDI DVR or SDI monitor. • It can receive power from the SC-HDR0801, SC-HDP0801 or SC-HLR01/02. 9 4. Connection Diagram 4.1 Example #1: HDMI to HD-SDI (SC-HDT0801) -> HD-SDI to HDMI (SC-HDR0801) When transmitting HDMI signals from a HD splitter (SC-6HDS) to a HD monitor, you need to use the SC-HDT0801 as transmitter and the SCHDR0801 as receiver. The maximum transmission distance is 200m over RG-6 cable. To extend the distance, you can use one more receiver as repeater as 4.2 diagram. 4.2 Example #2: HDMI to HD-SDI (SC-HDT0801)-> HD-SDI to HD-SDI (SC-HDR0801) -> HD-SDI to HDMI (SC-HDR0801) When you want to extend the transmission distance, you can use the one more unit of SC-HDR0801 as a repeater, extending the transmission distance max. 400m. In this case, the first SC-HDR0801 (①) does not need extra power supply since it receives the power from the second SC-HDR0801(②). 10 4.3 Example #3: HD-SDI output -> HD-SDI to HDMI (SC-HDR0801) -> HDMI input When the HD camera has HD-SDI output and you want to supply power to camera via the single coaxial cable, you need to use SC-HDR0801 as receiver and the SC-HDP0801 power supply to down-convert the 48VDC power supplied from the receiver to 12VDC power. The SC-HDP0801 let the HD-SDI signals pass to the camera and send the 48VDC power received from the SC-HDR0801 to the HD camera after converting the power to 12VDC. 4.4 Example #4: HDMI Output -> HDMI to HD-SDI (SC-HDT0801) -> HD-SDI input When you want to connect a HD camera with HDMI output with a HD DVR with HD-SDI input, you need to use SC-HDT0801 as transmitter and the SC-HDS0801 to supply power to the camera (12VDC) via the single coaxial cable. he SC-HDS0801 let the HD-SDI signals pass to the DVR and send 48VDC power to the SC-HDT0801 and the HD camera. 4.5 Example #5: HD-SDI Output -> HD-SDI input (Power Supply) When the HD camera and the HD DVR have HD-SDI output and HD-SDI input respectively, and you want to supply power to the camera via coaxial cable from the DVR, you can use the SC-HDS0801 as power supply and the SC-HDP0801 to down- convert the 48VDC power to 12VDC for the camera. 11 4.6 Example #6: HD-SDI Output -> HD-SDI input (Extending the transmission distance) When the HD camera and the HD DVR have HD-SDI output and HD-SDI input respectively, and you want to extend the transmission distance over the coaxial cable, you can use the SC-HLR01, the repeater. To operate the SC-HLR01, you need to supply power to the unit through the SC-HDS0801. If you use the SC-HDP0801 and the SC-HDS0801 together, you can supply power to the camera as well via the single coaxial cable. 12 5. Transmission Distance 5.1 Transmission Distance between two HD-SDI transmission solutions per coaxial cable type Transmission Distance (m) Cable L-5CFB(Canare) 5C-HFBT(U-JIN) 5C-HFBT(Dongbok) 5C-FBT(U-JIN) L-3C-2V(Canare) Belden 1694A 18AWG Belden 59(8241) Belden 59(543945) 1.485Gb/s (HD) 2.97Gb/s (FULL HD) 210 200 200 200 90 220 100 150 130 110 100 100 40 130 90 Please note the distance may reduce in the actual field due to any possible video loss. Therefore, we recommend you to connect the cable under 70% of the maximum distance stated above. We recommend you to use BNC connectors with low connection resistance when connecting the coaxial cables. Please be careful not to make deformation of the cable when wiring the cable. Please avoid pulling the cable by force when wiring the cable. Please avoid bending the coaxial cable too tightly when wiring the cable. It may make deformation of the cable. 5.2 Transmission Distance using multiple repeater (SC-HLR01) Connecting the SC-HDT0801 + SC-HLR01 + SC-HDR0801 Not supplying power to the camera through the HD-SDI transmission units, you can connect max. six (6) repeaters, when using RG-6 coaxial cable. When supplying power to the camera over the single coaxial cable using the HD-SDI transmission units, the number of repeater and the transmission distance may vary depending on the loop resistance of the coaxial cable. 13 6. SPECIFICATION 6.1 SC-HDT0801(1CH HDMI to HD-SDI transmitter) Model # SC-HDT0801 Video In HDMI Digital Signal Video Out Power Input SDI (1.485G, 3G) DC +12V/1A ~ +48V/1.04A DC 12V / 0.67A (8W MAX.) Out Power LED Indicator Normal: LED on / Abnormal: Flickering (RED LED) Transmission Distance Refer to transmission distance table per coax HDMI HDMI A Connector Connect Port SDI Out 75Ω, BNC-F(Low return loss applied) SDI(Green) LED On: Normal Operation LED HDMI(Yellow) LED On: Normal Operation Power(Red) LED On: Normal, LED Flickering: Power Drop Power Consumption (Without supplying power to the 3.8W camera) -10℃ ~ +40℃ / 0 ~ 80% Temperature /Humidity Case body / Weight Aluminum / 202g Dimension (mm) 93(W) X 92.5(H) X 34.7(D)mm 6.2 SC-HDR0801(1CH HD-SDI to HDMI receiver) Model # SC-HDR0801 Video In SDI (1.485G, 3G) Video Out HDMI Digital Signal HD-SDI Output Buffered Output (Used when using as repeater) Power In DC +12V/1A ~ +48V/1.04A SDI In 75Ω, BNC-F(Low return loss applied) SDI Out 75Ω, BNC-F(Low return loss applied) Connect Port HDMI Out HDMI Connector Power Input 3Pin Terminal Block SDI(Green) LED On: Normal Operation LED HDMI(Yellow) LED On: Normal Operation Power(Red) LED On: Normal, LED Flickering: Power Drop SW1 Not used DIP SW(DC 48V ON: DC 48V Power supply control) SW2 OFF: DC 48V Power off Power Consumption (Without 4.6W(in Full HD mode) supplying power to the camera) -10℃ ~ +40℃ / 0 ~ 80% Temperature /Humidity Case body / Weight Aluminum / 214g Dimension (mm) 93(W) X 92.5(H) X 34.7(D)mm Adapter Input: AC 110~240V / Output: DC +48V/1.04A 14 6.3 SC-HDP0801 (DC48V to DC12V Down Converter) Model # SC-HDP0801 SDI In 75Ω, BNC-F(Low return loss applied) Connect SDI Out 75Ω, BNC-F(Low return loss applied) Port Power Output 2Pin Terminal Block Power Output DC +12V/0.67A (8W) Power (RED LED) LED On: Normal, LED Flickering: Power Drop -10℃ ~ +40℃ / 0 ~ 80% Temperature /Humidity Case body / Weight Aluminum / 100g Dimension (mm) 45(W) X 60(H) X 25(D)mm 6.4 SC-HDS0801(Power Model # SDI In Connect SDI Out Port Power Input Power Led (Red) Power In Temperature /Humidity Case body / Weight Dimension (mm) Adapter Supply Unit) SC-HDS0801 BNC-F BNC-F 3Pin Terminal Block LED On: Normal DC Adapter +48V 1.04A -10℃ ~ +40℃ / 0 ~ 80% Aluminum / 100g 45(W) X 60(H) X 25(D)mm Input: AC 110~240V / Output: DC +48V/1.04A 6.5 SC-HLR01(Repeater) Model # SC-HLR01 Video In SDI (1.485G, 3G) Video Out SDI (1.485G, 3G) HD-SDI OUT Buffered Output Power In DC +12V/1A ~ +48V/1.04A SDI In BNC-F SDI Out BNC-F Connect 1 2 48V Output Status Port DIP SW OFF OFF ON Loop Through SDI (Green) Flickering: Normal Operation LED Power (Yellow) LED On: Normal, LED Flickering: Power Drop -10℃ ~ +40℃ / 0 ~ 80% Temperature /Humidity Case body / Weight Aluminum / 120g Dimension (mm) 78(W) X 60(H) X 25(D)mm 15 6.6 SC-HLR02(Repeater) Model # SC-HLR01 Video In SDI (1.485G, 3G) Video Out 1 SDI (1.485G, 3G) with Power Supply Video Out 2 SDI (1.485G, 3G), Only SDI signals Power In DC +12V/1A ~ +48V/1.04A SDI In BNC-F SDI Out BNC-F Connect 1 2 48V Output Status Port DIP SW OFF OFF ON Loop Through SDI (Green) Flickering: Normal Operation LED Power (Yellow) LED On: Normal, LED Flickering: Power Drop -10℃ ~ +40℃ / 0 ~ 80% Temperature /Humidity Case body / Weight Aluminum / 120g Dimension (mm) 78(W) X 60(H) X 25(D)mm 16 7. Warranty Certificate This product has passed thorough quality control and test, and if this gets broken during normal use, we provide 12 months warranty service. Model No. Serial No. Distributor Date you purchased Place you purchased Warranty Period Name Purchaser Address • Please • Please One (1) year from the date of purchase check this warranty indication first. contact your distributor after checking out any defect in the products. • The standard for repairing, replacement or reimbursement follows Customer. • Warranty content any defect under normal use within the warranty service period we give you free repair service according to the warranty certificate. • We charge you with the fee of parts and service despite of free warranty service period. Any breakage made without care such as: - Breakage or trouble made by natural disaster. - Breakage or trouble made by breaking the product guide or manual. - Breakage or trouble made by wrong power voltage or frequency. - When you want to reassemble for full system or replace parts within warranty service period. - When unauthorized person modified or made damage on the product trying to repair it. • Please note that we don’t support the breakage after warranty service period is expired. If the customer wants to get it repaired, we charge them with the fee. • The specification is subject to change without prior notice for quality improvement. 17 [ MEMO ] 18 SeeEyes Co.,Ltd is the New Corporate Name of Samsung CCTV Service Co.,Ltd SeeEyes Co.,Ltd #502~506, Sunil Technopia, 440, Sangdaewon-Dong, Jungwon-Gu, Sungnam-Si, Gyeonggi-Do, Korea TEL : +82-(0)31-777-3508 FAX : +82-(0)31-777-3512 EMAIL : [email protected] http://www.sscctv.com/eng 19 20