1
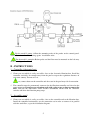
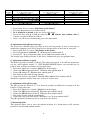
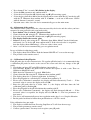
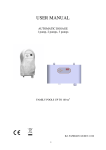
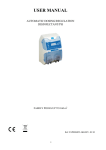
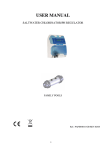
USER MANUAL
JUST DOSING REDOX
1 pump and 2 pumps
FAMILY POOLS UP TO 160 m3
Ref. PAPI004063 GB 05/09
1
TABLE OF CONTENTS
I.
SAFETY INSTRUCTIONS
II.
PACKING LIST
III.
INSTALLATION
IV.
ACTIVATION
V.
MAINTENANCE
VI.
ALARMS
VII
WINTERING
VIII. WARRANTY
IX.
ENVIRONMENT PRESERVATION
To improve product quality, the manufacturer reserves the right to modify production, at
any time and without notice.
I. SAFETY INSTRUCTIONS
* READ AN FOLLOW ALL INSTRUCTIONS
* SAVE ALL INSTRUCTIONS
In the manual this symbol indicates a WARNING.
It informs you of the risk of damage to the equipment or of serious injury.
It is very IMPORTANT that you pay attention to these warnings !
2
WARNING - RISK OF ELECTRIC SHOCK
The safety instructions outlined in this manual are not exhaustive. They highlight the
most common risks of using electrical equipment in presence of water. Any installation
and use of this equipment should be carried out with caution and common sense.
To prevent injury or accident install the equipment out of the reach of children.
Ensure that the installation conforms to the regulation in force in the region concerned.
The filtration box power supply line should be protected by a differential circuit
breaker with a release security of 30 mA maximum with an opening distance of at least
3 mm on all poles. This circuit breaker has nothing to do with the house’s one- from 300
to 500 mA-. In case of doubt, get a qualified electrician to look at the installation. The
electrical installation of this equipment should be performed by a qualified person in
accordance with the regulation in force in the region concerned.
The power supply cables must be protected against accidental damage. A damaged
cable should be replaced immediately and exclusively with an original cable. Never cut
or extend the cables.
It is important to turn off the power supply before carrying out any technical work. Do
not modify the device. Any modification may cause damage or be dangerous. Only
qualified personnel should carry out maintenance in case of break down.
This device is intended for use in family pools only.
NON-OBSERVANCE OF THESE INSTRUCTIONS MAY CAUSE DAMAGE TO
THE DEVICE OR SERIOUS INJURY
3
II. PACKING LIST
Before starting installation, ensure that the box contains:
Type
1 Pump
Type
2 Pumps
1 User manual
1 Controller (electronic box)
1 Peristaltic pump
1 REDOX probe
5 m colored tubing
1 inlet filter
1 control panel with probe holder, filter and mounting set
1 Injection connector Ø ½ ’’
2 inserts and 2 fixing screws
1 kit for assembly panel connection: 5 m clear tubing, 2
fittings Ø ½ ’’ , 2 saddles 50 mm x ½ ’’ and 2 small valves
M/F ½”
1 saddle Ø 50 mm x ½ ’’
1 User manual
1 Controller (electronic box)
2 Peristaltic pumps
1 REDOX , 1 pH probe
5 m transparent tubing for pH
5 m coloured tubing for REDOX
2 inlet filters
1 control panel with probes holder, filters and mounting set
2 Injection connectors Ø ½ ’’ (check valves)
2 inserts and 2 fixing screws
1 kit for assembly panel connection: 5 m clear tubing, 2
fittings Ø ½ ’’ , 2 saddles 50 mm x ½ ’’ and 2 small valves
M/F ½ ”
2 saddles Ø 50 mm x ½’’
III. INSTALLATION
A – INTRODUCTION
This manual covers the 2 automatic dosing models:
• Model 1 pump for the simple disinfection of the pool.
• Model 2 pumps for the disinfection and the pH regulation of the pool.
Before proceeding with the installation of the device, it is very important to check the
following points:
The technical area should be dry and properly ventilated, protected from rain, splashes,
discharges of water and UV radiation. Provide a space for each which is at a sufficient
distance from the electrical appliances or any other chemical containing product.
Non-compliance with this instruction will lead to abnormal oxidation of the metallic parts,
which may result in the device break down.
Assembly of the dosing controller and its attachments must strictly conform to the
following installation diagram.
4
For the model 2 pump : follow the mounting order of the probes on the control panel.
Also follow the order of correcting agents’ installation order.
For the model 1 pump the Redox probe and the filter must be mounted on the left entry
of the control panel.
B - INSTRUCTIONS
1 – Controller (electronic box)
Choose an area which is easily accessible, close to the electronic filtration box. Install the
controller vertically, far enough away from the pool to respect the regulation distances of
your own country. Do not cover it.
Any contact
between the controller and the water in the pool may risk electrocution.
The controller must be permanently connected to the filtration controller and slaved to the
pump contactor. Do not use an extension cord with a plug or use a plug to connect the
unit. Turn off the differential circuit breaker beforehand. Ensure that the controller
switches off when the filtration pump stops.
2 – Assembly panel
Choose an area which is easily accessible, close to the controller and to the filtration box.
Install the controller horizontally, use the connection set in order to connect it in parallel
with the sand filter, as per the installation diagram.
5
The valves mounted on the saddles allow isolating the measuring circuit. Another valve,
placed between the 2 filters allows the water sampling for measurements by photometer
for example.
Assembly panel connection
Place the first saddle. Mark, then drill the pipe. Mount the small valve on the saddle with
Teflon. Mount the fitting M ½’’on the small valve.
Place the second saddle. Mark, then drill the pipe. In the same way, mount the small valve
on the second saddle with Teflon. Mount the fitting M ½’’on the small valve.
Take off the rubber protections from the probes then mount them on the corresponding
probe holders. Ensure it is not stuck in the pipe.
Connect the cables from the REDOX and pH probes (BNC plugs) to the bottom of the
controller. Keep it away from all other electric cables to avoid any electromagnetic
disturbance which may distort measurements.
3 – Accessories
Type 1 pump (disinfectant)
Place the first saddle in the middle of a horizontal pipe of a minimum of 40 cm, turning
the opening 1/2’’ preferably upwards. Mark, then drill the pipe. Mount the injection
connector on to the saddle with Teflon.
Connect the inlet filter to the pump with a part of the coloured tubing supplied. Follow the
direction of the arrows on the cover of the pump.
Connect the outlet of the disinfectant pump to the injection connector with a piece of the
tubing supplied.
Connect the pump to the controller.
Type 2 pumps (disinfectant, pH)
Place the first saddle and accessories as per Type 1 pump
Place the second saddle at a minimum distance of 50 cm from the first one. Turn the
opening ½’’upwards. Mark, then drill the pipe. Mount the injection connector ½ ’’ with
Teflon. The injection connector should be as close as possible to water pushing in to the
pool.
Connect the suction strainer to the pH pump with a part of the tubing supplied. The arrow
on the pH pump cover indicates the flow direction.
Connect the outlet of the pH pump to the injection connector with a piece of the tubing
supplied.
Connect the pump to the controller.
6
IV. ACTIVATION
A – INTRODUCTION
When installing the device for the first time or at the start of a new season, it is
imperative to check and adjust the following 3 points :
The pool water must be clear and free from algae or sediment.
The water should be correctly balanced (alkalimetry, hydrometry):
• Alkalimetry shows the level of bicarbonates dissolved in the water.
• Hydrometry, shows the water hardness, that is the level of calcium or magnesium salts
dissolved in the water.
The pH of water should be stabilised between 7,0 and 7,2.
The efficiency of a chlorine chemical treatment is rapidly decreased by the increase in pH and
scale precipitates more quickly when pH is high or unstable.
Source : French Ministry of Health
B – INSTRUCTIONS
All models:
The Redox and pH probes have been calibrated in the factory; no calibration needs to be
carried out before first using the device.
It is necessary to set the device according to the pool volume and the used treatment agents.
Please follow the instructions outlined in chapter V.
The activation of your device is now completed. We recommend you to activate your
guarantee on www.pool-technologie.com. It will enable you to receive information on your
device.
7
V. MAINTENANCE
Never use hydrochloric acid. Only use a pH corrector product (acid or base) which is
recommended by your professional. The use of any other chemical product can lead to
irreversible damage to the device.
Use exclusively a disinfectant made from chlorine recommended by your professional
(sodium hypochlorite or soda hypochlorite). The use of any other chemical product can lead
to irreversible damage to the device.
It is IMPERATIVE to check the levels of chlorine and pH each week with your usual
analysis kit. An excessive level of chlorine and/or a low pH is likely to cause oxidation of the
metal parts and can lead to non-reversible deterioration of the pool surface, axes and
automatic shutter flaps, telescopic shelters, thermal exchangers. If you are covering the pool
(shutter, tarpaulin, cover), ventilate the pool regularly so as to avoid dissolved gases
accumulating which could disrupt the measurements of pH or chlorine probes. The
manufacturer is not liable for the non-observance of the maintenance instructions.
Your device allows you to carry out different operations detailed below. Button C allows to
you stop an operation which is running, at any time, so you can go back to the main menu.
A – INTRODUCTION
Depending on the model (1 or 2 pumps), the device may have the following functions:
disinfection / pH.
1) Display ( 2 pumps model)
The display alternatively shows the Redox or the pH value. Example:
.
⇒ 7.0 stands for a pH value of 7
⇒ 75 stands for a redox value of 750 mV
2) A scrolling menu allows setting the JUST DOSING REDOX :
1. MA: manual injection for disinfectant and pH
2. Ad: adjustment of Redox and pH probes
3. CA : pH probe calibration
4. CP : pool volume
8
5. Co : pH correcting agent
6. SE : pH and redox set point
7. do : daily dose
8. OP: empty can function (option)
Summary of the menu
Mise en
route
V Long
PH
"60"
Dém arrage pom pe Ph
60s par défaut
Injection m anuelle
(tem ps en s)
rE
"20."
Dém arrage pom pe RE
20. par défaut
Injection m anuelle
(dose en m l)
PH
6.8 à 7.6
Oh/Er
mesure pH ou 7 par
déf aut
Ajustage pH
rE
40. à 80.
Oh/Er
mesure REDOX ou
650mV par défaut
Ajustage REDOX
CA
7
Oh/Er/10
Oh/Er
CP
01 à 30
15 par
défaut
Param ètre Volum e pH
Co
AC / bA
AC par
défaut
Correcteur pH
MA
Ad
Calibration pH
7.2 par
défaut
PH
6.8 à 7.6
Consigne pH
rE
"78."
do
"50."
Réglage de 0 à 990m l
pas de 10m l
50. par
défaut
Param ètre dose RE
journalière en m l
OP
Etat
ON/OFF
OFF par
défaut
Option bidon vide
SE
Réglage de 500 à 900
pas de 10m V + do
780mV par
déf aut
do: mode
dosage
Consigne REDOX
Disinfectant regulation:
The injection of the disinfectant is automatically carried out according to the Redox set point
you will adjust and the daily recommended dose advised by the disinfectant provider.
Example:
Recommended dose 900 ml/100 m3/day. If your pool capacity is 50 m3, the daily dose (do)
will be 450 ml.
pH regulation:
The injection of the pH correcting agent (acid or base, to set in Co menu) is automatically
carried out according to the set point and the pool volume (CP).
B – INSTRUCTIONS
To modify the parameters of a function:
Hold the button V for 3 secs to access the parameters which can be modified.
Choose the code of the parameter to modify using the buttons then confirm with V.
The parameter to modify flashes.
Choose the desired value using the buttons then confirm with V.
9
The value will be displayed for 3 secs. The device then automatically returns to the main
display.
Button C allows you to stop the operation in progress at any time and to return to the main
menu.
1) – Start / Stop
This function allows you to stop or start the device again at any time.
Press and hold C for 3 seconds.
2) – Adjustment of the pool volume
This function allows you to adapt the quantity of product to be injected according to the
volume of the pool. The volume by default corresponds to pools from 30 to 35 m3 (code 15).
Pool volume
0 m3 to 1 m3
1 m3 to 2 m3
2 m3 to 3 m3
3 m3 to 4 m3
4 m3 to 5 m3
5 m3 to 6 m3
6 m3 to7 m3
7 m3 to 8 m3
8 m3 to 9 m3
9 m3 to 10 m3
code
01
02
03
04
05
06
07
08
09
10
Pool volume
10 m3 to 15 m3
15 m3 to 20 m3
20 m3 to 25 m3
25 m3 to 30 m3
30 m3 to 35 m3
35 m3 to 40 m3
40 m3 to 45 m3
45 m3 to 50 m3
50 m3 to 55 m3
55 m3 to 60 m3
Code
11
12
13
14
15
16
17
18
19
20
Pool volume
Code
60 m3 to 70 m3
21
3
3
70 m to 80 m
22
3
3
80 m to 90 m
23
90 m3 to100m3
24
3
3
100 m to 110m
25
3
3
110 m to 120 m
26
120 m3 to 130 m3
27
3
3
130 m to 140 m
28
3
3
140 m to 150 m
29
150 m3 to 160 m3
30
Each code corresponds to an injection time for the disinfectant and the pH corrector. Due to
the nature of water it may be necessary to adapt the average timing.
Press the V button for 3 seconds : MA flashes.
Choose CP using the buttons then confirm with V.
The display flashes and shows the default value (code 15) when first installed.
Choose the code which corresponds to the volume of the pool using the buttons then confirm with V.
The display stops flashing. After 3s the device automatically goes to regulatory
mode.
3) Adjustment of the disinfectant dose
Just Dosing Redox may be used with all type of available disinfectant products. Do menu
allows setting the daily dose according to the product manufacturer recommendations.
Example: recommended dose 900 ml/100 m3/day. If your pool capacity is 50 m3, the daily
dose (do) will be 450 ml.
10
Pool
Volume
1 m3
10 m3
30 m3
50 m3
60 m3
100 m3
Hypochlorite, concentration at 2,7%
(8,5° chlorometric degrees)
100ml (do→ 10.)
990ml (do→ 99.)
Hypochlorite, concentration at 9,6%
(35° chlorometric degrees)
20ml (do→ 20)
170ml (do→ 17.)
500ml (do→ 50.)
850ml (do→ 85.)
990ml (do→ 99.)
Hypochlorite: Concentration at
12,5% (50° chlorometric)
10ml (do→ 10)
100ml (do→ 10.)
300ml (do→ 30.)
500ml (do→ 50.)
600ml (do→ 60.)
990ml (do→ 99.)
Press button V for 3 seconds. MA flashes in the display.
Select the do parameter and confirm with V.
50. is displayed as default (or the last saved value in ml)
Select the dose from 0 to 990 ml using the buttons then confirm with V.
Caution: a display of 15 means 150 ml.
After 3 secs the device automatically goes to the main menu.
4) Adjustment of the pH corrector type:
The device has a default setting for using an acid corrector product. It may be necessary to
modify this regulation (acid / base) adapt it to the characteristics of the water in your pool.
Press button V for 3 seconds : MA flashes in the display.
Select the function Co with the buttons then confirm with V.
Select by an acid product (AC) or base (bA) then confirm with V.
The display stops flashing and after 3s the device automatically goes to regulation mode .
5) Adjustment of Redox set point
The Redox set point by default is 780 mV. This value corresponds to an efficient disinfection
rate for a pH regulated around 7.2. JUST DOSING REDOX allows you to modify the set
point in order to fit the own features of your pool water.
Press the V button for 3 seconds. MA flashes in the display.
Choose the SE function with the buttons then confirm with V.
Choose rE with the buttons then confirm with V.
The display flashes with the stored details.
Choose the desired value with within 500 to 900 mV then confirm with V.
The Redox regulation will be, from now, at the new chosen value.
6) Adjustment of the pH set point
The pH set point by default is 7.2. It is however possible to modify this set point to fit the
features of your pool water.
Press the V button for 3 seconds. MA flashes in the display.
Choose the SE function with the buttons then confirm with V.
Choose the PH function with the buttons then confirm with V.
The display flashes with the stored details.
Choose the value you want with within 6.8 to 7.6 then confirm with V.
The pH regulation will from now on be at the new value chosen.
7) Manual injection
This function allows you to carry out manual injection of a disinfectant or pH corrector
product for an adjustable amount of time.
11
Press button V for 3 seconds. MA flashes in the display.
Select the MA parameter and confirm with V.
Select the desired product rE (disinfectant) or pH (pH correcting agent).
Select the dose from 0 to 990 ml for the disinfectant or a time from 0 to 9,5 mn for the pH
with the buttons then confirm with V. Caution : a read out of 15 means 150 ml
while 1.1 means 1 mn and 1 second.
Injection starts. After 3secs the device automatically goes to the main menu.
8) – Adjustment of the probes
This function allows you to adjust the values measured by the device and the values you have
measured in your pool with your usual analysis kit.
Press button V for 3 seconds . Ma starts to flash.
Choose function Ad using the buttons then confirm with V.
Select the desired product rE (disinfectant) or pH (pH correcting agent).
The display flashes the current value
Select the desired value using the buttons from 400 to 800 mV for the disinfectant
and from 6,8 to 7,6 for the pH then confirm with V. If the selected value is acceptable,
then the display shows Oh during 3 s. The new value is then saved.
After 3 secs the device automatically goes to regulation mode.
In case of failure in adjusting a probe:
The display shows Er for Error. Push the button ON/OFF or V to erase the message.
The previous value remains stored.
9) – Calibration of the pH probe
Each pH probe has its own characteristics. To regulate pH effeciently, it is recommended that
a calibration pH probe be made at the start of the season and after any change of the pH
probe.
Check that you have pH7 and pH10 solutions (not supplied).
Stop filtration. Remove the probe from its holder and replace it with a coin. Then set
filtration to MANUAL mode.
Hold down the V button for 3 seconds. MA flashes.
Choose function CA using the buttons then confirm with V.
The display shows the 1st point of calibration by flashing 7.
Place the pH probe in a standard pH 7 solution then confirm by V.
Please wait. Calibration is automatic: the display will flash alternatively 7 and - - . If the
measured value is correct, the display will read Oh.
Rinse the pH probe then let it drain. After 3 s, the display will then show the 2nd
calibration point by flashing 10.
Place the pH probe in the pH 10 solution then confirm with V.
Please wait. Calibration is automatic: the display will flash alternately 10 and - - . If the
measured value is acceptable, the display will read Oh for 3 s. The new parameters are
then stored.
The device will automatically move into regulation mode after 3 secs. Stop the filtration.
Put the probe back into its holder then put filtration to « AUTO » mode.
If the calibration does not work:
The display reads Er for Error. Pressing Stop/Start or V will clear the message.
The previous parameters remain stored.
Contact a professional. You may need to replace your pH probe.
12
The calibration solutions are disposable. They can be kept for 1 year in their vacuum
sealed packet stored away from light and heat. Dispose after use.
Never dry the pH probe with a cloth or absorbent paper since it may damage it. Leave
it to drip dry.
VII. ALARMS
1– Flashing pH display
The device has detected an abnormal pH value: > 1 (High pH Alarm) or pH < 1 (low pH
Alarm).
Check the value of the pH in the pool using your usual analysis kit. If the pH is abnormal,
stop the device. Add a pH acid corrector (Alarm pH high) or pH base (Alarm pH low) directly
in the pool through the flow out pipes. Restart the device. If the pH is normal, adjust or
calibrate the pH probe.
2–Flashing AL display
The device has detected that the previous correction attempts have failed.
Check that the disinfectant and or pH corrector and tank are not empty
Check that the pumps are injecting properly (refer to chapter V, paragraph )
Check the probes comparing the values indicated by the device with the measured
values in the pool with your usual analysis kit
Check the condition of the extraction and injection valves
Check the volume of the pool (refer to paragraph V.)
Do not hesitate to visit our FAQ on www.pool-technologie.com. If you do not find
solution to your problem, contact our Technical Assistance Service on:
N° INDIGO 0 892 705 520 (from France)
0,34 € TTC/MN
Please supply:
Proof of purchase
Serial number of the controller and the pH probe
Date when the device was installed
Name of the professional shop where it was purchased and/or who installed the
equipment.
You will be asked : pH value, chlorine level, water temperature, stabiliser level, pool
volume, time of daily filtration.
13
VIII. WINTERING
When wintering the pool (emptying the pool and/or stopping filtration), carry out the
following maintenance operations:
Remove the pH probe and keep it in the rubber protection filled with tap water.
Rinse the flexible tube of the peristaltic pump with clean water.
Changing the pump tubing:
Replace the flexible tubing from the peristaltic pump each season, the check valves.
The maintenance kit (Réf. KIT02MAINMTP) contains all of the parts necessary for
annual maintenance operation.
IX. WARRANTY
All our care and technical expertise has gone into making this device. It has undergone quality
control. If, in spite of all care and knowledge which has gone in to its manufacture, you have
to use our warranty, free replacement only applies to parts of our equipment which are
defective.
Duration of the warranty
2 YEARS for New material (controller).
1 YEAR for the pH probe (basic probe excluded)
1 Month* for After Sales Repairs and spare parts
* Authentic invoice date.
Warranty objects
The warranty applies to all parts with the exception of consumables which must be replaced
regularly.
The device is covered for any manufacturing defect only when it has been used normally in a
family pool. Use in public pools voids the warranty.
After sales service
All repairs are done in our work-shop.
All transport fees are payable by the user. There will be no compensation for
immobilisation and privation of the equipment when it is being repaired.
In any case, the equipment is always carried at the user’s own risk. It is up to the latter to
check that it is in perfect condition before the order is collected and if need be to state any
reservations on the carrier’s slip. Confirm this with the carrier within 72 hours by
registered letter, with an acknowledgement of receipt.
IMPORTANT: A replacement under guarantee will on no account extend the initial
warranty.
14
Limit of the warranty
Not included in the warranty:
1. Equipment and labour provided by a third party at the time of the installation of the
equipment.
2. Damage caused by an installation which is non-compliant.
3. Problems caused by deterioration, accident, harsh treatment, professional negligence or by
the final user, non-authorised repairs, fire, floods, lightening, frost, armed conflict or any
other force majeure.
ATTENTION: The warranty does not cover any damaged equipment further to non
respect of security use rules, use and maintenance stated in the current manual.
Every year we improve our products and software. These new versions are compatible with
previous models. New versions of equipment and software are not added to the warranty from
the previous models.
Implementation of the warranty
For more information on the current warranty contact your professional or our After Sales
Service. Any request should be accompanied by a copy of your proof f purchase
Do not hesitate to activate your guarantee on www.pool-technologie.com. It will enable
you to receive information on your device.
No part replacement will be made without the defective part being returned beforehand.
Any part which is not returned will be charged at the current tariff.
Laws and disputes
The present warranty is subject to French law and all other European directives or
international treaties which are in force at the moment of complaint and which are
applicable in France. In the event of dispute with regard to its interpretation or its
execution, this is the remit of TGI de Montpellier.
15
IX. ENVIRONMENT PRESERVATION
Environment preservation is essential. Our company is very much involved in this.
Our products are designed and manufactured with materials and components which are of
a high quality, respect the environment, and are reusable and recyclable. However, the
different components of which they consist may not be biodegradable. Our products
should not just be discarded.
European environmental directives set, for each product category, appropriate methods of
managing and disposing of waste material. The aim is to reduce waste material and to use
it, avoid making their components become a danger and to encourage the products to be
reused. To carry out this policy successfully, product manufacturers, distributors, users
and even professionals are involved in managing waste material from these products.
Since August 13, 2005, a European directive means you can dispose of your used product
free of charge:
If you buy a new product which is more or less the same, you can bring it back to the
distributor when you are buying a new one.
Take it to a waste recycling facility.
The symbol
stamped on a product means that a selective collection is
necessary and that it must be sorted from other household waste.
Manufactured by :
POOL TECHNOLOGIE
Zac des Jasses
115 rue de l’Oliveraie
34130 Valergues – France
www.pool-technologie.com
16