1
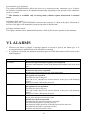
USER MANUAL
AUTOMATIC DOSING/REGULATION
DISINFECTANT/PH
FAMILY POOLS UP TO 160 m3
Ref. PAPI004052-GB-REV. 03/10
1
TABLE OF CONTENTS
I.
SAFETY INSTRUCTIONS
II.
PACKING LIST
III.
INSTALLATION
IV.
ACTIVATION
V.
CHLORINE PROBE OPTION
VI.
OPERATION
VII
ALARMS
VIII. WINTERING
IX.
WARRANTY
X.
PROTECTING THE ENVIRONMENT
To improve product quality, the manufacturer reserves the right to change the characteristics of
its products at any time without prior notice.
I. SAFETY INSTRUCTIONS
* READ AND FOLLOW ALL INSTRUCTIONS
* SAVE ALL INSTRUCTIONS
In the manual this symbol indicates a WARNING.
It informs you of the risk of damage to the equipment or serious injury to
humans. It is very IMPORTANT that you pay attention to these warnings!
2
WARNING - RISK OF ELECTRIC SHOCK
The safety instructions outlined in this manual are not exhaustive. They highlight the most
common risks of using electrical equipment in the presence of water. Any installation and
use of this equipment should be carried out with caution and common sense.
To prevent injuries or accidents, install the equipment out of reach of children.
Ensure that the installation complies with the regulations in force in the country of
installation. The filtration box power supply line should be protected by a
differential circuit breaker with a tripping safety device of 30 mA maximum, with a
contact opening distance of at least 3 mm on all poles. This device is completely
different from the differential circuit breaker protecting the whole house, which
has a rating of about 300 to 500 mA. In case of doubt, get a qualified electrician to
check your whole installation area installation. Installation of this equipment
should be performed by a qualified person in accordance with the electrical
standards in force in the country of installation.
The power supply cables must be protected against accidental damage. A damaged
cable should be replaced immediately with an original cable exclusively. Never cut
or extend the cables.
It is important to turn off the power supply before carrying out any technical
operation on the equipment. Do not modify the device. Any modification may
damage the equipment or endanger human life. Only qualified personnel should
carry out maintenance or repairs in case of breakdown.
This device is intended for use in family pools only.
NON-OBSERVANCE OF THESE INSTRUCTIONS MAY CAUSE DAMAGE TO THE
DEVICE OR SERIOUS INJURY
3
II. PACKING LIST
Before starting installation, ensure the box contains:
1 User manual
1 Controller with mounting kit
1 Accessories holder provided with a hydraulic grounding kit and 1 plug: 1/2"
1 pipe saddle, dia. 50 mm x ½’’
1 pH probe
2 buffer solutions, pH7 and pH10
2 extra hoses (pump peristaltic)
2 Reducers, 63/50
1 Water temperature/low water sensor
1 pH kit comprising:
-
5 m of semi-rigid transparent tubing
1 suction strainer
1 injection connector, dia. ½’’
1 roll of Teflon Tape
1 Red disinfectant kit comprising:
-
5 m of semi-rigid colored tubing
1 suction strainer
1 injection connector, dia. ½’’
4
III. INSTALLATION
A – INTRODUCTION
Before proceeding with installation of the device, it is very important to check the following
points:
Ensure that all of the hydraulic equipment is in good working order and is correctly sized. In
particular, check the delivery of the filtration pump, the capacity of the filter and the diameter of
the pipes.
The device’s treatment capacity should be appropriate for the volume of water to be treated and
for the climate of the location in which it is installed. A device which is designed to treat a
volume of 100 m3 in a temperate climate should be limited to an 80 m3 family pool in a hot
climate.
The installation area should be dry and properly ventilated, protected from rain, splashes, water
spray and UV radiation. Provide a location for each treatment product container which is a
sufficient distance away from any electrical equipment. Keep the containers separate from one
another.
Non-observation of this instruction will lead to abnormal oxidation of the metallic parts which
could result in a complete breakdown of the device.
Assembly of the controller and its accessories must be performed strictly in compliance with the
following layout diagram:
5
B - INSTRUCTIONS
1 - Controller
Choose a location that is easily accessible, close to the filtration unit. Install the controller
vertically, far enough away from the pool to comply with the regulatory distance in force in
your country. Use the mounting kit supplied. Do not cover, and allow air to circulate between
the rear of the controller and the wall.
Any contact between the controller and the pool water may cause an electric shock.
The controller must be permanently connected to the filtration unit and servo controlled by the
pump switch. Do not use an extension cord. Do not plug the device into an electric power
outlet. Turn off the differential circuit breaker beforehand. Ensure that the controller switches
off when the filtration pump stops
2 – pH pump
Assemble the accessories holder after every other treatment, cleaning or heating device.
Provide for a pipe of at least 200 mm without any elbow before and after the accessories holder
to prevent any measurement disturbance.
Mount the accessories holder horizontally; the arrow showing the direction of water flow must
be visible on top.
Remove the rubber protection from the pH probe and then mount it on the accessories holder
after taping it with 7 or 8 layers of Teflon. Make sure it is not stuck in the pipe.
Mount the low water/temperature detector on the accessories holder and tighten by hand.
Mount the injection connector on the accessories holder with Teflon.
Connect the suction strainer to the pH pump with part of the supplied pipe. Comply with the
direction of the arrows on the pH pump cover.
Connect the outlet of the pH pump to the injection connector with the remainder of the supplied
tubing.
Connect the cable of the pH probe (BNC plug) to the base of the controller. Keep it away from
all other electric cables to avoid any electromagnetic disturbance which could distort the
measurements.
Connect the cable of the low water and temperature detector to the base of the controller.
3 – Disinfectant pump
Position the pipe saddle at least 50 cm after the accessories holder. Direct the opening
preferably 1/2’’ downwards. Mark, then drill the pipe. Mount the injection connector on the
pipe saddle with Teflon. The injection connector should be as close as possible to the water
discharge into the pool.
Connect the suction strainer to the disinfectant pump with part of the supplied colored pipe.
Comply with the direction of the arrows on the disinfectant pump cover.
Connect the outlet of the disinfectant pump to the injection connector with the remainder of the
supplied colored tubing.
6
IV. ACTIVATION
When installing the device for the first time or at the start of a new season, it is imperative to
check and correct the following points:
The pool water must be clear and free from algae and sediments.
The water should be correctly balanced (Alkalinity, Total Hardness):
• Alkalinity is a measure of the level of bicarbonates dissolved in the water.
• Total Hardness is a measure of the water's hardness, i.e. the level of calcium or magnesium
salts dissolved in the water.
The pH of the water should be stabilised between 7.0 and 7.2.
Before using any pool caulking product, remove the pH probe from the accessories holder.
WARNING: Whatever the system of chemical treatment, the effectiveness of chlorine
decreases very rapidly as the pH increases, and scale precipitates more quickly when the pH level is
high or unstable.
Source: French Ministry of Health
Filters and primary filters must be clean and used in accordance with the manufacturer's
specifications.
The level of stabilising agent should be less than 50 ppm. The role of the stabilising agent or
isocyanuric acid is to protect the chlorine from the effects of UV. A level that is too high will
impede the disinfectant effect of the chlorine produced by the device. To bring down the level
of stabiliser in your pool, follow the recommendations of your professional.
Where chlorine is used, the free chlorine level of the pool should be greater than or equal to 1
ppm.
Do not use stabilising agent in the case of an installation with a chlorine probe.
Before using any pool caulking product, remove the pH probe from the accessories holder.
7
Preferably use water from the public water supply. Avoid using any water from natural
sources (rain, runoff water, reservoirs, wells). If you do use water from a natural source, have it
analysed beforehand and ensure that it complies with drinking water standards, and if necessary
carry out appropriate treatment.
The pH probe has been calibrated in the factory, so it does not have to be calibrated again when
the device is started for the first time. Calibration of the pH probe should then be done on a
yearly basis, at the start of the swimming season. Refer to the relevant section.
To optimise the operation of your system, we advise you to enter the pool volume in the
parameters. Refer to the relevant section.
Adjust the dose of disinfectant product in accordance with the instructions in Section VI.
Your equipment is now operational. Don't hesitate to activate your warranty online on
http://www.pool-technologie.fr/.
This will enable you to receive any new information that could be of interest to you.
V. OPERATION
Never use hydrochloric acid. Use only a pH corrector product (acid or base) which is
recommended by your professional. The use of any other chemical product could cause irreversible
damage to the device.
Where pH corrector product is added directly to the pool, it is essential to distribute it
regularly around the delivery orifice.
In the case of an installation with chlorine option, the chlorine option goes to safety
configuration upon detection of a pH < 6.0. It is reactivated automatically as soon as the pH rises to
a value > 6 again.
It is IMPERATIVE to check the levels of chlorine and pH each week with your usual
analysis kit. An excessive chlorine level and/or a low pH tends to cause oxidation on all metallic
parts and can lead to irreversible deterioration of the pool lining, automatic cover pins and slats,
telescopic shelters and heat exchangers. If you cover the pool (shelter, tarpaulin, cover), ventilate
the pool regularly to prevent dissolved gases accumulating, since these could disturb the
measurements of the pH or chlorine probes. The manufacturer may not be held liable in the event of
failure to comply with these operating instructions.
A - BASIC FUNCTIONS
1 – Start/Stop
To stop or restart a function:
Press key C for 3 seconds.
Your device allows you to carry out various operations detailed below. Key C also allows you to
stop an operation in progress and return to the main menu.
8
2 - Parameters displayed
Depending on whether or not the chlorine option is activated, the main screen displays the dose of
disinfectant set in the parameters and the pH value measured by the device in the pool, or the free
chlorine level and the pH value measured by the device in the pool:
DOS
pH
ON
ON
10ml/h ↑
7.0
←→
Basic situation or with chlorine
probe option deactivated
Press the
Cl
ON
pH
ON
0.8ppm
7.0 ← →
Situation with chlorine probe
option installed and activated.
← → keys or the direct access keys to scroll the following parameters:
WATER TEMPERATURE
FILTRATION TIME
Indicates the pool water temperature.
Indicates the recommended time to obtain optimum
treatment. Comply with these indications.
The main screen also shows the status of the functions:
STATUS CODE
ON
OFF
STOP
INJ
MEANING
The function in question is on standby
The function in question has been deactivated
An alarm has placed the function in question in safety configuration
The pH pump injects the corrector product
3 – Adjusting the disinfectant dose
Press ↑↓ to adjust the hourly dose of disinfectant.
Where chlorine is used, maintain the free chlorine level in the pool at between 1 and 1.5 ppm.
B – ADVANCED FUNCTIONS
To obtain access to the advanced functions, simply press the OK key for 5 seconds.
1 - Injection of a dose of disinfectant: INJ. DOSE
This function allows manual injection of a dose of disinfectant.
Press the OK button for 5 seconds.
←→
Select the INJ. DOSE function with the
keys and confirm by pressing OK.
You can change the injection time according to your needs with the ↑ et ↓ keys. Confirm by
pressing OK.
The countdown is started. You can suspend or resume the countdown by pressing OK
At the end of the countdown, the device automatically goes to regulation mode.
9
2 - Manual injection of pH: INJ. pH
Manual injection of pH corrector product can be used to correct the pool pH level or to prime the
pH pump when replacing the product container.
Press the OK button for 5 seconds.
←→
Select the INJ. pH function with the
keys and confirm by pressing OK.
You can change the injection time according to your needs with the ↑ ↓ keys. Confirm by
pressing OK.
The countdown is started. You can suspend or resume the countdown by pressing OK
At the end of the countdown, the device automatically goes to regulation mode.
3- Adjusting the pH probe
This function allows the device to display the pH value you have measured in your pool with your
usual analysis kit.
←→
Select the Adjustment function in the pH PROBE menu with the
keys, then confirm
by pressing OK.
Follow the instructions.
Select the value measured manually with the ↑ ↓ keys and confirm by pressing OK.
At the end of the procedure, the following message indicates whether the operation has
succeeded or failed:
ADJUSTMENT SUCCESSFUL
PROBE
PROBE UNSTABLE
CALIBRATE PROBE
OK
OK
Press OK to store the adjustment in memory. To return to the main screen, press C several
times.
In the event of failure, or if despite the adjustment you observe a major difference between the
pH value measured in the pool with your usual analysis kit and the value displayed by the
device, press OK and perform calibration of the pH probe as explained in the following section.
4 - Calibration of the pH probe
Each pH probe has its own characteristics. To obtain satisfactory pH regulation, it is recommended
that the pH probe be calibrated at the start of the season and after any change to the pH probe.
Take the pH7 and pH10 control solutions.
Remove the pH probe from the accessories holder and stop up with the ½ ’’dia. plug.
Press the OK key for 5 seconds and select PH PROBE; confirm by pressing OK.
←→
Select the CALIBRATION function with the
keys and then confirm by pressing OK.
Scrupulously follow the instructions appearing on screen.
At the end of the procedure, the following message indicates whether the operation has
succeeded or failed:
CALIBRATION SUCCESSFUL
PROBE UNSTABLE
SEE
SEE MANUAL…
OK
OK
Press OK to store the calibration in memory. To return to the main screen, press C several
times.
In the event of calibration failure, start the procedure again.
In the event of a second failure, call your professional. You may need to replace your pH probe.
10
The calibration solutions are disposable. They can be kept for 1 year in their sealed packet
stored away from light and heat. Throw away after use.
Never dry the pH probe with a cloth or absorbent paper, since this could damage it. Leave it
to drip dry.
C - OTHER ADVANCED FUNCTIONS
1 – Annual reactivation
For reactivation of the combined saltwater chlorinator/pH regulator at the start of each season, a
number of operations described in Section IV must be performed.
However, the "Activation" menu facilitates your task by guiding you step-by-step.
Press the OK button for 5 seconds.
←→
Select the "Activation" menu with the
keys and confirm by pressing OK.
Use the arrows and the OK key to answer the questions asked.
At the end of the procedure, the following message indicates successful activation:
REACTIVATION OK
PLACE FILTRATION
ON AUTO
OK
Press OK. To return to the main screen, press C several times.
2 - Choice of language
This function allows you to have messages displayed in the language you have selected.
Press the OK button for 5 seconds.
Select LANGUAGE.
Select the desired language with the ↑ ↓ keys and confirm by pressing OK.
3 - Audible alarm
By default, the audible alarm is deactivated. This function allows you to activate the audible alarm.
Press the OK button for 5 seconds.
Select ALARM.
Select ON with the ↑ ↓ keys and confirm by pressing OK.
The visual alarms are still activated.
4 - Professional menu and options
Your professional is able to obtain access to the menu dedicated for his use. This menu contains
advanced functionalities which will enable him to optimise the performance of your device.
Moreover, your professional can set the available options for you:
a) Chlorine probe option
Thanks to its revolutionary technology, the chlorine probe (ref.: OPT09POO0003) measures
directly the free chlorine contained in your pool. With this option, your device becomes fully
automatic. This function can be installed later.
11
b) Automatic cover function*
This option (OPT04POO0001) allows the device to be connected to the automatic cover. It allows
the injection of disinfectant to be adapted automatically depending on the position of the automatic
cover or a switch.
* This function is available only in dosing mode (chlorine option deactivated or manual
mode)
c) Separate flow sensor
The flow sensor (ref.: OPT03POO0002) can detect the presence of a flow in the pipes. Detection of
no flow in the pipes will immediately stop the injection of disinfectant.
d) Empty container sensor
The empty container sensor automatically detects a lack of pH corrector product in the container.
VI. ALARMS
Whenever an alarm is tripped, a message appears on screen to specify the alarm type. It is
accompanied by an audible alarm if the function is activated.
If a problem is detected, the function in question goes to STOP and returns to ON as soon as the
fault disappears.
ALARMS
LACK OF WATER /
NO FLOW
LOW WATER TEMP.
pH LOW
pH HIGH
pH REGULATION
CAUSES / SOLUTIONS
The device has detected a lack of water in the pipes.
Disinfectant injection and pH regulation are suspended.
Check the entire hydraulic circuit of the filtration unit and the water level in the
pool.
The device has detected a water temperature < 10°C.
Disinfectant injection is suspended.
Disinfection is not necessary at a low water temperature.
The device has detected a pH 0.5 points lower than the set point value.
pH regulation is suspended.
Check the pH value in the pool.
If the pH is low, add pH base corrector directly in the pool, at the discharge
nozzles.
If the pH is normal, calibrate the pH probe.
The device has detected a pH 0.5 points higher than the set point value.
pH regulation is not suspended.
Check the pH value in the pool.
If the pH is high, add pH acid corrector directly in the pool, at the discharge
nozzles.
If the pH is normal, calibrate the pH probe.
The device has detected that the most recent attempts to correct the pH around
the set point value have been unsuccessful.
pH REGULATION is suspended.
Check that the pH corrector container is not empty.
Check that the pH pump is injecting correctly.
Check that the rubber protection on the pH probe has been removed.
Check that the pH probe is operating correctly.
Check the injection and suction valves.
12
ALARMS
Cl REGULATION
EMPTY CONTAINER
(option)
pH STOP ???
FILTRATION LOW
FLOW
(option)
CAUSES / SOLUTIONS
The device has detected that the most recent attempts to maintain the chlorine
level around the chlorine set point value have been unsuccessful.
Chlorine REGULATION is suspended.
Check that the liquid chlorine container is not empty.
Check that the disinfectant pump is injecting correctly.
Check the injection and suction valves.
Detects that the pH corrector container is empty when the "Empty container"
option is installed.
pH REGULATION is suspended.
Replace the pH corrector container, taking the necessary safety precautions.
No calibration of the pH probe has been validated.
pH REGULATION is suspended.
Calibrate the pH probe.
The device has detected a filtration time far less than the recommended filtration
time.
No function is suspended.
Increase the filtration time.
Detects a lack of sufficient flow in the pipes when the "Flow" option is installed.
Disinfectant injection and pH REGULATION are suspended.
Check the entire hydraulic circuit of the filtration unit.
If, despite the checks, the problem persists, contact your professional. The device is provided with a
protected diagnostic aid menu reserved for professionals. It enables them to determine the cause of
the problem on the spot.
For all assistance, consult the FAQs on http://www.pool-technologie.fr/. If you do not find an
answer to your problem, post us your message via our website or contact your professional. You
can also contact our After Sales Service Department:
INDIGO No. 0 892 705 520 (from France)
€0.34 incl. VAT/min.
Please supply:
Proof of purchase.
Serial number of the controller and the pH probe.
Date when the device was installed.
Name of the professional who sold and/or installed the equipment.
Salinity, pH, chlorine level, water temperature, stabiliser level, pool volume, daily filtration
time.
13
VII. WINTERING
When the water temperature is less than 10°C, the low water temperature alarm will be
actuated and will automatically stop injection of the disinfectant. Stop the device by pressing key C
for 3 seconds.
When wintering the pool (emptying the pool and/or stopping filtration), carry out the following
maintenance operations:
Remove the pH probe and store it in the rubber protector filled with drinking water.
Rinse the entire pH corrector circuit with fresh water.
Changing the pump peristaltic pump tube:
Each season, replace the peristaltic pump hose and the check valves. The maintenance kit
(ref. KIT02MAINMTP) contains all the parts necessary for annual maintenance
operations.
VIII. WARRANTY
All our care and technical expertise has gone into making this device. It has undergone quality
control procedures. If, despite all the care and knowledge which has gone in to its manufacture, you
had to use our warranty, free replacement only applies to parts of our equipment which are
defective (excluding transport).
1 - Warranty period
2 YEARS* for new equipment (controller + pH probe).
1 YEAR* for replacement probes.
1 MONTH* for After Sales Repair and spare parts.
* Authentic invoice date.
2 - Scope of warranty
The warranty applies to all parts except wear parts, which must be replaced regularly.
The device is covered for any manufacturing fault only when it has been used normally in a family
pool. Use in public pools voids the warranty.
3 - After Sales Service
All repairs are done in our workshop.
All return transport costs are payable by the user. No compensation will be paid for downtime
and loss of enjoyment of the equipment when it is being repaired.
In all cases, the equipment is always transported at the cost and risks of the user. Before
accepting delivery, it is up to the user to check that the equipment is in perfect condition and if
necessary to state any reservations on the carrier's transport slip. Confirm this to the carrier
within 72 hours by registered letter with acknowledgement of receipt.
IMPORTANT: A replacement under warranty will in no case extend the initial warranty.
14
4 - Limits of warranty
The warranty does not cover:
1. Equipment and labour provided by a third party for installation of the equipment.
2. Damage caused by nonconforming installation.
3. Problems caused by an alteration, accident, mistreatment, negligence of the professional or the
end user, unauthorised repairs, fire, floods, lightening, frost, armed conflict or any other case of
force majeure.
ATTENTION: The warranty does not cover any equipment damaged due to failure to comply
with the safety, installation, operation and maintenance instructions set out in the present
manual.
Every year we improve our products and software. These new versions are compatible with the
prior models. New hardware and software versions cannot be covered by the warranty on the
previous models.
5 - Application of the warranty
For more information on the current warranty get in touch with a professional or our After Sales
Service Department. All requests should be accompanied by a copy of proof of purchase.
When you buy your equipment, don't hesitate to activate your warranty online on
http://www.pool-technologie.fr/. This will enable you to receive any new information that could
be of interest to you.
No part will be replaced unless the defective part has been returned beforehand. Any part which
is not returned will be charged based on the current price list.
6 - Laws and disputes
The present warranty is subject to French law and all other European directives or international
treaties which are in force at the time of the claim and which are applicable in France. Should
any dispute arise concerning the interpretation or execution of the warranty, sole jurisdiction is
assigned to the Tribunal de Grande Instance (High Court) of Montpellier.
15
IX. PROTECTING THE ENVIRONMENT
Protecting the environment is essential. For our company this is a strong commitment.
Our products are designed and manufactured with materials and components which are of high
quality, environmentally friendly, reusable and recyclable. However, the various parts of which
they are formed may not be biodegradable.
European environmental directives set, for each product category, appropriate methods for
managing and disposing of waste material. The aim is to reduce and recycle wastes, to prevent
their components from becoming a danger and to encourage re-use of the products.
The symbol
stamped on a product means that selective collection is necessary and
that it must be sorted from other household waste.
Therefore, you must not discard our product by simply throwing it away anywhere.
* You may deposit it in a waste collection centre.
* If you buy a similar device, you may leave the old one with your seller at the time of
purchase.
Manufactured by:
POOL TECHNOLOGIE
Zac des Jasses
115 rue de l’Oliveraie
34130 Valergues – France
www.pool-technologie.fr
16