1
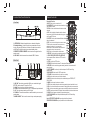
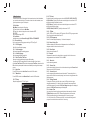
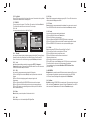
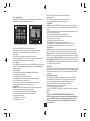
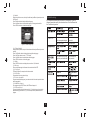
User Manual
Of Digital Set Top Box
S7010PVR
Please read this User Manual carefully to ensure proper use of this product and keep this manual for future reference.
Important Safety Instructions
1) Read these instructions.
2) Keep these instructions.
3) Heed all warnings.
4) Follow all instructions.
5) Do not use this apparatus near water.
6) Clean only with dry cloth.
7) Do not block any ventilation openings, install in accordance with the instructions.
8) Do not install near any heat sources such as radiations, heat registers, stoves,
orother apparatus (including amplifiers) that produce heat.
9) Do not defeat the safety purpose of the polarized plug. If the provided plug does
not fit into your outlet, consult an electrician for replacement of the obsolete outlet.
10) Protected the power cord from being walked on or pinched particularly at plugs,
convenience receptacles, and the point where they exit from the apparatus.
11) Only use attachments/accessories specified by the manufacturer.
12) Unplug this apparatus during lighting storms or when unused for long periods of
time.
13) Refer all servicing to qualified service personnel. Servicing is required when the
apparatus has been damaged in any way, such as power-supply cord or plug is
damaged, liquid has been spilled or objects have fallen into the apparatus, the
apparatus has been exposed to rain or moisture, does not operate normally, or has
been dropped.
14) Mains plug is used as the disconnect device, the disconnect device shall remain
readily operable.
15) The ventilation should not be impeded by covering the ventilation openings with
items, such as newspapers, table-cloth, curtains, etc.
16) No naked flame sources, such as lighted candles, should be placed on the
apparatus.
17) Attention should be drawn to the environmental aspects of battery disposal.
18) The use of apparatus in moderate climate.
WARNING: To reduce the risk of fire or electric shock, do not expose this apparatus to
rain or moisture.
WARNING: The batteries shall not be exposed to excessive heat such as sunshine,
fire or the like.
Caution: When the apparatus was in electrostatic circumstance, it may be malfunction
and need to reset by user.
Warning: The USB memory stick should be plugged in the unit directly. USB extension
cable should not be used to avoid failing of data transferring and interference caused.
The symbol indicates that dangerous voltages constituting a risk of electric
shock are present within this unit.
The s ymbol in dicates t hat t here a re im portant o perating a nd m aintenance
instructions in t he lit erature a ccompanying t his u nit.
The s ymbol in dicates t hat t his p roduct in corporates d ouble in sulation b etween
hazardous m ains v oltage a nd u ser a ccessible p arts. W hen s ervicing u se o nly
identical r eplacement p arts.
Table of Contents
Front and Rear Panel Illustration........................................................................... 1
Remote Controller ............................................................................................... 1
Connections........................................................................................................ 2
User Interface ...................................................................................................... 3
Quick Installation............................................................................................. 3
Menu Operations..............................................................................................4
Normal Play..................................................................................................... 7
Troubleshooting .................................................................................................. 8
Specifications...................................................................................................... 9
Front and Rear Panel Ill ustration
Remote Controller
Remote Key Function:
1. MUTE: Used to turn the sound on or off.
2. NUMBER KEYS: Used to select channel numbers or
input numbers in menus.
3. RECALL: Used to switch between the last two viewed
channels.
4. INFO: Used to display information about the channel
being viewed or further information about the program
when in small EPG screen.
5. SUBTITLE: Used to switch between different subtitles
that are broadcasted
6. EXIT: Used to return to the previous screen or menu.
7. CH+: Used to move around the menu screens or
selecting the channels in non-menu state.
8. VOL+:Used to move around the menu screens or
changing the volume in non-menu state.
9. OK: Used to confirm a selection within a menu.
10. RECLIST: Used to show the recorded programs list.
11. COLOR KEYS (RED/ GREEN/ YELLOW/ BLUE):
Used to operate different functions in TEXT screen or
other menus.
12. STOP: Used to stop PVR function.
13.TV/RADIO: Used to switch between TV channels and Radio stations.
14. RECORD: Used to record the program manually, and select the record duration if
pressed it again.
15. FAST FORWARD: Used to adjust the forward speed if in HDD time shifting
playback mode.
16.VIDEO MODE: Used to switch VIDEO output mode.
17.STANDBY: Used to switch the set top box to on or standby.
18. FAV: Used to switch access your favourite channels.
19. AUDIO: Used to set the sound output, the available settings are STEREO,LEFT,
RIGHT, MONO.
20. MENU: Used to open the main menu window.
21. EPG: Used to display information about the program being viewed and what's on next.
22. VOL-: Used to move around the menu screens or changing the volume in non-menu state.
23. CH- :Used to move around the menu screens or selecting the channels in non-menu state.
24. TEXT: Used to open teletext OSD display if teletext available in the broad caste stream.
25. PAUSE: Used to pause or playback the program being viewed .
26. FAST BACKWARD: Used to adjust the backward speed if in HDD time shifting
playback mode.
1. Front Panel
3
4
1. LED DISPLAY: Used to display the time or channel information.
2. Standby Indicator: Used to visually show power state of the set
top box, the green LED will show if turned on the set top box and the
red LED will be light if the set top box entered standby mode.
3. REMOTE CONTROL SENSOR: Used to receive the signal from the
remote control.
4. USB JACK: Used to connect to an external USB 2.0 device.
2. Rear Panel
1
2
3
4
5
6
7
1. LNB IN: This socket connects the LNB to your receive the signal.
2.TO TV: Used to output RF signal for TV set.
3. CVBS: This socket outputs composite video signal.
4. Y/Pb/Pr:These sockets connect to your TV component input terminals.
5. L/R: This socket outputs analog audio L/R signal.
6. COAXIAL: This socket connects to a coaxial socket on your surround
sound system.
7. MAINS CABLE: This is used to connect to your main power supply.
Note: SUBTITLE/TEXT/LANGUAGE may not be available for all channels.
RED/GREEN/YELLOW/BLUE may has specifical function in different menus.
1
Installing the Batteries
Connections
Remove the battery cover from the remote control and put 2xAAA size batteries inside
the compartment.
The diagram inside the battery compartment shows the correct way to install the
batteries.
1.Open the cover
O
PE
N
2.Install batteries
Caution: Make sure to check the voltage specification of the wall outlet is the same
rating with the receiver. To prevent the risk of electric shock, do not open the cover or
the back of the receiver.
3.Close the cover
O
PE
VI DEO IN
N
Y
Pb
Pr
Using the Remote Control
To use the remote control, point it towards the front of the digital set top box The remote
control has a range of up to 7 metres from the set top box at an angle of up to 60 degrees.
The remote control will not operate if its path is blocked.
Coaxial
VOLUME
INPUT SELECTOR
POWER
BYPASS
PRO LOGIC
3 STEREO
MODE
TEST
CHANNEL
KARAOKE
MUTE
UP
DOWN
BASS
1
Sunlight or very bright light will decrease the sensitivity of the remote
control.
MIC
2
1
MIC VOL
2
MIC
TREBLE
ECHO
EXCITE
Amplificador Digital
Note: When connecting the receiver to other equipment, e.g., TV, VCR and amplifier,
make sure to refer to relevant user manual for instruction.
Also, make sure you disconnect all the equipments from the mains supply before the
connection.
2
User Interface
SETUP- Installation ( MY DISH )
01/01/07 00:02
Switch Type
Toneburst
01/01/07 00:02
SETUP- Installation ( MY DISH )
NONE
Switch T
OFF
Toneburs
NONE
Set Location
Exit
Move
Set LNB
Set West Limi
Page 1/8
NONE
NONE
NONE
NONE
Switch
Exit
Set East Limit
Figure 3. DiSEqC1.2 Setting
Figure 4. DiSEqC1.2 Motor Limitation
Then user can press BLUE key to scan the focus satellite or RED key to scan multisatellites, as Figure 5.
Scan Mode: select Blind-Quick or Blind-Detail for blind scan, or Default to scan the
default transponder list.
Programme: select to receive all programs or only free programs.
SETUP- Installation ( MY DISH )
01/01/07 00:03
Switch Type
NONE
OFF
Toneburst
Scan Mo de
Sca n Mod e
Programme
Bli nd-Det ail
All
7.0 E
01/01/07 00:02
Move
Switch
OK
Scan
Exit
Edit
Figure 5. Scan Mode
1.2.2 Transponder configuration and scan
If there exist satellite in the database, then user can edit and scan transponder in the
menu Main Menu Setup Installation TP MANAGER, as Figure 6.
Press <Left/Right> button to select satellite;
Press <Up/Down> button to select transponder.
Press <OK/Up/Down/Left/Right/0~9>, user can edit Frequency, Symbol Rate or
Polarity of the transponder.
Press <BLUE> button to scan the focused transponder.
00%
Exit
Exit
Pos ition 04
Switch
Move
Set Limit
Pos ition 03
NONE
Pos ition 04
Strength 00%
Switch
NONE
Pos ition 03
Satellite Name
LNB Type
LNB Low Freq
LNB High Freq
22K Tone
LNB Power
Transponder
Quality
Move
NONE
Pos ition 02
01/01/07 00:03
DiSEqC 1.2/ USALS
Set Limi t
Move Conti nue
Stop
Pos ition 01 Stop
Move Step
Goto R ef.
GoTo
Disa ble Pos
Limit
ition 02 Clea r
NONE
Pos ition 01
1.2 How to receive the programs?
Scan the satellites to receive the programs.
1.2.1 Satellite configuration
Satellite configuration and manager is in Main Menu->Setup->Installation->MY DISH
menu.
Firstly, select the proper switcher according to the switcher you have, as Figure 1.
For sample switcher, each branch is connected with a satellite, user can configuration it
as Figure 2.
Switch Type
Switch Type
Page 1/8
1.Quick Installation
1.1 Setting Language
User can select preferred language at Setup Installation General Setting page.
(1) Press <Menu> button to enter Main Menu.
(2) Press <Left/Right> button to select SETUP option.
(3) Press <Up/Down> button to select Installation option.
(4) Press <Up/Down> button to select General Setting option.
(5) Press <OK> button to enter General Setting page.
(6) Press <Up/Down> button to select the language option.
(7) Press <Left/Right> button to set a language.
SETUP- Installation ( MY DISH )
SETUP- Installation ( MY DISH )
DiSEqC 1.2/ USALS
Add SAT
Figure 1.Satellite Installation
Figure 2.Add Satellite
For DiSEqC1.2 motor, user can set limit position, user location and LNB of it, as ,then
user can adjust and store max 32 position for different satellites, as Figure 3, Figure 4.
Satellite Name
move down to the satellite selection area, and press OK key to add the proper satellite,
as Figure 2.
LNB Type: select the LNB type according to your dish.
LNB Low Freq: set the low frequency of LNB.
LNB High Freq: set the high frequency of LNB if it is universal.
EUTELSAT W3A
No.
Frequency
Symbol Rate
Polarity
001
10928
30000
H
002
11345
27500
H
003
11471
30000
H
004
11513
27500
H
005
11554
27500
H
006
11595
30000
H
007
11637
30000
H
008
11679
30000
H
Move
Add
Del
Switch
OK
Edit
Delete All
01/01/08 00:19
OSD Language
English
Audio Language
English
00 00
S
Exit
Subtitle Language
OFF
Auto Time Zone
OFF
Time Zone
+ 08:00
Q
Move
Switch
Exit
Scan
Figure 6. Scan for Transponder
3
SETUP- Installation (General Setting)
01/01/08 00:19
SETUP- Installation (Transponder Manager)
Switch Type: select DiSEqC1.0/1.2 switcher or DiSEqC1.2 motor, or select none if you
don't have any DiSEqC device.
Toneburst: enable or disable toneburst switcher.
Figure 7. General Setting
2.Menu Operations
Once the channel scan is finished and all the channels are stored into the database,
you can start to watch the digital TV channel or listen to the radio broadcast, some
typical operations are given in this chapter.
2.2.2.1 TV Format
Set display format for watching program, such as 4:3LB, 4:3PS, 16:9PB,16:9AUTO.
4:3LB(LetterBox): Typically for wide screen content displays on conventional 4:3 TV
with black bars above and below the picture.
4:3PS(PanScan): Typically for wide screen content displays on conventional 4:3 TV
with left and right edges cropped.
16:9PB(PillarBox)/16:9 AUTO: Typically for wide screen 16:9 TV.
2.1 Main Menu
Main Menu for operating a lot of functions.
(1) Press <Menu> button to enter Main Menu.
(2) Press <Info> button to display the version information of STB.
2.2 SETUP
Set the system settings of STB.
2.2.1Installation
Installation menu include General Setting, MY DISH and TP MANAGER.
2.2.1.1 General Setting
Set the receiving and playing program settings of STB, as Figure 7.
2.2.1.2 OSD Language
Set the On Screen Display Language.
2.2.1.3 Audio Language
Set the audio language for watching program.
2.2.1.4 Subtitle Language
Set the language for displaying subtitle.
2.2.1.5 Auto Time Zone / Time Zone
Allow you to enable or disable auto time zone offset update.
If you know the GMT(Greenwich Mean Time) time zone offset of your location,
set the Auto Time Zone to OFF and select an appropriate Time Zone, otherwise set it to
ON and let the system update the time zone automatically according to the transport
stream.
2.2.1.6 Auto Scan
Press <RED> button to start Auto Scan. See section 1.2.1 for details.
2.2.1.7 Manual Scan
Press <GREEN> button to start Manual Scan. See section 1.2.2 for details.
2.2.2.2 TV Mode
Set PAL, NTSC or AUTO for display. AUTO will switch PAL or NTSC by program content.
This setting should be matched with user's TV.
2.2.2.3 OSD Transparency
Set the On Screen Display transparency. 1 is the most transparent.
2.2.2.4 Banner Display Time
Set Banner displays time. Banner doesn't disappear when set as " Always " and
disappears at timeout when set as other values.
2.2.2.5 Video Output
Set the video output mode to TV.
2.2.3 Password
Set password for menu lock or channel lock or censorship lock. And the user can
change password here, the default PIN Code is 6666.
2.2.3.1 Menu Lock
Lock the menus by password.
2.2.3.2 Channel Lock
Lock the channel which has been set to lock status when turning on the Channel Lock.
Please see section 2.3.1.2 for details.
2.2.3.3 Censorship Lock
Lock the program by password and censorship threshold. The censorship info is in
program content. Under the censorship rating, user has to enter the right password for
watching program.
2.2.3.4 Change Password
To change the PIN code, select this option, press <Left/Right> button to trigger
changing password and <0~9> buttons to enter old password, new password and
confirm new password. If succeed, the PIN Code Changed message will be displayed,
otherwise the PIN Code Error message will be displayed.
2.2.4 Advance Timer
User can set timer for watching the program by date and time manually or from the
TV/Radio Guide(see section 2.3.2). When setting date and start time is arrived,
STB will automatically switch to the wanted program. Press any key except
<Vol-/Vol+/Mute> button, STB asks user to abort it or not when watching booked
program. User can delete the event while it isn't at running.
2.2.2 TV Setup
Setup the display mode for TV. See Figure 8.
SETUP- TV Setup
01/01/08 00:19
16:9 PB
TV Format
TV Mode
AUTO
OSD Transparency
6
Banner Display Time
3S
Video Output
CVBS
Move
Switch
Exit
Figure 8. TV Setup
4
2.2.5 Set Default
Restore STB to factory default. All settings did by user will be restored to factory default
values and the database will be erased together.
2.3 TV/RADIO
There are two types of program: TV and Radio. The operation of the List and Guide of
TV and Radio are almost the same. Herein take TV as example.
2.3.1 List
User can operate some functions in List. See Figure9.
TV List
01/01/2008 02:19
All
No. Program Name
TV Guide
2.3.1.8 Search
User can search the program name by partial keyword.
(1) Press <Left/Right> button to select Search option.
(2) Press <OK> button to entry search page.
(3) Press <Up/Down/Left/Right/OK/0~9/RED/GREEN> button to input keyword.
(4) Press <OK> button to Search and return List. The matched program will be focused.
(5) Press <GREEN/YELLOW> button to the next or previous matched program.
17/07/2007 02:19
Wed.
2007
10/17
Today 18 19 20 21 22 23
11:30 Por La Manana 2007
13:15 EI Negociador
14:00 Informativ o Madrid 2007
14:30 Corazon De Otono 2007
2
15:00 Telediario 1 Edicion 2007
CH23/490166 KHz
PID:V 1025 , A 1041
Favorite s
2.3.1.7 Delete
Delete will delete the program permanently from database. User must rescan to recover it.
Press <OK/GREEN> button to set delete one or delete all when Delete option selected.
Date
No.Program Name
0800 TVE 1
0800 TVE 2
0802 24H TVE
0803 CLAN TVE
Status
0001 CT SPORT
0002 Aplik ace MHP
0003 CT 1
0004 CT 2
0005 CT 24
0006 NOVA
2.3.1.6 Skip
Skip will skip the program when changing program by CH+/-. Press <OK> button to set or
clear skip status when Skip option selected.
CH+/-
1-8: Favorite Group Edit
Tool
Exit
Save
EPG+/-
Date
OK
Detail
2.3.2 Guide
Guide is also naming EPG (Electronic Program Guide). See Figure 10.
(1) Press <Up/Down> button to select program or EPG event.
(2) Press <Left/Right> button to change event or date.
(3) Press <OK> button to exit all the menus or show the detail
information of selected event.
(4) Press <Exit> button to exit to previous menu.
(5) Press <RED> button to enter Book page and <YELLOW> button to save after edited.
If it conflict with itself or other event, a conflict message will be displayed.
The successful booking will be added to Main Menu-> SETUP->Advance Timer
(see section 2.2.4).
Exit
Book
Figure 10. Guide - Event
Figure 9. TV List
2.3.1.1 Favorites
User can quickly channel up/down the favorite programs by favorite filter. There are 8 groups
of favorite for user setting: News, Sport, Movie, Music, Shopping, Travel, Boy and Girl.
Press <1~8> button to set or clear the favorite group when Favorites option selected.
2.3.1.2 Lock
Lock will ask password before watching this program when SETUP -> Password ->
Channel Lock is turned on. Please see section 2.2.3.2 for details. Press <OK> button to set
or clear lock status when Lock option selected.
2.3.1.3 Edit
User can edit the program name, maximum length is 20 characters.
(1) Press <Left/Right> button to select Edit option and <Up/Down> button to select the
program.
(2) Press <OK> button to display program info and press it again to edit
program name.
(3) Press <Up/Down/Left/Right/0~9/RED/GREEN> button to select the character.
(4) Press <OK> button to finish the editing and return to previous program info page.
(5) Press <RED> button to save the editing and return to List or press <Exit> button to
return to List without saving.
2.4 MULTIMEDIA
Multimedia must be used with external USB device inserted, otherwise the "Device is not
ready!" message will be displayed, remove device when playing photo or MP3/WMA,
the "Device is removed!" message will be displayed and return to Main Menu.
2.4.1 My Album
My Album can display JPG/BMP/GIF photos and operate it. If there are photos in device root
folder, it will start at Thumbnail mode, otherwise it will start at Folder mode. Press <BLUE>
button can switch to Folder mode and <Exit> button to Thumbnail mode again.
2.3.1.4 Move
Move will allow you move the position of the channels in the list.
2.3.1.5 Sort
Sort will allow you sort the channels by A<->Z or Pay<->Free.
5
Press <YELLOW> button to set play mode as Repeat All, Repeating,
Random, repeat Off.
Press <BLUE> button to set fast forward speed as x2,x3,x4,Normal.
Press <Left/Right/Mute> button to adjust volume while playing.
2.4.3 My Movie
My Movie can play most of MPEG2/4 files. It displays the played file name at the top left
corner , and use the info key to get the current playing time and total time information while
playing.
Press<Info>button to select device if an external USB hub connected while browsing, and to
show the control info bar while playing.
Press<Up/Down/Left/Right/OK> to select folders and files during
browsing, and to switch next/previous file or adjust the volume while playing.
Press<OK>button to select a file to play.
Press<RED>button to play or pause while playing.
Press<GREEN>button to play the frame one by one while palying.
Press<YELLOW>button to set fast backward speed as x2, x4, x8, x16, x32, Normal.
Press<BLUE>button to set fast forward speed as x2, x4, x8, x16, x32, Normal.
2.4.4. My Record
My Record make user can view the program that has been recorded, or configure the
options for recording. Please notice that the File System supported is FAT and FAT32.
In Recorded List menu, user can view or delete the recorded program. In Recording
Device menu, user can select different storage media or different partition in one storage
media for recording. In Recording Preference menu, user can change the mode of Time
Shift, One Button Recording, and the length of default recording period. Please notice
that Time Shift Size is calculated automatically according to the current storage media
or current partition, it can't be modified.
Time Shift:
Auto: this option will start Time Shift recording automatically for program
being viewed. Pause: this option will start Time Shift recording only after
PAUSE key is pressed by user. OFF: this option will disable Time Shift
recording.
One Button Recording:
ON: this option will start recording the program being viewed directly
after RECORD key is pressed. OFF: this option will enable user to
pre-set the length of recording after RECORD key is pressed.
Press <Up/Down/Left/Right> for navigation in the menu.
Press <OK> to select or modification confirm.
Press <EXIT> to exit the current menu.
Press <RED/GREEN/YELLOW/BLUE> for special function indicated in
the menu.
Note:
For usility of TIMESHIFT/RECORDING/PLAYBACK function,
USB2.0 storage device is needed basicly. We strongly recommend
user to use USB2.0 HDD, and use independent partition for PVR.
Before using the partition, please format the partition through
the set-top-box.
2.4.1.1 Thumbnail/Folder
The info (Width X Height and Date) of selected photo will be displayed at the left bottom in
Thumbnail mode and right up in Folder mode. See Figure11.
My Album - Thumbnail
17/10/07 12:59
My Music
04/07/05 19:21
MUSIC : 66 songs
Move
Move
OK
View
Root (USB)
001. 18- vbr _48KB _44. 1
STBAF
002. 19- vbr _64KB _44. 1
JPEG
003. 20- vbr _96KB _44. 1
PROGRE-1
004. 22- vbr _192 KB_44 .
QUALI TYO
005. 23- vbr _256 KB_44 .
GUNDAM
006. 24- vbr _320 KB_44 .
HAPPY
007. 25- vbr _32KB _44. 1
Exit
Folder
Figure 11. My Album - Thumbnail
Devi ce
Move
Move
OK
Sel ect
Exi t
Figure 12. My Music - Browser
Press <Up/Down/Left/Right/OK> button to browse folders or files.
Press <OK> button to view the selected photo and press again to start slide show.
Press <Info> button to see the help information when view or slide show.
2.4.1.2 Zoom
Press <RED> button to zoom in or zoom out the photo in view mode.
The zoom factor can be 25%, 50%, 100%, 150%,2 00%. If zoom factor greater than 100%,
press <Up/Down/Left/Right> button can move around the photo.
2.4.1.3 Rotation
Press <Left/Right> button to rotate left or right and <YELLOW/BLUE> button to flip horizontal
or vertical in view mode. After rotating or flipping the photo and return Thumbnail mode,
the effect will be keeped.
2.4.1.4 Slide Show
Press <OK> button to view the photo from Thumbnail or Folder mode and
press it again to start the slide show.
Press <RED> button to play or pause the slide show.
Press <GREEN> button to set music playing at background when slide show.
Press <YELLOW> button to set repeating or once.
Press <BLUE> button to set the time interval between current and next photo.
Press <Up/Down> button to next or previous photo right away.
2.4.2 My Music
My Music can play most of MP3/WMA files. It displays progress bar, audio spectrum,
current playing time and total time while playing. See Figure 12.
Press <Info> button to select device if an external USB hub connected.
Press <Up/Down/Left/Right/OK> button to browse folders and files.
Press <OK> button to start play.
Press <RED> button to play or pause.
Press <GREEN> button to stop.
6
3.3 Volume
Press <Vol-/Vol+> button to adjust the volume.
Press <Mute> button to mute.
If adjust the volume while mute, mute will be canceled.
NOTE:
FORMAT operation will delete all the files in the disk or the current
partition, so please backup the files before FORMAT operation.
18/0 7/0 8 15:1 3
My Record
18/0 7/0 8 15:2 1
My Record- Recorded Lis t
3.4 Program List
Press <OK> button to display Program List with No., name and lock/scramble/skip
status.
Press <Up/Down/Left/Right> to switch the program.
Press <OK/Exit> to return normal play mode.
No. Progra m Name
0001 Sky Travel_ 080717
0002 Sky Travel_ 080717
0003 Sky Travel_ 080717
0004 Sky Travel_ 080717
0005 UKTV His to ry_080717
Recorded List
Recording Device
Recording Preference
In fo
Sky Travel_ 080717
08/0 7/1 7
16:44~16:45
00”01 12
Move
OK
Select
Exit
Device
CH+/-
Page
OK
Select
Exit
Del
Figure 13. My Record
Figure 14. Recorded List
2.5 ACCESSORY
There are three options: Gomoku, Calendar, Calculator.
Gomoku
Press <Up/Down/Left/Right> button to set play mode and difficulty.
Press <OK> button to start play Gomoku.
Press <Up/Down/Left/Right> button to select the position.
Press <OK> button to place the piece.
Calendar displays the year, month, and date.
Calculator can used for mathematical calculations.
TELETEXT
Teletext Language
Audio channel
Channel
eng
Audio PID
0650
Sound Mode
LR
Figure 17. Audio Channel
eng
OFF
Figure 18. Teletext Setting Page
3.5 Audio
Switch the sound channel and switch sound mode to LR(stereo) or LL(left) or RR(right).
If setting audio language at SETUP->Installation->Audio Language, the audio
channel default language will be chosen by setting. See Figure 17. Press <Audio>
button to display the audio channel page. Press <Up/Down> button to select Channel/
Audio PID or Sound Mode option. Press <Left/Right> button to set the value.
3.Normal Play
Normal Play means STB under watching TV or listening to the Radio. See Figure15.
Program Info
Program Name ITV1
Program No 0003 Video PID
0512
Channel No. 0045 Audio PID
0650
Frequency
665934 KHz
Bandwidth
0008 MHz
Constellation QAM64 Hierarchy Mode N/A
Guard Interval 1/32 HP Code Rate 7/8
FFT
8K LP Code Rate 1/2
Strength 62%
Quality 88%
3.6 Pause
Pause video and audio. But it will be canceled by any input.
3.7 Favorites
User can switch the favorite programs in the same favorite group. About favorites setting,
see section 2.3.1.1 for details.
Press <YELLOW> button to switch the favorite group in Program list.
Press <CH +/-> button to switch the same favorite program in normal play mode.
Figure15. Normal Play - Radio
Figure 16. Program Info
3.1 Information
Press <Info> button once to display info banner. Banner displays the program No.,
favorite setting, current time, program name, now and next event, lock, scramble,
subtitle and teletext info.
Press <Info> button when banner exist to display detail info of now event.
Press <Info> button when detail exist to display current program info. See Figure 16.
3.2 Switch Program
User can switch program by CH+/- or input program number directly.
If the input program number doesn't exist, STB will ignore the input. Or press <Recall>
button to switch to last watching program from current watching program.
3.8 Teletext
Display teletext on screen, the style of teletext may be different by content provider.
See Figure 18.
Press <Text> button to display the teletext setting page.
Press <Up/Down> button to select the teletext language if the program has teletext.
Press <OK/Exit> button to exit the teletext setting page.
Press <0~9/Up/Down/Left/Right> button to change teletext page if teletext exists.
7
3.9 Subtitle
Display the subtitle on screen, the style of subtitle may be different by content provider.
See Figure 19.
Press <Subtitle> button to display subtitle setting page.
Press <Up/Down> button to select subtitle language, if the program has subtitle.
Press <OK/Exit> button to exit subtitle setting page.
Troubleshooting
If you experience problems with this receiver or its installation, in the first
instance please read carefully the relevant sections of this User Manual and
this Troubleshooting section.
SUBTITLE
Subtitle Language
eng
OFF
Figure 19. Subtitle Setting Page
3.10 Teletext Subtitle
Display subtitle by teletext, the style of the teletext subtitle may be different by content
provider.
Press <Text/Subtitle> button to display teletext or subtitle setting page.
Press <Left/Right> button to select “TTX Subtitle”.
Press <Up/Down> button to select teletext subtitle language.
Press <OK/Exit> button to exit the setting page.
3.11 Guide
Press <GUIDE> button at normal play state, see section 2.3.2 for details.
3.12 Message
There are some messages to inform user the current status of the STB.
3.12.1 No Signal
STB can't get signal, for example, cable is disconnected.
3.12.2 No Service
Program doesn't have any content to play.
3.12.3 Service Scrambled
Program is scrambled for payment, you need contact with the content provider to know
how to descramble it.
3.12.4 HDTV Not Support
If the program content is HDTV format, this STB doesn't support it.
3.12.5 Channel Locked
Program is locked by setting lock (see section 2.3.1.2) and turning on channel lock in
password setting (see section 2.2.3.2). User must input correct password to watch
program.
8
Dish is disconnected
Check dish lead
Dish is damaged/misaligned
Check dish
Faulty LNB on dish
Have dish tested
This is caused by low or bad
signal from your satellite dish
Have a satellite tech
check your dish
Specifications
Item
Specification
Tuner
Frequency Range
950MH z to 21 50MH z
Input Imp edance
75 Oh ms un balanced
-65 ~ -25DBM
Signal Input Level
Demo dulation
Symb ol Rate
2-45Mb ps
LNB Po wer
13/18 V, ma x. 500mA
Demo dulator
QPSK
1/2, 2/3,3/4,5/6,7/8
FEC
LNB IN
Connectors
CVBS
F-Connector
Compos ite video(CVB S)
L/R
Audi o L/R
TO TV
Output RF signal for TV set
Frequency: 215.25+1MHz, PAL-B/G
COAXIAL
Power
Display
Decoding
Others
RCA, for SPDI F digital audio output
Y/Pb/Pr
Connect to your TV component input terminals.
INPUT
100-240V~ 50/60Hz
Consump tion
18W max.
Decoder Mo dule
PAL,NTSC
Resolution
720x576(PAL);720x480(NTSC)
Aspect Ratio
4:3(Letterbox, Pan & Sc an); 16:9
Video
MP EG2 Transport MP @M L
Audio
MP EG2 Audio La yer I&II
Comp liance
ETSI/EN 30 0421 DV B-S Co mp liant
Sound Mo de
Right, Left, Stereo
This symbol on the product or in the instructions means that your electrical and electronic equip
ment should be disposed at the end of life separately from your household waste.
There are separate collection systems for recycling in the EU.
For more information, please contact the local authority or your retailer where you purchased the
product.
9