1
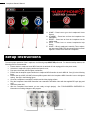
enior Design – Spring 2013 3 EE494 Se Engineered d and Built by y: Micchael Wheele er Jordan Dupree e Jim Crosslin n 2 ner’s Manual Luxxaphone Own Im mporttant Safe ety In nform matio on This symbol warns the userr of dangerous oltage levels localized with hin the vo en nclosure of th he unit. This symbol ad dvises the use er to read all ccompanying g literature for safe ac op peration of the unit. This symbol warns the userr that laser ources are prresent. so bee n spilled onto o the productt; or the prod duct has been n expo osed to rain n; or the pro oduct does n not appear to o ope rate normallly or exhibitts a marked change in n perfformance; or the product has been drropped, or the e encllosure is dam maged. The e power sup pply cord off this producct should be e unp lugged from the outlet wh hen left unussed for a long g perio od of time, orr during electrrical storms. Do not drip or splash liquids, nor placce liquid-filled d conttainers on the e unit. CAU UTION: No user service eable parts inside, refe er servvicing to qualiified personne el only. ead, retain, and a follow all a instruction ns. Re wa arnings. Heed all a On nly connect th he electric line e cord to an earth e grounde ed AC C receptacle in accordan nce with the e voltage an nd frequency rating gs listed und der INPUT POWER on th he sid de panel of thiis product. WA ARNING: To prevent dam mage, fire, or shock hazarrd, do not expose this unit to rain n or moisture. nplug the AC power line co ord before cle eaning the un nit Un extterior (use a damp cloth only). o Wait until u the unit is com mpletely dry before b reconn necting it to po ower. Ma aintain at least six inches s of unobstructed air spac ce behind the unit to allow for proper ventilation v an nd coo oling of the un nit. This product should be locatted away from m heat source es succh as radiato ors, heat regis sters, or othe er products th hat pro oduce heat. This product may m be equip pped with a polarized plu ug (on ne blade wid der than the other). Th his is a safe ety fea ature. If you u are unable to insert the e plug into th he outtlet, contact an electrician n to replace your obsole ete outtlet. DO NO OT DEFEAT THE PURPO OSE OF THIS SA AFETY PLUG. Pro otect the pow wer cord from being pinched d or abraded.. This product should be serviced by qu ualified servic ce personnel when n: the power supply cord or o the plug ha as bee en damaged; or objects have fallen, or liquid ha as The e amplifier sysstem and loudspeaker em mployed in this prod duct are cap pable of pro oducing veryy high sound d presssure levelss which ma ay cause ttemporary or o perm manent hearin ng damage. Use care whe en setting and d adju usting volume e levels during g use. FCC C COMPLIANC CE NOTICE This p product HAS NOT BEEN T TESTED NOR R FOUND TO O COMP PLY with the e limits for a Class B d digital device e, pursua ant to Part 15 of the FCC C rules. The ese limits are e design ned to provvide a reaso onable prote ection agains st harmfu ul interferencce in a resiidential insta allation. This producct generates,, uses, and ccan radiate ra adio frequency y energyy and if not used in accord dance with the instructions s, may ccause harmfu ul interference e to radio communications and th here is no gu uarantee that interference will not occu ur allation. If th in a p particular insta his equipmen nt does cause e harmfu ul interferencce to radio or television recception, which h can be e determined d by turning tthe equipmen nt off and on n, the usser is encoura aged to try to correct the in nterference by y one off more of the following me easure: reorie ent or relocate e the re eceiving ante nna, increase the separa ation between n the eq quipment and d receiver, co onnect the equipment into o an ou utlet on a circcuit different from that off the receiverr. Consu ult an experrienced radio o/TV technician if help is neede ed. Luxaphone Owner’s Manual Introduction The Luxaphone is a fully interactive digital electronic instrument that contains 128 digital MIDI sound effects and instruments ready for you to explore and experiment with! Best of all, there is no additional equipment to lug around; everything is contained in one easy-to-carry package. Interacting with the Luxaphone is easy. The resistive touchscreen allows you to select one of 128 possible instruments, set the volume level, vary the pitch bank, and define the root note of any pitch bank. The diverse library includes a host of instruments, such as stringed, woodwind, percussion, complete orchestral sections, and experimental sound effects. The enclosure is outfitted with a series of 12 Red/Green/Blue Light Emitting Diodes (RGB LEDs) to indicate the natural notes, sharp notes, and the played notes. The RGB LEDs turn GREEN to indicate natural notes, BLUE to indicate sharp notes, and RED to indicate when and where a laser beam was interrupted. This Owner’s Manual is provided to the customer in digital and hardcopy form. Features The Luxaphone contains the following features: 15W Audio Amplifier, Texas Instruments Digital Signal Processor (DSP), 8” loudspeaker, Inactivity Timer (interrupts power to the lasers if the Luxaphone has been idle too long), Safety Interlock momentary switch (interrupts power to the lasers if the enclosure is opened), 2.8” Resistive Touchscreen, 128 MIDI Instruments and Sound Effects, 10 Octave Banks, 12 Laser Beams; One Beam for Each Note Within the Octave (A, A#, B, C, C#, D, D#, E, F, F#, G, G#), 12 Red/Green/Blue Light Emitting Diodes (RGB LED) to indicate Natural Notes, Sharp Notes, and Played Notes. Touchscreen Overview A. MENU – Press here to go to the Main Menu. B. SWIPE-TO-SELECT AREA – After selecting any of the options below, swipe your finger here to make a change. C. INSTRUMENT – Press here to access Luxaphone’s extensive MIDI library. D. VOLUME – Press here to access the volume control. E. ROOT NOTE – Press here to tell the Luxaphone what note to assign to the first laser. F. OCTAVE – Press here to tell the Luxaphone which octave bank to initialize to. 3 4 Luxaphone Owner’s Manual A. HOME – Press here to go to the Luxaphone’s Home Screen. B. STANDBY – Press here to force the Luxaphone into hibernation. C. RESET – Press here to force the Luxaphone into its default state. D. HELP – Press here to access Luxaphone’s help library. E. WAKE – When Luxaphone’s Inactivity Timer expires, the lasers and RGB LEDs shut down and this screen appears. Press here to wake the Luxaphone. Setup Instructions To ensure proper operation of the Luxaphone, the following steps MUST BE performed. For electrical safety reasons, the following order is recommended: Ensure that the Luxaphone Laser MIDI Controller is switched off and unplugged from the power outlet, Unlock the Luxaphone’s playing surface and open the unit, Prop open the lid with the lid support mechanism, Ensure that the amplifier system within the Luxaphone MIDI Controller is set for MIDI IN. See (A) in the following figure, Ensure that the LOOP VOLUME of the amplifier system within the Luxaphone MIDI Controller is set to its highest setting. See (B) in the following figure, Close the Luxaphone Laser MIDI Controller and lock the playing surface, Plug the Luxaphone Laser MIDI Controller into a standard 120V/60Hz outlet with the supplied EIC-style plug and cord, Switch the power ON, After the Luxaphone has booted, you are ready to begin playing! See “TOUCHSCREEN OVERVIEW” for information on making changes to the program. Luxaphone Owner’s Manual APPENDIX A: TROUBLESHOOTING The following troubleshooting table is presented in decreasing order of likely Possible Causes for a particular Problem. If after running through this troubleshooting guide the Luxaphone still does not behave as expected, refer to the Luxaphone Service Manual for more information. Problem Instrument does not turn on Lasers do not turn on Possible Causes Instrument not plugged into the wall. Instrument is not turned on. Inactivity Timer has expired. Lid is open. Instrument does not make any sounds Instrument is not turned on. Inactivity Timer has expired. Lid is open. Volume is turned all the way down. Amplifier volume is turned all the way down. The Amplifier is not set to process MIDI messages. Instrument is producing unexpected or incorrect sounds Instrument selected is different than what you wanted. The KEY SELECT knob is set to TUNER. Solution Plug instrument into a 120V/60Hz wall outlet. Plug instrument into a 120V/60Hz wall outlet and turn the instrument on. Press the “wake” button on the touchscreen. Close and lock the lid, press the “wake” button on the touchscreen. Plug instrument into a 120V/60Hz wall outlet and turn the instrument on. Press the “wake” button on the touchscreen. Close and lock the lid, press the “wake” button on the touchscreen. Verify the volume setting on the touchscreen by pressing the VOLUME button. Open the lid and verify that the LOOP VOLUME knob is turned all the way up. Open the lid and verify that the LOOP knob is set to MIDI IN Select the desired instrument from the MIDI library by using the INSTRUMENT option on the touchscreen. Open the lid and verify that the KEY SELECT knob is not set to the TUNER position. 5 6 Luxaphone Owner’s Manual APPENDIX B: MIDI PROGRAM NUMBERS Program Change 1 2 3 4 5 6 7 8 9 10 11 12 13 14 15 16 17 18 19 20 21 22 23 24 25 26 27 28 29 30 31 32 33 34 35 36 37 38 39 40 41 42 43 44 45 General MIDI Instrument (Grand) Piano 1 (Bright) Piano 2 (Electric Grand) Piano 3 Honky-Tonk Piano Electric Piano 1 Electric Piano 2 Harpsichord Clavi Celesta Glockenspiel Music Box Vibraphone Marimba Xylophone Tubular Bells Santur Drawbar Organ Percussive Organ Rock Organ Church Organ Reed Organ Accordion (French) Harmonica Tango Accordion Acoustic Guitar (Nylon) Acoustic Guitar (Steel) Electric Guitar (Jazz) Electric Guitar (Clean) Electric Guitar (Muted) Overdriven Guitar Distortion Guitar Guitar Harmonics Acoustic Bass Finger Bass Picked Bass Fretless Bass Slap Bass 1 Slap Bass 2 Synth Bass 1 Synth Bass 2 Violin Viola Cello Contrabass Tremolo Strings Program Change 46 47 48 49 50 51 52 53 54 55 56 57 58 59 60 61 62 63 64 65 66 67 68 69 70 71 72 73 74 75 76 77 78 79 80 81 82 83 84 85 86 87 88 89 90 General MIDI Instrument Pizzicato Strings Orchestral Harp Timpani String Ensemble 1 String Ensemble 2 Synth Strings 1 Synth Strings 2 Choir Aahs Voice Oohs Synth Voice Orchestra Hit Trumpet Trombone Tuba Muted Trumpet French Horn Brass Section Synth Brass 1 Synth Brass 2 Soprano Sax Alto Sax Tenor Sax Baritone Sax Oboe English Horn Bassoon Clarinet Piccolo Flute Recorder Pan Flute Blown Bottle Shakuhachi Whistle Ocarina Lead 1 (Square) Lead 2 (Sawtooth) Lead 3 (Calliope) Lead 4 (Chiff) Lead 5 (Charang) Lead 6 (Voice) Lead 7 (Fifths) Lead 8 (Bass + Lead) Pad 1 (Fantasia) Pad 2 (Warm Program Change 91 92 93 94 95 96 97 98 99 100 101 102 103 104 105 106 107 108 109 110 111 112 113 114 115 116 117 118 119 120 121 122 123 124 125 126 127 128 General MIDI Instrument Pad 3 (Polysynth) Pad 4 (Choir) Pad 5 (Bowed) Pad 6 (Metallic) Pad 7 (Halo) Pad 8 (Sweep) FX 1 (Rain) FX 2 (Soundtrack) FX 3 (Crystal) FX 4 (Atmosphere) FX 5 (Brightness) FX 6 (Goblins) FX 7 (Echoes) FX 8 (Sci-Fi) Sitar Banjo Shamisen Koto Kalimba Bap Pipe Fiddle Shanai Tinkle Bell Agogo Steel Drums Woodblock Taiko Drum Melodic Tom Synth Drum Reverse Cymbal Guitar Fret Noise Breath Noise Seashore Bird Tweet Telephone Ring Helicopter Applause Gunshot NOTE: The MIDI Program Number in the digital domain begins at 0 and ends at 127 for a total of 128 instruments and is typically numbered in Hexadecimal format.