1
Getting Started
Information for Getting Started with iAutoFocus Collision Management System
Version 8
End-User License Agreement
NEWERA SOFTWARE IAUTOFOCUS VERSION 8
IMPORTANT – READ CAREFULLY: Be sure to carefully read and understand
all of the rights and restrictions described in this NewEra End-User License
Agreement ("EULA"). This EULA is a legal agreement between you (either
an individual or an entity) and NewEra Software for the iAutoFocus software
accompanying this EULA, which includes the accompanying computer software, and may include associated media, printed materials and any "online"
or electronic documentation (hereafter known as "PRODUCT"). This agreement must be signed (by a responsible party) and returned to NewEra software prior to the installation and use of the PRODUCT.
BY INSTALLING, COPYING, OR OTHERWISE USING THE PRODUCT, YOU
AGREE TO BE BOUND BY THE TERMS OF THIS EULA. IF YOU DO NOT AGREE
TO THE TERMS OF THIS EULA, YOU MAY NOT INSTALL OR USE THE PRODUCT.
SOFTWARE PRODUCT LICENSE
The PRODUCT is protected by copyright laws and international copyright treaties, as well as other intellectual property laws and treaties. The PRODUCT is licensed, not sold.
1. GRANT OF LICENSE. This EULA grants you the following rights, provided you comply with all terms
and conditions of this EULA:
•
Software. You may install, use, access, display, ("RUN") or otherwise interact with no more than
one copy of the PRODUCT, on any single computer, workstation, terminal, or other digital electronic device ("COMPUTER").
•
Storage/Network Use. You may also store or install a copy of the PRODUCT on a storage device, such as a network server, used only to RUN the PRODUCT on your other COMPUTERS over an
internal network; however, you must acquire and dedicate a license for each separate COMPUTER
on which the PRODUCT is RUN from the storage device. A license for the PRODUCT may not be
shared or used concurrently on different COMPUTERS.
•
Reservation of Rights. All rights not expressly granted are reserved by NewEra Software.
•
Accessing Services Using the PRODUCT. Your use of any service accessible using the PRODUCT is not covered by this EULA and may be governed by separate terms of use, conditions or
notices.
2. RESTRICTIONS.
•
You must maintain all copyright notices on all copies of the PRODUCT.
•
Limitations of Reverse Engineering, De-compilation and Disassembly. You may not reverse
engineer, decompile, or disassemble the PRODUCT, except and only to the extent that such activity is permitted by applicable law notwithstanding this limitation.
•
Rental. You may not rent or lease or lend the PRODUCT.
•
Software Transfer. You may permanently transfer all of your rights under this EULA one time,
provided you retain no copies, you transfer all of the PRODUCT (including all component parts, the
media and printed materials, any upgrades, and this EULA), you do not receive any payment or
other compensation for transferring the PRODUCT and the recipient agrees to the terms of this
EULA. If the PRODUCT portion is an upgrade, any transfer must include all prior versions of the
PRODUCT.
NewEra Confidential
•
Support Services. NewEra Software may provide you with support services related to the PRODUCT ("Support Services"), in its discretion. Use of Support Services, if any, is governed by the
NewEra Software policies and programs described in the user manual, in "online" documentation,
and/or other NewEra-provided materials. Any supplemental software code provided to you as a
part of Support Services shall be considered part of the PRODUCT and subject to the terms of this
EULA. With respect to technical information you provide to NewEra as part of the Support Services, NewEra may use such information for its business purposes, including for product support
and development. NewEra will not utilize such technical information in a form that personally identifies you except to the extent necessary to provide you with support.
•
Replacement, Modification and Upgrade of the Software. NewEra Software reserves the
right to replace, modify or upgrade the PRODUCT at any time by offering you a replacement or
modified version of the PRODUCT or such upgrade and to charge for such replacement, modification or upgrade. Any such replacement or modified software code or upgrade to the PRODUCT
offered to you by NewEra shall be considered part of the PRODUCT and subject to the terms of this
EULA (unless this EULA is superseded by a further EULA accompanying such replacement or modified version of or upgrade to the PRODUCT). In the event that NewEra offers a replacement or
modified version of or any upgrade to the PRODUCT, (a) your continued use of the PRODUCT is
conditioned on your acceptance of such replacement or modified version of or upgrade to the
PRODUCT and any accompanying superseding EULA and (b) in the case of the replacement or
modified PRODUCT, your use of all prior versions of the PRODUCT is terminated.
3. TERMINATION. Without prejudice to any other rights, NewEra Software may terminate this EULA if
you fail to comply with the terms and conditions of this EULA. NewEra Software may terminate this EULA
by offering you a superseding EULA for the PRODUCT or any replacement or modified version of or upgrade to the PRODUCT and conditioning your continued use of the PRODUCT or such replacement, modified or upgraded version on your acceptance of such superseding EULA. In addition, NewEra Software may
terminate this EULA by notifying you that your continued use of the PRODUCT is prohibited. In the event
that NewEra Software terminates this EULA, you must immediately stop using the PRODUCT and destroy
all copies of the PRODUCT and all of its component parts.
4. COPYRIGHT. All title and copyrights in and to the PRODUCT (including but not limited to any images,
photographs, animations, video, audio, music, text and "applets," incorporated into the PRODUCT), the
accompanying printed materials, and any copies of the PRODUCT, are owned by NewEra Software or its
suppliers. All title and intellectual property rights in and to the content which may be accessed through
use of the PRODUCT is the property of the respective content owner and may be protected by applicable
copyright or other intellectual property laws and treaties. This EULA grants you no rights to use such content. If this PRODUCT contains documentation which is provided only in electronic form, you may print one
copy of such electronic documentation per license. You may not copy the printed materials accompanying
the PRODUCT. Any distribution of said documentation must receive prior approval from NewEra Software.
5. EXPORT RESTRICTIONS. You acknowledge that the SOFTWARE is subject to U.S. export jurisdiction.
You agree to comply with all applicable international and national laws that apply to the SOFTWARE, including the U.S. Export Administration Regulations, as well as end-user, end-use, and destination restrictions issued by U.S. and other governments.
6. DISCLAIMER OF WARRANTIES. NewEra Software and its suppliers provide the product “AS IS” and
with all faults, and hereby disclaim all other warranties and condition, either express, implied or statutory,
including but not limited to any (if any) implied warranties or conditions of merchantability, of fitness for a
particular purpose, of lack of viruses, and of lack of negligence or lack of workmanlike effort. Also, there
is no warranty or condition of title, of quiet enjoyment, or infringement. The entire risk arising out of the
use or performance of the product is with you.
7. EXCLUSION OF ALL DAMAGES. To the maximum extent permitted by applicable law, in no event
shall NewEra Software or its suppliers be liable for any consequential, incidental, direct, indirect, special,
punitive, or other damages whatsoever (including, without limitation, damages for any injury to person or
property, damages for loss of profits, business interruption, loss of business information, for loss of privacy for failure to meet any duty including of good faith or of reasonable care, for negligence, and for any
pecuniary or other loss whatsoever) arising out of or in any way related to the use of or inability to use
the PRODUCT, whether based on contract, tort, negligence, strict liability or otherwise, even if NewEra or
any supplier has been advised of the possibility of such damages. This exclusion of damages shall be effective even if any remedy fails of its essential purpose.
8. LIMITATION AND RELEASE OF LIABILITY. NewEra Software disclaims all warranties and liability for
the PRODUCT. To the full extent allowed by law, YOU HEREBY RELEASE NEWERA SOFTWARE AND ITS
SUPPLIERS FROM ANY AND ALL LIABILITY ARISING FROM OR RELATED TO ALL CLAIMS CONCERNING THE
NewEra Confidential
PRODUCT OR ITS USE. If you do not wish to accept the PRODUCT under the terms of this EULA, do not
install or use the PRODUCT.
9. GOVERNING LAW. The laws of the State of Utah, U.S.A will apply to this contract.
10. QUESTIONS. Should you have any questions regarding this agreement, or if you desire to contact
NewEra Software for any reason, please call (801)447-4707 or write: NewEra Software, 722 Shepard
Lane, Suite 104, Farmington, UT 84025.
Signature of Responsible party:
Name:
______________________________
Company:
______________________________
Title:
______________________________
Address:
______________________________
City, State & Zip:
______________________________
Signature:
______________________________
Date:
______________________________
NEWERA SOFTWARE
Quick Start User Guide
NewEra Confidential
© 2010 NewEra Software
722 Shepard Lane • Suite 104
Farmington, Utah 84025
Phone 801.447.4707 • Fax 801.447.4708
NewEra Confidential
Table of Contents
Getting Started with iAutoFocus .................................................................................................................................8
iAutoFocus Version 8 ...................................................................................................................................................8
If You’re New to iAutoFocus....................................................................................................................................8
If You’ve Used iAutoFocus Before...........................................................................................................................9
Before You Begin ..........................................................................................................................................................9
Minimum Hardware Requirements ..........................................................................................................................9
How to Obtain Support ..............................................................................................................................................11
Getting Started Manual ...........................................................................................................................................11
For Customers with a Support Contract .................................................................................................................11
For Customers without a Support Contract ............................................................................................................11
On-Site Training and Support .................................................................................................................................11
Installing iAutoFocus .................................................................................................................................................12
If You’re Installing a New Copy of iAutoFocus .....................................................................................................12
If You’re Updating an Existing Copy of iAutoFocus .............................................................................................12
Launching iAutoFocus............................................................................................................................................13
Creating Your Database .............................................................................................................................................14
Creating a New Company .......................................................................................................................................14
iAutoFocus Setup .......................................................................................................................................................15
Company Information Screen .................................................................................................................................16
Security Screen .......................................................................................................................................................19
General Ledger Codes Screen ................................................................................................................................22
File Locations Screen..............................................................................................................................................24
Invoice Setup Screen ..............................................................................................................................................25
Departments Screen ................................................................................................................................................26
PO Setup (Purchase Orders) Screen .......................................................................................................................28
AutoComplete/AutoSave Screen ............................................................................................................................29
Zip Codes Screen ....................................................................................................................................................32
User-Defined Fields Screen ....................................................................................................................................33
Import Translation Screen.......................................................................................................................................34
Scheduling Screen ..................................................................................................................................................35
iAutoFocus Overview ..................................................................................................................................................40
Left Navigation Bar Overview ...................................................................................................................................40
Pending Work..........................................................................................................................................................41
Work In Progress ....................................................................................................................................................41
Completed Work .....................................................................................................................................................42
Reports ....................................................................................................................................................................43
Parts Management ..................................................................................................................................................44
Labor Management .................................................................................................................................................44
Management............................................................................................................................................................44
Contacts ..................................................................................................................................................................45
Utilities....................................................................................................................................................................46
Using iAutoFocus ........................................................................................................................................................48
Launching iAutoFocus ...............................................................................................................................................48
Importing Estimates ...................................................................................................................................................49
Possible Errors ........................................................................................................................................................51
Work In Progress ........................................................................................................................................................52
File Search ..............................................................................................................................................................52
Custom View...........................................................................................................................................................53
Work Order.................................................................................................................................................................54
NewEra Confidential
General Tab .............................................................................................................................................................54
Insurance Tab ..........................................................................................................................................................56
Line Items Tab ........................................................................................................................................................57
Totals Tab ................................................................................................................................................................58
Payments Tab ..........................................................................................................................................................60
Preview & Print ......................................................................................................................................................60
Images & Documents..............................................................................................................................................62
Work Order – Right Click Options .........................................................................................................................62
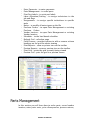
Parts Management .....................................................................................................................................................63
Purchase Orders ......................................................................................................................................................64
Receiving Parts .......................................................................................................................................................69
Views ......................................................................................................................................................................74
Labor Management ....................................................................................................................................................77
Labor Costing..........................................................................................................................................................77
Time Clock..............................................................................................................................................................86
Management...............................................................................................................................................................86
Receivables .............................................................................................................................................................86
Dashboard ...............................................................................................................................................................88
Letters & Labels......................................................................................................................................................89
Contacts .....................................................................................................................................................................93
All Contacts ............................................................................................................................................................93
Using iAutoFocus Advanced Features .......................................................................................................................94
Labor Management ....................................................................................................................................................94
Time Clock..............................................................................................................................................................94
Load Based Scheduler................................................................................................................................................97
Scheduler Features ..................................................................................................................................................97
Scheduling a Job .....................................................................................................................................................99
QuickBooks ..............................................................................................................................................................101
Getting Started ......................................................................................................................................................102
Creating QuickBooks Reports ..............................................................................................................................107
Exporting Data to Microsoft QuickBooks ............................................................................................................108
WebView ...................................................................................................................................................................114
How to Upload Photos to Your Website................................................................................................................114
Menu Searches & Sorts ............................................................................................................................................115
Enter an Unlocking Key ...........................................................................................................................................116
NewEra Confidential
7
NewEra Confidential
G e t t i n g
S t a r t e d
w i t h
i A u t o F o c u s
Getting Started with iAutoFocus
Welcome to NewEra Software’s iAutoFocus Collision Management System, a complete, integrated management system for
the auto collision shop. Version 8 of iAutoFocus introduces
many new features to the iAutoFocus product, including improved cycle-time tracking, better workflow management, and
improved reporting.
When installing iAutoFocus for the first time, you will need to
make several choices. This manual will guide you through the
process of installing and configuring iAutoFocus Collision Management Software.
iAutoFocus Version 8
iAutoFocus Version 8 is the most reliable, easy to use and manage version to date. Enhancements to iAutoFocus allow you to
better track cycle-time and job status throughout the repair
process. Additionally, iAutoFocus Version 8 streamlines many
processes, enabling you to spend less time managing jobs in
iAutoFocus.
NewEra Software, makers of iAutoFocus, has been producing
collision and mechanical shop management software since
1984. Version 8 is the latest incarnation of iAutoFocus, NewEra
Software’s collision management software.
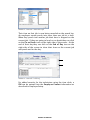
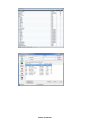
If You’re New to iAutoFocus
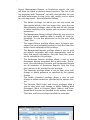
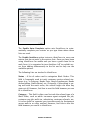
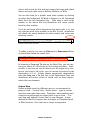
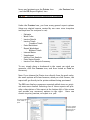
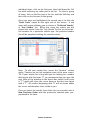
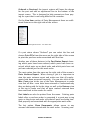
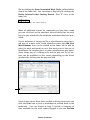
If you’re not familiar with iAutoFocus, it’s easy to get started.
The following illustration shows the main iAutoFocus screen (or
grid), which appears when you start up iAutoFocus. The main
grid gives you quick access to common information, such as the
number of jobs currently in the shop and general information
about each one. From the main grid you can also easily access
more detailed information and perform other tasks, such as labor allocation and parts ordering. You will find that as you get
familiar with just a few steps initially then the rest of the pro-
NewEra Confidential
8
G e t t i n g
S t a r t e d
w i t h
i A u t o F o c u s
gram will become easy for you to navigate and explore on your
own.
iAutoFocus Main Screen
If You’ve Used iAutoFocus Before
If you’ve worked with earlier versions of iAutoFocus before, the
transition to Version 8 should be smooth and easy. You should
be able to navigate the program as you did prior; noticing the
additional features designed to enhance your ability to manage
your shop.
Before You Begin
Minimum Hardware Requirements
Before you install iAutoFocus Version 8, make sure your computer meets the following minimum hardware requirements:
•
•
•
•
•
•
•
•
1 GHz processor or faster
256 megabytes (MB) of RAM
200 MB of free hard drive space
28.8k or faster Internet connection
SVGA 800x600/True Color-capable video card
CD-ROM Drive
Internet Explorer 6
Windows™ 2000 (Service Pack 3 or later), or
Windows™ XP (Home and Professional Editions)
NewEra Confidential
9
G e t t i n g
S t a r t e d
w i t h
i A u t o F o c u s
NewEra Software recommends the following hardware configuration:
•
•
•
•
•
•
•
•
2.4 GHz processor or faster
512 megabytes (MB) of RAM
200 MB of free hard drive space
High-speed Internet connection (T1, Cable Modem or DSL)
SVGA 1024x768/True Color-capable video card
CD-ROM Drive
Internet Browser
Windows 7 Professional
For shared/network installations, iAutoFocus supports the following server operating systems:
•
•
Peer-to-peer configured Windows™ 2000 or Windows™ XP
(Home or Professional Editions) with Windows™ 2000,
Windows™ XP (Home and Professional Editions), or Windows 7 clients.
Client/Server configured Windows™ 2000 Server (any Edition) or Windows™ 2003 Server.
NewEra Confidential
10
G e t t i n g
S t a r t e d
w i t h
i A u t o F o c u s
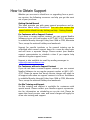
How to Obtain Support
Whether you are new to iAutoFocus or upgrading from a previous version, the following resources can help you get the most
out of your purchase.
Getting Started Manual
This book provides you with many general procedures and information about using iAutoFocus. You can also access this
manual within iAutoFocus by clicking on Help…Getting Started.
For Customers with a Support Contract
If you have a current support contract, you can contact NewEra
Software via our toll-free number at (877) 447-4707. Assistance
is available Monday through Friday from 9AM to 5PM, Mountain
Time, except for national holidays and weekends.
Support for specific incidents or for general training can be
scheduled after normal support hours on a case-by-case basis
and will incur a separate charge. Please contact your NewEra
support representative to schedule a time if you require help
outside of regular support hours.
Support is also available via email by sending messages to
[email protected].
For Customers without a Support Contract
If you do not have a current support contract, you can contact
NewEra Software via our regular support number at (801) 4474707. Please be aware that hourly service charges will apply to
all support calls when no support contract is in force. Assistance
is available Monday through Friday from 9AM to 5PM, Mountain
Time, except for national holidays and weekends.
On-Site Training and Support
On-Site training and support is available for customers with
special needs. Please contact your NewEra support representative for information on scheduling an on-site visit. Please be
aware that hourly service rates and travel charges will apply for
all on-site training and support.
NewEra Confidential
11
G e t t i n g
S t a r t e d
w i t h
i A u t o F o c u s
Installing iAutoFocus
The iAutoFocus Setup Wizard copies the necessary program files
to your hard disk. When the installation is completed, you can
begin configuring iAutoFocus for use in your shop. Note that
your computer may need to be restarted several times during
Setup depending on your operating system configuration.
If You’re Installing a New Copy of iAutoFocus
If you have never installed iAutoFocus on this computer, or if
you have already uninstalled iAutoFocus on this computer, you
will use the following method to install iAutoFocus Version 8.
Downloading iAutoFocus Version 8 from the Internet
By Appointment, a NewEra Support Representative will download
iAutoFocus Version 8 from NewEra Software’s website, and
browse to the folder where you saved the file using Windows
Explorer or other browser. The Support Representative will extract its contents to a specific location and help you with your
company’s setup.
Obtaining the Latest Software Upgrade
Updates for iAutoFocus can be obtained by browsing to the following
address
using
Internet
Explorer:
http://www.newerainc.com/support.html . After downloading
any updates, double-click on them in Windows Explorer, then
click ‘Unzip’ to install them. iAutoFocus will then be updated.
This process needs to be repeated on each station that has
iAutoFocus installed. Note: iAutoFocus must be closed on the
workstation being upgraded or you will receive an error.
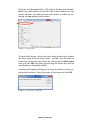
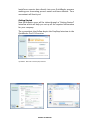
If You’re Updating an Existing Copy of iAutoFocus
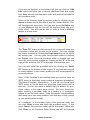
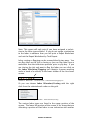
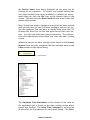
If an older version of iAutoFocus is already installed on this system, you may need to uninstall the old version of iAutoFocus
before you can upgrade to Version 8. You can check which version of iAutoFocus is installed by clicking on Help…About on
the iAutoFocus menu. The release number is located in the
black bar at the top of the window as pictured below.
NewEra Confidential
12
G e t t i n g
S t a r t e d
w i t h
i A u t o F o c u s
iAutoFocus Version 8 Help…About Screen
For information on contacting NewEra Software’s Technical Support, see “How to Obtain Support”
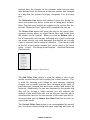
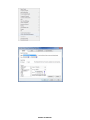
Launching iAutoFocus
Note if you are running the application on more than one workstation and this is the first workstation that has been upgraded,
you will need to ensure all other iAutoFocus users have exited
the software at this point so that the data files can be upgraded.
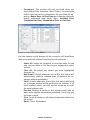
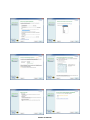
You can start iAutoFocus Version 8 by either double-clicking on
the iAutoFocus icon on the desktop,
or by clicking on iAutoFocus on your program menu.
You will be prompted to enter a user name and password, as
pictured below.
NewEra Confidential
13
G e t t i n g
S t a r t e d
w i t h
i A u t o F o c u s
iAutoFocus Version 8 Login Screen.
After entering your username and password, click on ‘Okay’ to
login to iAutoFocus. Please note that username’s and passwords
are NOT case-sensitive.
Creating Your Database
Creating a New Company
Follow these short steps to create a new shop database (generally your Support Representative will assist you with this process):
1.
2.
Launch iAutoFocus Version 8 either by double-clicking on
the iAutoFocus Version 8 icon on your desktop, or by
clicking on iAutoFocus Version 8 on your program menu.
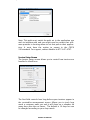
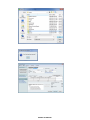
Click on File on the menu and then choose New Company.
iAutoFocus Version 8 New Company
3.
Your Support Representative will Type in the Server name
in the “Server” field, iAutoFocus in the “Company” field,
the user id, and password. Then he/she will Check the
“Remember Me” box and click “Okay”.
NewEra Confidential
14
G e t t i n g
S t a r t e d
w i t h
i A u t o F o c u s
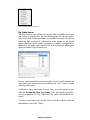
iAutoFocus Setup
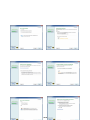
iAutoFocus Version 8 provides a Setup Wizard to help you set up
and customize your iAutoFocus program. This section will take
you through the steps to necessary to begin using iAutoFocus
Version 8.
iAutoFocus Version 8 Setup Wizard
To start the iAutoFocus Version 8 Setup Wizard, click on File…
Setup from the iAutoFocus menu.
There are several steps to configure iAutoFocus Version 8. Each
step is described in more detail below.
The following steps are required in order to use iAutoFocus
Version 8:
•
•
Company Information
General Ledger Codes
The following steps are not mandatory, but highly recommended:
•
•
•
•
•
•
Security
File Locations
Departments
PO Setup (Purchase Orders)
AutoComplete/AutoSave
Scheduling
The following steps are completely optional:
•
Invoice Setup
NewEra Confidential
15
G e t t i n g
S t a r t e d
•
•
•
w i t h
i A u t o F o c u s
Zip Codes
User-Defined Fields
Import Translation
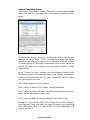
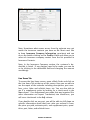
Company Information Screen
The Company Information screen allows you to set general information about your company, as well as global options for this
database. The General tab of the Company Information Screen is
pictured below.
iAutoFocus Version 8 Company Information General Tab
Enter your Company Name, Federal Tax ID, State Tax ID, Phone
and Fax Numbers on this tab.
If you intend to use the e-mail facility in iAutoFocus to send emails to your customers, vendors and insurance companies, you
will need to fill in the SMTP Server and Reply-to Address
fields. These fields allow you to specify your outgoing mail
server and the default email address all messages will be
stamped with. If you are unsure of your mail settings, contact
your e-mail provider or NewEra Technical Support for additional
information.
When checked, the Use estimating system RO#s option causes
iAutoFocus to use the RO Number assigned by the estimating
NewEra Confidential
16
G e t t i n g
S t a r t e d
w i t h
i A u t o F o c u s
system when importing estimates. If you have only one estimating system, or if you manually enter your repair order numbers in your estimating system, you should check this box. Otherwise, iAutoFocus will override the estimating system’s repair
order number with an auto-incrementing invoice number set
from the invoice setup screen.
The Generate Supplements in PM option will allow the user to
generate supplements right from the Parts Management section
of iAutoFocus. Warning: Choosing this option will cause the
original estimate to vary . It is suggested that the user use the
estimating system to create the supplement and re-import the
estimate back into iAutoFocus.
The Work Order Locking option will allow the users to be notified if another user is already viewing/editing a workorder.
Since only the last user’s changes will be saved, this is an important feature to turn on to ensure you are saving the most
up-to-date information.
The Password Protect Closed RO’s option will require users to
enter a password to access any workorders that have been
marked as closed and billed by your accounting system. Once
this item is checked, you will be prompted for a password. Use
the “Mngr.” button to the right of this option to manage or remove any locks prohibiting you from doing necessary work on
the workorder. E.g. if a user is in a workorder and leaves for the
evening without closing it and another user needs to make
changes, an administrator might justify removing a lock on that
workorder. Other reasons might be for a power failure, or system re-boot.
The Promote Techs by Hours Flagged option will allow you to
view who the Primary technician is on a job in the reports section of iAutoFocus. When you assign a work order to the technicians, iAutoFocus will track how many hours each technician has
flagged on that job and list the one with the most hours as the
“Primary” technician for the job.
The Combine Estimate Totals option causes iAutoFocus to import all supplements as original estimates. This option is most
useful when you are first importing your work-in-progress from
your estimating system. After you have imported all of your
work-in-progress, you should clear this option so that iAutoFocus can properly track supplement versus original estimate
amounts. However, if you never want iAutoFocus to track sup-
NewEra Confidential
17
G e t t i n g
S t a r t e d
w i t h
i A u t o F o c u s
plement versus estimate lines, you may leave this field checked.
Note that estimate versus supplement totals in iAutoFocus will
not be correct unless the file is imported into iAutoFocus before
a supplement or additional supplements are created.
The Use Responsibility option causes iAutoFocus to import information about betterments, appearance allowances, and unrelated and related prior damage as a payment note on the work
order screen. Anything that will affect the amount of the deductible will show here when this option is checked.
The Close RO with Unpaid Labor option will affect what happens when you mark a job as billed and send to accounting.
Checking this option will allow you to indicate Yes, I want to
Close the RO with Unpaid Labor or leave it unchecked to indicate
No, I do not want to be able to close the workorder until all the
Labor has been recorded and paid.
The Protect Work Order Fields option, when checked, will retain the customer information and address fields in iAutoFocus
and any changes made in the estimating system (i.e. to a name
or phone number) will not overwrite what is in iAutoFocus if reimported into the system. E.g. This is helpful if a field was left
blank in the estimating system (like a customer’s phone number) and then an iAutoFocus User updates the phone number.
The Place Notes Cursor option allows the user to choose “start”
or “end” depending on whether they prefer to add the newest
notes to a work order at the beginning of the note field or newest notes and the end.
The Locked Billed Invoices on or Before date field. This is
relatively the same option as Password Protect RO’s option
above (you can only choose one or the other) but this option allows the user to determine a date by which work orders on or
before that time cannot be accessed without entering the correct password; also set up here.
The Accounting System Export Format option should be left at
the default position, unless directed otherwise by NewEra Software technical support department.
Enter your shop’s address information on the Primary and Secondary Address tabs. Note that Secondary Address was created
for companies with a mailing address that was different from
their physical address. However many shops are required to in-
NewEra Confidential
18
G e t t i n g
S t a r t e d
w i t h
i A u t o F o c u s
clude EPA and BAR numbers as part of their address. If you wish
to do this then you will need to enter your address into the Secondary Address section and your EPA and BAR number into the
primary address lines so that it appears correctly on your printouts.
Disclaimers to be printed at the bottom of your Estimates,
Workorders, Invoices, Purchase Orders, and Reports can be
modified on the Disclaimers tab as shown below. E.g. On estimates, some collision center owners choose to add a disclaimer
such as, “This is only an Estimate and does not cover additional
parts and labor that maybe discovered later.”
iAutoFocus Version 8 Company Information General Tab
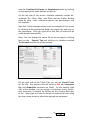
Security Screen
The security screen allows you to create users, and set access
rights for that user. By default, there will be two or three users
already set up for you; admin, sa, and webview (if you use our
online communication software).
NewEra Confidential
19
G e t t i n g
S t a r t e d
w i t h
i A u t o F o c u s
iAutoFocus Version 8 Security Screen
The Security screen is divided into two parts: The top half shows
a list of users in the iAutoFocus system; the bottom half shows
the privileges assigned to the user currently selected in the list
at the top.
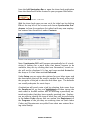
Click on Create New User and enter a user ID such as Rob, full
name such as Robert Smith, and password (setting the password
to the same as the user Id is helpful) as shown in the screen below. Use Delete User to delete users.
iAutoFocus Version 8 Security/Create New User Screen
Clicking Change Password allows you to change the user’s
password. Clear Privileges clears all privileges set for the currently selected user. Lastly, Set Defaults will reset the user’s
privileges to only allow them to View and Add Contacts, Payments, Estimates, Work Orders, and Invoices. Individual privileges are explained in detail in the bulleted list below.
Note: The first 5 options in the list is really a Yes or No option.
If you choose “View” for Admin, Management Setup, Import/
NewEra Confidential
20
G e t t i n g
S t a r t e d
w i t h
i A u t o F o c u s
Export, Management Reports, or Production reports, the user
will have the rights to perform those functions. The rest of the
list beginning with “Payments”, you will select whether the user
will have permissions to view, print, add, modify, and or delete
for each item listed. More information follows:
•
•
•
•
•
•
•
•
•
The Admin privilege, for which you can only select the
View option (which in this case means Yes), gives the user
Administrative privileges; they will be able to add, change
or delete anything in the system and can access all setup
parameters.
The Management Setup privilege allows the user access to
the setup wizard, enabling them to modify all setup information. To turn this permission on for the user, click
“View” (Yes).
The Import/Export privilege allows users to import estimates from your estimating system(s). Only the View (Yes)
option can be selected for this privilege.
The Management Reports privilege allows a user to print
out reports associated with shop management, such as
labor and payroll information. Only the View (Yes) option
can be selected for this privilege.
The Production Reports privilege allows a user to print
documents directly associated with a work order. The Invoice, Parts Worksheet, Estimate and Supplement Reports
are all examples of Production Reports. Only the View
(Yes) option can be selected for this privilege.
The Payments privilege allows a user to view, print, add,
change or delete payments as specified by the options
chosen.
The Profile (Contacts) privilege allows a user to add,
change or delete contacts as specified by the options chosen.
The Estimate, Work Order, and Invoice privileges allow a
user to view, print, add, change, or delete Pending Work
(Estimates), Work in Progress (Work Orders), and Completed Work (Invoices) as specified by the options chosen.
The Labor and Parts privileges handled the same way.
NewEra Confidential
21
G e t t i n g
S t a r t e d
w i t h
i A u t o F o c u s
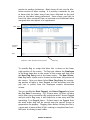
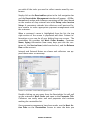
General Ledger Codes Screen
The General Ledger Codes screen allows you to define general
ledger codes used for tracking your income accounts and sales
tax rates.
iAutoFocus Version 8 General Ledger Code Setup Screen
When you first open the General Ledger Codes screen, it will be
populated with a default list of more than 20 codes. It is
strongly recommended that you do not remove items from the
default list, as iAutoFocus uses the default list for importing estimates from your estimating system. If you need to add additional codes, add them to the end of the list of default codes
where the code and description fields are blank.
At this time, you should go through the list of General Ledger
Codes and enter your labor rates for the various labor codes and
the tax rate charged for each code. You generally only enter a
labor rate for anything with the word “Labor” in the description.
This is your standard advertised labor rate and will show on all
your forms. Note: This can be changed manually for special
jobs if need be.
After entering each labor or tax rate, press the down arrow on
your keyboard to save the changes. Be certain to put a sales tax
rate on any code name that starts with Taxable regardless of
whether tax in your area is calculated on that income type. The
labor rates entered are used when hand-writing an estimate in
iAutoFocus, and will not override the rate(s) you have set up in
your estimating system.
NewEra Confidential
22
G e t t i n g
S t a r t e d
w i t h
i A u t o F o c u s
It is recommended that under the QuickBooks Income Name (QB
Income Name) column, you combine Rows such as Taxable Parts
and Non taxable Parts and call them both “Parts” in that column.
Do the same for Taxable Sublet and Non Taxable Sublet and
change the QB Income Name to be Sublet for both. Taxable
Other and Non-Taxable Other can both be renamed “Other” in
the QB Income Name Column. The next column is reserved for
Quick Books Cost of Goods Sold (COGS) Name. E.g. If your parts
name in QuickBooks cost of goods sold is called Parts Costs,
enter that here.
The column heading Labor is used to distinguish which income
accounts are available for your use in labor costing and payroll
to technicians. Just change them to No or Yes to indicate appropriately.
The Export Accounts tab, pictured below, allows you to set the
name of your state’s tax agency for export to Intuit’s QuickBooks™ accounting software. Users will complete any necessary
fields (most will default appropriately). The only field that gerenally needs to be edited by the user is the “Sales Tax Agency”
field to be the name of the Sales Tax Agency in your state.
The “Class” checkbox will allow you to export every category in
iAutoFocus as a different income class in QuickBooks. Additionally, the blank field below that option allows multiple shop
users to separate shops income by a name given here… generally the name of the city or the street this particular shop is located on.
The industry standard Default (and recommended format) for
the field QB Export Format is “Last Name, First Name.
Export Vendor Bills as Items is not commonly used but allows
you to get detail information into QuickBooks.
Load Factors: If the user clicks the “Enable” checkbox when an
estimate is imported, iAutoFocus will take your determined
percentage of the entire estimates labor and move it and into
another category of your choosing. E.g. Some shops need to allocate a certain portion of Labor for Car Detail. In that scenario,
the user will click on Enable, Name the Line Item Description as
“Car Detail” and type in the desired percentage in the Percent
field. The user would then need to choose the proper Taxable
and/or Non-taxable GL code based on whether Labor is taxable
in your state.
NewEra Confidential
23
G e t t i n g
S t a r t e d
w i t h
i A u t o F o c u s
Clicking on the Export to QB button will create a standard
QuickBooks™ import file containing a list of accounts to be
added to the QuickBooks™ chart of accounts. Import this file
using QuickBooks™ if you plan on using the QuickBooks™ export functionality of iAutoFocus Version 8.
iAutoFocus Version 8 General Ledger Code/ Export Accounts Screen
File Locations Screen
The File Locations screen allows you to specify where various
files used by iAutoFocus, such as Estimating systems, QuickBooks™ exports, and Paint System files, can be found.
To add a new file location, choose the file type from the drop
down list at the top, then type the fully-qualified path, or
browse to the location where these files are located using the
ellipse (…) button at the right of the location column. To delete
a File Location, click the gray box to the left of the file type description, then press the Delete key on your keyboard. Click
okay when you are done with this screen to close it.
NewEra Confidential
24
G e t t i n g
S t a r t e d
w i t h
i A u t o F o c u s
iAutoFocus Version 8 Security/File Locations Screen
Note: This path must match the path set in the application you
wish to interface with and you might need to contact that software provider in locating where to set that path in their application. It must have the option to export in the CIECA
2.01standard. For support, contact NewEra at 877-447-4707.
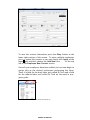
Invoice Setup Screen
The Invoice Setup screen allows you to control how invoices are
handled in iAutoFocus.
iAutoFocus Invoice Setup Screen
The first field controls how long before open invoices appear in
the receivables management screen. Allows you to track how
much a customer owes you and it will show on a calendar ##
many days after the car leaves. The default is 10 days but can
be changed according to your shop needs.
NewEra Confidential
25
G e t t i n g
S t a r t e d
w i t h
i A u t o F o c u s
The Last Work Order Number field controls how Work Orders are
numbered in iAutoFocus. If you did not select the ‘Use Estimating System RO Number’ option on the Company Information
screen, iAutoFocus will use the next available Work Order Number after this number when authorizing a new Work Order. Most
shops using this field will enter 10000 as the first number. If
you do not designate a starting number, iAutoFocus will use
number 1.
The BM and PM Profit Percent fields allow you to specify the default profit percentage your shop receives on Body Materials and
Paint Materials, respectively. It is not necessary to fill either of
these fields.
The GST % and Local Sales Tax Heading fields are only enabled
in the Canadian release of iAutoFocus.
Tax Adjustment Limits and Adjustment Limit require iAutoFocus
to notify you anytime an adjustment over the entered amount
occurs. When iAutoFocus imports from the estimating system, if
it can’t calculate the totals correctly, it will place the difference
into an adjustment. This will help the user to determine why the
totals differ and will not allow you to close the file unless the
adjustment amount is less than the dollar amount entered here.
To disregard any amounts entered into the Adjustment fields,
check the “Close with Adjustments” option.
Locate Mismatched Parts During Import allows the user if you
have received a part on a workorder and the part number
changed from the time of the import or wasn’t correct. Once
you re-import that estimate and now that part number is located, it can match up those mismatches. A box will appear and
ask the user if this is the part they are looking for? Yes or No.
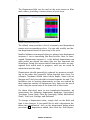
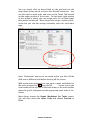
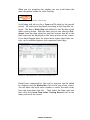
Departments Screen
The Department Setup screen allows you to specify departments
for classifying work orders within your shop in order of the work
flow. Individual departments can be set up for both physical locations within your shop, such as Teardown, Refinishing, and
Storage, and for vehicle states, such as Completed, Delivered
and Total Loss.
NewEra Confidential
26
G e t t i n g
S t a r t e d
w i t h
i A u t o F o c u s
The Department field can be used on the main screen to filter
work orders, providing a clearer picture of your shop.
iAutoFocus Department Setup Screen
The default setup provides a list of commonly used department
names and corresponding colors. You can add, modify, and delete departments based on your shop’s life cycle.
NewEra Software recommends that you always have department
sequence 1 set to something like New Arrivals, New, or Unassigned. Department sequence 1 is the default department new
work orders are placed into when they are first imported into
iAutoFocus. Doing this insures that all new work orders are segregated from actual work in progress, until you are ready to
move them into the shop.
Departments should generally be ordered by sequence according to the order they generally follow through your shop. For
example, Teardown should come before Repair. Items such as
Storage and Totals loss should be located towards the end. This
facilitates ease in locating departments as they are ordered by
their sequence number in department lists. Items can be put in
order using the arrow icons at the lower left of the screen.
For shops that don’t want to over complicate themselves, we
recommend the following department headings: Unassigned,
Teardown, Frame, Body, Paint, Re-Assembly, Sublet, Mechanical,
Detail, Total Loss, Storage, and Delivered.
To change a department name, simply click on the field and
type in the changes. If you would like to add a department between two departments, click on the department below where
you want your department added, then click the ‘Add Depart-
NewEra Confidential
27
G e t t i n g
S t a r t e d
w i t h
i A u t o F o c u s
ment’
icon and change the name accordingly. To change
the position or sequence of a department, click on the department and use the ‘Arrow’
icons to
move the department up or down to your desired location. To
completely remove a department, highlight the department and
click on the ‘Delete’
icon.
Note: Once you have appropriately set up your departments,
keep in mind that any changes will affect all current jobs. It is
recommended that you never delete sequence number 1 or the
last department in your list. Deleting those sequences can
cause jobs to be moved into the wrong department. To prevent
this from happening, use the method in the following example:
If you need to delete the first sequence, we recommend instead
that you change the name of sequence 1 to match sequence 2
and then delete sequence 2.
The columns entitled ‘Mail to Customer’ and ‘Mail to Insurance’
will allow you to browse your letter files (created in the Letters &
Labels section under Management on the left navigation pane in
iAutoFocus) by clicking in the appropriate field and select specific letters to be automatically emailed to customers or insurance companies when the cars change departments.
The Foreground and Background color columns have already
been defaulted for you. These colors will help identify what departments the cars are in. Although not recommended, colors
can be changed by clicking on the appropriate field and selecting the colors of your choice.
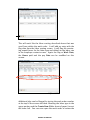
PO Setup (Purchase Orders) Screen
The PO Setup screen allows you to specify how Purchase Orders
are numbered in the iAutoFocus system.
NewEra Confidential
28
G e t t i n g
S t a r t e d
w i t h
i A u t o F o c u s
iAutoFocus PO Management Setup Screen
The first panel of options allows you to define a standard prefix
applied for Purchase Orders. The options allow the PO Number
to either be prefixed with the first three letters of the Vendor’s
name, or to be prefixed with a set of predetermined letters,
such as the initials of your shop.
The second panel allows you to control how the main PO number is generated. You can either choose sequential PO Numbers,
or to use the Work Order Number as the PO Number. When using the Work Order Number as the PO Number, iAutoFocus will
automatically append a -1, -2, e.g. as needed when there is
more than one PO. The default is to Use the Workorder Number
as the PO number and is also the recommended format.
AutoComplete/AutoSave Screen
The AutoComplete/Auto-Save Settings screen allows you to
modify various lookup lists used by iAutoFocus, as well as to set
whether iAutoFocus will automatically store new entries in these
lists.
NewEra Confidential
29
G e t t i n g
S t a r t e d
w i t h
i A u t o F o c u s
iAutoFocus AutoComplete/AutoSave Screen
The Enable Auto-Complete option sets iAutoFocus to automatically complete your entries as you type them where these
lists are used.
The Enable AutoSave option instructs iAutoFocus to save new
entries that do not exist in the various lists. Once you have been
using iAutoFocus for awhile and you have a good clean list to
work from, it is suggested to turn AutoSave ‘off’ to prohibit users from adding unnecessarily to the list and to only use the
available options.
The following lists are tracked in iAutoFocus:
Status – A list of codes used to categorize Work Orders. This
field is frequently used to track customer-service related statuses (e.g., In Progress, Needs Parts, Needs Supplement, Needs
Authorization, Needs Rental, etc.) Generally, if everything is going well with the work order, the vehicle might not have any
status at all. However, feel free to use this field however you see
fit in iAutoFocus.
Category – This field is often used to track the referral type of a
Work Order, such as which insurance agent assigned the job,
customer-pay job, walk-ins, advertising, customer referrals, etc.
It is also useful to separate your insurance work by Assignment
versus walk-in or other method. However, feel free to use this
field however you see fit in iAutoFocus.
NewEra Confidential
30
G e t t i n g
S t a r t e d
w i t h
i A u t o F o c u s
Progress – This list contains pre-defined statuses used to indicate the progress of a Work Order in a specific Department.
This list is used in conjunction with the list of Departments created on the Department Setup screen. It is commonly filled with
items such as Not Started, In Progress, Completed, and Awaiting
Parts. Progress can also be used to track sublet items such as
Electrical, Detail, Mechanical, Pin striping, or PDR.
Description – This list contains line item descriptions entered
on the Line Item screen. Generally, it is best to leave this list
empty, turn on AutoSave, and allow lines to be saved from the
Line Item screen as they are typed.
Operation – This list contains operations performed on a line,
(e.g, Repair, Remove or R&I). If you type your own estimates into
iAutoFocus it is beneficial to fill this list with common Operations.
Payment Method – This shows the payment types accepted at
your place of business such as Cash, Check, MasterCard, Visa,
etc.
Assignments – This area is for assigning different tasks to employees on specific work orders. Tasks commonly used are Paper Work, Thank You, Clean-up, Detail, and the like.
Sales Rep – The primary sales rep or estimator for a Work Order. If you import estimates from an estimating system, this
field is automatically populated for you, otherwise, you should
fill it with a list of Service Reps/Estimators in your shop.
Job Type – This category determines what size the job is.
Common descriptions in this section are Tow In, Small, Medium,
Heavy, and Total Loss.
Returned Parts – This section allows the user to add to a list of
already determined reasons for returning parts within Parts
Management. The permanent list already created by NewEra
(shown below) cannot be changed however, this features allows
the user the flexibility to add more based on shop needs.
NewEra Confidential
31
G e t t i n g
S t a r t e d
w i t h
i A u t o F o c u s
iAutoFocus Returned Parts Reasons
Zip Codes Screen
The Zip Code screen allows you to add, edit or modify the list of
zip codes in iAutoFocus. By pre-defining the list of zip-codes,
you insure that Cities and States are spelled correctly, as well as
reducing the amount of information that needs to be typed
when entering a work order, customer or vendor in iAutoFocus.
Whether a zip code exists in this list or not does not affect your
ability to enter it into iAutoFocus.
iAutoFocus Zip Codes Screen
If your shop generally services vehicles from a small number of
zip codes, you may wish to pre-define the list of cities, states
and zip codes here.
If there are many zip codes in your area, you may prefer to enable the Remember New Zip Codes. This will instruct iAutoFocus to remember all City, State and Zip code combinations entered.
To enter a new zip code, simply click in the first field, enter the
information, and click ‘Okay’.
NewEra Confidential
32
G e t t i n g
S t a r t e d
w i t h
i A u t o F o c u s
User-Defined Fields Screen
iAutoFocus has already completed this part of the setup for you.
The User-Defined Fields screen has two tabs: 1) Profile Fields 2)
Service Item Fields. This screen allows you to set custom titles
for various pieces of information on the Contact screen.
iAutoFocus User-Defined Fields Screen
Note: If you are using CIECA, you must use these defaults!
It is not necessary to modify these labels unless you are installing a customized version of the iAutoFocus. If changes are made
accidentally, click reset defaults to populate these labels on the
‘Profile Fields’ tab and do the same on the tab called ‘Service
Item Fields’ then click OK to exit.
Also on the Profile tab are Grid Tracking Symbols. You will see a
circle, a rectangle, and a triangle. Each of those shapes can either be red (Needs to be Done), Blue (Being Done), or Green
(Completed). These fields can be changed however generally
these are used to track sublet items such as alignments, glass
installations, and other.
NewEra Confidential
33
G e t t i n g
S t a r t e d
w i t h
i A u t o F o c u s
Import Translation Screen
The Import Translation screen allows you to setup translations
which will move a Line Item from one income account to another.
iAutoFocus Import Translation Screen
To add a new item to translate, scroll to the end of the list and
look for an empty field. Click in the field and enter the words
you want iAutoFocus to search for. Using the wildcard symbol
“%”either before or after your description will ask the system to
search for items that contain your description before or after
other words.
In the ‘Convert to Code’ column, use the following format to tell
iAutoFocus how to translate line items: Line number you want to
covert from, followed by the GL Code, followed by the line number you want to covert to.
The line descriptions are as follows:
Line 1 refers to Parts: Parts, Sublet, Towing, Materials
Line 2 refers to Labor: All labor except for refinish labor such as;
Body, Frame, Mechanical, Detail, etc.
Line 3 refers to Refinish Labor: Refinish/Paint Labor Time
Example 1: Corrosion% 1PM1 tells iAutoFocus to take information from the Parts Line with the word Corrosion and anything
after that word, give it a code of PM for Paint Materials, and
keep it on Line 1.
NewEra Confidential
34
G e t t i n g
S t a r t e d
w i t h
i A u t o F o c u s
Example 2: Car Cover/Refinish Jams 2RL3. If car covers are generally part of your paint department but the insurance company
placed it under body labor, you can request iAutoFocus look for
Car Cover/Refinish Jam on line 2 for Labor, give it a code of RL
for Refinish Labor, and move it to Line 3 for Refinish Time.
Example 3: %Hazardous Waste% 1EPC1 will look for anything on
Line 1 for Parts with the words Hazardous Waste in them, give it
the GL Code of EPC, and leave it on the Parts line.
Example 4: Towing% 1TW1. This format searches for the word
Towing on Line 1 for Parts, gives it a separate GL tracking code
of TW for Towing, and leaves it on Line 1. You could use this if
an insurance company will only pay for towing when coded as a
Taxable Otherwise and instruct iAutoFocus to recode towing
into a separate Towing account so that you can track towing
charges in your accounting system.
Commonly translated items include: Hazardous Waste, Corrosion Protection, Towing, and Car Cover.
The checkbox at the bottom of the screen entitled ‘Include Part
Type in Translation’ will double check and run import translation of the part types as well. This allows you to take things
such as repair or new parts and move them to codes specific for
your shop.
If you have multiple shops and have your Import Translation already set up at one location, you can also use the ‘Export’ key to
export the information to a file, and then open up the second
location and use the Import key to import the file. This will save
time and ensure consistency between shops.
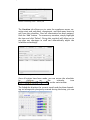
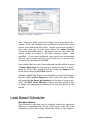
Scheduling Screen
The Scheduling Screen has four tabs and is used to determine
Load Hours, Work Weeks, Holidays, and Vacations. Portions of
the four tabs are shown below.
The First tab for Load Hours allows you to enter how many
hours of productivity you have available in different departments
of your shop. In the first field for Body Load, you just take the
number of body technicians you have and multiply that by the
number of productive hours per day. In the example above,
there are 4 technicians and each work 7 productive hours per
NewEra Confidential
35
G e t t i n g
S t a r t e d
w i t h
i A u t o F o c u s
day. 4 multiplied by 7 equals 28 body load hours per day. The
system then calculates a weekly total of 140 body load hours
available per week. You would do the same for Refinish Load
and then enter how many cars per week your shop can handle in
Car Load.
The scheduling threshold allows you to enter the percent (in increments of 10) at which you want to be notified you are approaching your preferred load capacity. The percent you enter
here will cause the scheduler to turn “green” at that level. Other
colors in the scheduler are blue (low capacity) and red (approaching maximum capacity).
Once you have entered the appropriate information, you can
then decide whether to use the checkboxes or not to have the
scheduler calculate recommended scheduled IN and OUT dates
based on hours available and capacity.
iAutoFocus Scheduling – Load Hours Screen
The Work Week is defined by clicking on the typical days you
are open (shown below) and then entering how many hours you
want factored into your daily job flow, whether or not you want
refinish hours included in the job flow, how many months of
scheduler history you want to retain, and how many months into
the future you want available.
iAutoFocus Scheduling Screen - Work Week Tab
The Holiday tab allows you to set up holidays by simply entering the name of the holiday, the date, the number of hours and
then click ‘Add’.
NewEra Confidential
36
G e t t i n g
S t a r t e d
w i t h
i A u t o F o c u s
iAutoFocus Scheduling Screen - Holiday Tab
The Vacation tab allows you to enter the employees name, vacation start and end dates, department, and how many hours to
pull from the scheduler. Once all information has been entered,
click the ‘Add’ button. To remove any vacation, simply highlight
the item and click ‘Delete’. Doing this regularly will allow you to
pre-plan any shortages in staff and automatically adjust the
scheduler accordingly.
iAutoFocus Scheduling Screen – Vacation Tab
Once all entries have been made, you can access the scheduler
by
clicking
on
the
calendar
icon
on the main toolbar.
The Scheduler displays the current month and day then depending on information previously entered during the setup, you can
view past or future months.
NewEra Confidential
37
G e t t i n g
S t a r t e d
w i t h
i A u t o F o c u s
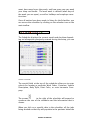
iAutoFocus Scheduler
The search fields at the top of the scheduler allow you to enter
criteria for locating a particular Work Order, Customer, Vehicle
Description, Body Style, Paint Color, or even Insurance Company.
The arrows
to the right of the scheduler will expand or
condense the size of the scheduler and the information that is
shown.
When you click on a specific date in the scheduler, all the jobs
being worked on that day will populate in the portions below the
calendar indicating the job information and hours associated
with that date.
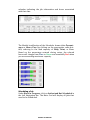
iAutoFocus Scheduler – Lower Portions
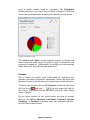
The Weekly Load Section of the Scheduler shows either Percentages or Hours/Cars referring to the load capacity of Body, Paint,
or Cars. Based on the percentage entered during setup, the colored boxes will change from blue to green and eventually red
when you are approaching maximum capacity.
NewEra Confidential
38
G e t t i n g
S t a r t e d
w i t h
i A u t o F o c u s
iAutoFocus Scheduler – Weekly Load Portion
NewEra Confidential
39
iAutoFocus Overview
This Section will help provide an overview of iAutoFocus screens
and options. Reviewing this information will provide a solid base
from which to build on. When you are ready for more detailed
information, please refer to the “Using iAutoFocus” and “Using
iAutoFocus Advance Features” sections of this manual.
Left Navigation Bar Overview
Along the left hand side of the iAutoFocus screen is the navigation bar, which allows you to interact with the various functions
of the program. This section provides a brief overview of the
underlined headings on the left navigation bar.
The Left Navigation Bar is separated into 9 color coded groups
with sub-groups: Blue headings are for all your jobs and estimates (Pending Work, Work in Progress and Completed Work).
Green headings are reserved for management functions (Reports, Parts Management, Labor Management, Management, and
Contacts). The Red heading is solely for importing and exporting from iAutoFocus (Utilities).
To the left of most sub-groups, you will notice a number that
corresponds with the number of files or items located in that
section. This feature gives you an idea of what is in a section
without even clicking on it.
When you first import a estimate into iAutoFocus, depending on
the options chosen, the file will be located in either Not Authorized, All Work in Progress, or All Completed Work. Once you locate the file, changes you make to it will cause it to automatically move to different sub-groups under the Blue sections on
the Left Navigation Bar.
E.g. when a file is located in All Work in Progress, adding a
Scheduled In date will cause it to move to Future Arrivals or
Arriving Today. From those sub-groups, when you change or
add information, you will notice the file moving to other appropriate sub-groups.
Remember the first three Blue groups, Pending Work, Work in
Progress, and Completed Work, allow you to work with the jobs
H o w
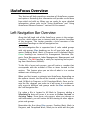
t o
U s e
i A u t o F o c u s
41
and estimates in your shop. Those types of files will always be
located there.
Pending Work
Click on Not Authorized on the navigation bar to view pending
work. Pending work is any estimate that has been written or assigned to your shop by an insurance company or adjuster, but
has not yet been authorized by you. Until the estimate is
authorized by you, it will not receive a work order number.
Work In Progress
This is where files that have been authorized but have not yet
been delivered are displayed. Work in Progress is separated into
numerous areas for your convenience in working with the files
but ALL work in progress is always displayed when you click on
the All Work in Progress heading on the left navigation bar.
Other dates on the actual work order that move work in progress into subsections are: Scheduled In, Rental Start, Work
Started, Work Completed, and Scheduled Out. Scheduled In and
Out dates are recommended that you use. Rental Start, Work
Started, and Work Completed are optional dates for your convenience and do not have to be used in the system.
•
•
•
•
•
•
•
All Work In Progress - These files have been assigned a
work order number and have an authorized date set and
do not have a Delivered date on the record.
Authorized not Scheduled – These files have been authorized but do not have a Scheduled In date.
Future Arrivals – Once a file have been given a Scheduled
In date for greater than today’s date, they will be found
here.
Arriving Today – Any file with a Scheduled In today
matching today’s date will be located here.
Missed Arrivals – If a file passes its Scheduled In date
without an Arrival date being entered, the file will have
missed its arrival date and will be located here.
Arrived – Once a file has been given an Arrival date, it will
be found here.
Rentals Out – Once a date has been selected in the Rent
Start date, files will be in this category.
NewEra Confidential
H o w
t o
U s e
i A u t o F o c u s
•
•
•
•
•
42
Work Started – Once actual work begins on a vehicle, users will select a Work Start date and files will be located
here.
Work Completed – Once all work has been completed on a
file, users will select a Work Completed date and files will
move here.
Future Deliveries – Once a file has been given a Scheduled
Out date later than today’s date, it will show here.
Delivering Today – If a file’s Schedule Out date matches
today’s date, it will show here.
Past Due Deliveries – Any file where the Scheduled Out
date has passed and Delivered date have not been entered (must open the
workorder, click on ‘Date Info’ radio button in the top right section of the work order,
check on the Delivered Box which is defaulted to today’s
date, and click Okay)..
Completed Work
These are all the files that have been completed or have a Work
Completed date on the file.
•
•
•
•
All Completed Work – Displays job that have been completed by selected a Work Completed date. All the files
located in this section have also been separated into additional areas for your convenience.
Delivered Not Billed - Files that have been marked as Delivered (in the Date Info section of the work order) but
have not been marked as Billed (also in the Date Info section of the work order).
Billed Invoices - Files that have been marked as Billed but
have a balance owing in the Bal. Due column will be displayed here.
Closed Invoices - Files that have been Billed and Bal. Due
Column shows 0.00 (or paid in full) will be in this section.
Note: Until the file is marked as Billed it will not display in any
of your financial reports. You would want to mark a file as Billed
when you have finalized the sales price of the work done regardless of where or not it is paid.
NewEra Confidential
H o w
t o
U s e
i A u t o F o c u s
43
Reports
This section provides a wealth of information using the data in
iAutoFocus! Simply click on the heading System Reports. Doing
so will bring up a window with numerous categories of reports
(shown below).
iAutoFocus System Reports Screen
The plus signs to the left of each report category will expand
when clicked and provide a list of reports available for that
category (shown below).
iAutoFocus System Reports Screen
Choosing the desired report will populate the right side of the
reports screen with options and filters to fine-tune your report.
Once you have completed your options, you can then Preview,
Export, or Print your report.
NewEra recommends you spend some time in the System Reports Screen to familiarize yourself with the many report options and incorporate ones most fitting to your shop strategy.
NewEra Confidential
H o w
t o
U s e
i A u t o F o c u s
44
iAutoFocus System Reports Screen
Parts Management
The Parts Management section of the Left Navigation Bar is reserved for all functions regarding parts. This is where you
maintain Purchase Orders, Vendor Invoices, inventory, and
Returns. You can easily view parts that need to be ordered in
Order Parts, see parts that have already been ordered in All
Parts Ordered, and all parts that arrived in All Parts In. More
detailed information on how to use Parts Management is provided later in this document.
Labor Management
Labor Costing provides an area to assign employees to jobs,
flag hours, and keep track of payroll. Additionally, the Time
Clock feature is provided for employees to track time on jobs,
break and lunch time, vacation and holidays. More information
on how to use Labor Costing and the Time Clock is provided
later in this document.
Management
The Management heading on the Left Navigation Bar provides
three options to choose from. The Receivables heading provides a management screen with all current and aging receivables. Using this screen provides you with all the tools you
NewEra Confidential
H o w
t o
U s e
i A u t o F o c u s
45
need to collect monies owed by customers. The Dashboard
heading displays a pie chart for your Work in Progress. Different
charts can be displayed by changing the options on the screen.
iAutoFocus Dashboard Screen
The Letters and Labels screen displays options to design and
store commonly used letters to email or mail to customers and
insurance companies. Additionally, the ability to print envelope
labels help keep you efficient and organized.
Contacts
This is where you would enter information for repetitive use.
Vendors, Insurance Companies, Employees, Dealer Accounts and
Business Contacts are the types of contacts you would add here.
To add a new contact click on All Contacts on the left side then
click on the Add New icon
on the upper left side of
the screen. The picture for the Add New icon looks like a blank
sheet of paper.
On the upper portion of the screen select the type of contact
that you are adding (Business, Individual, Insurance, Vendor,
Employee, or Personal) and then enter the pertinent information for that contact record.
NewEra Confidential
H o w
t o
U s e
i A u t o F o c u s
46
iAutoFocus New Contact Screen
Note: When entering vendors you will notice an account info
icon towards the right of the screen below the id number where
you can enter account terms used when exporting to accounting
interfaces before clicking on the account info tab you will need
to save the contact record by clicking on apply at the lower
right.
When entering an employee there is a display field which defaults to the first name but you can choose to make that the initials or employee id # if you would prefer. This field is used for
displaying the technician on the main grid and the work in progress reports.
When you have completed entering information for the contact
record press Apply at the lower right to save or Okay at the
lower right to save and exit or the Add new icon on this screen
at the upper left to save and add another contact of the same
type.
Utilities
The Utilities heading list two options to choose from: Import
and Export. You will use The Import function to import estimate
into iAutoFocus Collision Management Software from any estimating software you currently use.
Note: Importing estimates in iAutoFocus is discussed in greater
detail in the Importing Estimates section of this manual.
NewEra Confidential
H o w
t o
U s e
i A u t o F o c u s
47
iAutoFocus Import Screen
Exporting data from iAutoFocus into QuickBooks is handled by
clicking on the Export option.
Note: Exporting to QuickBooks is discussed in greater detail in
the QuickBooks section of this manual.
iAutoFocus Export Screen
NewEra Confidential
H o w
t o
U s e
i A u t o F o c u s
48
Using iAutoFocus
This Section will help you get started in using iAutoFocus for
managing jobs in your shop. It covers the basic steps you will
need for accomplishing necessary tasks on a day-to-day basis.
Once you are familiar with the functions described in this section, it will be easier to pick up on the advanced features of
iAutoFocus.
Launching iAutoFocus
You can start iAutoFocus Version 8 by either double-clicking on
the iAutoFocus icon on the desktop,
or by clicking on iAutoFocus on your program menu.
You will be prompted to enter a user name and password, as
pictured below.
NewEra Confidential
H o w
t o
U s e
i A u t o F o c u s
49
iAutoFocus Version 8 Login Screen.
After entering your username and password, click on ‘Okay’ to
login to iAutoFocus. Please note that username’s and passwords
are NOT case-sensitive.
Importing Estimates
With iAutoFocus open there is a tool bar menu on the left side.
The items are color coded in sections and if you scroll down and
locate the “red” utilities section you will find options that deal
with organizing, importing, and exporting data files. You can
click on Import to find EMS files that have been exported from
an estimating system.
Remember that you will not be able to import a file until you
have successfully set up your File Locations (as explained in the
iAutoFocus Setup section of this document) and exported an
EMS file from an estimating system using the CIECA standard.
It is also useful to note that up along the top toolbar in the program is an icon that looks the same as this icon on the left toolbar. That means you could also click that icon on the top toolbar
to import estimates without having to scroll down the left toolbar.
To Import Estimates:
Click Import Estimates,
authorize any estimates,
Click on Import.
Note: Before importing
Discard any unwanted
NewEra Confidential
H o w
t o
U s e
i A u t o F o c u s
50
iAutoFocus Main Grid
When the import screen opens it should automatically locate any
available estimates to import. If you do not see any estimates
listed for import but feel like you have exported a file you can
use browse to the drive and correct folder using the window located at the left center of the Estimate Import screen. If you are
successful in finding an estimate this way then you will need to
determine why your file locations window does not correctly find
the files needed.
iAutoFocus Import Estimate Screen
Once you have correctly identified files to import you may click
on Import at the lower right to begin importing estimates. Some
new customers will discover hundreds of import files that have
been created over years of using their estimating system when
first viewing the import screen. You will want to choose Purge
files rather than import otherwise you will import many unnecessary files that will need to be deleted one by one later. Purge
NewEra Confidential
H o w
t o
U s e
i A u t o F o c u s
51
files will delete the file to be imported without importing it into
the system. It will not delete the file from the estimating system.
It will only delete the EMS Export file that had been created.
Another option on this screen is a check the box located on the
left side of the file to be imported titled Skip. This will make it
so when checked the estimate will be skipped and not imported
into the system. It will remain available to import when you return to the estimate import screen. You are not able to highlight
a single line to import. When you click import it will import all
estimates listed with the exception of items marked skip.
You also have the option to manually type the work order number to an estimate on this screen. If you do not already see a
work order number on the estimate but know that you have assigned one in the estimating system then go back and check the
option in Setup, Company Information, Use Estimating System
RO#s, and then open the Estimate Import window again.
If a Supplement exists on an estimate, the Sup Exist Checkbox
will be checked
Also if you have a file that you want to import directly into Work
in Progress rather than into Pending Work, make sure that the
Authorized Check at the end of the line is checked before clicking import. When you have clicked import it will import the file
or files into the system.
Possible Errors
If when importing the file, iAutoFocus is not able to correctly
match the total sent in the file you will receive an informative
message indicating this to you. You might receive this message
if you have not correctly set your sales tax rates and taxable
items in Setup, General Ledger Codes.
You might also receive this message if the taxable calculation in
iAutoFocus does not match that from the Estimating System. It
is wise when receiving this message to write down the total the
file should be then you will be able to open the file and determine where the discrepancy is and know when you have corrected the problem.
When you receive this informative message you might note that
you need to click OK to continue and in some cases your mouse
NewEra Confidential
H o w
t o
U s e
i A u t o F o c u s
52
pointer might still look like it is busy, but that is not the case
and you can click OK once you have read the message to continue with Importing Estimates.
Close the Estimate Import Screen by clicking Exit located at the
lower right and then locate the file you have imported in the appropriate place either Pending Work or Work in Progress. Items
imported with the Authorized box checked will go into Work in
Progress and items imported without the box checked will be
imported into Pending Work.
It is important to note that if you have any problems importing
estimates or having your numbers balance; this is usually an indication of not having a correct setup in either iAutoFocus or
your estimating system. Due to the complex nature of importing
estimates and the need to have the files balance, you might
need to be in contact with Technical Support until you have
achieved a proper setup, and are aware of any known anomalies
in the import process.
Work In Progress
File Search
When you import a file into iAutoFocus, the file will be located in
one of three places: Not Authorized (no auth date), All Work in
Progress (have an authorized date), or All Completed Work
(have an Authorized date AND a Delivered Date).
If you are unable to locate a particular file in one of those 3
places, you can use the Search box on the iAutoFocus toolbar to
assist you. To locate a file and using the search feature, click on
either Not Authorized, All Work in Progress, or All Completed
Work from the Left Navigation Bar. Then type a key word into
the Search box on the toolbar at the top of the screen (shown
below).
iAutoFocus Search Field
E.g. Users could enter a word like “chev”. iAutoFocus will search
for files that include the letters “chev” in the file such as Chevy
or Chevrolet. Users could also enter letters such as “Will”. iAut-
NewEra Confidential
H o w
t o
U s e
i A u t o F o c u s
53
oFocus will search for first and last names that begin with those
letters and return files such as William, Williams, or Willy.
You can also look for a specific word order number by clicking
on either Not Authorized, All Work in Progress, or All Completed
Work from the Left Navigation Bar. Then enter a work order
number in the Search box and iAutoFocus will return results
based on that number.
If you do not know which department the work order is in, you
can type the work order number in the WO # Field. iAutoFocus
will search the entire database for that number and return any
matching results.
iAutoFocus Search Fields and Filters
To refine a search, you can use Date and/or Department filters
on the toolbar below the search box.
iAutoFocus Search Fields and Filters
By choosing a From and To date on the Date Filter, you can narrow your search of a file based on the Authorized dates. Additionally, if you have an idea of where your file might be in relation to your shop’s life-cycle, you can narrow the search by the
department it is in. Simply choose appropriate departments
from the From and a To pick lists in the Department Filter and
iAutoFocus will return results of based only on those departments the ones between.
Custom View
Define multiple views for different users or circumstances by
going to View… Current View….Define Views… type in a name
and save view under that name. Thereafter, when headings and
columns are rearranged you simply have to go to View … Current View and Update Current View, to save changes. A view
defined for Work In Progress does not apply to Completed work
or Billed Invoices. Each can have a unique arrangement.
NewEra Confidential
H o w
t o
U s e
i A u t o F o c u s
54
Headings can re rearranged by dragging
and dropping the column heading where you
want. To save changes,
click on View, Current
View, and Update Cur-
iAutoFocus Main Grid – Custom Views
Work Order
When you double-click on a file in iAutoFocus, another window
will pop-up and display the work order. The work order is separated into five sections by tabs along the top: General, Insurance, Line Items, Totals, and Payments.
General Tab
The customer information and vehicle information has already
been populated from the estimate. You can enter more information or edit fields such as email addresses and phone numbers. On the top-right of the screen, the work order Tracking
Info section, you can use the Category drop-down to select or
enter how this job was referred to your shop. You can also
NewEra Confidential
H o w
t o
U s e
i A u t o F o c u s
55
change the Status, Department, Service Rep, or Progress (related to the Department) of the job right from this screen.
iAutoFocus Work Order Screen – General Tab
The colored boxes help you identify where the vehicle is currently in relation to the dates you entered on the Date Info section defined below.
If you click on the Date Info radio button, important dates will
appear allowing you to check-off and modify crucial information
relating to this estimate/job only.
iAutoFocus Work Order Screen – General Tab – Date Info Radio Button
Of all these dates, there are only a few that are critical to the use
of iAutoFocus: 1) The Authorized date indicates the day that the
estimate is turned into a job or work in progress. Without an
authorized check or a date in that file, it will not be part of your
Work In Progress group on the left navigation bar.
2) Once a file is marked Delivered it is moved out of your Work
in Progress screen and goes to the All Completed Work.
3) Once a file has been marked Billed, it is moved onto the financial statements and the sales records for iAutoFocus.
NewEra Confidential
H o w
t o
U s e
i A u t o F o c u s
56
The other fields, Scheduled In, Arrived at Shop, Rental Start,
Work Started, Work Completed, and Scheduled Out, are recommended and very handy in keeping your jobs organized
however, will not affect where the file is located in iAutoFocus.
The Note & Options field at the bottom of the General Tab is
for adding comments about the job to the file which can be customized base on who is reviewing them.
Insert Time Stamp – Will insert the ID of the person entering the
note, the date, and the time.
Internal - Internal notes for only the shop to see.
External - Comments placed here will print on all the reports
that the customer will see.
Options - Imports vehicle options from the estimate (such as Intermittent Wipers, Tinted Glass, Body Side Moldings, Clear Coat
Paint, Power Brakes, etc.) which may assist you in making notes
however this button will not allow any other comments to be
added.
WebView Customer - Will post comments to your web for the
customer to track site if you have our WebView feature.
WebView Insurance - Will post comments to your website for the
insurance companies to track jobs.
To add a note, the user would click on the type of comment (Internal, External, etc.) then click on Insert Time Stamp, type the
necessary comments, and click Okay.
E.g.
Heather – 5/1/2010 – 3:34PM Parts have been ordered.
Insurance Tab
To access the insurance information, click on the Insurance Tab
at the top of the Work Order screen. Most of the information
will already be populated from the estimate but can be changed
or updated. The screen is split into four sections: Insurance
Company Information, Adjuster Information, Insurance
Company, and Insured Information.
NewEra Confidential
H o w
t o
U s e
i A u t o F o c u s
57
iAutoFocus Work Order Screen – Insurance Tab
Note: Sometimes what comes across from the estimate may not
match the insurance contacts you have on file. Most users like
to keep Insurance Company Information consistent and can
do so by double-clicking on the Profile # field and allow you to
select an insurance company contact from the list provided in
Insurance Contacts.
Note: In the Insurance Company section, the customer’s deductible is listed. If any changes need to be made, you can do
so by clicking in the deductible field and changing the amount
accordingly.
Line Items Tab
To access the Line Items screen, open a Work Order and click on
the Line Items Tab at the top of the screen. Here you are able to
see the repair of the estimate including descriptions, part numbers, price, labor and refinish times, etc. You are also able to
see if a supplement exists by looking for a check mark in the
Sup column. If an Adjustment was made that was imported (for
more information see Import Translation) into iAutoFocus, you
will see a checkmark in the Adj column.
If you double click on any part, you will be able to drill down on
specific information about that part: who you ordered it from,
the price you paid, estimate price, and supplement price, quantities, part, labor, and refinish times.
NewEra Confidential
H o w
t o
U s e
i A u t o F o c u s
58
You can use the toolbar at the bottom of the line items screen
to add or modify line items on this workorder.
iAutoFocus Work Order Screen – Line Items Tab Toolbar
The first icon
will add a new line, the yellow folder
will
allow you to open the highlighted line item (same as doubleclicking on a line item), and the red X
will delete the highlighted line item. 123
allows you to re-number line items.
E.g. If you click the first icon to Add a new line item, it will
automatically add the item to the end of the list. If want to
move that item, you can double click on the line item, change
the number in the Line field to the correct number, close the
line item, and click the 123 icon. This will resort the list by
number placing your new line item where it should be.
iAutoFocus Work Order Screen – Line Items Tab
Two additional buttons appear on the bottom of the line items
screen near the center of the page. One is an alternate route to
Parts Management (also
accessible by right-clicking on a
work order and choosing Parts Management of clicking on Parts
Management directly from the left navigation bar) and the
other, Print Labels, provides a handy tool for printing different
types of parts labels to help keep track of your part inventory.
Totals Tab
The Totals screen is accessed by opening any work order and
clicking on the Totals Tab at the top of the screen. You can
NewEra Confidential
H o w
t o
U s e
i A u t o F o c u s
59
view the Combined, Estimate, or Supplement totals by clicking
on the appropriate radio buttons at the top.
On the left side of the screen, available subtotals include descriptions for: Labor, Parts, and Other and are further broken
down by units, rates, subtotal amounts, tax percentages, and
tax amounts.
Rate and Tax Percentage columns can be changed in this screen
by clicking in the appropriate fields and typing the new rate or
tax percentage. Once you click off of that line, all totals will be
recalculated automatically.
Note: You can change the entire file to tax exempt by clicking
back on the General Tab and clicking on checkbox entitled
Tax Exempt and the top of the window.
iAutoFocus Work Order Screen – Totals Tab
On the right side of the Totals Tab, you can see Grand Totals
for the file. Any balance due will show in Red and Insurance
Pay and Deductible amounts are listed. On the bottom right
side of the window, you can assign a technician (and a Secondary technician if needed) by clicking on the Primary filed next
to the labor type you want to assign a technician for and using
the drop-down arrow to select the appropriate employee.
NewEra Confidential
H o w
t o
U s e
i A u t o F o c u s
60
Payments Tab
To access the Payments screen, open any work order and click
on the Payments Tab at the top of the window. Here you can
view, add, and delete payments for the work order.
To add a payment, click on the New Payment icon
at the bottom of the window. The Date field will default to today’s date but can be changed if necessary. Use the drop-down
arrow in the Method field to choose the appropriate type of
payment (previously determined in your Setup). Enter any pertinent comments in the Note field such as check number and the
type of check (insurance or customer), then enter the amount in
the Amount field. Once you are finished with the payment, click
the Save icon
and the payment will save and the
Balance Due field will be re-calculated.
To delete a payment, click on the payment to be deleted and
then click the
Delete Payment Icon
. Once again,
Balance Due will be re-calculated.
To edit a payment: simply click on the payment, make the desired changes, and click the Save icon. If necessary, the Balance
Due field will re-calculate.
iAutoFocus Work Order Screen - Payment Tab
Preview & Print
Many forms and printouts are available from the workorder for
your use. To access those forms, open any workorder and use
the icons at the top of the window. The icons associated with
NewEra Confidential
H o w
t o
U s e
i A u t o F o c u s
61
forms and printouts are the Printer Icon
, and the RR (Report Righter) Icon
.
, the Preview Icon
iAutoFocus Work Order Screen - Print and Preview Icons
Under the Preview Icon, you have many general report options
(these are original reports created by our users since inception
and kept here for everyone’s use):
•
•
•
•
•
•
•
•
•
•
•
Estimate
Work Order
Invoice Details
Invoice Totals
o
Combine Totals
Parts Worksheet
Repair Worksheet
o
Without Totals
Internal Notes
Supplement
Invoice Cost Analysis
iAutoFocus Print and Preview
Parts Status Report
Invoice Cost Analysis Summary
To use, simply place a checkmark in the report you wish you
generate, click the Process icon, and then review or Print as
necessary.
Note: If you choose the Printer icon directly from the work order,
the same options will show however, when you click Process, the
report will go directly to the printer without being previewed.
The RR icon displays numerous reported added since our original ones were created. Selecting one of these reports will provide a description of the report at the bottom left of the screen
and provide any necessary options to the right. Users can
choose to print, preview, or export to a .pdf.
This box provides a
list of useful reports.
This box changes
to reveal options
based on the selected report.
NewEra Confidential
H o w
t o
U s e
i A u t o F o c u s
62
This box provides
a description of
the selected report.
iAutoFocus RR Screen
Images & Documents
From any work order, you can utilize the quick links to View
Images or View Documents related to your file. To attach images, click on the Show Images link. This will open up your
browser to the location your images are being stored for this
file. Once there, you can copy and paste, drag, or move pictures
from wherever you keep your camera’s photos into the browser.
Now that those pictures have been associated with this file, any
time you open up this work order and click on View Images,
those pictures will show.
Note: If you are using the WebView feature, you can drag photos
into the WebView folder then update comments on your company’s website by using the Update WebView link and check
box. For more information, contact NewEra directly at 877447-4707.
iAutoFocus Work Order Screen - Show Images and Show Documents
Show Documents work in a similar fashion. Simply scan and/or
save any documents here that you want to keep with this file.
Work Order – Right Click Options
From the Main Grid, you can Right-Click (using the button on
the right side of your mouse) on any work order revealing a
shortcut to any options within
iAutoFocus.
To use the shortcut menu, highlight the desired work order,
then right click using your mouse. When the menu appears, use
your mouse to select the desired shortcut.
NewEra Confidential
H o w
t o
U s e
i A u t o F o c u s
•
•
•
•
•
•
•
•
•
•
•
•
•
•
•
63
Enter Payments – to enter payments
Parts Management – to order parts
Print Part Labels – to print part labels
Labor Allocation/Costing – to assign technicians to the
job and flags
Assignments – to assign specific technicians to specific
tasks
Notes – to modify all notes types on the file
Purchase Orders – to open Parts Management or existing
Purchase Orders
Vendor Invoices – to open Parts Management or existing
Vendor Invoices
Scheduler – to the load based scheduler
Refresh Grid – refreshes page
Field Chooser – provides options to add or remove column
headings on the grid for easier viewing
Print Reports – same as printer icon on the toolbar
Preview Reports – same as preview icon on the toolbar
Print Grid – prints the grid currently being viewed
Preview Grid – puts the grid in a preview screen
iAutoFocus Main Grid – Right Click Shortcut Menu
Parts Management
In this section you will learn how to order parts, record vendor
invoices, enter parts costs, price discrepancies, process returns,
NewEra Confidential
H o w
t o
U s e
i A u t o F o c u s
64
account for miscellaneous costs, and print parts labels while using your IAutoFocus collision management software.
Purchase Orders
Parts Management can be accessed from two different areas in
IAutoFocus. The first way is to highlight any work order on the
main screen, right click to access the quick menu, and then
choose Parts Management.
iAutoFocus Right Click Parts Management
The second way is to double click on any work order, click on
the “line Items” tab, and then click on the Parts Management
button at the bottom of that screen.
iAutoFocus –Line Items Screen - Parts Management Button
NewEra Confidential
H o w
t o
U s e
i A u t o F o c u s
65
Once Parts Management is open, you can change the order in
which the columns are shown by clicking and dragging the column heading to the preferred location. Further, you can click
any column heading and the list will sort in order by that heading. Click the heading again, and the list will sort in reverse order.
Only
iAutoFocus - Parts Management Screen
The “Show Parts Only” checkbox at the bottom of the screen
will display only line items for the work order that have a charge
on the part line which includes all parts, sublet, or material
charges.
At the top of the screen you can use the Current View Radio
Buttons to toggle between the work order Line Items, Purchase
Orders, Vendor Invoices, Miscellaneous Costs, and Returns.
iAutoFocus - Parts Management Screen – Current View Radio Buttons
On the right side of the screen you can access many functions
for the processing of parts.
The first step is to select the parts that need to be ordered from
a particular vendor. The easiest way to accomplish this is to
click on the Part Type column heading to sort your list then select each part needing to be ordered by that vendor. To select
NewEra Confidential
H o w
t o
U s e
i A u t o F o c u s
66
individual items, click on the first part, then hold down the Ctrl
key while selecting any other part in the list. To select a group
of items, click on the first part in the list, hold the Shift key and
then click on the last part in that group.
Once your parts are highlighted, the second step is to click the
“Order Parts” option on the right side of the screen. A sub
menu will appear allowing you to choose a “Preferred Vendor”
or “Any Vendor” list. When first using the system you will
choose the vendor from the “Any Vendor list but as you establish vendors for a particular vehicle type, the preferred vendor
list will be populated making the selection easier.
iAutoFocus - Parts Management Screen – Order Parts From a Preferred Vendor
Note: To edit your vendor lists, access the “Vendors” section
under “Contacts on the left navigation pane of the main screen.
TIP: If your vendor list is long and you are looking for a vendor
that begins with the letter “S”, we recommend that you type the
next letter of the alphabet in the Search box (which in this case
is “T”) which will move the cursor down to the first item begin
with a “T”. All vendors beginning with “S” will be shown above
the cursor and therefore more visible to you.
Once you select the vendor from either list you are taken into a
New Purchase Order with the previously selected parts prepopulated in the form.
NewEra Confidential
H o w
t o
U s e
i A u t o F o c u s
67
iAutoFocus – New Purchase Order Screen
Note: The purchase order number is determined by your choice
in the initial setup screen, under File, Setup, and Purchase Order
Setup. Most shops use the work order number as the purchase
order number. To differentiate between orders and avoid confusion, your second purchase order created for the same job will
have a “-1” at the end. The third purchase order for the same
job will be appended with a “-2” and so forth.
On the Purchase Order screen, the “Attention” and “Due” fields
are populated from the vendor profile but can be modified here
if necessary.
The “Shop Contact” box is a free-form notes area and whatever
is typed in that box is remembered and brought into each subsequent purchase order. This is useful for entering comments
that you want attached to each purchase order.
The “Delivery Remarks” and the “Purchase Order Remarks”
are additional note fields however; comments typed here are for
this purchase order only.
Additional short comments for a specific line can be added by
clicking on the desired line item and entering the information in
the “Notes” column.
For the last step, if you are finished, you can click “Okay” at the
bottom right of BOTH the Purchase Order Screen AND then the
Parts Management Screen to save your changes.
NewEra Confidential
H o w
t o
U s e
i A u t o F o c u s
68
If you are not finished, at the bottom left you can click on “Add
Line” which will allow you to choose additional lines that might
have been missed from the work order and need to be added to
this purchase order.
Lines can be removed from a purchase order by clicking on the
Arrow indicator on the left side of any line (shown below). This
will highlight the entire line. You can now press the Delete key
on your keyboard and the line will be removed from this purchase order. You will now be able to order it from a different
vendor at a later time.
iAutoFocus – New Purchase Order Screen – Ordered Lines Close-up
The “Print PO” button at the bottom of the screen will show you
a preview of what will be sent to the printer. You can change
the printer location by clicking the Page Setup icon to the left of
the printer icon. You can print the purchase order by clicking
the Printer icon. Once the purchase order is printed you can
close the print preview window by clicking on the “X” at the top
right of the screen or the “X” to the right of the printer icon.
You can also email the purchase order by clicking the “Email
PO” button at the bottom of the screen. If you have not entered
an email address in the vendor profile you will be prompted for
an email address.
Note: If this function is not working then you need to enter an
SMTP server in the initial setup screen of company information.
(File/Setup/Company Information) If you do not know your
SMTP server, or do not have one, then type (mail.1and1.com) in
that box. You can also enter a default reply to address for purchase orders in this same setup screen. We have found that
when sending a purchase order to a vendor it is sometimes
helpful to use the semi-colon“;” after the vendor’s email address
then enter your own email address and that way a copy is sent
to your email system as well.
As a reminder, at the bottom right of the purchase order you
can click Okay to save and close the purchase order. If you
press Cancel, the purchase order will be discarded. When you
click Okay on the Purchase Order Screen you will be returned
NewEra Confidential
H o w
t o
U s e
i A u t o F o c u s
69
the Parts Management Screen where you still have to click Apply
or Okay to close Parts Management and save the purchase order. If you Cancel out of Parts Management, all entries entered
will be discarded.
Once the purchase order is created you can now see that the
lines are changed from “RED” to “YELLOW” indicating that they
have been ordered.
You can now repeat these steps until all parts have been ordered. Parts that are received internally are usually left in a not
ordered state until the job is closed.
Note: This works if the parts that are left are not listed with an
income account of “TP, NP, TS, or NS”. If they are listed with any
of those income accounts we recommend that you use import
translation to translate those parts to another materials income
account. For more information, please review information on
Import Translation.
Another way to handle internal parts is to highlight all the additional parts and receive them into a vendor invoice for your own
shop name. We recommend that you use the work order number as the invoice number. This way the system will know that
all parts have been ordered and will automatically change the
Parts Status from “Not Ordered” to “Ordered” on the work in
progress grid and in the parts management tracking module.
Receiving Parts
Receiving parts is very similar to ordering parts. You can receive parts by clicking on the parts that have arrived but instead
of clicking order parts on the right side of the screen, you click
“Receive Parts” instead.
iAutoFocus – Parts Management – Receive Parts
NewEra Confidential
H o w
t o
U s e
i A u t o F o c u s
70
Note: You cannot select parts that have been ordered from different vendors and try to receive them. However, it is not necessary that the part be ordered in IAutoFocus prior to receiving
it. For new users, you can start by just receiving parts and as
you begin to get new jobs in the system, you can then create
purchase orders in advance of receiving parts. If a part is not on
the estimate that is being received, we recommend that you add
the part to the estimate BEFORE recording the vendor invoice.
However, if a part was received that was never order and is not
needed, or a miscellaneous charge is on the invoice for core
charges or shipping you do not need to add these lines to the
estimate (the entries would just cancel each other out).
If a purchase order was created prior to the vendor invoice being received the easiest method of receiving the parts is to click
on the purchase order radio button at the top of the Parts Management screen and then expanding the appropriate purchase
order by clicking on the “+” sign to the left of the purchase order. You can now select any parts that have been received from
the lines on the purchase order by clicking and holding either
your Ctrl or Shift key and then click Receive Parts on the right
side of the screen.
Click on the +
sign to expand
your purchase
orders
iAutoFocus - Parts Management Screen – Purchase Order View
To avoid repeating steps, we have found that it is easier to select ALL ordered parts that could be on the vendor invoice and
choose Receive Parts. Then, on the next screen (Vendor Invoice Screen), add costs to the lines received, and delete lines
that are not on the vendor’s invoice.
NewEra Confidential
H o w
t o
U s e
i A u t o F o c u s
71
Note: To receive parts that have not yet been ordered, you will
be prompted to select the vendor before displaying the vendor
invoice screen.
On the Vendor Invoice Screen you will enter the vendor Invoice
# and the vendor Invoice Date. If a Profit % is entered in the
vendor profile setup then the cost information is already calculated based upon the list amount of the part. If you enter a
Profit % and press TAB then the cost amount is calculated for
each part based upon the list amount.
iAutoFocus – Vendor Invoice Screen – Edit Vendor Invoice
Whether you choose to do it this way or to manually enter the
costs on each line, the choice is up to you. To do it manually,
you will go through the lines and find them on the actual paper
vendor invoice, modify the list amount if necessary and enter
the cost amount of the part.
It is easier to use the up and down arrow keys than clicking on
each line and then entering the part cost. Once you have been
through the IAutoFocus vendor invoice and entered all the costs
you should verify the invoice amount matches with your vendor
invoice in hand. If you have any parts that have a cost amount
of “0” you will now remove those lines from the vendor invoice
by clicking on the arrow on the left side of the line so that the
entire line is highlighted and then pressing the delete button on
the keyboard.
NewEra Confidential
H o w
t o
U s e
i A u t o F o c u s
72
An easy way to do this is to sort by the cost amount by clicking
on the (List Amount or Ex Cost) cost amount column header and
then you can click the first line with a cost of “0” and press the
delete button until all the lines are removed that don’t have a
cost associated with them that don’t belong on this vendor invoice.
Note: In the original Setup there is an option under Company
Information to Automatically Generate Supplements in PM
(Parts Management). If you have this option selected then the
line item amount will be changed and a supplement will be created for all parts price increases. Most shops do not have this
option selected as they typically will go back to the estimating
system and process their supplements there and then transfer
the file back into the management system. For more information, contact NewEra at 877-447-4707 about Supplements.
In the Vendor Invoice Screen there are some options on the
right side. The Add Line from WO (Work Order) will allow you
select additional lines that might have been missed when originally selecting the lines for the vendor invoice. If you do not see
the line you are looking for it is because it either does not exist
on the estimate, it has been received on another vendor invoice,
or it is has been ordered from a different vendor. If the part was
received on a prior invoice and then was returned it will be
available again to select or if it was removed off the purchase
order for the incorrect vendor then it will be available again to
select.
iAutoFocus – Vendor Invoice Screen – Edit Vendor Invoice
The Add New Line option is not one that is recommended for
the typical collision repair center as it will actually add a line to
the estimate. Therefore, if you are using an estimate system, it
will no longer match the estimate that was created. We recommend that the line be added to the estimating system first, reimport the estimate, then select it from the Add Fine from WO
option. Lines that are marked red indicate that they are or-
NewEra Confidential
H o w
t o
U s e
i A u t o F o c u s
73
phaned from the charges on the estimate either because they
were deleted from the estimate or the part number was changed
in a way that the system no longer recognizes it as the same
part.
The Backorder Line option will remove it from the vendor invoice and update the status of the part to being back ordered.
Note: The part must actually be ordered in the system first before the “Backorder Parts” option will be available to click on.
The Return Line option will move the part to the return management section where its actual Return Date and Credit from
the vendor can be tracked. When you click on Return Line, a
list of commonly used reasons indicating why a part is returned
are shown such as; not used, damaged, not needed, etc. for why
a part is returned can be edited or added to If you want to add
to the list of part return reasons this can be done in the initial
setup screen (File/Setup/AutoComplete AutoSave/Returned
Parts section.
iAutoFocus – Vendor Invoice Screen – Return Reasons
The Add Other Cost option is used for adding a cost to the
vendor invoice that will not be passed on to the customer. This
is used for entering such things as core charges, shipping
charges, tax on vendor invoices, parts damaged by the shop, or
parts that were received that were never ordered and need to be
returned. Additionally if a part was damaged by the vendor and
they will be issuing a credit amount you will subtract the
amount of the credit from the cost on the part line then add a
miscellaneous cost line for the amount of the credit you will receive and then you can Return the Other Cost line to track receipt of the credit.
The Convert Other Cost option is not recommended for normal
use, but when selected along with parts matching will move an
NewEra Confidential
H o w
t o
U s e
i A u t o F o c u s
74
item from Other Costs to the Line Items section of the vendor
invoice.
Once you have used all the appropriate options on this screen
and the vendor invoice is entered click Okay at the bottom right
to save the invoice and return to the Parts Management screen.
The Cancel option will discard all changes or entries made in
the vendor invoice. Don’t forget that on the Parts Management
screen you need to click Apply or Okay to save all changes
made within Parts Management. The Cancel option will discard
all entries made regardless of whether you clicked Okay on the
vendor invoice screen. Note: Fortunately, if you click cancel, you
will receive a popup asking you if you want to save changes.
Click “Yes” if you want your changes saved.
Views
Along the top of the Parts Management screen you can track the
Line Items on the estimate, the Purchase Orders created, the
Vendor Invoices entered,
Miscellaneous Costs entered, and
parts marked for Return.
iAutoFocus - Parts Management Screen – Current View Radio Buttons
If a part is listed in Miscellaneous Costs and still needs to be
returned you can click on the part and choose the Return Misc.
Cost option on the right side of the screen. If you are on the
Line Items screen you can choose the option to Return a part
(the part must be in a “Received” status to do this).
Once a part has been marked as Returned the status reverts to
the prior state it was before the part was received regardless of
the reason you entered for the return. For instance, if you had
ordered the part from ABC vendor, Received the part, and then
marked the part as Returned with the reason NOT NEEDED, the
part is still going to be listed as Ordered from ABC Vendor. You
will need to reselect that line and then click on the Remove
Parts option on the right side to remove it from the Purchase
Order. It will be returned to the state of Not Ordered. This is
important if the part will be deleted from the estimating system
and then re-imported into the management system. If the part
is no longer part of the estimate and you still have it marked as
NewEra Confidential
H o w
t o
U s e
i A u t o F o c u s
75
Ordered or Received, the import system will leave the charge
for the part and add an adjustment line to the bottom of the
import screen. This is designed to help prevent you from paying for a part that is not being billed to the customer.
On the Line Item section of Parts Management there are additional features on the right side of the screen.
iAutoFocus - Parts Management Screen – Line Items View
If a part status shows “Ordered” you can select the line and
choose Print PO’s from the menu on the right side of the screen
to print the purchase order associated with that line.
Another one of these features is the Part Status Report showing which parts have been ordered, which parts have been received, which parts are on back order and which parts have not
yet been ordered just for this work order.
The next option from the menu on the right side of the screen is
Parts Variance Report. When closing a job it is important to
view the parts variance report and make sure that all supplements have been processed correctly. You can also click on the
Misc Costs view at the top of the Parts Management to make
sure that all Misc. costs have been returned or understand why
they are being paid for by the shop, as well as the Returns view
at the top to make sure that all parts marked returned have
been sent back to the vendor for credit.
Part Labels can also be printed from the menu. Printing parts
labels after a purchase order is generated it a great way to tag
parts as they arrive and make sure that all parts are being handled properly and associated with the appropriate work order.
The last option, Show Documents, allows access to any
scanned documents stored with the work order. Scanning ven-
NewEra Confidential
H o w
t o
U s e
i A u t o F o c u s
76
dor invoices into your system and storing them in the documents folder will help you more efficiently track your parts, and
allow more people access to the archived information long after
the vendor invoice has moved to accounts payable for processing payments.
Although, tracking returns and credits is typically done using
the Returns option under Parts Management on the main management grid, you can track them in the “Return” Screen as well.
If you select the Returns view radio button at the top of Parts
Management there are new options on the right side of the
screen.
iAutoFocus - Parts Management Screen – Return View
The first one is to Mark [a part as] Returned. It will put Today’s
date on the returned date of the selected line. The next option
is to Mark Credited which also enters today’s date into the
Credited column indicating a credit has been received from the
vendor.
Note: The Add Manual Item is currently grayed-out and not
functional in this version but is an new enhancement coming
which will allow the user to manually add a returned item in this
screen.
The last option is Delete Item. Deleting a part from the returns
screen will put it back onto the vendor invoice it came from and
remove the part from needing to be returned.
NewEra Confidential
H o w
t o
U s e
i A u t o F o c u s
77
Labor Management
Labor Costing
The first step in costing labor within iAutoFocus is to set up new
employees and their pay rates. Scroll down on the left navigation toolbar to Employees under the Contacts Section.
iAutoFocus – Left Navigation Bar – Contacts
To add a new employee, choose the New Contact Icon at the
top left of the screen in the icon toolbar.
iAutoFocus – Main Grid - New Contact Icon
Enter the employee information as described on the screen. The
necessary fields to enter are the employee’s Last Name, First
Name, and the Display As fields. The default for the Display
As is the employee’s first name but that can be modified should
you have 2 employees with the same first name or if an employee uses a nickname that you are more familiar with.
To enter the employee’s pay rate press the F8 function key on
your keyboard while on the Employee New Contact Screen.
You can enter a flat rate or a commission % by following the
number with a % symbol. If you will be using the time clock and
want added security for the technician an employee pin number
can be entered by pressing the F9 function key on your keyboard. This will prevent other employees from tampering with
their time entries.
NewEra Confidential
H o w
t o
U s e
i A u t o F o c u s
78
iAutoFocus – New Contact Screen
To save the contact information press the Okay button at the
lower right portion of the screen. To enter multiple employees
you can repeat this process or you can simply click Apply at the
lower right and then choose the Add New icon
at the top
left of the Employee New Contact screen.
Once all your employees have been added, you can now begin to
assign jobs to the desired technicians performing the labor.
There is a field for the body labor tech called BL Tech and a field
for the refinish labor tech called RL Tech on the work in progress grids.
iAutoFocus – Main Grid – BL Tech and RL Tech Close-up
NewEra Confidential
H o w
t o
U s e
i A u t o F o c u s
79
You can simply click on those fields on the grid and use the
drop down arrow search to select the desired technician. You
can also open a work order and move to the Totals Tab located
on the upper portion of the screen. On the lower right portion
of the screen is where you can assign techs for all labor types
that pertain to that job. Most shops only assign a primary technician but you can also assign secondary techs for each labor
type.
iAutoFocus – Work Order – Totals Tab
Note: Technicians’ names are not saved unless you click off the
field onto a different field before moving off the screen.
With a technician assigned you can print a repair worksheet for
the techs assigned by choosing the RR
report icon in the
icon toolbar at the top left of the work order or the main toolbar
when the grid is displayed and the appropriate work order is selected.
Most shops choose the Repair Worksheet for Techs report.
You will then select the Labor Code and choose Preview or
Print.
NewEra Confidential
H o w
t o
U s e
i A u t o F o c u s
80
iAutoFocus – RR Report Icon – Repair Worksheet for Techs
Note: This report will only print if you have assigned a technician to the labor type selected. If you do not assign a technician
to the labor in advance then you will print a Repair Worksheet
and not the Repair Worksheet by Tech Report.
Labor costing or flagging can be accomplished in two ways. You
can flag labor as the job is closing or you can flag labor from a
worksheet that the technician provides prior to pay day. If you
are closing the job and want to flag the labor you can click on
the Labor Allocation/Flagging icon (depicts a person working
under a hood of a vehicle) at the lower toolbar of the Line Items
screen.
iAutoFocus – Work Order – Line Items Screen – Labor Allocation/Flagging Icon
Or you can choose Labor Allocation/Costing with the right
click from the selected work order on the grid.
iAutoFocus – Main Grid – Right Click Menu – Labor Allocation/Costing
The various labor types are listed in the upper portion of the
screen. The lower left portion of the screen is for shops that are
allocating a portion of that labor to one technician and another
NewEra Confidential
H o w
t o
U s e
i A u t o F o c u s
81
portion to another technician. Most shops do not use the allocation section of labor costing. It is merely a reminder for you
to know that the labor hours have been allocated to the tech
prior to the labor being performed. Some shops used this to
track the labor assigned from an estimate and additional labor
assigned after the import of a supplement.
Labor Types
Allocation
Section
Flagging
New
iAutoFocus –Labor Allocation/Costing Screen
New Flag
To actually flag or assign the labor this is done on the lower
right portion of the screen. To flag time choose the Employee
in the drop down box in the center of the screen and then click
the New Flag Entry icon at the lower center. The New Allocation flag looks similar and is located at the lower left portion of
the screen. Once you have clicked New Flag Entry the remaining portion of labor is then flagged to that technician and the
pay rate is pulled from the employee contact information
screen.
You can modify the Date Flagged, the Hours Flagged and even
the flag Rate if necessary. E.g. If there were 10 hours of labor
and a prior entry existed for the technician with 5 hours flagged
and you add a flag entry it will default to a new entry with the
remaining 5 un-flagged hours. If these hours are flagged from
the work order they will be carried onto the payroll screen in
preparation for payday. Flagging labor before closing the file is
a great way to ensure that all job-costing is completed and verified prior to closing a work order.
NewEra Confidential
H o w
t o
U s e
i A u t o F o c u s
82
When you are preparing for payday you can scroll down the
main navigation toolbar to Labor Costing.
iAutoFocus – Left Navigation Bar – Labor Costing
It will open and ask you for a From and To date for the payroll
period. All entries are displayed according to the flag date entered. The flag or Work Date will default to the To date of the
labor costing screen. With the dates set you can select an Employee from the drop-down list and their entries that fall in the
date range will be displayed on the lower portion of the screen.
If you have flagged labor for closed work orders then those entries can be matched against their requested labor flags.
iAutoFocus – Left Navigation Bar – Labor Costing (Employee Tab)
Partial hours requested for jobs still in progress can be added
by clicking onto the Workorders Tab at the top of the screen.
You will enter the work order number or select the work order
from the drop down tool bar. Then select the labor type and
then click the Create New Labor Costing Record icon at the
lower portion of the screen.
NewEra Confidential
H o w
t o
U s e
i A u t o F o c u s
83
iAutoFocus – Left Navigation Bar – Labor Costing (Workorders Tab)
This will work like the labor costing described above that was
used from within the work order. It will add an entry with the
flag date from the labor costing screen. It will flag the remaining unpaid hours for the labor type and default to the labor rate
in the employee contact screen. Again the flag or Work Date,
the Hours paid and the pay Rate can be modified on this
screen.
iAutoFocus –Workorders Tab – Create New Labor Costing Record
Additional jobs can be flagged by typing the work order number
at the top of the screen and then choosing the labor type in the
upper portion and the Create New (White sheet of paper) icon at
the lower left. You can even open the work order to review the
NewEra Confidential
H o w
t o
U s e
i A u t o F o c u s
84
file by clicking the Open Associated Work Order (yellow folder)
icon at the lower left. You can delete a flag entry by clicking the
Delete Selected Labor Costing Record (Red ‘X’) icon at the
lower left.
iAutoFocus –Workorders Tab – Toolbar Close-up
When all additional entries for requested pay have been made
you can click back to the employee tab and verify that the total
hours to pay match with the employee worksheet they have provided.
If your technician is being paid for a miscellaneous entry that is
not part of a work order inside iAutoFocus then the Add New
Miscellaneous icon can be clicked at the lower left to add an
entry for work performed on cars that were prior to the use of
IAutoFocus, for vacation time, or other miscellaneous pay items.
Some shops pay on a sliding scale and the pay rate for all entries can be modified on this screen depending on the hours
produced by clicking into the pay rate field.
iAutoFocus –Employee Tab – Create New Labor Miscellaneous Record
Once all the entries have been verified as being correct you can
click the Print icon to print a worksheet to provide back to the
technician. You can choose to have it include a summary of
time available for the work orders flagged or you can Exclude
NewEra Confidential
H o w
t o
U s e
i A u t o F o c u s
85
the Service Items from being displayed on the print out by
clicking on the checkbox. To protect your payroll entries that
have been verified from being modified or deleted we recommend that you click the Pay icon at the bottom right of the
screen. This will mark the Date Paid field with today’s date and
protect those entries.
Note: Should you need to change an entry that has been marked
paid you will need to have full labor privileges and you can select the employee that you want to modify then press the F10
function key then click on the date paid field of their time entries. You can now make the changes necessary. The information will automatically relock when you close the labor costing
screen.
Additional reports for labor costing can be found on the System
Reports from the main navigation tool bar and then open up the
Labor section of the report listing.
iAutoFocus –Left navigation Bar – System Reports
iAutoFocus –System Reports - Labor
The Employee Time Worksheet in this section is the same as
the worksheet that is found on the labor costing screen where
payroll was verified. The Labor Time Summary is an overview
of all entries for all employees for the payroll period. The Over/
NewEra Confidential
H o w
t o
U s e
i A u t o F o c u s
86
Under Flagged Labor reports are useful to verify that jobs have
not been closed with labor being overpaid or underpaid. The
Labor Allocation reports are used for you in preparation of
payroll if you have previously allocated labor to technicians. If
you do not allocate employee times then these reports are not
applicable to your shop.
With labor flagging complete the shops cost report for Completed Sales in the Financial section will display an accurate
picture of profit and costs of labor, as well as the Invoice Cost
Analysis report (accessed when you Right-Click on any particular work order and choose Print Reports).
iAutoFocus –System Reports –Financial
iAutoFocus –Right-Click from Work Order – Invoice Cost
Time Clock
(See Advanced Features)
Management
In this section you will learn simple management function which
will help you track Receivables, view production Dashboards,
and create Letters & Labels to help your shop run both smooth
and efficient.
Receivables
The Receivables heading provides a management screen with
all current and aging receivables. Using this screen provides
NewEra Confidential
H o w
t o
U s e
i A u t o F o c u s
87
you with all the tools you need to collect monies owed by customers.
Simply click on the Receivables option in the Left navigation bar
and the Receivables Management window will appear. All Delivered work orders with balances remaining will be listed based
on the number of days entered into initial Setup under Invoice
Setup. A convenient calendar lets collectors scroll past and future months to make appropriate payment arrangements with
the customer.
When a customer’s name is highlighted from the list, the top
right section of the screen is populated with their Contact Information so you can do all your dialing from one screen. The
receivables list provides the Work Order Number, Customer
Name, Aging information (how many days past due the customer is), the Service Item (vehicle worked on), and the Balance
Due on the account.
Internal and External Notes are shown and collectors can append these notes as necessary.
iAutoFocus –Receivables – Receivables Management Screen
Double-clicking on any name from the Receivables list will pull
up the customer’s Work Order and open to the Payments Tab.
Collectors can easily enter and save payments and continue
working the receivables list.
Once payment arrangements have been made, use the Next Action Date on the Receivables Screen to enter the date you
NewEra Confidential
H o w
t o
U s e
i A u t o F o c u s
88
would like to follow-up on that account again. E.g. If a customer states they are going to mail a check, you may want to set
the Next Action Date to 10 days in the future to follow up if the
payment has not been received. The account will then be removed from your list for 10 days.
iAutoFocus –Receivables Management Screen –Work Order – Payments Tab
Dashboard
The Dashboard heading displays pie charts for your Work in
Progress and Sales. Different charts and ratios can be displayed
and printed by changing the tabs and dropdown options on the
screen.
NewEra Confidential
H o w
t o
U s e
i A u t o F o c u s
89
iAutoFocus - Dashboard Screen – Work In Progress Tab
iAutoFocus - Dashboard Screen – Sales Tab
Letters & Labels
The Letters and Labels screen displays options to design and
store commonly used letters to email or mail to customers and
insurance companies. Additionally, the ability to print envelope
labels help keep you efficient and organized.
NewEra Confidential
H o w
t o
U s e
i A u t o F o c u s
90
From the Left Navigation Bar, Click Letters & Label and the Letters Screen will appear. On the left side of the window, you can
choose whether you want to work with Letters or Labels by selecting the appropriate radio button.
iAutoFocus - Letters Screen
To work with Letters, select the Letter radio button then choose
the letter type from the drop-down. Initially, you will need to
create any commonly used letters by clicking on the New Letter
icon (you can Edit any letter by selecting the letter from the list
and clicking on the yellow folder).
A window will appear asking you to name the letter you are creating with one word. Enter the name of the letter and click OK.
iAutoFocus - Letters Screen – New Letter
NewEra Confidential
H o w
t o
U s e
i A u t o F o c u s
91
A Rich Text File (.RTF) window will appear where you can type,
edit, and save your letter. Work Order-specific fields can be selected from the right side to personalize your letters.
Note: We recommend creating your letter in Microsoft Word or
another word processing program first. That way, you can
change font styles, colors, and complete a spell check prior to
copying and pasting your letter into the .RTF window.
Once your letter is finished, click Okay to save. In the main Letter Screen, choose the letter you just created from the dropdown.
Using the option in the From, Select, and Parameters boxes,
determine which customer you are sending the letter to.
•
•
From: In the From section, choose either Estimates,
Work Orders, Invoices (iAutoFocus will pull information
from Pending Work, Work In Progress and Completed
Work) or Profiles (iAutoFocus will pull information from
your Contacts section.
Select: Choose one or more boxes in this category. When
you select Estimates, Work Orders and Invoices in the
From section, your choices in this category will be Estimates (Pending Work), Work Orders (Work In Progress),
Invoices (Completed Work), or All of the Above. When
you choose Profiles in the From section, your choices will
be all your types of contacts; Individuals, Businesses,
Vendors, Insurance Companies, Employees, Personal,
All of the Above.
NewEra Confidential
H o w
t o
U s e
i A u t o F o c u s
•
92
Parameters: This section will only be listed when you
have selected the Estimates, Work Orders, Invoices radio
button. Here you will set parameters for your letter by entering a Begin Date and End Date and choosing the radio
button associated with those dates; Estimate Date,
Scheduled Out Date, Scheduled In Date, or Out Date.
iAutoFocus - Letters Screen – ThankYou Letter
Use the buttons at the bottom of the screen to tell iAutoFocus
what to do with the selected letter and list of recipients:
•
•
•
•
•
•
•
Select All: Selects all recipients to send the letter to (can
also use your Shift or Ctrl key on your keyboard to select
names).
Clear All: De-selects any names you have highlighted
from the list.
Bulk Email: If email addresses are on file, this button will
automatically send the selected letter via email to the recipients without previewing.
Email: If email addresses are on file, this button will bring
up a preview window of the email prior to sending. If no
email address exists, you will receive a pop-up to enter
the email address into.
Preview: Displays a replica of the selected letter with all
work order specific information populated. From here you
can save or print.
Print: Sends the letter to all selected recipients directly to
the printer.
Done: Closes the window.
NewEra Confidential
H o w
t o
U s e
i A u t o F o c u s
93
Labels are handled in a similar fashion but now instead of letters, you can print address labels for the same list of recipients.
At the top of the Letter Screen, click the Labels radio button. A
list of commonly sold labels is already loaded for you. Select
the desired label type from the drop-down.
iAutoFocus - Letters Screen – Labels
Note: You can tell the printer what row or column to start printing on. E.g. If you have a sheet of half-used labels, you can tell
the printer to start printing on Row 5 Column 2 so you can
continue using your inventory of labels without wasting.
Contacts
All Contacts
To add a new contact click on All Contacts on the left side then
click on the Add New icon
on the upper left side of
the screen. The picture for the Add New icon looks like a blank
sheet of paper.
On the upper portion of the screen select the type of contact
that you are adding (Business, Individual, Insurance, Vendor,
Employee, or Personal) and then enter the pertinent information for that contact record.
NewEra Confidential
H o w
t o
U s e
i A u t o F o c u s
94
iAutoFocus New Contact Screen
Note: When entering vendors you will notice an account info
icon towards the right of the screen below the id number where
you can enter account terms used when exporting to accounting
interfaces before clicking on the account info tab you will need
to save the contact record by clicking on apply at the lower
right.
When entering an employee there is a display field which defaults to the first name but you can choose to make that the initials or employee id # if you would prefer. This field is used for
displaying the technician on the main grid and the work in progress reports.
When you have completed entering information for the contact
record press Apply at the lower right to save or Okay at the
lower right to save and exit or the Add new icon on this screen
at the upper left to save and add another contact of the same
type.
Using iAutoFocus Advanced Features
Labor Management
Time Clock
Shops that will use the time clock feature, within IAutoFocus for
technicians to punch in and out of jobs, will open the time clock
NewEra Confidential
H o w
t o
U s e
i A u t o F o c u s
95
from the Left Navigation Bar or open the time clock application
from the iAutoFocus folder located in your program files folder.
iAutoFocus Left Navigation Bar - Time Clock
With the time clock open you can set it for initial use by clicking
File at the top left of the screen and choose Synchronize Employees to have the employee list refresh with any new employees entered into iAutoFocus under Contacts.
iAutoFocus Left Navigation Bar - Time Clock
Note: Synchronize RO’s will happen automatically but if a technician is looking for a work order that doesn’t appear to be
available, they can try clicking that icon. Remember, a work order will not be displayed if it has not been marked Arrived at
the shop or if it has been marked Delivered.
Under Setup you can setup descriptions for your labor types and
the description that will be used to update the work order with
the progress of the job to describe that labor type. The defaults
are usually adequate for most shops.
A technician will punch onto a job by selecting their name from
the Employee list so they are highlighted and then typing the
work order in the RO number box or selecting a previously entered work order that they have recently punched into. Employees are able to identify the type of labor they will be performing
in the Labor Code column and can update the Department or
the Progress of the job they are entering time on (both Labor
Codes and Departments are pulled from what was entered during initial Setup).
NewEra Confidential
H o w
t o
U s e
i A u t o F o c u s
96
Not Started
In Progress
Completed
On Hold
iAutoFocus - Time Clock – Select Labor Type
Their time on that job is now being recorded on the punch log.
An employee cannot punch into more than one job at a time.
When they punch into another job their time is stopped on the
current job. If they are going to lunch or on break they can click
on the Go on Break icon on the right side of the screen. At the
end of their day they can click on the End of Day icon on the
right side of the screen to close their time on the current job
and punch out for the day.
iAutoFocus - Time Clock – Punch Log
For added security for the technicians using the time clock, a
PIN can be entered into the Employee Contact information as
described in Employee Setup.
NewEra Confidential
H o w
t o
U s e
i A u t o F o c u s
97
iAutoFocus - Time Clock – Employee Pin
Note: Time on a work order of less than one minute will be discarded. Also, the employee has no ability to modify their time
entries from within the time clock. Should you need to modify a
time entry you can do that from within the Labor Costing
screen as described above. Additional time-in and time-out
entries cannot be added in the labor costing screen - only
modified. If you need additional time entries we recommend
that the tech punches into the job and then out a minute later
so that entry can then be modified.
From within the time clock the technician has the ability to print
a Repair Worksheet for the job he is punched into or a worksheet for all his labor assigned to him. Under the Reports icon
in the time clock are Job Track reports.
Additional Job Track Reports are available from the Left Navigation Bar under System Reports as well. From here, most shops
will print the Job Hours by Employee for the day or the pay period. The Work Order Efficiency reports are also useful to use
to gauge the employees performance for the pay period or the
month.
Load Based Scheduler
Scheduler Features
The Scheduler is the best way to schedule vehicles to maximize
efficiency and productivity. During initial Setup, users will enter
information about how many technicians work in each depart-
NewEra Confidential
H o w
t o
U s e
i A u t o F o c u s
98
ment, how many hours they work, and how many cars per week
your shop can handle. The work week is defined (what days of
the week you are open), as well as holidays and employee vacation time.
Once all entries have been made in Setup for the Scheduler, you
can access the scheduler by clicking on the calendar icon on the
main toolbar.
The Scheduler displays the current month and day then depending on information previously entered during the setup, you can
view past or future months.
iAutoFocus Scheduler
The search fields at the top of the scheduler allow you to enter
criteria for locating a particular Work Order, Customer, Vehicle
Description, Body Style, Paint Color, or even Insurance Company.
The arrows
to the right of the scheduler will expand or
condense the size of the scheduler and the information that is
shown.
When you click on a specific date in the scheduler, all the jobs
being worked on that day will populate in the portions below the
NewEra Confidential
H o w
t o
U s e
i A u t o F o c u s
99
calendar indicating the job information and hours associated
with that date.
iAutoFocus Scheduler – Lower Portions
The Weekly Load Section of the Scheduler shows either Percentages or Hours/Cars (by clicking on the appropriate radio button) referring to the load capacity of Body, Paint, or Cars.
Based on the percentage entered during setup, the colored
boxes will change from Blue to Green and eventually Red when
you are exceeding maximum capacity.
iAutoFocus Scheduler – Weekly Load Portion
Scheduling a Job
Under Work In Progress, click on Authorized Not Scheduled in
the Left Navigation Bar. The Main Grid will display all jobs that
need to be Scheduled.
NewEra Confidential
H o w
t o
U s e
i A u t o F o c u s
100
iAutoFocus – Left Navigation Bar - Authorized Not Scheduled
Highlight the job you would like to Schedule and Right-Click on
the job. From the menu, choose Scheduler remember, you can
also access the scheduler from the Toolbar in iAutoFocus by
clicking on the calendar icon)..
iAutoFocus –Authorized Not Scheduled – Right Click Menu
All the Information from the job you clicked on will be populated
into the Scheduler. From here you can see your work load by
looking at the colored boxes and reviewing percentages. In this
example, the new job being scheduled requires 4.5 hours of
body work and 2.8 hours of paint. Based on that information,
the user can click forward or back through days and months and
choose the best time for the vehicle to arrive (whatever date you
click on in the calendar will display on the Schedule for 00/00/
0000 button.
NewEra Confidential
H o w
t o
U s e
i A u t o F o c u s
101
iAutoFocus –Scheduler
All jobs scheduled to come in on the date selected in the calendar will display below the calendar as well has daily Hour Totals
and Revenue Totals.
Note: Remember, you can choose to view more or less of the
Scheduler by using the up and down arrows on the right side of
the Scheduling Window.
Once you have decided the best today to schedule the vehicle to
come in, select that date in the calendar and click the Schedule
for 00/00/0000 button. The Scheduler will close and you will
be returned to the Authorized Not Scheduled page. The job
will be missing from this section as it has automatically been
moved but can of course be viewed under All Work in Progress!
Continue scheduling the rest of your jobs in this fashion and
you will always understand your shop’s load capacity for every
day of the year!
QuickBooks
An optional, but highly recommended, supplement to iAutoFocus is to incorporate QuickBooks as your accounting program.
NewEra Confidential
H o w
t o
U s e
i A u t o F o c u s
102
IautoFocus exports data directly into your QuickBooks program
making your accounting process easier and more efficient. Your
accountant will thank you!
Getting Started
New QuickBooks users will be taken through a “Getting Started”
Interview which will help you set up all the required information
for your company.
The screenshots that follow depict the EasyStep Interview in the
QuickBooks Pro 2010 version.
QuickBooks –Welcome to the EasyStep Interview
NewEra Confidential
H o w
t o
U s e
i A u t o F o c u s
103
NewEra Confidential
H o w
t o
U s e
i A u t o F o c u s
104
NewEra Confidential
H o w
t o
U s e
i A u t o F o c u s
105
NewEra Confidential
H o w
t o
U s e
i A u t o F o c u s
106
NewEra Confidential
H o w
t o
U s e
i A u t o F o c u s
107
Creating QuickBooks Reports
The following QuickBooks reports need to be created and configured in QuickBooks prior o exporting any data from iAutoFocus. The following is a comprehensive list of exactly which reports you will need:
Completed Sales – QB
•
Choose Customer Transaction Detail report and make the
following changes:
o
Date – This month
o
Transaction Type –
Multiple Transaction Types
Invoice
Credit memo
o
Detail Level – Summary Only
o
Posting Status – Either
o
Template – Choose any valid template types
o
Header Footer – Name the report – Completed Sales
– QB
o
Display – Unmark all except: Name, Num, Date,
memo, Amount
o
Sort by: Number or Date
o
Memorize as Completed Sales – QB
Payments Received – QB
•
Choose Customer transaction detail report and make the
following changes:
o
Date – This month
o
Accounts – Account Receivable
o
Transaction Type – Multiple Transaction Types
NewEra Confidential
H o w
t o
U s e
i A u t o F o c u s
108
Check
Payment
Statement Charge
Header Footer – Name the report – Payments Received – QB
•
Display – Unmark all except: Name, Num, Date, memo,
Amount
•
Group By: Payment Method
•
Sort By: Date
•
Memorize as Payments Received – QB
Unapplied Payments – QB
•
Same as above report but change the following
o
Date - All
o
Paid Status – Open
o
Posting Status – Either
o
Memorize as unapplied Payments – QB
Accounts Receivable – QB
•
Choose the Customer Balance Summary Report and make
the following changes:
o
Header Footer – Report Title – Accounts Receivable –
QB
o
Memorize as Accounts Receivable - QB
Exporting Data to Microsoft QuickBooks
Once you have set up your company and followed the instructions on creating the proper reports in QuickBooks, you can begin to export data from iAutoFocus into QuickBooks.
NewEra Confidential
H o w
t o
U s e
i A u t o F o c u s
109
NewEra Confidential
H o w
t o
U s e
i A u t o F o c u s
110
NewEra Confidential
H o w
t o
U s e
i A u t o F o c u s
111
NewEra Confidential
H o w
t o
U s e
i A u t o F o c u s
112
NewEra Confidential
H o w
t o
U s e
i A u t o F o c u s
113
NewEra Confidential
H o w
t o
U s e
i A u t o F o c u s
114
WebView
How to Upload Photos to Your Website
First open a work order. Check the box Show in WebView.
Make sure you are on Date Info radio button has been selected
and that the Authorized and Arrive at Shop boxes have been
checked. iAutoFocus now knows to update this particular Work
Order on your website.
iAutoFocus –Work Order – Date Info
Once you have verified all the right information has been
checked, click on the link to Show Images link at the top of the
window. This defaults to a file location with a folder entitled
WebView. This folder is where you want to store all images of
the vehicle pertaining to this Work Order. Either copy and paste,
drag, or otherwise move pictures you can uploaded from your
camera INTO this folder (note the below pictures are BY the
WebView folder but must be moved into the folder for the website to be updated accurately).
NewEra Confidential
H o w
t o
U s e
i A u t o F o c u s
115
iAutoFocus –Work Order – Show Images Link – WebView Folder
Once you have the desired pictures in the folder, click the red X
in the top right corner of that window to close out the window
and you will be back to the Work Order.
To modify notes for the customer to view on WebView, you can
simply click on the radio button above the Notes & Options
section of the Work Order labeled WebView Customer Notes
and enter notes EXACTLY as you want the customer to see them.
Note: You can also Right-click on the Work Order from the Main
Grid, hover over Notes, then choose Modify WebView Customer Notes to add notes to WebView.
Once you are finished adding images and notes to update WebView, click the Okay button at the bottom of the work order to
save and tell iAutoFocus you are ready to update WebView.
WebView updates automatically every hour. Any new information
will be loaded to your website for your customer’s to see!
Note: The Update WebView link is a placeholder for now as is
not functional. The Okay button is the only button you need to
successfully update WebView.
Menu Searches & Sorts
To locate a record select the desired location of the record on
the Left Navigation Bar. On the upper portion of the screen you
will notice a Search box where you can type the customers first
or last name, vehicle information, phone numbers, or you can
use the # sign and the work order number, then click Search
and the records displayed will be refined to those matching the
criteria entered.
NewEra Confidential
H o w
t o
U s e
i A u t o F o c u s
116
If you know the Contact ID number or Work Order Number you
can type it in the box at the upper right labeled WO # and that
will search and open the file number entered. This option is not
available when viewing Pending Work. In addition, while veiwing
Work in Progress, you can search for departments within a range
by using the Department From and To filter boxes.
Note: Searches will not function in Work in Progress for files that
do not have a Department set because the Department search is
triggered at the same time other searches are being made.
On the title bar for each selection displayed are the field titles
for the items displayed. You can click on any column heading to
sort that search by the column desired. If you click the same
column heading a second time then it will do a reverse order
sort. You can also reposition the column headings displayed by
dragging the column heading to the appropriate position where
you want it displayed.
Note: Depending on the size of your monitor, additional fields
might available further to the right of the screen. Make sure to
use the scroll bar to view all the available columns.
These columns can be placed in view by dragging and holding
toward the left of the title bar until the screen begins to move
back toward the left. The column positions that you move and
the sort order you select will be remembered for your user
login.
For the records that are displayed on the screen you can click
onto certain fields and change the contents without having to
open the record. This is convenient when you need to update
the file status or dates for multiple records. You can also open
the highlighted file when double clicking onto a field that is not
editable from the grid or the arrow that is on the left of the selected line. Additional operations might be available by right
clicking on the highlighted line. This is to help you accomplish
necessary tasks without having to open the record and find the
desired area within the file.
Enter an Unlocking Key
An Unlocking Key is used to track your iAutoFocus subscription
or purchase options. Periodically (usually twice a year), iAutoFo-
NewEra Confidential
H o w
t o
U s e
i A u t o F o c u s
117
cus will prompt you to enter an unlocking key in order to keep
using the product. Unlocking keys are faxed automatically to
users with a support plan. If your system informs you that your
unlocking key will expire soon, please contact NewEra Software’s technical support line to obtain a new unlocking key.
To enter a new Unlocking Key, Click on Help…Enter new Unlocking Key. Type in the Unlocking Key exactly as it is displayed on
your Unlocking Key form. Please remember that the Unlocking
Key is Case-Sensitive. After you have entered the Unlocking Key,
Click on Okay. iAutoFocus will inform you if you correctly entered the Unlocking Key.
NewEra Confidential