1
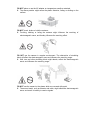
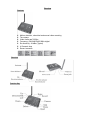
SpyCameras.com
WIC-DG60R
Content
Foreword--------------------------------------1
Statement-------------------------------------2
Liability Limit----------------------------------3
Operating Restrictions----------------------3
FCC Information------------------------------3
Important Information------------------------4
Symbol Description---------------------------4
Illustration---------------------------------------5
Accessories------------------------------------10
Parameter---------------------------------------11
Camera
Features------------------------------------------12
Structure------------------------------------------12
Size------------------------------------------------12
Receiver
Features-------------------------------------------13
Structure-------------------------------------------13
Function Key--------------------------------------13
Size--------------------------------------------------13
Quick start------------------------------------------14
Interface---------------------------------------------16
Functional menu
System setting--------------------------------------18
Time Setting------------------------------------------19
Video System----------------------------------------19
Scan Setting------------------------------------------20
Format--------------------------------------------------20
Default Setup------------------------------------------21
Version--------------------------------------------------21
Recorder Setting
Video Setting-------------------------------------------22
Trigger Record Time----------------------------------23
Schedule Record---------------------------------------23
Time Stamp----------------------------------------------24
Overwrite--------------------------------------------------24
Video Record---------------------------------------------25
Pair----------------------------------------------------------25
Playback---------------------------------------------------26
FAQ---------------------------------------------------------28
Certificate--------------------------------------------------29
Foreword
Congratulations on buying our wireless home DVR camera series. The series of products
are suitable for the custody of children and elders, monitoring of residence, office, store,
factory and so on. It meets FCC,CE Authentication standards, and can offer you a safe,
long-lasting, reliable and high-performance service.
Our digital 2.4GHz wireless camera series word at ISM band.
It may cause interference wording with other wireless equipments. Please turn off the said
equipments to eliminate the interference.
Our digital 2.4GHz wireless camera series will emit electromagnetic wave, just like other
wireless products. But the output power of our products is less than mobile phones.
The digital 2.4GHz wireless camera series meet wireless frequency security standards and
indexes .The standards and indexes are certificated by academic organization and
represent the cogitative research of the scientific organization and represent the cogitative
research of the scientific workers who continuously explore and annotate the involved fields.
So our products are safe for you.
Statement
1. Please read the manual in detail before using the product. The manual will present lots of
significant information and notes of using the product. Please keep it well for future
convenience, We hope we have satisfied your requirements, and hope it can serve you
effectively and for a long time.
2. Under any circumstance, no matter civil infringement, contract or other reasons, we
should not be responsible for any accidents, indirect or special damages caused by the
manual or other information.
3. The guidance and description in the manual are precise for digital 2.4GHz series
products at the moment when it is printed.
Liability Limit
l We will not be responsible for any sudden occurrences caused by earthquake,
theunderbolt, fire, or any third party behaviours that exceed the duties and capabilities;
including customer’s intentional or unintentional mistakes, misuses and uses under
improper conditions.
l We will not be responsible for any occasional loss (loss of commercial profit and
business interruption), which are caused by incapability of using the product.
l We will not be responsible for any loss or damage due to the nonperformance of the
descriptions in the manual.
l We will not be responsible for any loss or damage caused by using any third party’s
product.
Operating Restrictions
l DO NOT put the product too close to medical equipments.
1. Radio waves might potentially cause breakdown of medical electrical equipments and
thus cause incidents.
2. Place the product at least 22cm from the heart pacemaker. Radio wave potentially
influences heart pacemaker and thus leads to respiratory disturbance.
l DO NOT use the product to monitor equipments or activities that are relevant to
people’s privacy.
1. Monitoring of equipments or activities concerned directly to people’s privacy.
2. Monitoring related to people’s antiques or rare articles. For it is not designed and
manufactured for these purposes.
l DO NOT use the product to carry out any illegal activities (such as sneak
preview, etc.)
FCC Information
NOTE: This equipment has been tested and found to comply with the limits for a Class B
digital device, pursuant to part 15 of the FCC Rules, These limits are designed to provide
reasonable protection against harmful interference in a residential installation.
This equipment generates, uses and can radiate radio frequency energy and, if not installed
and used in accordance with the instructions, may cause harmful interference to radio
communications. However, there is no guarantee that interference will not occur in a
particular installation. If this equipment does cause harmful interference to radio or television
reception. Which can be determined by turning the equipment off and on. The user is
encouraged to try to correct the interference by one or more of the following measures:
--Reorient or relocate the receiving antenna.
--Increase the separation between the equipment and receiver.
--Connect the equipment into an outlet on a circuit different from that to which the receiver is
connected.
--Consult the dealer or an experienced radio/TV technician for help.
Important Information
The user manual provides important information for customers to use the product properly,
and avoid possible hurts or damages.
And this information can also decrease the hurt or damage to the lowest level.
Before you read the text. Please make sure you have completely understood the following
information and symbols. Please refer to the manual while using the product.
Symbol Description
Means that if not operated to the manual, it might cause death or serious
damages
Means that if not avoided timely, slight wounding or property loss might occur
Messages you need to pay attention to
Messages you should know
Means that you should not do
Illustration
DO NOT put the plastic package bags in reach of children or or babies.
l It might cause asphyxia of children or babies put the bags into their mouths.
DO NOT plug the AC adapter into the outlet in improper situations.
l Plucking o plugging AC adapter by wet hand might cause electric shock.
l Plugging AC adapter unsteadily might cause fire or electric shock.
DO NOT cover the AC adapter when it is connected to power socket, place the
adapter near heaters, or put it on the floor which is equipped with a heater.
l The above mentioned operation might cause fire or incidents.
DO NOT use it aboard, please abide by the airway’s provision.
l It might influence communication aboard and the flying apparatus if departing
from the airway’s regulation. This will result in accident, possible death and
severe physical hurt.
DO NOT put the camera in wet places where water might splash or where rainwater
and mist might erode (Except weather-proof series).
l It might cause fire, shock, short circuit ,etc.
DO NOT disassemble or repair the camera, receiver or other relevant peripheral
equipment s by yourselves.
l Improper disassembly might cause damages to the product or the peripheral
equipment.
DO NOT put the camera in quaky paces.
l The camera may be unstable or out of operation if installed improperly. Such
installation may also cause breakdown.
DO NOT use the receiver on the surface of thermolabile material.
l Please embed thermal insulating material when using on the surface of the
thermolabile material.
DO NOT place or use the AC adapter on temperature sensitive materials.
l The above practice might cause the plastic distortion, fading or sticking on the
surface.
DO NOT touch, shake or hold the antenna.
l Touching, shaking or holing the antenna might influence the receiving of
electromagnetic wave, and thereby influence the receiving effect.
DO NOT use the camera in complex environment, The obstruction of stumbling
block will affect the electromagnetic wave and influence the receiving range.
l Wall, tree and other stumbling block might absorb, reflect the electromagnetic
wave, and influence the receiving range.
DO NOT use the camera in the places which are covered with metal.
l The around metal, such as elevator and cabin, might shield the electromagnetic
wave, and result in inability to receive signals.
Accessories
Receiver*1
Adapter*2
User Manual
Camera*1
Antenna*2
AV cable*1
Bracket*1
SD Card*1(optional)
Screws*3
Parameter
General
Receiver
Camera
ISM 2400—2483.5MHz
Modulation
GFSK
Antenna
Omni 3dBi
Transmission distance
100m
Operating temperature
-10℃-60℃
Operating humidity
20%-80%
Rx sensitivity
-81dBm(Typical)
Video resolution
640*480(VGA),320*240(QVGA),ZOOM
Video signal output
NTSC/PAL Composite, 1V pk-pk, 75ohm(with
audio)
Image input channel
4 wireless channels
Video mode
M-JPEG AVI
Video frame rate
9-25fps
Photo format
JPEG
Memory
extension Up to 32GB SD card
supported
Power supply
AC 100-240V DV 12V 500 mA
Power consume
Max 160 mA
Dimensions
120*84*23MM
Net Weight
190g(including adapter)
Record overwrite
Optional
Recording mode
Video recording and photo shooting
Detection sensitivity
Max 5 meters
Record time display
Available
Video system
NTSC/PAL adjustable
Startup mode of recording Motion detection, scheduled and manual video
video
recording
Video file size
Approx. 10M/min
Playback
Normal, fast forward, fast backward, pause
Sensor
CMOS1/4″
Resolution
640*480 pixels
View angle
66°
Ingress protection
IP33
Night vision Range
15 meters
Transmit output power
100 mW
Power supply
AC 100-240V DV12V 500 mA
Power consume
Max 270 mA
Dimensions
110*75*82mm
Net Weight
555g(including adapter)
Frequency
Camera
Features
l
l
l
l
l
l
Structure
Size
Night Vision
Weather-proof
1/4″ CMOS
Minimum Illumination:0 Lux
24 Infrared LEDs
Night Vision Range:15m
Receiver
Features
l
l
l
l
l
l
l
Structure
Function Key
Motion detection, scheduled and manual video recording
Time stamp
Video frame rate”9-25fps
Frequency :ISM 2400-2483.5MHz digital
Rx sensitivity: -81dBm (Typical)
4 Channels loop
Record overwrite
Size
Quick start
1、 Fix the camera in the desired position and connect it to the power supply.
2、 Insert SD card into the receiver, then connect the “AV out” to TV with the AV cable
supplied.
3、 After the receiver is connected to power supply, turn on the TV and switch it to AV mode.
Now, you can see the image on the screen.
4、 Press “Talk” button to go to the intercom mode. Press and hold it, your sound will
transmit from the receiver to the camera end; release it, you can hear the sound from the
camera end.
5、 In real-time monitoring mode with multiple cameras, press “Cam select” button to
manually switch cameras, or press “QUAD” to go to the split screen to view multiple
cameras simultaneously.
6、 Press “OK” button, the product will go to the MD mode and the image will display an
“
” symbol. If passing people were detected, the receiver will automatically
record and save the video to the SD card.
Press “OK” button again to exit the MD mode, then the “Detection” indicator goes out.
Tip:
In detection mode, if there are newly recorded video files, the “NEW” indicator of the
receiver will light up. The following three methods will make this LED go out. Otherwise, it
lights continuously.
(1) Press “Menu” button to select the video to view, and then go to the menu where the video
file is stored to play the video, now the LED goes out.
(2) Press “DELETE” button, and the LED will go out. (This does not apply to the menu where
the recorded video file is stored. In this menu, the “DELETE” button is still used to delete
video files.)
(3) Plug out the SD card, and the LED will go out.
Interface
Tips:
1) When the storage media is normal and available for recording, the above SD card icon will appear on
the screen.
When the storage media runs out of space, the SD card icon and the “Record” indicator on the screen will
flash.
When the storage media is not inserted or identified, the screen will not display SD card icon and
available recording time.
2) When you press “Talk” button, the screen will display the word “Talk”, indicating that intercom function
is enabled.
3) Interface icons of the monitor and the file name below the interface are only displayed during
recording, e.g.
4) The recording mode includes a shooting mode and a record mode.
5) When the camera is switched to the letter M, it refers to manual loop; when switched to the
letter A, it refers to automatic loop.
6) When no signal is received, black screen will occur. Signal strength icon only displays the left part with
the middle part of the screen displaying “NO SIGNAL”.
7) When the screen is split into four parts, the top left corner of each image displays the camera number,
such as CAM1, CAM2. Those split screens without images will go black.
Functional menu
Press “MENU” button to go to the following interface menu, and press “UP”, “DOW N”, “RIGHT” and
“LEFT” button to select the setting item. The selected icon will turn blue and descriptive text of the
corresponding function will appear on the top of the screen, then press “OK” button to go to the sub menu.
Press the “MENU” button again to exit the interface setting menu.
System Setting
Press “UP”, “DOWN”, “RIGHT” and “LEFT” button to select the setting item , the selected icon will turn
blue and descriptive text of the corresponding function will appear on the top of the screen, then press
“OK” button to go to related settings.
System setting
A, Time Setting
Press “RIGHT” and “LEFT” button to make selection, and then press “UP” and “DOWN” button to set.
Press “OK” button to save the setting. If no setting is desired, press “MENU” button to return to the main
menu.
B, Video System
Press “UP” and “DOWN” button to select the desired system, and then press “OK” button to save the
setting and exit; if no selection is made, press “MENU” button to exit.
C, Scan Setting
Auto sequence
1) Select Scan Time
Press “UP” and “DOWN” button to select time. Available options include OFF, 5 sec, 10 sec and 30 sec.
2) Select Cameras
Press “LEFT” and “RIGHT” button until the desired channel turns yellow, and then press “UP” and
“DOWN” button to set whether to select the corresponding channel.
When selection is done, press “OK” button to save the setting, if no setting is desired, press “MENU”
button to return to the main menu.
D, Format
Press “UP” and “DOWN” button to select “YES / NO”, the selected option turns blue. Press “OK” button to
save the setting and exit; if no selection is made, press “MENU” button to exit.
E, Default Setup
Press “UP” and “DOWN” button to select “YES / NO”, the selected option turns blue. Press “OK” button to
save the setting and exit; if no selection is made, press “MENU” button to exit.
F, Version
Enable this function to display the version of the receiver and the camera.
Recorder Setting
Press UP, DOWN, RIGHT and LEFT to select the item to set, the selected icon will turn blue and
descriptive text of the corresponding function will appear on the top of the screen, then press “OK” button
to go to the related settings.
A, Video Setting
Press “UP” and “DOWN” button to make selection, the selected option turns blue. Press “OK” button to
save the setting and exit; if no selection is made, press “MENU” button to return to the previous menu.
B, Trigger Record Time
Press “UP” and “DOWN” button to select the detection record time, the selected option turns blue. Press
“OK” button to save the setting. The record time can be set to be 10SEC, 30SEC and 2 min. If no setup is
desired, press “MENU” button to return to the previous menu.
C, Schedule Record
Press “RIGHT” and “LEFT” button to make selection, and then press “UP” and “DOWN” button to set
time.
When selection is properly done, press “OK” button to save the setting, if no setting is desired, press
“MENU” button to return to the main menu.
D, Time Stamp
When the “TIME STAMP” is enabled, the system will display the record date and time on the recorded
video.
Press “UP” and “DOWN” button to select whether to enable, when the selection is done, press “OK”
button to save the setting. If no selection is made, press “MENU” button to return to the main menu.
E, Overwrite
When the “Overwrite” function is enabled, the device will delete the oldest video files recorded to free
space for storing new videos after the storage media is full. If “Record Overwrite” is disabled, the device
will stop recording when the storage media is full.
Press “UP” and “DOWN” button to make selection, when the selection is properly done, press “OK”
button to save the setting, if no setting is desired, press “MENU” button to return to the main menu.
F, Video Record
Press “UP” and “DOWN” button to make selection, when the selection is properly done, press “OK”
button to save the setting, if no setting is desired, press “MENU” button to return to the main menu.
Tip:
A: In recording mode, “. Record” indicator lights up when recording starts, and “REC” icon
will appear on the monitor screen; the “Record” indicator goes out when recording stops.
B: In shooting mode, “Record” indicator flashes when shooting starts, and “-----” icon will
appear on the monitor screen; the “Record” indicator goes out when recording stops.
Pair
Press “UP” and “DOWN” button to select the desired camera number, when the selection is done, press
“OK” button to enable pairing.
When pairing is enabled, the screen will go black, indicating “Please press pair key on camera side”.
When pairing is successfully done, the camera image will be displayed. Pair other cameras in the above
way, when finished, Press “MENU” button to exit the menu and display images.
Playback
After entering the playback mode, the user is required to select the data folder where the file to play is
stored. The root directories are “Video” and “Picture”.
The name of the subdirectory is named based on the recording date. Press “UP” and “DOWN” button to
select the file time. After selecting the right one, press “OK” button to enter the folder.
NOTE: the first file icon in the subdirectory indicates that you can return to the previous
directory.
After entering the folder, select the file to play.
Press “OK” button to play. The file name is named based on the recording camera and time
“CAM#-HHMMSS” e.g. 1-110521.
In the course of play, press “Left” button for fast backward and “Right” button for fast forward.
Press “OK” button to pause and press it again to continue.
After selecting files or folders, press “ DELETE” button to pop up options to delete, and then
press “LEFT” and “RIGHT” button to select “YES” or “NO” to decide whether to delete or not
to delete the file. Press “Menu” button to return to the previous menu.
FAQ
Abnormal Phenomena
Possible Reasons/Solutions
Check whether camera/receiver
connected to power supplies and
power on.
Make sure that the A/V cable is
connected correctly.
Mismatching system of TV(monitor)
and cameras, TV may not support
NTSC video format.
Certificate
The product is meet with CE/FCC/ROHS. Please see the certificates as following