1
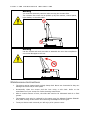
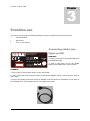
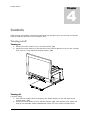
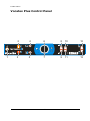
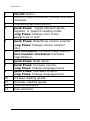
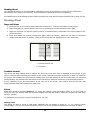
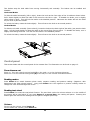
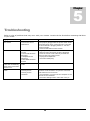
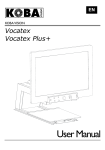
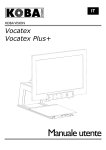
GW MICRO [email protected] (260) 489-3671 Vocatex Plus User Manual This manual describes the following versions of the GW Micro Vocatex Plus: Vocatex Plus 4.0.6 In combination with screen: LG 26” monitor. Slight differences are possible if other versions or screens are used. The latest versions of the manual can be downloaded from the GW Micro website: www.gwmicro.com Release date: Wednesday, March 16, 2011 i VOCATEX PLUS User Manual GW Micro, Inc. 725 Airport North Office Park Fort Wayne, IN 46825 E-mail: [email protected] Phone: 260-489-3671 1 2 Table of contents Table of contents ......................................................................................................3 1. Introduction ..........................................................................................................5 Vocatex Plus parts ........................................................................................................................... 5 Read aloud video vagnifier Vocatex Plus.................................................................................... 5 Screen ......................................................................................................................................... 5 Adapter ........................................................................................................................................ 6 HDMI-HDMI ................................................................................................................................. 6 What else might you need? .............................................................................................................. 6 Coaxial cable (for TV use) ........................................................................................................... 6 HDMI–DVI, HDMI-HDMI, VGA-VGA connector (computer connection) ..................................... 6 Audio cable (computer connection) ............................................................................................. 6 2. Safety and maintenance instructions ..................................................................7 Safety instructions ............................................................................................................................ 7 Maintenance instructions .................................................................................................................. 8 3. First-time use ........................................................................................................9 Connecting cables ............................................................................................................................ 9 Screen settings ............................................................................................................................... 10 Making sure the device works ........................................................................................................ 10 4. Controls ...............................................................................................................11 Turning on/off ................................................................................................................................. 11 Turning on ................................................................................................................................. 11 Turning off ................................................................................................................................. 11 Vocatex Plus control panel.......................................................................................................12 Reading Aloud ......................................................................................................................... 124 Reading aloud ................................................................................................................................ 14 Steps to Follow .......................................................................................................................... 14 Continue to read ........................................................................................................................ 14 Pause ........................................................................................................................................ 14 Sliding table .................................................................................................................................... 14 Horizontal brake.............................................................................................................................15 Control panel .................................................................................................................................. 15 Zoom in/zoom out...................................................................................................................... 15 Reading modes ......................................................................................................................... 15 Reading aloud ........................................................................................................................... 15 Column selector ........................................................................................................................ 16 Computer (Vocatex Plus) .......................................................................................................... 16 Contrast (Vocatex Plus) ............................................................................................................ 16 Previous/Next sentence (Vocatex Plus) .................................................................................... 16 3 Usage tips ....................................................................................................................................... 16 Reading aloud – Text blocks ..................................................................................................... 16 Reading aloud – Recognition .................................................................................................... 16 Reading ..................................................................................................................................... 17 Watch photos ............................................................................................................................ 17 Handiwork ................................................................................................................................. 17 Handwriting ............................................................................................................................... 17 Vocatex – computer (Vocatex Plus) ............................................................................................... 17 Headphone ..................................................................................................................................... 17 5. Troubleshooting ..................................................................................................18 6. Warranty ..............................................................................................................19 Express warranty ............................................................................................................................ 19 Monitor warranty............................................................................................................................19 Warranty provisions ........................................................................................................................ 19 Service fulfillment ........................................................................................................................... 19 7. Specifications ......................................................Error! Bookmark not defined.20 Vocatex Plus................................................................................................................................... 20 4 1 Chapter I N T R O D U C T I O N Introduction Thank you very much for buying the Vocatex Plus! We have gone to great lengths to create a high-quality and user-friendly device. We hope that the device will increase your independence and make reading and viewing pictures an enjoyable experience for many years to come. Vocatex Plus parts You will need the following parts to be able to use the Vocatex Plus: Read Aloud Video Magnifier Vocatex Plus Vocatex Plus Screen Always ask GW Micro or your local dealer whether your screen specifications are sufficient. *Assembly instructions are included on separate sheet* Warning This unit requires assembly. Non-compliance of the instructions can cause severe damage and void the warranty. 5 assembly I N T R O D U C T I O N Adapter To power the device, you need to connect the AC adapter to the Vocatex Plus. Only use the Vocatex Plus in combination with adapter supplied with the device by GW Micro or your local dealer: AC Adapter FranMar FRA045-S12. HDMI HDMI-HDMI You need a HDMI-HDMI connector to connect the Vocatex Plus to the screen. What else might you need? Coaxial cable (for TV use) *Sold separately If you also wish to use the screen as a TV, you will need a coaxial cable that plugs into the cable distribution network. The TV is controlled with the remote control of the screen. Press the Input or Source button on the remote control to toggle between the Vocatex Plus and the TV. Note: Not all screens have an aerial terminal. HDMI–DVI, HDMI-HDMI, VGA-VGA connector (computer connection) *Sold separately To use the screen as a computer screen, you will need an HDMI-DVI, HDMI-HDMI or VGA– VGA connector. This connector will help you connect your computer to the screen. Depending on the screen type, you will need an HDMI-DVI, HDMI-HDMI of VGA-VGA connector. Always look at the monitor specifications to verify what cable you will need. Press the Input or Source button on the remote control to toggle between the Vocatex Plus and the computer. Audio cable (computer connection) *Sold separately If you use the screen as computer screen, you need an audio cable to pass the sound from your computer to the speakers of the screen. 6 S A F E T Y A N D M A I N T E N A N C E I N S T R U C T I O N S 2 Chapter Safety and maintenance instructions Safety instructions Consult the user manual that comes with the monitor for specific safety instructions regarding the monitor. Read this manual carefully. It contains all necessary information about your device. Keep the device in a dry, well-vented, and clean spot. Do not place the device in direct sunlight or next to a source of heat. Never use this device in ambient temperatures higher than 95°F. Plug the unit into a grounded outlet. The manufacturer cannot be held responsible for any injuries to humans or animals or for any damage to objects caused by noncompliance with this safety instruction. Never attempt to repair the device by yourself. It is dangerous to remove protective covers which are there to prevent electric shock. You must contact GW Micro or your dealer in case of defects. Any attempt to repair the device by an unauthorized party will void the warranty. To avoid electrocution, do not place the device in a spot where it can come into contact with liquids. Your product is designed and manufactured with high quality materials and components, which can be recycled and reused. Do not dispose of your old product in your general household waste bin. Dispose of the complete product (including its cables, plugs and accessories) in a designated collection facility. 7 S A F E T Y A N D M A I N T E N A N C E I N S T R U C T I O N S Warning You must be extremely cautious when moving the Vocatex Plus. The Vocatex Plus must not be picked up by the monitor, control panel, light shades, or the slide table. Warning Use the screws and tools provided to assemble the unit. Non-compliance can cause damages to the unit. Maintenance instructions The device can be cleaned with a lightly damp cloth. Never use chemicals for they can damage the finish and/or other parts. Occasionally clean the screen and the lens using a soft cloth. Refer to the manufacturer of your screen for further cleaning instructions. After a certain amount of time, the slide rails need to be lubricated with oil or fluid grease. The adapter must only be replaced by the same type (AC Adapter FranMar FRA045S12) after turning off the device and removing the adapter from the grid. Treat your device with care and you will enjoy it for years to come. 8 F I R S T - T I M E 3 Chapter U S E First-time use You need to go through the following steps to use the Vocatex Plus for the first time: Connect cables Set screen Turn on the device Connecting cables (see figure on left) www.kobavision.be Made in Belgium HDMI OUT Input: 9V ,, 12VDC DC 2.22A 3.75A (Max) Max. Power: 20W 45W Standby Power: 0.06W 0.16W HDMI OUT: POWER IN Only use with AC Adapter FranMar FRA024-S09 FRA045-S12 1. Plug in one end of the HDMI cable into the HDMI Out port. 2. Plug in the other end of the HDMI cable to the HDMI port on the monitor. POWER IN: 1. Plug in the Y-cord (shown below) to the wall outlet. 2. Plug in the end of the monitor power cord and the adapter power cord to the two ends of the Y-cord. 3. Plug in the small round end of the AC adapter into the Power In receptacle on the back of the Vocatex Plus. The Vocatex Plus is now ready to be used! 9 F I R S T - T I M E U S E Screen settings You may need to set the screen’s display settings before using the device if the image is not clear. To optimize the display settings of the Vocatex Plus, set the following display controls on the monitor: Contrast: maximum Brightness: 40% Color: 30% Sharpness: 40% Making sure the device works After you have completed the previous steps, you can ensure the device is working properly by turning on both the Vocatex Plus and the monitor. (See next chapter – Turning on/off) 10 4 Chapter C O N T R O L S Controls After having successfully connected and tested the Vocatex Plus, we will now review the controls and the operation of the Vocatex Plus. Turning on/off Turning on 1. Press the Power button to turn on the monitor. (1) 2. Press the Power button on the left side of the control panel to turn on the Vocatex Plus. This is a red, diamond-shaped button. (2) 2 1 Turning off (reverse order) 1. Turn off the Vocatex Plus by pressing the Power button on the left side of the control panel. (2) 2. Press the Power button to turn off the monitor. (1) (The monitor may power off and go into standby mode automatically when you turn off the Vocatex Plus.) 11 C O N T R O L S Vocatex Plus Control Panel 1 2 4 6 8 10 12 3 5 7 9 11 13 12 C O N T R O L S 1 ON/OFF button 2 Button to switch between Vocatex Plus and computer. 3 4 Contrast/Brightness button. Quick Press: Toggle between photo, negative, or positive reading mode. Long Press: Change color of the background or text. Quick Press: Hide/Show column selector. Long Press: Change column selector color. Turn Clockwise: Increase magnification. Turn Counter-clockwise: Decrease magnification. Quick Press: Read aloud. Quick Press: Increase volume. Long Press: Change language/voice. Quick Press: Decrease volume. Long Press: Change language/voice. Increase reading speed. Decrease reading speed. Previous sentence. Next sentence. 5 6 7 8 9 10 11 12 13 13 Reading Aloud The read aloud function is not immediately ready after turning on the device. If you press the read button immediately after turning on the device, it will indicate the read aloud function is initializing. An audible sound will be played by the Vocatex Plus after the read aloud function initializes and is ready for use. Reading Aloud Steps to Follow: 1. Place the text on the reading table under the Vocatex Plus. The text will appear on the screen. 2. Make sure that the column selector line is on by pressing the Column Selector button (5). 3. Align the text that you want to read so that it is located directly underneath the column selector line. (Pictured below) 4. Press and release the central turning knob (7) to start the reading. Please do not move or resize the image while the device is reading. Doing so can cause the text highlighting to track incorrectly. aaaaaaaaaaaaaaaaaaaaaaaaaaaaaaa aaaaaaaaaaaaaaaaaaaaaaaaaaaaaaa aaaaaaaaaaaaaaaaaaaaaaaaaa aaaaa aaaaaaaaaaaaaaaaaaaaaaaaaaaaaaa aaaaaaaaaaaaaaaaaaaaaaaaaaaaaaa aaaaaaaaaaaaaaaaaaaaaaaaaaaaaaa aaaaaaaaaaaaaaaaaaaaaaaaaaaaaaa aaaaaaaaaaaaaaaaaaaaaaaaaaaaaaa aaaaaaaaaaaaaaaaaaaaaaaaaaaaaaa aaaaaaaaaaaaaaaaaaaaaaaaaaaaaaa aaaaaaaaaaaaaaaaaaaaaaaaaaaaaaa aaaaaaaaaaaaaaaaaaaaaaaaaaaaaaa aaaaaaaaaaaaaaaaaaaaaaaaaaaaaaa aaaaaaaaaaaaaaaaaaaaaaaaaaaaaaa aaaaaaaaaaaaaaaaaaaaaaaaaaaaaaa aaaaaaaaaaaaaaaaaaaaaaaaaaaaaaa aaaaaaaaaaaaaaaaaaaaaaaaaaaaaaa 2 1 aaaaaaaaaaaaaa aaaaaaaaaaaaaa aaaaaaaaaaaaaa aaaaaaaaaaaaaa aaaaaaaaaaaaaa aaaaaaaaaaaaaa aaaaaaaaaaaaaa aaaaaaaaaaaaaa aaaaaaaaaaaaaa aaaaaaaaaaaaaa aaaaaaaaaaaaaa aaaaaaaaaaaaaa aaaaaaaaaaaaaa aaaaaaaaaaaaaa aaaaaaaaaaaaaa aaaaaaaaaaaaaa aaaaaaaaaaaaaa 1. Column selector line 2. Text block Continue to read The device will stop reading when it reaches the end of the text block that is displayed on the screen. If you want to read the next part that isn’t visible on the screen, slide the next part of the text so that it is visible on the screen. The Vocatex Plus will continue reading from your last position in the text block after you press the reading button. The Vocatex Plus will search for the last word it read and continue to read from that location. It isn’t necessary to put the last position at the very top of the screen. The Vocatex Plus will find your last reading position and start reading from that point. Pause Read aloud starts by pressing button 7. To pause the reading, press this button again. If you don’t slide or move the text, the Vocatex Plus will continue reading from the last position when you resume the read aloud function. (Pause) To start again from the top, move the text back up 1/2 inch. Sliding Table The sliding XY table is made of high-grade materials and can display a whole 8 ½” x 11” sheet of paper (horizontally). You can only read a full sheet of text if the text is printed horizontally on the sheet of paper. 14 Two brakes stop the slide table from moving horizontally and vertically. The brakes can be enabled and disabled. Horizontal Brake To slide the table horizontally (left to right), locate the knob at the front edge of the XY table as shown below. Pull it down slightly to allow the table to be moved to the left or right. To disable the brake, turn it slightly while pulling it down. This will lock the brake in the disabled position. Otherwise the brake will lock the table as you move it past the middle. To unlock the brake, rotate the knob slightly. This will return the knob to its normal position. Vertical Brake To slide the XY table vertically (front to back), locate the knob at the back right of the table, just past the back edge. Lift the knob slightly to allow the table to be moved from front to back. To disable the brake, turn it slightly while lifting the knob. This will lock the brake in the disabled position. To unlock the brake, rotate the knob slightly. This will return the knob to its normal position. Control panel This section deals with the control panel of the Vocatex Plus. The illustration can be found on page 13. Zoom in/zoom out Zoom in: Turn the central turning knob (6) to the right, or in the clockwise direction. Zoom out: Turn the central turning knob (6) to the left, or in the counter-clockwise direction. Reading modes Press button 4 to switch between photo mode, negative reading and positive reading. (Negative: dark background and light-colored letters). Long press button 2 in the negative or positive reading modes to change the color of the background or text. Reading text aloud Press button 7 to start the read aloud function. The text block under the column selector or in the middle of the screen will be read aloud. If you press button 7 a second time, the reading will pause. Pressing this button again will resume the reading from the place it stopped previously. Volume To turn up the volume, press button 8. To turn down the volume, press button 9. 15 Reading speed To increase the reading speed, press button 10. The Vocatex Plus will indicate that the reading speed is becoming faster. To decrease the reading speed, press button 11. The Vocatex Plus will indicate that the reading speed is becoming slower. When you pass the middle of the range of speeds, the Vocatex Plus will say, “Normal.” Change language or voice The device will change languages or voices by long pressing button 8 or button 9. The languages are listed in order from Z to A. When you press button 8, you will move towards letter Z. When you press button 9, you will move towards letter A. The voice or language of the text being read aloud will change. The spoken messages (louder, faster, zoom in,…) of the device will remain in the original voice or language. This cannot be changed. Column selector Press button 5 to hide or turn on the column selector. The column selector is the line in the middle of the screen. With this line you can select a text block to read. The text block that is positioned underneath the column selector line will be read aloud. By long pressing button 5, the color of the column selector will change. Displaying computer image Pressing button 2 switches the Vocatex Plus to a connected computer. The image of the Vocatex Plus disappears and the image of the computer will appear. To use this button, you MUST use an HDMI cable. If you only have a VGA cable to connect your computer to the Vocatex Plus, then you will need to use the buttons on the monitor or the remote control to change the input from the Vocatex Plus to the computer, and vice versa. Contrast and brightness Pressing button 3 changes the level of contrast and brightness. The device has 5 levels of contrast and brightness. Previous/Next sentence The device has the ability to navigate between sentences. To move to the previous sentence, press button 12. To move to the next sentence, press button 13. Usage tips Reading aloud – Text blocks Reading aloud is best done in a reading mode where you easily select the text that needs to be read. Reading aloud – Recognition Text recognition is very accurate, but it is impossible to be 100% accurate all of the time. On rare occasions, the device may make a mistake. By changing the magnification you can adapt the quality of recognition. You may find that reading is more accurate with a higher magnification. 16 Reading Reading is best done in positive or negative mode. These modes adapt the image for the visually impaired to a high-contrast image with improved background. The color of the background and text can be set at your discretion. The background can be set by means of background suppression. This will allow you to filter out the structure of a sheet. This unique function allows you at all times to set a contrasting background without annoying paper impurities. A newspaper can be read without annoying paper impurities. Factory settings will take you back to the original settings. Viewing photos Photos are best viewed in photo mode. This mode is an unprocessed image without contrast enhancement. Using the contrast, brightness, and color buttons, you can adjust the image so that the photo becomes clearly visible. Factory settings will take you back to the original settings. Handiwork Handiwork is best done with a small enlargement. It is best to select a dark background during this activity so that the camera is not hindered by large differences in contrast with whatever is darkened by the hands. Handwriting You can also write under your video magnifier. It is best to use a black pen and lined paper. Vocatex Plus – computer The Vocatex Plus screen can be used as a computer screen. If the Vocatex Plus is connected to HDMI-1 and the computer to HDMI-2, you can easily switch between them by pressing button 2. Warning! This option is available only if the monitor supports CEC (Consumer Electronic Control). Headphones It is possible to connect a set of headphones if your monitor supports it. The speakers of the screen will mute once you have connected the headphones. 17 5 Chapter Troubleshooting Below is a list of problems that may occur with your Vocatex. Consult the list first before contacting GW Micro or your dealer. Symptom No display on the screen Possible causes • Power failure • The screen is not switched on No sound • The screen volume is on zero • The sound has been disrupted • Headphones are plugged in • The HDMI connector is loose • Screen is on stand-by mode No sound or image while the red stand-by light at the front of the screen is on. The PC modes don’t work. • Wrong connectors • Wrong source • Wrong screen resolution What to do • Check whether the plug of the power cord has been properly plugged into the power outlet. If the device still won’t work, unplug the unit. Then wait 60 seconds before plugging it back in. Turn the screen on again. • Press the On button on the remote. • Slightly turn up the screen volume. • Make sure the sound has not been disrupted. • Point the remote control directly towards the sensor at the front of the screen. • Unplug the headphones. • Check the HDMI plug. • Press the On or 1 button on the remote. • Check whether the source has been correctly selected. Press the button to open the source list and select the correct source. • Check whether you have set the computer to the correct screen resolution. • Check the settings of the video card in the pc. 18 6 Chapter Warranty Express warranty GW Micro offers a three-year warranty on the Vocatex Plus, starting from the purchase date. The warranty covers labor and materials. To make use of the warranty, you need to keep the box and the packaging material. Warranty services are provided by GW Micro or a dealer acting for GW Micro. If the video magnifier cannot be repaired, GW Micro can decide on its own initiative to replace the reading device by another video magnifier featuring the same specifications. All components and products replaced within the warranty period become property of GW Micro. Monitor warranty The warranty for the Vocatex monitor must be handled directly by the manufacturer of the monitor. GW Micro will be responsible for warranty issues on the camera only. Warranty provisions 1. The warranty becomes invalid if the video magnifier: Was not used according to the instructions or was misused, Was damaged as a result of a fall or blow, Was disassembled or tinkered with, Was repaired by a non-official service partner. 2. Consequential loss is under no circumstances covered by the warranty. GW Micro will neither assume any liability nor accept any possibility of liability except for the warranty provisions expressly stated above. This limitation to the liability does not imply a breach of the customer’s legal consumer rights or his or her rights with the seller. Service fulfilment Before claiming the warranty or service and before contacting GW Micro or the dealer that you purchased the unit from, you must write the down product name, serial number, purchase date, invoice number and any error messages or particular problems that exist. 19 7 Chapter Specifications Vocatex Plus Type: GW Micro Vocatex Plus Inputs: HDMI OUT, POWER IN Power supply: Input: 12V DC 3,75A (MAX) Max. Power: 45W Standby Power: 0.16W Measurements (without screen) Height 10.6” x 16.3” x 22.8” X Width X Depth Measurements (with 26”screen): Height 25.2” x 26.4” x 22.8” X Width X Depth Maximum viewing angle 8.7” Minimum viewing angle 0.4” Magnification: 26” monitor 2.6x – 64x 32” monitor 3.2x – 78x 37” monitor 4x – 90x Weight (without monitor) 26.5 lbs. Features: Text focus rectangle: word and text block Column selector Continuous reading Adjustable reading speed Adjustable volume Multiple languages (UK English, US English, German, French, Dutch, Belgian Dutch, Italian, Spanish, Turkish, Norwegian, Swedish, Slovak, Danish, Hungarian, Polish, Portuguese, Romanian, Czech, Russian, Greek, and Finnish) Photomode 28 color combinations (black-blue, black-cyan, black-green, black-magenta, black-red, black-white, black-yellow, blue-black, blue-yellow, cyan-black, green-black, magenta-black, red-black, white-black, yellow-black, yellow-blue, 20 black-orange, orange-black, black-grey, grey-black, blue-white, white-blue, red-white, white-red, orange-white, white-orange, green-white, white-green) Autofocus LED lighting Spoken buttons High definition Contrast and brightness: 5 levels PC-connection Navigation: next/previous sentence 21 2011 GW Micro 725 Airport North Office Park Fort Wayne, IN 46825 [email protected] (260) 489-3671 22