1
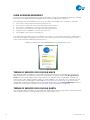
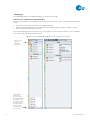
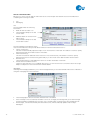
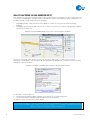
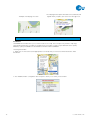
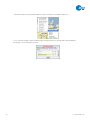
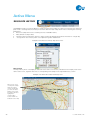
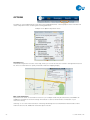
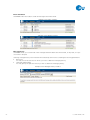
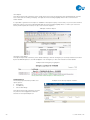
trackZEON
User Manual
www.trackzeon.com.au
Table of Contents
INTRODUCTION....................................................................................................................................... 4
TRACKZEON'S TOP 10 FEATURES........................................................................................................... 5
USER ACKNOWLEDGEMENT .................................................................................................................. 5
TERMS OF SERVICE FOR GOOGLE MAPS............................................................................................... 6
TERMS OF SERVICE FOR GOOGLE EARTH ............................................................................................. 6
MINIMUM COMPUTER REQUIREMENTS ................................................................................................ 7
LOG IN..................................................................................................................................................... 8
CHANGING YOUR PASSWORD................................................................................................................ 8
OPERATIONAL INFORMATION ................................................................................................................ 9
How do resources update their location? (Events and Status Icons) ............................................ 9
GPS Coverage versus Radio Frequency Coverage ....................................................................... 9
TRACKZEON INTERFACE ....................................................................................................................... 11
1. Primary and Active Menus .................................................................................................... 11
2. Navigational Icons................................................................................................................. 11
3. Map Display.......................................................................................................................... 12
4. Resource List (and Resource Information Box) ...................................................................... 12
Info ............................................................................................................................. 13
Messaging .................................................................................................................. 13
WHAT HAPPENS IN AN EMERGENCY? .................................................................................................. 14
RIGHT CLICK FUNCTIONALITY .............................................................................................................. 15
Show Closest Units and Hide Closest Units .............................................................................. 15
Directions From Here, Directions To Here and Clear Route ....................................................... 15
Obtaining directions between two points on the map .................................................. 16
Obtaining directions between any two resources ........................................................ 16
Obtaining directions between a resource and a point on the map ................................ 16
Identify Street and Clear Street................................................................................................. 17
Tag Map Here........................................................................................................................... 17
Smart Zones ............................................................................................................... 17
Inserting a Map Tag .................................................................................................... 17
Bookmarks ............................................................................................................................... 18
Inserting a bookmark ................................................................................................... 18
ACTIVE MENU
RESOURCE HISTORY ............................................................................................................................ 20
History View ............................................................................................................................. 20
Google View ............................................................................................................................. 21
STREET SEARCH ................................................................................................................................... 22
OPTIONS ............................................................................................................................................... 23
Targeting cross......................................................................................................................... 23
New event notification.............................................................................................................. 23
Highlight interval ......................................................................................................... 24
Change label background ............................................................................................ 24
Auto track new events.............................................................................................................. 24
Centre on resource at zoom level.............................................................................................. 24
2
USER MANUAL
Map tag visible at zoom level .................................................................................................... 24
Hide map event labels .............................................................................................................. 24
Hide map events ......................................................................................................... 24
Max closest units ........................................................................................................ 24
Zoom to closest units .................................................................................................. 24
Show notifier (in Resource History) ........................................................................................... 24
CURRENT .............................................................................................................................................. 25
PRIMARY MENU
MAP ...................................................................................................................................................... 26
MESSAGING .......................................................................................................................................... 26
New Message .......................................................................................................................... 26
Inbox and Outbox ..................................................................................................................... 27
Message History ...................................................................................................................... 27
REPORTS............................................................................................................................................... 28
Standard Reports ...................................................................................................................... 28
Total Usage Report ......................................................................................................... 28
Zone Report ................................................................................................................... 29
Emergency Log Report ................................................................................................... 29
Activity Reports ........................................................................................................................ 29
HELP ..................................................................................................................................................... 30
LOG OUT ............................................................................................................................................... 31
3
USER MANUAL
INTRODUCTION
Welcome to trackZEON; Motorola’s online GPS location service for the Zeon Digital network.
Zeon Digital radios are amongst the few two-way radios in Australia with inbuilt GPS, enabling you to locate your
employees 24/7 on web based maps, to improve safety and fleet efficiency.
A driver’s location can be identified in real-time to help you keep customers completely informed and your team
safe.
GPS history replay also lets you trace a team member’s movements from the past month to improve route
planning, prove compliance or assist with incident investigations.
The following user manual will guide you through each trackZEON feature step-by-step to enable you to get the
most out of this intuitive interface.
Enjoy the convenience of using a single device for both communications and a GPS location service.
4
USER MANUAL
TRACKZEON’S TOP 10 FEATURES
trackZEON gives you the capability to…
1.
Find your radios.
See where your entire team is on the map or drill down to get more precise location details for individual
team members.
2.
Handle emergencies better.
Pinpoint the location of a team member in an emergency! trackZEON’s reporting feature also ensures there
is a paper trail describing how the emergency is handled and by whom.
What happens in an emergency?
3.
See where your resources have been.
Re-create the trail for where your team has travelled to over the past month. Export the data to Google Earth
for a fully photographic view.
Resource History
4.
Dispatch jobs.
Use trackZEON to exchange text messages with a single person or your entire team. ‘Message history’
keeps track of the information exchanged.
Messaging
5.
Find a street.
Search for and find a street with ease.
Street Search
6.
Find the closest radios to any position on the map.
Right-click to find the closest team member to that point on the map.
Show Closest Units and Hide Closest Units
7.
Get directions.
Get directions for how to get from ‘A’ to ‘B’ via Google Maps.
Directions From Here, Directions To Here
8.
Map customisation.
Tag important landmarks, customers or suppliers to give your maps better perspective.
Tag Map Here
9.
Create ‘smart zones’.
Establish zones around your map tags to stay informed of when team members have entered that area; an
excellent tool to prove services rendered.
Tag Map Here (Smart Zones)
10. Access more comprehensive reports.
trackZEON is capable of retrieving GPS data for any radio for up to one month in the past to create a range
of automated reports.
Reports
5
USER MANUAL
USER ACKNOWLEDGEMENT
The following user acknowledgements must be accepted prior to logging in trackZEON. Acceptance is indicated
by ticking the trackZEON User Acknowledgements box within the login field, shown below.
Zeon Digital provides the trackZEON service on an 'as is' basis. Zeon Digital does not warrant or guarantee:
• the accuracy of any location provided through the service;
• the accuracy or timeliness of any event reported through the service;
• the accuracy, completeness or currency of any map on the service;
• the timely or secure delivery of messages sent through the service;
• the performance, availability or security of the service; or
• the suitability of the service for any purpose.
Zeon Digital will not be liable for any loss, damage, claim, expense, cost (including legal costs) or liability arising
in any way (including from negligence) from your use or non-use of the service or your reliance upon location,
event or map information obtained through the service.
Example of login window with trackZEON User Acknowledgements ticked
TERMS OF SERVICE FOR GOOGLE MAPS
Zeon Digital provides the capability to export data that may be imported into Google Maps. By using Google
Maps and any data or information accessed from Google Maps, you agree to be bound by Google Terms of
Service as well as these additional terms and conditions. For individual users, Google Maps, including local
search results, maps, and photographic imagery, is made available for your personal, non-commercial use only.
For business users, Google Maps is made available for your internal use only and may not be commercially
redistributed, except that map data may be accessed and displayed by using the Google Maps API pursuant to
the API terms and conditions. Reference site: http://maps.google.com/help/terms_maps.html
TERMS OF SERVICE FOR GOOGLE EARTH
Zeon Digital provides the capability to export data that may be imported into Google Earth. Google Earth requires
users to agree and adhere to Google Earth terms and conditions prior to use.
6
USER MANUAL
MINIMUM COMPUTER REQUIREMENTS
The following hardware and software requirements will enhance trackZEON’s performance:
Web Browser
Internet browsers that support trackZEON include Safari, Chrome, Internet Explorer and Firefox.
trackZEON may perform better using Safari than other internet browsers. Safari 3.1.1 can be downloaded from
http://www.apple.com/safari/download/. If you wish to establish a shortcut from your desktop to operate
trackZEON using Safari, please follow the instructions below:
Go to your desktop to start the following process.
This is the location where your shortcut link to trackZEON will be established.
1. Right click on the desktop.
2. Select New -> Shortcut.
3. In the dialogue box that appears, select BROWSE. Find the location where you have downloaded
4.
5.
6.
7.
8.
9.
Safari to your computer and select. The default location is: C:\Program Files\Safari\Safari.exe.
Click NEXT.
Label the shortcut e.g. trackZEON.
Click FINISH.
Right click on the newly created shortcut and select PROPERTIES.
In the dialogue box that appears, find the target field. By default it will read:
"C:\Program Files\Safari\Safari.exe”
Add the following text to the end, so that the target field reads:
"C:\Program Files\Safari\Safari.exe" - URL http://www.trackzeon.com.au
N.B. Ensure a space is left before you add the additional text.
10. Select OK to finish.
Clicking this shortcut will automatically navigate to the trackZEON login page using Safari, without interfering
with the internet browser you may use for other applications.
Applications
MS Excel 2003 or later.
Internet Connectivity
A connection to the Internet is required to access the service, preferably a high-speed broadband connection. At
a minimum, high-speed dial-up connectivity is required. Proxy servers must not strip off unknown http headers.
System Requirements
System requirements are highly dependent upon the number of resources allocated to your trackZEON login and
the browser you choose to use.
Suggested minimal requirements, for the following resource quantity brackets, include:
7
1-50 Resources
51-100 Resources
101+ Resources
CPU: 1.8 GHz
RAM: 768 Mb
CPU: 2.4 GHz
RAM: 1 Gb
CPU: Intel Core 2 Duo 1.8 GHz or greater
RAM: 2 Gb
USER MANUAL
LOG IN
A unique user name and password is given to all trackZEON customers to provide you with exclusive access to
view the location of your Zeon Digital radios online. Your unique user name and password will be provided to you
by your Zeon Digital dealer.
1.
2.
3.
Access trackZEON at www.trackzeon.com.au
Type in your user name and password.
trackZEON will display your Zeon Digital radios on screen.
•
The map will automatically zoom to an appropriate level that encompasses all of your Zeon
Digital radios with GPS lock.
•
Each radio will display its last known location including status, date and time stamps.
trackZEON can have improved performance in Safari.
Be aware that the “Back” button in all browsers will log you out of trackZEON.
CHANGING YOUR PASSWORD
trackZEON users are able to change their contact details and password via the trackZEON interface. Selecting
Account in the top right hand corner of the screen will open a new page containing the following two tabs:
•
•
Account details – a record of the contact information for your primary trackZEON administrator.
The nominated email address will be used by Motorola to issue new passwords (See Change Password
below) and to send trackZEON updates. Email addresses are strictly for use by Motorola only.
Change password – to change your password to any password of your choice.
o Only one password is applicable per trackZEON login; it is important to advise all trackZEON users
of the active password to ensure their access is not impeded.
If you forget your password, please call Motorola on 1300 936 648 within business hours and a new, randomly
selected password will be emailed to the email address saved within your account details.
8
USER MANUAL
OPERATIONAL INFORMATION
Throughout this user manual a Zeon Digital two-way radio is referred to as a ‘resource’.
How do resources update their location? (Events and Status Icons)
Events
An ‘event’ is a pre-defined trigger for a Zeon Digital radio to update its GPS location by sending a poll of its
position to trackZEON. The default ‘event’ settings are:
•
Time: every 10 minutes.
•
Distance: every 1 kilometre.
•
Emergency being initiated (the radio will continually update its location until the emergency is disengaged.)
•
The radio being switched off.
•
Transmit Inhibit being enabled or disabled.
Each event is matched with a time and date stamp to give a precise indication of when that event occurred. This
information is stored by trackZEON for up to one month.
Status Icons
Events (or triggers) also determine what is referred to as the ‘status’ of the radio, indicated on screen using
different, easy-to-identify icons. These status icons are:
Green Arrow: Indicates the radio is on.
(this is the default icon to display the location of a radio on the map)
Emergency: Triangle with an exclamation mark, flashing alternately between red
and yellow. This icon indicates the radio’s emergency button is engaged, and
persists until both the radio user and the trackZEON operator have cleared the
emergency state.
Universal Off symbol: Indicates the radio is turned off.
TXI: Indicates the radio has transmit inhibit mode enabled.
Low Battery: Indicates when a radio’s battery level is less than 10%.
Out of Coverage: Indicates a radio has lost GPS coverage.
Additional Status Icon
The following status icon is not triggered by an event as per the above.
Message: Indicates that an unread message has been sent by this radio to
trackZEON.
At all times the radio must have GPS lock to update its location on trackZEON.
GPS Coverage versus Radio Frequency Coverage
Zeon Digital radios send two types of location and status updates to indicate the radio’s last known position for:
1.
GPS coverage
When the radio has GPS lock and is capable of updating its physical location on trackZEON via satellite.
GPS coverage is not always available due to loss of satellite signal, the radio going undercover, or a
number of other factors external to the radio itself.
2.
Radio Frequency (RF) coverage
When the radio has RF coverage for voice communication.
It is important for trackZEON operators to be able to discern between the two sets of location and status
updates in order to more accurately interpret the information displayed on trackZEON.
The following example explains how this information is displayed in the radio information box.
9
USER MANUAL
Example
A courier driver delivers a package to a building.
He is detained within the building for five minutes
waiting for his receipt. As he is still within RF
coverage of the Zeon Digital network, the status
of his radio remains as ‘on’ with the radio’s RF
coverage time and date stamps continuing to
update accordingly.
When he entered the building however, he did
lose sight of GPS satellites and lost GPS lock on
his radio. The time and date stamps for the
address shown therefore indicate the last known
location for when the radio had GPS coverage.
A radio that loses both GPS and RF coverage will not be capable of sending any updates to trackZEON.
10
USER MANUAL
TRACKZEON INTERFACE
trackZEON uses a concise interface that includes:
1. Primary and Active Menus
2. Navigational Icons
3. Map Display
4. Resource List
2. Navigational Icons
1. Primary and
Active Menus
4. Resource List
3. Map Display
1. Primary and Active Menus
The primary and active menus include four headings each, to provide different functionality to navigate and
manage trackZEON. The functionality for each of these headings is explained in greater detail, in respectively
named sections, throughout this user manual.
2. Navigational Icons
The navigational icons allow you to move the map as required. These are:
Navigate Map
This function
allows the user to
move the map in
any direction.
Zoom Out
Click for a wider
view of the map.
Zoom In
Click for a closer
view of the map.
Each time you click on Zoom In or
Zoom Out, the zoom level (below)
will move one space. The active
zoom level is indicated by the
green bar.
You can also jump to your desired
zoom level by clicking directly on
any bar in the zoom level (below).
1:5000000 to 1:5000
Zoom Out to Zoom In
11
Rubber Zoom
The rubber zoom
allows you to
select a specific
area you wish to
zoom in to.
Click and hold to
draw a square
around the area
you wish to zoom
in to.
The map will
automatically
centre on this area
and zoom to the
lowest level
available,
depending on
square size drawn.
Return to
Extents of all
Events
This icon will
automatically
adjust the map
to show all
resources.
Return to
Previous Map
Selecting this icon,
will automatically
re-centre and
adjust the map to
its most recent
view.
USER MANUAL
3. Map Display
The map display refers to the graphical display of your radios on the map.
4. Resource List (and Resource Information Box)
All resources allocated to your trackZEON login are listed in the resources column on the right-hand side of the
screen.
•
•
Each resource is listed, with its status icon, alphanumerically.
Radios are categorised by the most recent activity, being either Today, Yesterday or Older, in order to
quickly determine which radios are active.
The contracted (default) view of the resources column lists the resource name and status icon. The expanded
view also provides the last known GPS location.
Examples of the contracted and expanded views of the resources column
Click on these
arrows to
change the
column view.
It is possible to
search for a
specific resource
via a search field at
the bottom of the
resource list. This
is a useful feature
to find a resource
quickly versus
scrolling through
the entire list.
12
USER MANUAL
Resource Information Box
Placing your cursor over any radio ID within the resource list will open the relevant resource information box
containing the following two tabs:
•
•
Info
Messaging
Info
The Info tab provides the following
information:
•
Radio ID with its status icon.
•
Time and date stamps for its last
known event.
•
•
Address details for its last known
GPS location.
Time and date stamps for its last
known GPS location.
The five hyperlinks at the bottom of the
resource information box also provide direct interaction with the selected resource to:
•
Centre on Resource
This link will automatically adjust the map to zoom in and centre on the radio. This feature is useful to quickly
determine the last known GPS location of the radio.
•
View Latest History
This link will create an audit trail of the resource’s most recent activity. This feature is useful to quickly
determine the resource’s last activity, particularly if you are unsure of the date the radio was last active.
•
Poll Resource
Selecting Poll Resource will update the resource’s location and status in real time.
•
Directions From and Directions To
These two links will allow you to establish directions to or from the resource to another location via Google
Maps. See Options in this user manual for further details.
Messaging
Selecting the messaging tab allows you to send messages directly to the selected radio without the overhead of
using the messaging link in the menu bar.
•
•
•
13
The messaging box will turn red if the character limit is exceeded.
If the message is not successful (if the radio is off or out of range), the message will go into the message
queue and will be forwarded to the resource once it is again within coverage of the Zeon Digital network.
All messages, sent and received by the selected resource, will automatically update under ‘Today’s
Messages’.
USER MANUAL
WHAT HAPPENS IN AN EMERGENCY?
Zeon Digital’s two-way radio’s emergency button gives staff the peace of mind they can call for help at the touch
of one button. Integrating the emergency button with GPS also means that employees can be located quickly on
a web-based map, so help can be sent in an emergency.
•
•
trackZEON provides visual alerts and location details on screen for a resource which has emergency
engaged.
trackZEON will automatically pan and zoom in, to centre on the resource’s location, highlighted by a flashing
red and yellow status icon.
Example of the trackZEON display for a resource with emergency engaged
The resource information box will also introduce an emergency tab in order to create a log of how the
emergency is responded to. The emergency tab will request the trackZEON user to enter his or her name and a
description of the action taken.
Example of the radio information box emergency tab with details entered
It is possible to create a report of:
•
The emergencies that have been engaged, for any resources, for a specified period.
•
The action taken by trackZEON operators responding to an emergency.
See Reports in this user manual for further details.
An emergency status for a resource cannot be cleared within trackZEON until it is firstly cleared by the radio
operator. This is a health and safety feature to ensure the emergency is not mistakenly cleared before the radio
operator confirms the emergency state no longer exists.
14
USER MANUAL
RIGHT CLICK FUNCTIONALITY
‘Right-clicking’ your mouse on any part of the trackZEON map will create a drop down menu containing the
following parameters:
Show Closest Units and Hide Closest Units
Under Options in the sub-menu bar, you have the capability to ‘hide’ your resources on the map to reduce the
amount of information presented on the map and make it easier to read. This is a particularly useful feature if you
have a lot of resources displayed on trackZEON. See Options later in this user manual for further details.
After you have established your preferred settings under the Options menu, these two right click functions will
activate this function to ‘show’ or ‘hide’ the closest resources from the location where you have ‘right-clicked’ on
the map.
Directions From Here, Directions To Here and Clear Route
trackZEON gives you have the capability to obtain the directions between ‘A’ to ‘B’ via Google Maps. Directions
can be provided between any two points on the map (including map tags), between any two resources, or
between a resource and any point on the map.
Example of obtaining directions between two points on the map
The starting point for
directions is indicated
by the green circle.
The end point for
directions is indicated
by the red circle.
The directions fields
specifying the ‘from’
and ‘to’ locations
automatically open
and update, in the
bottom left hand
corner of the screen.
‘Get Directions’ will
initiate the query via
Google Maps.
15
USER MANUAL
Example of query results via Google Maps
Obtaining directions between two points on the map
1.
2.
3.
4.
5.
Select the location on the map from where you wish to start obtaining directions.
Right click and select ‘Directions From Here’. The directions field will automatically open and update, in the
bottom left hand corner of the screen.
Select the location on the map to where you wish to end the directions.
Right click and select ‘Directions To Here’. The directions field will automatically update, in the bottom left
hand corner of the screen.
Google Maps will open in a new window with detailed directions and a graphical display of the route.
To use a map tag as a start or end point for your directions, click on Street Search in the menu bar, select the
appropriate map tag and click ‘From here’ or ‘To here’ within the map tag to start or end the directions
respectively.
Obtaining directions between any two resources
1.
2.
3.
4.
5.
6.
7.
8.
Click on the resource in the right-hand resource column from which you wish to start obtaining directions.
The selected radio’s information box will open.
Click on ‘Directions From’. The directions field will automatically open and update, in the bottom left hand
corner of the screen.
Click on the resource in the right-hand resource column to which you wish to end the directions.
The selected radio’s information box will open.
Click on ‘Directions To’. The directions field will automatically update, in the bottom left hand corner of the
screen.
Click on ‘Get Directions’.
Google Maps will open in a new window with detailed directions and a graphical display of the route.
Obtaining directions between a resource and a point on the map
1.
2.
3.
4.
5.
6.
16
Click on the resource in the right-hand resource column from which you wish to start obtaining directions.
The selected radio’s information box will open.
Click on ‘Directions From’. The directions field will automatically open and update, in the bottom left hand
corner of the screen.
Select the location on the map to where you wish to end the directions.
Right click and select ‘Directions To Here’. The directions field will automatically update, in the bottom left
hand corner of the screen.
Google Maps will open in a new window with detailed directions and a graphical display of the route.
USER MANUAL
Identify Street and Clear Street
Right-click on any street and select ‘Identify Street’ to highlight this street on the map and specify its name,
suburb and state.
Example of identifying a street on the map
Selecting ‘Clear Street’ will remove the highlight of that street from the map.
Tag Map Here
A map tag allows you to mark a specific location on the map. You may create map tags for frequently visited
locations or to mark important land marks to give your trackZEON maps better perspective and make them
easier to read.
Smart Zones
Defining a ‘smart zone’ around your map tag also gives you the ability to ‘track’ resources being present within
that defined area. This is a useful feature if you wish to produce a compliance report to prove that a particular
location was visited within a given date and time. For example, a security firm may create a smart zone around
each of its customers’ locations and produce a report at the end of each month to prove each location had been
visited, as per their security contract. See Reports in this user manual for further details.
A resource’s presence within a smart zone is however only recorded if the radio sends a poll of its GPS location
whilst within the smart zone area. This may occur as a matter of course, as per the radio’s standard location
update settings, or can be performed manually by programming a single-push button on the radio to act as a
‘polling button’ which will force the radio to update its GPS location with trackZEON, when pressed.
Inserting a Map Tag
1.
2.
Right click on the location where the map tag is to be placed and select ‘Tag Map Here’.
The map tag configuration box will open:
•
Title: enter the name of the map tag (e.g. a customer name, an address, etc)
•
Zone diameter: define the radius of the smart zone around this map tag.
•
Description: enter important information relating to the tag (e.g. “phone customer on 03 9877 5555
before delivery”)
Example of the map tag configuration box
The dotted red line
indicates the smart
zone boundary
17
USER MANUAL
Example of a map tag on screen
The map tag’s description and smart zone (if defined) will
appear when you place your cursor over the tag’s icon
Map tags are automatically listed as a shortcut under street search.
Bookmarks
trackZEON’s bookmarks allow you to ‘mark’ a location on a map. The concept is very similar to map tags,
although bookmarks are not visible on a map but act as a means to jump to a pre-defined location quickly.
Brisbane, Sydney and Melbourne are default bookmarks within trackZEON.
Inserting a bookmark
1. Right click on the location (at the appropriate zoom level) that you wish to bookmark and select ‘Add
Bookmark’.
2. The ‘Add Bookmark’ configuration box will open to allow you to name your bookmark.
18
USER MANUAL
3. New bookmarks are automatically added to your bookmark list, accessible via right-click.
4. You can later manage your bookmarks by right-clicking anywhere on the map and selecting ‘Manage
Bookmarks’. The following box will open:
19
USER MANUAL
Active Menu
RESOURCE HISTORY
trackZEON provides you with the ability to create an instant action replay of a radio’s movements from within the
past month. Selecting Resource History in the menu bar will create a drop down menu containing the following
parameters:
•
Resources (drop-down menu containing the list of available radios).
•
Date (default is today’s date).
•
Time period (hour and minute options to refine results; All (default) will produce all results for a single day.
•
“Google View” and “History View” are explained in greater detail below.
Example of the Resource History drop down menu
History View
Clicking “History View” will display an audit trail of the radio’s movements, indicated on the map by a trail of the
radio’s status icons, together with a list of corresponding time stamps in the right hand history column.
Example of an audit trail created via History View
Placing your cursor
over any time stamp
within the history
column will provide
you with the radio’s
address in the radio
information box and
highlight the
corresponding
location within the
audit trail on the map.
20
USER MANUAL
A flashing icon within your audit trail indicates the last known location for the resource within the audit
trail. This feature may be switched on and off via the Options menu.
See Options/ Show notifier (in Resource History) for further details.
In the bottom right hand corner, the History Replay toolbar gives you greater control to ‘replay’ a
radio’s movements on screen.
•
•
•
•
Play will start the historical journey of the radio.
Stop will stop the replay and revert to a display of the entire audit trail on the map.
Pause will freeze the replay.
Speed slider will control the speed of the replay.
Google View
“Google View” will export the query results into a kml file that can be imported into various mapping
programmes, including Google Earth.
Please see the below steps for importing mapping data into Google Earth:
1.
2.
3.
4.
5.
6.
Download Google Earth from: http://earth.google.com/ (you will be required to agree and adhere to Google
Earth’s terms and conditions).
Run the Google Earth installer.
Click on Resource History / Google View to export the resource’s audit trail into a kml file.
Save the kml file on your computer.
Open the kml file within Google Earth.
Google Earth will graphically display the audit trail on the map.
Example of the same audit trail (above) created via Google View
21
USER MANUAL
STREET SEARCH
trackZEON has the ability to search for specific streets to make it easier to dispatch jobs and provide directions.
Selecting street search in the menu bar will create a drop down menu containing the following parameters:
•
Zoom to a map tag
A shortcut to jump to a map tag’s location in one step (the map tag must be previously defined – see Right
Click Functionality in this user manual for further details).
•
Enter Street name, Suburb and/or City name
Select a street from the list of options provided (specific street numbers are not searchable).
Examples of the Street Search drop down menu and the street highlighted on the map
trackZEON will
give you a list of
options for the
street you have
specified.
Once selected,
the map will
zoom in and
highlight the
street.
Once three characters are entered into the street search field, trackZEON will dynamically
short-list the possible matches to select from.
You will be advised if trackZEON is unable to find the street or suburb name requested.
22
USER MANUAL
OPTIONS
A number of customisable features exist within the trackZEON interface. Selecting Options in the menu bar will
create a drop down menu containing the following parameters:
Example of the Options drop down menu
Targeting cross
This feature ‘targets’ the resource on the map, when you roll over the resource’s name in the right-hand resource
list. This is a useful feature to quickly find a radio within the mapping display.
New event notification
Any time a new ‘event’ is received from a resource, for example a radio may be switched off, trackZEON can
establish a visual alert of the event change. This feature is useful to remain aware of what each of your
resources is doing.
Selecting ‘on’ for ‘new event notification’ will change the background colour behind the relevant radio’s name
within the resource list. Additional visual alert options include:
23
USER MANUAL
Highlight interval
This option allows you to define the time frame for which the background colour is changed.
Change label background
This option allows you to also change the colour of the resource’s ID tag on the mapping display and to
temporarily highlight this resource on the map if the option to ‘hide map events’ (explained in detail later within
this section of the user manual) is activated.
Auto track new events
Activating this feature will ensure trackZEON checks that any time a resource updates its GPS location, the
resource itself has not moved outside the visible map area on screen. If the resource has moved beyond this
area, trackZEON will automatically zoom out to the extents of all resources to ensure your entire team is visible
on screen.
This feature is best used when monitoring resources only as the display will continually and
automatically change its view, based on the location of your resources. Turn this feature off if you wish
to maintain control of the zoom level of your mapping display.
Centre on resource at zoom level
This feature allows you to specify the appropriate zoom level when ‘centre on resource’ is selected in the
resource information box. The default setting is 1:5000.
Placing your cursor over the zoom level indicator in the controls menu will highlight the scale for each level.
Map tag visible at zoom level
This feature allows you to specify the appropriate zoom level to display map tags on the map. The default setting
is 1:50000.
Hide map event labels
trackZEON gives you the capability to ‘hide’ your resources on the map to reduce the amount of information
presented. This is a particularly useful feature if you have a lot of resources displayed on trackZEON.
Selecting ‘yes’ for ‘hide map event labels’ will hide each resource’s ID tag on the mapping display. Additional
options related to this function include:
Hide map events
This option will also hide each resource’s status icon on the mapping display (in addition to hiding the ID tag).
Placing your cursor over the resource’s name in the resource list will however highlight the location of this
resource on the map. You can retain visibility of a resource on-screen by right-clicking on the resource’s name in
the resource list: the name will be underlined and turn bold. Right-clicking a second time will hide this resource
again.
Max closest units
This option will specify how many of the closest units you wish to view when you right-click anywhere on the
map and select the ‘Show Closest Units’ function. See Right Click Functionality in this user manual for further
details.
Zoom to closest units
This option will force trackZEON to automatically zoom in or out to display the ‘max closest units’ on the
mapping display. See Max Closest Units above for further details.
Resources with emergency engaged will automatically display on the map, irrespective of the ‘hide
map event label’ settings.
Show notifier (in Resource History)
This feature will highlight the last known location for a resource within an audit trail (created by selecting ‘History
View’ under ‘Resource History’). This is useful to quickly determine the resource’s last known GPS location
within the audit trail.
24
USER MANUAL
CURRENT
Selecting Current in the menu bar will revert trackZEON to the mapping page.
25
USER MANUAL
Primary Menu
MAP
Selecting Map in the menu bar will revert trackZEON to the mapping page, including a complete refresh of the data
for each resource. This option will take longer to return to the mapping page than selecting ‘Current’, to allow
trackZEON to interpret the new incoming data.
MESSAGING
trackZEON enables you to send and receive text messages to and from your radios in the field.
Selecting Messaging in the menu bar will open a new page containing the following options:
•
New Message
•
Inbox (default messaging view)
•
Outbox
•
Message History
New Message
trackZEON provides you the ability to send messages one-to-one or one-to-many. Selecting New Message in the
menu bar will create a drop down menu containing the following parameters:
•
Select Resources
You may choose all resources, or manually select the individual resources, you wish to send a message to.
•
Message Text
You may type your message text within this box.
Example of the New Message interface
26
USER MANUAL
Inbox and Outbox
trackZEON’s inbox and outbox contain all messages sent and received.
Example of the Inbox interface
Example of the Outbox interface
Message History
trackZEON allows you to retrieve all of the messages that have been sent and received, for any radio, for up to
one month in the past.
Selecting message history in the menu bar will create drop down menus containing the following parameters:
•
Resources
You may choose the resource for which you wish to obtain the messaging history.
•
Start Date and End Date
You may specify the period for which you wish to obtain the messaging history.
Example of the Message History interface
27
USER MANUAL
REPORTS
trackZEON provide a number of reports to assist with interpreting the data received by each resource. Selecting
Reports in the menu bar will open a new page that will allow you to choose from two different types of reports:
•
Standard Reports
•
Activity Reports
All reports can retrieve information for up to one month in the past, which can be exported as web (HTML),
Microsoft Excel (XLS) or Comma Separated Value (CSV) files.
Standard Reports
The standard report interface provides three report options:
•
Total Usage Report
•
Zone Report
•
Emergency Log Report
Example of the Standard Reports interface and drop down menu
Total Usage Report
This report provides you with a summary of the activity of a resource, such as the resource’s location and status,
for the specified period. Tick the ‘show latitude and longitude’ box to include the resource’s geographic position
within your report.
Example of a Total Usage Report
28
USER MANUAL
Zone Report
This report will provide a summary of the Smart Zones a resource has entered for the specified period. A smart
zone is the area surrounding a map tag. See Right Click Functionality/Tag Map Here in this user manual for
further details.
It is possible to generate a zone report to establish a retrospective query of the activity of your resources within a
particular location. Follow the steps detailed Right Click Functionality/Tag Map Here to review your resources’
activity within a particular location, for up to one month in the past.
Example of a Zone Report
Emergency Log Report
This report will provide a summary of the details relating to when an emergency is received, and the action taken
by the trackZEON operator. See ‘What happens in an emergency’ in this user manual for further details.
Example of an Emergency Log Report
Activity Reports
The activity report interface provides four
report options:
•
Emergency
•
Low Battery
•
Out of GPS Range
Example of the Activity Reports interface
This report will provide a summary of when
any resource has engaged the selected
activities for the specified period.
29
USER MANUAL
Example of an Activity Report for an emergency query
Data is stored by trackZEON for a continuously rolling four week period.
Export and save important reports to your computer to retain a permanent record.
HELP
Selecting Help will open the trackZEON user manual to read online.
30
USER MANUAL
LOG OUT
Selecting Log Out from the upper right hand corner of the menu bar will log users out of trackZEON. The system
will automatically revert to the trackZEON login page for the next user.
31
USER MANUAL
Motorola Australia Pty. Limited
10 Wesley Court Tally Ho Business Park
East Burwood VIC 3151
Tel +61 3 9847 7700 Fax +61 3 9847 7752
[email protected] www.zeondigital.com.au
The information presented herein is to the best of our knowledge true and
accurate. No warranty or guarantee expressed or implied is made regarding
the capacity, performance or suitability of any product. MOTOROLA and the
stylized M logo are registered in the US Patent & Trademark Office. All other
product or service names are the property of their respective owners.
32
USER MANUAL