1
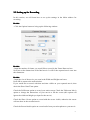
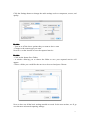
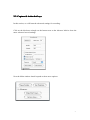
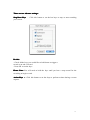
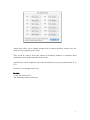
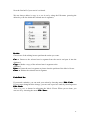
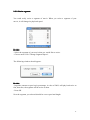
Easy Video Recorder for Mac
User's Guide
Follow us on :
http://www.facebook.com/videorecordersoftware
https://twitter.com/VideoRecorderNe
https://plus.google.com/115150222758716042381
http://www.youtube.com/user/VideoRecorderNet
Contents
1. Introduction.....................................................................................................................3
2. Basics...............................................................................................................................3
2-1. The Main Window............................................................................................... 3
2-2 Setting up for Recording...................................................................................... 5
2-3. Capture & Action hot keys..................................................................................7
2-4. Recording........................................................................................................... 11
2-5. Movie Viewer.................................................................................................... 12
2-5-2. Resize segment:.......................................................................................14
2-5-3. Exporting:................................................................................................ 15
3. Easy Video Recorder for Mac - Frequentlsy Asked Questions.................................16
4. Contact & Technical Support...................................................................................... 20
1. Introduction
Easy Video Recorder for Mac is a great choice for those who want to record online
videos, game missions, screencasts as well as create presentations or video
tutorials with amazing video and audio quality!
When the Easy Video Recorder was installed, you will see an icon on the computer
screen. Click the icon to launch it. Then you may set the options to begin recording
video from your screen and audio from your microphone to a QuickTime movie.
In the following pages, you will learn all the main features of Easy Video Recorder
for Mac.
2. Basics
2-1. The Main Window
The main window contains all the basic settings that you will need to record your
screen:
Record – Press this button to start/stop recordingyour screen.
Options – This brings up more options such as compression, quality, frame rate, and
the size of the final movie
Capture Width – This is the capture width.
Capture Height – This is the capture height.
how Date/Time – Check this option to show the current date and time while
Show
capturing.
Show Cursor – Check this option to show the user’s cursor in the recorded movie.
Record Audio – Check this option to record with audio from a sound input device
such as a microphone.
Settings – Click here to show the audio settings. In the audio settings, you may
change the input source, compressor, and quality of the audio.
Camera – This is the type of camera to use while recording. The camera is the area to
capture on your screen.
* Fixed – This option will leave the camera at a fixed location that you set.
* Smooth Pan – This option will smoothly pan the camera to the location of the
user’s cursor.
* Auto Pan – This option will move camera to the location of the cursor when the
user moves the cursor close to the bounds of the camera.
Save Folder – Click this button to choose the folder to save your recorded movie.
et Region – Click this button to set the location and size to record your screen.
Set
Stop/Stop Keys – Click this button to set the hot keys to start and stop recording.
Action Keys – Click this button to set actions keys that will be able to change any
setting on the main window while capturing.
4
2-2 Setting up for Recording
In this section, we will learn how to set up the settings in the Main window for
recording.
Do this:
- Click the Options button to bring up the following window:
Do this:
- Input the number of frames you would like to record in the Frame Rate text box.
Now lets set the dimensions of the final movie. It will fit the captured movie area into
this dimension.
Do this:
- Input the size of the movie you want in the Width and Height text boxes.
Press OK to return to the main window.
If you would like to record with date and time visible on your captured movie, then
check the Show Date/Time option.
Check the FullScreen option to record your entire screen. Check the Fullscreen Movie
option to change the dimensions of your movie to fill the screen (this option will
ignore the width and height you input for the movie).
Check the Show Cursor option to record with the cursor visible, otherwise the cursor
will not show in the recorded movie.
Check the Record Audio option to record audio from your microphone to your movie.
5
Click the Settings button to change the audio settings such as compressor, source, and
quality:
Do this:
- Turn on or off the above options that you want or don’t want
- Change to the camera type you want.
Now let’s set the location to save the captured movies.
Do this:
- Click on the button Save Folder
- A window allowing you to choose the folder to save your captured movies will
appear:
- Select a folder you would like the movies to be saved and press Choose.
Now we have set all the basic settings needed to record. In the next section, we’ll go
over the more advanced capturing settings.
6
2-3. Capture & Action hot keys
In this section, we will learn the advanced settings for recording.
Click on the disclosure triangle on the bottom next to the Advance label to show the
more advanced record settings.
Now the Main window should expand to show more options:
7
There are two Advance settings:
Stop/Start Keys – Click this button to set the hot keys to stop or start recording
your screen:
Do this:
- Check all the keys you would like to hold down to trigger a
record or an end of record.
- Press OK to set the keys.
Please Note: You will need to hold the keys until you here a snap sound for the
recording to begin or end.
Action Keys – Click this button to set hot keys to perform actions during a screen
capture:
8
Action keys allow you to change settings such as camera position, camera size, etc.
while you are capturing your screen.
They could be used to focus the camera on different windows or locations when
capturing an area smaller than the entire screen.
Actions keys can be assigned to any of the function keys on your keyboard from F1 to
F12.
Now let’s do a sample Action key.
Do this:
- Click Set Action for F1.
The following window will open:
9
Width – This is the width of the capture area.
Height – This is the height of the capture area.
Show Date/Time – Check this option to show the current date and time.
Fullscreen – Check this option to record the entire screen.
Camera – This is the type of camera to use while recording.
Fixed – This option will leave the camera at a fixed location that you set.
Smooth Pan – This option will smoothly pan the camera to the location of the
user’s cursor.
Auto Pan – This option will move camera to the location of the cursor when the user
moves the cursor close to the bounds of the camera.
Position – Click this button to set the position (and size) of the camera:
10
Press the space key to accept the position and size. Press the ESC key to cancel the
changes.
You may also right-click to bring up a menu.
The highlighted area is the position and size of the camera You may move it by
dragging within the highlighted area. To resize, drag the small boxes at the corners of
the highlight area.
Cursor Visibility – Check this option to show the user’s cursor.
On the left part of the window are check boxes. By checking these check boxes, the
settings to the right of that check box will be changed when the user presses the that
function key.
Do this:
- Turn on one or more of the settings by checking the check boxes on the left.
- Now change the settings to something new.
- Press OK when done.
- Press Done on the Set Action Keys window.
Now when you hold F1 on your keyboard until you hear a woop sound while
recording, the settings will be changed to the settings you set for the F1 function key.
When you hold that same function key again until you hear a pop sound, the settings
will revert back to the original capture
settings.
Now you have learned how to assign action hot keys.
2-4. Recording
In this section, we will guide you through the recording process.
Lets begin recording!
Do this:
- Press Record from the Main window or trigger the record by pressing the record hot
keys (if you have it set).
Now your screen should look something like this:
11
The highlighted area is the position and size of the camera You may move it by
dragging within the highlighted area. To resize, drag the small boxes at the corners of
the highlight area.
Press the space key to accept the position and size. Press the ESC key to cancel the
changes. You may also right-click to bring up a menu.
Do this:
- Position and size the camera
- Press the space key to accept the position and size.
Now it should be recording your screen.
Do this:
- Once you’re ready to end the capture, click on the ScreenRecord icon in the dock to
end it, or you may press the start/stop hot key if you have it set.
Now you recorded movie should automatically load in ScreenRecord.
Here you may delete the movie if you don’t like it, or you may edit your movie using
copy and paste.
12
To delete the movie you just recorded, choose menu:
File — Delete
2-5. Movie Viewer
In this section, we will learn about the Movie Viewer and its powerful features.
2-5-1. Editing:
The movie viewer contain simple editing features using cut, copy, paste, and clear.
Let’s first learn how to select a movie segment with the Movie Viewer by using the
controller bar on the bottom of the Movie Viewer window:
Let’s select from the beginning of the movie to the middle of the movie so you can
get the first half of the movie selected.
Do this:
- Move the movie cursor to the beginning of the movie and release the mouse.
- Drag the movie cursor to the middle of the movie:
13
Now the first half of your movie is selected.
We can choose delete it, copy it, or cut it out by using the Edit menu (pressing the
delete key will also delete the selected movie segment):
Do this:
Choose one of the editing item to perform the action you want:
Cut – Removes the selected movie segment from the movie and puts it into the
clipboard.
Copy – Makes a copy of the selected movie segment to the
clipboard.
Paste – Pastes the movie segment or picture into the position of the Movie Cursor.
Clear – Deletes the selected movie segment.
Undo/Redo Do:
If you made a mistake, you can undo your action by choosing menu: Edit - Undo.
If you want to bring back the change, you can redo a previous undo by choosing menu:
Edit - Redo.
That’s it; you ’ve learned to edit using the Movie Viewer. When you are done, you
…
can save it by choosing the menu: File - Save
Save…
14
2-5-2. Resize segment:
You could easily resize a segment of movie. When you resize a segment of your
movie, it will change its playback speed.
Do this:
- Select the segment of your movie that you would like to resize.
- Choose menu: Edit ? Change Segment Speed…
The following window should appear:
Do this:
- Input the amount to speed up in percentage. A value of 200% will play back twice as
fast; therefore, the segment will be twice as short.
- Press OK
Now the segment you selected should be a new speed and length.
15
2-5-3. Exporting:
The Movie Viewer has the ability to export any QuickTime compatible movie!
Do this:
…
- Choose menu: File - Export
Export…
Your export dialog should look something like this:
Export – This is the format to export your movie or project to.
Use – These are preset settings you may use for the selected format.
Options –Click here to view more options for the selected format.
Do this:
- Set a name and location to save the file.
- Select a format and change it to the settings you want.
- When you’re done, you may export your movie by clicking Save.
16
3. Easy Video Recorder for Mac - Frequentlsy Asked
Questions
Question:
What's the limit of a trial version?
Answer:
The trial version will add a red string watermark "Demo Version" on the recorded
video. You may order an unlock code to turn a trial one into a full version.
_____________________________________________________________________
Question:
What OS version will it support?
Answer:
Easy Video Recorder for Mac will support Mac OS X 10.5, 10.6, 10.7 and higher.
_____________________________________________________________________
Question:
How to start or stop recording with key strokes?
Answer:
Please see the below screenshot. Click the triangle icon at the left side of "Advanced:",
the window will be expanded and you will see button "Stop/Start Keys..." and "Action
Keys...", here you may see the default keys or configure your own keys.
_____________________________________________________________________
17
Question:
How to select a fixed region before recording?
Answer:
On the main window, click button "Set Region...", then click your mouse on computer
screen with drag and drop to select a rectangle area, and press the space key.
_____________________________________________________________________
Question:
What audio sample rates are supported?
Answer:
Easy Video Recorder for Mac OS X supports these audio sample rates: 8000 Hz,
11025 Hz, 16000 Hz, 22050 Hz, 32000 Hz, 44100 Hz, 48000 Hz.
_____________________________________________________________________
18
Question:
Can I use it to record video from a Camera?
Answer:
Yes, you can. And you may set the recording settings on main window, options dialog,
and settings dialog.
____________________________________________________________________
Question:
How to transfer the recorded video to iPod or iPhone?
Answer:
You should use Apple iTunes to do that. Import the recorded video to Apple iTunes
playlist, then sync it with your iPhone or iPod.
_____________________________________________________________________
Question:
What video codecs will it support?
Answer:
Easy Video Recorder for Mac supports most video codecs available on
your computer which include:
—
—
—
—
—
—
—
—
—
—
—
—
—
—
—
—
—
—
—
—
—
Apple Planar RGB,
Soreson Video Compressor,
Soreson Video 3 Compressor,
Apple BMP,
H.264,
Apple Cinepak,
Apple DVCPRO50 - NTSC,
Apple DVCPRO50 - PAL,
Apple DV/DVCPRO - NTSC,
Apple DV - PAL,
Apple DVCPRO - NTSC,
Apple H.261,
H.263,
Apple Intermediate Codec,
Apple Photo - JPEG,
JPEG 2000 Encoder,
Apple Motion JPEG A,
Apple Motion JPEG B,
Apple MPEG4 Compressor,
Apple PNG,
Apple Pixlet Video,
19
— Apple None,
— Apple Animation,
— Apple Video,
— Apple Graphics,
— Apple TGA,
— Apple TIFF,
— Apple Component Video - YUV422.
_____________________________________________________________________
Question:
What audio codecs will it support?
Answer:
Easy Video Recorder for Mac supports the below audio codecs:
MACE 3:1
MACE 6:1
QDesign Music 2
Qualcomm PureVoice
ALaw 2:1
32-bit Float Pointing
64-bit Float Pointing
IMA 4:1
24-bit Integer
32-bit Integer
uLaw 2:1
_____________________________________________________________________
Question:
Can I use this Video Recorder for Mac software to convert DRM protected video to
non-protected file?
Answer:
You may play your protected video by iTunes, then record the playing area to video
file which will be not protected.
_____________________________________________________________________
Question:
Can I use this Video Recorder for Mac software to convert DRM protected music to
non-protected file?
Answer:
You may play your protected music by iTunes, then record the sound to a video file
which will be not protected. Then you should use another software , for example an
audio converter, to extract the audio part from the video file.
20
4. Contact & Technical Support
If you have any technical problems when using the Easy Video Recorder for Mac, or
have any questions about it,please send your message to this email:
[email protected]
If you have any ordering questions or problems when buying the Easy Video Recorder
for Mac. Or if you want to query about the prices, discounts, etc. You may contact our
sales representives with this email:
[email protected]
For more information aboutus, please visit:
http://www.video-recorder.net
21