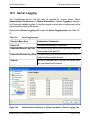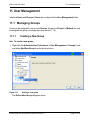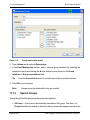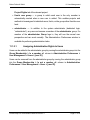
1
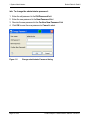
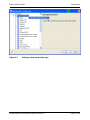
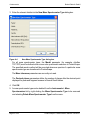
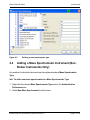
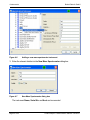
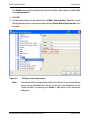
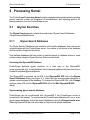
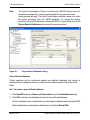
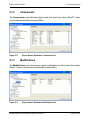
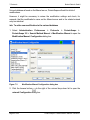
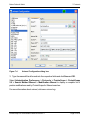
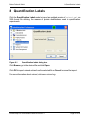
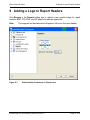
proteinscape 3.0
Administration Manual
Bruker Daltonics
Revision 1 (November 2011)
Legal and Regulatory Notices
Bruker Daltonik GmbH
Legal and Regulatory Notices
Copyright © 2011
Bruker Daltonik GmbH
All other trademarks are the sole property of their respective owners.
All Rights Reserved
Reproduction, adaptation, or translation without prior written permission is prohibited,
except as allowed under the copyright laws.
Document History
ProteinScape 3.0 Administration Manual Revision 1 (November 2011)
Part number: # 276427
First edition: November 2011
Warranty
The information contained in this document is subject to change without notice.
Bruker Daltonik GmbH makes no warranty of any kind with regard to this material,
including, but not limited to, the implied warranties of merchantability and fitness for a
particular purpose.
Bruker Daltonik GmbH is not liable for errors contained herein or for incidental or
consequential damages in connection with the furnishing, performance or use of this
material.
Bruker Daltonik GmbH assumes no responsibility for the use or reliability of its software on
equipment that is not furnished by Bruker Daltonik GmbH.
Use of Trademarks
The names of actual companies and products mentioned herein may be the trademarks of
their respective owners.
Page 2 of 65
ProteinScape 3.0 Administration Manual Revision 1
Bruker Daltonik GmbH
Contact
Limitations on Use
For Research Use Only (RUO). Not for use in diagnostic procedures.
Hyperlink Disclaimer
Bruker Daltonik GmbH makes no express warranty, neither written nor oral, and is neither
responsible nor liable for data or content from the linked Internet resources presented in
this document.
Contact
Contact your local Bruker Daltonics representative for service and further information.
USA
Germany
Bruker Daltonics Inc
Bruker Daltonik GmbH
40 Manning Road
Fahrenheitstraße 4
Billerica, MA 01821
28359 Bremen
USA
Germany
Phone: +1 978 6633660
Phone: +49 421 2205-450
Fax: +1 978 6675993
Fax: +49 421 2205-370
Internet: www.bdal.com
Internet: www.bdal.de
Service Support
Service Support
Phone: +1 978 6633660-1445
Phone: +49 421 2205- 350
E-mail: [email protected]
E-mail: [email protected]
ProteinScape 3.0 Administration Manual Revision 1
Page 3 of 65
Typographic and Application Conventions
Bruker Daltonik GmbH
Typographic and Application Conventions
These conventions list the font styles used for indicating specific graphical user interface
(GUI) elements (for example, Menu Items).
They also list the meanings of terms used to describe user interactions with the graphical
user interface of software (for example, right-click).
Typographic Conventions
File and Directory Names and Paths
File and directory names and paths are written in regular type.
Example: "Go to the C:\Bruker\solariXcontrol\test directory and open the file test_
1.txt."
GUI elements
GUI (graphic user interface) elements are options that are available in software that
enable a user to interact with the software without using the keyboard.
Typical GUI elements include windows, menus, menu options, drop-down lists, and
buttons.
l
Names of windows are written in regular, capitalized type.
l
Names of text entry fields and buttons are written in bold type.
Example: "In the New Digest window, type a Name (obligatory) and Note
(optional) and click Next."
l
GUI menus and command names are written in bold type.
Example: "Select Window > Show View > LC-MS Survey."
Keyboard
References to keys on the keyboard are written in UPPER CASE.
Example: "Press ALT+F4."
Publications
References to electronic and printed documents are written in italic type.
Example: "See the ProteinScape Administrator Manual for more details."
Page 4 of 65
ProteinScape 3.0 Administration Manual Revision 1
Bruker Daltonik GmbH
Typographic and Application Conventions
URLs
Uniform Resource Locators (URLs) are written in italic type. The protocol name (for
example, http://) is usually omitted.
Example: "Visit www.bdal.com for more details."
GUI User Interactions
Clear
Deactivate a software feature by positioning the mouse pointer over a selected
check box and pressing the left mouse button.
Example: "Clear the Curve Smoothing option."
Click
Position the mouse pointer over a GUI element and press the left mouse button to
start an action in the software.
Example: "Click OK."
Click and drag
Position the mouse pointer in a window and press the left mouse button. Hold the
left mouse button down and move the pointer to select a (usually rectangular) area.
Example: "Zoom in on peaks of interest by clicking and dragging in the Spectrum
window."
Double-click
Point to a GUI element and press the left mouse button twice in quick succession to
start an action in the software.
Example: "Double-click the Sample button."
Drag and drop
Point to a GUI element and press the left mouse button. Hold the left mouse button
down and move the selected element to a new location.
Example: "Drag and drop the tab into the desired pane."
Select
a) Follow the path to a desired menu command.
Example: "Select File > Zip > Zip Project"
ProteinScape 3.0 Administration Manual Revision 1
Page 5 of 65
Typographic and Application Conventions
Bruker Daltonik GmbH
b) Point to a GUI element (for example, a table entry) and press the left mouse button
to select it.
Example: "Select the desired file in the list and click Export."
c) Activate a software feature by positioning the mouse pointer over an empty check
box and pressing the left mouse button.
Example: "Select the Curve Smoothing option."
Right-click
Position the mouse pointer over a GUI element and press the right mouse button to
open a menu for the selected element.
Example: "Right-click in the Spectrum View window".
Keyboard Conventions
Press
Use the indicated key(s) on the keyboard. When modifier keys (for example, SHIFT,
ALT, CTRL) are indicated, keep them pressed while pressing the other key.
Example: "To toggle between Table and Spectrum view press CTRL+F3."
Page 6 of 65
ProteinScape 3.0 Administration Manual Revision 1
Bruker Daltonik GmbH
Table of Contents
Table of Contents
Legal and Regulatory Notices
2
Contact
3
Typographic and Application Conventions
4
Table of Contents
7
1 System Administrator
9
1.1
Logging in for the First Time as System Administrator
1.1.1 Changing the Administrator Password
9
9
2 Administration Preferences
11
3 Managing Calibration Lists
13
3.1
Importing a Calibration List
13
3.2
Exporting a Calibration List
14
3.3
Deleting Calibration Lists
15
3.4
Editing Calibration Lists
15
3.4.1 Adding a Calibrant to a Calibration List
15
3.4.2 Editing a Calibrant in a Calibration List
16
3.4.3 Deleting a Calibrant from a Calibration List
17
4 Instruments
19
4.1
Adding a Mass Spectrometer Type (Non-Bruker Instruments Only)
20
4.2
Adding a Mass Spectrometer Instrument (Non-Bruker Instruments Only)
23
5 Processing Kernel
5.1
Glycan Searches
27
27
5.1.1 Glycan Search Databases
27
5.1.2 Components
29
5.1.3 Modifications
29
5.2
General Properties
30
5.3
Process Definitions
31
5.4
Protein Search Engine Settings
32
5.4.1 Setting up Mascot
33
5.4.2 Setting up Phenyx
33
5.4.3 Setting up SEQUEST
34
5.4.4 Synchronizing Search Engines
34
ProteinScape 3.0 Administration Manual Revision 1
Page 7 of 65
Table of Contents
5.5
Bruker Daltonik GmbH
Scheduling
35
6 Project Access
37
7 Protocols
39
7.1
ProteinScape Protocol Configurations
39
7.1.1 Editing Protocol Configurations
40
7.1.2 Creating Protocol Configurations
40
7.1.3 Deleting Protocol Configurations
41
7.1.4 Adding New Modifications
41
7.1.5 Assigning Protocol Configuration User Rights
44
8 Quantification Labels
45
9 Adding a Logo to Report Headers
47
10 Displaying System Information
49
10.1
Managing Licenses
50
10.2
Displaying Logged In Users
52
10.3
Server Logging
53
11 User Management
11.1
55
Managing Groups
55
11.1.1 Creating a New Group
55
11.1.2 Special Groups
56
11.2
11.1.2.1 Assigning Administration Rights to Users
57
Managing Users
58
Index
Page 8 of 65
63
ProteinScape 3.0 Administration Manual Revision 1
Bruker Daltonik GmbH
1 System Administrator
1 System Administrator
The system administrator is a special user category that is used to set up and manage
ProteinScape administrative tasks.
1.1
Logging in for the First Time as System
Administrator
The system administrator must log in to ProteinScape using the User Name and
Password administrator. After ProteinScape has opened, the system administrator
should change the default system administrator password.
►► To set a new administrator password
1. Select File > Change Password to open the Change Password dialog box.
2. Enter the old password (administrator) in the Old Password field.
3. Enter the new password in the New Password field.
4. Reenter the new password in the Confirm New Password field
5. Click OK to save the new password or Cancel to abort.
Figure 1-1
1.1.1
Change Password dialog box
Changing the Administrator Password
Select File > Change Password to open the Change Password dialog box.
ProteinScape 3.0 Administration Manual Revision 1
Page 9 of 65
1 System Administrator
Bruker Daltonik GmbH
►► To change the administrator password:
1. Enter the old password in the Old Password field.
2. Enter the new password in the New Password field.
3. Reenter the new password in the Confirm New Password field
4. Click OK to save the new password or Cancel to abort.
Figure 1-2
Page 10 of 65
Change administrator Password dialog
ProteinScape 3.0 Administration Manual Revision 1
Bruker Daltonik GmbH
2 Administration Preferences
2 Administration Preferences
ProteinScape offers a number of features that are only available to users who have been
assigned administrator user rights (see section 11.1.2).
These features are accessed by selecting Window > Admin Preferences and include:
l
Importing, exporting, editing and deleting calibration lists (see section 3)
l
Defining instrument types (see section 4)
l
Managing processing kernel processes (see section 5)
l
Controlling project access (see section 6)
l
Managing protocols (see section 7)
l
Structuring reports (see section 9)
l
Managing system information (see section 10)
l
Managing users (see section 11)
The Window > Admin Preferences options are unavailable to users who have not been
assigned administrator user rights.
ProteinScape 3.0 Administration Manual Revision 1
Page 11 of 65
2 Administration Preferences
Page 12 of 65
Bruker Daltonik GmbH
ProteinScape 3.0 Administration Manual Revision 1
Bruker Daltonik GmbH
3 Managing Calibration Lists
3 Managing Calibration Lists
Calibration lists (= Mass Control Lists, MCL) are required for the ScoreBooster
functionality in PMF searches and can be imported from or exported to FlexAnalysis.
Refer to the ProteinScape User Manual for details.
Figure 3-1
3.1
Calibration list
Importing a Calibration List
►► To import a Calibration List
1. Right-click the Calibration Lists node in the Administration Preferences tree
structure.
2. Select Import MCL from the shortcut menu.
ProteinScape 3.0 Administration Manual Revision 1
Page 13 of 65
3 Managing Calibration Lists
Figure 3-2
Bruker Daltonik GmbH
Importing a calibration list
3. Find and select the relevant *.mcl file.
4. Click Open.
3.2
Exporting a Calibration List
►► To export a Calibration List
1. Right-click an existing Calibration List.
2. Select Export as MCL from the shortcut menu.
Figure 3-3
Page 14 of 65
Exporting a calibration list
ProteinScape 3.0 Administration Manual Revision 1
Bruker Daltonik GmbH
3 Managing Calibration Lists
3. Find and select the desired location.
4. Click Save.
3.3
Deleting Calibration Lists
►► To delete a Calibration List
1. Right-click an existing Calibration List.
2. Select Delete MCL from the shortcut menu.
Figure 3-4
3.4
3.4.1
Deleting a calibration list
Editing Calibration Lists
Adding a Calibrant to a Calibration List
►► To add a calibrant to a calibration list
1. Select an existing Calibration List.
2. Right-click an empty row in the calibrant table.
3. Select Add calibrant from the shortcut menu.
ProteinScape 3.0 Administration Manual Revision 1
Page 15 of 65
3 Managing Calibration Lists
Figure 3-5
Bruker Daltonik GmbH
Adding a calibrant to a calibration list
4. Type the relevant details directly into the table cells.
5. Click OK and save changes when prompted.
3.4.2
Editing a Calibrant in a Calibration List
►► To edit a calibrant in a calibration list
1. Select an existing calibration List.
2. Select an entry in the calibrant table.
Page 16 of 65
ProteinScape 3.0 Administration Manual Revision 1
Bruker Daltonik GmbH
Figure 3-6
3 Managing Calibration Lists
Editing a calibrant in a calibration list
3. Make the desired change(s).
4. After a change has been made, click Apply to apply the change(s) or Restore to reject
the change(s).
5. Click OK and save changes when prompted.
3.4.3
Deleting a Calibrant from a Calibration List
►► To delete a calibrant from a calibration list
1. Select a calibration List.
2. Select and right-click an entry in the calibrant table.
3. Select Remove calibrant from the menu.
ProteinScape 3.0 Administration Manual Revision 1
Page 17 of 65
3 Managing Calibration Lists
Figure 3-7
Bruker Daltonik GmbH
Deleting a calibrant from a calibration list
4. Click OK and save changes when prompted.
Page 18 of 65
ProteinScape 3.0 Administration Manual Revision 1
Bruker Daltonik GmbH
4 Instruments
4 Instruments
The Instruments > Mass Spectrometers node contains a list of mass spectrometers
that have been used for tutorial and experimental data acquisition in the ProteinScape
user's labs.
Figure 4-1
Instrument type details
Individual instruments are grouped under a specific mass spectrometer type.
ProteinScape 3.0 Administration Manual Revision 1
Page 19 of 65
4 Instruments
Figure 4-2
Bruker Daltonik GmbH
Individual instrument details
New Bruker mass spectrometers are automatically added to the list the first time that they
import data into ProteinScape.
The mass spectrometer type and identifier of non-Bruker instruments must be entered
manually.
4.1
Adding a Mass Spectrometer Type (Non-Bruker
Instruments Only)
►► To add a new mass spectrometer type to the Instruments > Mass
Spectrometers list
1. Right-click the Instruments > Mass Spectrometers node in the Administration
Preferences tree.
2. Select New Mass Spectrometer Type from the menu.
Page 20 of 65
ProteinScape 3.0 Administration Manual Revision 1
Bruker Daltonik GmbH
Figure 4-3
4 Instruments
Adding a mass spectrometer type
ProteinScape 3.0 Administration Manual Revision 1
Page 21 of 65
4 Instruments
Bruker Daltonik GmbH
3. Enter the relevant details into the New Mass Spectrometer Type dialog box.
Figure 4-4
New Mass Spectrometer Type dialog box
For all mass spectrometer types, the Model parameter (for example, ultraflex
TOF/TOF) must be defined when a user sets up automatic searches in ProteinScape.
The specified search method will be executed whenever spectra of a particular mass
spectrometer type are transferred to ProteinScape.
The Mass tolerance parameters are currently not used.
The Decimal places parameters define the number of places after the decimal point
displayed for peak and fragment masses in Search Result tables.
4. Click OK.
5. A mass spectrometer type can be deleted from the Instruments > Mass
Spectrometers list by right-clicking the Mass Spectrometer Type to be removed
and selecting Delete Mass Spectrometer Type from the menu.
Page 22 of 65
ProteinScape 3.0 Administration Manual Revision 1
Bruker Daltonik GmbH
Figure 4-5
4.2
4 Instruments
Deleting a mass spectrometer type
Adding a Mass Spectrometer Instrument (NonBruker Instruments Only)
Any number of individual instruments can be registered under a Mass Spectrometer
Type.
►► To add a new mass spectrometer to a Mass Spectrometer Type
1. Right-click the relevant Mass Spectrometer Type node in the Administration
Preferences tree.
2. Select New Mass Spectrometer from the menu.
ProteinScape 3.0 Administration Manual Revision 1
Page 23 of 65
4 Instruments
Figure 4-6
Bruker Daltonik GmbH
Adding a new mass spectrometer instrument
3. Enter the relevant details into the New Mass Spectrometer dialog box.
Figure 4-7
New Mass Spectrometer dialog box
The instrument Name, Serial No. and Host can be recorded.
Page 24 of 65
ProteinScape 3.0 Administration Manual Revision 1
Bruker Daltonik GmbH
4 Instruments
The Visible option defines whether the instrument will be visible (Yes) or invisible (No)
in the Instruments list.
4. Click OK. 5. A mass spectrometer can be deleted from the Mass Spectrometer Type list by rightclicking the instrument to be removed and selecting Delete Mass Spectrometer from
the menu.
Figure 4-8
Note
Deleting a mass spectrometer
Instruments that have generated data that is stored on the ProteinScape
server cannot be deleted from the list. In this case, the instrument can be
"made invisible" by selecting the Visible > No option in the instrument
dialog box.
ProteinScape 3.0 Administration Manual Revision 1
Page 25 of 65
4 Instruments
Bruker Daltonik GmbH
Page 26 of 65
ProteinScape 3.0 Administration Manual Revision 1
Bruker Daltonik GmbH
5 Processing Kernel
5 Processing Kernel
The ProteinScape Processing Kernel module manages background processes such as
protein searches, protein list compilation (ProteinExtractor) and importing spectra. All
these processes run on the ProteinScape server.
5.1
Glycan Searches
The Glycan Searches node contains three sub-nodes, Glycan Search Databases,
Components and Modifications.
5.1.1
Glycan Search Databases
The Glycan Search Databases node contains a list of public databases, their most recent
synchronization with the ProteinScape server, the number of structures in the database
and the number of imported structures.
User-defined databases that can contain a selected subset of database entries or novel
entries created using the Glycan Structure Editor are also listed.
Accessing the GlycomeDB Database
ProteinScape performs glycan searches on a local copy of the GlycomeDB
(www.glycome-db.org), a meta-database that is frequently updated with structures from a
number of individual glycan databases.
The GlycomeDB is accessed via the URL in the GlycomeDB URL field of theGlycan
Search Databases dialog (see Figure 5-1). Select the User remote access check box to
activate remote access to the database. To change the GlycomeDB URL, click Change
and type a new URL into the GlycomeDB URL field of the Edit GlycomeDB URL
dialog.
Synchronizing glycan search databases
ProteinScape can be synchronized with GlycomeDB if the ProteinScape server is
connected to the Internet. To synchronize the ProteinScape database with one or more
glycan search databases, select the desired database(s) and click Resynchronize now.
Selecting GlycomeDB (last row in the table) will synchronize all sub-databases.
ProteinScape 3.0 Administration Manual Revision 1
Page 27 of 65
5 Processing Kernel
Note
Bruker Daltonik GmbH
The Kyoto Encyclopedia of Genes and Genomes (KEGG) may be used for
academic purposes only. A license must be obtained for commercial use
(www.genome.jp/kegg). The initial ProteinScape installation does not contain
the glycan structures from the KEGG database. To access the glycan
structures in the KEGG database, select the KEGG or GlycomeDB entry in the
Glycan Search Databases list and start the synchronization.
Figure 5-1
Glycan Search Databases dialog
User-defined databases
Protein searches can be performed against user- defined databases that contain a
selected subset of database entries or novel entries created using the Glycan Structure
Editor.
►► To create a user-defined database
1. Click New DB and type a Name and Abbreviation into the New Database dialog.
2. Click OK to add the new database to the list of user-defined databases.
Edit the database name or abbreviation by selecting the database and clicking Edit DB.
Delete databases by selecting the database(s) and clicking Delete DBs.
Page 28 of 65
ProteinScape 3.0 Administration Manual Revision 1
Bruker Daltonik GmbH
5.1.2
5 Processing Kernel
Components
The Components node lists basic glycans and their short form name, GlycoCT name,
sum formula and molecular ion mass (MH+).
Figure 5-2
5.1.3
Glycan Search Databases Components list
Modifications
The Modifications node lists common glycan modifications and their short form name,
GlycoCT name, sum formula and molecular ion mass (MH+).
Figure 5-3
Glycan Search Databases Modifications list
ProteinScape 3.0 Administration Manual Revision 1
Page 29 of 65
5 Processing Kernel
5.2
Bruker Daltonik GmbH
General Properties
Parameters in the General Properties dialog box are settings for background processes.
They include the score threshold for peptides in a ProteinExtractor search result below
which they will not be imported (proteinextractor.mascot.min_ peptide_ score) and the
number of slots for parallel execution of protein list compilations and other steps in the
protein search workflows.
These parameters are not part of ProteinScape methods.
Figure 5-4
Page 30 of 65
Administration Preferences > Processing Kernel > General Properties
view
ProteinScape 3.0 Administration Manual Revision 1
Bruker Daltonik GmbH
5.3
5 Processing Kernel
Process Definitions
The parameters and values in the Process Definitions window should not normally be
changed by users. They may be altered by service personnel when workflow definitions
must be changed.
Figure 5-5
Administration Preferences > Processing Kernel > Process Definitions
view
ProteinScape 3.0 Administration Manual Revision 1
Page 31 of 65
5 Processing Kernel
5.4
Bruker Daltonik GmbH
Protein Search Engine Settings
Search engine configuration settings are defined in the Protein Search Engine Settings
node.
Clicking a Protein Search Engine Settings sub-node opens the respective search
engine configuration settings dialog box. Obligatory fields are marked with asterisks.
Figure 5-6
Page 32 of 65
Search Engine Setting Configuration dialog
ProteinScape 3.0 Administration Manual Revision 1
Bruker Daltonik GmbH
Table 5-1
5 Processing Kernel
Protein Search Engine Settings parameters
Parameter
Description
Active
Select to activate the search engine
Note
Free text field for optional comment.
cgi-URL and Web- Two URLs are only required for Mascot: the cgi-URL is used for
URL
starting the search and the Web-URL for receiving results.
Engine version
Enter the search engine version number here.
Weighting for
ProteinExtractor
Factor used for balancing the different scores when more than one
search engine is used. This factor is multiplied by a second
weighting factor defined on the ProteinExtractor page of the
search method.
For example, if the Phenyx Weighting for ProteinExtractor = 4
and the Mascot Weighting for ProteinExtractor = 1, and in the
search method the weighting factor for both search engines is = 1,
the Phenyx peptide scores are multiplied by 4 before adding them
to the Mascot peptide scores to form a protein “meta” score.
Slots
Number of concurrently running searches.
Max. size of
subbatch
A ProteinExtractor search will be split in chunks of this size
(number of spectra).
Authentication,
Select the relevant check box to activate the desired authentication
Engine/Proxy/Http function.
5.4.1
Setting up Mascot
The most important step for the administrator is to enter the search engine server name
into the cgi-URL field and the version of the search engine into the Engine version field.
Click OK to save changes.
5.4.2
Setting up Phenyx
Setting up a connection to a Phenyx server is straightforward. The URL settings depend
on the setup of the Phenyx server’s web server.
ProteinScape 3.0 Administration Manual Revision 1
Page 33 of 65
5 Processing Kernel
Bruker Daltonik GmbH
cgi-URL
http://<phenyxserver>:8080/cgi-bin
web-URL
OR
http://<phenyxserver>:8080/cgi-bin
http://<phenyxserver>:8080/pwi
The web URL should display the login dialog box of Phenyx.
Go to http://<phenyxserver>:8080/cgi-bin/showEnv.pl to display a list of the environment
variables on the Phenyx server.
To access Phenyx, users must generate a user ID on the Phenyx server.
►► To generate a Phenyx user ID
1. Log in as admin on the Phenyx server using a web browser.
2. In the Management Console select Users > Add, Role: user.
3. Type a user name and a password.
This name and password must be entered on ProteinScape’s Search Engine Settings
page for Phenyx.
4. Select Administration Preferences > Search Engine Settings and select Phenyx
from the search engine list.
5. Click Resynchronize now (see section 5.4.4).
5.4.3
Setting up SEQUEST
ProteinScape can communicate with SEQUEST as part of the Proteomics Browser
package (versions 3.2 to 3.3SP1). For more information, contact your local Bruker support
team.
5.4.4
Synchronizing Search Engines
The ProteinScape server can synchronize its lists of available sequence databases,
enzymes, and modifications with the lists on the relevant search engine server(s).
To synchronize the ProteinScape server with a search engine server, select one or more
search engines in the Search Engine Settings window and click Resynchronize now.
Page 34 of 65
ProteinScape 3.0 Administration Manual Revision 1
Bruker Daltonik GmbH
5 Processing Kernel
The ProteinScape server will automatically try to synchronize with all search engines on
startup.
Figure 5-7
5.5
Search Engine Settings dialog box
Scheduling
ProteinScape users can delete Search Results, MS datasets, LC separations, and
even whole Projects by right-clicking the corresponding item in the navigation tree and
selecting Delete from the menu.
However, to prevent the server from slowing down when large amounts of data are
deleted, deleted items are first hidden in the ProteinScape GUI and queued for deletion at
a later point in time.
The time window for deleting the database entries and clearing disk space can be defined
using the Scheduling dialog box.
Select the Enable check box to activate Cleanup Scheduling between the given Start
time and Stop time points.
Clear the Enable check box to deactivate Cleanup Scheduling.
ProteinScape 3.0 Administration Manual Revision 1
Page 35 of 65
5 Processing Kernel
Figure 5-8
Page 36 of 65
Bruker Daltonik GmbH
Administration Preferences > Processing Kernel > Scheduling view
ProteinScape 3.0 Administration Manual Revision 1
Bruker Daltonik GmbH
6 Project Access
6 Project Access
The read/write permissions of projects can be assigned on a user-group basis using
Project Access settings (see section 11.1).
To assign read/write permissions, select the relevant user group in the Project Access
list and select the relevant project check box(es) in the project list window.
Click Apply to save changes or Restore to reject changes.
Figure 6-1
Administration Preferences > Project Access view
ProteinScape 3.0 Administration Manual Revision 1
Page 37 of 65
6 Project Access
Page 38 of 65
Bruker Daltonik GmbH
ProteinScape 3.0 Administration Manual Revision 1
Bruker Daltonik GmbH
7 Protocols
7 Protocols
7.1
ProteinScape Protocol Configurations
ProteinScape protocol configurations are listed under Administration Preferences >
Protocols > ProteinScape > ProteinScape 2.0. To expand or collapse a node, doubleclick the respective node or use the expand/collapse button.
Figure 7-1
Administration Preferences > Protocols view
ProteinScape 3.0 Administration Manual Revision 1
Page 39 of 65
7 Protocols
7.1.1
Bruker Daltonik GmbH
Editing Protocol Configurations
►► To edit a protocol configuration
1. Double-click the desired protocol attribute (for example, Organism).
2. Select the configuration to be changed (for example, Bos taurus) in the configuration
list and make the desired changes to the respective parameters.
3. Click OK to save the changes.
Figure 7-2
7.1.2
Organism > Bos taurus parameters
Creating Protocol Configurations
►► To create a protocol configuration
1. Double-click the desired node attribute (for example, Sample > Organism).
2. Select an existing configuration (for example, Chicken) in the configuration list and
click Save As.
Page 40 of 65
ProteinScape 3.0 Administration Manual Revision 1
Bruker Daltonik GmbH
7 Protocols
3. Type the new configuration name in the New method name field of the Save As New
Method dialog box.
4. Select the new configuration in the configuration list and make the desired changes to
the relevant parameters (click Save to save changes).
5. Click OK to close the dialog box.
Note
When a new protocol configuration is created, only the user who created
the configuration has access rights. Other users require user rights to use
the new protocol configuration (see section 7.1.5).
Two additional steps must be performed to add and use search- engine specific
parameters such as databases.
l
The parameter must be introduced into the search engine database. For more
information, see the respective search engine documentation.
l
ProteinScape and the search engines must be resynchronized by selecting the
respective search engines in the Search Engine Settings dialog box and clicking
Resynchronize now (see section 5.4.4).
After synchronization, all databases available on the search engine will also be available in
the Search Method protocols. Configurations in the Search Method protocols (for
example, Sequence Database) should not be edited manually.
7.1.3
Deleting Protocol Configurations
►► To delete a protocol configuration
1. Double-click the desired attribute (for example,Organism).
2. Select an existing configuration (for example, Chicken) in the configuration list and
click
.
3. Click Yes when prompted to confirm deletion.
7.1.4
Adding New Modifications
New protein modifications are generally added to the ProteinScape server during the
resynchronization process (see section 5.4.4). If a modification that is not included in the
ProteinScape 3.0 Administration Manual Revision 1
Page 41 of 65
7 Protocols
Bruker Daltonik GmbH
Unimod database is found on the Mascot server, ProteinScape will add it to its list of
modifications.
However, it might be necessary to review the modification settings and check, for
example, that the modification's name on the Mascot server and in the related unimod
entry are identical.
►► To add a new modification to the unimod database
1. Select
Administration
Preferences
>
Protocols
>
ProteinScape
>
ProteinScape 2.0 > Search Method Mascot > Modification Mascot to open the
Modification Mascot Configuration dialog box.
Figure 7-3
Modification Mascot Configuration dialog box
2. Click the browse button
to the right of the unimod drop-down list to open the
unimod Configuration dialog box.
Page 42 of 65
ProteinScape 3.0 Administration Manual Revision 1
Bruker Daltonik GmbH
Figure 7-4
7 Protocols
Unimod Configuration dialog box
3. Type the mass shift and formula into the respective fields and click Save and OK.
Select Administration Preferences > Protocols > ProteinScape > ProteinScape
2.0 > Search Method Mascot > Modification Mascot to display a complete list of
protein modifications used by ProteinScape for Mascot searches.
For more information about unimod, visit www.unimod.org.
ProteinScape 3.0 Administration Manual Revision 1
Page 43 of 65
7 Protocols
Bruker Daltonik GmbH
7.1.5
Assigning Protocol Configuration User Rights
User rights for parameter classes are assigned on the respective configuration Rights
tab.
Note
When a new protocol configuration class is created, only the user who created
the class has access rights. Use the following procedure to make the new
protocol configuration class available to other users.
►► To assign protocol configuration user rights
1. Click the relevant node to open the protocol configuration dialog box.
2. Click the Rights tab to open the Rights dialog box.
3. Click Configure to display a list of all users and groups currently registered on the
ProteinScape server.
4. Select the desired user(s) and/or group(s) and assign read/write permissions by
selecting the relevant check box(es).
5. Click OK to save changes.
Page 44 of 65
ProteinScape 3.0 Administration Manual Revision 1
Bruker Daltonik GmbH
8 Quantification Labels
8 Quantification Labels
Click the Quantification Labels node to import an updated version of unimod.xml, an
XML- format file defining the masses of protein modifications used in quantification
experiments.
Figure 8-1
Quantification labels dialog box
Click Browse, go to the desired file and click Open.
Click OK to import unimod entries from the selected file or Cancel to cancel the import.
For more information about unimod, visit www.unimod.org.
ProteinScape 3.0 Administration Manual Revision 1
Page 45 of 65
8 Quantification Labels
Page 46 of 65
Bruker Daltonik GmbH
ProteinScape 3.0 Administration Manual Revision 1
Bruker Daltonik GmbH
9 Adding a Logo to Report Headers
9 Adding a Logo to Report Headers
Click Browse in the Reports dialog box to upload a new graphic image for report
headers. BMP, JPG, PNG, and GIF graphic formats are supported.
Note
Figure 9-1
The image will not be scaled and will appear in full size in the report header.
Administration Preferences > Reports view
ProteinScape 3.0 Administration Manual Revision 1
Page 47 of 65
9 Adding a Logo to Report Headers
Page 48 of 65
Bruker Daltonik GmbH
ProteinScape 3.0 Administration Manual Revision 1
Bruker Daltonik GmbH
10 Displaying System Information 10 Displaying System Information
Clicking the System Information node displays current version information for the most
important ProteinScape server modules.
Figure 10-1
Administration Preferences > System Information view
ProteinScape 3.0 Administration Manual Revision 1
Page 49 of 65
10 Displaying System Information Bruker Daltonik GmbH
10.1 Managing Licenses
ProteinScape licensing is managed by selecting Administration Preferences > System
Information > Licenses.
New licenses are registered by right-clicking the Licenses node and selecting Register
New License Key from the menu. Registering a new license key will overwrite any
existing license keys for the same application.
The Licenses menu option Show MAC Address can be used when the MAC
address/es of the server must be sent to Bruker, for example, to obtain a new license. In
this case, the MAC address can be copied using the menu and sent by mail to
[email protected]. A new license key will be generated by the ProteinScape
support team and mailed to the user.
To delete a license, right-click the relevant Licenses sub-node and select Delete License
from the menu.
Page 50 of 65
ProteinScape 3.0 Administration Manual Revision 1
Bruker Daltonik GmbH
Figure 10-2
10 Displaying System Information Administration Preferences > System Information > Licenses view
ProteinScape 3.0 Administration Manual Revision 1
Page 51 of 65
10 Displaying System Information Bruker Daltonik GmbH
10.2 Displaying Logged In Users
Clicking the System Information > Logged In Users node displays a table showing
users currently logged into the server. This list includes users currently using
ProteinScape or external programs that connect to ProteinScape (for example, BioTools
and WARP-LC).
Right-click a user to open the Logged In Users table menu (see Table 10-1).
Table 10-1
Shortcut menu for logged in users.
Shortcut Menu Item
Explanation/ Comments
Refresh Session
The session of the respective user is refreshed – effectively
this command has no effect.
Remove Session
The respective user’s session is terminated – effectively a
forced logoff.
Figure 10-3
Page 52 of 65
Administration Preferences > System Information > Logged In Users view
ProteinScape 3.0 Administration Manual Revision 1
Bruker Daltonik GmbH
10 Displaying System Information 10.3 Server Logging
The ProteinScape server's log files may be required for support issues. Select
Administration Preferences > System Information > Server Logging to display a
list of currently available log files. If a log file exceeds a certain size, a backup copy will be
generated and a fresh log file started.
Right-click the Server Logging node to open the Server Logging menu (see Table 102).
Table 10-2
Server logging menu
Shortcut Menu Item
Explanation/ Comments
Select All
All log files are selected for download
Download Recent Log Files
The current log file and the existing backup copies are
downloaded to the client PC.
Download Selected Log Files The selected log files are downloaded to the client PC
(select log files using the mouse).
Refresh
Figure 10-4
The list is refreshed, that is, the data (file names, sizes
etc.) are loaded from the server.
Administration Preferences > System Information > Server Logging view
ProteinScape 3.0 Administration Manual Revision 1
Page 53 of 65
10 Displaying System Information Page 54 of 65
Bruker Daltonik GmbH
ProteinScape 3.0 Administration Manual Revision 1
Bruker Daltonik GmbH
11 User Management
11 User Management
Individual Users and Groups of Users are configured in the User Management folder.
11.1 Managing Groups
Users can be assigned to one or more Groups. Access to a Project or Method can only
be assigned to a group, not single users (see section 7.1.5).
11.1.1
Creating a New Group
►► To create a new group
1. Right-click the Administration Preferences > User Management > Groups) node
and select Add New Group from the shortcut menu.
Figure 11-1
Adding a new group
The Define New Group dialog box opens.
ProteinScape 3.0 Administration Manual Revision 1
Page 55 of 65
11 User Management
Figure 11-2
Bruker Daltonik GmbH
Group membership details
2. Type a Name and an optional Description.
3. In the User Membership section, add or remove group members by selecting the
respective user(s) and clicking the ◄ or ► button to move them into the Group
members or Not group members field.
Tip
Use the ◄◄and ►►buttons to move all users in the respective direction.
4. Click OK to save changes.
Note
11.1.2
Groups cannot be deleted after they are created.
Special Groups
Two existing ProteinScape groups have special properties:
l
All Users — Every user is automatically a member of this group. Therefore, if a
Project should be accessible to all users, this group must be assigned access in the
Page 56 of 65
ProteinScape 3.0 Administration Manual Revision 1
Bruker Daltonik GmbH
11 User Management
Project Rights tab of the relevant project.
l
User's own group — a group in which each user is the only member is
automatically created when a new user is added. This enables projects and
methods to be assigned to individual users, that is, on the group rather than the user
level.
l
administrator — In addition to the system administrator (dedicated login
“administrator”), any user can become a member of the administrator group. If a
member of the administrator Group logs in, they will see the normal user
perspective and can work normally. The Administration Preferences window is
available for performing administration tasks.
11.1.2.1
Assigning Administration Rights to Users
Users can be added to the administrator group by moving the administrator group into the
Group Membership > Is a member of: column in Administration Preferences >
User Management > Users > [user ID].
Users can be removed from the administrator group by moving the administrator group
into the Group Membership > Is not a member of: column in Administration
Preferences > User Management > Users > [user ID].
ProteinScape 3.0 Administration Manual Revision 1
Page 57 of 65
11 User Management
Figure 11-3
Bruker Daltonik GmbH
Group membership details of an individual user
11.2 Managing Users
All users must belong to one or more groups. After creation, all users are automatically
added to the group All Users and their own group (see section 11.1.2).
►► To create a new user ID
1. Right-click Administration Preferences > User Management > Users) and select
Add New User from the menu.
Page 58 of 65
ProteinScape 3.0 Administration Manual Revision 1
Bruker Daltonik GmbH
Figure 11-4
11 User Management
Adding a new user
The Define New User dialog box opens.
Figure 11-5
Define New User dialog box
2. Type a Last Name, First Name, Login, and Email for the new user ID.
3. Click OK to add the new user to the list of users and open the User configuration dialog
box.
ProteinScape 3.0 Administration Manual Revision 1
Page 59 of 65
11 User Management
Figure 11-6
Bruker Daltonik GmbH
Configuring a new user
4. Select or clear the Active check box to activate or deactivate the respective User.
Clearing the Active check box means that the user cannot log in to ProteinScape.
Page 60 of 65
ProteinScape 3.0 Administration Manual Revision 1
Bruker Daltonik GmbH
Note
11 User Management
Because of the number of dependencies to projects, analytes, spectra,
methods etc., user IDs cannot be deleted.
Users cannot be deleted because there are too many dependencies to Projects,
Analytes, Spectra, Methods etc. Deactivated users cannot login to ProteinScape.
Optional:
An password for the user can be set in the User Password section. Type
the administrator password into the Administrators Password field,
type the user’s password in the New Password and Confirm New
Password fields and click Set Password.
5. In the Group Membership section, add the user to or remove the user from groups by
selecting the respective group(s) and clicking the ◄ or ► button to move them into the
Is member of or Is not a member of field.
A user can be a member of multiple groups, including the administrator group (see
section 11.1.2).
Tip
Use the ◄◄and ►►buttons to move all groups in the respective direction.
ProteinScape 3.0 Administration Manual Revision 1
Page 61 of 65
11 User Management
Page 62 of 65
Bruker Daltonik GmbH
ProteinScape 3.0 Administration Manual Revision 1
Bruker Daltonik GmbH
Index
Index
D
Delete MCL
A
Add calibrant
15
11
Administrator
G
9, 61
9
logging in
9
27
Glycan Searches
27
Groups
10
C
Calibration list
13-14
adding and removing members
55
Administrator
57
All Users
56
creating
55
managing
55
special groups
56
user's own group
57
adding calibrants
15
deleting
15
deleting calibrants
17
editing
15
I
editing calibrants
16
Import MCL
exporting
14
Instruments
importing
13
Change Password
Cleanup Scheduling
9
35
Configurations
protocol
Confirm New Password
39
10, 61
ProteinScape 3.0 Administration Manual Revision 1
27
synchronizing
57
changing password
Administrator password
14
Glycan Search Databases
Administration rights
assigning
E
Export as MCL
Administration Preferences
features
15
mass spectrometer types
13
19
L
Licenses
managing
50
registering
50
Log files
53
Page 63 of 65
Index
Bruker Daltonik GmbH
Logged In Users
52
Logo image
Protocol configuration class
creating
40
deleting
41
M
editing
40
Mass spectrometer instruments
user rights
44
changing
adding
Mass Spectrometer Types
adding
47
23
19
20
Modifications
adding
41
39
39
Q
45
R
Read/write permissions
10, 61
O
Old Password
configurations
Quantitation Labels
N
New Password
Protocols
10
P
projects
37
Register New License Key
50
Remove calibrant
17
Reports
47
9
S
administrator, changing
9
Scheduling
35
Phenyx search engine
33
Search Engine Settings
32
user
61
Mascot
33
27, 36
Phenyx
33
Password
Processing Kernel
general properties
30
SEQUEST
34
process definitions
31
synchronizing
34
scheduling
35
Server Logging
53
Project Access
37
Synchronizing databases
System administrator
Projects
read/write permissions
Page 64 of 65
37
System Information
27, 34
9
49
ProteinScape 3.0 Administration Manual Revision 1
Bruker Daltonik GmbH
Index
U
unimod
41, 45
User Management
55, 58
User rights
protocol configuration class
44
Users
creating
58
display current
52
managing
58
ProteinScape 3.0 Administration Manual Revision 1
Page 65 of 65