1
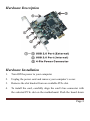
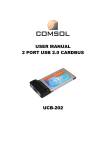
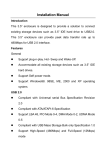
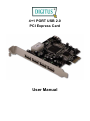
4+1 PORT USB 2.0 PCI Express Card User Manual Features and Benefits Compliant with PCI Express Specification 1.0a Provide four 4 external Type A USB 2.0 (480Mbps) and one internal Type A USB 2.0 (480Mbps) ports into your system Hot-swapping feature allows you to connect/disconnect devices without first turning system off Compliant with USB specification rev. 2.0 Supports high-speed (480Mbps), full-speed (12Mbps), and low-speed(1.5Mbps) data transfer modes for simultaneous operation of multiple USB 2.0/1.1 devices Works with a various type of USB devices including hubs, removable drives, digital cameras, scanner, CD-RWs, DVD-ROMs, PC video cameras, printers, and more… Note: USB 1.1 devices are limited to USB 1.1 speeds even when they are connected to USB 2.0 host adapter or USB 2.0 hubs. System Requirements Windows 7, Vista, XP, 2000 PCI Express-enabled system with an available PCI Express slot Page 2 Hardware Description Hardware Installation 1. Turn Off the power to your computer. 2. Unplug the power cord and remove your computer’s cover. 3. Remove the slot bracket from an available PCIe slot. 4. To install the card, carefully align the card’s bus connector with the selected PCIe slot on the motherboard. Push the board down Page 3 firmly. 5. Connect the system power source to the board’s power connector. 6. Replace the slot bracket’s holding screw to secure the card. 7. Replace the computer cover and reconnect the power cord. Driver Installation Important: If your system doesn’t boot to Windows properly with our card installed, check with your system’s manufacturer for the latest system firmware update. For Windows® XP/2000 Windows® XP/2000 will automatically detect and install the correct driver for the PCIe USB 2.0 4+1 Ports. However, please ensure you have the latest Service Pack Installed. For Windows® XP Windows® XP Service Pack 1 or later For Windows® 2000 Windows® 2000 Service Pack 4 or later For Windows® Server 2003/Vista Page 4 Windows® Server 2003/Vista has built-in driver support for this controller. Just install the board and Windows will automatically detect and install the correct drivers for it. No additional driver is necessary. To Verify Windows Installation 1. Right click My Computer, then click Manage. Click Device Manager. 2. Double click Universal Serial Bus controllers option. - NEC PCI to USB Open Host Controller - NEC PCI to USB Open Host Controller - Standard Enhanced PCI to USB Host Controller - USB 2.0 Root Hub (USB Root Hub in Windows® XP, Server 2003 and Vista) - USB Root Hub - USB Root Hub Page 5