1
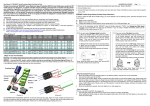
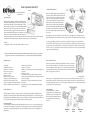
USER’S MANUAL FOR G33™
Rev E
For use with G33 Magnifiers
or HHS Systems
INTRODUCTION
Thank you for purchasing L-3 EOTech’s new Generation III
3X magnifier. These magnifiers offer users of the Holographic
Weapon Sight (all models) the additional advantage of vastly
improved target recognition and increased lethality at medium
range distances. The new Switch to Side (STS) mount allows
the user the ability to engage the enemy with confidence in a
Close Quarters Battle (CQB) situation or at distances out to 600
meters or more. This user manual describes the features of the
L-3 EOTech Magnifiers and provides information on their use and maintenance. Please read the instructions
carefully before mounting and using the magnifiers. Always practice proper firearm safety.
Included:
• 3x Magnifier • Switch to Side (STS) Mount• 7mm Riser • 4 Screws
OPTIC CONFIGURATION
The L-3 EOTech Holographic Weapon Sight (HWS)
product line has two different heights above the rail
based on user preference. For this reason, the magnifier does not come preassembled to the mount.
It is user configurable based on the specific model
HWS it will be mounted behind. The 7mm riser,
included, may be required to align the magnifier
optical axis with the sight. Only HWS models with
side buttons or quick detach levers require the use of
the riser. For all other HWS models, the riser should
not be used.
The magnifier system can be configured to switch to the left or to the right based on shooting preference.
Typically, right handed shooters prefer the mount to switch to the left, and left handed shooters to the right.
To configure your HWS you will need a screwdriver (not included). If the spacer is not used, the shorter
screws should be selected. The longer screws are used with the spacer only. If the spacer is being used, place
the spacer on the optic mounting interface. Open the STS mount. Position the mount on the optic mount
interface (or riser) so it opens either to the left or right (based on preference). Insert each screw through the
components, and tighten securely.
The G33 is controlled under the Export Administration Regulations (EAR) ECCN 0A987, and may not be exported to a
foreign person, either in the U.S. or abroad, without a license or exception from the U.S. Department of Commerce
ADJUSTABLE DIOPTER
SPECIFICATIONS:
3x Magnifier
Magnification Fixed: 3X
Eye Relief: 2.2” (55.8mm)
Field of View: 7.3 degrees
Length: 3.9” (99mm)
Weight: 6.1oz (174g)
Water-Resistant: 33 ft. (10m)
Sealing: Fog-resistant internal optics
Finish: Non reflective / Rubber coated
Optical Axis Adjustment: Internal adjustment
Retrofits to all HWS models with 7mm riser
Switch to Side (STS) Mount
Length: 1.66” (42.2mm)
Height: 1.18” (30mm) Clears common low profile flip up rear
iron sights
Weight: 2.9 oz (81g)
Color/Finish: Non reflective black with hard coat finish.
Switch Orientation: Ambidextrous mount Flip Orientation to
allow left or right flip
Rail Interface: 1” Weaver or MIL-STD-1913 with Quick
Detach lock
Magnifier Interface: User configurable height with quick
detach mount
BASIC OPERATION
The G33 magnifier is designed to be used behind an L-3 EOTech Holographic Weapon Sight (HWS). The
magnifier can be mounted directly behind the HWS. Simply switch the magnifier out of the way and operate
the sight. When used with HWS models 518, 558, 556, 517, EXPS or 516 HWS (with side button interface) the
user can easily operate the sight even with the magnifier in the locked position.
Positioning the Reticle:
Once the magnifier is installed properly behind the HWS, it may be necessary to re-zero the sight. This may
be due to the shooter’s ability to see the target and Point of Impact (POI) more accurately than without the
magnifier. Re-zeroing the sight will prevent a perceived shift in POI when going from no magnification to
magnification.
The G33 optic includes an adjustable diopter that allows the user to customize
the focus to their particular vision. This feature ensures a crisp, clean aiming
dot for more precision and shot placement. To adjust, simply grasp the diopter
with the thumb and fore finger and turn either clockwise or counter-clockwise
until a clear sight picture is achieved.
After zeroing or re-zeroing the sight, it may be necessary to reposition the reticle image into the center of
the magnifier window. This is aesthetic in nature and has no affect on the sight’s zero. Turn the horizontal
and vertical adjustments on the top or side of the magnifier by hand, with a coin or a flat head screwdriver to
reposition reticle to the desired position.
Switch operation:
To switch the magnifier to the side,
simply push the optic to the right or left,
depending on how it is mounted. To close
the mount, push the magnifier back into
its original position until a hard stop is
achieved.
WARRANTY
L-3® EOTech® warrants every product to be free from defects in materials and workmanship for a period of
two years from the original date of purchase. L-3® EOTech® will promptly repair or replace, at its option, any
product that is defective in material or workmanship, without charge.
All costs associated with the product shipment for product repair will be incurred by the owner. This warranty
does not cover defects caused by improper handling, unauthorized disassembly, installation, or maintenance;
abnormal use; or unapproved alterations. L-3® EOTech® shall not, in any event, be liable for any damages,
including any lost profits, lost savings, or other incidental or consequential damages arising out of the use or
inability to use such products. See L-3® EOTech®’s Standard Terms and Conditions for complete details.
Figure 4
Figure 5
INSTALLATION
To install the configured magnifier onto the weapon, open the quick detach lever. To do this, use your thumb
to depress the locking button (see Figure 4). Once depressed, swing the quick detach lever open and away
from its nested position. Place the mount in the desired position behind the HWS®. Once the mount is
located in the desired position, push the magnifier forward until the cross bolt of the magnifier is set into the
slot located on the mount. Close the quick detach lever.
If the mount is too loose or tight for your specific rail, adjustments can be made for a proper fit (see Figure
5). First, remove the magnifier from the rail. Leaving the quick detach lever in its open position, turn the
unit upside down, exposing the rail interface. To loosen the adjustment, turn the dial counterclockwise. To
tighten, turn the dial clockwise. Once done, re-mount the optic to the rail. Continue incremental changes
until a desired fit is achieved. CAUTION: Never make adjustments while the quick detach lever is in the
closed position.
MAINTENANCE
Maintenance of the magnifier is limited to cleaning of the outside housing of the optic and cleaning the lenses.
The optical system is coated with anti-reflection material. When cleaning the glass surfaces, first blow away
any dirt and dust. Fingerprints and lubricants can be wiped off with lens tissue or a soft cotton cloth which is
moistened with lens cleaning fluid or glass cleaner, sold in any camera store. Never clean the glass surface with
a dry cloth or paper towel; always dampen the glass surfaces prior to cleaning.
No maintenance is needed on the magnifier’s surface, except to occasionally wipe off with a soft cloth. Use
only a water-based cleaner such as glass cleaner, ammonia, or soap and water. Never use any solvent-type
cleaner such as alcohol or acetone.
WARNING: NEVER DISASSEMBLE YOUR MAGNIFIER! The optical cavity is purged, nitrogen filled,
and sealed to achieve fog proof performance. Disassembly will void the warranty and damage the sight.
If the switch action of the switch to Side mount begins to stick from wear, use a common spray lubricant on
the hinge portion of the mount. No other maintenance is needed on the Switch to Side Mount other than
cleaning the surface. Please follow the same guidelines when cleaning the magnifiers.
Contacting the manufacturer for repair:
1. V
isit the manufacturer’s website at https://www.L-3com.com/eotech. Click on the Customer Service Tab in
the menu bar and follow the instructions.
2. Call or email L-3® EOTech®’s Customer Service Department at the following:
(734) 741-8868 x2176
[email protected]
3. Be sure to leave a name, contact number, return shipping address, and failure description in the email or on
a voice mail. This will allow the manufacturer to generate a Return Authorization Number (RA#) to include
with the sight(s). DO NOT SHIP THE SIGHTS WITHOUT A RETURN AUTHORIZATION NUMBER
(this will severely delay the turn around time on repair or replacement).
4. I f you require, fill out a DD Form 1149 to include with the sight(s) you will return. Include a reference to
the RA#, and a signature line for L-3® EOTech®’s Service Department to sign indicating the receipt of materials. The signed copy will be mailed, faxed, or emailed back to you upon receipt of the sight(s) for the
purposes of accountability.
5. If the manufacturing date located on the bottom of the sight is more than two years old, a fee will be assessed
for repair to include the cost of both parts and labor. A purchase order will be required to process the repair.
Please contact L-3® EOTech® for an estimate.
Please send the unit postage prepaid, to address listed in Appendix B. Please include your name, address,
telephone number, and a written description of the problem you are encountering, and also include the RA #.
Whenever possible, ship the sight in its original box.
FACTORY CONTACTS
Product Registration....................... ..........................................................www.eotechinc.com/product-registration
Customer Service/Repair........................................................................................................................888-EOTHOLO
(734) 741-8868 x2176
Link to website to submit RA Request:....................................................http://www.EOTech-inc.com/raform.php
Technical Sales/Service...........................................................................................................................888-EOTHOLO
Shipping Address:
L-3® EOTech® Inc.
1201 E. Ellsworth Rd.
Ann Arbor, MI 48108
USA
EMAIL............................................................................................................................................general@L-3com.com
Visit us on the web.................................................................................................................www.L-3com.com/eotech