1
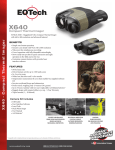
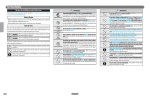
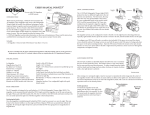
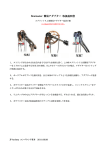
INTRODUCTION
Congratulations on your choice of a HOLOgraphic Archery Sight , a revolutionary
sighting system based on advanced holographic technology. The HOLOgraphic Archery
Sight enhances target acquisition, improves accuracy, and provides more control over
your shooting environment.
The HOLOgraphic Archery Sight fills the needs of all shooters from the novice to the
most advanced professional. Our objective is to give each and every customer the quality,
commitment, and service expected from the sighting industry leader. Whatever your
shooting discipline, we wish you the best shooting, and again, we thank you for choosing
the HOLOgraphic Archery Sight.
This user manual describes the features of the HOLOgraphic Archery Sight. Please read
the instructions carefully before mounting and using the sight and always practice
proper Archery safety.
HOLOgraphic Archery Sight will include:
• Sight assembly
•
•
2 x Type N alkaline batteries
7/64” allen wrench.
Figure 1
User Manual
BASIC OPERATION
The HOLOgraphic Archery Sight uses laser light to illuminate a holographic reticle
pattern embedded in the heads-up display window and forms a virtual image of a reticle
pattern. The shooter looks through the heads-up display window and sees a bright red
image of a reticle pattern projected onto the target plane. There is
absolutely no light projected onto the target plane, and the sight is legal to use in most
shooting and hunting situations. The HOLOgraphic Archery Sight has no magnification.
1
BATTERIES
Two (2) commonly available Type N alkaline 1.5 V batteries power your HOLOgraphic
Archery Sight. An initial set of batteries comes with your sight. The HOLOgraphic
Archery Sight is designed to maintain constant brightness at a particular setting as the
batteries drain down. The reticle brightness will not fade gradually as the batteries run
down but rather shut down abruptly. Another indication of low batteries is the reticle
pattern blinking off and on during recoil. With high recoil bows, this can occur before the
battery check indicates low battery condition. If the reticle pattern blinks off and on
during recoil or turns off suddenly, replace the batteries. Please read and follow the
battery replacement and battery check procedures described in this Manual.
Alkaline batteries from different manufacturers are not all constructed the same way.
Tests show some brands are more susceptible to degradation by the shock of recoil. We
recommend the use of Eveready Energizer batteries with the HOLOgraphic Archery
Sight. It is always good practice to replace the batteries with a fresh set before a match or
an extended hunting trip.
CAUTION-There is a 12 V battery that is approximately the same size as the Type
N 1.5 V battery. DO NOT USE 12 V battery. They will severely damage the sight.
REPLACING BATTERIES
Remove the battery compartment by lifting up on the locking cam lever and carefully
sliding the battery compartment away and up from the sight housing (Figure 2) . After
the battery compartment is removed, slide the batteries out and replace them with a fresh
set. The labels on the bottom of battery compartment show the correct battery orientation.
To re-install the battery compartment, point the sight towards the ground and slide battery
compartmant onto base. Make sure there is enough clearance between the contact and the
batteries to avoid bending the contacts. Hold the battery compartment down firmly
against the base and close the locking cam. Before you push down on cam lever, make
sure the battery compartment sits all the way down and parallel to the base. Verify
correct battery installation immediately by turning on the sight and checking if the
holographic reticle appears. If the batteries are left in the sight backwards, they will be
drained of their power.
2
Figure 2
ELECTRONIC FEATURES
All electronic controls are via push-button switches located at the rear of the unit housing
as shown in Figures 1. To ensure proper operation of the push button switches we
recommend pressing firmly on the center of the switch.
1. ON/ AutoBattery Check
Depressing the Up Arrow push-button switch will turn the sight ON. The sight will
automatically perform a battery check everytime it is turned on. If the batteries have less
than 20% of life left, the sight will turn on with the reticle image blinking on and off for 5
seconds. If the remaining battery life is more than 20%, the sight will turn on with a
steady reticle pattern. The battery condition can be checked any time by turning the sight
off and back on.
2. OFF
To turn the sight off depress both UP and DOWN arrows simultaneously. Verify by
looking through heads-up display window.
3. Brightness Adjustment
Push-button switches vary the brightness intensity of the holographic reticle pattern.
Depressing and releasing the push-button switches moves the brightness level UP or
DOWN one (1) step from the previous setting. Depressing and holding the up arrow or
down arrow switch will change brightness level up or down continuously in steps. There
are twenty (20) brightness settings providing a dynamic range of 20,000:1 from the
lowest setting to the highest setting. When the sight is turned ON, the brightness intensity
level is automatically set to Level 12.
4. Auto Shutdown
The HOLOgraphic Archery Sight is equipped with auto shutdown capability and will
automatically shut itself OFF 8 hours after the last push-button control is used.
3
MOUNTING
The Holographic Archery Sight Requires the use of a mounting adaptor that has it’s own
elevation and course windage adjustments. We recommend the HHA Optimizer Plus.
Please read the instruction that were sent with your mounting adaptor for correct
installation and zeroing.
SIGHTING AND ZEROING
It is important to have your anchor point set-up correctly before beginning to adjust your
windage and elevation. Refer to your mount manual for correct anchor point alignment
and elevation/windage zeroing.
FINE WINDAGE ADJUSTMENT
Your HOLOgraphic Archery Sight features a click mechanism for windage adjustments.
The windage adjustment is located on the Right-hand side of the sight (Figure 1). The
knob towards the front is your windage adjustment. The knob towards the rear is a
housing plug and should not be tampered with. This adjustment mechanism is grooved
with a slotted screw head and requires the use of a screwdriver, or coin to turn.
The windage adjustment is shown in Figure 4. Each click will change the arrow’s point
of impact 1/2 Minute of Angle (MOA), which translates to 1/4 inch at 50 yards, 1/8 inch
at 25 yards. Also, one full rotation of the knob will change your point of impact 10
MOA. This translates into 5 inches at 50 yards, 2.5 inches at 25 yards. To move the
point of impact RIGHT, turn the adjustment screw clockwise; to move the point of
impact LEFT, turn the adjustment screw counterclockwise .
Caution: DO NOT use the micro windage adjustments for greater than 4 inch
adjustments in either direction at 20 yards. Refer to your mount user manual for
zeroing sight within 4 inches @ 20 yards (Coarse Adjustment).
The windage adjustment has been intially set at the factory near the
midpoint of it’s adjustment range and should be close to being at zero with a properly
installed mounting rail. Please do not turn the
adjustment before mounting the sight on the Bow. Be
sure to check that the mount and the sight remain
secured after the first arrows are fire
ELEVATION ADJUSTMENT
There is no elevation adjustments built into the Holographic Archery Sight. The
elevation adjustments will be performed with the mounting system you are using. Refer
to your mounts user manual for proper elevation adjustment procedure.
LASER SAFETY ISSUES
The HOLOgraphic Archery Sight is a Class laser product. The Class level illuminating
beam, however, is completely blocked by the housing. The only laser light accessible to
the eye is the image beam and is at a power level within the limit of a Class a laser
product. The illuminating beam can become accessible to the eye if
the housing is broken. Turn the sight off immediately and return the
broken unit to the factory for repair.
FCC COMPLIANCE
The HOLOgraphic Archery Sight complies with Part 15 of the FCC Rules. Operation is
subject to the following conditions: (1) this device may not cause harmful interference
and (2) this device must accept any interference received, including interference that may
cause undesired operation.
MAINTENANCE AND CARE
Your HOLOgraphic Archery Sight is a precision instrument that deserves reasonably
cautious care. The following tips are provided to ensure long lasting use of the sight.
1. The optical system and the window are coated with anti-reflection material. When
cleaning the glass surfaces, first blow away any dirt and dust. Fingerprints and lubricants
can be wiped off with lens tissue or a soft cotton cloth, moistened with lenscleaning fluid
or glass cleaner sold in any camera store. Never clean the glass surface with a dry cloth
or paper towel; always dampen the glass surfaces prior to cleaning
2. All moving parts of the sight are permanently lubricated. Do not try to lubricate them.
3. No maintenance is needed on the sight's surface, except to occasionally wipe off with
a soft cloth. Use only a water-based cleaner such as glass cleaner, ammonia, or
soap and water. Never use any solvent-type cleaner such as alcohol or acetone.
Figure 4
CAUTION-When encountering a sudden increase in resistance in these adjustments,
the end of the adjustment range has been reached. DO NOT TRY to turn the
adjustments any farther or serious damage may occur to the sight
4
REPAIR
4. Never disassemble the sight's optical assembly. The optical cavity is purged, nitrogen
filled, and sealed to achieve fog proof performance. Disassembly will void the
warranty.
5
NOTES
If your HOLOgraphic Archery Sight should need repair, please send the unit postage
prepaid. Include your name, address, and telephone number as well as a written
description of the problem you are encountering. Whenever possible, ship the sight in its
original box.
Send to:
EOTECH
ATTN: Service Department
3600 Green Court Suite 400
Ann Arbor, MI 48105
Inside the United States you can contact EOTECH’S Customer Service Department at
734-741-8868 Extension 3688
Outside of the U.S.A or Canada: Contact your local dealer or distributor.
WARRANTY STATEMENT
All EOTECH HOLOgraphic Archery Sights are crafted with pride in the U.S.A. More
importantly, they are manufactured with our customer's satisfaction in mind. EOTECH
warrants every product to be free from defects in materials and workmanship for a period
of one year from the original date of purchase.
EOTECH will promptly repair or replace at its option any product that is defective in
material or workmanship, without charge. EOTECH requests that the purchaser send in
the warranty card that is enclosed with the product at the time of purchase. All costs
associated with the product shipment for product repair will be incurred by the owner.
This warranty does not cover defects caused by improper handling, unauthorized
disassembly, installation, or maintenance; abnormal use; or unapproved alterations.
EOTECH shall not, in any event, be liable for any damages, including any lost profits,
lost savings, or other incidental or consequential damages arising out of the use or
inability to use such products. This warranty gives the owner certain legal rights and
possibly other rights that vary from state to state.
6