1
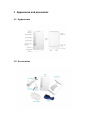
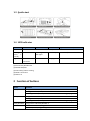
Student Card Phone User Manual (Version 1.0) 1 Appearance and accessories 1.1 Appearance 1.2 Accessories 1.3 Quick start 1.4 LED indicator Statue Green – GSM Blue – GPS Dark Flashing (every second) Red – Power Purple – Missed SMS/Calls No internet/ No SIM card GSM is on Searching GPS signal 1 Bright GPRS connected is GPS is located for Low battery Missed SMS/calls Charging Indicated order: (1) No internet/ No SIM card (2) Missed SMS/calls (3) Low battery/ GPS is working (4) GPRS is connected (5) GSM is on 2 Function of buttons Button Function Family Number1 Long press to call Family Number 1. During phone calls, short press to add one level of volume. After ringtone is set, short press once to add one volume during playing. Family Number2 Long press to call Family Number 2. During phone calls, short press to add one level of volume. After ringtone is set, short press once to add one volume during playing. Family Number3 Long press to call Family Number 3. SOS Button When the device is off, long press to turn it on. In standby mode, long pressing the button will call the pre-set SOS numbers in turns for three times until the call is picked up. During phone calls, short press to hang up. During ringtone setting, when the ringtone is playing, short press to stop. Power Off The device can only be turned off when the restricted power off function is off. NOTE: (1) In standby mode, long press any Family Numbers to dial the relative number; (2) When Family numbers call in, short press any Family Number buttons to answer the phone call; (3) During phone calls, long press family numbers can switch between receiver and speaker. 3 Before use 3.1 Check the accessories After open the box, please check whether the accessories are complete. If there is anything missing, please contact your supplier. 3.2 Operating environment The device should be operated in the temperature of 0℃-40 ℃ and in the humidity of 45℃ -85 ℃. The device should be used away from TV, computer, telephone and other office equipment; otherwise the communication may be influence. 3.3 Battery When the red LED light is flashing, it means the battery is low and needed to be charge. The standby time provided by your supplier is based on an ideal environment, for reference only. The real standby or working time varies from the operating environment and internet statue. 3.4 Charging (1) Connect the wall charger with the charging cable; (2) Open the rubber plug of the dock connector and connect it with the charging cable; (3) The charging process will take 3 to 4 hours. In the meanwhile, it is normal that the battery and the device will become hot; (4) The device can still be working during charging; NOTE: It is normal that the indicator will light up after few seconds if the device shuts down because the battery runs out. Warning: Please charge in a ventilated place with the temperature of 0℃-40 ℃ and use standard charger provided by your supplier. The damage caused by inappropriate charger will be against our warranty. 3.5 SIM card (1) Turn off the device before you insert or take our your SIM card; (2) Open the front cover of the device; (3) Insert the SIM card in the SIM card slot with the metal part facing down. NOTE: Please use a SIM card with GSM network, GPRS and caller ID function. Warning: Please turn off the device before you inset or take out your SIM card. It is forbidden to do it with external power connected; otherwise your SIM card may be damaged. 4 Parameter setting 4.1 Set APN Please send SMS command to the number of device so as to set up the APN parameter. The device will reply “OK” automatically after setting successfully. The SMS command is as follows: APN,APN’s name# E.g. APN,internet# NOTE: The APN of some countries have user name and password, you may need to send SMS command as following: APN,APN’s name,user name,password# E.g. APN,internet,CLIENTE,AMENA# 4.2 Add SOS Number 4.2.1 Add SOS number Via SMS command Send SMS command: SOS,A,number1,number2,number3 #(A means add number). You could set 3 SOS numbers in maximum. If set successfully, the terminal will reply “ok”. e.g. SOS,A, 13510****60,135116****6,136126****8# (set all 3 SOS numbers) SOS,A,13510****60# (set the first SOS number) SOS,A,,135116****6# (set the second SOS number) SOS,A,,,136126****8# (set the third SOS number) 4.2.2 Delete SOS Numbers Via SMS command Send SMS command: SOS,D,1,2,3# (D means delete SOS number) e.g. SOS,D,1# means delete the first number SOS,D,3# means delete the third number If you do not know the sequence number, you can also delete the number by SMS command like this: SOS,D,number# e.g. SOS,D,13527852360# means delete this SOS number directly. It will reply “OK” if the number is deleted successfully. 4.2.3 Add SOS numbers via platform You can set SOS number via the platform after activating the terminal. 4.3 Set Family Numbers 4.3.1 Add/delete Family Numbers via SMS command Family numbers can only be added or deleted by the commands sent by SOS numbers. (1) Add three Family Numbers Send SMS command: FN,A,Name1,Phone Number1,Name2,Phone Number2,Name3,Phone Number3# (A means add numbers) e.g. FN,A,Dad,13510***360,Mom,1351***85136,Grandma,1352****9982# (2) Add one Family Number To add the first Family Number, send SMS command: FN,A,Name1,Phone Number1# e.g. FN,A,Dad,13510***360# To add the first Family Number, send SMS command: FN,A,,Name2,Phone Number2# e.g. FN,A,,Mom,1351***85136# To add the third Family Number, send SMS command: FN,A,,,Name3,Phone Number3# e.g. FN,A,,,Grandma, 1352****9982# (3) Delete Family Numbers via SMS Send SMS command: FN,D,1,2,3# (D means delete the number) 1,2,3 means sequence numbers OR Send SMS command: FN,D,Phone Number# 4.3.2 Add/delete Family Numbers via platform You can set SOS numbers via the platform when the terminal connects to the platform. 4.4 Call Family Numbers Long press Family Number buttons can call preset numbers. Short press SOS button can hang off the call. NOTE: When the people you call pick up the phone, the terminal will vibrate slightly. 4.5 Answer phone calls When calls come, it will ring or vibrate according to the settings. The button will light up when relevant Family Numbers call in. If the calls come from the White List, button 1,2 and 3 will light up. 4.6 White List To avoid the situation where students might be interfered, 15 White List numbers can be set on platform. 4.7 Silent mode for classes (off as default) During silent mode, there will not be alarm. Silent period should be set on platform. 4.8 Low battery alarm SOS number will receive low battery alarm when the device is running out of battery. 4.9 Call reminder mode There are three modes of call reminder: ringtone/ vibration/ ringtone and vibration. It can be set by sending SMS: CALLMODE,0/1/2# (0 means ringtone; 1 means vibration; 2 means ringtone and vibration). e.g. CALLMODE,1# means the device will vibrate when calls come in. NOTE: 10 ringtones can be set on platform. 4.10 Power Off Limited function Send command: PWRLIMIT,ON# to turn on the function; PWRLIMIT,OFF# to turn off the function. NOTE: Only can SOS number turn on/off the function. The function can also be turned on/off on platform. 5 SOS alarm Long press SOS button for 3 seconds can activate GPS. The device will vibrate twice and dial pre-set SOS numbers in turns for three times until one of them answers. In the meanwhile, it will send location to SOS numbers. NOTE: SOS number should be set. 6 GPS working period If the working period is set, GPS will work during the pre-set period. If the working period is not set, it will not upload GPS data. It is recommended to set working period on the time after classes. NOTE: Working period should be set on platform. 7 Check location 7.1 Check by calls SOS numbers call the device and hang up after 5 seconds will activate GPS. It will upload GPS data to the platform and send location information to SOS numbers. The longest GPS searching time is 5 minutes. 7.2 Check by SMS SOS numbers send command: WHERE# to check the coordinates. The device will reply coordinates information. e.g. Lat:N22.571285,Lon:E113.877115,Course:42.20,Speed:0.0740,DateTime:10-11-23 22:28:51 If GPS is not located at all, the device will reply after 5mins:“NO DATA!” SOS numbers send command: URL# If GPS is located, it will reply google link of the latest longitude and latitude: e.g. Google link reply <DateTime:10-11-23 23:42:51> http://maps. oogle.com/maps?q=N22.571490,E113.877103 If GPS has never been located before, it will reply “NO DATA!” after 5mins. 8 Voice monitor When SOS number sends monitor command: MONITOR# to the terminal, the terminal will reply “OK” and call the SOS number. After the call connected, the terminal will enter monitor condition. The SOS number can hear the sound around the terminal. 9 Geo-fence (Off as default) Log in the platform to set the geo-fence. When the device is leaving or entering a pre-set area, it will send alarm to pre-set family number. 10 RFID RFID is used to record students’ attendance by sending messages to the Smart Attendance System. Then it will convey the messages to the parents via SMS. Once students swipe through the device of the system, and parents will get the message about student’s attendance. If the school has installed the 2.4G barrier-free attendance system in the front gate, the parents will get messages whenever students get in or out of the school. 11 Appendix 11.1 Battery security Please use the original battery. The warranty will be invalid by using any other accessory. The manufacturer will not take any responsibility for any damage caused by not using the original battery. The new battery can realize the optimal performance after fully- charging for 2 or 3 times. The battery can be used for hundreds of times, yet it will wear out eventually. When its talking time and standby time shrinks sharply, you need a new one. Cut off power supply when not using the charger. Don’t charge the battery for more than one week, since over charging will reduce its using time. Do not short-circuit the battery with metal stuff (such as the key in your pocket) Do not bend or open the battery. Do not put the battery into water or fire. The battery should never be charged at temperature below 0 degrees or above 45 degrees Celsius. 11.2 Trouble shooting Common problems Causes Solutions Radio waves cannot communicate with device when it is used in a bad signal area, like basement or space besides tall building. Move to a place with good signal. Cannot talk in Call-intensive period. Avoid call-intensive period Device fails to switch on No power Change a new battery Calls fail to get through Have not setup the family number for that key. Setup specific number for each key. SIM card installed incorrectly Check the SIM card The sheet mental of SIM card is dusty Wipe with a clean wiper. Invalid SIM card Contact your internet service provider Out of GSM service area Move back to the GSM service covered area. Weak signal Try again in a strong signal area Voltage is out of charging range of charger. Change to the proper voltage Use non-standard charger Use charger that come with the package Poor contact Check if the plug is in. SIM card does not support GPRS functions Please contact SIM card sell service to activate GPRS functions Reply “not receiving data, please try again” all the time Please contact with your distributors or selling services Cannot check with none preset family numbers Please set your phone number as family number Bad reception Device fails connect to the network Device fails to be charged Fail to check location information