1
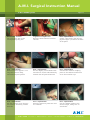
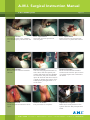
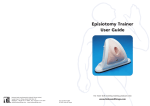
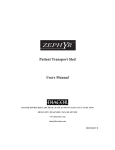
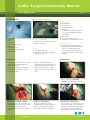
A.M.I. Surgical Instruction Manual A.M.I. ATOMS System Page 1/4 Recommended Materials Special Instruments • Roux-retractor & wound retractor • A.M.I. Tunnellers Linen • Universal linen set • 2 gowns, side drape, leggings • Adhesive strips Disposables • Compresses • Suction bag • 2 x blade size 20 • Syringes: 1 x 20 ml for rinsing the wound 1 x 10 ml NaCl 0.9% for filling the implant • Urine bag • Silicone catheter CH 14 • Anaesthetic, antiseptic lubricant Suture Material • Polypropylene / absorbable braided / absorbable monofilament / non-absorbable (for securing the implant and port, subcutiular and perineal wound closure) • Lithotomy position, patient under spinal or general anaesthesia • Sterile preparation • Draping (plug anus with gauze and tape with adhesive strips) • Tape sterile bag • Place catheter, wrap sterile compress around glans penis to absorb any urethral secretion • Attach urine bag, let it hang down over the stomach (patient’s right) y making a approximately 6 cm long. Dissection of bulbar urethra Prepare an area on both sides of the bulbospongiosus muscle without cutting the muscle itself. The obturator foramen is easily palpable. Implant - positioning Correct positioning of the ATOMS implant. The catheter must lie on the patient’s lefthand side and point upwards. Mesh arms - placement To get a feel for the correct insertion of the A.M.I. TOA Tunneller, practise outside the body near the inferior pubic ramus by guiding the tunneller around in the air. A.M.I. Surgical Instruction Manual A.M.I. ATOMS System Page 2/4 Mesh arms - placement Use the outside-in approach. The suture loop of the mesh arm on the patient‘s left is hooked onto the tip of the left tunneller, and the tunneller then penetrates the obturator foramen. Mesh arms - placement The tip of the left tunneller should exit in the distal perineal wound. Using the forefinger, push the bulbar urethra to the patient’s righthand side at the point where the tunneller is expected to exit. Then rotate the tunneller carefully until it can be felt by the forefinger. Mesh arms - placement Pull the left-hand mesh arm all the way through. Mesh arms - placement Repeat on the patient’s righthand side. Mesh arms - placement Pull the right-hand mesh arm through and tighten it. Mesh arms - placement Remove the protective sleeves – pull first on one arm and then on the other to bring them as close as possible to the bone, and ensure the implant is securely in place. Mesh arms - fixation Ensure the sutures are grouped together correctly. Mesh arms - fixation Hold the mesh arms tight and determine where the fixation sutures should be passed through the mesh arms to achieve firm positioning of the implant. Mesh arms - fixation Cut off the remainder of the mesh arm approx. 1 cm above the fixation sutures. A.M.I. Surgical Instruction Manual A.M.I. ATOMS System Page 3/4 Mesh arms - fixation Tie each suture pair to the corresponding sling arm. Irrigation of implant site Rinse the wound with a betadine solution. Port - implantation Create a port bed in the left symphyseal region just above the base of the penis. Port - implantation Make an incision approx. 3 cm long and create a deep, subcutaneous port pocket. Port - implantation Use the slightly curved A.M.I. TVA Tunneller to tunnel subcutaneously towards the left perineal wound. Port - implantation Connect the catheter coupling piece to the catheter and hook it on to the tunneller’s tip. Port - implantation Pull the catheter up to the port site incision. Avoid any contact with skin. Port - implantation Place the puncture protection over the catheter. Port - implantation Cut the catheter down to the correct length, taking care to avoid kinks. A.M.I. Surgical Instruction Manual A.M.I. ATOMS System Page 4/4 Port - implantation Connect the port to the catheter, once avoiding any contact with the skin. Port - implantation Screw the puncture protection onto the port. Port - implantation Place the port into the port bed and secure it in place with sutures. Port - implantation Rinse the wound with a betadine solution. Filling of system Use a 10 ml syringe filled with isotonic saline and the special port needle delivered with the ATOMS set. Puncture the port membrane, inject all the fluid and then remove it again to empty the system of air. Subsequently fill again with 4 - 6 ml of saline. Closure of wound Rinse the wound with betadine solution and close the port incision in multiple layers with a subcuticular suture. Closure of wound Close the perineal wound in three layers. Closure of wound The procedure is complete. Adjustment of system Make the first adjustment to the system after the 4th postoperative week.