1
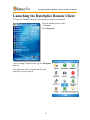
DataSplice® Mobile Computing Remote Client User Manual Date: 10/20/2010 DataSplice, LLC 414 E. Oak Street Fort Collins, CO 80524 Web: http://www.datasplice.com Email: [email protected] Phone: 800.377.1974 Fax: 970.484.0965 Table of Contents Table of Contents ................................................................................................................ 2 Copyright Information ........................................................................................................ 4 Introduction ......................................................................................................................... 4 Purpose............................................................................................................................ 4 Version Information ........................................................................................................ 4 User Interface ...................................................................................................................... 4 Toolbar ............................................................................................................................ 5 Filter Toolbar .............................................................................................................. 5 Data Grid & Single Record Toolbar ........................................................................... 6 Menus .............................................................................................................................. 7 File Menu .................................................................................................................... 7 Edit Menu (Desktop)................................................................................................... 8 Record Menu ............................................................................................................... 8 Grid Menu ................................................................................................................... 8 Navigating to Filter, Grid, or Single Record Display ............................................... 10 Launching the DataSplice Remote Client ......................................................................... 12 Beginning a Session .......................................................................................................... 13 Logging In ..................................................................................................................... 13 Reconnecting an Existing Session ................................................................................ 14 Offline Behavior ........................................................................................................... 15 Completing a Session ........................................................................................................ 19 Completing an Online Session ...................................................................................... 19 Completing an Offline Session ..................................................................................... 20 Home Screen ..................................................................................................................... 22 Assets ................................................................................................................................ 23 Description .................................................................................................................... 23 Fields ............................................................................................................................. 23 Using the View ............................................................................................................. 24 Meter Readings ......................................................................................................... 27 Specifications ............................................................................................................ 29 Spare Parts ................................................................................................................ 29 Custodians ................................................................................................................. 30 Work History ............................................................................................................ 31 Inspection Rounds ............................................................................................................. 32 Description .................................................................................................................... 32 Fields ............................................................................................................................. 32 Using the View ............................................................................................................. 33 Inspection History ..................................................................................................... 35 Inventory ........................................................................................................................... 36 Description .................................................................................................................... 36 Fields ............................................................................................................................. 36 Using the View ............................................................................................................. 37 Balances .................................................................................................................... 39 Issues and Returns..................................................................................................... 40 Transfers ................................................................................................................... 41 Where Used ............................................................................................................... 42 Inventory Transfer ............................................................................................................ 43 Description .................................................................................................................... 43 Fields ............................................................................................................................. 43 Using the View ............................................................................................................. 43 Issues and Returns............................................................................................................. 45 Description .................................................................................................................... 45 Fields ............................................................................................................................. 45 Using the View ............................................................................................................. 46 Purchase Order Receiving................................................................................................. 49 Description .................................................................................................................... 49 Fields ............................................................................................................................. 49 Using the View ............................................................................................................. 50 Reserved Material ............................................................................................................. 52 Description .................................................................................................................... 52 Fields ............................................................................................................................. 52 Using the View ............................................................................................................. 52 Cycle Count ...................................................................................................................... 55 Description .................................................................................................................... 55 Fields ............................................................................................................................. 55 Using the View ............................................................................................................. 55 Discrepancy Report ........................................................................................................... 58 Description .................................................................................................................... 58 Fields ............................................................................................................................. 58 Using the View ............................................................................................................. 58 Work Orders...................................................................................................................... 60 Description .................................................................................................................... 60 Fields ............................................................................................................................. 60 Using the View ............................................................................................................. 61 Task Steps ................................................................................................................. 64 Failure Reporting ...................................................................................................... 65 Material Usage .......................................................................................................... 68 Planned Items and Tools ........................................................................................... 70 Work History ............................................................................................................ 71 Spare Parts ................................................................................................................ 71 DataSplice Mobile Computing – Remote Client User Manual Copyright Information DataSplice® is a registered trademark. ©2000-2010 DataSplice Corporation. All rights reserved. Other product and company names may be the trademarks of their respective owners. MAXIMO® software is a registered trademark of IBM. DataSplice is not owned, licensed, or in any way affiliated with IBM. IBM is not responsible for the content or accuracy of this document or for the content, performance or quality of DataSplice products or services. Microsoft, Visual Studio, Windows and the Windows logo are either registered trademarks or trademarks of Microsoft Corporation in the United States and/or other countries/regions. Other names and products mentioned herein may be the trademarks of their respective owners. Introduction Purpose This document is designed as a guide to the set of views for the DataSplice Remote Client application. This guide is intended to provide a general set of instructions for how each DataSplice view is intended to be used and how each of the views functions. Version Information The information in this document is valid and current with DataSplice version 4.0. User Interface 4 DataSplice Mobile Computing – Remote Client User Manual Toolbar The toolbar in the Remote Client contains a variety of capabilities. Icon Name Display Home Screen Save Changes Purpose Returns Back to the Main View Selection screen Saves the pending record changes. Filter Toolbar The last few items on the toolbar are context-sensitive to the current screen being displayed. As such, when looking at the filter screen of a view, the following toolbar items are available: Icon Name Clear Filter Insert New Filter Item Delete Filter Item Display View Selection Save Changes Search Screen Data View Purpose Blanks out the criteria presently in place for the currentlyselected filter item. Creates a new filter entry immediately below the currentlyselected one. Deletes the currently-selected filter item. Displays the Home Screen Saves the pending record changes. Displays the Search Screen Toggles Between Grid View 5 and Single Record DataSplice Mobile Computing – Remote Client User Manual Data Grid & Single Record Toolbar The last few items on the toolbar are context-sensitive to the current screen being displayed. As such, when looking at the data grid or single record screen, the following toolbar items are available: Icon Name Display View Selection Save Changes Search Screen Data View Purpose Displays the Home Screen. Commits the pending record changes to the server. Displays the Filter Screen Toggles Between Grid View and Single Record Connection Status Menus Displays the available options based on the current user’s session status. When the current status is Connected, the user can select Synchronize with Server and Log Out. When the status is currently Online, user’s can select Synchronize with Server, Work Offline, and Log Out. When the status is currently Offline, user’s can select Synchronize with Server, Work Online, and Log Out. 6 DataSplice Mobile Computing – Remote Client User Manual Menus The main menu bar of the Remote Client contains many useful features. It will display the different options available on each screen. File Menu Desktop Menu Item Log Out Change Password Save Changes Synchronize With Server Work Online About Hand-held Purpose Logs out of the Remote Client. After the current user is logged out, the login dialog box is displayed again. Displays the Change Password dialog box to allow users to change their passwords. Note: In order for the password change to take effect, the current password must be entered correctly, and the New Password and Confirm Password fields must match. Saves pending changes. When working offline, these changes are still cached locally on the device until a synchronization is performed. Updates Remote Client information with the latest information on the DataSplice Server. Allows the handheld in the cradle to communicate with the DataSplice Server to commit any pending modifications and update schema information. Connects in order to work in an offline mode. This option is only available when the handheld is in the cradle and a connection has been established with the DataSplice Server. Opens the About dialog box and provides basic file information and loaded plug-in information. By default, the dialog box will display file information. Loaded Plug-ins can also be selected from the Section dropdown list to see the corresponding plug-in information. 7 DataSplice Mobile Computing – Remote Client User Manual Logs out and closes the Administration Client. Exit Edit Menu (Desktop) Menu Item Cut Copy Paste Purpose Removes the selection from its current location and places it on the system clipboard. Places a copy of the selection onto the system clipboard. Inserts the contents of the system clipboard into the current selection. Record Menu Clicking on the “handle” of record in the data grid display will open the record menu. Icon Menu Item Cut Copy Paste Create New Record Delete Selected Record(s) Reset Record Purpose Removes the selection from its current location and places it on the system clipboard. Places a copy of the selection onto the system clipboard. Inserts the contents of the system clipboard into the current selection. Creates a new record immediately following the currently selected record. Deletes the selected record(s). Resets the selected record back to the original state before edits were made. Grid Menu 8 DataSplice Mobile Computing – Remote Client User Manual Clicking or tapping on the “handle” in the upper left corner of the data grid will open the Grid Menu. Icon Menu Item Export Data Display Single Record / Display Data Grid Select All Create New Record Purpose (Desktop Only) Exports the contents of the data grid to a *.csv file. Toggle the current display mode between single record display and data grid. Used to “select” all of the records in the data grid. Will insert a new row of data immediately following the currently selected row. 9 DataSplice Mobile Computing – Remote Client User Manual Navigating to Filter, Grid, or Single Record Display Views can be seen in three different states. The different navigation entries to access each of these states are as follows: Display Filter Icon - Tapping this icon shows the default filter for the view. An * or a % acts as a wildcard in any search. Display Data Grid Icon - Tapping this icon shows multiple records from the recordset. Use the scrollbar at the bottom of the grid to view the details of each record. 10 DataSplice Mobile Computing – Remote Client User Manual Click on the ellipses (…) to view a truncated line. Display Single Record Icon - Tapping this icon shows only one record from the recordset. Use the data grid “handle” to open the grid menu when accessing the data in the detail tabs. 11 DataSplice Mobile Computing – Remote Client User Manual Launching the DataSplice Remote Client To begin, the DataSplice Remote Client application needs to be launched. Place the handheld in the cradle. Click Start. Select Programs. In the resulting Programs menu, tap the DataSplice 4.0 icon. The application will be launched and the login dialog box will be displayed. 12 DataSplice Mobile Computing – Remote Client User Manual Beginning a Session Depending on the steps previously taken, the behavior for working with a session may vary. For example, if the user has not yet been authenticated from a previous session, the initial login dialog box is displayed. The user must then log in using the correct credentials to connect to the DataSplice Server and be authenticated appropriately. In contrast, if the user has previously been authenticated, the list of available views will be displayed upon launching the application, although the user is still not connected at this time. Any action in the application that requires a query of information from the DataSplice Server will attempt to automatically reconnect. Logging In If this is the first time accessing the Remote Client, or if the previous session was successfully logged out, the user will be required to log in to obtain a new session. To log in to the DataSplice Remote Client: Launch the Remote Client. In the resulting dialog box, enter the appropriate login information, keeping in mind that all entries are case-sensitive. Field Name User Name Password Domain DataSplice Server Description The unique login name for this user. The password corresponding to the unique user name in the previous field. The domain that this user belongs to. If the desired entry does not show up in the drop-down list, it can be typed directly into the drop-down field. After a successful login attempt, the domain that was entered will remain in the drop-down list for future use. The computer name or IP address of the machine running the DataSplice Server. If a port other than the default, 4100, is being used, it should be specified with a colon and the port number immediately following the server name or IP address. For example, if the server is named test and the DataSplice Server is configured to listen on port 4101, the value should be entered as test:4101. 13 DataSplice Mobile Computing – Remote Client User Manual Click the Connect menu button to continue. If the Cancel button is clicked, the user will not be authenticated, and the Remote Client application will automatically close. The Remote Client will attempt to authenticate and connect with the given information. The behavior to follow depends on the settings of the Offline Behavior attribute, as described in the following sections. Reconnecting an Existing Session If the user has previously been authenticated and has not since logged out, the list of available views will be displayed upon launching the application, although the user is still not connected at this time. To reconnect with an existing session: Launch the Remote Client. The home screen will be displayed, showing the list of available views. Remember that, at this time, the connection to the DataSplice Server has not yet been re-established. 14 DataSplice Mobile Computing – Remote Client User Manual Perform any action in the Remote Client application that requires a query of information from the DataSplice Server, such as querying data in a view, attempting to synchronize with the DataSplice Server, etc. The Remote Client will attempt to automatically reconnect to the DataSplice Server. Offline Behavior When Offline Behavior is Defined as Never Offline If the Offline Behavior attribute in the DataSplice Administration Client has been defined as Never Offline, it is not possible to cache offline data onto the Remote Client device. For the same reason, it is also not possible to obtain an offline session in this scenario. Please see the explanation of built-in system attributes for more information about this attribute setting. When Offline Behavior is Defined as Always Offline If the Offline Behavior attribute in the DataSplice Administration Client has been defined as Always Offline, the caching of offline data will be automatically performed during any login or synchronization process. In addition, the user always has an offline session, even if the user is still connected to the DataSplice Server. This offline session will remain until it is released by logging out of the Remote Client or it is revoked by an administrator in the Administration Client. Please see the explanation of built-in system attributes for more information about this attribute setting. 15 DataSplice Mobile Computing – Remote Client User Manual To acquire offline data when the Offline Behavior attribute is defined as Always Offline: Launch the Remote Client. Log in with the credentials of a user who has offline behavior defined as Always Offline. Offline data will automatically be cached onto the Remote Client device, during which time a status dialog box will be displayed. Click OK to close the dialog box when the offline data has finished loading on the device. The home screen will be displayed, showing the list of available functions. 16 DataSplice Mobile Computing – Remote Client User Manual Because of the Always Offline setting, the application will immediately assume the device is disconnected as soon as the synchronization process finishes. Thus, as soon as the offline data is loaded on the device, it is ready to be used in an environment without network connectivity. Acquiring Offline Data when Offline Behavior is Undefined If the Offline Behavior attribute in the DataSplice Administration Client has not been defined, the ability to acquire offline data is available to the user but it requires the synchronization process to be explicitly invoked. Once a synchronization has been performed in this scenario, the user will have an offline session, even if the user is still connected to the DataSplice Server. Please see the explanation of built-in system attributes for more information about this attribute setting. To acquire offline data when the Offline Behavior attribute is not defined: Launch the Remote Client. Log in with the credentials of a user who has undefined offline behavior. Upon successful login, tap Menu > Synchronize with Server. Offline data will be cached onto the Remote Client device, during which time a status dialog box will be displayed. 17 DataSplice Mobile Computing – Remote Client User Manual Click OK to close the dialog box when the offline data has finished loading on the device. The home screen will be displayed, showing the list of available views. 18 DataSplice Mobile Computing – Remote Client User Manual Click Menu > Toggle Connection to disconnect from the DataSplice Server and begin using the stored offline data. Completing a Session When all of the desired tasks of a session have been performed, the current session should be properly completed. This process releases the session, which also ensures that all licenses being consumed by the session are freed up and made available for additional sessions. The process of completing a session differs depending on whether an online or offline session is being used. Completing an Online Session To complete an online session, it is necessary to either log out or exit the Remote Client application. Because the session is online, performing either of these actions will immediately release the session in use. To complete an online session, perform one of the following step: Click Menu > Log Out. Note: Closing the Remote Client application by using the button in the upper right corner of the screen on a Windows Mobile device will not release the session. Rather, the application will still be running in a minimized state. 19 DataSplice Mobile Computing – Remote Client User Manual Completing an Offline Session Due to the nature of offline sessions, there are a few more scenarios that may be encountered. As such, the process of completing an offline session is slightly more involved. It is important to remember that, during an offline session, all of the pending modifications are stored on the Remote Client device, not on the DataSplice Server. To successfully complete the session, any modifications must be committed to the DataSplice Server and the session must be released properly. To synchronize data and continue working in the existing session: Ensure that a valid network connection is active, with visibility of the DataSplice Server. Click Menu > Synchronize with Server. All pending record modifications will be committed to the DataSplice Server. In addition, the system will be queried for any new or updated records to cache offline on the Remote Client device. During the synchronization process, a progress dialog box will be displayed. Click OK to close the dialog box when the offline data has finished loading on the device. Click Menu > Work Offline to disconnect from the DataSplice Server and begin using the stored offline data. To synchronize data and release the offline session: Ensure that a valid network connection is active, with visibility of the DataSplice Server. 20 DataSplice Mobile Computing – Remote Client User Manual Click Menu > Log Out. All pending record modifications will be committed to the DataSplice Server. Once complete, the user will be logged out and the session will be released, returning the Remote Client application to the login screen. 21 DataSplice Mobile Computing – Remote Client User Manual Home Screen After you have successfully logged in, you will be presented with the home screen. Default View DataSplice will display the list of all available functions. The list contains all of the DataSplice inventory views (screens) that you have access to based on your user login. To access a particular view, tap on the button with your stylus, or highlight it using the tab key on the handheld and press the “Enter” key. To return to the home screen, tap the Home Screen button . All Available Views You may, at any time, scroll through the list of all available functions. Each Category can be expanded or collapsed using the or buttons in the category header. 22 DataSplice Mobile Computing – Remote Client User Manual Assets Description The Assets mobile screen provides the user with the ability to search on, modify, and create new asset records. In addition to standard asset updates, the user can view and modify asset specifications, meter readings, work history, and spare parts. Fields Field Name Asset Description Parent Location Status Failure Code Priority Bin Item Serial Number Asset Tag Vendor Manufacturer Install Date GL Account Class Structure ID SiteID Description The Maximo Asset Number The description of the asset The parent asset, if this asset is a child. The location identifier for this asset The asset’s status; NOT READY, OPERATING, etc.. The asset’s failure classification The priority for the asset. Helps to determine which assets should be worked on first. The bin location of the asset, if it is a rotating item in inventory. The item number of the asset, if it is a rotating item in inventory. The serial number of the asset The Asset’s tag identifier The vendor code from where the asset was purchased The manufacturer’s code (not the same as name) The date the asset was installed The general ledger account for the asset The class structure identifier. Specifies the hierarchy of attributes associated with the asset The SiteID of the asset. 23 DataSplice Mobile Computing – Remote Client User Manual Using the View Assets To access the Assets mobile screen, tap on the Search for Assets button on the Home Screen. Search for Asset The Asset’s filter screen initially displays a predefined filter for searching for assets. Key in, or scan, the desired values to search on then hit the “Enter” key. Optionally, you can tap on either of the display mode toolbar buttons: Display results in Grid Mode. Display results in Single Record Mode. 24 DataSplice Mobile Computing – Remote Client User Manual Grid Mode Display Single Record Display New Asset Records The Assets screen supports the creation of new assets provided the user has the rights to do so in Maximo. To create a new asset, tap the Actions menu and select; 1. Create Copy of Asset – to duplicate an asset record. 2. Create New Asset – to create new asset record that the user will complete. 25 DataSplice Mobile Computing – Remote Client User Manual Editing the Asset Record If the “Create Copy of Asset” option is used, the new record will default with the values from the selected asset. Otherwise, the user can enter the desired values for the new record. Entering a location value When selecting a location value, the popup value grid provides menus for navigating the hierarchy. Use the Child Locations navigation menu to move down the hierarchy of locations. Use the Parent Location menu to move up. Additionally, the location value can be scanned in as well. 26 DataSplice Mobile Computing – Remote Client User Manual Detail Tabs Users can access the detailed data for the selected asset by tapping on the arrow keys on either side of the client display screen. The different tabs will be displayed. Tap on a particular tab to select it. 1. 2. 3. 4. 5. Meter Readings Specifications Custodians Spare Parts Work History The tab will be displayed in bold. Meter Readings Meter Readings The Meter Readings tab allows the user to view the meters associated with the asset and enter new meter readings. To enter a new reading, place focus in the corresponding “New Reading” field, for the correct row, and enter the desired value. 27 DataSplice Mobile Computing – Remote Client User Manual Meter Readings Characteristic meters, or meters with a domain value list, will have a drop-down value selection available. Meter Readings New gauge readings, that are out of range of the defined limits, will be displayed with a darker background color. This visual cue is to alert the user to an “out-of-bounds” condition for the new reading. 28 DataSplice Mobile Computing – Remote Client User Manual Specifications Asset Specs The Specifications tab allows the user to view and update asset specification values. The Value field can modified, if the user has the rights to update asset data. If there is a domain value list associated with the selected specification, a drop-down will be available to pick from. Otherwise, the user can key-in the correct numerical or text based value. Spare Parts Spare Parts The Spare Parts tab displays the list of items that have been defined as spare parts, for the selected asset. 29 DataSplice Mobile Computing – Remote Client User Manual Custodians Custodians The Custodians tab allows the user to view the associated custodian information for the selected asset. New Custodian Record If the user has the rights to update this information, they will be able to create new entries for additional (or new) custodian records. Use the grid handle, in the upper left corner of the data grid to access and select the Create New Record menu option. 30 DataSplice Mobile Computing – Remote Client User Manual New Custodian Record Key-in, scan, or select the Person for the new custodian record. Work History Work History The Work History tab is a read-only display of the historical work orders for the selected asset. 31 DataSplice Mobile Computing – Remote Client User Manual Inspection Rounds Description Inspection Rounds is a screen designed to allow the user to easily enter new meter readings by searching on an Asset or Round. Fields Below is a listing of the fields included in this view. Field Name Reading Description Last Value Last Date Unit of Measure Meter Name Lower Action Lower Warning Upper Warning Upper Action Asset Asset Description Stop Seq Round Location Point Number Meter Type DomainID SiteID Description The description of the meter reading The value of the last reading taken. The date of the last reading The unit of measure for the meter The meter name ( identifier ) The low limit defined for normal operation of the meter. Readings less than this value require corrective action. The low warning defined for normal operation of the meter. The high warning defined for normal operation of the meter. The high limit defined for normal operation of the meter. Readings above this value require corrective action. The asset this meter is attached to. The asset’s description The sequence number that the meter should be read. The Round the asset belongs to The location the asset is at The point number for this meter. Used to define the upper and lower limit for gauge meters. The type of meter. GAUGE, CONTINUOUS, CHARACTERISTIC The Domain ID that identifies a drop-down value list for meter readings. The Site ID 32 DataSplice Mobile Computing – Remote Client User Manual Using the View Inspection Rounds To access the Inspection Rounds, tap on the Inspection Rounds button on the Home Screen. Search by Asset or Round To search for a set of readings, key-in or scan the Asset number. Or, select the desired round from the Round’s drop-down list of available values. Once the filter values are entered, hit the “Enter” key. Optionally, you can tap on either of the display mode toolbar buttons: Display results in Grid Mode. Display results in Single Record Mode. 33 DataSplice Mobile Computing – Remote Client User Manual Display Grid Display Single Record Enter New Readings The results of the search are displayed in Stop Sequence and Point Number order. User can begin entering readings into the “New Value” field. “New Value” fields, with a drop-down arrow, will have a value list to select from. Otherwise, users can perform numerical data entry using the key-pad of the device or the virtual keypad. 34 DataSplice Mobile Computing – Remote Client User Manual Inspection History Inspection History The Inspection History tab displays the historical readings for the selected meter reading. Use the scroll bar at the bottom of the screen to view additional details. Or, use the grid menu to display the data in single record mode. History records that are displayed with a yellow background indicate that the reading was “out-of-range”. 35 DataSplice Mobile Computing – Remote Client User Manual Inventory Description Inventory is a view designed for looking up inventory items. After a successful search on an item, users can perform counts, transfers, issues, etc... for the selected inventory item. Fields Below is a listing of the fields included in this view. Field Name Item Description New Count Last Count Current Balance Count Date Storeroom Bin Issue Unit Catalog Code Manufacturer Model Number Vendor Min Level Max Level Category Rotating Reconciled Count Frequency Description The identification number of the item being issued. The item description. Used to enter the value for physical counts. The value of the last physical count. The current on-hand qty in stock. The date of the last count. The storeroom location of the item. The bin location within the storeroom. Unit of Measure for issues of the item. Typically vendor part number. The item manufacturer. The manufacturer’s part/model number. Company the item was purchased from. Minimum stock level. Maximum stock level. Item category (Stock, Non-stock, Obsolete, etc…) Specifies if the item is a rotating equipment spare. Specifies if the item’s last count has been reconciled. The number of days scheduled between each physical count. Used in conjunction with count frequency. Determines how often to count ABC Type the item. Calculated value. Shows how many days before an item is due to be Days Until Count counted. The type for this record (ITEM, TOOL, STDSERVICE). Item Type 36 DataSplice Mobile Computing – Remote Client User Manual Using the View Inventory View List To access the Inventory Search screen, tap on the name with the stylus, or highlight the name (using the tab key) and hit the “Enter” key. Searching for records The Inventory screen initially displays a predefined filter for searching for inventory items. Key in, or scan, the desired values to search on then hit the “Enter” key. Optionally, you can tap on either of the display mode toolbar buttons: Display results in Grid Mode. Display results in Single Record Mode. 37 DataSplice Mobile Computing – Remote Client User Manual Grid Mode Display Single Record Display Detail Tabs Users can access the detailed data for the selected item by tapping on the arrow keys on either side of the client display screen. The different tabs will be displayed. Tap on a particular tab to select it. 1. 2. 3. 4. Balances Issues and Returns Transfers Where Used The tab will be displayed in bold. 38 DataSplice Mobile Computing – Remote Client User Manual Balances Entering a Physical Count To enter a physical count, edit the New Count field by entering the quantity of the count into the value cell. This can only be performed if the user has the proper permissions to do so in Maximo. Tap on the Filter button to return to the filter screen to search for more items. Or, user can scan the item barcode to automatically search for that item. Adjusting Current Balance To adjust the current balance, edit the Current Balance field by entering the desired quantity into the value cell. This can only be performed if the user has the proper permissions to do so in Maximo. Tap on the Filter button to return to the filter screen to search for more items. Or, user can scan the item barcode to automatically search for that item. 39 DataSplice Mobile Computing – Remote Client User Manual Issues and Returns Create New Record User can create a new issue or return record for the selected item. To access the Grid Menu, tap on the grid handle in the upper left corner of the data grid. Using the Grid Menu, select the Create New Record option. Transaction Values DataSplice will insert the new record, into the grid, just below the record that had focus. Enter the desired values for Issue To, Work Order, Asset or Location. Note: at least one of these values must be specified. 40 DataSplice Mobile Computing – Remote Client User Manual Transfers Create New Record User can create a new transfer record for the selected item. To access the Grid Menu, tap on the grid handle in the upper left corner of the data grid. Using the Grid Menu, select the Create New Record option. Transaction Values DataSplice will insert the new record, into the grid, just below the record that had focus. Enter the desired values for Quantity, From Bin, To Storeroom, and To Bin. 41 DataSplice Mobile Computing – Remote Client User Manual Where Used Item / Spare Parts Display This tab provides a read-only display of the assets that contain the selected item in their spare parts list. 42 DataSplice Mobile Computing – Remote Client User Manual Inventory Transfer Description Inventory Transfer is a view designed for transferring inventory items to different bin and / or storeroom locations. Fields Below is a listing of the fields included in this view. Field Name Item Quantity From Bin From Store To Bin To Store Description The identification number of the item being issued. The quantity of the chosen item to be issued. The bin the item will be issued from. The storeroom the item will be issued from. The bin the item will be issued to. The storeroom the item will be issued to. Using the View Inventory View To access the Inventory Transfer screen, tap on the Transfer Material button on the Home Screen. 43 DataSplice Mobile Computing – Remote Client User Manual Scan an Item barcode To transfer an item, scan the item’s barcode label. A transfer record will be created. Single Record Display / Edit Mode A new transfer transaction is started based on the select item. Enter the Quantity (number of items) being transferred, and select the correct From Bin and To Bin values. If transferring to another storeroom, pick the To Storeroom value before selecting the To Bin. To Bin and To Storeroom values will have a drop-down selection available. 44 DataSplice Mobile Computing – Remote Client User Manual Issues and Returns Description Issue and Returns is a view designed to easily issue or return material to/from a work order, general ledger account, location, or asset. Fields Below is a listing of the fields included in this view. Field Name Item Description Quantity Issue Unit Issue Type Storeroom Bin Issue To Asset Work Order Location GL Account Date Description The unique identifier for a piece of inventory in the system. Description of the item in question. The current balance since the last reconciliation. The unit of measure used when referring to the quantity of this item. ISSUE or RETURN Physical storeroom where the item is located. Physical bin where the item is located. The labor code to issue this unit to. The asset number related to this transaction. The work order related to this transaction. The location related to this transaction. The general ledger account related to this transaction. The date and timestamp of this transaction. 45 DataSplice Mobile Computing – Remote Client User Manual Using the View Inventory View List To access the Issues and Returns screen, tap on the button with the stylus. Searching for records The Issue and Returns screen initially displays a predefined filter for starting an issue transaction. Key in, or scan, the desired Work Order and Issue To and then hit the Enter key. If returning an item, change the Issue Type to RETURN by selecting it from the dropdown prior to starting the transaction. 46 DataSplice Mobile Computing – Remote Client User Manual Edit Mode Scan the 1st item to issue to the specified work order. If a barcode is not available, users can tap on the “Add Item” menu in the lower left corner. A prompt is displayed where the user can “key-in” the desired item number. Tap on 47 to continue. DataSplice Mobile Computing – Remote Client User Manual Scan or Key-in Item number A new transaction is started. Enter the Quantity (number of items) being issued/returned. To issue additional items, simply scan the next barcode. Or, tap on the Add Item menu and key-in the item number. Another issue/return record will be created. Tap on the Filter button to return to the filter screen to issue/return to a different work order. Deleting Records If the wrong part is scanned, or the user keys-in the wrong item number, the record can be deleted by “tapping” on the record handle (located at the left edge of the record) and selecting Delete Selected Record from the pop-up menu. 48 DataSplice Mobile Computing – Remote Client User Manual Purchase Order Receiving Description Purchase Order Receiving is a view designed to easily receive inventory items from incoming purchase orders. Fields Below is a listing of the fields included in this view. Field Name Purchase Order Status Line Number Item Quantity Received Quantity Rejected Packing Slip Reject Code Storeroom Bin Remark Description Order Quantity Order Unit Total Quantity Total Rejected Catalog Code Model Number Manufacturer Location Asset Work Order Description The purchase order number. Status of the PO. APPR, COMP, etc… The unique identifier purchase order line. The unique identifier for a piece of inventory in the system. The quantity to receive. The quantity rejected. The packing slip for this receipt. The reject code, if any, for this receipt. Physical storeroom where the item is located. Physical bin where the item is located. The description set by user. Description of the item ordered. Amount of items ordered. Unit of Measure for ordered qty. Amount of items received. Amount of items rejected. Catalog code. The model identifier of this item. Manufacturer of this item. The associated location. The associated piece of equipment. The associated work order. 49 DataSplice Mobile Computing – Remote Client User Manual Using the View Inventory View List To access the Purchase Order Receiving screen, tap on the Receive by PO button on the home screen. Searching for records The Purchase Order Receiving screen initially displays a predefined filter for PO Line searches based on PO number and Receipts Complete. Key in, or scan, the desired values to search on then hit the “Enter” key. Optionally, you can tap on either of the display mode toolbar buttons: Display results in Grid Mode. Display results in Single Record Mode. 50 DataSplice Mobile Computing – Remote Client User Manual Grid Mode Display Single Record Display Editing Fields There are 3 editable fields on this screen: 1. Receipt Qty–The amount / quantity currently being received. 2. Bin 3. Packing Slip Enter the Receipt Qty, and the Bin where the parts is being put away. If this is a direct issue item, Bin is not needed. 51 DataSplice Mobile Computing – Remote Client User Manual Reserved Material Description The Reserved Material screen provides the user with a list of items that have been “reserved” for particular work orders. From this list, users can issue the desired items by enter the “picked qty” for each line item. Fields Field Name Item Description Reserved Qty Actual Qty Bin Issue Unit Storeroom Requested By Request Number Work Order SiteID Description The inventory item number The description for the item How many of this item has been reserved How many of this item has already been issued The bin location for the item ( for this particular issue ) The unit of measure, example: EACH The storeroom location where the item is located Who requested the item The request number The work order number ( identifier ) The SiteID for the work order Using the View Reserved Material To access the Reserved Material screen, tap the button on the Home Screen. 52 DataSplice Mobile Computing – Remote Client User Manual Searching for Item Reservations A search filter is displayed that can be used to find the desired item reservations. Users can search by work order to display a specific set of reserved items. Or, users can search by storeroom to display all the reservations for items in the specified storeroom. Key in, or scan, the desired values to search on then hit the “Enter” key. Optionally, you can tap on either of the display mode toolbar buttons: Display results in Grid Mode. Display results in Single Record Mode. Grid Display Single Record Display 53 DataSplice Mobile Computing – Remote Client User Manual Issuing a Reserved Item To issue an item, enter the amount being issued in the Issue Qty field. Additionally, if the user is pulling the parts from a bin that is different from the one specified, they can key-in or select the correct bin location. The current balance of the item for each bin is displayed in the drop-down value list. 54 DataSplice Mobile Computing – Remote Client User Manual Cycle Count Description Cycle Count is a view designed for scanning item barcodes and entering new physicall counts. After a successful scan of an item, the record is unlocked and the user can enter a new physical count. Fields Below is a listing of the fields included in this view. Field Name Item Description New Count Count Date Storeroom Bin Issue Unit Reconciled ABC Type Description The identification number of the item being issued. The item description. Used to enter the value for physical counts. The date of the last count. The storeroom location of the item. The bin location within the storeroom. Unit of Measure for issues of the item. Specifies if the item’s last count has been reconciled. Used in conjunction with count frequency. Determines how often to count the item. Using the View USE: To perform a guided cycle count based on items due to be counted by a specific date based on their count frequency and last count date. Select Cycle Count from the home screen to begin a cycle count. 55 DataSplice Mobile Computing – Remote Client User Manual The search screen provides the ability to filter on a bin range and ABC type. To filter on a bin range, enter a bin value followed by a wildcard “%”. For example, A%, would return all bins that start with “A”. Otherwise, users can select an ABC type to filter on. This displays the list of matching records sorted by bin so it is easier to walk down the isles and count the items. Also notice that this process performs a blind count, so the current balance and physical count information in Maximo is not displayed. Records displayed with a yellow background indicate an un-reconciled inventory item. 56 DataSplice Mobile Computing – Remote Client User Manual Enter the new physical count into the New Count field. Use the Next Record and Previous Record buttons in the toolbar (or the page up/down keys if available) to move through the list of records and enter new physical counts for the items. Return to the main screen when finished. 57 DataSplice Mobile Computing – Remote Client User Manual Discrepancy Report Description Discrepancy Report is a view designed to display the unreconciled counts for the specified storeroom. Fields Below is a listing of the fields included in this view. Field Name Item Description New Count Count Date Storeroom Bin Issue Unit Reconciled ABC Type Description The identification number of the item being issued. The item description. Used to enter the value for physical counts. The date of the last count. The storeroom location of the item. The bin location within the storeroom. Unit of Measure for issues of the item. Specifies if the item’s last count has been reconciled. Used in conjunction with count frequency. Determines how often to count the item. Using the View USE: To re-count items with balance discrepancies prior to reconciling the balance. This works essentially the same as the Cycle Count process. Select the Discrepancy Report button from the home screen. 58 DataSplice Mobile Computing – Remote Client User Manual Select the desired storeroom to query on and hit the “Enter” key. This will display the list of non-reconciled items sorted by ABC Type and Bin. Notice that all the records are colored yellow, indicating the last count was not reconciled. Enter a count into the New Count field. Use the Next Record and Previous Record buttons in the toolbar (or the page up/down keys if available) to move through the list of records and enter new physical counts for the items. Return to the main screen when finished. 59 DataSplice Mobile Computing – Remote Client User Manual Work Orders Description This mobile screen allows users to search, modify and create work orders. The ability to modify and create work orders depends upon a user’s access rights in Maximo. Fields Field Name Work Order Status Description Long Description Location Location Description Asset Asset Description Priority Failure Code Problem Code Work Type Lead Supervisor Report Date Targ Start Date Sched Start SiteID Parent Has Children? Reported By Crew Description The work order number The status of the work order The work order’s description The work order’s long description. (associated to the description) The work order’s location Description of the Location The work order’s asset number Description of the Asset Designated priority for this work order. Designated failure classification for this work order. This value is usually determined by the Asset or Location. The code that represents the “Problem”, within the failure class hierarchy, that is tied to this work order. The type of work order; PM, CM, EM The lead person associated with this work order The supervisor associated with this work order The date the work order was created The date the work is targeted to begin ( used by PMs) The date the work is scheduled to begin ( used by Assignment Mgr ) The work order’s Parent, if the work order is part of a route or project or is a task Check box indicates if this work order is a parent The person (ID) who created this work order The crew associated with this work order 60 DataSplice Mobile Computing – Remote Client User Manual Using the View Work Orders To access the Work Orders screen, tap on the Search for Work Orders button on the Home Screen. It is located below the Assigned Work Orders data grid. Or, double-tap on the desired work order from the list. 61 DataSplice Mobile Computing – Remote Client User Manual Searching for Work Orders When users select the “Search for Work Orders” button, a search filter is displayed that can be used to find the desired work orders. Users can search by work order to display a specific record. Or, users can search by Lead, Status, Asset, or Location. By default, the filter is setup to search by Lead and Status. Key in, or scan, the desired values to search on then hit the “Enter” key. Optionally, you can tap on either of the display mode toolbar buttons: Display results in Grid Mode. Display results in Single Record Mode. Grid Display Single Record Display 62 DataSplice Mobile Computing – Remote Client User Manual Modifying a Work Order The work order record can be updated by selecting a different Status value from the drop-down, updating the Long Description, or changing the Lead. Additional updates can be made by selecting the desired detail tab and modifying the associated data. 63 DataSplice Mobile Computing – Remote Client User Manual Detail Tabs Users can access the detailed data for the selected work order by tapping on the arrow keys on either side of the client display screen. The different tabs will be displayed. Tap on a particular tab to select it. 1. 2. 3. 4. 5. 6. Tasks Failure Reporting Labor Reporting Material Usage Planned Material Work History The tab will be displayed in bold. Task Steps Task Step Updates Users can indicate a task is completed by checking the Done? checkbox. To view the tasks individually, users can tap on the detail grid handle to open the available menu. 64 DataSplice Mobile Computing – Remote Client User Manual Task Step Updates In addition to the Done? checkbox, user can enter Observation and Measurement Value. If there is an associated measure point, the new measurement and/or observation will be saved and can be viewed in the standard Condition Monitoring area within Maximo. Failure Reporting Failure Reporting Updates The Failure Reporting tab is where the user can specify the Problem / Cause / Remedy reporting for the work order. There is a a drop-down list for each of the 4 fields. Once the user has entered a Failure Code, the Problem Code becomes editable. After selecting a Problem Code, the Cause Code can be selected, and so on. Each of the value lists, with the exception of Failure Codes, is dependent on the previous value selected. Additionally, users can enter Remarks by typing free-form text into the field. 65 DataSplice Mobile Computing – Remote Client User Manual Labor Reporting Create new labor transaction Select the Labor Reporting tab to display the labor transactions reported for the current work order. To create a new labor entry, user can perform one of the following steps; Using the grid menu, select the Create New Record menu option. Or, using the Actions menu in the lower left corner, select the Start Work menu option. Create new labor transaction A new labor transaction is created. The new record will be inserted into the detail grid just after the record that had the current focus. To display the new record in “Single Record View”, tap on the grid handle (upper left corner of grid) and select the Display Single Record option. 66 DataSplice Mobile Computing – Remote Client User Manual New labor transaction Enter the Start Time and Hours, Finish Time and Hours, or Start Time and Finish Time. Based on the combination of values entered, DataSplice will calculate the third value. When entering a date value, use the calendar control to select the date. When ready, hit the “Enter” key to populate the field with the specified date. When entering a time, enter the desired hours and minutes. When ready, hit the “Enter” key to populate the field with the specified time. . If the Start Work menu option was used to create the labor transaction, then the user can use the Stop Work menu option to complete the labor transaction entry. The Stop Work menu option will NOT be available if the Start Work option wasn’t used. 67 DataSplice Mobile Computing – Remote Client User Manual Material Usage The Material Usage tab can be used to issue or return items to a work order. Also, this detail tab will display any items previously issued to the selected work order. The following sections illustrate the two methods to create a new issue/return transaction. Using the Barcode Scanner The first, and easiest, method for creating issue transactions is to use an integrated barcode scanner. When the Material Usage tab has focus, and an Item barcode is scanned, DataSplice will create a new issue transaction for the scanned item. The work order, asset, and location values will be defaulted based on the selected work order. The Quantity field will default to 1.00. User can edit this value if issuing more then 1.00. If the Item barcode is scanned a 2nd time, DataSplice will increment the Quantity by 1.00. So, in this case the resulting Quantity would then be 2.00, and so on. Additional Field Edits After the Quantity has been specified, the user can select the Bin they are issuing from ( or returning to ). The Issue Type can be modified to indicate the transaction is a return or an issue. The type will default to ISSUE. The last field to modify, if needed, is Issue To. A pop-up value selection dialog is available to select the desired PersonID. Or, the value can be scanned or keyed in. 68 DataSplice Mobile Computing – Remote Client User Manual Using the Actions Menu -> Add Item The second method for creating issue transactions is to use the Actions menu in the lower left corner of the client display screen. When the Add Item menu option is selected, the user is prompted for the item number. After the number is entered, tap on “OK” or hit the enter key. New issue/return transaction DataSplice will create a new issue transaction for the entered item. The work order, asset, and location values will be defaulted based on the selected work order. The Quantity field will default to 1.00. User can edit this value if issuing more then 1.00. If the Item barcode is scanned a 2nd time, DataSplice will increment the Quantity by 1.00. So, in this case the resulting Quantity would then be 2.00, and so on. 69 DataSplice Mobile Computing – Remote Client User Manual Additional Field Edits After the Quantity has been specified, the user can select the Bin they are issuing from ( or returning to ). The Issue Type can be modified to indicate the transaction is a return or an issue. The type will default to ISSUE. The last field to modify, if needed, is Issue To. A pop-up value selection dialog is available to select the desired PersonID. Or, the value can be scanned or keyed in. Planned Material Issuing items and tools The Planned Items and Tools tab allow the user to view and issue materials and tools for the current work order. To issue one of the displayed items or tools, perform the following steps; Check the Use? checkbox Update the Quantity field to reflect the actual issued amount. Users can scroll the grid to the right, or view the data grid on Single Record mode to see the Quantity field. 70 DataSplice Mobile Computing – Remote Client User Manual Spare Parts Asset Spare Parts The Spare Parts tab displays the list of items from the associated asset’s spare parts. Work History History Grid Display The Work History tab is a read-only display of the historical work orders for the associated asset on the selected work order. 71 DataSplice Mobile Computing – Remote Client User Manual History Single Record Display Use the grid menu to select the Single Record Display to view more details about a particular history work order. Hazards and Precautions Hazards & Precautions The Hazards & Precautions tab is a readonly display of the safety related hazards for the selected work order. The three columns of data show the work order number, hazard, and precaution (if specified). 72 DataSplice Mobile Computing – Remote Client User Manual Attachments Linked Documents The Attachments tab displays the list of linked documents associated with the selected work order. In the File Data column, users can tap on the dialog icon to open the attached document. Adding a File Attachment To add an attachment, open the grid menu and select Create New Record. Add new record is added to the list. 73 DataSplice Mobile Computing – Remote Client User Manual Adding a File Attachment (continued) Enter the following values; Description Document Type URL Type URL And select the target file to add using the open dialog icon in the File Data field. After selecting the file, the File Data field will display the application type of the file selected. 74