1
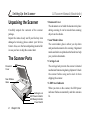
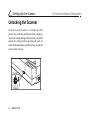
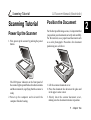
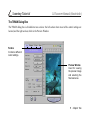
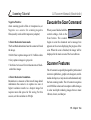
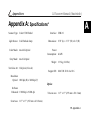
User Manual
For MAC
A3 Scanner
with
The TWAIN Driver (For Macintosh)
English
User Manual
Contents
Chapter Two
Preface
Scanning Tutorial
Chapter One
Setting Up the Scanner
1
System Requirements ..................................... 1
Unpacking the Scanner .................................. 2
The Scanner Parts ........................................... 2
Unlocking the Scanner ................................... 4
Installing the Scanner to a Macintosh............. 5
Installing the Scanner Driver ......................... 6
7
Power Up the Scanner ................................ 7
Position the Document ................................. 7
Acquire the TWAIN Driver ........................... 8
The TWAIN Dialog Box ................................ 9
The Main Folder ........................................... 10
The Enhancement Folder .............................. 11
The Filters Folder ......................................... 12
The Preview Window ................................... 13
Prescan the Image ........................................ 14
Set Up the Scan Parameters ......................... 14
Execute the Scan Command ......................... 15
Scanner Features .......................................... 15
Using Batch Scan ......................................... 17
The Batch Scan Dialog Box ......................... 17
Chapter Three
Appendices
19
Appendix A: Specifications* ........................ 19
Appendix B: Maintenance ............................ 21
Cleaning Procedures .................................... 22
Appendix C: Troubleshooting ...................... 23
Determining Error Messages ........................ 23
LED Ready Indicator Messages ................... 23
Other Troubleshooting .................................. 23
Setting Up the Scanner
A3 Scanner Manual (Macintosh)
Setting Up the Scanner
System Requirements
This chapter covers the scanner installation and has
the following topics:
The scanner and the bundled software comply with
the TWAIN protocol for the Macintosh platform. For
the scanner and scanner software to perform
suitably to task, you should at least have:
y System Requirements
y Unpacking the scanner
y Package contents
• MAC OS X 10.4 to 10.6
y The scanner parts
• Available USB port
y Unlocking and locking the scanner
• 24-bit video card or higher
y Installing the scanner
• CD-ROM or DVD-ROM driver
y Installing TWAIN
• At least 64 MB RAM
• 32 MB available hard disk space for software
installation
1
Chapter One
1
Setting Up the Scanner
A3 Scanner Manual (Macintosh)
Unpacking the Scanner
• Document Cover
Carefully unpack the contents of the scanner
package.
Inspect the items closely and if you find any item
damaged or missing, please contact your Service
Center. Also, save the box and packing material for
in case you have to ship the scanner later.
• Scan Window Glass
The Scanner Parts
Scan Window
Glass
• Carriage Lock
• LED Power Indicator
Carriage Lock
LED Power Indicator
LED Ready Indicator
Power Switch
Chapter One
The scan window glass is where you lay down
and position documents for scanning. Alignment
marks and rulers are printed on the borders to help
you position documents.
The carriage lock prevents the scanner’s internal
mechanism from moving during shipment. Unlock
the scanner before using and re-lock it when
shipping the scanner.
Document
Cover
2
The document cover holds the document in place
during scanning. It can be raised when scanning
objects such as books.
When you turn on the scanner, the LED power
indicator flashes momentarily and then remains
lit.
Setting Up the Scanner
A3 Scanner Manual (Macintosh)
• LED Ready Indicator
When scanning or warming up, the LED ready
indicator will keep flashing. When the scanner is
available for scanning, the LED ready indicator
will remain lit.
• Power Switch
Powers ON/OFF electrical power.
USB Port
Transparency
Adaptor Port
Power Cord Receptable
• USB Port
The Universal Serial Bus Port on the rear panel
are true plug-and-play serial ports for attaching
your scanner to your computer.
• Transparency Adapter Port
This port is for connecting an optional transparency adapter.
• Power Cord Receptable
Connect the scanner Power Cord to the Receptable.
This is used for your scanner’s power supply.
3
Chapter One
Setting Up the Scanner
Unlocking the Scanner
In the rear of the scanner is a carriage lock that
protects the scanning mechanism during shipping.
To prevent causing damage to the scanner, you should
unlock the carriage before operating the unit. As
shown in the illustration, push the carriage lock down
to release the carriage.
Lock
Unlock
4
Chapter One
A3 Scanner Manual (Macintosh)
Setting Up the Scanner
A3 Scanner Manual (Macintosh)
Installing the Scanner to a
Macintosh
Refer to the following illustration and steps to
connect your scanner:
1. Connect the power adapter to the scanner and plug
it into an appropriate power outlet.
3. Connect the other end of the scanner’s USB cable
to the scanner’s USB port.
2. With the power to your computer on, connect the
scanner’s USB cable to the USB port of your
computer.
Upon connecting the USB cable, the system would
automatically detect your scanner and update your
system configuration.
5
Chapter One
Setting Up the Scanner
Installing the Scanner Driver
1. Turn on your Macintosh.
A3 Scanner Manual (Macintosh)
5. A dialog box appears asking you to install
TWAIN by clicking the Install button. Note: you
can specify the location of the installation.
2. Insert the A3 Scanner CD into your CD-ROM
drive.
3. Click on the A3
Scanner CD icon on
the desktop window.
4. Click on the Install
icon.
6. After installation is completed, click Quit to exit
installation.
6
Chapter One
Scanning Tutorial
A3 Scanner Manual (Macintosh)
Scanning Tutorial
Position the Document
Power Up the Scanner
For the best possible image scans, it is important that
you position your documents correctly and carefully.
For this tutorial, use a paper-based document such
as a color photograph. Procedures for document
positioning are as follows:
1. First, power up the scanner by pushing the power
button.
The LED power indicator on the front panel of
the scanner lights up and flashes for about a minute
and then remains lit, signifying that the scanner is
ready.
2. Power up the computer and wait until the
computer finishes booting.
1. Lift the scanner document cover.
2. Place the document face down on the glass and
in the upper center corner.
3. Slowly lower the scanner document cover,
making sure the document remains in position.
7
Chapter Two
2
Scanning Tutorial
A3 Scanner Manual (Macintosh)
Acquire the TWAIN Driver
The TWAIN driver is the scanning module provided
with your scanner. It is easily accessed from within
the bundled scanner software or from within any
TWAIN-compliant program. Before you start with
the steps below, be sure you have installed and
configured the bundled scanner software. Refer to
Chapter 1 for details.
1. Turn on your Macintosh computer.
2. Run the host TWAIN-compliant software (e.g.
Photoshop)
3. Call up the TWAIN Data Source by selecting
Acquire from the File menu. (In some programs,
the Acquire command will appear in a submenu
under the Import command.) The TWAIN
dialog box will appear in a submenu under the
Import command.
The TWAIN dialog box contains control settings,
which you must set prior to scanning a document.
The basic steps to scan a document are:
1. Prescan the document.
2. Set the desired image area to be scanned.
3. Select the scan source.
4. Select the desired scan mode.
5. Select the desired resolution.
6. Click on the Scan button.
8
Chapter Two
Scanning Tutorial
A3 Scanner Manual (Macintosh)
The TWAIN Dialog Box
The TWAIN dialog box is divided into two sections: the left section where most of the control settings are
located, and the right section, which is the Preview Window.
Folders
Contains defferent
conrol settings.
Preview Window
Used for viewing
the prescan image
and selecting the
final scan area
9
Chapter Two
Scanning Tutorial
A3 Scanner Manual (Macintosh)
The Main Folder
The main folder contains the control
settings needed for specifying the
scanning parameters such as scan
mode, resolution, etc.
Scan Mode
Sets the scanner to read color,
grayscale, lineart, etc.
Scan Source
Sets the media type of the
document to be scanned,
Output Scaling
Changes the dimensions of the
final output
Width and Length
Show the dimensions of the image
area inside the Crop Frame.
Image Size
Displays the amount of computer
space needed to display or save
the selected image area.
10 Chapter Two
Scan Size
Refers to the size of the image
or document that you area
about to scan.
Resolution
Sets the resolution in dots per
inch (dpi).
Descreen
Sets the media type of the
document to be scanned to
reduce image noise.
Previous Button
Sets settings to previous
values.
Reset Button
Returns settings to their default values.
Scanning Tutorial
A3 Scanner Manual (Macintosh)
The Enhancement
Folder
The Enhancement folder contains
preprocessing controls you can
apply to the image before making
your final scan.
Thumbnails
Are used to see the effects of
any changes in the control
settings.
Histogram
Shows the distribution of the
brightness levels in the image.
Histogram Button
Adjusts the histogram.
Previous Button
Sets settings to previous
values.
Highlight Control
Adjusts the overall amount of
brightness in the image.
Shadow Control
Adjusts the overall amount of
shadows in the image.
Gamma Control
Adjusts the brightness level in
the highlights, midtones, and
shadows of the image.
Reset Button
Returns settings to their default
values.
11 Chapter Two
Scanning Tutorial
A3 Scanner Manual (Macintosh)
The Filters Folder
The Filters folder contains preprocessing controls that allow you to
apply special effects to the image
before making your final scan.
None
No filter is applied.
Blur or Blur More
Smooths or softens the image.
Sharpen or Sharpen More
Enhances the detail in the image.
Invert
Reverses an image to its
negative or compliment.
Previous Button
Sets settings to previous
values.
12 Chapter Two
Thumbnails
Are used to see the effects of the
selected filter.
Filter Control Buttons
Use these buttons to add/subtract
a degree of the Blur or Sharpen
filter.
Flip
Creates a mirror image of the
original.
Unsharp Mask
Emphasizes shape edges and
color boundaries.
Emboss
Makes the elements in the image
appear raised or sunken.
Reset Button
Returns settings to their default
values.
Scanning Tutorial
A3 Scanner Manual (Macintosh)
The Preview Window
The Preview Window is where
you can view the prescan
image. The first time you want
to scan a document, it is better
that you do a precan.
Batch Scan Button
Allows creation of up to 10 scan
regions for Crop Frames for
multiple scanning.
Language Setting
Allows you to select the desired
language that the dialog box
will be displayed in.
Preview Button
Allows you to see the effect of
any changes made to the
image prior to scanning.
Help Button
Provides On-line Help.
Exit Button
Click to exit (or close) the
TWAIN or Batch Scan Dialog
boxes.
Crop Frame
Outlines the scan area or
region that will be included in
the final scan.
Scan Button
processes the pre-scanned
image, and displays it in the
host software (where you
opened up the TWAIN dialog
box).
13 Chapter Two
Scanning Tutorial
Prescan the Image
A Preview is a quick lowresolution scan of the entire
original image. From this lowresolution scan you can get a
clearer idea of the image area you want to include
when you click Scan. To Preview, the steps are:
1. Place the document face down on the scan window glass.
A3 Scanner Manual (Macintosh)
or corners of the Crop Frame and drag it out or in to
the desired length and width.
Crop frame
2. Click the Preview button in the dialog box. After
the scanner has scanned the document, the scanned
image will appear in the Preview Window. From
the Preview image, you can now set the exact
image area you wish to include in your final scan.
Only the area inside the Crop Frame will be included
in the resulting scanned image when you click Scan.
The size information at the bottom of the dialog box is
automatically updated when the Crop Frame is resized.
Set Up the Scan Parameters
Since we are going to scan a color photograph, choose
Reflective.
1. Set the desired image area to be scanned.
Reflective:
Use the Crop Frame in the Preview window to outline
the image area you wish to scan. Click one of the sides
when scanning paper-based documents such as
photographs or text (magazines, books, or images).
14 Chapter Two
2. Select the scan source.
Scanning Tutorial
Negative/Positive:
when scanning positive film or transparencies, or
Negative as a source for scanning negative
film.(usually works with transparency adapter)
3. Select the desired scan mode.
The Scan Mode determines how the scanner will read
the image.
• 24-Bit Color captures images in 16.7 million colors
• Gray captures images in grayscale
• Text/Line Art is used for text documents or blackand-white images
4. Select the desired resolution.
Resolution is a measure of how much image detail
information the scanner is to capture in a scan. A
higher resolution results to a sharper image but
requires more disk space for file saving. For this
session, set the resolution to 300 dpi.
A3 Scanner Manual (Macintosh)
Execute the Scan Command
When you are finished with the
control settings, click on the
Scan button. The scanner
begins to scan the document and a message box
appears on the screen displaying the progress of the
scan. When the scan is finished, the image will be
displayed in the main screen of the host software.
Scanner Features
The A3 scanner is especially designed for professional
electronic publishers, graphic arts designers, multimedia developers, or anyone else who demands only
the best scanning results. The A3 scanner recognizes
over 68 billion colors and can capture subtle changes
in color and depth rendering images that are more
vibrant, clearer, and sharper.
15 Chapter Two
Scanning Tutorial
A3 Scanner Manual (Macintosh)
With a true optical resolution of 1800 x 3600 dpi and
a maximum resolution of 19200 x 19200 dpi (through
interpolation), the A3 scanner offers a wide range of
resolution to complement a variety of printers from
black-and-white inkjet and laser printers to color
inkjet, laser, and dye sublimation printers.
images for multimedia presentations, printed output,
or autodemos can be obtained using this scan mode.
When disk space is limited, use 24-bit color scan
mode to capture color images.
Scan Modes
This scan mode is for capturing fine details and
shading in continuous-tone originals such as photographs.
The A3 scanner incorporates multiple scan modes
and high resolutions. The A3 scanner’s multiple scan
modes can reproduce your documents into three types
of images: 24-bit color images, grayscale images, and
line-art images. The choice of scan mode and image
type depends on your output requirements and
system configuration.
24-Bit Color
This scan mode captures 24 bits of color image
information for every pixel in the screen image.
Reproduce over 16.7 million colors. Impressive
16 Chapter Two
Gray
Line Art
Images scanned in Text/Line Art have absolutely no
shading, only black and white. This scan mode is
best used with text images for OCR and graphics with
only black and white areas.
Scanning Tutorial
A3 Scanner Manual (Macintosh)
Using Batch Scan
Batch Scanning is an easy way to multi-scan any part
of your document using different scan modes and
resolutions. In batch scanning ,you can specify up to
a maximum of 10 scan regions or you can scan a
single region several times using different combinations of scan modes and resolutions.
To activate batch scanning, click on the
Batch Scan button. This will bring up the
Batch Scan dialog box.
New Batch Button
The Batch Scan Dialog Box
The Batch Scan dialog box contains several controls
that make batch scanning simple and easy to use. It
will also display the number of batch jobs that you
make when you create the scan regions.
Click on this button to create a new scan
region on the image in the Preview Window.
Duplicate Batch Button
Click on this button to duplicate a batch job.
You can then specify different control
settings for this particular batch job.
17 Chapter Two
Scanning Tutorial
Trash Batch Button
Click on this button to delete the selected or
highlighted batch job.
A3 Scanner Manual (Macintosh)
4. Repeat steps 2 and 3 if you wish to create more
scan regions. You can have up to 10 scan regions.
If you want to duplicate the current scan region,
simply click on the Duplicate Batch Button.
Cancel Batch Button
Click on this button to cancel batch scan and
exit the Batch Scan dialog box.
To do a batch scan, the steps are:
1. Click the Batch Scan button. The Batch Scan
dialog box appears.
2. Create a scan region:
(a) Move the cursor inside the Preview Window.
(b) Reposition or resize the crop frame if
necessary.
3. Set the desired scan mode and resolution for the
current scan region.
18 Chapter Two
5. Click Scan. The scanner will begin to scan the
scan regions one after the other.
For scanning multiple documents or images, Batch
Scan is equipped with an auto crop function that is
not abailable in the regular scanning mode. Batch
Scan auto-detects the borders of the images or paper
edges of the documents, allowing you the option of
scanning any or all of these images/documents without having manually select, and scan them
individually (as required in the regular mode.)
Appendices
A3 Scanner Manual (Macintosh)
Appendix A: Specifications*
Scanner Type: Color CCD Flatbed
Light Source: Cold Cathode lamp
Color Mode: true 24-bit/pixel
Gray Mode: true 8-bit/pixel
Text/Line Art: 1-bit/pixel (2 levels)
Resolution
Optical: 1800 dpi (H) x 3600 dpi (V)
A
Interface: USB 2.0
Dimensions: 27.0” (L) x 17.3” (W) x 6.4” (H)
Power
Consumption: 26.6 W
Weight: 15.5 kg (34.21bs)
Support OS: MAC OS X 10.4 to 10.6
X
Option
Software
Enhanced: 19200 dpi x 19200 dpi
TA/scan area: 11.7” x 17” (297 mm x 431.8 mm)
Scan Area: 11.7” x 17” (297 mm x 431.8 mm)
19 Appendix A
Appendices
20 Appendix A
A3 Scanner Manual (Macintosh)
Appendices
A3 Scanner Manual (Macintosh)
Appendix B: Maintenance
Ensure that your flatbed scanner operates at
optimum performance by observing the following:
• Cover the scanner when it’s not in use to avoid
dust contamination
• Avoid environments where the scanner would be
exposed to direct sunlight (or any other source of
excessive heat) for long periods of time
B
Scratches on the glass will show up as unwanted
marks in scanned images.
• Don’t open the scanner case because there is
danger of electrical shock and there are no
customer-serviceable parts inside. For servicing
needs, call your scanner dealer for assistance.
• Protect the scanner from potential liquid spills such
as soda, coffee, tea, etc.
• Operate the scanner on a level, well-grounded work
surface, free of excessive vibration
• Be careful to avoid scratching the glass when
placing multi-page documents (bound by sharp
staples or paper clips) on the scan window glass.
21
Appendix B
Appendices
A3 Scanner Manual (Macintosh)
Cleaning Procedures
1. Power off the scanner and disconnect the power
cord.
3. Wipe off the detergent with a soft cloth damp with
2. Gently wipe the scan window glass with a soft
lint-free cloth and mild liquid detergent to remove
fingerprints, smudges, or loose particles. Do not
use a spray detergent as this may get inside the
case and damage the unit’s internal components.
4. Finally, dry the surface by wiping it with a clean
soft cloth.
22 Appendix B
water.
Appendices
A3 Scanner Manual (Macintosh)
Appendix C: Troubleshooting
Determining Error Messages
LED Ready Indicator Messages
When the scanner is turned on, it will automatically
perform a series of self-diagnostic tests. The LED
power indicator located on the scanner’s front panel
should tell you if there is something wrong with the
unit. Upon power up, the LED ready indicator lights
up and flashes for about a minute and then remains
lit. The scanner lamp will also be on and will
remain on until you power off the scanner.
1. If the LED ready indicator light continues to flash
beyond one minute, call Technical Support.
2. If the LED ready indicator remains lit, but the
scanner lamp is dim, call Technical Support.
Other Troubleshooting
1. Check to make sure all cable connections are
correct:
• The USB cable is firmly plugged into the scanner
and the computer.
• The power cord is firmly connected to the
scanner, plugged into an appropriate power
outlet, and the power switch is turned on.
23 Appendix C
C
82-115-00150