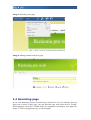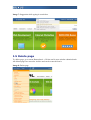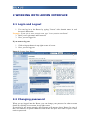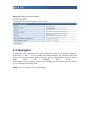
1
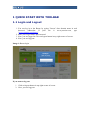
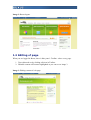
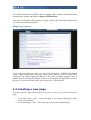
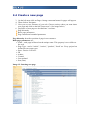
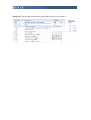
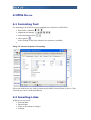
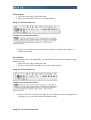
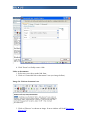
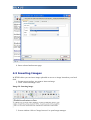
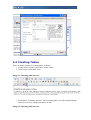
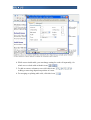
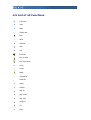
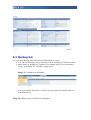
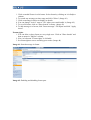
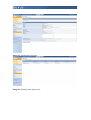
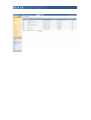
User Manual
February 2011 (BUXUS 6.0.0)
ui 42 spol. s r. o.
Haydnova20/B
811 02 Bratislava
tel./fax: +421 650 520 142
helpdesk: +421 650 520 142
e-mail: [email protected]
web: www.buxus.sk
www.ui42.sk
Table of Contents
1 QUICK START WITH TOOLBAR................................................................................................3
1.1 LOGIN AND LOGOUT........................................................................................................................3
1.2 EDITING OF PAGE............................................................................................................................4
1.2 CREATING A NEW PAGE....................................................................................................................5
1.5 SEARCH PAGE.................................................................................................................................6
1.9 DELETE PAGE.................................................................................................................................7
2 WORKING WITH ADMIN INTERFACE.....................................................................................8
2.1 LOGIN AND LOGOUT........................................................................................................................8
2.2 CHANGING PASSWORD......................................................................................................................8
2.3 NAVIGATOR...................................................................................................................................9
2.4 CREATING A NEW PAGE..................................................................................................................11
2.5 SEARCH PAGE ..............................................................................................................................12
2.6 MOVE PAGE INTO ANOTHER SECTION ................................................................................................12
2.7 SORTING PAGES.............................................................................................................................13
2.8 DELETE PAGE...............................................................................................................................13
2.9 PAGE PROPERTIES..........................................................................................................................13
2.10 PAGE TYPES...............................................................................................................................14
2.11 IMAGE MANAGER........................................................................................................................15
2.12 DOCUMENT MANAGER..................................................................................................................16
2.13 PAGELIST...................................................................................................................................16
3 ADMINISTRATION.......................................................................................................................18
3.1 USER RIGHTS MANAGEMENT...........................................................................................................18
3.2 RIGHT MANAGEMENT IN MODULES...................................................................................................19
3.3 RIGHT MANAGEMENT IN FILE SYSTEM..............................................................................................19
4 HTML EDITOR...............................................................................................................................21
4.1 FORMATING TEXT.........................................................................................................................21
4.2 INSERTING LINKS..........................................................................................................................21
4.3 INSERTING IMAGES........................................................................................................................25
4.4 CREATING TABLES........................................................................................................................27
4.5 LIST OF ALL FUNCTIONS.................................................................................................................29
5 MODULES........................................................................................................................................31
5.1 ESHOP.........................................................................................................................................31
5.2 MAILING LIST...............................................................................................................................32
5.3 COUNTERS...................................................................................................................................32
5.4 DISCUSSION..................................................................................................................................34
5.5 ARCHIVE.....................................................................................................................................37
1 QUICK START WITH TOOLBAR
1.1 Login and Logout
1. You can log in to the Buxus by typing "/buxus" after domain name in web
browser's addressbar. If your site is www.yoursite.com, type
"www.yoursite.com/buxus"
2. Enter your Login name and Password.
3. Now, you are logged in.Click on logout button in top right corner of screen.
4. Now, you are logg out.
Image 1: Buxus login.
If you want to log out:
1. Click on logout button in top right corner of screen.
2. Now, you are logg out.
Image 2: Buxus logout.
1.2 Editing of page
When you are logged in Buxus, there is blue panel - Toolbar - above every page.
1. Turn edit mode on by clicking edit icon in Toolbar.
2. Editable content will became highlighted as you can see on image 3.
Image 3: Editing content of web page
If you will click into text, HTML editor will appear above textarea. Read more about
inserting links, images and tables in chaper 4 HTML Editor.
You can also edit non-visible preperties of page. Click on the icon Page properties and
you will see all editable properties.
Image 4: Page properties
If you will make change on page, two new icon will appear – Publish and Original
version. While editing, page is in state „Draft“. Draft can't see visitors of page and is
visible only for editors logged into Buxus. If you want to publish changes, click on
Publish icon. By clicking on Original version you will display last published version of
this page. If you want to delete draft, go to menu Page > Discard draft.
1.3 Creating a new page
You can create new page on the same level as page you are on, or you can create subpage.
1. Go to menu Page > New > Insert new page if you want to add page on same
level in tree structure
2. Go to menu Page > New > Insert sub-page if you want to add sub-page.
Image 5: Inserting a new page
Image 6: Adding content to the new page
1.4 Searching page
If you can't find page because you don't know location of it in web structure, but you
know part of name of this page, you can find this page with search box in Toolbar.
While typing in search box, Toolbar offers you suggestion according to your input. See
image 7. Click on suggestion to go on selected page.
Image 7: Suggestion while typing in search box.
1.5 Delete page
To delete page, go to menu Buxusclassic > Delete and in next window submitt detele.
All deleted pages are moved to Archive and can be restored from it.
Image 8: Delete page
2 WORKING WITH ADMIN INTERFACE
2.1 Login and Logout
1. You can log in to the Buxus by typing "/buxus" after domain mane in web
browser's addressbar.
Example: If your site is www.yoursite.com, type "www.yoursite.com/buxus"
2. Enter your Login name and Password.
3. Now, you are logged in.
If you want to log out:
1. Click on logout button in top right corner of screen.
2. Now, you are logg out.
Image 9: Logout from Buxus.
2.2 Changing password
When you are logged into the Buxus, you can change your password or other account
details by clicking on user name in top right corner.
If password is not strong enough, alert message will appeare above Buxus. In case of
this, use numbers or special characters and do not use your user name or part of user
name as password.
Image 10: Change password dialog
2.3 Navigator
In Navigator you can display web in tree structure. Same as in Windows Explorer,
clicking on "+" and "-" you can expand and collapse subtrees. By clicking on the page
name, you can edit this page. Name of the page in gray color indicates page is in passive
mode.
Blue
color
indicates
active
mode.
In the header of every subtree are tools for inserting new item (section, article, product
etc.), reordering and sorting items.
Image 11: Tree structure of web in Navigator.
2.4 Create a new page
3. On the left menu click on Pages. Orange contextual menu for pages will appear.
4. Than click on Navigator.
5. Now you see tree structure of your web. Choose section, where you want insert
new page and click on the link "Insert new". (See image below)
6. Properties of new page are devided into 3 sections:
• Page hierarchy
• Basic page parameters
• Page content and extended parameters
Page hierarchy describes position of page in tree structure.
Basic page parameters are:
• Name - each page in Buxus has the unique name. This property is not visible on
the web.
• Page Type - can be "article", "section", "product", "book" etc. Every project has
defined its own page types.
• State - Passive or Active.
• ID
• Author
• Created
• Last updated
• Sort (time)
Image 12: Inserting new page
2.5 Search page
There are 3 ways to search page in Buxus.
1. ID
2. Navigator
3. advanced search according multiple criteria
By default, there is an page ID in URL (e.g. in www.ui42.sk/cms-buxus.html?
page_id=63 ID is 63). Quick way to edit page 63 is insert page ID into text input in
upper left corner of Buxus.
Another way is click on left menu Pages>Navigator. Navigator let you explore your
web in three structure.
If you can't find page, click Pages>Search. There you can search acording several
criteria - name, author, date, last update etc.
2.6 Move page into another section
Pages can be easily moved from one section to another. Buxus provides many options
for this. You can move single page or group of pages with or without root page, you can
set
the
state
of
page
(active/passive),
date
and
so
on.
You can move page only under appropriet page type. Every project has its own setting.
Example: You can move page type "Product" under page type "Category", but you
cannot move "Product" under page "Press releases".
Moving pages:
1. Open page you wish to move in Buxus.
2. In left orange menu click "Cut".
3. Now click on "Navigator" in left menu and open page under which cutted page
should be.
4. Click "Paste" in left orange menu.
5. Now you see page with many options. If you don't want to change default
settings, click "Paste".
Image 13: Paste page options.
2.7 Sorting pages
Pages are ordered on web and in Navigator according to the parameter "Sort (time)". To
change order of pages you have to click on "Reorder" button in blue heading of
Navigator upon this part of tree you wish to reorder.
Select page (click radio button) and move it up or down with arrows.
Image 14: Sorting pages
2.8 Delete page
Deleting of parent page will will delete all child pages.
Example: If you delete
• Go to page you want to delete
•
•
In orange left menu click on "Delete"
Submit deleting page
When deleting page the dialog box will appear, where you can decide whether you wish
to delete only subpages or subpages with root page. See image below.
Image 15: Delete dialog
2.9 Page Properties
Page properties are devided into 3 sections:
1. Pagee hierarchy
2. Basic page parameters
3. Page content and extended parameters
1. Page hierarchy show position of page, on the left are parent directories.
2. Basic page parametres are:
• Name
• Page Type
• State
• ID
• Author
• Created
• Last updated
• Sort (time)
Name
Name of page must be unique and is visible only in Buxus. Name of page cannot be
seen on the web.
Page type
Page type defines parameters in 3rd section - "Page content and extended parameters".
State
Page is as default in passive state. While in passive, you can display page on the web by
inserting page ID.
ID
Every page has its unique ID number. New page will get ID after first Save.
Author
Author of page is user of Buxus who created page.
Created
It displays time, when page was inserted into database. This parameter cannot be
changed.
Last update
It displays time of last change on page. This includes changes in text filds and changes
of parametres. This parameter cannot be changed.
Sort (time)
This parameter influence order of displayed pages on web as welll as in Buxus.
3. Page content and extended parameters
In this section are parametres defined in page type. This usually includes Title, Text,
Subtitle, Excerpt etc. Every project hasx its own page types.
2.10 Page Types
Page type is set of properties dedicated to page. Every project can have its own page
types as needed.
Common page types are:
1. Article
2. Section
3. Chapter
4. Story
5. Product
6. Category
7. and many more...
Example:
"Article" can have this properties: Title, Excerpt, Text, Author, Date of publishing,
Issue number etc.
"Book" can have this properties: Title, Author, Publisher, ISBN, Price, Discount and
many others.
2.11 Image Manager
Image manager shows images uploaded to your web. In top section are directories in
tree structure. With Image manager you can upload images into directories, create new
directories or delete the old ones. As administrator you can limit access to directories
for other users (see chapter Rights management in file system).
Below directories is list of files in selected directory. There are
1. file name
2. file type
3. size
4. image dimension
5. last change
You can display image by clicking on file name.
Image 16: Image manager
2.12 Document manager
Document manager shows files uploaded to your web. In top section are directories in
tree structure. With document manager you can upload images into directories, create
new directories or delete the old ones. As administrator you can limit access to
directories for other users (see chapter Rights management in file system).
Below directories is list of files in selected directory. There are
1. file name
2. file size
3. last change
You can display document by clicking on file name.
Image 17: Document manager
2.13 Pagelist
Pagelist is list of links on pages with relevant content. With pagelist you do not need
create link manualy, just select related pages from tree structure or search result. Use of
pagelist is defined by page type.
Example: In e-shop there is sometimes need to add links on similar products.
How to create link:
1. You can directly type ID of page or start typing name of page you wish to add
and suggestions will roll up below line. See image 18.
2. If you will change title of page added to pagelist, this change will change name
of link in pagelist, but you can change name of link in pagelist and this change
doesn't affect title or name of linked page. Link name can be synchronize with
original page by clicking on icon with two arrows.
3. Suggestion can be narrowed with filter on the right side.
4. Reorder links with arrows on the right side.
5. To delete link in pagelist click cross icon. To delete whole pagelist, click cross
icon below pagelist table.
Image 18: You can add internal and external links and you can reorder it.
3 ADMINISTRATION
3.1 User Rights management
Note: Rights management is accesible only for administrators.
In Buxus, pages can have defferent types and they are organized in tree structure.
Additionally, modules contains separate parts of functionality. Rights management in
Buxus allows administrators to set up access separatelly to every page type and every
module.
Example: User can edit all products (all pages that have its type set to "product"), but
can't make changes in section pages.
To set up user's access to specific page types follow this steps:
1. When logged into Buxus, click on "Users" in menu on the left.
2. In table of users click on user's login name. See image 1.
3. Now you can edit selected user. Below user's details is table with page types that
can be allowed to user.
Use of modules can be set up in user details.
To allow user access to exact part of web tree follow this steps:
5. When logged into Buxus, click on "Users" in menu on the left.
6. In table of users click on "Pages" in last column.
7. Now select the part of web, for example "Main page"
8. Now you can see, which user have access to this part of web. You can set up
right to read, write and right to workflow. See more about workflow.
Image 18:
3.2 Right management in Modules
Newsletter
For sending newsletters to group of your visitors, you need modul "Web users" to make
a list of e-mail addresses. For more information see section Modules.
Everytime you create new mailing list with e-mail addresses of your visitors, other users
of Buxus without admin rights can't send new message to visitors on the list. You have
to give them right on new mailing list.
1. Click on Users in left orange menu
2. Select user from table by clicking on user name in first column
3. Under user detail is table Mailing list. Check mailing lists you wish selected user
to have right on.
Image 19: Setting rights on page types, directories, forms and mailinglists.
3.3 Right management in File System
User can access file system trough Image manager and Document manager. It is
possible to set access to different folders for different users. For example, every user can
have his own folder for storing uploaded images or documents, but can't delete or, if
needed, even see content of another user's folder.
Folders are accessible for all by default. If Administrator will add right management
point to selected folder, users without admin rights will not access this folder unless
Administrator will permit them.
Adding right management point
1. Click on Image browser or Document browser in left menu.
2. Select folder by clicking on its name.
3. Click "Add right management point".
Image 20: Adding rights management point.
Permiting user to access folder
1. Click on Users in left menu.
2. Select user by clicking on user name in first column.
3. Bellow User details are tables Document dirs or Image dirs. Check directories
according your need.
Image 21: Adding rights on directory.
4 HTML EDITOR
4.1 Formating Text
For formating text in Buxus are used standard icons similar as in MS Word.
• bold, italics, underline
• alignment and margin
• sorted and unsorted list
• other options
After clicking on this icon advanced css options are available.
•
Image 22: Advanced options of formating.
Select text with cursor you wish to format and available icons will turn to active. Click
icon and you can see result immediately.
4.2 Inserting Links
In Buxus you can create:
• External links
• Internal links
• Links on documents or images
• Anchors
External links
1. Select text you wish to make link from.
2. Click on "create/edit link" icon (see image bellow).
Image 23: External link icon.
3. Insert your url as shown on image and set options as needed. Click "Insert" to
finally create a link.
Internal links
To prevent from future incompatibility, use "Internal link" function for linking on pages
inside your web.
1. Select text you wish to make link from.
2. Click on "create/edit link in Buxus" icon (see image bellow).
Image 24: Internal link icon.
3. Click on "Browse" as shown on image. In new window you can select page from
Navigator or you can search page according its name.
Image 25: Creating internal link.
4. Click "Insert" to finally create a link.
Links on documents
1. Select text you wish to make link from.
2. Click on "create/edit link on document" icon (see image bellow).
Image 26: Link on document icon.
3. Click on "Browse" as shown on image. In new window will load Document
Manager38.
4. Choose document and click "Insert" in left column.
5. Confirm link on document by clicking on "Insert".
Links on images
Similar as creating link on document you can create link on image - just click on
"create/edit link on image" and you will be offered with a "Image directory" instead
"Document directory".
Anchor
Anchors are links that doesn't take you to another page just scroll same page on
connected text.
1. At first, you have to insert anchors into text where you wish to point by link.
Click somewhere in text, for example at the beggining of last paragraph.
2. Click on "Anchor" icon.
3. Type name for anchor (for example "see this") and click "Insert"
4. As shown bellow, yellow mark before text cursor will appear.
Image 27: Anchor at the begining of paragraph.
5. Now scroll at the top of page and select text you wish to make link from.
6. Click on "External link" icon.
7. In new window expand row with Anchors. You can see there all created anchors
on current page.
Image 28: Creating the link on anchor.
8. Insert selected anchor onto page.
4.3 Inserting Images
In HTML editor you can insert image uploaded on server or image located on your local
disk.
1. Locate cursor to place you want to insert an image.
2. Click "insert/edit image" icon.
Image 29: Inserting image.
3. In new window click on "image browser" to open Image manager.
4. In Image manager choose image you have uploaded before or you can upload
image now from your local disk.
5. When uploading new image, click "Add new files" and than "Browse". You can
upload 5 files at once, but there is no limit for number of files to be uploaded.
Image 30: Adding images into directory.
6. Choose file or files and click "Add". Now select image with radio button at the
left side and click "Insert".
7. Fill Title and Alternative text fields and click "Update"
Image 31: Inserted image aligned to right.
8. You can set many options (e.g. alignment, border, spacing) by clicking again on
"Insert/edit image" icon.
Image 32: Setting appearance options of image.
4.4 Creating Tables
There are many options for creating tables in Buxus.
1. Locate cursor on place you want to insert a table.
2. Click "Insert a new table" icon
Image 33: Inserting table into text.
3. Set number of columns and rows. After inserting table you still can add columns
and rows as well as change parametres of tabl
Image 34: Inserting table into text.
4. While cursor inside table, you can change setting for each cell separatelly, for
whole row or whole table with this icons
.
5. To add or remove columns or rows click this icons
Adding or removing depend on position of cursor.
6. For merging or splitting table cells, click this icons
.
.
4.5 List of all Functions
Full screen
Undo
Redo
Display code
Bold
Italics
Underline
Style
Link
Buxus link
Link on image
Link on document
Unlink
Anchor
Image
Unsorted list
Sorted list
Indent
Outdent
Align lift
Align center
Align right
Justify full
Cut
Copy
Paste
Paste plain text
Paste text from Word
Insert div element
Insert span element
Clear
Insert non-breaking space
Insert table
Edit row
Edit cell
Add row before
Add row after
Remove row
Add column before
Add column after
Remove column
Split table cells
Merge table cells
Visual control characters
Horizontal rule
Remove formating
Invisible elements
Subscript
Superscript
Special characters
5 MODULES
5.1 Eshop
This modul is dedicated to administer orders from your eshop. You can display all
orders and filter it according state, date, ordered product, customers etc. (You can see all
parameters on the image 1)
1. To display all orders, leave input fields empty and click "Select" button.
2. To see details of order, click on variable symbol in first column.
Image 35: Orders in e-shop module.
3. In first section of Order detail is order specification like date, state, price etc. In
second section are
• Customer details
• Ordered Items
• Note
• Invoices
• Notification
• Change log
7.
4. On second tab - Items - you can edit items in order by clicking in right column.
5. To generate invoice, click on tab invoice and than click on "Show" icon.
6. On the next tab you can set e-mail notifications.
The last tab is change log. Click on "Details" link to show details.
Image 36: Details of order.
5.2 Mailing list
To create new Mailing list is allowed only administrator of web.
1. You can create Mailing list by clicking on "New mailing list" link in left menu.
2. Insert Name of mailing list. Tag have to be without spaces. Set e-mail adress
"From" and "Reply-To" and click "Apply Insert".
Image 37: Creating new mailinglist.
3. Now go to modul "Web users". Click on any user and select mailing lists you
wish him to be in.
Image 38: Adding web user to the new mailinglist.
4. Click "New message" in left orange menu.
5. Select a recipient from list and fill "Subject" field.
6. The screen bellow is devided into three sections - Header, Body and Footer. In
header and footer can be parts that all emails have the same. You can load
standard header and footer by clicking on button next Recipients.
7. If you have a file to send, you can attach it to email.
8. Before sending emails to selected recipients, you can send test email.
Image 39: Creating new messagge in Mailinglist module.
5.3 Counters
1. You can set counter to any page just by clicking on "Insert counter" link in left
menu.
2. Insert name, page id and click "Apply insert".
3. Counter is working immediatelly.
4. To see data from counter click "Show counters" and than "Select"
5. Choose counter and click on "Show" in Statistics column.
6. Counter will display how many times selected page has been viewed in inserted
period of time. (See image 1)
Image 40: Statistics according set criteria.
5.4 Discussion
Discussion module let visitors of your web page leave a message in message-board or
react on article. As an editor, you can:
• allow or deny forum to selected web users
• search messages according defined criteria
• edit and insert single message in a forum
1. Click on modul Forum in a left menu. Select forum by clicking on it in Subject
column.
2. To search any message set time range and click "Select" (Image 41)
3. Click on message's subject to display its details.
4. You can change "Active" state to "No" when you want dissable it. (Image 42)
5. To see all forums, click on "Show boards" in menu. (Image 43)
6. To add message to a forum, click "Insert message". Fill inputs and click "Apply
insert".
Forum rights
1. You can allow or deny forum to every single user. Click on "Show boards" and
than on name in "Subject" column.
2. Now, in left menu "Forum rights" is clickable.
3. Set forum rights to users according your needs. (Image 44)
Image 41: Search message in forum.
Image 42: Enabling and disabling forum post.
Image 43: Displaying all forums.
Image 44: Setting forum right to user.
5.5 Archive
Modul Archive record very change on pages so you can restore page to older version or
restore deleted pages.
How to restore previous version of page
1. While editing page in Buxus, in left orange menu are links - "Page archive" and
"Deleted pages". See Image 45.
2. Click Page archive to see changes made on page. Now in table you can see detail
info about versions like author, date, made changes. To display archived page
click "Old" in column Versions. See Image 46.
3. Copy text fields from archived page and paste it in actual version of page.
4. To detele versions of page, select it in right column and click "Delete selected"
under table.
How to restore deleted pages
1. Click "Deleted pages" in left orange menu.
2. Now select pages you want to restore or completely delete. See Image 47.
3. Under table click on buttons "Restore selected" or "Cempletely delete selected".
Image 45: All deleted pages.
Image 46: Page archive – all changes made on one page.
Image 47: Restoring page.