1
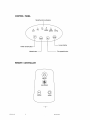
MAC 7500 Owner's Manual
• Air Conditioner
• Dehumidifier
• Oscillating Fan
®
Please read this owner's
manual
carefully before operating the unit.
66126113
.p65
17
POWERED
02.12.2_
BY
' 15:44
41_GREE
INTRODUCTION
Thank you for purchasing the 5ofeus
.-_ Mac 7500 portable air-conditioner.
This unit is
designed for improving living and working comfort by providing cooling, dehumidifying
and
fan functions only with a minimum installation required. With its whisper quite operation and
attractive design, you will enjoy the convenience and comfort that this unit provides for many
years to come.
When operating as an air conditioner, this unit is designed for spot cooling or cooling for a room
no larger than 150 square feet with the standard ceiling height 7-1/2ft.
ALERT
SYMBOLS
The following symbols used in this manual, alert you to potentially dangerous conditions to
users, service personnel or the appliance:
this symbol refers to a hazard or unsafe practice, which can
result in severe personal injury or death.
_
[CAUTION
this symbol refers to a hazard or unsafe practice, which can
]
result in personal injury or product or property damage.
IMPORTANT
SAFEGUARDS
1_
• Read these instructions
carefully before using this air
conditioner. If you still have any ditticulties or problems, consult your dealer for help.
• Never use or store gasoline or other flammable
vapor or
liquid near the air conditioner.
This air conditioner
has no ventilator for taking in fresh air
from out of doors. You must open doors or windows frequently when you use gas or oil heating appliances
same room ,which consume
a lot of oxygen from the air.
Otherwise, there is a risk of suffocation
--1--
66Z26113
p65
1
in the
D2-12_21,15:44
in extreme cases.
• Unplug unit from the electrical outlet when not in use and
before cleaning it.
• Do not use an adapter plug extension cord.
• Do not use near gas appliances, open flames (fireplaces) or
near the vicinity flammable liquids.
• Do not operate this unit if it had a damaged cord or plug or if
_/_L
cAUTION
J
it is not warking properly, or has been dropped or damaged
in any manner. Take the unit to the nearest authorized. Service Facility for examination, repair or electrical/mechanical
adjustment.
• The use of accessories and attachments not recommended
or sold by 5'o/eu_
.=_. may cause fire, electric shock or
injury.
• To protect against risk of electrical shock, do not immerse
the unit, cord or plug in water or any other liquid.
• Do not cut or remove the third (ground) prong from the power
cord.
• If the plug gets hot, call a qualified electrician.
• Close supervision is required when the unit is used by or near
children.
• Do not stick anything into the air outlet of the air conditioner.
• Do not use in a room with poor air circulation.
• Do not expose the unit to direct sunlight.
• Do not use the unit near water.
2
6E126113
p65
2
02=12-21.15:44
PACKAGE
CONTAINS:
Mobile Air Conditioner
LITHIUM BATTERY 3V-
Air Exhaust Duct
Window Kit - 3 Sliding Panels
Exhaust Duct Window Kit Adapter
Window Kit Fastener Screws (4)
Remote Controller
User Manual
NAMES OF PARTS
FRONT
control
air flow
pane'
guider
.__
_
_
--handle
front
air outlet
grill_
_I_
I
water
castol
-_
_
!
_
tank
cable(power
cord
and
plug)
BACK
3er air
inlet grill
hot air
lower
outlet
grill-
air inlet
grill"
"- Outlet
for Continuous
Drainage
"Use exclusively
for continuous
drainage.
"Don't
pull out the outlet except
for this application.
Otherwise
the drain will leak.
3
661261J.3
p65
3
02.12.21,15:44
Exhaust
Duct
Exhaust Duct
Unit Terminal End
Window
Window
Kits
Exhaust
Duct
Kit Adaptor
When you use the unit as an air conditioner, the hot exhaust air must be directed out of the
room. The exhaust duct is used to allow the hot air out. DO NOT INSTALL OR USE THE
EXHAUST DUCT WHEN THE UNIT IS OPERATED AS A DEHUMIDIFIER
a)
Slide exhaust
connector
OR FAN.
all the
over the hot Air outlet grill.
b)
Mount the external and of the exhaust duct onto a bole of 51/4"(132
I_1"1
mrn) on the wall for optional wall
hot air outlet installation.
al
4--
6_126113
.p_s
4
_
°2-_2-21'
15:44
c)
Or connect the window kit adaptor to the external end of the exhaust duct for a window
or sliding door hot air outlet installation.
NOTE: In order to increase the efficiency, the exhaust duct should be keep as short and
straight as possible, The exhaust hose can be cut shorter by unthreading
either end of the
exhaust duct counter clockwise. It is not recommended to increase the manufacturer's
length
of the exhaust hose. This may impede or damage the unit.
Window
Kit Installation
a)
Open window or sliding door for approximately
5 inches (130 mm).
b)
Adjust the length of the window kit to the same length of the window or the sliding door.
Use all three panels if necessary.
c)
Use screws to affix the window kit length.
d)
Place the window kit to the window or sliding door. Close the window or door as far as
it goes.
e)
Mount the window kit extension of the exhaust host onto the window kit.
f)
Use screws on the window kit extension if necessary.
NOTE: When using the window kit on a window or sliding door it will cause the window or
sliding door not to be properly closed and locked. Additional security measurements
taken.
_
should be
windows
exhaustair opening
5--
66z2611J
.p65
5
02.12-21,15:44
CONTROL
PANEL
Mode/function
/
REMOTE
cool
"
Mode button
--
indicators
op._u
speed
swing
Fan speed button
CONTROLLER
f
©
ON/OFF
FAN SPEED
G
©
SWING
MODE
J
--6
6512_Z3
p_5
8
!
m
02-12.21,
15:44
OPERATION
1)
USING
CONTROL
PANEL
For Manual Mode:
Press the Mode Button
2)
a)
Coot - Cooling function on indicator.
b)
Dry - Dehumidify function on indicator.
c)
Fan - Fan on indicator.
For Coolina Ooeration:
a)
Be sure that the drain tank is properly placed in the unit.
b)
Install the exhaust duct properly.
c)
Plug the Power Cord to the power outlet,
d)
Press the Mode Button until the cool indicator is on.
NOTE: During hot days, the unit will cool off the room most efficiently by setting the fan at the
lowest speed. Reducing the length of the exhaust duct, insulating the exhaust duct and keeping
direct sunlight to a minimum will also improve the cooling efficiency.
3)
DehumidifYing
Operation:
a)
Be sure that the drain tank is propedy placed in the unit.
b)
Plug the Power Cord to the power outlet
c)
Turn on the unit by pressing the ON/OFF Button on the control panel,
d)
Press the Mode Button until the DRY indicator is on.
NOTE: Do not use the exhaust duct when the unit is running at dehumidisying mode. You must
remove the exhaust duct from the unit. When the unit is running at dehumidifying mode, the fan
speed cannot be adjusted.
Keep the windows and the doors closed to aid the effectiyeness
moisture from the room.
--7--
G6126Z13
.p6S
7
02.12-21,15:44
of the unit in removing the
4)
Fan Oneration:
a)
Plug the Power Cord to the power outlet.
b)
Turn on the unit by pressing the ON/OFF Button on the control panel.
c)
Press the Mode Button until 'FAN' indicator is on.
d)
Select the fan speed by pressing the Fan Speed Button.
NOTE: When the unit is running on fan mode, the exhaust duct is inoperative
and is not
required.
OPERATION
USING
REMOTE
CONTROLLER
The remote controller provided with the unit may operate this portable air conditioner.
The
remote controller uses one LITHIUM BATTERY 3V . Install the battery before using the remote controller.
1. Press the On/Off key to turn on the unit.
2. Press Mode Key to:
a)
Cool indicator is on = Cooling Function
b)
Dry indicator is on = Dehumidify Function
c)
Fan indicator is on = Fan Function
3. Fan Speed:
a)
Press the Fan Speed key to turn fan speed to high or low.
4. Swinql
a)
Press swing key to tum on auto swing function.
Do not dispose of batteries in fire, batteries may
explode or leak.
--8--
66_26113.p65
8
0_12-21,1544
CONDENSATE
1)
WATER
DRAINAGE
Internal Water Tank
When operating in cooling or dehumidifying mode, the condensate water will drain into
the internal water tank. Depending on the surrounding humidity, the unit can continuously operate for 2 to 12 hours before the internal water tank is full. When the internal
water tank gets full, a beep slarrn will sound eight times for 15 seconds. The compressor stops running and the fan will continue to run in the set speed for three minutes
before the entire unit automatically
shuts off.
When the water tank is full, take out the entire water tank slowly and discard the water
inside the tank, place it back to its odginal position. You will then be able to tum on the
unit again.
If you want to take out the internal tank before it is full of water, please stop the unit
first. Wait for 3 minutes before taking out the water tank to prevent the condensate
water from discharging into the unit.
NOTE: Do not take out the water tank when the unit is running on either cooling or dehumidifying mode or the alarm will sound and the compressor stops. The mode will automatically
change to FAN mode and the compressor will require approximately 3 minutes to restart to the
cooling/deh umidifying cycle.
--9--
6_12_113
.p_5
9
02-12.21
' 15:44
CAUTION I
Do not remove the water tank when the unit is in use.
Always turn "Off' the unit before removing water tank.
Periodically
inspect and clean the drain valve to prevent
dogging.
METHOD
OF CONTINUOUS
DRAINAGE:
1. Slide out drain valve from the left side of the unit.
2. Connect a rubber pipe to the valve (not included).
3. Make sure the rubber pipe drains downward.
VBl_e
_
Slide _1
dt_n
slide_ imo
c_mecbon
ulO--
66_2_113
p65
10
02.12-21.15:44
i$
AIR
FILTER
• Soleus Air recommends cleaning your air filter at least after every two weeks of use. Keeping your air filter clean will maximize the performance
and life of this product.
• Open the air filter cover on the left side of the unit (fig. a)
• Remove the filter from the cover.
• Wash the filter using warm water and a mild dishwasher detergent.
• Allow to air dry before replacing in unit.
Fig. a
to remove
firth" _ver
air
Water Tank
• Using the handle, slowly remove water tonk from unit (fig. b).
• Pour out any condensation accumulated in water tank (fig. c)
• Wash water tank using warm water and a mild dishwasher detergenr.
• Allow to dry completely.
• Replace water tank in unit (fig. d).
Fig. d
Fig. b
11_ handle
p_l
ull
661251_3
.p65
11
--
02-12-21,
t5:44
NOTE: Be very careful when using an external water tank. The unit will not shut off automatically when an external water tank is full. Spill water can cause substantial damages to carpet,
furniture and other valuables.
Do not use lengthy drainage tabing without a condensate water pump.
MAINTENANCE
NOTE: Make sure power is off and the plug is pulled out of the power outlet before performing
any maintenance activities.
Case
1)
2)
a)
Keep the unit from being exposed directly to the sun for possible color fading.
b)
Clean the surface with a damp cloth and dry it with a soft towel.
Storina the Unit for an Extended Period of Time
a)
Ensure that the water drain tank is empty.
Remove the stopper from the water drain pipe and allow draining until empty.
(Fig. e)
b)
The water drain valve should be reinserted back in the unit.
c)
The filter should be cleaned and air dded.
d)
The power cable must be disconnected from power outlet and neatly rolled.
e)
The unit should be stored in a dry place.
(Fig. f)
Fig. e
66126Z13
p65
12
02-1Z-21.15:44
TROUBLE
SHOOTING
PROBLEM
POSSIBLE
Unit does not operate
Unit does not cool
room
CAUSE
REMEDY
Unit is umplugged
Seoorely plug receptacle intothe power
outlet
Drain tank is full
Empty water tank
Water tank not installed correctly
Completely insert water tank
Air exhaust is clogged
Clear exhaust hose
There is a heating source in the room
Turn down or off the other heating
source
Air filter is dirty
Clean or replace the air fitler
Air exhaust is not installed correctly
Check the air exhaust duct to make sure
that the hot exhaust air is let out of the
room freely
Room is too big or too much ambient
sunlight is reaching in
This unit provides spot cooling or cooling for a room no larger than 150
squarefeel with standard ceilling height
7_/_
,,
There is frost on the evaporator
The unit will defrost automatically and
return to operation afterwards
In dehumidifying mode,
There is frost on the evaporator
no cool air coming out
Noise or vibration
The unit will defrost automatically and
will return to operation afterwards
Surface is not level
Place unit on a level surface and away
from obstructions
Surface is not level
Drainage pipe is loose
Place uniton a level surfaceaway from
obstructions
Unit has been moved
When moving unit, emptydrain tank first
and keep unit updght at all times
Stopper on water drain pipe is loose
Make sure the stopper on the water
drain pipe is securelyin place
Machino stops and
starts
Air exhaust is not attached proparty
Check installationof air exhausthose
Air exhaust is curved too much
Try to keep the air exhaust horizontal
13--
G6_261Z3.1_65
13
02=12-21,15:44
SPECIFICATIONS
Model #
MAC - 7500
Power Source
115V~ / 60Hz
Cooling capacity
7500 BTU/h
Dehumidifyling capacity
24.0 liters/day
Cooling input power
1000W
Rated current
8.7A
Refrigerant type
HCFC R22
Refrigerant capacity
1.15 Ib
Operating Range - Cooling
Max 95°F Dry Bulb - 71°F Wet Bulb
(indoor air temperature)
Min 67°F Dry Bulb - 57°F Wet Bulb
Unit dimensions (H x D x W)
31"x 12.8" x 16.3"
Specifications
are subject to change without notice
PRODUCT
INFORMATION
If you have problems or questions concerning your air conditioner, you will need the following
information. Model and Serial numbers are on the nameplate on the back of the unit,
Model No.
Serial No.
Date of Purchase
Dealer's Name
Dealers Address
Purchaser's Name
Day Phone
Evening Phone
--14
6_261_]
.p65
14
m
02=12_1,15:44
DISCLAIMER
ALL INFORMATION
USER'S
MANUAL
INTERNATIONAL
TION AND
CONTACT
For
AND
ARE
THE TECHNICAL
SPECIFICATIONS
THE PRESENTATION
HAS NOT CONDUCTED
THE SPECIFICATIONS
OF THE MANUFACTURER
INDEPENDENT
PRESENTED
HEREWITHIN.
INFORMATION
Optional and Spare Parts
Warranty Claim
Customer Service
Please Call (888) 8-Soleus
Or Write to:
Soleus International Inc.
9451 Telstar Ave.
El Monte CA 91731 USA
www.soleusair.com
15
p65
15
IN THIS
SOLEUS
TESTS FOR THE INFORMA-
Technical Support
_612_ZZ3
PRESENTED
0_12_1,1544
WARRANTY
ONE YEAR
LIMITED
WARRANTY
Soleus International Inc. warrants the accompanying Soleus Air MAC-7500 Mobile Air Conditioner to be free of defects in material and workmanship
for the applications
specified in its
operation instruction for a period of ONE ( 1) year from the date of original retail purchase in the
United States or Canada.
If the air conditioner exhibits a defect in normal use, Soleus International Inc. will, at its option,
either repair or replace it, free of charge within a reasonable time after the air conditioner is
returned during the warranty period.
As a condition to any warranty service obligation, the consumer must present this Warranty
Certificate along with a copy of the original purchase invoice.
THIS WARRANTY
DOES NOT COVER:
1) Damage, accidental or otherwise, to the air conditioner while in the possession of a
consumer not caused by a defect in matedal or workmanship;
2) Damage caused by consumer misuse, tampering, or failure to follow the care and
special handling provisions in the instructions.
3) Damage to the finish of the case, or other appearance
parts caused by wear.
4) Filter.
5) Damage caused by repairs or alterations of the air conditioner by anyone other than
authodzed by Soleus Intemational Inc.
6) Freight and Insurance cost for the warranty service.
ALL WARRANTIES, INCLUDING ANY IMPLIED WARRANTY OF MERCHANTABILITY
ARE
LIMITED TO ONE-YEAR DURATION OF THIS EXPRESS LIMITED WARRANTY.. SOLEUS
INTERNATIONAL
INC. DISCLAIMS ANY LIABILITY FOR CONSEQUENTIAL
TAL DAMAGES AND IN NO EVENT SHALL SOLEUS INTERNATIONAL
EXCEEED THE RETAIL, VALUE OF THE AIR CONDITIONER
WRI'Iq'EN
OR IMPLIED WARRANTY
p_5
16
INC'S LIABILITY
FOR BREACH OF ANY
WITH RESPECT TO THIS AIR CONDITIONER.
--16
6_12_113
OR INCIDEN-
0_12_1,15:44
66126113
02-12-21,15:44