1
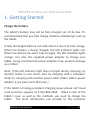
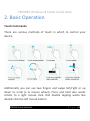
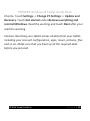
PREMIER Windows 8 Tablet Guide Book
Copyright © 2015 Visual Land Inc. All rights reserved.
Windows® and the Windows logo are trademarks of the
Microsoft group of companies. Intel Inside is a trademark of Intel
Corporation in the U.S. and/or other countries. Visual Land and
the Visual Land logo are trademarks of Visual Land Inc. All other
marks and trademarks are properties of their respective owners.
The content of this guide including images/illustrations may differ
in some details from the product or its software. All information
in this document is subject to change without notice.
For online Help and support, visit www.visual-land.com.
©2015 Visual Land Inc.
P a g e |1
PREMIER Windows 8 Tablet Guide Book
Table of Contents
1. Get Started...................................................................Page 3
2. Basic Operation............................................................Page 9
3.Synchronizing Your Tablet............................................Page 13
4.Recovery………………......................................................Page 14
Safety Information………..................................................Page 16
©2015 Visual Land Inc.
P a g e |2
PREMIER Windows 8 Tablet Guide Book
1. Getting Started
Charge the battery
The tablet's battery may not be fully charged out of the box. It’s
recommended that you fully charge it before attempting to set up
the tablet.
A fully discharged battery can take about 4 hours to fully charge.
When the battery is being charged, the LED indicator lights red.
When the battery has been fully charged, the LED indicator lights
orange. Use only the supplied power adapter to charge your
tablet. Using unauthorized power adapters may severely damage
your tablet.
Note: If the LED indicator light does not light during charging, try
another outlet in your home, also try charging with a computer,
lastly try charging with another power cable (either USB or power
adapter if you have more than one.)
If the tablet is having persistent charging issues please call Visual
Land Customer support at 1-562-860-2669. Make a note of the
tablet's issue as well as the methods you used to charge the
tablet. The more information you provide to the Customer
©2015 Visual Land Inc.
P a g e |3
PREMIER Windows 8 Tablet Guide Book
Support Representative the better he/she will be able to assist
you.
Power On & Sign In
To turn on your tablet, press and hold the Power button for 2-3
seconds or until the screen turns on. Release the power button
when the screen turns on.
Set up your tablet
The initial boot up will walk you through setting up your tablet for
first use. Specify what language you’d like the tablet to use.
Devices sold in the United States typically use English as the
default.
Decide on a name for your tablet. This can be any combination of
letters and numbers but there can’t be any spaces. This name is
used when other devices encounter your tablet on your home
network, or when you’re configuring settings for OneDrive
syncing.
Next you will be asked to accept the Terms and Conditions. You
must agree to them before you proceed with the setup.
©2015 Visual Land Inc.
P a g e |4
PREMIER Windows 8 Tablet Guide Book
Now you’ll need to configure your wireless network. If your
network has a password set up, you will need that in order to
connect to the Internet. Please contact an internet service
provider if you would like to have wireless internet set up in your
household. Visual Land cannot set up an internet connection for
you. Look at the list of available networks for yours and tap on
your Wi-Fi network. If your network is password enabled, you will
need to enter it now.
Tap on Express Settings if new at using Windows 8, otherwise
you can customize the settings to your preference. Add your
Microsoft Account to your device or create a new one. This
ensures you’ll get the latest updates automatically, have
OneDrive syncing capabilities and access to the Windows Store to
download apps.
After this set-up process, you’ll be taken to the Start Screen.
©2015 Visual Land Inc.
P a g e |5
PREMIER Windows 8 Tablet Guide Book
Subsequent boot ups will go
straight to the Windows
lock screen. Note: If the
login screen is not enabled
in Windows 8, you will be
taken directly from the lock
screen to the start screen.
Swipe up with
your finger from the bottom of the display to switch to the login
screen and then enter your password to log in to Windows.
Power Off the Tablet
You can turn off the tablet in two ways. 1. Press and hold the
power button for at least 4 seconds. A shut down confirmation
screen will appear, swipe it down to the bottom edge of the
display to turn off the tablet. 2. Swipe in from the right edge of
the display to access Charms. Touch Settings -> Power -> Shut
Down to turn off the tablet.
Turning On/Off the Screen
You can turn on and off the screen display by pressing the power
button once. Alternately you can use the Charms by swiping in
©2015 Visual Land Inc.
P a g e |6
PREMIER Windows 8 Tablet Guide Book
from the right edge of the display. Touch Settings -> Power ->
Sleep to turn off the screen.
Inserting/Removing a MicroSD Card
Align the MicroSD Card so that the pins are pointed toward the
card slot. Push the MicroSD Card into the card slot.
Caution: Removing the MicroSD Card while it is in use may cause
data loss or result in application errors. Make sure all save
operations to the MicroSD Card are complete before removing
the MicroSD Card. Touch the Desktop tile to enter Desktop mode.
Touch Safely Remove Hardware in the notification area at the
bottom right corner of the screen. Note: If you do not see Safely
Remove Hardware, touch Show Hidden Icons to display all icons
in the notification area. Touch Eject SD Memory Card. A message
appears confirming that the MicroSD Card can be safely removed.
If a warning message appears stating the MicroSD Card cannot be
removed, ensure all data transfers involving the MicroSD Card are
complete. Press on the MicroSD Card to release it. Slide the card
out after it pops out from the slot.
©2015 Visual Land Inc.
P a g e |7
PREMIER Windows 8 Tablet Guide Book
Connecting the Keyboard
For the sake of using convenience, this device is designed to be
equipped with a dedicated keyboard. Follow these steps to
connect the keyboard to your tablet:
1. Place the dedicated keyboard on an even and
stable plane (i.e. desk).
2. Hold your tablet with two hands, align the
connector on the keyboard to the jack and
positioning slots at the bottom of the tablet.
3. As soon as the keyboard is connected to the tablet,
it is ready to use.
Note:
•
•
This keyboard is a plug-and-play device, you can
plug/unplug it into the keyboard jack at any time.
There is no notification for the keyboard connection,
except for the appearance of the mouse icon (arrow) as
you put your hand onto the touch area.
©2015 Visual Land Inc.
P a g e |8
PREMIER Windows 8 Tablet Guide Book
2. Basic Operation
Touch Commands
There are various methods of touch in which to control your
device.
Additionally you can use two fingers and swipe left/right or up
down to scroll (a la mouse wheel). Press and hold also works
similar to a right mouse click. And double tapping works like
double click the left mouse button.
©2015 Visual Land Inc.
P a g e |9
PREMIER Windows 8 Tablet Guide Book
Swiping in from the right edge of the display will bring up the
Charms, which allow you to adjust various settings on your
device.
You can also swipe in from the right edge of the display to bring
up the Charms from any screen and tap the Windows logo to
bring you back to the Start Screen.
©2015 Visual Land Inc.
P a g e | 10
PREMIER Windows 8 Tablet Guide Book
From the start screen, you can swipe up from the bottom edge of
the display to bring up all your apps and programs.
On the home screen you can tap along the bottom edge of the
display to bring up a menu with which you can customize your
home screen (such as removing and adding apps/tiles).
Swiping in from the left edge of the display will allow you to
switch between currently running apps/programs.
©2015 Visual Land Inc.
P a g e | 11
PREMIER Windows 8 Tablet Guide Book
Wi-Fi Setting
To turn on/off Wi-Fi, swipe in from the right edge of the display
to access Charms. Touch Settings -> Network icon. Swipe the
Wi-Fi icon left or right to turn Wi-Fi on or off.
To connect to a network, swipe in from the right edge of the
display to access Charms. Touch Settings -> Available. Select an
available network from the list and touch Connect.
©2015 Visual Land Inc.
P a g e | 12
PREMIER Windows 8 Tablet Guide Book
3. Synchronizing Your Tablet
Using a Microsoft Account
If your computer has Microsoft Windows 8 installed, you can
synchronize user settings of your tablet with your computer using
a Microsoft account. When you sign in with your Microsoft
account on your tablet, your settings, including internet browser
history, app settings, and personal files etc., are synchronized
with other Windows 8 PCs and tablet computers.
On the tablet, access Charms and tap Settings -> Change PC
Settings -> Accounts -> Your account -> Connect to a Microsoft
Account.
Tap Settings -> Change PC Settings -> OneDrive -> Sync settings
to see the options for synchronizing your data and settings.
Copy music, photos and videos
Connect your tablet to a USB storage device with a MicroUSB to
standard USB conversion cable (included), then transfer files to or
from the USB storage device. After transferring files, use the
Safely Remove Hardware wizard to remove the USB storage
device.
©2015 Visual Land Inc.
P a g e | 13
PREMIER Windows 8 Tablet Guide Book
4. Recovery
Refreshing Your Tablet
Refreshing your tablet will restore Windows to original factory
settings without deleting any of your personal files, installed apps
from the Windows Store, or personalization settings.
To restore your tablet swipe in from the right edge of the display
to access Charms. Touch Settings -> Change PC Settings ->
Update and Recovery -> Recovery. Touch Get started under
Refresh your PC without affecting your files. Read the warning
and touch Next after you read the warning.
Note: Apps installed from the Windows Store are automatically
reinstalled after the refresh is complete. Apps installed from
sources other than the Windows Store are removed and have to
be manually installed. A list of apps removed during this process is
created on the desktop after the process is complete.
Resetting your Tablet
Resetting your tablet will return the system to original factory
settings. Swipe in from the right edge of the display to access
©2015 Visual Land Inc.
P a g e | 14
PREMIER Windows 8 Tablet Guide Book
Charms. Touch Settings -> Change PC Settings -> Update and
Recovery. Touch Get started under Remove everything and
reinstall Windows. Read the warning and touch Next after your
read the warning.
Caution: Resetting your tablet erases all data from your tablet,
including your account configuration, apps, music, pictures, files
and so on. Make sure that you back up all the required data
before you proceed.
©2015 Visual Land Inc.
P a g e | 15
PREMIER Windows 8 Tablet Guide Book
Safety Information
•
•
•
•
•
•
•
•
•
The battery is not intended to be replaced by the consumer. If you believe
the battery is damaged or needs to be replaced, contact Visual Land
customer support for inspection and/or replacement.
Do not let the battery come in contact with liquids.
Do not place your device near a heat source or leave it in your car in high
temperatures.
Do not dispose of the battery in a fire.
Avoid dropping device.
Never use any charger or battery that is damaged in any way. Use only the
provided charger which is specifically designed for your device.
Do not use if screen is cracked or broken as this could cause injury to you.
Please note that a touch screen responds best to a light touch from the pad
of your finger or a non-metallic, no sharp stylus. Using excessive force or
hard or sharp objects when pressing on the touch screen may damage the
tempered glass surface and void the warranty.
Do not set the volume at its highest levels when using headphones.
Prolonged exposure to loud noise could damage your hearing.
FCC Compliance
This device complies with Part 15 of the FCC Rules. Operation is subject to the
following two conditions: (1) this device may not cause harmful interference, and
(2) this device must accept any interference received, including interference that
may cause undesired operation.
FCC Radiation Exposure Statement: This equipment complies with FCC RF
radiation exposure limits set forth for an uncontrolled environment. This
transmitter must not be co-located or operating in conjunction with any other
antenna or transmitter.
©2015 Visual Land Inc.
P a g e | 16