1
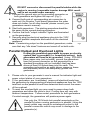
ST-PKIT2000 Generator Parallel Kit Operating Instructions PLEASE READ THESE INSTRUCTIONS CAREFULLY BEFORE USING Safety Instructions: Please refer to your Generator(s) owner’s manual and follow all safety and operating instruction for proper use. NEVER connect or disconnect the parallel kit cables from the generators while running. Doing so will cause permanent damage not covered under warranty. The load requirement of the electrical appliance cannot exceed the combined continuous output of the paralleled generators. Please refer to your Generator(s) owner’s manual for specifics. This parallel kit cannot be used for paralleling three or more generators or running two different brands of generators. Parallel Operating Features: Two identical inverter generators that have dual parallel pin connectors and a single ground connection can be linked together using this kit and run in parallel to increase the total output and maximum load. Please see generators owner’s manual for specific outputs on parallel function. Parallel Operation Procedure: 1. Prepare two identical inverter generators for operation as outlined in the owner’s manual. 2. Parallel connections MUST be made with the generator’s engines NOT running. DO NOT connect or disconnect the parallel cables while the engine is running. Irreparable inverter damage WILL result and is not covered under warranty. 3. Connect the ground wire on the grounding connector on both generators and tighten the cap nut. (Fig 1) 4. Connect both sets of corresponding pin connectors to each unit (for Smarter Tools brand generators the order does not matter; for all other brands, please consult your generators owner’s manual) 5. Start both generators. The starting procedure should be the same as the normal starting procedure. 6. Confirm that both "output indicator" lights are illuminated on the generators. 7. Securely plug the electrical appliance plug into the 120V twist-lock parallel receptacle and switch on the electrical appliance. Fig 1 Note: If maximizing output on the paralleled generators, make sure that any “idle down” features are turned off on both units. Parallel Output and Overload Lights If using the paralleled generators to power an electric system that is grounded (i.e. household wiring), both generators will need to be grounded. Using #10 AWG bare copper wire (not included) ground the generators from the ground connector on the generators to a standard grounding rod (not included) that has been driven at least 24 inches deep into the earth. The grounding rod must be an earth-driven copper or brass rod (electrode) which can adequately ground the generators. 1. Please refer to your generator’s user’s manual for indicator light and power output status of your generators. 2. If the generators are overloaded, remove all electrical loads from the generators by disconnecting all electrical appliances from the 120V twist-lock on the parallel kit and then determine and correct the cause of the overload. 3. To reset the overload light you may need to power down both generators and allow the units to cool. Cooling time will vary with ambient temperature. Follow restart procedure for both generators. If cooled enough, the generators will produce power again. Use only the 120V twist-lock parallel receptacle on the parallel kit when running generators in parallel. Using the panel outlets may cause an unbalanced output to the parallel connection which may result in damage to the generator(s). Powering down the generators: 1. Turn off all electrical appliances connected to parallel outlet. 2. Unplug the appliance power cord from the 120V twist-lock parallel receptacle. 3. Power down generators as instructed in user manual. 4. Disconnect the pin connectors and ground connection from the two generators. Note: Make certain that the engines of both generators are OFF and have stopped running, BEFORE disconnecting these cables. Air Conditioning Operation 1. Most inverter generators producing 1600 continuous watts or more can start and run most RV Air conditioners when operating in parallel. 2. Bring the generators to normal operating temperatures before applying the air conditioning load. Always allow a 2 minute wait period when manually cycling an air conditioner off and on. A longer wait period may be required under unusually hot weather conditions. Additionally, all other loads should be turned off until the air conditioner has started and is performing normally. 3. It is also important to follow the air conditioner manufacturer's instructions for starting and restarting for proper operation. Some air conditioner manufacturers offer a start capacitor or rapid start kit as an extra cost option. The lack of a start capacitor can cause the air conditioner to draw too much starting current and overload the generators. LIMITED WARRANTY Effective January 1, 2014. Replaces all undated warranties and all warranties dated before January 1, 2014 Warranty Qualifications Smarter Tools will require a copy of your sales receipt from one of Smarter Tools' retail locations as proof of purchase in order to qualify for warranty. Repair/Replacement Warranty Smarter Tools warrants to the original purchaser that the mechanical and electrical components will be free of defects in material and workmanship for a period of one (1) year or from the original date of purchase (90 days for commercial & industrial use). Transportation charges on product submitted for repair or replacement under this warranty are the sole responsibility of the purchaser. This workmanship for a period of warranty only applies to the original purchaser and is not transferable. Warranty Exclusions This warranty does not cover the following repairs and equipment: Normal Wear This warranty does not cover repair when normal use has exhausted the life of a part or the equipment as a whole. Installation, Use and Maintenance This warranty will not apply to parts and/or labor if this product is deemed to have been misused, neglected, involved in an accident, abused, loaded beyond the generator's limits, modified, installed improperly or connected incorrectly to any electrical component. Other Exclusions This warranty excludes: Merchandise sold as reconditioned, used as rental equipment, or floor/display models sold without packaging and/or missing parts or components. Repair and transportation costs of merchandise determined not to be defective. Cosmetic defects such as paint, decals, etc. Wear items such as connectors and outlets Failures due to acts of God and other forces of nature beyond the manufacturer’s control. Problems caused by parts that are not original Smarter Tools parts. This warranty does not apply when generators are used for prime power in place of a utility. Limits of Implied Warranty and Consequential Damage Smarter Tools disclaims any obligation to cover any loss of time, use of this product, freight, or any incidental or consequential claim by anyone from using this product. THIS WARRANTY IS IN LIEU OF ALL OTHER WARRANTIES, EXPRESS OR IMPLIED, INCLUDING WARRANTIES OF MERCHANTABILITY OR FITNESS FOR A PARTICULAR PURPOSE. A unit provided as an exchange will be subject to the warranty of the original unit. The length of the warranty governing the exchanged unit will remain calculated by reference to the purchase date of the original unit. This warranty gives you certain legal rights which may change from state to state. Your state may also have other rights you may be entitled to that are not listed within this warranty. Some states do not allow the exclusion, so it may not apply to you. Contact us at: Smarter Tools Customer Service|12195 Harley Club Drive Ashland, VA 23005|(804)798-8588|[email protected]