1
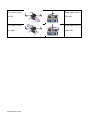
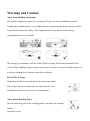
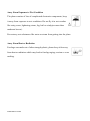
IFLY-4S multi-rotor User Manual Shenzhen Idea-Fly Technology Co.,Ltd http://www.idea-fiy.com IFLY4S Ver1.0 WWW.IDEA-FLY.COM Catalog Catalog ............................................................................................................... 2 Disclaimer .......................................................................................................... 4 After-Sale Service ................................................................................................ 6 Preface ............................................................................................................... 9 Abstract ............................................................................................................ 10 Basic Parameters.................................................................................................11 Transmitter ........................................................................................................ 12 Connect Receiver ........................................................................................ 12 Calibrate Transmitter ................................................................................... 13 Camera Mount Control ....................................................................................... 13 Connect Pitch Angle of Camera Mount .......................................................... 13 Connect Roll Angle of Camera Mount ........................................................... 13 Connect Control Parameters of Camera Mount ............................................... 14 Power Supply .................................................................................................... 15 Low Voltage Alarm ..................................................................................... 15 Low Voltage Protection ............................................................................... 15 Sensor Reset ...................................................................................................... 15 Gyro Reset ................................................................................................. 15 Start Motor........................................................................................................ 16 Stop Motor ........................................................................................................ 17 Propeller Assembly ............................................................................................ 18 WWW.IDEA-FLY.COM Propeller Rotation. ...................................................................................... 18 Flight Mode and LED Indication ......................................................................... 20 Manual Mode ............................................................................................. 21 Self-Leveling Mode .................................................................................... 21 Altitude Mode ............................................................................................ 21 GPS Mode(with GPS module) ...................................................................... 22 Auto-Return Mode(with GPS module) .......................................................... 22 Fail Safe Mode .................................................................................................. 22 Firmware Update ............................................................................................... 23 GPS Available ................................................................................................... 23 Calibrate Compass ............................................................................................. 23 Re-mounting GPS in Offsetting Angle .................................................................. 25 First Flight ....................................................................................................................... 25 Low Voltage ............................................................................................................. 26 Fight Controller Output ........................................................................................... 26 Working Status Check ........................................................................................ 26 Command Illustration ......................................................................................... 28 Warning and Caution .......................................................................................... 30 Maintenance ...................................................................................................... 32 WWW.IDEA-FLY.COM Disclaimer Please read this disclaimer carefully and follow instructions on assembly and calibration contained in this manual. By using our product, you hereby agree to this disclaimer and signify that you have read the entire manual thoroughly. THIS PRODUCT IS NOT SUITABLE FOR PEOPLE UNDER THE AGE OF 18. This product is not a toy! It is a complicated combination of mechanics, electronics, aerodynamics and high-frequency radio technologies. Users should strictly obey safety operation specification on aerial model and follow steps illustrated in the manual to install and calibrate the product. Idea-Fly takes no responsibility for any direct or indirect damage(s) or injuries caused by improper installation, calibration and operation. Idea-Fly takes no responsibility for any direct or indirect damage(s) or injuries caused by installing/calibrating/flying this product when users are in situations including but not limited like drunk, taking drugs, dizziness, fatigue or any other cases no matter mentally or physically that would impair your ability. Idea-Fly takes no responsibility for any direct or indirect damage(s) or injuries caused by flying this product in inappropriate whether like windy(no more than gentle wind), rainy, snow, hail, lightning, earthquake, tsunami and other natural disasters Idea-Fly takes no responsibility for any direct or indirect damage(s) or injuries caused by using this product in inappropriate area like magnetic or radio interference area, government regulated no-fly zone or any other not permitted WWW.IDEA-FLY.COM public or private areas. Idea-Fly takes no responsibility for any direct or indirect damage(s) or injuries caused by using Idea-Fly product assembled any other non-original Idea-Fly parts, uncompleted Idea-Fly product and Idea-Fly product in aging or erosion conditions. If any questions or problems occurred before, during, after using Idea-Fly products, please contact local distributor/seller or Idea-Fly customer service for answer or assistance. Idea-Fly takes no responsibility for any direct or indirect damage(s) or injuries caused by customer‟s improper operation or subjective misjudgment. Any other losses that are not under Idea-Fly‟s liability. WWW.IDEA-FLY.COM After-Sale Service Warranty Items 1. Idea-Fly(hereinafter called IDF) provides manufacturer warranty for defective electronic parts of IDF products that NOT caused by accident or human error, it doesn‟t include the frame and its parts, circuits or the outer cover of electronic parts, etc. 2. IDF provides 90days After-Sale warranty period, starting from the date on the proof of purchase till the 90th day. 3. IDF provides replacement or repair for free for parts are covered by warranty items and within 90days warranty period. Following conditions are not covered by warranty. 1. Users don‟t follow IDF‟s official manual to assemble, calibrate and operate. 2. Performance failure caused by IDF products assembled any other non-original IDF parts or fake IDF parts 3. Performance failure caused by using mismatched affiliated devices or parts including power cord, battery, transmitter, receiver, etc. 4. Performance caused by objects including but not limited to water, oil, steam, sand ingress into the product. 5. Performance failure caused by accident or human error including but not limited to dropping, carry, crash or improper storage. 6. Performance failure caused by irresistible factors including but not limited to WWW.IDEA-FLY.COM earthquake, fire, flood, mudslide and other natural disasters. 7. Performance failure caused by magnetic interference, radio interference or radiation. 8. Damage(s) or losses happened during post, please contact corresponding logistic company. Paid service for performance failure not covered by warranty. 1. Within one year since purchase, customers bear the charge of material cost and transportation cost. 2. Over one year since purchase, customers bear the charge for material cost, transportation cost, testing and repair. Service Procedure 1. If any problem occurs before, during or after using IDF products, please contact local distributor/seller or IDF customer service [email protected] to confirm the failure, service range and service solution, customers need to provide: 1) Proof of purchase 2) Product‟s SN 3) Detailed description about failure such as where, weather condition, operation and product‟s performance and so on. 2. Local distributor/seller or IDF would confirm service range and cost according to warranty items with customer. WWW.IDEA-FLY.COM 3. After customer agreed proposal of service range and cost, distributor/seller or IDF will provide replacement for free for parts covered by warranty item. For others, distributor/seller or IDF would further confirm with customer again for disposal. WWW.IDEA-FLY.COM Preface Dear Customers: Thanks for purchasing Idea-Fly model airplane. Please read the manual carefully before using this product and this manual should be well kept for further reference. Here we strongly recommend users to remove propellers when installing, calibrating, setting parameters and updating firmware, and keep children and animals away. The quad is equipped with high-performance electronic flight controller, foldable fuselage and high-performance brushless motors together with high-speed, silent motor governor. High capacity Li-Po battery supplies quite good playload ability. In addition, stabilization camera mount is able to carry normal digital camera and Gopro, enabling users to take aerial photos and video. The quad frame adopts ultra-strength compound material, provides lighter frame weight and brings users more enjoyable flight. WWW.IDEA-FLY.COM Abstract Cool appearance and foldable frame. Four low-noise high quality brushless motors. High performance fight control system installed and calibrated before delivery. Net weight: 830g(excluding receiver and battery). Playload: 700g(excluding receiver and battery). Optional: Single-axis gimbal or two-axis gimbal. WWW.IDEA-FLY.COM Basic Parameters Size Weight & Payload Size: 65cm X 65cm Distance between motor: 55cm Height: 25.4cm Propeller Fuselage Weight: 830g Maximum Takeoff Weight:1500g Motor Material: Plastic Brushless motor: (IF2212)11.1v CW: 10inch * 2 Motor Governor:10A digital governor CCW: 10inch * 2 Camera Mount Working Environment Anti-Vibration Ambient Humidity: <%80 Material: Carbon Fiber Ambient Temperature: 0-60 (Celsius No. of servos: 1 or 2 degrees ) Landing Gear High Flexible Plastic Landing Gear WWW.IDEA-FLY.COM Ambient Wind Speed: < 4m/s Power Working Voltage: 11.1v Max Working Current: 20A Warning Voltage: 10.8V Transmitter Support common PWM RC transmitter such as FUTABA/JR with maximum 7 channels used to control the attitude, flight mode and camera mount of the plane. Users need to connect and calibrate transmitter before flight, otherwise, you may not be able to start motors, transmitter with minimum 5 channel is required. Caution: Do not use any channel mixing in your transmitter. Connect Receiver FUTABA Receiver 2/3 pos sw Signal pin is near to the twist sw twist sw . A:Connect to AILERON channel of receiver E:Connect to ELEVATOR channel of receiver T:Connect to THROTTLE channel of receiver R:Connect to RUDDER channel of receiver M:To control flight modes, connect to either a 3-positions channel or 2-position WWW.IDEA-FLY.COM channel. For flight mode recognition, please refer to ' flight modes ' sector. S1:Connect to any channel on receiver controlling pitch angle of camera mount. S2:Connect to any channel on receiver controlling roll angle of camera mount. P1:Connect to pitch servo motor on camera mount. P2:Connect to tilt servo motor on camera mount. Calibrate Transmitter Please refer to "Transmitter Calibration" chapter in firmware for details. Camera Mount Control IFLY-4S supports 2-axis stability camera mount with vibrate isolation and angle tuning function. Distinctive smooth output algorithm provides great anti-vibration when tilting or rolling camera. Connect Pitch Angle of Camera Mount Connect camera Pitch channel on receiver to S1 of flight controller, then connect pitch servo on camera mount to P1 of flight controller and set up parameters in software. Connect Roll Angle of Camera Mount Connect camera Roll channel on receiver to S2 of flight controller, then connect pitch servo on camera mount to P2 of flight controller and set up parameters in software. WWW.IDEA-FLY.COM Connect Control Parameters of Camera Mount IFLY-4S allows users to customize parameters for camera mount module. Please refer to "Camera Mount Control" chapter in firmware for details.. WWW.IDEA-FLY.COM Power Supply With integrated power conversion and output module, all you need to do is just install a 3S 11.1V lithium battery. After battery installed, please keep plane stationary till buzzer buzzes twice. Caution: 3S lithium battery is the best suit for IFLY-4S. Flight controller provides 5V500mA output, any optional module requires higher power consumption, please use additional UBEC. Low Voltage Alarm When battery voltage is lower than 10.8 V, buzzer will buzz “BBBB” and the LED will be on constantly, you should land the plane right away to avoid any accident. Low Voltage Protection In Altitude Mode or GPS Mode when low voltage alarm is on, plane will descent automatically in a gentle manner but you can still keep current flight height by pushing throttle up. Under this circumstance, we strongly recommend you to move plane to an safer place and then land. Default Alarm Voltage: 11.1V(3S). Sensor Reset Gyro Reset Before flying or if joystick deviated from mid-point, place the plane horizontally on WWW.IDEA-FLY.COM ground and then execute stick command illustrated below to calibrate sensor. 1: Push throttle stick to the peak point. 2: Push orientation stick to the right-most point. 3: When calibration finished, the buzzer sounds “D” throttle in the right side throttle in the left side Start Motor Execute following steps to start motors. 1: Pull throttle stick to the lowest point. 2: Push orientation stick to the left-most point. 3: The propellers will start rotating at a slow speed. If it doesn‟t, please check transmitter channel whether or not is in reverse direction or try to re-calibrate transmitter over again. throttle in the right side throttle stick in the left side Caution: Make sure IFLY-4S is stationary during process of starting motors, otherwise, the plane will flip over when take off. WWW.IDEA-FLY.COM Stop Motor There are two ways to stop motor. 1. Put throttle stick at the lowest point for 5 seconds , 2. Execute following stick command, the motors will stop immediately. A: Pull throttle stick to the lowest point. B: Push orientation stick to the right-most point. throttle in the right side WWW.IDEA-FLY.COM throttle in the left side Propeller Assembly Please strictly follow rotate direction illustrated in below diagram to install propellers. We strongly recommend users to remove battery during propeller installation to avoid any accidents or injuries. Propeller Rotation. WWW.IDEA-FLY.COM 1st step: Install propeller on motor 2nd step: Install the propeller adapter and put screw drive through the hole on the propeller adapter. 3rd step:Hold motor stator with your hand and tighten propeller adapter by using screw driver to prevent propeller from loosing during flight. Caution:Check propeller status and adapter after every few flights. WWW.IDEA-FLY.COM Flight Mode and LED Indication FC supports Manual Mode, Self-Leveling, Altitude Mode and GPS Mode. Self-Leveling and Altitude Mode are available in default parameters. Users could activate Manual Mode and GPS Mode by setting up parameters in the software. LED Indications. 1, Manual mode: LED blinks once each circle. 2, Balance mode: LED blinks twice each circle. 3, Altitude mode: LED blinks 3 times each circle. 4, GPS mode: LED blinks once each circle means No. of satellite detected>4 LED blinks twice each circle means No. of satellite detected>6 LED blinks 3 times each circle means No. of satellite detected>8 Select flight mode, use a 2 or 3 position switch on the TX as input control connecting to „M‟ channel on FC. What is 2 position switch? Radio Transmitter WWW.IDEA-FLY.COM Position 1 Position 2 Manual Mode Users need to manually keep the plane balanced and maintain height. Self-Leveling Mode Users just need to maintain the height of the plane. Altitude Mode The plane will be hovering when joysticks are in neutral-point. 1. When throttle(on the right side) is in BLUE AREA, plane ascents. 2. When throttle is in GREEN AREA, position hold in current height. 3. When throttle is in YELLO AREA, plane descents. 4. When throttle is in RED AREA, plane descends rapidly. Be cautious when plan is high above ground. Caution: Under Altitude Mode, Ascend: Keep throttle in BLUE AREA. Descend: Keep throttle in YELLOW AREA. WWW.IDEA-FLY.COM GPS Mode(with GPS module) GPS can only be activated when No of satellite detected>5, otherwise, the plane will enter Altitude Mode automatically. The plane will be hovering when throttle is in the mid-point. GPS signals might be affected when plane is between buildings and under bridge. Desired altitude for GPS:2m and above. Move Forward/Back: Push up or pull down orientation stick, hovering when stick in the mid-point. Move Left/Right: Move orientation stick to left or right, hovering when stick in the mid-point. Auto-Return Mode(with GPS module) 1. Plane would automatic return to takeoff point. 2. Tilt and Roll will be valid and users are allowed to control the flying height and direction. 3. The plane will be hovering a few seconds above takeoff point. 4. Please make sure throttle is in mid-point when plane is hovering above takeoff point. Fail Safe Mode(with GPS and fail-safe position of throttle under 10%) 1. Plane will automatically execute Fail-Safe Mode when receiver lost signal from TX WWW.IDEA-FLY.COM or turn off TX, or in GPS mode, throttle abruptly down from over 40% to under 10%. 2. Plane will climb to around 10m high then return to takeoff point. 3. Hovering few seconds over takeoff point, then land gently and motors stop. 4. Keep throttle in neutral-point when plane is descending. Plane will record takeoff point automatically every time it leaves ground. Firmware Update Upgrade your firmware to the most up to date version online. Please refer to "Firmware" chapter in firmware for more details. GPS Available GPS is an optional module for IFLY-4S. Mount GPS on the plate with double-sided adhesive tape and connect to GPS port on flight controller. Make sure the vertex of triangle on the top of GPS is consistent with the nose direction of the plane. Calibrate Compass Compass is an additional module for IFLY-4S coming together with GPS module. Flying near ferromagnetic substances or in/through strong magnetic interference area may disable compass. Users need to calibrate compass in following conditions: 1. The first time use GPS. 2. Re-mounting GPS WWW.IDEA-FLY.COM Caution: 1. Do not calibrate compass in strong magnetic interference area or steel reinforcement under the ground. 2. Remove nearby ferromagnetic objects such as keys, mobile phone or any other sort of metals when calibrating compass. Calibration Steps(video demonstration in disk): 1. System power on and push throttle stick to peak point but DO NOT start motors 2. Toggle mode switch at least 5 circles until buzzer sounds 3. When buzzer buzzing “B” each time, hold the plane horizontally and rotate 360°slowly till buzzer buzzing “B-B” each time. Horizontal Calibration 4. When buzzer buzzing “B-B” each time, hold the plane vertically with plane‟s nose pointing to the ground and rotate 360°slowly till buzzer stops buzzing. WWW.IDEA-FLY.COM Vertical Calibration 5. When finished, reboot flight controller. Re-mounting GPS in Offsetting Angle Once the plane does not go straight in forward flight, you might need to adjust GPS in an offsetting angle showed in below diagram, “Θ”referring to offsetting angle. First Flight If this is the 1st time for you to use this plane, please strictly follow below steps to start. 1. Follow manual to calibrate TX. 2. Make sure no channel mixing on TX. WWW.IDEA-FLY.COM 3. Connect plane and computer to set up parameters. 4. Calibrate TX and make sure no reversed channel. 5. Configure Fail Safe parameters. 6. Complete following Working Status Check. Low Voltage For safety reasons, we strongly recommend users to install an additional low voltage beeper for battery. We strongly recommend users to land your plane ASAP when low voltage alarm is on. Fight Controller Output FC provides 5V/500mA output for receiver. Please install an UBEC(recommend 5V) for servos when camera mount carries playload >150g, otherwise, FC might reboot due to overload. Working Status Check Make sure propellers are installed in correct rotation On The Ground. 1. Put plane on the ground, and put transmitter nearby. 2. Throttle down to the lowest point and turn on transmitter, then power on the plane, press the canopy with hand and keep the plane on the ground throughout following test, then push throttle to 20% slowly. WARNING: DO NOT BE HURT BY BLADES! 3. Keep throttle at 20% and push stick in Pitch, Roll, and Yaw(stick value 30%), feel if WWW.IDEA-FLY.COM plane attempts to move to the corresponding direction. 4. If the plane acts in wrong direction or no react to Pitch, Roll and Yaw command, please check rotate direction of motors/propellers, cable connection between receiver and flight controller then back to steps1. In The Air 1. Grasp the bottom assembly board of the plane and lift it higher than your head, keep this gesture throughout following test. 2. Pull throttle down to the lowest point and turn on transmitter, power on the plane, then push throttle to 20% slowly. WARNING: DO NOT BE HURT BY BLADES! 3. Keep throttle at 20% and try to move plan in Forward/Back, Left/Right direction and feel if the plane showing resistance to every movement. 4. If no resistance to each movement or no reacts at all, please check rotate direction of motors/propellers, cable connection between receiver and flight controller then back to steps1. 5. If the plane acts perfectly in Working Status Check, pull throttle to the lowest point and power off plane, now it‟s time for you to enjoy the flight. WWW.IDEA-FLY.COM Command Illustration Mode 1《throttle on right-hand-side》 for your reference Ascend Push up right stick Descend Pull down right stick. The plane turns Push left stick to to left. left side. The plane turns Push left stick to to right. right side. The plane heads Push up left stick. down and moves forward The plane heads Pull down left up and moves stick. backward WWW.IDEA-FLY.COM The plane leans Push right stick to to left left side. The plane leans Push right stick to to right. right side. WWW.IDEA-FLY.COM Warning and Caution Away from building and people RC model is dangerous when it is working or flying. Incorrect installation, broken components, malfunction or even slight improper operation may incur serious accident. Users should ensure the safety of the flight and stay away from crowds, taking responsibility for any accidents. We strongly recommend a at least 100m*100m as flying field without obstacles like crowds, high buildings, high-voltage towers/lines, woods or any other similar objects, to avoid any damage(s) or injuries caused by accidents. Do Not Fly It Alone Beginners should be accompanied with experienced pilot. Do not fly it alone no matter you are experienced or not. Simulator software for practice is recommended. Away From Working Parts Do not touch any part of the working plane, especially the rotating blades. WWW.IDEA-FLY.COM Away From Exposure to Wet Condition The plane consists of lots of complicated electronic components, keep it away from exposure to wet conditions. Do not fly it in wet weather like rainy, snow, lightening storm, fog, hail or windy(no more than moderate breeze). Prevent any wet substances like water or steam from getting into the plane. Away From Heat or Radiation Fuselage was made out of ultra-strength plastic, please keep it far away from heat or radiation which may lead to fuselage aging, erosion or even melting. WWW.IDEA-FLY.COM Maintenance IFLY-4S is an RC plane consisting of precise components. Users need to make sure every part of the plane is in good condition. Please be aware that improper maintenance may lead to accidents and damage(s). We strongly recommend users to maintain the plane on a regular basis. If motors don‟t work well, turbulence may occur during flight. Check propellers status after every few flights, tighten or replace them if necessary. Make sure all cables are in good connection, especially for ESC and motors. Do not keep and expose the plane in wet condition, strong sunshine or space with static voltage higher than 64V. We recommend users to check connection status of fuselage, motors propellers and screws on a regular basis, suggest applying screw glue for higher intensity. WWW.IDEA-FLY.COM Manufacturer: Shenzhen Idea-Fly Technology Co., Ltd. Address: 6th floor, A3 building, China Rich Crown Industrial Park, Longhua New District, Shenzhen, China. Tel:+86-0755-2311 0006 Web:www.idea-fly.com Email:[email protected] WWW.IDEA-FLY.COM