1
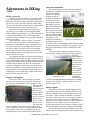
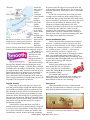
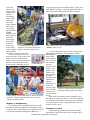
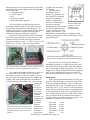
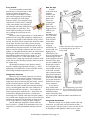
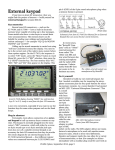
PCARA Update
Volume 15, Issue 9 Peekskill / Cortlandt Amateur Radio Association Inc. September 2014
See you in September
Among the highlights of the summer season from
an amateur radio perspective, was the ARRL National
Centennial Convention 2014 at the Connecticut Convention Center in Hartford, CT on July 17 - 19, 2014.
The convention was well attended by a contingent from
PCARA who carpooled to the convention and informed
me that it was quite an excellent event! The activities
included a visit to ARRL Headquarters in Newington,
CT.
The summer is coming to an end, but that doesn’t
mean the fun has to stop. There are quite a few
regional hamfests coming up in the next couple of
months, so keep the following dates in mind:
Ÿ Sunday Sept 14: Candlewood Amateur Radio Association Western CT Hamfest, Edmond Town Hall,
45 Main Street, Newtown, CT.
Ÿ Saturday Sept 20: Garden State ARA Fall Hamfest,
MOESC Building, 100 Tornillo Way, Tinton Falls,
NJ.
Ÿ Saturday Sept 27: Ocean Monmouth ARC Tailgate
Hamfest, Infoage Learning Center, 2300 Marconi
Rd, Wall Township, NJ.
Ÿ Sunday Oct 5: Hall of Science ARC Hamfest, NY
Hall of Science, 47-01 111th St., Flushing Meadows, Queens, NY.
Ÿ Saturday Oct 11: BARA Fall Hamfest, Westwood
Regional High School, 701 Ridgewood Rd, Township of Washington, NJ.
Ÿ Sunday Oct 12: Mt. Beacon ARC Fall Hamfest,
Employee Recreation Center, 83 Red Schoolhouse
Rd, Fishkill, NY.
Ÿ Sunday Oct 12: Meriden ARC Nutmeg Hamfest,
Sheraton Four-Points Hotel, 275 Research Parkway,
Meriden, CT.
Now that we’re back from our summer break, we
have to begin planning upcoming events for the months
ahead. Bring any and all of your ideas and suggestions
with you to the September 2014 meeting, on Sunday
September 7, 2014 at 3:00 pm at Hudson Valley Hospital Center in Cortlandt Manor, NY. I look forward to
seeing each of you there.
- 73 de Greg, KB2CQE
PCARA Officers
President:
Greg Appleyard, KB2CQE, kb2cqe at arrl.net
Vice President:
Joe Calabrese, WA2MCR; wa2mcr at arrl.net
Contents
See you in September - KB2CQE
Adventures in DXing - N2KZ
Summer medley
External keypad - NM9J
Coaxial care - NM9J
1
2
6
9
12
Net night
Peekskill/Cortlandt Amateur Radio Association
holds a weekly net on the 146.67 MHz W2NYW
repeater on Thursdays at 8:00 p.m. Join net control
Karl, N2KZ for news and neighborly information.
PCARA members register at the entrance to ARRL’s
Centennial Convention in Hartford, CT on July 19.
PCARA Update, September 2014, page 1
Adventures in DXing
- N2KZ
Allons-y (let’s go)
Consider it a modern miracle: You board a plane
and, eight hours later, you are across the world. My
flight took off from Newark at 1:00 AM and delivered
me to Paris, France just before déjeuner (lunch time.)
Upon arrival, Americans in Paris need to adapt to their
new surroundings. It’s easy, if you know how!
Things have changed since I last visited Paris
25 years ago. Now nearly everyone speaks English
without hesitation and speaks it well. The atmosphere
is warm and welcoming. The overall demeanor is
casual and relaxed. All signs said ‘good times ahead.’ It
felt nice to be there.
First things first... When in France, you should
drive a French car. We rented a Renault Mégane, a
sporty five-door hatchback coupe. Driving was effortless. The French drive on the right side of the street,
just like in America, and the roads are refreshingly
smooth and well-kept. Even in the most rural areas,
axle-bending potholes are missing in action and road
debris is never to be seen.
The highways run fast with posted speed limits up
to 130 kilometers per hour (81 mph.) You’ll see lots of
French and German vehicles: Renault, Citroën, Peugeot
along with Mercedes-Benz and BMW. Volkswagens and
Fiats are fairly common, too. Once in a blue moon, I
would see a compact Ford but they were not easy to
find. One peculiarity was learning the concept of the
French ‘priority’ road regulations. Just because you are
rolling along on what seems like a major road doesn’t
mean you have the right-of-way!
Mégane’s megahertz
In any case, what is the first thing to do when
starting up a new rental car? Of course, the answer
must be ‘play with the radio!’ The front plate of the
radio provided
the ability to
scan two bands:
FM and longwave combined
with medium
wave. It seemed
like the only
way to create
Touchscreen of rented Renault Mégane. presets was to
first scan and
capture a station. There was no direct tuning to be
seen! I instantly found Paris’ only prominent medium
wave station, France Bleu, on 864 kHz and the two
megawatt France Inter outlet on 162 kHz longwave.
Long wave memories
Not until I headed north towards Normandy did I
hear radio in English. I had never experienced longwave broadcasting
before and it quickly
became my link to
world news and sports! I
quickly adopted two
new favorite stations:
BBC Radio 4 on 198
kHz and RTE Radio One
from Ireland on 252
kHz. Both can be heard
day and night nearly all
the way into metropolitan Paris and were loud
The Normandy American
and clear as I rode
Cemetery at Omaha Beach.
through the Normandy
countryside for the next
few days. I had no luck picking up BBC Radio Scotland
on 810 kHz with any consistency day or night. See? If I
had gone to Edinburgh instead, I wouldn’t have this
problem!
The penetration of longwave is hard to believe.
Some stations simply would not die! Using my trusty
Sony ICF
SW7600GR portable, I even
heard the BBC
on 198 inside a
hotel room at
Charles de
Gaulle Airport
ensconced by
concrete and
steel! Another
remarkable
Normandy beaches.
station was on
153 kHz, Deutschlandfunk from Donebach, Germany,
blazing a cool 500 kW. I quickly added it to my ‘can
hear it anywhere’ list.
Sussex signals
Discovering my first two English language longwave stations was only the beginning! On day two of
my trip, I stumbled across true manual tuning on my
car’s radio. I had to remind myself that it is now the
year 2014. Tuning knobs don’t exist anymore. Radios
are tuned via the touchscreen on your dashboard! I
drilled down a few menus under the ‘Media’ folder and
found my way to a touch and tune screen where I
could create presets for any frequency I wished regardless of being able to pick it up. A major breakthrough!
You’ll find lots to listen to in English, if you know
where to find it! Driving into the town of Honfleur, just
PCARA Update, September 2014, page 2
outside the
major port of
Le Havre, I
started
hearing all
sorts of British
stations
beaming
across The
English
Channel
broadcasting
from nearby
Sussex. Dominant on
medium wave
was Smooth
Radio on 945
MF and LF Transmitter sites in southern
England (tower symbol) heard by Karl in kHz with a
France, including Bexhill 945/693 kHz.
pleasant
oldies hits
format. The first weekend we were there, Smooth was
featuring an all-American Motown weekend. Perfect!
BBC Radio 5 Live
outlets on 693 and
909 kHz were also
easy to receive.
During the middle of
the day, these two
BBC outlets would go
through long dramatic fades and phasing but never
losing their signal strength — probably due to multiple
transmitter sites operating in synchronicity. These were
great big emissions of RF. No matter what mix of propagation came their way during the day the muscle of
BBC’s signals held on tight and never let go. You’ll
never witness this kind of dominance in the USA. Our
limit is single transmitters at 50,000 watts. We don’t do
megawatts. The Europeans certainly do!
in-between could be logged. CW was quite alive and
well especially on 20 and 40 meters. I even heard a 25
watt NAV-aid beacon, LHO from Le Havre, on 346 kHz
longwave.
If I haven’t yet convinced you to bring a general
coverage receiver with you when visiting Europe, let
me add this: Many, many North American radio station
Internet streams are geo-blocked across the pond. Don’t
expect to hear Newsradio 88 WCBS overseas. One
exception is National Public Radio in the clear,
imported from America via the web, but you also have
to consider the time difference. Wake up in the
morning to shave and shower in France and you’ll
quickly notice it is about 1:00 AM in the morning on
the east coast of the U.S! American morning drive time
starts right around lunch time in Europe!
English channel
I later came to appreciate other U.K. music stations that could be heard at night like Absolute Radio
on 1215 kHz and Capital Gold from London on 1548
kHz. Remember Europe follows a 9 kHz channel standard instead of the 10 kHz spacing familiar to North
Americans, hence odd-looking (to us) operating spots
like 198, 693 and 909 kHz. Check your portable radio’s
manual before you leave home. Many receivers can be
converted to a 9 kHz standard with just a couple of
hidden button pushes.
I am pleased to report that there is no lack of
amateur radio operators in Western Europe. Using just
a few feet of wire as an antenna, I heard many operators in SSB, CW and RTTY without any trouble. Italy,
Great Britain, Sweden, Poland, Spain and everything
Euro-power
French household A/C power is different than
what you are accustomed to in America. You won’t find
plugs with flat blade connections here. A/C plugs
French modulation (FM)
French FM radio really reminded me of America.
Of course, everything is spoken en français, but they
have our act down and know it well. Jingles, sounders,
hot talking DJs, commercial clutter… yes, it’s all here
too, just like at home. [‘Sounder’ = short musical
sequence to identify a station or network –Ed.]
In Paris, there are dozens of FM stations to choose
from. Very popular with mature adults is RTL, the
descendant of the legendary Radio Luxembourg, with
an interesting mix of thoughtful talk and eclectic music.
Think of RTL as a peppy and energetic
full-service station.
French young adults prefer all hit
stations like NRJ. Nouvelle Radio des
Jeunes, (literally ‘New Youth Radio,’)
always has enough N R J to reach the
top of audience ratings.
One station really made me
smile: Music Box on 92.8 FM in Paris. Format? New
American Country! Rest assured, there is plenty of
Blake Shelton to hear in Paree. Amazing!
French power outlet has ground connection pointing
outward.
PCARA Update, September 2014, page 3
feature two sturdy round pins going into the wallplate
and one round pin coming out of the wallplate for
ground (earth.) The two main pins are slightly different
in size and not centered on the face of the round plug
making it impossible to insert it upside down inverting
neutral and hot. French A/C plugs make a very firm fit.
Here the standard is 240 volts instead of North America’s 120 volts.
If you are only interested in powering your computer or cell-phone, you may only need a simple
passive plug adapter. Many high-tech power supplies
can accept voltages from 100 to 240 volts without any
problem. Read the fine print on your device carefully to
decide. Active 240 to 120 voltage converters are easy
to find and inexpensive, but don’t expect to power a
hair dryer, coffee pot or other high current device with
it. A/C current runs at 50 not 60 cycles per second in
France. Your American clock will keep really odd time
if you try it in Europe! Also, remember that Wi-Fi is
pronounced ‘Wee-Fee’ when you ask for it in Paris.
La télévision
French television has improved vastly since the
advent of digital. Back in the days of analog, the
French used a very complex television standard called
SECAM, Séquentiel Couleur à Mémoire, (literal translation: ‘sequential color with memory’) that depended on
the local 50 Hertz alternation of A/C power. The result
was a stunningly beautiful picture with perfect color
fidelity and hue but the most annoying 50 Hertz
picture flicker since viewers first saw primitive movies
in theaters!
New widescreen digital TVs have a much faster
refresh rate than 50 cycles and now the flicker is gone.
Most everyone receives TV via satellite. All channels
ride on a multiplex
called TNT (Télévision
Numérique Terrestre)
also available in most
places over-the-air on
UHF. In France, the
UHF antenna design
of choice is a long
Yagi with a corner
reflector.
L’antenne
French UHF TV
antennas have a look
that distinguishes
them from all others.
Sometimes you’ll see
modified Yagi designs
that feature three
sticks coming out
Yagi antennas for French UHF TV
from the corner reflector (instead of one director stick
like you’ll see in North America) to optimize reception
on different
narrow UHF
bands. They
also can tilt up
and down
from true horizontal. Tilting
is quite
popular in the
neighborhoods
near the Eiffel
Tower where
UHF Yagi antenna with three rows of
the target trans- directors, tilted upward.
mitters are literally up in the sky for viewers to catch.
Look carefully up on
top of buildings wherever
you go and you’ll see a
little bit of French TV history. Most all terrestrial
broadcasts seem to now be
on UHF in horizontal polarization. There are still
some remnants of much
older upper VHF antennas,
still surviving on rooftops,
in both polarities — vertical and horizontal. I’ll bet
the oncoming of digital TV
pushed the French above
300 MHz just like in North
America.
Some things really
made me think. I saw two
types of FM radio antennas
on rooftops. One was a
Vertical S-loop FM antenna
hula-hoop like design
similar to those used by FM
transmitters in the USA. Want to really scratch your
head in wonder? The French also use FM band S-loop
antennas… but they mount them vertically. It makes a
very unusual visual to this DXer’s eyes!
The best quiz
was sitting down to a
French computer and
trying to negotiate an
‘AZERTY’ format keyboard. Just try to find
and type an ‘@’ sign
— or — look for a
dot for your dot-coms
or dot-frs (for
Detail of a French ‘AZERTY’
France!) It’s really
keyboard.
interesting!
PCARA Update, September 2014, page 4
Keep your eyes open
wherever you go! In a
museum dedicated to the
Normandy invasion, I
found a Morse code key
not hooked up to a transmitter but a naval signaling
light. Cool!
Networks
The premiere network
in France is TF1 watched
by almost a third of all
World War II signaling light
viewers at any given
with Morse key.
moment. It is literally
channel one on the TNT
delivery system and is a high profile first-class network
in every respect. Big events always seem to appear on
TF1. World Cup soccer on TF1 looked positively stunning on the flat-screens I saw everywhere we went.
Also available are a complete set of state-owned
channels: France 2, France 3, France 4 and France 5 all
with their own personalities. Canal+ (pronounced
Canal Plus) is
the French
version of HBO
and is the foremost subscription service in
the country.
You’ll know
right away if
someone is a
subscriber. A
Canal+ decoder
box is a beautiCanal+ decoder box below Philips TV. fully stylized
black contrasting with white box with a distinctive European look
and is a regular companion to French flatscreens.
Dozens and dozens of alternate channels fill up the rest
of the French TV spectrum. There is never a shortage of
TV programming to watch in France!
Expect to see quite a variety of international television when you stay at high end hotels, especially in
Paris. On your TV menu you’ll find the BBC, Germany’s
WDR, NHK from Tokyo, CCTV from Beijing, TVE Spain,
RAI Italy, and even stations from the Middle East and
South and Central America serving a wide variety of
tourist’s tastes.
C’est la vie (green)
French society should be applauded for their green
approach to daily life. Many, many French automobiles
rely on diesel fuel (sometimes called gaz-oil) for excep-
tional mileage.
In Paris, you’ll
also see innovative all-electric Autolib’
Bluecars
charging their
batteries along
many streets.
Become a subscriber to
Autolib’ and
you can travel
green from
point to point,
on demand,
Pininfarina Bluecar recharging from an
whenever you
Autolib’ port in Paris.
need a car.
Automatic
motion-sensing light switches are installed everywhere
you can imagine to conserve every possible electron.
Move around a little while you are in a public hallway
or bathroom or you will find yourself in the dark! Even
the toilets themselves have two plunger buttons on the
top of the water holding tank for a light or full flush to
conserve usage.
One thing that caught my
eye was a can of 3-In-One oil in
a Paris hardware store labeled
‘3-En-Un.’ Rest assured, WD-40 is
still called WD-40 in France!
Nearly every store had a big
‘SOLDES’ sign in their front
window declaring to everyone
that an amazing sale was going
on.
French oil.
Après tea
You may want to snack during the afternoon. Restaurants don’t even begin to serve dinner before 19h 30
(7:30 pm). Save room for dessert! The pastries and
breads are outstanding and creatively presented everywhere you go. Also, be prepared: The French still love
to smoke cigarettes and you’ll smell tobacco all over
town.
When you are not listening to the radio or trying
to DX terrestrial TV, you should spend some time visiting all the spectacles you’ll find in France. To me, leisurely visits to Paris’ art museums are comparable to
making a pilgrimage to church. Enjoy the beauty you
will find at The Louvre, The Musée d’Orsay, The Rodin
Museum and the renovated Orangerie. It’s only the
beginning!
Cathédrale Notre Dame, Centre Georges Pompidou
and the Opera House should all be on your must-see
PCARA Update, September 2014, page 5
list. After dusk, The Eiffel
Tower is lit with a warm
orange glow. At night, at
the top of every hour, there
is a spectacular display featuring hundreds of little
strobe lights covering the
tower with star bursts.
What a show! and what a
view from the top!
enjoyed the day. Outdoors the weather was pleasantly
cool for July and there were plenty of vendor tables.
Inside the main pavilion were a number of commercial
vendors — along with a table containing much equipment for sale by Ray, W2CH. (Ray and Marylyn’s table
has been a feature of several hamfests this year.)
Au revoir
Enjoy France and don’t
Eiffel Tower by daylight.
forget your general coverage radio! You have to
experience the wide area coverage and all the new
challenges of DXing long wave! On my next visit, I’ll
need to arrange the aid of some devoted TV/FM DXers
and radio amateurs to bring my reception to the next level. It is difficult to
discretely disassemble hotel TV installations so you can experiment!
France: Merci beaucoup pour la
belle visite. Au revoir de N2KZ ‘La
Vieille Chèvre.’ 73 et dit dit.
Summer medley
During the annual summer break months of July
and August, there have been quite a few events involving PCARA members.
July in Augusta
On Sunday July 13, the Sussex County Amateur
Radio Club Hamfest took place at the County Fairgrounds in Augusta, NJ. It isn’t the easiest place to find
thanks to the distance from major highways — nevertheless several PCARA members made the journey and
Henry KB2VJP checks out a cable on offer at the Sussex
County ARC Hamfest on July 13.
Indoor pavilion at Sussex County ARC Hamfest included a
table where Marylyn KC2NKU and Ray W2CH were selling.
Classy Centennial
One week later on Saturday July 19, PCARA
members joined in multiple carpools to visit the ARRL
National Centennial Convention at the Connecticut
Convention Center in Hartford. Saturday was the final
day of an enjoyable three-day event with talks and presentations from many famous radio amateurs. Your
editor enjoyed the talk by Riley Hollingsworth, K4ZDH
“What we owe the amateur service” followed by a presentation on “Software Defined Radio for Beginners” by
Stephen Hicks N5AC of Flex Radio Systems.
One floor of the Convention Center was dedicated
to an extensive exhibition by a large number of
amateur radio manufacturers, vendors and organiza-
Lovji, N2CKD checks the HF transceivers on show at ARRL’s
Centennial Convention in Hartford, CT on July 19.
PCARA Update, September 2014, page 6
tions. Just
about every
name you are
familiar with
from the
advertising
pages of QST
had a presence, and
many commercial vendors
were doing
good business.
PCARA
members were
busy checking
out all the
latest equipment from
Kenwood,
Yaesu and
Joe WA2MCR inspects high power
amplifiers at the Ameritron booth in
Icom, which
was on display ARRL’s Centennial exhibition area.
with antennas
connected, ready for a test-drive.
In the area dedicated to overseas radio clubs, I paid a visit to the
Radio Society of Great Britain’s
booth, where I met RSGB President
G3WKL. Incidentally, RSGB celeRSGB-ARRL pin.
brated its own Centenary in 2013.
NM9J/G3VNQ visits the RSGB booth at ARRL’s Centennial
Exhibition, manned by RSGB President Dr John Gould
G3WKL and Mark M1MPA.
Highway to Headquarters
Your editor and Joe WA2MCR joined one of the
bus tours to ARRL Headquarters in Newington, which
is only five miles from Hartford. We signed in then had
a good look around the Headquarters Building — I
even had a chance to chat with the Editor of QST, Steve
Ford WB8IMY. Editing a 170 page national journal is a
much larger undertaking than our little newsletter!
Sitting in the editor’s chair at ARRL HQ was Steve Ford
WB8IMY, editor of QST.
Joe and I also paid a visit to W1AW, the Hiram P.
Maxim Memorial Station, in the grounds of ARRL
Headquarters,
where ARRL
news bulletins
and code practice transmissions are
produced. The
‘studios’ were
all busy with
licensed visitors operating
under the
W100AW commemorative
callsign.
W1AW has an
impressive
array of equipHiram Percy Maxim Memorial Station
ment, feeding
W1AW at ARRL HQ [photo by W2CH].
antennas you
can only dream
about.
Back at the Convention Center in Hartford, after
the impressive closing ceremony, I was left wishing that
we could hold Centennial Conventions more often than
once every hundred years! Congratulations to all concerned on a fine event.
Newington revisited
Most people agreed that the short tour of ARRL
Headquarters and W1AW did not give enough time to
PCARA Update, September 2014, page 7
take everything in — so on August 9, Ray W2CH and
Marylyn paid another visit to Newington. They thought
they would tour ARRL HQ before lunch with volunteer
guide Skip, W1FTE, but then one of the studios —
with an Icom IC-7700 for 20 meters — opened up, so
they went back to the W1AW building to operate as
W100AW for an hour.
Ray and Marylyn outside the W1AW building [W2CH pic.]
They had some contacts in the Extra and General
portions of the 20 meter band, with stations happy to
work them using the special Centennial call of
W100AW. So before lunch Ray and Marylyn had
already qualified for their official certificate, signed by
station manager Joe Carcia NJ1Q to say they had operated W100AW as part of the ARRL 100 Year celebrations. After lunch they returned to W1AW, operating
On the way home, our intrepid pair paid a visit to
Lentini Communications in Berlin, CT. This is an
amateur
radio store
and a
music
store.
During the
trip, Ray
was trying
out his
Ray’s Leixen VV-898 compact 144/440 MHz
latest
acquisition mobile transceiver runs 4/10W output.
from the
far east, a Leixen VV-898 dual band mobile transceiver.
Footnote: If you decide to pay your own visit to
W1AW, be sure to check the opening hours and take
your amateur radio license along with you in order to
operate at the station.
High in Haledon
A few weeks later on Saturday August 23, it was
time for the Ramapo Mountain ARC Hamfest, which is
now in its fourth year at Camp Veritans, Haledon, NJ.
This is an
excellent location, with an
indoor building for the
commercial
vendors —
including KJI
Electronics —
plus leafy
glades providing welcome
shade for the
outdoor flea
market tables.
Ray and
Marylyn had
an outdoor
space, selling
radio equipment at this
Bob N2CBH and Mike N2EAB check out
year’s Haledon W2LCN’s 13 cm mesh network at the
event. The
Ramapo Mtn ARC Hamfest on August 23.
location is a
little difficult
to find, so be sure to bring your GPS and a good map.
W100AW Operating certificate.
- NM9J
20 meters, with the beam on Europe, where they
worked a number of stations from the UK and Ireland,
around to OE4BHA in Austria (in German) and
UA1AML in Saint Petersburg, Russia.
PCARA Update, September 2014, page 8
External keypad
pin 6 (GND) of the 8-pin round microphone plug when
a memory button is pressed.
If you have an Icom HF transceiver, then you
might find this project of interest — build yourself an
external keypad for around $34.00.
Key memories
Recent Icom HF transceivers — such as the
IC-7410A and IC-7000 — have a built-in electronic
memory keyer capable of storing up to four messages.
Some models also have a voice keyer to record short
voice announcements. The memory keyer can be
helpful for sending your callsign and standardized
contest exchanges — for example “CQ CQ de W2NYW
W2NYW” and “2A ENY”.
Calling up the stored memories is carried out using
“soft keys” positioned around the display. You need to
be in the correct part of the radio’s menu system before
these options appear. On the IC-7410, the sequence is
to select “CW” mode, press the “Menu” button to reach
Menu M1, press the F-4 “KEY” selection, then press the
F-2 “SEND” function-key. The four memory keys “M1”,
“M2”, “M3” and “M4” then appear on the display. This
Icom IC-7410 display showing “MENU” key and function
keys F-1 to F-5, ready to send from the four CW memories.
is not very convenient, especially if you want to use the
function keys for some other purpose such as the Band
Scope.
Plug-in shortcut
Fortunately, Icom allows connection of an external keypad to call up memory keyer contents at any
time. This keypad is normally plugged into the transceiver’s “MIC” connector, which will either be a screwon 8-pin round type or an 8-pin modular jack type.
Icom does not sell a suitable external keypad as an
accessory for their HF transceivers but they do provide
the circuit diagram for an external keypad in the
IC-7410 Instruction Manual — four different resistor
values are connected between pin 3 (UP/DOWN) and
Schematic from Icom IC-7410 User Manual for an External
Keypad that can access the four stored memories.
In recent years,
the “BetterRF Company” sold an “i-Mate”
external keypad for
Icom radios. The
i-Mate cost $85 and
was wired between the
existing microphone
and the radio’s MIC
connector. Unfortunately BetterRF does
not seems to be in
business any more.
The i-Mate external keypad was
manufactured by BetterRF.
Do it yourself
I decided to build my own external keypad, but
first I needed a suitable case for mounting the microphone connectors plus the four push-buttons for selecting memory contents. At a recent hamfest I had spotted
an MFJ-1251 “Universal Microphone Converter”. This
is a small
metal box
with front
panel connectors for both
an 8-pin
round microphone plug
and for an 8pin modular
plug. Separate
cables are provided for conMFJ-1251 Microphone Control
necting the
Center from MFJ Enterprises.
adapter to either
type of MIC
socket on the radio. The MFJ adapter allows one manufacturer’s microphone to be used with another manufacturer’s radio, which is often wired differently.
Headers and jumpers inside the case allow for a variety
of interconnections, so that (for example) an Alinco
microphone with a modular plug could be used with an
PCARA Update, September 2014, page 9
Icom radio having an 8-pin
round MIC socket. I thought the
MFJ-1251 would provide a good
basis for my external keypad.
At the ARRL Centennial
Convention in Hartford I purchased an MFJ-1251 adapter
from MFJ’s own booth. The price
was $29.95. Next day I purchased a packet of four momentary pushbutton switches from
Radio Shack — part number
275-1547, price $3.99. These
are the ‘normally open’ type.
Total so far — $33.94.
Radio Shack
momentary pushbutton switches.
The right connections
The first task was to evaluate the circuitry of MFJ’s
Universal Microphone Adapter. MFJ provides an
Instruction Manual containing the schematic plus connection diagrams for various combinations of microphone plug and radio manufacturer. My plan was to
use the Icom radio’s original HM-36 microphone with
the matching 8-pin round MIC socket on the Icom
transceiver. Unfortunately that straight-through combination is not included in the manual. (Not unexpected
though!)
Careful examination of the schematic showed that
MFJ selects four wires coming in from the microphone
for MIC-GND, MIC-AUDIO, MIC-PTT plus the 8 volt DC feed
to power any microphone circuitry, labeled THRU/PASS.
These four lines are then connected through appropriate jumpers
to the correct
pin-numbers
on the radio’s
“MIC” connector for:
RADIO-MICGND, RADIOMIC-AUDIO,
RADIO-PTT
and the
THRU/PASS
+8V DC line.
The black
ovals in the
diagram
alongside
MFJ-1251 jumper settings for an Alinco
modular-plug microphone connected to an show the
Icom radio with an 8-pin round MIC input. (default)
jumper settings for an Alinco modular microphone plug connected to an Icom 8-pin round MIC connector.
In order to arrange a “straight through” microphone connection for Icom-to-Icom, all you have to
do is combine
the left-hand
side of the
diagram for
your microphone connector with
the right
hand side of
the diagram
for your
radio’s MIC
connector.
See the
accompanying picture
Modified jumper settings for an Icom 8-pin
for an
round microphone connected to an Icom
radio with 8-pin round MIC input.
example for
“Icom 8-pin
Round Microphone Connector” combined with the
diagram for an “Icom 8 pin
Round Radio”.
(For readers who
might have an Icom radio
with an 8-pin modular
jack, I have provided a
smaller diagram for “Icom
Modular Microphone ConJumper settings for an Icom
nector” to an “Icom
Modular Radio”. I have not modular microphone plug
connected to an Icom radio
been able to test this
with modular MIC input.
arrangement myself.)
Step-by-step
In order to setup an MFJ-1251 adapter for a
straight
through connection, first
move the
jumpers from
their default
settings onto
new headers
as shown in
the appropriate diagram
— see the
photo alongside for an
example. You
MFJ-1251 with modified jumper settings
for an Icom 8-pin round microphone plug should then
carry out a
to an Icom 8-pin round MIC connector.
continuity
check with a multimeter on its ohms position to
confirm the connections from the 8-pin round micro-
PCARA Update, September 2014, page 10
phone connector on the front panel to the 8-pin round
microphone plug on the supplied cable. The important
pins to check are:
1. Microphone input
2. +8V DC output
5. PTT
6. GND (PTT ground)
7. GND (Microphone ground)
Next, you will need to drill four holes for the
momentary switches in the lid of the MFJ-1251 case.
For the Radio Shack switches, holes should be 17⁄64"
diameter and spaced 5⁄8" apart. Position the line of holes
equidistant from the front panel and rear panel to
avoid other components inside the metal case.
Mount the four Radio Shack switches in the holes,
then solder connecting wires and four resistors to the
switches as shown in Icom’s circuit for an external
keypad. The resistors I used — 1.5 kΩ (two off), 2.2 kΩ
and 4.7 kΩ, 1/8 watt — came out of my junk box.
up photo and accompanying diagram.
The Icom HM-36
microphone has two
buttons on top labeled “UP”
and “DOWN” for changing
frequency and memory
channel. I wanted these
Pinout and wiring of the
buttons to continue operaunused modular jack
tion when connected
position “J2” on the
through the MFJ-1251 adapter.
MFJ-1251 PCB
The UP and DOWN buttons
(component side).
work in a similar way to the
memory keyer buttons — the
DOWN button connects MIC pin 3 through a 470Ω
resistor to ground (pin 6) while the UP button directly
grounds MIC pin 3.
Icom 8-pin round microphone connections as seen from
the front panel. (From the IC-7410 Instruction Manual.)
The four momentary push-button switches and four resistors
are mounted in the lid of the MFJ-1251 metal case.
The components mounted in the top cover have to
be wired to Pin 3 and to Pin 6 of the 8-pin round
microphone connector output. The easiest way to do
this is to employ the empty position “J2” which is provided by MFJ on the circuit board for an additional
modular jack socket, but which is not used in this particular product. J2 is
located just
beneath the
front panel
8-pin round
connector.
Access for soldering to J2 is
available if
you gently
Close-up shows two wires from the case- push the
round conneclid switches soldered to the empty RJ45
modular jack position “J2”, at the pin 3 tor wires out
of the way —
and pin 6 locations. (Pin 1 is closest to
camera.)
see the close-
All you need to do to arrange for continued
UP/DOWN operation is to connect pin 3 of the 8-pin
round MIC connector on the MFJ-1251 front panel to
pin 3 of the empty modular jack position “J2”. A short
length of wire can be soldered between the appropriate
pins. J2 pin 3 should already have one of the wires
from the four push-buttons connected to it via 1.5 kΩ.
Final check
Before you plug the modified MFJ-1251 into your
expensive Icom radio, take a moment to verify all the
connections using an ohmmeter. There is a chance of
damaging the radio if the +8V supply has been wired
incorrectly. Pins 1, 2, 3, 5, 6 and 7 on the front panel’s
round connector should be connected straight through
to the same positions on the 8-pin round plug. Pins 6
and 7 (GND) will be connected to each other. In addition, you should check the resistance between pin 3
and pin 6 when each of these buttons is pressed — the
ohmmeter reading should be as follows:
M1 button
M2 button
M3 button
M4 button
Freq DOWN
Freq UP
PCARA Update, September 2014, page 11
1.5 kΩ
3.0 kΩ
5.2 kΩ
9.9 kΩ
470 Ω
0Ω
If all is well, plug your microphone into the modified MFJ adapter, then plug the adapter cable into your
Icom transceiver’s MIC socket. Before you check operation, you will need to enable “External Keypad” capability using
the radio’s
“Set Mode”
menu. For the
IC-7410, hold
down the
“Menu” button
to enter Set
Mode, then
choose menu
item 37,
“External
Keypad” and
change from
External keypad with the four memory
the default
buttons M1 - M4 suitably labeled.
“OFF” to
“KEYER
SEND” by rotating the VFO dial control. For enabling of
other Icom models, check your radio’s Instruction
Manual.
Make sure that the four keyer memory buttons are
working correctly, along with the normal functions of
the microphone — PTT, UP, DOWN and microphone
audio. If you are using a headset which requires
receiver audio from the radio, you will also need to
manually wire pin 8 (center pin on the round microphone connector) through to pin 8 on the output connector in a similar manner to the wiring for the
UP/DOWN buttons.
Ready for some CW! The external keypad based on an
MFJ-1251 is shown in-line with the Icom HM-36 hand
microphone and cabled to the Icom IC-7410 8-pin round
MIC input at bottom left.
Choose your Icom
Bear in mind that different Icom HF transceivers
may need some modification to these instructions,
especially if the radio has a modular MIC jack. Check
the radio’s Instruction Manual for connections to the
microphone, for suggested circuitry of an external
keypad and for the “Set Mode” menu item that will
enable the external keypad. Icom models with a
memory keyer include the IC-746 Pro, IC-756 Pro 2
and 3, IC-7000, IC-7100, IC-7410, IC-7600, IC-7700
and IC-7800. The high-end IC-7700 and IC-7800 have
a separate 3.5mm stereo input jack for their external
keypad.
Best of luck with this little project! My own external keypad has already been put to good use for some
DX CW contacts.
- NM9J
Coaxial care
After this year’s Field
Day, I had several coaxial
cables that needed attention.
This prompted some
thoughts on the general care
of coaxial feeders for the
radio amateur.
Parts of a single-shield
coaxial cable.
PL problem
The first item needing attention after Field Day
was a 100 ft length of RG-213/U cable that had caused
grief for the 6 meter station. A quick check with my
Fluke digital multimeter revealed that the outer conductor was disconnected at the antenna end. Since the
cable was full-size 0.405" outer diameter, I did not
attempt recovery of the connector. I simply hacksawedoff the cable with the old connector and prepared the
end for soldering on a new PL-259.
Need to solder
Detailed instructions
for soldering standard
PL-259 “UHF-series” connectors with and without
adapters are available in
several places including
the ARRL Handbook, the
Antenna Book and from
the Amphenol web site:
http://www.amphenolrf.
com. Don’t forget to
thread the coupling ring
onto the cable before you
start work on the connector body!
PCARA Update, September 2014, page 12
PL-259 connector assembly.
In my opinion, the most important factor for successful installation of a PL-259 connector is a soldering
iron with sufficient power and thermal mass to
bring the connector body up to temperature quickly.
This will create a good soldered joint through the four
holes in the connector body through to the pre-tinned
outer conductor. A Weller solder gun is not sufficient
for this task —
you need a large
iron that takes a
while to warm
up in order to
solder the outer
braid. A smaller
Esico 6150 150 watt soldering iron
iron can be used
has large thermal mass in the tip.
for the center
conductor.
Try to avoid outdoor breezes which will remove
heat from the soldering iron and connector. Do not
apply too much heat to the outer conductor or you will
melt the polyethylene dielectric insulation that separates the inner and outer conductors. Melted insulation
could allow conductors to move, introducing an impedance bump or — worse — you might short the inner
and outer conductors together. One suggestion for preventing damage is to cool the connector body immediately after
soldering by
wrapping with
a damp cloth.
Another
recommendation for successful
soldered connections is to PL-259 connectors with just enough
only use best- solder in the four solder holes to make a
quality silver- good bond between connector body and
plated brass
braid. Center conductor is soldered inside
PL-259 plugs. the center pin.
They are
easier to solder than the cheaper nickel-plated variety
and maintain a more reliable connection. Good quality
connectors are worth their weight in silver.
Prehistoric procedure
In my humble opinion, our continued use of solder-on “UHF-series” connectors in amateur radio is a
throwback to World War II technology. The “UHF”
coaxial connector was invented by Amphenol engineer
E. Clark Quackenbush in the 1930’s, when UHF meant
anything below 5 meters.
In RF terms, the PL-259/SO-239 design is little
better than a 4mm banana plug and socket with some
shielding wrapped around it. The resulting impedance
bump makes it unsuitable for use on modern UHF fre-
quencies above
300 MHz.
The procedure for soldering the
outer conduc“Little better than a banana plug and
tor of a PL-259 socket with shielding wrapped around.”
is fraught with
problems as you cannot see what is happening inside
the connector body, and you cannot easily disassemble
a soldered connector to check the innards. Production
of a successful soldered joint in the typical amateur
radio shack requires a lot of experience, the correct
equipment and a certain amount of luck. If you still
insist on soldering your PL-259s, there are some excellent hints from Alan K0BG at the following web page:
http://www.k0bg.com/coax.html.
Crimping your style
An alternative to the traditional solder-on PL-259
is the use of crimp-on connectors. You will need to
exactly match the connector size with the diameter of
the coaxial cable as there are no small-diameter adapters for crimp connectors. You will also need a powerful
crimping tool with the correct size die for the connector. Good quality crimping tools are relatively expensive — $50.00 to $150.00 — and crimped connectors
cannot be re-used. Depending on how many PL-259
connections you need to make in a year, it might be
more economical to purchase ready-made cables with
the connectors already installed.
Cold compress
Another alternative to soldering PL-259 connectors
is the type of fitting with a pressure sleeve, similar
to N-type and BNC coaxial connectors where the outer
braid is pushed over a metal clamp or ferrule, then kept
in place by a compressed rubber gasket. In the USA,
these are known as “clamp” connectors while in
Europe they are called compression fittings.
During my
time in England, I
purchased compression-style UHF
connectors made
by UK companies
“Greenpar Connectors Ltd” and
“Coline Connectors
Greenpar sleeve connector has a top-hatLtd”. They were
shaped sleeve that slides under the braid.
easy to install and I
still have a few in
use today. The key design feature is the top-hat-shaped
brass ferrule or sleeve which is pushed under the outer
braid and jacket of the cable. When the clamp-nut is
PCARA Update, September 2014, page 13
tightened, it compresses the silicone rubber gasket
against the cable and pushes the ferrule’s flange tight
against the connector body. This produces an excellent
connection of great strength without having to solder
the outer braid.
Coline is no longer in business, while Greenpar
has been absorbed by Tyco Electronics. Tyco / Greenpar connectors can be
obtained from distributors
such as Mouser and
Digikey. Similar Multicomp
‘clamp’ connectors are available from Newark Electronics and from “The RF
Multicomp “UHF Straight
Connection” in Gaithersburg, plug clamp” MC17-01F-5
MD, http://www.therfc.com.
Here are some part numbers:
Tyco/Greenpar
RG-58 male 1-1337473-0
RG-213 male 1-1478234-0*
RG-58 female 1-1337652-0
Multicomp
MC17-01F-5
MC17-01B-5
17-26F
RF Connection
RFC17-01F-5
RFC17-O1C
SO-239/RG-58
*obsolete
Casual coax
Coaxial cable used for portable operation and
special events needs special care. Stored cable should
be rolled up and
kept in a dry
environment
between activities.
There are
two recommended methods
— in the
over/under
technique, alternating loops of
Coaxial cable coiled up using the
cable are coiled
in opposite direc- “Over/Under” technique.
tions. There are
instructions on the following web site:
http://techno-fandom.org/~hobbit/flipcoil/howto.html.
Straight
coiling.
The alternative technique — which I
prefer — is straight coiling, where the
loops of cable are all coiled in the same
direction, just as though a hosepipe was
being wound onto an imaginary spool or
drum. Straight coiling is easy to learn and
fast to implement — important factors
during any Field Day teardown.
You should never wrap cable around
your elbow like a rope or a skein of wool
— or try to wind it into too small a loop.
Once the cable is suitably coiled up,
use Velcro cable ties to keep the coil together until it is
needed again. Be proud of your coiled-up cables!
Don’t store your coaxial cables in a tangled mess. Roll up
neatly and use Velcro cable ties to keep the turns together.
Tie me up
One advantage of Velcro-brand hook-and-loop
cable ties is the oblong hole
at the wider end of the
strap. By inserting the
rounded end through the
hole, the tie can be permanently attached to the cable
so it cannot be lost.
Velcro cable tie.
Tangled web?
Out in the field, the cable should be unrolled in
the same way it was coiled. With the over/under
technique, loops of wire can be pulled off or thrown
out straight from the coil. But you must take great care
not to pull cable off the wrong side of the coil or it will
become thoroughly knotted.
With the straight coiling method, cable should
be unrolled in a straight line, just as though it was still
wrapped around a large cable drum. Do not pull coils
off the top of the reel, or you will end up with a seriously twisted cable.
The reason for all
this care with coiling
and unwinding cable is
to avoid twists, kinks
and other strains that
might compress the
dielectric insulation,
open the braid or shift
Coax with a kink.
and break the conductors. Compressing the
dielectric will introduce an impedance bump and might
cause shorting between inner and outer conductors.
You should also take care not to damage the outer
jacket, as this could allow water to enter — there is a
later section describing the reasons for keeping your
cable dry.
PCARA Update, September 2014, page 14
It’s a stretch
If you are installing coaxial cable
permanently on a mast or tower, additional precautions are needed to
ensure long-term reliability. Coaxial
cable cannot support its own weight —
this is especially true of the larger
diameter cables. If you suspend a long
vertical run of cable, there is a danger
of the outer sheath, braid, polyethylene dielectric and inner conductor all
moving relative to each other. The
result could be breakage of a conductor or pulling the center-pin out of a
connector.
Because of this weight problem, it is inadvisable to
pull the end of a long cable straight up a high mast or
to lower a long length of cable from the top of a tower.
Instead, the whole coil of coaxial cable should be taken
up the mast, the end of the cable secured, then the
remaining feeder should be unrolled down the mast,
and fastened at frequent intervals. Use black cable ties
that are rated for outdoor exposure and do not overtighten, or you might distort the cable. Be careful when
bending the cable around a corner — the minimum
bend radius for RG-8 and RG-213 is approx. 3" to 4",
while for RG-58 it is 2". If the cable feeds a rotary
antenna, leave a large loop around the rotator to avoid
strain and excessive bending. Stranded cable is best for
the rotator loop.
All threaded connectors used outdoors should
have the coupling ring tightened with pliers — handtightening is not sufficient to ensure a reliable connection through multiple temperature cycles.
Dangerous when wet
Whatever style of coaxial connector you choose,
no design is 100% waterproof. When connectors are
used outdoors, there are two dangers — first, water
might enter the area between plug and socket, corroding the electrical contacts. Second, water could be
drawn into the cable’s stranded wire through wicking
action, corroding both inner and outer conductors. If
the dielectric insulator is porous — for example the
foamed polyethylene inside RG-8X — then water can
be absorbed, changing the dielectric constant and
increasing losses. Coaxial cable with corroded conductors or with water dripping out of the end is a total loss
and must be replaced. The last thing you want to see
on the copper braid is a coating of green verdigris!
Bear in mind that a high-loss coaxial cable can
show a perfect 1:1 VSWR at the transmitter end, even
when there is a badly mismatched antenna at the far
end.
Run the tape
Coaxial
connectors used
outdoors
should be protected with a
plastic boot
and/or by
wrapping the
joint with
plastic tape. A
suggested treatment for permanent
installation is to
use a self-amalgamating tape
such as Scotch
2228 rubber
mastic tape
Coaxial connectors exposed to the
wrapped
weather should first be wrapped with
around the cona self-amalgamating tape such as
nectors with overScotch 2228.
lapping layers,
followed by a top
layer of Scotch Super 88
electrical tape for protection against wear and
abrasion. These products are available from
Home Depot. Aim to
cover all gaps where
water might enter the
connectors, wind the
tape so that any future
gaps point downward
and leave a “drip loop”
at the end of the cable
run so that rainwater is
shed before it can get
near a connector.
If you need to
Self-amalgamating tape should
bury coaxial cable
underground, there are be covered with a layer of vinyl
tape for mechanical protection.
additional requirements to keep the cable
dry on the inside. Check the ARRL Antenna Book for
details.
Long term investment
With the current cost of quality coaxial cable and
connectors, you will want your investment to last a
very long time. Take good care of your coax and it will
be bringing you DX signals for many years to come.
- NM9J
PCARA Update, September 2014, page 15
Peekskill / Cortlandt
Amateur Radio Association
PCARA Calendar
Sun Sept 7: PCARA meeting, Hudson Valley Hospital
Center, 3:00 p.m.
Mail: PCARA, PO Box 146, Crompond, NY 10517
E-Mail: mail ‘at’ pcara.org
Web site: http://www.pcara.org
PCARA Update Editor: Malcolm Pritchard, NM9J
E-mail: NM9J ‘at’ arrl.net
Newsletter contributions are always very welcome!
Archive: http://home.computer.net/~pcara/newslett.htm
Hamfests
PCARA Information
PCARA is a Non-Profit Community Service
Organization. PCARA meetings take place the first
Sunday of each month* at 3:00 p.m. in Dining Room B
of the Hudson Valley Hospital Center, Route 202, Cortlandt Manor, NY 10567. Drive round behind the main
hospital building and enter from the rear (look for the
oxygen tanks). Talk-in is available on the 146.67
repeater. *Apart from holidays and July/August break.
PCARA Repeaters
W2NYW: 146.67 MHz -0.6, PL 156.7Hz
KB2CQE: 449.925MHz -5.0, PL 179.9Hz
N2CBH: 448.725MHz -5.0, PL 107.2Hz
Sun Sept 14: Candlewood ARA Western CT Hamfest, Edmond
Town Hall, 45 Main Street, Newtown, CT. 8:00 am.
Sat Sept 20: Garden State ARA Fall Hamfest, MOESC Building,
100 Tornillo Way, Tinton Falls, NJ.
Sat Sept 27: Ocean Monmouth ARC Tailgate Hamfest, Infoage
Learning Cntr, 2300 Marconi Rd, Wall Twnshp, NJ.
Sun Oct 5: Hall of Science ARC Hamfest, NY Hall of Science,
47-01 111th St., Flushing Meadows, Queens NY.
Sat Oct 11: BARA Fall Hamfest, Westwood Regional HS,
701 Ridgewood Rd, Twnshp of Washington, NJ. 8:00 a.m.
Sun Oct 12: Mt Beacon ARC Fall Hamfest, Employee Recreation
Center, 83 Red Schoolhouse Rd, Fishkill, NY 8:00 a.m.
Sun Oct 12: Meriden ARC Nutmeg Hamfest, Sheraton Four
Points Hotel, 275 Research Pkwy, Meriden CT. 8:00 a.m.
VE Test Sessions
Sep 7: Yonkers PAL Ham Radio Club, 127 N Broadway, Yonkers.
2:00 p.m. Michael Rapp (914) 907-6482.
Sep 7: Yonkers ARC, 1st Police Precinct, E. Grassy Sprain Rd,
Yonkers, NY. 8:30 am. John Costa, (914) 969-6548.
Sep 11: WECA, Westchester Co Fire Trg Cen, 4 Dana
Rd., Valhalla, NY. 7:00 pm. S. Rothman, 914 831-3258.
Sep 15: Columbia Univ VE Team ARC, 531 Studebaker Bldg, 622
W 132nd St, New York. 6:30 pm. Alan Crosswell, 212 854-3754.
Sep 27: P.E.A.R.L., Mahopac Public Library, Periodicals Room,
668 Rt 6, Mahopac, NY. 10:00 a.m. Contact W2AG.
Peekskill / Cortlandt Amateur Radio Association Inc.
PO Box 146
Crompond, NY 10517
PCARA Update, September 2014, page 16