1
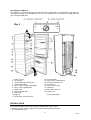
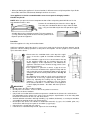
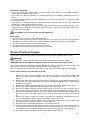
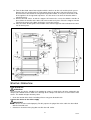
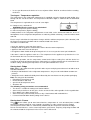
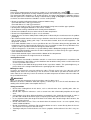
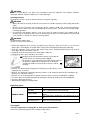
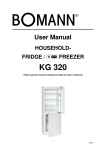
User Manual
FRIDGE /
FREEZER
KG 210
KG 211
Please read this manual carefully and keep for future reference!
1
04/2012
TABLE OF CONTENT
OVERVIEW
DISPOSAL OF USED DEVICES
IMPORTANT USE AND SAFETY INSTRUCTIONS
General safety precautions
Risk of injury
Coolant
Intended use
Unpacking
PRODUT DESCRIPTION
Specifications
Description of appliance
INSTALLATION
Location
Electrical connection
REVERSE THE DOOR OPENING
STARTUP / OPERATION
Prior to first use
Turning on
Storing food
Freezing
Making Ice-cubes
TIPS FOR SAVING ENERGY
MAINTENANCE AND CLEANING
Defrosting
Cleaning and care
Operating noise
Repairs
What if . . . Troubleshooting
Transport
2
2
3
3
3
3
3
4
4
4
5
5
6
7
7
8
8
9
9
10
10
11
11
11
12
12
13
13
14
OVERVIEW
Please read this user manual thoroughly before first time operation. It includes important information with regard to installation, operation and maintenance of the device.
Improper use may cause hazardous situations, especially for children.
Keep this manual for future reference. Pass it on to any future owner of this product. In
case of any doubt regarding questions or topics which are not extensively described in this manual,
please contact your distributor or a specialist.
DISPOSAL OF USED DEVICES
This product is marked in accordance with the European waste regulation
2002 / 96 / EC - WEEE
It regulates the proper disposal of the product. Environmentally friendly disposal will prevent possible negative consequences to health caused by improper disposal.
This symbol on the product or its packaging indicates that this product must not be disposed of with the regular household waste. The user has to return the product to a collection point for
the recycling of electric and electronic equipment.
The disposal must comply with the local regulations in place.
For further information please contact your local authorities or waste collection service.
Disable waste equipment before disposal:
• Disconnect the mains plug from the wall socket.
• Disconnect the plug from the mains cable.
• Remove or disable any existing spring or latch locks.
2
04/2012
This will prevent children from locking themselves (risk of suffocation!) or from getting into perilous
situations. Children might not understand the risks that arise from handling household devices.
Therefore, observe children and make sure they do not play with the device.
IMPORTANT USE AND SAFETY INSTRUCTIONS
General safety precautions
All safety information in this user manual are marked with a warning symbol. They indicate possible
dangers
precociously.
It
is
imperative
to
read
and
follow
these
information.
• Do not touch the plug at the mains cable with wet or moist hands when connecting or disconnecting. Risk of death by electric shock!
• In case of emergency, unplug the device immediately.
• Hold the plug when disconnecting the mains cable; do not pull the cable.
• Disconnect the plug before cleaning or servicing.
• Regularly check the device and cable for signs of damage. Do not continue to operate the device in
case of damage.
• A damaged mains cable must be replaced by the manufacturer or a technician and without any
delay. Do not use the device with a damaged cable or plug.
• Do not repair the device by yourself. Please contact authorized personnel. In order to avoid hazards. A damaged mains cable must be replaced with an equivalent cable by the manufacturer or
qualified specialist.
• Except for cleaning and maintenance work described in this manual, no other alterations of this
device must be executed.
• Do not place vases or other containers filled with liquids on the device.
Risk of injury!
• So that you can disconnect the appliance quickly in event of an emergency, do not use extension
cables.
• This device may not be operated by children or persons with physical, sensory or mental abilities or
lack of experience and knowledge, unless they are supervised or guided.
• Children should be supervised to ensure that they do not play with the device.
• Transport the unit never with content.
WARNING
• Packaging materials (e.g. plastic bags, polystyrene) are dangerous for children. Risk of suffocation!
Keep packaging materials out of reach of children.
• Containers with flammable gases or liquids can leak due to cold ambient temperatures. Risk of
explosion! Do not store combustible materials such as aerosol cans or refill cartridges for lighters in
your device.
Coolant
CAUTION
The coolant circuit of this device contains the refrigerant Isobutane (R600a), a natural gas that is
flammable and of high environmental compatibility. Make sure no parts of the Coolant circuit gets
damaged during transport and installation of the device.
If the coolant circuit is damaged:
• it is imperative to avoid any open flames or ignition source.
• thoroughly air the room in which the device is installed.
Intended use
• This device is intended for private use (household) or similar environments and it is suitable for
freezing food. Similar environments such as: staff kitchen areas in shops, offices and other working
environments; farm houses and by clients in hotels, motels and other residential type environments; bed and breakfast type environments; catering and similar non-retail applications.
• The manufacturer is not reliable for any damage resulting from improper or other then intended
use.
• For safety reasons, alterations or modifications of the device are prohibited.
3
04/2012
• Please keep in mind that the manufacturer is not reliable for any damage resulting from commercial
or any other use then cooling/freezing food.
Unpacking
The packaging must be undamaged. Check the device for any possible transport damage. Do not
install a damaged device. In case of damage, please contact your distributor.
ATTENTION
Remove the separate polystyrene part (transport protection) between the rear of the device and condenser – metal grid (if available).
Packaging material
The packaging for transportation of the device and individual parts is produced of recyclable materials.
• corrugated cardboard / paperboard (mainly of waste paper)
• form part of PS (foamed, CFC-free polystyrene)
• Films and bags of PE (polyethylene)
• Strapping strips of PP (polypropylene)
IMPORTANT
Make sure you dispose of packaging materials environmentally friendly.
Removing the transport protection
The device and parts of the interior are protected for transport. Remove all adhesive tapes from the
right and left side of the door. You may remove adhesive residue with a cleaning solvent. Also remove
any adhesive tapes and packaging materials from the inside of the device.
PRODUCT DESCRIPTION
BOMANN Model No.
Energy efficiency class(1)
Climate class(2)
Gross/net capacity, total
Net capacity fridge/freezer
Freezing capacity
Storage time by power failure
Energy consumption 24 h(3)
Energy consumption year(3)
Connection voltage
Connection power
Operating noise
Sizes H x W x D
Gross / net weight
Coolant(4)
KG 210
A++
N/ST
244 / 227 l
173 / 54 l
6,0 kg / 24h
max. 18 h
0,49 kWh
179 kWh
220-240 V, 50 Hz
140 W
40 dB(A)
150,0 x 60,0 x 65,0 cm
55,0 / 59,5 kg
R600a (51,0g.)
KG 211
A++
N/ST
296 / 279 l
191 / 88 l
8,0 kg / 24 h
max. 20 h
0,56 kWh
204 kWh
220-240 V, 50 Hz
140 W
40 dB(A)
176,0 x 60,0 x 65,0
64,0 / 69,5 kg
R600a (57,0g.)
(1)
A++ = economical - G= less economical
The Manufacturer guarantees reliable operation of the refrigerator when the relative air humidity not greater
than 70% and the ambient temperature is:
Climate class N (Normal): ambient temperature of +16 C up to +32 C
Climate class ST (Subtropics): ambient temperature of +16 C up to +38 C
(3)
The actual energy consumption depends on the use and installation of the device. EC 1060/2010.
(4)
The appliance is ecologically clean, containing no material harmful to the ozone layer. The refrigerant used
is R600a, the foaming agent used for the appliance insulation is Cyclopentane C5H10.
(2)
All device-specific data of the energy label have been determined by the manufacturer under laboratory conditions in accordance with pan-European standardized measuring methods. These are regulated
by ISO EN 15502. The actual energy consumption depends on the usage and might therefore also be
above the values determined by the manufacturer under standard conditions.
An expert knows these relations and will execute the tests with special measurement instruments in
accordance with the regulations in place.
MANUFACTURER DATA
The manufacturer reserves the right ti make future changes to technical parameters and specifications. Product is subject to changes and improvements.
4
04/2012
Description of appliance
The appliance is a two–compartment refrigerator-freezer combination. The refrigerator compartment is
intended for storage of fresh foodstuffs; the freezer compartment is intended for freezing and longterm storage of foodstuffs.
1 Power (green)
2 Thermostat
3 On/off switch for interior light
4 Interior light (LED)
5 Glass shelves (height-adjustable)
6 Glass shelf vegetable box
7 Bottle shelf
8 Fruit/Vegetable box
9 Door trays
10 Egg tray
11 Thaw water channel cleaner
12 Freezing tablet
13 Super Freeze compartment
14 Freezing compartments
15 Ice-cube tray
16 Thaw water channel
17 Condenser
18 Thaw water drip tray
19 Compressor
User manual D/GB
INSTALLATION
It is recommended to prepare the appliance for operation with a helper.
• Remove package. Lift the appliance away from foamed polystyrene base.
• Tear off adhesive tapes.
5
04/2012
• When positioning the appliance in chosen location, it will move more easily into position if you lift the
front a little and incline it backward, allowing it to roll on its casters.
Your appliance is fit with screwed handles to not rise or push it taking by handles.
Handles may break.
NOTE: When you open the freezer compartment door a little red packing detail will fall out. It is for
transportation purposes only.
Remove all red-coloured parts from the shelves (fig. 2).
Tear away the red-coloured adhesive tapes from the door
trays – they are intended only for the transport of the appliance.
Suitably dispose the packaging material. Take two supports 1
(see fig.) from the bag and insert those into the guides 2 at the
top back part of the appliance.
Location
Place the appliance in a dry, well ventilated room.
Sufficient ventilation around the device is necessary in order for the heat to dissipate properly and to
guarantee efficient cooling operation at low power consumption. For this purpose, leave sufficient
space around the device.
• Do not cover the ventilation holes at the top of the appliances– it must be a good air circulation around the appliance.
• There should be a gap of at least 10 cm between the top
of the appliance body and any furniture that may be
above it (fig. 5). If this requirement is not followed, the
appliance consumes more electrical energy and its compressor may overheat.
• If the appliance is placed in a corner, a gap of at least
24,1 cm must be left between the appliance body and the
wall so that the freezer compartment door can be opened
enough to pull out the frozen product drawer. See fig. on
the right.
• The appliance must stand on a level surface and must not
touch the wall. If necessary, regulate the height of the appliance by adjusting the leveling feet: by turning them
clockwise – the front of the appliance rises, by turning
them counter clockwise – it comes down. If the appliance
is tilted slightly backward – the doors will close by themselves.
IMPORTANT
•
• Do not expose the device to direct sunlight.
• Do not place near heaters, next to a stove or any other heat sources.
• Do not use the device outdoors.
• Only install at a location with an ambient temperature suitable for the climate class of the device.
For information on the climate class, please refer to chapter “Specifications“ or to the rating label
located in the interior or on the rear side of the device.
• Avoid installation at locations with high humidity (e.g. outdoors, bathroom), as metal parts would be
susceptible to corrosion under such circumstances.
• Do not place the device near volatile or combustible materials (e.g. gas, fuel, alcohol, paint, etc.)
and in rooms which may have poor air circulation (e.g. garages).
• Only place on a steady and safe surface.
• If the device is not horizontally leveled, adjust the feet accordingly.
6
04/2012
Electrical connection
• The kind of current (AC) and the voltage must be conform to the data of the rating label, located inside or outside on the back of the unit.
• In case of heavy voltage fluctuations, it is recommended to use an automatic alternating current regulator.
• The plug, together with the grounding conductor, must fit into the wall socket. The mains plug must
be freely accessible.
• If the appliance is brought in from the cold (temperature is not higher than +12 °C), you should wait
for two hours before connecting it to the mains.
• The appliance should not be connected to the mains until all packing and transport materials aren’t
removed. Once the appliance is unpacked, make sure that it is complete, that the body and the electrical cord aren’t damaged.
It is forbidden to use a technically damaged appliance!
Mains cable
• Do not extend or roll up the cable during operation.
• Also, the cable must not be near the compressor on the rear side, since latter one gets hot during
operation. In case of any contact, the isolation would be damaged resulting in electric leakage.
• The use of extension cables is not recommended.
• Do not connect the device to the mains with wet hands.
• Install the device for the wall socket to be freely accessible.
REVERSE THE DOOR OPENING
If required, the door openings can be moved from the right (supplied condition) to the left side.
WARNING
When replacing the door stops, the device must be disconnected from the power supply.
WARNING! Turn off the appliance and pull the plug out of the electricity supply socket.
It is recommended that changing the opening direction of the doors should be done with a helper. You
will need two spanners No. 8 and No. 10 and a Philips head screwdriver.
When changing the opening direction of the doors, YOU CAN NOT lay the refrigerator horizontally.
Do the actions below in the order they are listed:
1. Remove the covers c from the body of the appliance and of the inner side of the door. Also
remove the upper bracket 6 together with the nut and washers and the spacer under the
bracket.
2. Remove the door of the refrigerator compartment. Remove the stopper 5 from the bottom of it.
On the other side of the door attach the stopper intended for doors that open on the left (you
will find it in the packet).
3. Remove the middle bracket 4 together with the washers on the axle and the plastic spacer.
4. Remove the freezer compartment door 3. Remove the bottom cover 1.
5. Remove the bottom bracket 2 together with the washers on the axle and the plastic spacer.
Unscrew the axle with the washers and screw it into the aperture provided on the other side.
6. Remove the bottom bracket 7 and in its place attach the other bottom bracket 2 together with
the washers on the axle and the plastic spacer. Fix this bracket 7 in place of the other bracket
2.
7. Remove the covers 8 from the partition separating the refrigerator compartment from the
freezer compartment and place them in the apertures on the other side.
8. Remove the covers 9 from the doors of the refrigerator compartment and the freezer compartment and place them in the apertures on the other side.
9. Hang the freezer compartment door on the axle of the bracket 2.
10. Turn the bracket 4 around 180° together with the washers on the axle and the plastic spacer,
transferring the washers to the axle on the other side of the bracket. Once the bracket is attached to the freezer compartment door, fix it in place on the other side of the appliance.
11. Hang the refrigerator compartment door on the axle of the bracket 4.
7
04/2012
12. Turn the bracket 6 around 180° together with the washers on the axle and the plastic spacer.
Remove the axle and the washers and reattach them on the other side of the bracket. Once
the bracket 6 is attached to the refrigerator compartment door, fix it in place on the other side
of the appliance in the uppermost apertures. Use the covers c to cover the bracket and the
remaining space.
13. Remove the bolt covers a and the stoppers b. Remove the screws that hold the handles in
place. Move the handles to the other side and screw them in place. Place the stoppers into the
remaining apertures in the door, and put the screw caps in place.
14. Place the cover 10 into guides of the bottom cover 1 on the opposite side and attach the cover
1 to its former place.
STARTUP / OPERATION
Prior to first use
ATTENTION
After transport, the device should be left standing for 4 hours in order for the oil to be collected in the
compressor. Nonobservance could cause damage to the compressor and hence result in failure of the
device. This would void your warranty claim.
• Clean the interior of the device including all accessory parts located inside.
Connect the device to the mains supply
IMPORTANT
• The device must be earthed properly. For this purpose the plug of the mains cable has been fitted
with the intended lead.
• Contact an electrician if the plug does not fit in the wall socket.
8
04/2012
• In case you disconnect the device or in case of power failure: Wait for 15 minutes before restarting
the device.
Turning on / Temperature regulation
The temperature in the refrigerator compartment is controlled using the thermostat knob 2 (fig. 1) by
turning it to one side or the other. The temperature indication in digits is shown beside the thermostat
knob.
The temperature is regulated on the scale of seven digits.
0 = Compressor is switched off.
WARNING! Electric current is not switched off.
1 = highest temperature (lowest cooling)
7 = lowest temperature (highest cooling)
If food products in the refrigerator compartment are too cold, set the thermostat knob to 1, 2 or 3. If
food products in the refrigerator compartment are not being chilled sufficiently, set the thermostat knob
to 4 or 6.
Please keep in mind that the temperature changes with the ambient temperature (of the location), with
the frequency of opening the door and the amount of food in the device.
Therefore we recommend:
• locate the appliance away from heat sources,
• food placed in the appliance should not be warmer than the room temperature,
• appliance door must not to be left open,
• the appliance door should not be open longer than it is necessary to take out or put in foodstuffs.
If the room is cool, the appliance cools less. The temperature in the appliance may therefore rise. Use
the thermostat wheel to set a lower temperature.
During initial operation, turn the temperature control to the highest setting first, until the device has
reached the desired operating temperature. Afterwards It is recommended to turn the control back to a
medium setting, correcting the temperature at a later point would then be easier.
Storing food - Fridge
Note: Always store food covered or packed in order to prevent drying-out and transfer of odor or taste
onto other food items.
• Do not put hot foodstuffs in the refrigerator compartment – they must be cooled down to room temperature.
• Strictly observe the foodstuff validity time indicated by the manufacturer on the product packaging.
Note: You may pack the food with:
• Polyethylene plastic bags or foil
• Plastic containers with a lid
• Special elasticated plastic covers
• Aluminum foil
The following safety precautions are recommended
• The device is suitable for storing fresh food and drinks.
• Store fresh packed items on the glass shelves and fresh fruits and vegetables in the vegetable box.
• Place bottles in the door storage rack.
• Store meat well packed and only for 2 to 3 days. Avoid contact with cooked dishes.
• Let warm food cool down before putting it in the device.
Storing food – Freezer
The
freezer allows you to store frozen food at a temperature of -18°C or below (from a middle
temperature control setting) for several months, to produce ice cubes and to freeze fresh good.
The temperature of the device is automatically controlled by the temperature control in the fridge.
Due to external influences such as room temperature, placements, frequency of opening the door and
the amount of food the temperature in the freezer can be influenced.
9
04/2012
Freezing
In the freezer compartment, the fast-freeze section (13) is marked with the symbol
.
Fresh foodstuffs prepared for freezing should be placed in one or two layers in the fast-freeze section.
The thermostat knob should be set to 7. After 24 hours, the frozen food products should be replaces
from the quick-freeze section to the storage section drawer(s) (Fig. 1, see page 1). When the products
are frozen, the thermostat wheel should be set at its earlier position.
• Do not exceed the indicated maximum amount of food freezing:
For model KG 210 it is 6,0 kg per 24 hours,
For model KG 211 it is 8,0 kg per 24 hours.
• Leave a gap of not less than 3 cm between the foodstuffs being frozen and the upper partition.
• Do not place unwrapped foodstuffs in the freezer sections.
• Fresh food for freezing should not touch already frozen foodstuffs.
• Do not freeze foodstuffs that are warmer than the room temperature.
• Do not freeze liquid foodstuffs in glass vessels or bottles.
• Strictly observe the frozen food product validity dates indicated by the manufacturer on the product
packaging.
• We recommend that frozen fish and sausage should be stored in the freezer compartment not longer
than 6 month cheese, poultry, pork, lamp – nor more than 8 month, beef, fruit and vegetables – not
longer than 12 month.
• Fresh food should be frozen as fast as possible to the core. Therefore during freezing operation, the
temperature of fresh food should be lowered as fast as possible in order to keep formation of ice
crystals as little as possible and not to damage the food structure.
• If the freezing process is too slow, ice crystals build up and the food quality might get affected.
• Even frozen food should be stored in the lower compartments, in order to keep the upper compartment available for fresh food.
• Frozen food should be kept in contact with the bottom of the compartment.
• Keep a space between the single items for air circulation.
Storing frozen food
• Packed frozen merchandise should be stored in a 4-star-freezer compartment in accordance with
the manufacturer’s data. Make sure the food items do not defrost after purchase and to store them
as fast as possible in the freezer.
• It is possible to store food for longer periods of time, up to three months. This period might vary, so
please observe the storage information on the packaging of the merchandise.
Making Ice-cubes
Ice-cubes are prepared in a tray for making ice-cubes. Fill each space in the ice cube tray ¾ full of
drinking water. Place the ice-cube tray in the fast-freeze section. When you want to remove the icecubes from the ice-cube tray, leave it for 5 minutes at room temperature and then shake the cubes into
the special dish for them.
IMPORTANT
Make sure that the temperature in the freezer does not rise above -18°C.
Moreover the device should be defrosted regularly. A thick layer of ice on the wall deteriorates the
cooling effect and the power consumption increases.
Safety precautions
• Do not store sizzling drinks in this device, such as mineral water, beer, sparkling wine, coke etc.
(risk of explosion).
• Do not store explosive substances such as aerosol cans with a flammable propellant in this appliance.
• Once products have been defrosted halfway or completely, they should be consumed as soon as
possible and should not be frozen again, except they have been processed to a ready meal.
• In case of power failure, do not open the door. If the failure does not take longer than 10 hours, the
food will not be affected.
• Do not store bottles or cans. These can break when the contents freeze – or even explode, if they
contain carbonated drinks.
• Do not eat food that is still frozen. Do not allow children to eat ice cream directly from the freezer.
The cold can cause injuries in the oral cavity.
• Touching metal parts inside the device can cause symptoms similar to burns if the skin is very sensitive.
10
04/2012
• Do not touch frozen food with moist or wet hands; they could freeze to the items.
TIPS FOR ENERGY SAVING
• Disconnect the plug if you do not use the device.
• Do not install the device near stoves, heaters or other heat sources. In case of higher ambient
temperatures, the compressor will run more frequently and longer.
• Ensure sufficient ventilation at the bottom and rear side of the device.
Never block any ventilation openings.
• Allow warm dishes to cool down before putting them in the device.
• Do not open the door longer then necessary.
• Only set the temperature as low as needed. The ideal temperature in the fridge is 7°C.
It should be measured in the upper shelf, as far as possible in the front.
• Make sure that the temperature in the freezer does not rise above -18°C.
• The freezer should be defrosted regularly.
• Always keep the condenser – metal grid on the rear side (if existing) – clean.
• Make sure the door sealing is in good order for the door to close properly.
Practical Tipps and Observation
• Do not keep bananas in the refrigerator – these fruits are sensitive to cold.
• Do not keep prepared food and ready-to-cook (“heat and eat”) food in the same container.
• Store in an airtight container in the appliance any foodstuffs that have a strong odour (e.g. fresh fish,
pâté de foie gras goose liver pâté, and cheese).
• Frozen foodstuffs should be thawed in the refrigerator compartment. Food that thaws slowly retains
better flavour properties and spread cold will help to maintain the set temperature in the refrigeration
compartment.
• Do not consume ice made in the freezer chamber straight away.
• Products will freeze more quickly if they are divided up and packed in small portions.
MAINTENANCE AND CLEANING
Defrosting the refrigerator compartment
The refrigerator compartment defrosts automatically. Drops of ice that form on the back wall of the
refrigeration compartment thaw during the time the compressor is not working and the thaw water runs
down the thaw water runoff channel to the tray on top of the compressor 19 (Fig. 1), where it evaporates.
Regularly clean the thaw water channel space with a special cleaner (11)for
that purpose. Make sure the flume does not get clogged a light formation of
ice on the rear side during operation is normal.
Defrosting the freezer compartment
The freezer compartment should be thawed not less than twice a year or when a layer of ice thicker
than 5 mm forms in it. Do the actions below in the order they are listed:
To start the defrosting process turn the appliance OFF and disconnect the plug. Remove the food
items and keep covered at a cool location.
Pull out the melt water channel, turn it by 180° and hang it (Fig. 4). Place a vessel under the melt water channel.
• Place a dish under the thaw water channels. Leave door of freezer compartment open. When the ice melts, clean and wipe dry the surfaces and
fixtures of the freezer compartment.
• Remove the melt water channel, turn it by 180° again, and put it back in its
original place.
Close the freezer compartment door. Plug in and turn on the appliance.
11
04/2012
WARNING
Never use metal objects (e.g. knives) for removing ice from the vaporizer. The vaporizer could be
damaged. A defect vaporizer could cause serious damages.
Cleaning and Care
For hygienic reasons, clean the interior and accessory parts regularly.
WARNING
• Always disconnect the plug or turn off/ unscrew the fuse before cleaning. Pull the plug and not the
cable.
• Do not use steam cleaners for cleaning the device; moisture could enter electrical components.
Risk of electric shock! Hot steam could damage the plastic parts. The device must be dry before
restarting operation.
• Essential oils and organic solvents, such as the juice of lemon or orange skin, botanic acid or
cleaning agents containing acetic acid can damage plastic parts. Prevent contact of any part with
such substances. Do not use abrasive cleaning agents.
WARNING
Do not bend the cooling coils.
Do not use arenaceous abrasives.
• Protect the appliance inner surfaces and plastic parts from fats, acids and sauces. In case of accidental spills – immediately clean with warm soapy water or dishwashing detergent. Wipe dry.
• Clean the appliance inner surfaces with warm soapy water. Dishwashing detergent may also be
used. Wipe dry inner and outer surfaces.
• Regularly clean the hermetic gaskets of the doors. Wipe dry.
• Regularly wash the trays and other accessories.
Regulary clean the thaw water channel space with the
special cleaner (11) for that purpose (fig.1).
• At least once a year clean dust away from the back part of
the appliance body and the compressor. A soft brush,
electrostatic cloth or vacuum cleaner may be used for
cleaning.
• DO NOT use dishwashing detergent for cleaning trays, butter dishes, meat
compartments, or shelves.
• DO NOT use detergents containing abrasive particles, acid, alcohol or benzene for cleaning the appliance inner and outer surfaces.
• DO NOT use for cleaning cloths or sponges that have coarse surfaces intended for scrubbing.
• Use warm water and a mild detergent for cleaning the interior (including rear side and bottom).
• Check the discharge opening.
• After thorough drying, restart operation
Operating noise
TYPE OF SOUND
Mumbling
NORMAL NOISE
Liquid sounds
Click sounds
Disturbing noises
CAUSE/ SOLUTION
Caused by the compressor during its operation.
This is stronger when it turns on or off.
Caused by the circulation of the refrigerant in the
device.
The temperature control turns the compressor on or
off.
Vibration of the shelves or cooling coils – check if
those are securely fastened.
Turning off
Turn the temperature to setting OFF in order to turn off the device.
If the device will not be operated for a longer period of time:
12
04/2012
•
•
•
•
•
Remove the entire food from the device.
Turn the appliance off.
Disconnect the plug or turn off / unscrew the fuse.
Thoroughly clean the device (refer to chapter of “Cleaning and Care”).
Keep the door open in order to prevent bad odors.
Lighting
WARNING! DO NOT OPEN THE COVER OF THE LED ILLUMINATION.
In case that LED illumination is used the service representative must be contacted when the LED light
is defected.
Repairs
WARNING
Servicing of electric devices must be conducted by qualified experts only. Incorrect or improper repairs
constitute a risk for the user and will void the warranty!
What if . . . Troubleshooting
The design of the device ensures a trouble-free operation as well as a long life cycle. Nevertheless, if
any defect occurs during operation, please check if it is caused by improper operation.
The following problems can be solved by you by checking for the possible cause.
PROBLEM
The device is not
working properly or
at all
POSSIBLE CAUSE
Is the plug securely connected to the
mains? Has the safety mechanism of the
wall socket been triggered?
Is the temperature control properly set?
Is the place unqualified?
Do food items or shelves and/or drawers
prevent the door from closing properly?
Is the ventilation of the device hedged?
SOLUTION
Connect the plug properly to the socket, turn
on the fuse, and contact a technician if necessary.
Check the settings.
Check the ambient temperature.
Arrange the food or shelves and/or drawers
properly.
Clear the ventilation slits, install the device
freely
Loud noise during Does the device not stand vertical or hori- Adjust the feet accordingly.
operation
zontal?
Liquid flow sounds in the cooling circuit are
normal.
Water on the bottom Is the temperature control set properly?
Check the temperature settings.
Is the condensate flume clogged?
Clean the discharge opening with a pipe
cleaner or knitting needle.
Water has appeared Food items or dishes in the refrigeration
Do not let food items or dishes touch the
on the tempered
compartment are touching the back wall of back wall.
glass shelves.
the compartment.
Water has appeared The thaw water collection tray has slipped
under the appliance. off the compressor.
Place the tray on top of the compressor.
When the appliance The gasket is smeared with sticky foodstuffs
door is opened, the (fat, syrup).
rubber sealing gasket pulls out.
Clean the sealing gasket and the groove for
it with warm water containing soap or dishwashing detergent and wipe dry. Put the
rubber sealing gasket back into the place.
High temperature in Ascertain whether the appliance door is shutting tightly, whether the door wasn’t kept
appliance, the com- open longer than necessary when taking out or putting in foodstuffs, or whether a large
pressor operation
amount of warm food was placed in the appliance.
pauses are short.
The top of the appli- The ambient relative air humidity is above
ance has condensa- 70 %.
tion on it.
Ventilate the room where the appliance
stands, and if possible remove the cause of
the humidity.
Note. On days of high humidity, condensation might occur on the outer surface of the device. This is
no malfunction; you may simply wipe the water off.
13
04/2012
If a problem still persists after following the steps above, please contact your distributor or a technician.
TRANSPORT
The manufacturer will not be responsible for any damage to the appliance that results from noncompliance with the instructions for the transportation.
• The appliance should be transported in the vertical position.
• When being transported, the appliance should be protected from atmospheric conditions (rain, snow,
dampness).
• The appliance should be firmly secured in place while being transported, to avoid slippage or any
shocks in the transport vehicle.
• If the appliance was transported not vertically, it may be connected to the mains after 4 hours at
least. If this is not done, the appliance compressor may fail.
Are you interested in other Bomann products? Please visit our website:
www.bomann.de
Distribution: C. Bomann GmbH • Heinrich-Horten-Str. 17 • D-47906 Kempen
14
04/2012