1
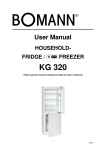
 User Manual
WINE COOLER
KSW 191
Please read this manual carefully and keep for future reference!
1
06/2010
TABLE OF CONTENT
OVERVIEW
3
MEANING OF THE “DUSTBIN” SYMBOL
3
IMPORTANT USE AND SAFETY INSTRUCTIONS
3
General safety precautions
3
Risk of injury
4
Intended use
4
Unpacking
4
Packaging material
4
Removing the transport protection
4
PRODUCT DESCRIPTION
5
Delivery scope
5
Specifications
5
INSTALLATION
6
Location
6
Power supply
6
STARTUP/ OPERATION
6
Prior to first use
6/7
Turning on the device
7
Storing / Tempering
8
Defrosting
8
Turning off
8
TIPS FOR SAVING ENERGY
8
MAINTENANCE AND CLEANING
9
Cleaning and care
9
Interior light
9
Repairs
9
What if . . . Troubleshooting
9/10
2
06/2010
OVERVIEW
Please read this user manual thoroughly before first time operation. It includes important information with regard to installation, operation and maintenance of the device.
Improper use may cause hazardous situations, especially for children.
Keep this manual for future reference. Pass it on to any future owner of this product. In
case of any doubt regarding questions or topics which are not extensively described in this manual,
please contact your distributor or a technician.
MEANING OF THE “DUSTBIN” SYMBOL
This product is marked in accordance with the European waste regulation
2002 / 96 / EC - WEEE
It regulates the proper disposal of the product. Environmentally friendly disposal will prevent possible negative consequences to health caused by improper disposal.
This symbol on the product or its packaging indicates that this product must not be disposed of with the regular household waste. The user has to return the product to a collection point for
the recycling of electric and electronic equipment.
The disposal must comply with the local regulations in place.
For further information please contact your local authorities or waste collection service.
Disable waste equipment before disposal:
• Disconnect the mains plug from the wall socket.
• Disconnect the plug from the mains cable.
• Remove or disable any existing spring or latch locks.
This will prevent children from locking themselves (risk of suffocation!) or from getting into perilous
situations. Children might not understand the risks that arise from handling household devices.
Therefore, observe children and make sure they do not play with the device.
IMPORTANT USE AND SAFETY INSTRUCTIONS
General safety precautions
All safety information in this user manual are marked with a warning symbol. They indicate possible
dangers
precociously.
It
is
imperative
to
read
and
follow
these
information.
WARNING
Do not touch the plug at the mains cable with wet or moist hands when connecting or
disconnecting. Risk of death by electric shock!
•
•
•
•
•
•
•
•
In case of emergency, unplug the device immediately.
Hold the plug when disconnecting the mains cable; do not pull the cable.
Disconnect the plug before cleaning or servicing.
Regularly check the device and cable for signs of damage. Do not continue to operate the device in
case of damage.
A damaged mains cable must be replaced by the manufacturer or a technician and without any
delay. Do not use the device with a damaged cable or plug.
Do not repair the device by yourself. Please contact authorized personnel. In order to avoid hazards a damaged mains cable must be replaced with an equivalent cable by the manufacturer or
qualified specialist.
Except for cleaning and maintenance work described in this manual, no other alterations of this
device must be executed.
Do not place vases or other containers filled with liquids on the device.
3
06/2010
Risk of injury
• So that you can disconnect the appliance quickly in event of an emergency, do not use extension
cables.
• This device may not be operated by children or persons with physical, sensory or mental abilities or
lack of experience and knowledge, unless they are supervised or guided.
• Children should be supervised to ensure that they do not play with the device.
• Transport the unit never with content.
WARNING
Packaging materials (e.g. plastic bags, polystyrene) are dangerous for children.
Risk of suffocation! Keep packaging materials out of reach of children.
WARNING
Containers with flammable gases or liquids can leak due to cold ambient temperatures.
Risk of explosion! Do not store combustible materials such as aerosol cans or refill cartridges for lighters in your device.
Intended use
• This device is intended for private use. It is suitable for tempering and storing of wine.
• Pls. take note that the device is not suitable for storing unsealed bottles of wine and unpacked food
products.
• The manufacturer is not reliable for any damage resulting from improper or other then intended
use.
• For safety reasons, alterations or modifications of the device are prohibited.
• Please keep in mind that the manufacturer is not reliable for any damage resulting from commercial
or any other use then storing food.
Unpacking
The packaging must be undamaged. Check the device for any possible transport damage. Do not
install a damaged device. In case of damage, please contact your distributor.
Packaging material
The packaging for transportation of the device and individual parts is produced of recyclable materials.
• corrugated cardboard / paperboard (mainly of waste paper)
• form part of PS (foamed, CFC-free polystyrene)
• Films and bags of PE (polyethylene)
• Strapping strips of PP (polypropylene)
WICHTIG
Make sure you dispose of packaging materials environmentally friendly (see page 3).
Removing the transport protection
The device and parts of the interior are protected for transport. Remove all adhesive tapes from the
right and left side of the door. You may remove adhesive residue with a cleaning solvent. Also remove
any adhesive tapes and packaging materials from the inside of the device.
4
06/2010
PRODUCT DESCRIPTION
1
2
3
4
5
6
Chrome shelves
Adjustable feet
Water try
Safety glass
Control panel
Door handle
Delivery scope
The delivery scope of this device includes four chrome shelves, the door handle with mounting screws
incl. gripping tool and a water tray.
Specifications
BOMANN Model No.
KSW 191
Bottles capacity
8 à 0,75 l
Net capacity
22 l
Power consumption(1)
0,857 kWh/24h - 313 kWh/Jahr
Climate class
N (+16°C up to +32°C)
Power supply
220-240 V, 50/60 Hz
Input power
50 W
Dimensions H x W x D
44,3 x 26,4 x 52,5 cm
Gross / net weight
12,0 / 10,2 kg
(1)
The actual energy consumption depends on the use and installation of the device.
All device-specific energy data have been determined by the manufacturer under laboratory conditions
in accordance with pan-European standardized measuring methods. These are regulated by EN ISO
15502. The actual energy consumption depends on the usage and might therefore also be above the
values determined by the manufacturer under standard conditions.
An expert knows these relations and will execute the tests with special measurement instruments in
accordance with the regulations in place.
MANUFACTURER DATA
Product is subject to changes and improvements.
5
06/2010
INSTALLATION
Location
Sufficient ventilation around the device is necessary in order for the heat to dissipate properly and to
guarantee efficient cooling operation at low power consumption. For this purpose, leave sufficient
space around the device.
• Minimum clearance of 5 cm between rear side and wall,
• at least 20 cm on both sides and on the top of the device.
• Leave proper space in front of the device in order to open the door at an angle of 120°.
IMPORTANT
• Do not expose the device to direct sunlight.
• Do not place near heaters, next to a stove or any other heat sources.
• Do not use the device outdoors.
• Only install at a location with an ambient temperature suitable for the climate class of the device.
For information on the climate class, please refer to chapter “Specifications“ or to the rating label
located in the interior or on the rear side of the device.
• Avoid installation at locations with high humidity (e.g. outdoors, bathroom), as metal parts would be
susceptible to corrosion under such circumstances.
• Do not place the device near volatile or combustible materials (e.g. gas, fuel, alcohol, paint, etc.)
and in rooms which may have poor air circulation (e.g. garages).
• Only place on a steady and safe surface.
• This appliance is equipped with non-slip rubber feet. As furniture surfaces are made of a variety of
materials and are treated with many different types of cleaning agents, it cannot be completely ruled out that some of these substances may contain ingredients which could corrode the rubber
rests and soften them. If possible place an antislip material under the feet of the device.
• If the device is not horizontally leveled, adjust the feet accordingly.
Power supply
The kind of current (AC) and the voltage must be conform with the data of the rating label, located
inside or outside on the back of the unit. In case of heavy voltage fluctuations, it is recommended to
use an automatic alternating current regulator.
The plug, together with the grounding conductor, must fit into the wall socket. The mains plug must be
freely accessible.
STARTUP/ OPERATION
Prior to first use
• Clean the interior of the device including all accessory parts located inside.
Connect the device to the mains supply
IMPORTANT
The device must be earthed properly. For this purpose the plug of the mains cable has
been fitted with the intended lead.
IMPORTANT
Contact an electrician if the plug does not fit in the wall socket.
IMPORTANT
In case you disconnect the device or in case of power failure: Wait for 5 minutes before
restarting the device.
6
06/2010
Assembling the water tray
Sliding-in the water tray along the track which is located below the unit. The tray should be slide from
the back of the unit.
Assembling the door handle
Note the existing hole positions on the door frame for installing the door handle.
Open the door and take the door sealing at the door frame carefully aside.
Insert the screws (provided) in the below holes (see below tip).
Use a screw-driver to mount the door handle. Align the handle and tighten the
screws. To avoid damages at the handle do not over-tighten the screws.
Replace the door sealing to its original position.
TIP
1. For ease of installation, a gripping tool is provided for handle fixing screw.
2. Use the gripping tool to shift the screw into the hole on the door frame.
3. Hold the door handle in position, shift the screw-driver into the gripping tool and tighten the screw.
4. Remove the gripping tool. Keep the gripping tool for future use.
Turning on the device
Turn on the device by connecting the plug to a wall socket.
Operate the temperature control, which is located on the control panel at the front of the unit.
Please also refer to the following chapter “Settings“.
Settings
1. Light
The interior light is turning on and/or off by
4 + 5. Temperature control
Regulate the internal temperature by pressing
pressing the button
. Pls. also refer to the
chapter „Interior light“.
up (warmer) or 5
down
the buttons 4
(cooler). The setting happens in one grad Celsius and/or Fahrenheit steps. About 5 sec.
after the last button press the electronic switch
automatically and the actual internal temperature will be indicated.
• The temperature range can be regulate
between 4°C and 22°C, max. 15°C below
the ambient temperature. The optimale
room temperature is approx. 20°C.
• Is the ambient temperature 25°C, the lowest
internal temperature of 10°C can be
reached. When the ambient temperature is
21°C the internal temperature falls to max.
6°C.
• The thermostat recognizes an outside temperature between 0°C and 70°C.
Is the outside temperature lower than 0°C
and higher than 70°C the display will show
„--“, until the device has warmed up and/or
cooled down.
2. Temperature unit
You can change the temperature indication
from Celsius „C“ to Fahrenheit „F“ by pressing
.
the button
3. LED-Display
The display indicates your temperature setting
and the actual internal temperature.
• When the device turned on the LED always
shows the standard setting 10°C. Short time
after that the LED indicates the internal
temperature.
7
06/2010
Storing / Tempering
• Fill the device from the bottom tot he top, this cools the bottles faster.
• The following specifications are only recommendations and are optional:
Wine
Temperature
Champagne, sparking wine
7 – 10°C / 45 – 50°F
Fruit wine
10 – 12°C / 50 – 54°F
Light red wine / white wine
12 – 13°C / 54 – 56°F
Dessert wine
14 – 15°C / 57 – 59°F
Red wine
14 – 17°C / 57 – 63°F
• We suggest to serve wine cool than too warm; white wines less cool in winter and red wines cooler
in summer.
• The temperature in the device will be warmer at the top of the cooling zone and cooler at the bottom. If you are going to store a mixture of wine types in the device, it is recommended that the red
wines are stored at the top of the cooling zone, white wine in the middle of the cooling zone and
sparking wines at the bottom.
• Ultimately, the correct temperature is a matter of personal taste.
Defrosting
The device has an automatic defrosting system.
The arising condensate during the operation runs through the drain opening to the outside into the
water tray, where it will evaporate.
Turning off
Unplug the device in order to turn it off.
If the device will not be operated for a longer period of time:
• Remove the entire content from the device.
• Disconnect the plug or turn off / unscrew the fuse.
• Thoroughly clean the device (refer to chapter of “Cleaning and Care”).
• Keep the door open in order to prevent bad odors.
TIPS FOR SAVING ENERGY
• Disconnect the plug if you do not use the device.
• Do not install the device near stoves, heaters or other heat sources. In case of higher ambient
temperatures, the ventilator will run more frequently and longer.
• Ensure sufficient ventilation at the bottom and rear side of the device.
Never block any ventilation openings.
• Always keep the ventilation openings at the rear side clean.
• Only set the temperature as low as needed.
• The temperature in the device will be warmer at the top of the cooling zone and cooler at the bottom. If you are going to store a mixture of wine types in the device, it is recommended that the red
wines are stored at the top of the cooling zone, white wine in the middle of the cooling zone and
sparking wines at the bottom.
• Pre-cool the wine for 2 hours in refrigerator before storing inside the device.
• Only switch the interior light on if necessary.
• Do not open the door longer then necessary.
• Make sure the door sealing is in good order for the door to close properly.
8
06/2010
MAINTENANCE AND CLEANING
Cleaning and care
For hygienic reasons, clean the interior and accessory parts regularly.
WARNING
Always disconnect the plug or turn off/ unscrew the fuse before cleaning. Pull the plug
and not the cable.
WARNING
Do not use steam cleaners for cleaning the device; moisture could enter electrical components. Risk of electric shock! Hot steam could damage the plastic parts. The device
must be dry before restarting operation.
IMPORTANT
Essential oils and organic solvents, such as the juice of lemon or orange skin,
butanoic acid or cleaning agents containing acetic acid can damage plastic parts. Prevent contact of any part with such substances. Do not use abrasive cleaning agents.
•
•
•
•
Remove the contents and keep covered at a cool location.
Use warm water and a mild detergent for cleaning the interior (including rear side and bottom).
After thorough drying, restart operation.
Clean the ventilation openings on the rear side by using a soft brush or vacuum cleaner.
Interior light
The light contributes to a warming of the interior. Therefore we recommend, switch the light off if it is
not needed. This also saves energy!
IMPORTANT
The light diodes of the device have an extremely long lifespan. It is not necessary and
also not possible, to exchange them. The light diodes are firmly assembled into the
light. Under no circumstances should you open the light! This would irreparably damaged the device.
Repairs
WARNING
Servicing of electric devices must be conducted by qualified experts only. Incorrect or
improper repairs constitute a risk for the user and will void the warranty!
What if . . . Troubleshooting
The design of the device ensures a trouble-free operation as well as a long life cycle. Nevertheless, if
any defect occurs during operation, please check if it is caused by improper operation.
The following problems can be solved by you by checking for the possible cause.
PROBLEM
The device is
not working
properly or at
all
POSSIBLE CAUSE
Is the plug securely connected to the
mains? Has the safety mechanism of the
wall socket been triggered?
Is the temperature control properly set?
Is the place unqualified?
Do bottles or shelves prevent the door from
closing properly?
Is the ventilation of the device hedged?
SOLUTION
Connect the plug properly to the socket,
turn on the fuse and contact a technician if
necessary.
Check the settings.
Check the ambient temperature.
Arrange the bottles and shelves properly.
Clear the ventilation openings, install the
device freely
Loud noise Does the device not stand vertical or hori- Adjust the feet accordingly.
during opera- zontal?
tion
The ventila- The temperature has been programmed to Then it is normal that the ventilator is runtion
runs a very low temperature, or the difference ning. It is not a malfunction.
often or al- between the ambient and programmed
ways.
temperature is very large.
9
06/2010
Water on the Is the temperature control set properly?
bottom.
Is the drain opening logged?
Check the temperature settings.
Clean the drain opening with a pipe cleaner
or knitting needle.
Interior lamp Is the plug not connected to the mains?
Connect the plug properly to the socket,
does
not Has the safety mechanism of the wall turn on the fuse, and contact a technician if
work.
socket been triggered?
necessary.
Is the illuminant defect?
Contact the distributor or a technician.
Note. On days of high humidity, condensation might occur on the outer surface of the device. This is
no malfunction; you may simply wipe the water off.
If a problem still persists after following the steps above, please contact your distributor and/or a technician.
Are you interested in other Bomann products? Please visit our website:
www.bomann.de
Distribution: C. Bomann GmbH • Heinrich-Horten-Str. 17 • D-47906 Kempen 10
06/2010