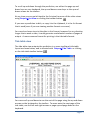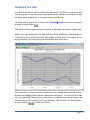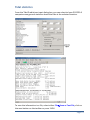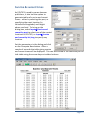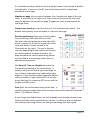
1
POLTIPS3 ver 3.5.1 User Guide NOTE TO PUBLISHERS If you intend to publish the tides computed by POLTIPS3, please ensure that you read this user guide carefully, that you fully understand how to use the software and have a good understanding of tides. Installation of POLTIPS Please read the installation instructions on page 11 before attempting to install this software. National Oceanography Centre Joseph Proudman Building 6 Brownlow Street Liverpool L3 5DA : 0151 795 4800 : 0151 795 4905 : [email protected] Page 2 Contents Contents .............................................................................................................. 3 Warranty and Liability ......................................................................................... 5 Introduction ........................................................................................................ 7 The National Oceanography Centre ................................................................ 7 The Applications Team .................................................................................... 7 POLTIPS3 tidal predictions software ............................................................. 8 What are the differences between the Standard, Custom / Publishers and UserData versions of POLTIPS ......................................................................... 8 Publishing tidal prediction on the Internet ..................................................... 9 Hardware Requirements ................................................................................. 9 Prediction Methods ......................................................................................... 9 Conventions used in this manual .................................................................. 10 Installing and starting POLTIPS3 ...................................................................... 11 How to install POLTIPS3 Please read before installation.......................... 11 How to start POLTIPS3 ................................................................................. 11 Troubleshooting ............................................................................................ 11 Ports with complex tidal patterns ................................................................. 12 The POLTIPS3 Window .................................................................................... 13 Using POLTIPS3 ................................................................................................ 15 Setting the parameters for the prediction .................................................... 15 List view ......................................................................................................... 16 Tide table view .............................................................................................. 17 Equal Interval Predictions ............................................................................. 18 Output precision and units............................................................................ 20 Datums .......................................................................................................... 20 Formatting the List View ............................................................................... 21 Saving tidal data to disk or the clipboard ...................................................... 22 Saving a file to disk ........................................................................................ 22 Using the Clipboard ....................................................................................... 22 Graphing the tide .............................................................................................. 23 Formatting the graph view ............................................................................ 24 Switching between the different views ........................................................ 25 Locations with complex tidal characteristics .................................................... 27 Checking the Data ......................................................................................... 29 Tidal statistics .................................................................................................... 33 Using the map ................................................................................................... 35 Selecting a port for prediction ...................................................................... 36 Showing the location of a port on the map .................................................. 36 Sunrise & sunset times ...................................................................................... 37 Fixed format tide tables .................................................................................... 39 Page 3 Additional fixed format 1 .............................................................................. 39 Additional fixed format 2 .............................................................................. 40 Additional fixed format 3 .............................................................................. 41 Custom tide table format .................................................................................. 43 ‘Font’ tab ....................................................................................................... 43 ‘Appearance’ tab ........................................................................................... 44 ‘Advanced’ tab .............................................................................................. 46 Saving your tide table settings ...................................................................... 47 Vertical Spacing of the Data .......................................................................... 48 Batch Mode Operation ..................................................................................... 49 PBF File Format ............................................................................................. 49 Using your own harmonic constants ................................................................ 51 About Harmonic Constants ........................................................................... 51 Data Files ....................................................................................................... 51 Accessing the sample ports included with POLTIPS3 .................................. 53 Licence Restrictions ...................................................................................... 53 Showing your port on the map ..................................................................... 54 Handling Different Time Zones (UT/GMT or Local Time) .............................. 54 Specifying on non‐UT/GMT Time Zone ......................................................... 55 Using the data in Microsoft Excel‐97 ................................................................ 56 Time and Tide ................................................................................................... 58 A History of Tidal Prediction ............................................................................. 62 Frequently Asked Questions about Tides ......................................................... 66 Glossary ............................................................................................................. 74 Table of Standard Harmonic Constants ............................................................ 78 Page 4 Warranty and Liability 1. 2. 3. 4. 5. 6. 7. 8. 9. If the licence disk or CD‐ROM is defective NOC will replace it at no charge provided the defective item is returned within thirty (30) days from the date of despatch from the National Oceanography Centre (NOC). NOC will refund the purchasing price provided all items (CD‐ROM, licence disk and user manual) is returned within thirty (30) days from the date of despatch from NOC and provided that all seals remain intact. No refund will be made if the seal has been broken on any items. The latest version of POLTIPS∙3 will be available to download from our web site. NOC will endeavour to contact all registered customers (preferably by e‐ mail) informing them that a new update has been placed on the web ready to download. NOC will provide technical support for POLTIPS∙3 only to its registered users. We do not guarantee that the functions contained in POLTIPS∙3 will meet your requirements or that the operation of the program will be either error free or appear precisely as described in any documentation describing POLTIPS∙3. No responsibility can be accepted by NERC for any consequential loss or damage arising from any use that is made of POLTIPS∙3 and output from POLTIPS∙3 howsoever caused. All implied warranties, terms, representations and conditions, including (by way of example only) the implied conditions of satisfactory quality and fitness for any purpose of the information, are excluded to the fullest extent permitted by law. This Agreement is governed by English law and the parties submit to the exclusive jurisdiction of the English courts. Please ensure you read the warning in the box on page 20 regarding the calculation of tides for locations with a complex tidal regime. Please also read the full terms & conditions given on a separate sheet included with the software. Page 5 Page 6 Introduction The National Oceanography Centre The National Oceanography Centre (NOC) is a component laboratory of the UK’s Natural Environment Research Council (NERC). The offices of the Liverpool Site of the National Oceanography Centre, the other site being based in Southampton. Around 100 people work in the Liverpool office. The NOC has provided a national and international tidal prediction service since 1924, in fact the modern methods of tidal prediction used throughout the world are based on the work of Dr. Arthur Doodson in the 1920s and who later became Director of the laboratory. Since then, NOC has continued to develop and refine the analytical methods used to compute the tides. Coupled with advances in modern computer hardware and software, we now have the most accurate tidal prediction software available. As the laboratory responsible for the installation, maintenance and running of the UK’s National Tide Gauge Network we have access to the most accurate and up‐to‐date data which we utilise to derive harmonic constants used in the computation of tide tables. Although some methods of tidal prediction use only a few harmonic constituents, the National Oceanography Centre uses up to 150 harmonic constants for some main ports, hence producing what NOC believes to be the most accurate tidal predictions available. The Applications Team The National Oceanography Centre has, since the 1920s, had a team of tidal experts produce tide tables for organisations all over the world. In 1992, the group was renamed ‘The Applications Team’ and the range of data and Page 7 services it offered was greatly expanded to include the results of the latest NOC scientific research. However, oceanographic research tends to produce vast amounts of raw data with little meaning to anyone other than a trained oceanographer. The Applications Team mission is to provide a ‘value‐added’ service, which includes ensuring that the customer gets the data they require in a form that is easily understood. This is achieved by creating visualisations of the data, fully documented reports, or by processing the raw data to derive new data sets that are of more value to users in the ‘real’ world. The Applications Team also develops software that allows users to buy raw data that remains hidden behind a friendly user interface, and carries out all the processing necessary to produce attractive and informative displays which can be easily printed or exported into other software. POLTIPS3 tidal predictions software POLTIPS is one such product developed by the Applications Team. First released in 1993 as a DOS product for PCs, its success has led to successive refinements, and the inevitable move to the Windows environment. The current version of POLTIPS is by far the most powerful and user friendly version to date. Hidden behind the simple to use interface is a powerful mathematical engine for computing the tides, combined with sophisticated graphical layout tools for producing tide tables and graphs of the tide. Combined with NOC’s internationally renowned reputation for accuracy, POLTIPS is one of the most powerful tidal prediction programs available. What are the differences between the Standard, Custom / Publishers and UserData versions of POLTIPS Due to the different requirements of the wide variety of POLTIPS users, we have created three different versions of POLTIPS3. They are basically the same program but have certain restrictions imposed. The standard version can be bought with either a three or five year licence and contains around 700 UK ports. This has a slightly reduced accuracy over both the NOC in‐house predictions and the custom/publishers version of POLTIPS3. Users of the standard version are not licensed to publish the data in any form however the tide tables can be distributed free of charge within a membership club (e.g. a sailing or fishing club). Users cannot use the custom tide‐table layouts or their own harmonic constants with the software. Page 8 Although the accuracy is slightly reduced compared with the customised version, it is still suitable for the majority of applications. For consultancy or engineering use, we recommend the custom version. The custom/publishers version is purchased on an individual port basis with either a two or three year licence. Users are permitted to publish the tide tables for resale in any number of books for which they own the complete copyright (i.e. users cannot purchase this software and then sell the results on to third party publishers without written permission from NOC). See also the restrictions on Internet publishing below. Users will also be able to use the custom tide table layout and use their own harmonic constants (subject to the same 2 or 3 year licence). The UserData version of POLTIPS3 is provided without any data sets. It is for use by users who want to compute predictions using their own harmonic constants and is usually sold with a 10 year licence. Publishing tidal prediction on the Internet Only users of the Custom/Publishers and UserData version of POLTIPS3 can publish the results on the Internet. This is limited to one month in advance of the current date. Hardware Requirements The minimum requirements for POLTIPS3 is a PC running Windows XP, Vista or Windows 7 with about 10MB of free hard disk space. Prediction Methods Harmonic constants are used for computing predictions for standard ports with time and height differences used for the secondary ports. Some standard ports have additional tidal terms called Shallow Water Corrections. Harmonic Constants and Standard Ports A set of harmonic constants exists for most of the main ports around the coast. These are called standard ports, and POLTIPS3 can compute equal interval predictions as well as high and low waters. Sets of harmonic constants usually exist only for locations where there has been a tide gauge Page 9 and a suitable period of observed data to analyse (for example, ports on the National Tide Gauge Network, or locations of particular scientific interest). A few standard ports have quite a complex tidal pattern that cannot be accurately reproduced just using harmonic constants. These ports have additional factors called shallow water corrections, used to make small adjustments to the high and low water times and heights. Equal interval predictions cannot be made for ports with shallow water corrections. Secondary Ports There are many locations around the coast where long periods of tidal observations do not exist. Predictions for such locations are computed by making a prediction for a nearby main port, and then applying time and height differences to the high and low waters. Each secondary port has 4 separate time differences depending on whether high or low waters are being predicted and on the time of day. There are also 4 height differences for mean high and low water springs and neaps. Equal interval predictions cannot be computed for secondary ports. Conventions used in this manual File Print means from the ‘File’ menu, select ‘Print’. abcdefg means you type this text in. + X means hold down the shift key and press ‘X’. + X Page 10 means hold down the control (or ctrl) key and press ‘X’. Installing and starting POLTIPS3 How to install POLTIPS3 Please read before installation IMPORTANT: You must be logged on as administrator to install POLTIPS on your machine. Insert the POLTIPS3 CD into your optical drive. The CD should automatically run the installation program. If this does not start after 20 seconds, you will need to run the program manually as explained below. Click on the start button and select Run. In the dialog box, type d:\setup where d is the drive letter of your CD‐ROM, and click OK. Follow the on‐ screen instructions. When the installation program asks for a destination folder to install POLTIPS into, accept the default folder otherwise the automatic licence and font installation may not work. POLTIPS3 will be installed on your computer’s hard disk (the default location is c:\Program Files\POLTIPS–3) and an icon will be created automatically on the programs menu of your Start Button and on your desktop. How to start POLTIPS3 To start POLTIPS3, click on the start button, select Programs and then POLTIPS3. Alternatively, double‐click the icon on your desktop. Troubleshooting POLTIPS won’t compute the tides for the locations or period that you expect. When you start POLTIPS, your licence details will be displayed on the initial photo screen. If this does not match what you expect, the licence may not have installed properly. Copy the file from the root directory of the POLTIPS CD into the folder in which POLTIPS is installed (usually C:\Program Files\POLTIPS‐3). Page 11 The Moon Symbols are not appearing on the tide tables. The moon symbols font should install when you install POLTIPS – however if, when viewing a tide table, you see the letters ‘A’, ‘B’, ‘C’, and ‘D’ appearing under the day of the week instead of the moon symbols (A B C D), the font did not install and you will need to install it manually. Copy the moonsym.ttf file from the CD into the fonts folder inside your windows folder (you will need to be logged on as administrator to do this). The software did not appear to install correctly. If you are having problems running the software after installing it, please make sure you are logged on as administrator when you install it. You should also try uninstalling any previous versions of the software and then try to reinstall the CD. If you still have problems, contact the Tidal Prediction Service at the National Oceanography Centre. Ports with complex tidal patterns Some ports have unusual tidal characteristics (e.g. Bournemouth, Cowes, Poole, Portland, Southampton and Weymouth). If you use POLTIPS3 to do predictions for any of the above ports, please read the section “Locations with unusual tidal characteristics” on page 27. Page 12 The POLTIPS3 Window The picture above shows how the POLTIPS3 should first look when you start the program. Interaction with the program is done through the options on the program menu, however, more commonly used controls have a button on the toolbar to provide quicker access. This screen also gives information on your licence and restrictions on the use of the software. The first line gives the company name the software is licensed to. Do not give copies of the software to other people, as it will have your company name embedded within the software. The licence duration is the period for which predictions can be made. Note that the software can be used outside of this period, but it will only make calculations for the years specified. The third line specifies whether you have a standard, customised or UserData licence (see page 8), and whether this is a single‐user licence or a network licence. Page 13 The last two lines specify whether the custom tide table feature is enabled (see page 43), and whether you are licensed to use your own sets of harmonic constants with the software (see page 48). Toolbar The buttons on the toolbar are: save the prediction to a text file on the disk print the display currently on screen copy the prediction data to the clipboard display the map set the input parameters for the prediction display the prediction in list format display the prediction as a tide table display the prediction as a graph scroll and zoom buttons about POLTIPS3. Page 14 Using POLTIPS3 This section takes you through what you need to know to produce your first printed tide table. Setting the parameters for the prediction Before you can compute the tides, you need to tell POLTIPS3 where you would like the tide table for, the duration of the tide table and the type of prediction. Select InputTidal Predictions… to bring up the dialog box shown below. First select the port you require from the list of ports. You can either scroll down the list using the arrows and scroll bar, or just start typing the name in the box and the list will scroll automatically to the right place. Once you see the port name in the list, click on it. Now set the start and end date of the prediction you require in the date boxes – either by typing in the number directly, or using the up and down arrows next to each box. Alternatively, just click on one of the three preset buttons to make a prediction for the next 7 days, the current month or the current year. The dates will be filled in automatically for you. Page 15 Then select the type of prediction you require from the choice of five types. The default is to compute high and low waters (sometimes known as turning points), however you can select equal interval predictions and specify the time interval in minutes (default is 60 minutes). You can also opt to just have the high waters, the low waters or general tidal statistics for the location (see page 32). Finally select if you want times adjusted for British Summer Time (box ticked) or to leave all times in GMT/UT (unticked). And that’s it … just click ‘compute’ and the results will be displayed in the window. If you selected a long duration or you have a slower computer, you will see a progress indicator in the bottom left corner of the window and the calculation may take a few seconds. List view When you make a prediction, it is always initially displayed in what is called the list view (see picture). This gives one high water or low water per line. As high waters and low waters always alternate (unless you selected “high waters only” or “low waters only” in the dialog box) it should be obvious which is a high water and which is a low water. Page 16 To scroll up and down through the prediction, use either the page up and down keys on your keyboard, the up and down cursor keys or the up and down arrows on the toolbar. At any time you can switch back to the list view from one of the other views using OutputList View or clicking the toolbar button If you save a prediction to disk, or copy it to the clipboard, it is the list format that is used (even if you are viewing another format on screen). You can also choose to print the data in this format, however for any duration longer that a week or two, it could generate a substantial number of pages of output. A more common format for printing is the tide table format. Tide table view The tide table view outputs the prediction in a more traditional tide table layout as shown below, and is selected with OutputTide Table or clicking on the tide table toolbar button . You can scroll up and down to see the rest of the page using the up and down arrows on the keyboard or the toolbar. To move onto the next page of the tide table, use the left and right arrows or page up and page down on the keyboard. Page 17 To print the tide table, select FilePrint or click the print button on the toolbar. From the print dialog you can select which pages of the tide table you wish to print and the number of copies, as well has being able to change all the settings specific to your printer. Note that on rare occasions it is possible that five tides can occur in one day. If this happens, POLTIPS will automatically reduce the text size and spacing to fit in the extra tide. Why do some days only have three tides? The average time between successive turning points is 6 hours and 12½ minutes (i.e. four tides take 24 hours and 50 minutes meaning the tide moves on by 50 minutes each day). About every 7th or 8th day, one of the tides moves across midnight into the next day leaving only three turning points on that day. Why is the phase of the moon shown on a tide table? The tide is directly related to the phase of the moon. Spring tides usually occur 1 to 2 days after new and full moon and neap tides 1 to 2 days after the first and third quarter. The moon symbols are shown to enable easy identification of springs and neaps. A = New Moon B = First Quarter C = Full Moon D = Third Quarter Equal Interval Predictions An equal interval prediction is one that gives the height of the tide at certain equally spaced time intervals (for example every 15 minutes or every hour), rather than at the specific time of high and low water. Using this type of prediction you can see how the tide changes over time. Equal interval predictions are only available for standard ports, not secondary ports (see page 9). If you ask POLTIPS3 to compute an equal interval for a secondary port, you will be asked whether you would like to use the reference standard port, or whether you would like to change to high and low waters for your selected port. Select the option you require to continue, or cancel the prediction. Page 18 The list view for equal interval predictions is the same as for high and low waters, however the time intervals are equally spaced. The tide table view for equal interval predictions is completely different from the high and low water tide table and is available only when the interval is set to 60 minutes – this is often called an hourly height table. Note that all times for equal interval predictions are given in GMT/UTC only – British Summer Time (BST) is not supported. As with the high and low water tide table, the full width of the window is used meaning that you may need to scroll up and down with the arrow keys or toolbar buttons to see the whole table. Page 19 When printing the hourly height tide table you must set the printer to landscape mode rather than portrait. If you forget to change this, you will get a warning message appear and printing will not continue until this has been changed. Output precision and units The output precision on the list view and the tide table view can be set to 1,2 or 3 decimal places (the default being 2). Note that although the data can be output to 3 decimal places, it does not imply that the data is accurate to 3 decimal places as there are many factors that can influence the tides (see Time and Tide on page 58). To change the precision of the output, select OutputPrecision. You also have the option of switching the units used for the sea level between metres (default) or feet. Select OutputUnits and select the unit you require. Note: if you select feet for the units, the value is a decimal value and not feet and inches (e.g. 4.5 means 4½’ (4’6”) and not 4’5”). Datums What is a Datum? When measuring the height of something, you must specify what that height is measured relative to. For example if you hold a ball out in front of you over a desk, the height of the ball is say 70cm above the desk. However if someone comes and takes the desk away, you could say the height of the ball is 145cm above the floor. You have two different heights even though you have not moved your arm. What has happened is that the datum has changed. In the first case the datum was the desk, and in the second, the datum was the floor. Likewise tide heights must be measured to a specified datum – the two most common being Chart Datum and Ordnance Datum, although some ports use a datum specific to that location (for example a dock sill). These are called special datums. Chart Datum This is the most common datum used on tide tables and is defined as the datum of soundings on Admiralty Charts. It is usually set to correspond to the Page 20 lowest level to which a tide can fall under normal conditions (called the Lowest Astronomical Tide or LAT), therefore making all the predicted tide level values positive. However this is not always the case and for some ports, the surveying authority has set chart datum above LAT. Chart Datum does not conform to any uniform tidal level as it is based on the tidal range at the location. Therefore it is not a suitable datum for comparing levels at more than one location. Ordnance Datum Ordnance datum is sometimes referred to as land survey datum, and is a horizontal plane. It is used when the absolute heights along a stretch of coastline need to be compared. The datum used for the British mainland (and some of the closer offshore islands) is called Ordnance Datum (Newlyn) as it is based on the average value of mean sea level at Newlyn for the six year period from 1915 to 1921. Due to the subsequent rise in mean sea level, this datum is now about 0.2m below mean sea level at Newlyn. For locations not on the British mainland, other horizontal datums exist – Ordnance Datum (Belfast) [ODB] for Northern Ireland, Ordnance Datum (Dublin) [ODD] for the Republic of Ireland and Ordnance Datum (local) [ODL] for more remote locations. European locations have their own land‐levelling datum. Datums in POLTIPS3 When making a prediction in POLTIPS3, the default datum is always Chart Datum unless a special datum is specified for the port (usually given in the port name). For most locations, you can switch between Chart and Ordnance datum by selecting OutputDatum and choosing the one you require. The currently selected datum is displayed on both the list view and the tide table view. Formatting the List View One of the main uses of the list view is for getting the tide data into another Windows application (such as Microsoft Excel spreadsheet). To allow for more flexibility, POLTIPS3 Page 21 will let you change the format by selecting OutputFormat List View. This is only available when the list view is selected for the current prediction. This dialog gives you the capability to change the date and time separator characters and the field separator (the characters between the date and time, and the time and height). You can also specify whether the month is displayed as a number or 3 letter abbreviated word, and whether you require leading zeros on the dates and time (only the hours as the minutes always use a leading zero). The options set in this dialog box are also used when tide data is copied to the clipboard or saved into a text file (see the next section). Saving tidal data to disk or the clipboard Although POLTIPS3 has a powerful and easy to use set of features, there may be times when you need to export the data into another Windows application. POLTIPS3 gives you two ways to do this: save the list view to a text file on your hard disk copy and paste via the clipboard Saving a file to disk Compute the tides as normal and ensure list view is selected. Make any changes to the layout using the Format List View dialog, then select either FileSave as Text File, click on the save button on the toolbar or press +S. Enter the filename and click the save button to save the prediction to disk. This can now be loaded into any Windows application that will read in a plain (ASCII) text file (e.g. notepad, Word, Excel) Using the Clipboard A quicker way of getting data into another application is to use the Windows clipboard. Make your prediction as normal, then select EditCopy, click the copy button on the toolbar or type +C. Now simply switch to the application you want to put the tidal data into and select paste from the edit menu of that application. Provided the program supports text input, the data should appear in the application. Page 22 Graphing the tide In addition to the list view and the tide table view, POLTIPS3 can display the tide as a graph. How this graph looks depends on whether you display a high and low water prediction or an equal interval prediction. To bring up the graph of the tide, select OutputGraph or click on the graph button on the toolbar . The picture below shows how one month of high and low waters might look. When you view the graph of a high and low water prediction, blue diamonds indicate the time (horizontal axis) and height (vertical axis) of the data. In the picture below, you can clearly see the spring‐neap tidal cycle. You can zoom in to any section on the graph by holding down the left mouse button and dragging from left to right across the graph. You will see the area you are selecting change colour, and when you release the mouse button, the selected area will be scaled to fill the window. You can also use the buttons on the toolbar to zoom in and out. Page 23 You can scroll left and right within the limits of the prediction using the left and right arrows on the keyboard or the toolbar. If you view the graph of an equal interval prediction, you get a continuous line showing the shape of the tide. To get an accurate graph, it is advisable to use an interval of 15 minutes or less for the prediction. Below shows how a 5 minute prediction for 2 days might look. When viewed in list view, you get 576 values however this is much easier to grasp when you look at it as a graph. Notice that the intervals plotted on the time axis vary automatically depending on how much is displayed. When viewing a month, you only get the date of each Sunday displayed. However with 2 days in view you get every 6 hours. Zoom in further, and the graph will show every hour. Formatting the graph view Many of the automatic settings on the graph can be changed (for example you can remove the grey background from the graph for clearer printing). To do this, select Output Format Graph. Page 24 From this dialog box, it is possible to change various aspects of the graph: the title along the top of the graph the text displayed along the vertical (Y) axis the maximum and minimum values for the vertical axis the interval for the time axis (default is automatic) the size of the markers (default is small) whether you want grid lines shown on the graph whether you want the grey background on the graph whether just markers, just lines or both are used to display the graph (defaults to markers only for high and low waters and lines only for interval predictions). If the X‐axis (time‐axis) scaling is set to automatic, then POLTIPS3 will select the appropriate one based on the period of time displayed on the screen. When viewing a high and low water prediction, it is advisable only to use markers for the plot style as using lines simply joins the points together rather than showing the actual shape of the tide. You must use an equal interval prediction to get a sensible plot of the tide between the turning points. The line thickness can be varied by pressing ‘L’ when the graph is displayed (without the dialog box showing). Switching between the different views You can switch between list view, tide table view and graph view by selecting the appropriate view from the output menu or by clicking on one of the three output buttons on the toolbar . Page 25 Page 26 Locations with complex tidal characteristics Most ports in the UK have a fairly regular semi‐diurnal tidal regime ‐ two high waters and two low waters per day (well every 24 hours and 50 minutes). The graph below shows the tides for Liverpool. High waters and low waters are collectively known as turning points because at these points in time, the tide turns from flood to ebb (a high water) or ebb to flood (a low water). There are some locations that experience a more complex tidal pattern which can lead to additional turning points occurring. Look at the graph below for Southampton – a location famous for its double high water. You can clearly see the double high water in each tidal cycle however between them there is, technically speaking anyway, a low water. Most people would not consider this a ‘real’ low water as to someone standing at the quayside the tide would still appear to be ‘in’. Page 27 These ‘additional’ turning points cause a problem for any tidal calculation software, especially if you want to create a traditional style tide table which shows no more than four turning points (two high waters and two low waters each day). The software must attempt to remove these unwanted turning points whilst leaving the correct ones for inclusion in the tide table. This is not difficult for ports such as Southampton or Weymouth (a double low water port – graph shown below), some locations have a tidal regime that is very complex. Below is a graph for the location “Islay (Port Ellen)”... Even an experienced tidal publisher would have difficulty identifying which tides should be included in a tide table. On the 6/9/2011 look how high the second high water is. Page 28 On the 7/9/2011 where is the second low water on that day? On the 8/9/2011 there are three possible candidates for the morning low water. Producing a tide table for Islay is near impossible and different software would pick different principle tides. Even manual selection of the tides could lead to a different tide table depending on who picked them. For this reason POLTIPS treats complex tidal locations a little differently. When a tidal prediction is made the software first looks for days when there are five tides. If it finds any, the software can produce a tide table as normal but will reduce the line spacing to fit in the extra tide. Although a rare occurrence it most often happens on BST adjusted tide tables when the clocks go back an hour (BST returns to GMT). On this day there are 25 hours and, therefore, a fifth tide is more likely. If any day is found to have six or more turning points then you are given two options. (i) POLTIPS can try to identify the main turning points and remove the extra ones, or (ii) you can elect to keep all turning points (although tide table formats will only show the first five on any day, and a warning will be given by the software to remind you). If you opt to remove the ‘additional’ tides then it is vital that you check the data. The procedure for doing this is outlined below. Note that for a small number of locations (such as Islay) it is not possible to remove the extra tides due to the complexity of the tidal regime and, therefore, all tide tables will show just the first five turning points in a day. Checking the Data When you opt to remove the tides you should view the data as a graph (Output Graph View). The plot shows the tides that POLTIPS has identified as being the principle turning points (blue dots) and the turning points it has selected to remove (red dots). You can toggle the red dots on/off by pressing ‘X’ on the keyboard. Page 29 The plot on the previous page shows a month of data for Weymouth. To inspect the data more closely zoom in onto a period to show a couple of days at a time. You will see that POLTIPS does not always pick the lowest low water and highest high waters when there are multiple tides. In most cases it will select the first low or first high water as the principle one as this will lead to better consistency from one tidal cycle to the next. Page 30 In the case of Weymouth (a double low water port) shown above, if POLTIPS always picked the lowest low water, the data would jump about between the first and second low waters meaning on one tidal cycle you could have a 5 hour ebb tide and on the next an 8 hour ebb tide. On certain occasions POLTIPS may identify the wrong principle turning points. For example in the graphs on the following page showing the tide for Christchurch (a double‐high water port) POLTIPS has selected to pick the first high water as the main one. However, over the course of a few tidal cycles, the significance of the first high water diminishes and for a few days the first high water is considerably lower than the second. If producing a tide table, it is sometimes desirable to swap one of the selected tides (shown in blue) with one of the removed tides (shown in red). This should be done with extreme caution and only if you fully understand what you are doing. To do this, follow these steps: 1. Zoom in on the area so that the dots on the graph are clearly separated. 2. With the mouse right‐click on the blue dot representing the turning point you no longer require (i.e. the one POLTIPS‐3 has wrongly selected. It will be ringed to show you have selected it. Page 31 3. Hold shift down and with the mouse, right‐click on the red tide you want to use in its place. These should be adjacent low waters or adjacent high waters. Since turning points always alternate between high water and low water, the two selected dots must be two dots apart. 4. Press ‘S’ to swap them. The red and blue dots will change places and the new blue dot will now be the one shown on the tide table outputs. Note that you can only swap two adjacent high waters if the low water between them is not selected (i.e. it must be a red dot). Likewise, swapping two adjacent low waters must have a non‐selected high water between them. Not having this rule would permit the tides to go out of sequence and you could end up with two high waters next to each other in the tide table rather than maintaining the alternating high‐low‐high‐low sequence. Page 32 Tidal statistics From the Tidal Predictions input dialog box, you can select to have POLTIPS3 compute some general statistics about the tide at the selected location. To save the information in a file, select either FileSave as Text File, click on the save button on the toolbar or press +S. Page 33 The information calculated is: Position – the latitude and longitude of the port (if available). Port details – usually states whether the port is a standard port (with harmonic constants) or a secondary port (based on time and height differences) with the reference standard port. Datum of Predictions – The height of Ordnance Datum relative to Chart Datum and a description of how the Ordnance Datum is defined. Highest Astronomical Tide (HAT) – the highest level the tide is likely to reach under normal meteorological conditions and the date this occurs between 1997 and 2015 (see glossary). Lowest Astronomical Tide (LAT) – the lowest level the tide is likely to reach under normal meteorological conditions and the date this occurs between 1997 and 2015 (see glossary). Maximum Tidal Range possible – the largest difference that occurs between one high water and its adjacent low water during the period 1997 to 2015. Mean High/Low Water Springs/Neaps (MHWS, MHWN, MLWN, MLWS) – see glossary. Tide Type – gives the value which indicates whether the tide is semidiurnal, diurnal or mixed (see glossary). Shallow Water Influence – an indication of how much shallow water effects influence the overall tide. Values over 0.2 indicate a port that shows unusual tides, especially during neap tides. Statistics for the Selected Period Highest Tide in period – the highest level the tide reaches in the selected time period. Lowest Tide in period – the lowest level the tide reaches in the selected time period. Largest Tidal Range in period – the biggest difference that occurs between a high water and an adjacent low water in the selected time period. Average Flood time – the average time taken for the tide to ‘come in’ i.e. average time between low water and the next high water. Average Ebb time – the average time taken for the tide to ‘go out’ i.e. average time between a high water and the next low water. Quickest Flood time – the fastest time that the tide ‘comes in’ in the selected time period. Page 34 Using the map POLTIPS3 can display a map of the UK and the ports simply by selecting InputShow Map or clicking on the toolbar button . When the map is first displayed, only a selection of the ports available in POLTIPS3 are shown. However you can zoom in to a smaller area of the coast using either the zoom buttons on the toolbar or using the left‐mouse button to drag a rectangle over the area of the map you are interested in. As you zoom in, more ports will be displayed and the zoom level will be displayed in the status bar along the bottom of the window as “Zoom level 1” through to “Zoom level 5 (all ports shown)” Page 35 The reason for the blue shaded cross‐ hatching is to indicate the largest square area that can be displayed in the window. This allows consistency between the screen and printouts as the non‐ shaded area is the only part guaranteed to appear on both. It also remains consistent as the window is resized. Selecting a port for prediction To use the map to select a port, zoom into the area so that the port name is visible and click on the small diamond next to the port name with the right mouse button. The Tidal Predictions dialog box will appear with the port name already selected. Showing the location of a port on the map If you have the Tidal Prediction dialog box on screen and want to locate where a particular port is, select the port from the list and click on the ‘Show on Map’ button. The dialog will disappear and switch to the map view with the selected port centred in the window and the zoom level set appropriately to show the surrounding ports. Page 36 Sunrise & sunset times As POLTIPS is used by some almanac publishers, it also has the option to generate tables of sunrise and sunset times – either by selecting the port, or specifying the exact location (in latitude and longitude) and height above sea level. To bring up the dialog box, select InputSunrise and sunset by port to select one of the coastal locations in POLTIPS, or InputSunrise and sunset by lat,long to specify any location. Set the parameters in the dialog and click on the Compute Now button. After a couple of seconds the table giving sunrise and sunset times will be displayed. This can be scrolled in the same way as the tide table using the arrow keys or toolbar buttons. Page 37 Note that all times for sunrise and sunset are shown in UTC/GMT only. If you want to save the sunrise and sunset times in a file, select either FileSave as Text File, click on the save button on the toolbar or press +S while the sunrise/sunset table is on screen. The data will be saved as a list, one line per day, which can easily be imported into other software such as Microsoft Word or Excel. Page 38 Fixed format tide tables When you compute a high and low water prediction and click on the tide table button, you will be presented with the default POLTIPS tide table format. This is a 2 month per page format. However we have created some additional fixed tide table formats in the software as well as the ability to tailor the layout with a custom tide table (see page 43). To bring up one of these formats, compute the data as normal, then select the appropriate format from the output menu. Additional fixed format 1 This tide table format is for calculations of just the high waters (or just low waters). It is a one month per page format that separates the tides into morning and afternoon columns. It will put asterisks into the column if there is no tide in that half of the day. Page 39 Additional fixed format 2 This tide table format is a one month per page format for both high waters and low waters data. Using a grid, it clearly separates out the high waters and the low waters, and then subdivides the columns into morning and afternoon tides. Additional Key Options: Press L: Toggles the grid lines on/off. Press G: Toggles the gap fill characters on/off Press F: Changes between 3 pre‐defined fonts Page 40 Additional fixed format 3 This format is a landscape format for high water (or low water) only predictions. It is a four month per page format that is popular with publishers as the 4 monthly columns can be split up onto separate pages of a small booklet. Additional Key Options: Press G: Toggles the gap fill characters on/off Press F: Changes between 3 pre‐defined fonts Page 41 Page 42 Custom tide table format One of the features of POLTIPS3 available only on the customised and UserData licence is the ability to customise your own high and low water tide table layout. To access this, make a high and low water prediction as normal and then select OutputCustom Tide Table (HLW). The default layout for custom tide tables looks like the picture below. To change this layout, select OutputFormat Tide Table to bring up the dialog box shown below. As there are many settings that can be changed, they have been split across three ‘tabs’ called Font, Appearance and Advanced (shown below). When you make any changes to the settings, click either the ‘Apply’ button to see the effect of the changes without closing the dialog box, or the ‘OK’ button to accept the changes and close the dialog box. Once you have clicked ‘Apply’, you can no longer select cancel – you will need to change the settings back manually. ‘Font’ tab This tab allows you to select the font, size, weight and italic properties for each of the 6 parts of the tide table. All the fonts installed on your system should be listed in the drop‐down list under typeface name. Title refers to the top line of the tide table used for the port name. Page 43 Subtitle is the line directly below the title used to display the time zone, latitude/longitude and the year. Month is the font settings for the month headings Date is the settings for the date value. Data refers to the font used for the main tidal data, as well as the ‘time’ and units headings, and the day of the week. Footer is used for the datum statement and the footer text that appears at the bottom of the tide table. In POLTIPS3, the font size is not specified in the conventional unit of points but in its own units to allow greater precision in specifying the size. To convert from point size into POLTIPS3 font size multiply by approximately 12. Point Size POLTIPS3 Size Point Size POLTIPS3 Size 20 pt 240 11 pt 132 16 pt 192 10 pt 120 14 pt 168 9 pt 108 12 pt 144 8 pt 96 The precise scaling for prints on A4 paper is 12.085, but multiplying by 12 is close enough for all point sizes below 24pt. ‘Appearance’ tab This tab allows you to adjust some of the more common properties that affect the appearance of the tide table. Tides allows you to select whether you want just high waters, just low waters or both of them (default). You can also turn both of them off although this would not leave much in the way of data! Show gives you the option of displaying the days of the week, the location of the port (as a latitude and longitude), the moons phases and the time and units‐of‐ height (metres or feet) on the tide table. Page 44 It is advisable to always have the units of height shown if you intend to publish the tide table. If you turn this off, you should ensure that it is displayed elsewhere on the page. Months per page lets you select between 1 to 4 months per page of the tide table. If you want to use larger font sizes, then you may want to select less than the default of 4 months per page (3 pages per year) to allow space for the larger fonts. Columns per month give you the choice of 1 to 4 columns per month. The default and probably the most useful is 2 columns per page. Relative positioning allows you to finely adjust the positioning of the data within its ‘box’. The box is the allocated area on the tide table which contains the 4 tides for a particular date (one date boxe is shown shaded in the illustration on the right). The size of the box can vary depending on the number of columns per month and the number of months per page therefore the relative positioning values are specified as a percentage rather than an absolute measurement. The Date (H), Time and Height values are the horizontal positioning of the three values. It specifies the position of the right‐hand edge of the numbers as numbers are traditionally right‐ aligned. In the illustration that shows the default values, the date is right justified 26% of the way across the box, the times are 60% across and the heights are 94% across. Date (V) is the vertical positioning of the date. It specifies the percentage down from the top of the box for the top of the date value. This defaults to zero. If you change the default fonts, you will probably need to adjust these values to keep the data evenly spaced within the box. It is best to play around with the relative positioning values until you get something that looks good. Page 45 Title Lines, Column Lines and Footer Lines are used to specify if you require lines drawn to separate the titles, the columns of data and the footer. This can be set to single line, double line, dashed line or no line. ‘Advanced’ tab Port Name will let you select between either a short name, the long name or custom text of your choice. Examples of this: Short name: Long name: Custom: AVONMOUTH ENGLAND, WEST COAST – AVONMOUTH Avonmouth (Port of Bristol) The default is for long port name to be selected. Only the standard ports in POLTIPS3 have a long port name. If this is selected for a secondary port, the short name will be used. Datum Information also has the option of short text, long text and custom text. The long text (which is the default) gives the datum selected relative to the other principle datum. For example: Short text: Long text: Custom: Datum of Predictions = Chart Datum Datum of Predictions = Chart Datum : 6.50 metres below Ordnance Datum (Newlyn) CHART DATUM : 6.5m below Ordnance Datum Be wary of using custom datum statements in case you specify incorrect information. Page 46 Time Zone Text allows you to select between the following two formats: Selected GMT ; GMT/BST Time Zone: GMT/BST Displayed if BST not selected GMT Time Zone: GMT only Displayed if BST selected GMT/BST Time Zone: GMT/BST Note that the text displayed is based on whether BST was selected when the prediction was made and not on which months are displayed on screen. For example, if you predict a whole year with BST selected, and opt to display two months per page, page one which will contain January and February predictions will display GMT/BST even though BST does not start until March. This is for consistency across all pages of the tide table. Footer Text enables you to change the line of text that appears below the datum statement at the bottom of every page. This defaults to the standard NOC copyright message. Although this can be changed within the program, the condition for publication of tide tables produced by POLTIPS3 is that it must have the standard copyright message in the footer. If you change the footer text, you will get the following warning when you click OK. If you wish to publish tables without the standard footer text, you must first seek written permission from the Applications Group at the NOC. All the settings are retained between predictions so if you set up a tide table layout you like, you can predict multiple ports or periods of time and retain the settings. If you want to use the layout at a later date, you will need to save the settings to a file on disk (see below). Custom port name and custom datum statement changes are not stored between predictions as this information could potentially be wrong if a new prediction is made. Saving your tide table settings Page 47 Once you get a tide table layout that you like, you can save your settings for use with other tide tables (for different years or locations). Select OutputSave Custom Tide Table Format and specify a filename in which all the settings will be stored for later use. When you use the program at a later date, you can calculate your tidal prediction as normal and then reload your tide table layout again using OutputSelect Custom Tide Table Format. Custom Tide Table layout files use the file extension .ctt. Note that any custom datum statement or custom port name is not saved as part of the tide table layout. If the layout was applied to a prediction for a different port, this information would be wrong. Vertical Spacing of the Data The vertical spacing of the data is worked out automatically based on the number of data columns per month. You should ensure that you select a font size that is appropriate to the spacing. On rare occasions, it is possible for there to be five tides on one day. When this happens, POLTIPS will automatically reduce the spacing slightly. If you select a font size that leave very little space between the tides, then they may overlap when POLTIPS needs to reduce the spacing to allow for an extra tide. In the example below, the data on the right shows an extract from a tide table computed with British Summer Time. On the 28th, the clocks went back therefore the 00:12 was in BST, and the others on that day in GMT. This lead to an extra tide on this day which does not appear in the example on the left (where the whole tide table was produced in GMT). Page 48 Batch Mode Operation Batch mode allows you to compute the tides for many locations and/or many different time periods quickly using a file containing details of all the calculations that need to be carried out. Before you can run POLTIPS in batch mode, you must first set up a POLTIPS Batch File (.PBF file). This is a text file that can be created in any text editor (including Windows Notepad) which precisely defines all the tidal predictions that you want to run. Once you’ve done this, you start the job by selecting “Batch Processing Mode” from the file menu which will ask you for the .PBF file and then start computing the data. PBF File Format Each line of the file corresponds to one tide table or text output file. The format of a typical line might look something like this: ABERDEEN 01 01 2012 31 12 2012 T 60 G 1 M C T 1 XXX FILENAME.TXT A 0027 STREF Spacing in this file is critical. The different fields mean the following: Portname First 31 characters of the line Start date Three integers (nn nn nnnn). 4‐digit year must be used. End date Three integers (nn nn nnnn). 4‐digit year must be used. Prediction type Single character {T=turning points ; E=equal interval ; H=high waters only ; L=low waters only} Interval Integer value (interval spacing in minutes) ignored unless prediction type is E, however a value must still be entered. Daylight saving Single character {G=GMT only ; B=BST adjustment} Precision Single digit number {1,2 or 3 decimal places} Units Single character {M=metres ; F=feet} Datum Single character {C=chart datum ; O=ordnance datum ; S=special datum} Output format Single character T=text file (2 options, see subformat) C=Comma Seperated Values P=PDF (2 options, see subformat) Output subformat Single character {used only when format is T or P} format T: 1=text, 2=STFS format P: 1=standard, 2=use CTT file Page 49 CTT file Custom Tide Table definition file {no spaces allowed} Used only when output format is P and the subformat is 2. Set this to xxx for other outputs. Output file Output Filename {no spaces allowed} Extra tides What to do when extra tides found A=leave all tides in the data R=remove any extra tides U=user intervention (ask at runtime) NOC reference 4 digit number used in STFS output format only Station Ref String of characters used as a station reference {no spaces allowed, 63 characters maximum} The STFS format is rarely used now, but used to be a popular format for including tidal data into external devices. If you have problems using this feature, please send an e‐mail to the applications team ([email protected]) and attached the .PBF file you have been trying to set up. If the Output file specifies a subfolder (e.g. output\Dover2011.txt), the folder must already exist – POLTIPS will not create new folders on your hard disk. Page 50 Using your own harmonic constants Users of the standard version of POLTIPS are not licensed to use their own harmonic constants in the program. This feature will usually be disabled (check the title screen of the program). PLEASE READ Do not attempt to use your own harmonic constants in the software unless you: are comfortable editing text files on your PC are familiar with the basic concepts of harmonic prediction. About Harmonic Constants The basis of all tidal predictions is a set of harmonic constants for the location of interest. With these and the appropriate mathematics for calculating various astronomical parameters it is possible to predict the tide for any date future or past. For more information on harmonic constants read the section in the Frequently Asked Questions about Tides (page Error! Bookmark not defined.) entitled “How can tide tables be produced so accurately?” If you have your own sets of harmonic constants for a location, you can use POLTIPS3 to compute tidal predictions based on these harmonics for any date and time within your licensed period. These harmonics could have been obtained from either a tidal analysis carried out for you by NOC, derived from the NOC Tidal Analysis Software Kit (TASK) or from some other source. To use this feature you must have either a POLTIPS3 customised licence or a POLTIPS3 UserData licence. A UserData licence usually runs for 10 years. Data Files To incorporate your own harmonic constants into POLTIPS3, you must modify two files in the POLTIPS directory on your hard disk. Unless you changed the default location when you installed POLTIPS, this will be c:\Program Files\POLTIPS-3 INDEX.DAT Page 51 If you have a customised licence, this file will contain a list of the ports already included in POLTIPS3 (however your licence will restrict access to most of them). There is an example file called indexusr.dat which can replace index.dat that contains the additional three example ports included with POLTIPS3. If you have a UserData licence, index.dat will contain three sample ports only. The index file contains one line per port and includes the short port name, three numbers, a descriptive piece of text, and the long port name (optional). The spacing of the information on the line is very important – see table below: Characters 1 to 31 32 33 to 36 37 to 41 43 to 122 123 to end of line Description Short port name (max 30 characters) Port type: 1=standard port included by NOC 2=secondary port using time/height differences 4=port created with users own constants Number to indicate how to find the correct data for the port. If port type equals 4, this number is the line number in the USERCON.DAT file were the data for this port starts. If port type equals 1 or 4, this should generally be set to zero. If port type equals 2, it is used to indicate the reference port. descriptive text – optional (however 80 spaces must be typed if no text is supplied). This is displayed in the input dialog box when a port is selected. long port name – used by default on the hourly height tide table and optionally on the custom high and low waters tide table format. (max 72 characters). Normally, only standard ports have a long name, although one could be added for any port in the index file. As the spacing of the information must be precise, 1 0 use an existing entry to line up the different pieces SAMPLE M2 ONLY 3.000 of information when inserting your own entry into -1.000 ODN the index file. 2.000 0.0 31 2 0 SAMPLE M2 AND S2 USERCON.DAT 3.000 -1.000 ODN This file is used to store all your own sets of 2.000 0.0 31 1.000 0.0 36 harmonic constants that you will want to use in POLTIPS3 (not the standard licence). Each port has a minimum of 4 lines of header information and then a list of the harmonic constants (one‐per‐line) as shown in the example. Page 52 The first line has two values that indicate how many standard harmonics and how many shallow water constants are used for the port (the latter value will nearly always be zero). The second line has the port name which in the example is “SAMPLE M2 ONLY”. The third line contains the datum shift to get from mean sea level to chart datum (sometimes called Z0). The fourth line is the height of Chart Datum relative to Ordnance Datum and the name of the Ordnance Datum used (e.g. ODN, ODL, ODB, ODD). As chart datum is normally below Ordnance Datum, this value is usually negative. This is followed by one line per harmonic constant (i.e. if you specified there were 10 harmonic constants, there should be 10 extra lines). Each line has 3 values separated by one or more spaces. The three values required for each harmonic constant are the amplitude in metres, the phase lag in degrees (for information on how time zone relates to the phase lag, see the section below), and the harmonic constant number (see table of harmonic constants on page 78). If you have a customised licence or a UserData licence, then there will be a sample USERCON.DAT file included giving three examples – the first two matching those shown above. The first one contains just a single M2 constant so any prediction made will look like a basic sine wave with a period of 12 hours 25 minutes. The second example includes M2 and S2, the principal lunar and solar constituents and a prediction made with this will show a simple spring‐neap variation. The final example is of a real port (not disclosed as it is for sample purposes only and uses old data), and contains 17 harmonic constants. Accessing the sample ports included with POLTIPS3 If you have a UserData licence, the entries for these three sample ports will already be set up in the INDEX.DAT file. If you have a customised POLTIPS3 licence, these ports are not listed in the INDEX.DAT file. To access them you will need to place an entry in the index file for them to appear in the POLTIPS3 input dialog box, or copy the file INDEXUSR.DAT over the INDEX.DAT file. Licence Restrictions Users with a standard POLTIPS3 licence cannot use this feature. Users with a customised version of POLTIPS3 will be able to make predictions using their own constants for the same period as their licence. Page 53 Users with a UserData licence for POLTIPS3 will usually have a 10 year licence – this will have been specified when you purchased the software. Showing your port on the map If you wish for your port to appear on the map, you can insert an additional line per port into the file latlong.txt which is in the POLTIPS3 directory. Use one of the existing lines in the file to line up the data as shown in the following example: Aberdaron Aberdeen Aberdovey Aberporth 52 57 52 52 48 09 32 08 N N N N 04 02 04 04 43 05 03 33 W W W W 4 1 4 4 1 1 1 2 In the above example, Aberdaron will be plotted on the map at 52°48’ North, 4°43’ West. The first number after the position indicates at what zoom level the port should be displayed (1 = always displayed, 2,3,4 means that it is only displayed as you zoom in further). The last number on the line indicates where the text is written relative to the location marker (see the example below). This is used to prevent the names of ports in close proximity overlapping. To be able to click on a port and have it automatically selected in the input dialog box, the port name in the latlong.txt file and the index.dat file must be the same (although it is not case sensitive). Handling Different Time Zones (UT/GMT or Local Time) If you require the tidal data to be computed in a time zone other than UT(GMT), there are two ways you can achieve this: The harmonic constants have the phase values in UT(GMT) and the data is time shifted by POLTIPS‐3 to output the information in the correct time zone, along with the appropriate labels on the output. The harmonic constants are derived with the phase values already set such that the data is directly computed in the correct time zone. This Page 54 scenario is most likely if the original tide gauge data that was analysed was also in local time zone. POLTIPS‐3 must know which of these two methods is being used. For the first method, the data is time shifted into the correct time zone and the appropriate time zone label shown on all the outputs. For the second method, no time shift needs to be applied since the harmonic constants already have this included in the phase angles. Therefore POLTIPS only needs to know the time zone so that it can correctly label the output. Specifying on non‐UT/GMT Time Zone To specify a non‐UT/GMT time zone you should include a ‘dummy’ harmonic constant in the usercon.dat file. This should have an amplitude value which gives the time shift in hours, a phase value of 0.000 and a harmonic constant number of either ‐1 or ‐2. The time zone is specified in reverse (as is the norm on tide tables). Example: the port of Calais in France is 1 hour ahead of UT/GMT, therefore the amplitude for the ‘dummy time zone harmonic’ is set to ‐1.0 as it would normally be displayed as Time Zone: ‐0100 on the tide table. If the harmonic constants are already adjusted to this local time zone, specify a value of ‐2 for the harmonic constant number. However if the harmonic constants are all in UT/GMT and you require POLTIPS‐3 to adjust the output data into the local time zone, put ‐1 as the harmonic constant number. Remember to increase the harmonic constant count by 1 for the additional ‘constant’. 115 0 PORT OF CALAIS – FRANCE 4.09 0.000 XXX ‐1.0 0.0 ‐1 2.51 10.2 31 0.77 62.4 36 ... Page 55 Using the data in Microsoft Excel‐97 If you paste the data into Microsoft Excel, all the information will be placed in the first column of the spreadsheet. To make the data more useable you really need the date and time in one column and the levels in another column. To do this follow these steps. 1. Select column A by clicking on the letter at the top of the column. 2. From the Data menu, select Text to Columns. Step 1 of 3 of the text to columns wizard appears. 3. Select Fixed Width for the original data type and click the next button. 4. Excel will suggest some columns by putting the date and time in one and the heights in a second one. Accept these by clicking next. 5. Click finish to accept the default settings for each column. Page 56 6. You will probably need to widen column A to see the data as the date and time will not fit within the default column width. 7. Once you have the data in this form you will be able to use many of the excel functions to derive additional statistics and information about the tide, produce frequency distributions or use the chart wizard to produce graphs. 16 14 12 10 Series1 8 6 4 2 0 30/12/2001 00:00 04/01/2002 00:00 09/01/2002 00:00 14/01/2002 00:00 19/01/2002 00:00 24/01/2002 00:00 29/01/2002 00:00 03/02/2002 00:00 Page 57 Time and Tide Tides are the alternating rise and fall of the surface of the seas and oceans. They are due mainly to the gravitational attraction (pull) of the moon and sun on the rotating earth. Two high and two low tides occur daily around Britain and, with average weather conditions, scientists can predict their movements with considerable accuracy. Both moon and sun affect the tides, but since the moon is much closer to the earth (240,000 miles instead of 93,000,000 miles), it has more than twice the effect of the sun, even though it is much smaller. So, to understand tides it is best to start with the moon and the lunar tide, before looking at the effect of the sun. As everyone knows, the moon orbits around the earth. However the earth is not fixed rigidly in space, and as the moon orbits, it attracts the earth round in a monthly orbit of its own. So the earth has a small orbit caused by the moon in addition to its annual one round the sun. It is the gravitational pull of the moon on the earth that keeps the earth in its monthly orbit. This is just the same as when you whirl a weight round on a piece of string. It is only by constantly pulling on the string that you prevent the object from flying off. If you stop pulling completely, by letting go on the string, the object does fly off. Gravity acts in the same way as you pulling on the string, and prevents the earth from flying off. However, unlike the string, the attractive pull of gravity gets weaker as the distance between the objects increases (and it becomes stronger, of course, the closer they get). The earth is large, so the pull of gravity on the side of the earth nearer the moon is stronger than the pull on the side of the earth farther from the moon. The pull of the moon's gravity is just enough to keep the earth in its monthly orbit, but it is a bit stronger on the surface of the earth facing the moon (near side) and weaker on the far side. This means that on the near side, the moon tends to pull anything that's free to move towards it. In the same way, on the far side, there isn't quite enough gravitational pull, so that anything that's free to move tends to fly off, away from the moon. Of course, though land isn't free to move, the oceans are. So on the near side they are pulled into a bulge towards the moon, and on the far side, they pile up into a bulge away from the moon. Page 58 As the earth spins, different parts of the world move under the two bulges of high water and experience high tides, giving the familiar two tides a day (semi‐ diurnal tides) around Britain. In some parts of the world, local effects can mean only one tide a day (diurnal tides) – for example in the South China Sea and parts of North Australia – or even no tide at all. Between the two bulges are two troughs of low water, producing two low tides a day. The sun also creates a very similar though smaller effect (the solar tide) and it is the interaction of the lunar and solar tides that causes spring and neap tides. Springs and Neaps Tides change in height with low water level and high water level varying throughout the month. The tides build up to a maximum and fall to a minimum twice a month. The tides with the biggest difference between high and low water are called springs and those with the smallest are called neaps. Spring tides happen just after every full and new moon, when the sun, moon and earth are in line. That's when lunar and solar tides line up and reinforce each other, making a bigger total tide. Neap tides occur when the moon is in the first or third quarter ‐ when the sun, earth and moon form a right angle. The lunar high tide coincides with the solar low tide and they partly cancel out, giving a small total tide. Because of the regular motion of the sun, moon and earth, spring tides occur roughly 36 to 48 hours after the full or new moons, and for any given location, always at roughly the same time of day. For example at Liverpool, the spring tides are generally around midnight and midday. Not all spring tides are the same size. Springs nearest the equinoxes (21 March and 21 September ‐ when day and night are of equal length all over the world) are slightly bigger. The explanation for this is very complex and won't be given here. Worldly Effects Back on earth, tides are affected by more mundane things, such as weather and the shape of the coastline. In the upper reaches of estuaries the riverbed and shape of the estuary can distort the tidal pattern, producing long flood times and short ebb times. Though the time from high tide to high tide is the same as usual ‐ roughly 12 hours 25 minutes ‐ low tide is not half way between Page 59 them. At some places, the flood tide rises quickly after a period of low water lasting maybe four or five hours. This kind of geographical effect is very important, and because of it you should use local tide tables (available from tackle shops) when possible. Cromer, Lowestoft and Aldeburgh are fairly close to each other on the East Anglian coast. However, high tide is hours apart at these places. This is precisely the opposite to Southend and Herne Bay, which face each other across the mouth of the Thames. Their tides differ by only a few minutes. Without detailed geographical information, it is impossible to predict these differences, so stay with local tide tables. Geography also affects the tidal range. Looking at tide tables for all of Britain, it's clear that the height of the tide varies around the country. For example the spring tidal range at Avonmouth is 12.2m (40ft) while at Lowestoft it's only 1.9m (6ft). Weather which can have a profound effect on the tide, is impossible to predict when calculating tide tables. Strong winds and abnormal atmospheric pressure are two of the main causes of altered tides. For example, a strong wind blowing on to land has the effect of piling up the water, giving a higher than predicted tide. Page 60 Page 61 A History of Tidal Prediction It has long been known that there is a relationship between the movement of water in our seas and oceans, and the position of the sun and moon. Pytheas of Marseilles in the 5th Century BC was the first credited with linking the tides to the position of the moon. Pliny the Elder (AD 23‐79) noted that for twice‐ daily tides, the maximum tidal ranges occur just after the full and new moon, and how in March and September, they were likely to be even larger still. Strabo (c54 BC to AD 24) also noticed that the tidal range in the Persian Gulf was greatest when the moon is furthest from the plane of the equator, and are small and irregular when the moon passes through the equatorial plane. Of course not all facts about the tide were scientifically correct. Aristotle is credited with the law that no animal can die unless the tide is going out. This legend persisted for a long time, and even as recently as 1595, Parish Registers in Hartlepool recorded the phase of the tide along with the date and time of each death. By the mid‐17th century, many theories were being proposed to explain the movements of the tide. Galileo (1564‐1642) stated that tides were caused by the motion of the Earth around the Sun and its own rotation on its axis inducing motions in the sea which were modified by the shape of the sea‐bed. This is closer to what actually happens than Descartes (1596‐1650) theory that space is filled with an invisible matter called Ether which is compressed as the moon passed overhead and pushes down on the oceans. However Kepler (1571‐1630) was the first to state that the Moon exerted a gravitational attraction on the water. In the years that followed and as the laws of planetary motion and gravitation became accepted, Kepler’s idea of the tides became the most plausible. It wasn’t until Isaac Newton (1642‐1727) and his law of gravitational attraction that everything fell into place. He was the first to correctly explain the spring‐ neap cycle, and why equinoctial tides were larger than those at other times of the year. Now that tides were fully understood, scientists started to look for methods to accurately predict them for any date and time – future and past. Various methods have been devised for this, and all start with having a good series of observed sea levels, which are analysed to identify repeating patterns in the tide. Page 62 In 1832, Sir. John Lubbock developed a method of analysis and prediction based on relating the time and height of high and low water to the time of lunar transit, with corrections made for lunar and solar declination and distance. However the method generally considered to be the most accurate for most (but not all) locations is called Harmonic Analysis and Prediction. The basis for harmonic analysis is that the tide can be represented by a finite number of simple harmonic terms – each one a simple mathematical sine ‘wave’. Each constituent, either individually or in pairs, corresponds to one of the astronomical phenomena to affect the tide. Harmonic prediction involves simply calculating these harmonic ‘waves’ for any point in time and adding the results together to get the overall tide. Early development of Harmonic Analysis was carried out by Laplace, Lord Kelvin and George Darwin around 1910, however the most complete algebraic expansions were completed by Dr. Arthur Doodson (pictured right) in 1921, then secretary of the Liverpool Tidal Institute, and from 1946 to 1960, Director at Bidston. In 1924, the Liverpool Tidal Institute, under the directorship of Professor Proudman at Liverpool University, relocated to Bidston Observatory, and the first tide‐predicting machine was installed. This machine could be ‘programmed’ with the harmonic constants for any location and used to predict the tides for any date and time. A yearly tide table took nearly a week to produce. Five years later, the Liverpool Observatory of the Mersey Docks and Harbour Board and the Tidal Institute of the University of Liverpool amalgamated becoming the Liverpool Observatory and Tidal Institute. Dr. Doodson, now associate director, continued his ground‐breaking research into new methods for the analysis of tides. Two tide‐predicting machines were now in use (the only two in the British Empire), and the tidal expertise of the institute received worldwide acclaim. During the Second World War, valuable work was carried out at the observatory. The staff worked seven days a week, from early morning to late at night, analysing and predicting tides towards the war effort. Tidal predictions were swiftly predicted for the seas around Burma, France and Page 63 Holland. During these years one of the tide predicting machines was placed in a secret underground room in the Observatory grounds for security reasons. Photographic facilities were obtained, so that further copies of the predictions could be quickly provided in the event of their loss at sea. In 1946, Dr. Doodson took over as Director at Bidston, and the Tide Prediction Service expanded. It was helped by the construction of a large 42‐ constituent Doodson‐Légé predicting machine in 1949. This machine is still in working order at Bidston and can still predict the tide to an incredible accuracy. In 1961, shortly after the retirement of Dr Doodson, the Liverpool Observatory and Tidal Institute was renamed The University of Liverpool Tidal Institute and Observatory. In 1969, the Institute became a component body of the Natural Environment Research Council and was renamed the Institute of Coastal Oceanography and Tides (ICOT). It was around this time that an ambitious marine research programme was embarked upon, with a significant increase in staff. 1970 saw the installation of the institute’s first mainframe computer, an IBM 1130. This speeded up the computation of tide tables immensely – a yearly table now taking less than an hour to compute. The reduction of human intervention also meant that errors were less frequent so less time was spent checking the results for typing mistakes. In 1977 the institute was renamed yet again to the Proudman Oceanographic Laboratory in honour of Professor Proudman. It continued to develop its world‐renowned reputation in tidal prediction by developing new analytical Page 64 methods for locations that had a reputation for being difficult to predict accurately. By this time, ocean research had moved on to encompass the much harder to predict surge component of sea level (the change in level due to meteorological effects such as wind and atmospheric pressure). The computer model run twice a day at the UK Meteorological Office to predict surges around the coast was developed by scientists at NOC. In 1992, the Tidal Computation and Statistics Section became known as the Applications Group and the work branched out to include offshore tidal predictions based on sophisticated computer simulations of the worlds seas and oceans. In 1994, the first version of the POLTIPS tidal prediction package was released for the PC and could predict a yearly tide table in less than 10 minutes. The latest Windows version of the software (to which this user guide accompanies) can carry out the same task in less than 5 seconds on a typical modern PC. In 2004, the laboratory moved from it’s home in Bidston to a new building on the University of Liverpool campus. It is incredible to think how far we have come over the last 80 years with the help of computing technology. And even though we know a lot about the tides, we are just beginning to fully understand the other processes that go on within our seas and oceans. Page 65 Frequently Asked Questions about Tides The Applications Group at the Proudman Oceanographic Laboratory are often contacted by people wanting to know about tides. For this reason we compiled a Frequently Asked Questions page for the NOC web site. This is included below. 1. What is a tide? This is not as obvious as it may sound ‐ it is not just the rise and fall of the water in our seas and oceans (tides are only one of the contributing factors in this rise and fall). A tide is the regular and predictable movement of water caused by astronomical phenomena the way the earth, moon and sun move in relation to each other and the force of gravity. These are the values that you can see in tide tables. Movement of water caused by meteorological effects (for example winds and atmospheric pressure changes) is called a surge. These are not easily predictable and require powerful computers and sophisticated software to predict just 36 hours in advance. These are the reasons why tide table predictions do not always agree with observations. The NOC develops the storm surge models for flood forecasting that have been run at the Met. Office since 1978. A large positive storm surge can add a few metres to the predicted water level. There is also wave movement which is purely wind generated and impossible to predict accurately. Therefore statistical values are used such as significant wave height which is the average of the highest one third of waves. 2. How far ahead can the tide be predicted? Since the tide is caused by the astronomy of the earth‐moon‐sun system, which is known very accurately and can be predicted well into the future, the tides can also be predicted well into the future. So if you want to plan your sailing club events for the year 2025, get in touch and (for a small fee) the Applications Team can provide you with the tide table. Page 66 When trying to predict well into the future, we have to take into account the rise in global sea level. The further into the future we try and predict, the more significant this effect can become. 3. What causes tides? Tides are caused by the effects of gravity in the earth‐moon‐sun system, and the movement of those three bodies within the system. If you imagine that the earth is completely covered in water, there are two bulges of water ‐ one towards the moon and another on the opposite side (see question 4). The rise and fall in sea level is caused by the earth rotating on its axis underneath these bulges of water. There are two tides a day because it passes under two bulges for each rotation (24 hours) (see question 7). This is called the lunar tide. Two bulges of water are also caused by the sun, called the solar tide ‐ and these can either reinforce or partially cancel out the lunar tide to give spring and neap tides (see question 8). 4. If gravity is always pulling towards the moon, what causes the bulge on the opposite side of the earth? This is probably the most common question we get asked ‐ and it could be something to do with the fact that many reference books explain it incorrectly. Most people think the moon rotates round the earth. In reality, the earth and the moon rotate about a common centre just inside the earth's surface (indicated by the light blue dot on the diagram). At this position the two forces acting: gravity towards the moon and a rotational force away from the moon are perfectly in balance. They have to be otherwise the earth and moon would not stay in this orbit. Page 67 The 'tide‐generating' force is the difference between these two forces (not just gravity as most people think). On the surface of the earth nearest the moon, gravity is greater than the rotational force, and so there is a net force towards the moon causing a bulge towards the moon. On the opposite side of the earth, gravity is less as it is further from the moon, so the rotational force is dominant. Hence there is a net force away from the moon. It is this that creates the second bulge away from the moon. (note that even this explanation is simplified for the purposes of this FAQ.) 5. Why are the tides not the same all round the coast of Britain? You might expect that as Britain passes under the bulge of water, time of high water would be roughly the same for all points on the coast, but it isn't. The problem is caused by the land that 'gets in the way' of the moving water. As the earth rotates, the water has to move to generate the high tides but because of the shape of coastlines and the variation in sea depth (bathymetry), there is a lag. Every location has a unique coastline and bathymetry that gives each location its unique tidal pattern. 6. How often do high tides occur? In UK waters, approximately every 12 hours 25 minutes. You may wonder why it is not exactly 12 hours, but you must remember that the moon is also orbiting around the earth. By the time a point on the earth's surface has rotated from point x to point y (12 hours) the moon has also moved a small amount, so the earth has to rotate for an extra 25 minutes from point y to point z to be under the high water bulge. Page 68 7. Are there always two high tides a day? No. Although most places in Britain experience approximately two tides a day (semi‐diurnal) there are some places which experience what is known as a double‐high water (e.g. Southampton) or double‐low water (e.g. Portland). This is caused by the shape of the coastline and the bathymetry (sea depth). Even for ‘well‐behaved’ locations, when you look at a tide‐table you will see that some days only have 3 tides. This is because the average time between high water and low water is 6 hours 12 minutes and not exactly 6 hours. Therefore on certain days, the fourth tide actually gets pushed across into the next day. The diagrams below show a typical tidal curve for three places round the UK coast. In some parts of the world there is only one high and one low water each day (diurnal) – for example in Karumba, Australia. In other places, it varies between semi‐diurnal and diurnal as in Musay‐id in the Arabian Gulf. 8. What are spring tides and neap tides? When the earth, moon and sun are in line (during new and full moon), the bulges of water caused by the moon and sun occur in the same place on the earth's surface. The lunar tide and the solar tide are reinforcing each other ‐ which leads to higher than average high tides, and lower than average low tides. These are called spring tides. When the earth, moon and sun form a right angle (at 90°) the high water caused by the lunar tide coincides with the low water of the solar tide. This produces lower than average high waters and higher than average low waters which are called neap tides. They occur approximately 7 days after spring tides. 9. Why are they called spring and neap tides? Page 69 Neap means low ‐ so that is an easy one. Spring tides can be confusing because they have nothing to do with the season. It is not exactly known where the word 'spring' comes from in this context but there are two possible origins. One possible source is a Scandinavian word meaning to 'leap up'. Another possibility is that it is related to the natural feature of a spring ‐ which is a place where water wells up from the earth. 10. Where are the highest tides in the world? Burncoat Head in the Bay of Fundy, Canada has an average spring tidal range of 12.9 m. The second largest tides in the world occur at Avonmouth in the Bristol Channel where the average spring range is 12.3 m. (The average spring tidal range is the average difference between high and low waters during spring tides). 11. Do the tides follow a repeated pattern? No. There are similarities ‐ for example every 18.6 years, we experience larger than average tides ‐ but they never actually repeat. 12. When during a year can we expect to find the largest tides? A day or two after the full or new moon nearest to the equinoxes. The spring equinox is usually the 21st March, and the autumn equinox, the 23rd September. Some years have tides that are notably higher than other years. 1997 was a significant year, as will be the year 2015. For really favourable conditions ‐ you will have to wait around until the year 3182. Even then, the tides may only be 1 or 2 cm higher than in 2015. 13. Do the planets have any affect on the tides? The tidal force generated by a body in space is based on two things – its mass and its distance from the earth ‐ and it is the latter of these that is far more significant. The nearest approach of Venus to earth is still more than 100 times further away than the moon. Hence the tidal force is approximately 0.000054 times that of the moon. That equates to a movement in sea level of less that a quarter of a millimetre (one hundredth of an inch). The next most significant planet is Jupiter, where the tidal force is 10 times less again. So as you can see, the effect of the planets on the tide can safely be ignored. Page 70 Even if all the planets line up such that their effects are combined, the additional force would be minuscule. On the 3rd May 2000, Mercury, Venus, Mars, Jupiter and Saturn lined up with the sun and moon. At the time a rumour circulated that the collective gravitational pull would initiate earthquakes, tidal waves and volcanic eruptions, something which of course never happened. 14. How can tide tables be produced so accurately? There are many different steps involved in obtaining the final numbers that go into a tide table. Before a tidal prediction can be made for a port, a long sequence of tidal observations for that port are needed (called a time series). This time series will include all the astronomical effects and local coastline/depth effects (which make up the tide) as well as the weather induced effects called the surge (see question 1). As shown in questions 6 and 8, there are certain frequencies that are known to occur in the tide. Some of these are listed below: 12 hours (12:00:00) repeated pattern (cycle) due to the gravity of the sun. 12:25:14.164 cycle due to the gravity of the moon. 24:00 and 24:50:28.328 cycles caused by the differences in the two tidal bulges. 27.2122 day cycle caused by change in lunar declination (Moons angle to the Earth). 27.5546 day cycle caused by a regular change in the Earth‐Moon distance. 29.5306 day cycle caused by the phases of the moon (see question 8). Each of these cycles is called a tidal harmonic constituent and POLTIPS uses in excess of 100 of them in calculating a tide table. You can see that the length of these cycles is known very accurately (to the nearest 1/1000th of a second. Therefore it is easy to find them in a sequence of observations using a method called tidal analysis. Once each constituent is identified, its size (amplitude) and time of 'arrival' (phase) is stored. These two values (known as a harmonic constant) are unique for every location. The amplitude and phase for each constituent combined with the fixed speed of that constituent allows us to predict its contribution to the overall tide forward or backward in time almost indefinitely. Adding up the effects of all the constituents at a given location lets us predict the overall tide at any time in the future or past. Page 71 Most tide tables just list the time and height when the water is at a maximum and minimum level in each tidal cycle. This leads to approximately 2 high waters and 2 low waters every 24 hours, 50 minutes (or 4 tides a day on most days with 3 tides on every 7th or 8th day). 15. Where can I find out more information about tides? There are many books that cover the subject of tides but the reader should be aware of inaccuracies that often exist. You should avoid books that talk about the second bulge on the far side of the earth being caused by either the moon’s gravity pulling the earth away from the water or by the spin on the Earth on its axis. The daily rotation of the Earth on its axis has no effect on tides. (See page 67: If gravity is always pulling towards the moon, what causes the bulge on the opposite side of the earth?) One excellent book on the subject: “Tides, Surges and Mean Sea Level” – David T. Pugh. Published by John Wiley and Sons, 1987. ISBN: 0 471 91505 X It covers the subject in immense detail but is very mathematical and rather expensive to buy. Page 72 Page 73 Glossary Datums – see section on Datums on page 20 BST – see Time Zones below Diurnal Tides ‐ tides that have only one high water and one low water every 24 hours, 50 minutes. This does not occur in UK waters. Ebb Tide – the seaward tidal flow from high water to low water. The Ebb time is the time between a high water and the following low water. Equinoctial Spring Tides – the spring tides that occur closest to the spring equinox and autumn equinox. The tidal effect due to the sun is at a maximum since the declination is zero. These usually have the largest tidal range of the year (i.e. the highest high waters and the lowest low waters). Extreme Levels – the term used to describe levels higher than HAT or lower than LAT, caused by meteorological conditions. These can only be derived statistically and are usually quoted as the still water level that is likely to appear once every so many years. Example of Extreme Levels for Dover Highest Astronomical Tide 7.23m 10 year extreme level 7.74m 100 year extreme level 8.21m 1000 year extreme level 8.80m 10000 year extreme level 9.47m Extreme level information is available from NOC for many coastal and offshore locations. Flood Tide – the landward tidal flow from low water to high water. The Flood time is the time between low water and the following high water. GMT/UT – see Time Zones below Harmonic Constants – the amplitude and phase of the various harmonic constituents that can be added together to calculate the overall tide. See “How can tide tables be produced so accurately” in the Frequently Asked Questions section of this manual for more details. Every location has a unique set of harmonic constants which are derived from tidal analysis of observations for that location. Page 74 Harmonic Constituents – the tide is influenced by many factors – and each one of these can be represented mathematically by one or more simple sine wave functions. Each one of these mathematical ‘waves’ is called a harmonic constituent of the tide. There are about 150 common harmonic constituents, each directly tied in with astronomical influences on the tide Highest and Lowest Astronomical Tide (HAT and LAT) – The Highest and Lowest Astronomical Tides are the highest and lowest levels that will normally be reached under normal meteorological conditions. To calculate this, the maximum and minimum values are taken from a continuous 19 year prediction. POLTIPS3 uses basic knowledge of the tides to reduce the time taken to compute HAT and LAT by only predicting the tides around the spring and autumn equinoxes for the years from 1997 to 2015 (both known years of extreme tidal levels). See also the entry on Extreme Levels. High and Low Waters – the times in the tidal cycle when the tide reaches its maximum and minimum height respectively. The time between successive high waters or successive low waters is about 12 hours 25 minutes for UK ports. High and low waters are collectively known as turning points as it is the point in the cycle when the tide turns from ebbing to flooding or vice versa. Hourly Heights – a type of tidal prediction where the height of the tide is computed at an hourly interval in time and not just for the point of high and low water. Mean High Water Neaps (MHWN) – the average level of high water during periods of neap tides. Mean High Water Springs (MHWS) – the average level of high water during periods of spring tides. Mean Low Water Neaps (MLWN) – the average level of low water during periods of neap tides. Mean Low Water Springs (MLWS) – average level of low water during periods of spring tides. Mixed Tide – tides that are neither totally semidiurnal or diurnal, however one or the other is usually predominant. Page 75 Neap Tides – tides that usually occur around the time of the first and last quarters of the moon, and have a smaller than average tidal range. Semidiurnal Tides – tides that have two high waters and two low waters every 24 hours 50 minutes. Nearly all the tides around the UK are of this type. Shallow Water Influence – a value that indicates how much shallow water effects influence the overall tide. See table below: Value less than 0.1 0.1 to 0.2 0.2 to 0.3 greater than 0.3 Description small influence – tide should have a typically sinusoidal profile. moderate influence – tide may show slightly unusual features, particularly during neap tides. significant influence – tide is complex and will probably have more than 4 tides per day (see the section on locations with unusual tides on page 27). very significant influence – tide will have a very unusual profile, possibly switching between semidiurnal and diurnal tides. Will certainly show more than 4 tides per day (see page 27). Spring Tides – tides that usually occur one or two days after new and full moon, and have a larger than average tidal ranges. Surges – the movement of water caused by meteorological effect (e.g. wind, atmospheric pressure changes). These are not easily predicted, requiring accurate weather forecasts and complex computer models of the seas and oceans. Tide tables do not included predictions of the surge, and explains why they may differ from what is observed. See question 1 of the Frequently Asked Questions (page Error! Bookmark not defined.). Tidal Analysis – the process of extracting the amplitude and phase of each harmonic constituent from a period of tidal observations from a tide gauge. This creates a unique set of harmonic constants for that location. Tidal Range – the difference in height between high water and an adjacent low water. As this is not constant, it is usually quoted as one of the following: Page 76 mean tidal range – the average difference between high water and adjacent low water. mean spring range – the average difference between Mean High Water Springs and Mean Low Water Springs. mean neap range – the average difference between the Mean High Water Neaps and Mean Low Water Neaps. Tide Type – specifies whether the tide is semidiurnal, diurnal or mixed. The equation below is used to calculate a value that is used to decide this. O K1 Value 1 M 2 S2 Value 0.0 to 0.25 0.25 to 1.5 1.5 to 3 greater than 3 Tide type Semidiurnal Mixed (mainly semidiurnal) Mixed (mainly diurnal) Diurnal Time Zones – Tidal predictions are traditionally made to Greenwich Mean Time (also called Universal Time). This is the local time for all UK ports. However the UK switches to British Summer Time (BST) for 7 months of the year which is GMT+1hour. You can select BST by ticking this box on the input dialog. BST correction is only supported for high and low water predictions and not for interval predictions. Turning Points – see high and low waters Page 77 Table of Standard Harmonic Constants No. Name No. Name No. Name No. Name 1 Sa 30 OP2 59 2SM6 88 3MN8 2 Ssa 31 M2 60 MSK6 89 M8 3 Mm 32 MKS2 61 2MN2S2 90 2MSN8 4 Msf 33 2 62 3M(SK)2 91 3MS8 5 Mf 34 L2 63 3M2S2 92 3MK8 6 2Q1 35 T2 64 MNK2S2 93 MSNK8 7 1 (sigma) 36 S2 65 SNK2 94 2(MS)8 8 Q1 37 R2 66 2SK2 95 2MSK8 9 1 (rho) 38 K2 67 2MS2N2 96 4MS10 10 O1 39 MSN2 68 MQ3 97 3M2S10 11 MP1 40 KJ2 69 2MP3 98 4MSN12 12 M1 41 2SM2 70 2MQ3 99 5MS12 13 1 (chi) 42 MO3 71 3MK4 100 4M2S12 14 1 (pi) 43 M3 72 3MS4 101 MVS2 15 P1 44 SO3 73 2MSK4 102 2MK2 16 S1 45 MK3 74 3MK5 103 MA2 17 K1 46 SK3 75 M5 104 MB2 18 1 (psi) 47 MN4 76 3MO5 105 MSV2 19 1 (phi) 48 M4 77 2(MN)S6 106 SKM2 20 1 (theta) 49 SN4 78 3MNS6 107 2MNS4 21 J1 50 MS4 79 4MK6 108 MV4 22 SO1 51 MK4 80 4MS6 109 3MN4 23 OO1 52 S4 81 2MSNK6 110 2MSN4 24 OQ2 53 SK4 82 2MV6 111 NA2 25 MNS2 54 2MN6 83 3MSK6 112 NB2 26 2N2 55 M6 84 4MN6 113 MSO5 27 2 (mu) 56 MSN6 85 3MSN6 114 MSK5 28 N2 57 2MS6 86 MKL6 115 2MN2 29 2 (nu) 58 2MK6 87 2(MN)8 Some harmonic constants have alternative names: Page 78 No. NOC name also known as No. NOC name also known as No. NOC name also known as 24 OQ2 MNK2 44 SO3 MP3 104 MB2 MSP2 30 OP2 MSK2 103 MA2 MPS2