1
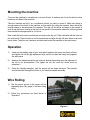
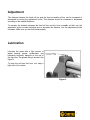
CT151
12” SLIP ROLLER
User Manual
Important Safety Precautions
Plead read all the instructions before using this tool.
1) Always keep your work area clean. Cluttered areas invite injuries.
2) Do not use, tools in damp, wet or poorly lit locations. Do not expose to rain.
3) Children should be kept away from the work area.
4) When not in use, tool should be kept in a dry place to inhibit rust.
5) Do not force the tool. It will do the job better and more safely at the rate for
which it was intended.
6) Do not wear loose clothing or jewelry.
7) Wear ANSI approved impact goggles and protective gloves.
8) Use clamp or vise to hold the work piece if possible. It is safer than using your
hands.
9) Keep tools sharp and clean for better and safer performance
10) Keep proper footing and balance at al times.
11) Serious injury could occur if the tool is tipped over.
12) Never operate the machine unless all the guards are functioning properly.
13) Get help when lifting tools and materials that are too heavy for you to do yourself.
14) When appropriate and whenever possible, use a fork truck or a hoist.
2
SPECIFICATIONS
•
Roller Diameter:
1”
•
Maximum capacity:
12" width & 22 Gauges thickness
•
Wire forming:
1/16", 1/8" & 5/32"
•
Gear Drive
•
Cast iron frame
•
Weight:
12 kgs
UNPACKING
CT151 is carefully packed in a box and completely assembled. The unpainted surfaces of the
machine are coated with rust prevention waxy oil and you will want to remove this after unpacking
the machine.
The machine comes fully assembled, so before you begin you need to mount your machine.
3
Mounting the machine
To mount the machine to a workbench, you need 4 bolts, 4 washers and 4 nuts for the four holes
located on the base of the machine.
Take the machine and put it on a workbench where you want to mount it. Make sure there is
enough space at the back of the machine, so that when slip rolling the material, there should be
enough space to accommodate the material. The slip roll should be mounted on the bench in
such a way that when looking at the slip roll, the handle of the machine should be on the right and
there should be enough space for it to move.
Now, mark the holes on the work bench and remove the slip roll. Take a drill and drill the holes on
the work bench. Place the slip roll on the work bench and align the slip roll base holes to the work
bench holes. Take the nuts, washers, and bolts and mount the machine to the work bench.
Operation
1)
Insert just the leading edge of your work piece between the upper and lower roll bars
and tighten the roll bar gap adjustment keys until the roll bars are barely snug against
the work piece.
2)
Advance the adjustment knobs as much as desired depending upon the tightness of
the roll to be accomplished. (The tighter the roll, the more the knobs must be
advanced.)
3)
Crank the Handle assembly, until the proper roll has been achieved. The material
should feed itself through the rollers or you crank the handle assembly.
Wire Rolling
1)
Use the proper groove in the upper roll bar
depending upon the gauge of the wire being
rolled
2)
Follow the procedures as listed above in
“Operation”
Figure-1
4
Adjustment
The distance between the fixed roll bar and the front moveable roll bar can be increased or
decreased by turning the adjustment knobs. This distance should be increased or decreased
according to the material thickness.
To increase the distance between the fixed roll bar and the front moveable roll bar, turn the
adjustment knobs counter-clockwise and to decrease the distance, turn the adjustment knobs
clockwise. Make sure you turn both knobs equally.
Lubrication
Lubricate the gears with a light amount of
wheel bearing grease occasionally and
lubrication frequency depends on the use of
the slip roller. The grease fitting is shown in the
figure-2.
To keep the roll bars free from rust, keep a
light coat of oil on them.
Figure-2
5
CT151-12” ROLLER
PARTS LIST
6
WARRANTY
CRAFTEX 2 YEAR LIMITED WARRANTY
Craftex warrants every product to be free from defects in materials and agrees to correct such defects
where applicable. This warranty covers two years for parts and 90 days for labor (unless specified
otherwise), to the original purchaser from the date of purchase but does not apply to malfunctions
arising directly or indirectly from misuse, abuse, improper installation or assembly, negligence,
accidents, repairs or alterations or lack of maintenance.
Proof of purchase is necessary.
All warranty claims are subject to inspection of such products or part thereof and Craftex reserves the
right to inspect any returned item before a refund or replacement may be issued.
This warranty shall not apply to consumable products such as blades, bits, belts, cutters, chisels,
punches etceteras.
Craftex shall in no event be liable for injuries, accidental or otherwise, death to persons or damage to
property or for incidental contingent, special or consequential damages arising from the use of our
products.
RETURNS, REPAIRS AND REPLACEMENTS
To return, repair, or replace a Craftex product, you must visit the appropriate Busy Bee Tools
showroom or call 1-800-461-BUSY. Craftex is a brand of equipment that is exclusive to Busy Bee
Tools.
For replacement parts directly from Busy Bee Tools, for this machine, please call 1-800-461-BUSY
(2879), and have your credit card and part number handy.
• All returned merchandise will be subject to a minimum charge of 15% for re-stocking and handling
with the following qualifications.
• Returns must be pre-authorized by us in writing.
• We do not accept collect shipments.
• Items returned for warranty purposes must be insured and shipped pre-paid to the nearest
warehouse
• Returns must be accompanied with a copy of your original invoice as proof of purchase. Returns
must be in an un-used condition and shipped in their original packaging a letter explaining your
reason for the return. Incurred shipping and handling charges are not refundable.
• Busy Bee will repair or replace the item at our discretion and subject to our inspection.
• Repaired or replaced items will be returned to you pre-paid by our choice of carriers.
• Busy Bee reserves the right to refuse reimbursement or repairs or replacement if a third party
without our prior authorization has carried out repairs to the item.
• Repairs made by Busy Bee are warranted for 30 days on parts and labor.
• Any unforeseen repair charges will be reported to you for acceptance prior to making the repairs.
• The Busy Bee Parts & Service Departments are fully equipped to do repairs on all products
purchased from us with the exception of some products that require the return to their authorized
repair depots. A Busy Bee representative will provide you with the necessary information to have
this done.
• For faster service it is advisable to contact the nearest Busy Bee location for parts availability prior
to bringing your product in for repairs.
7