1
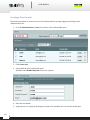
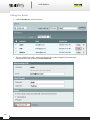
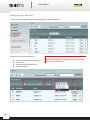
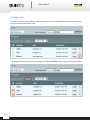
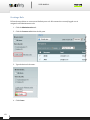
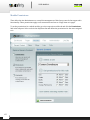
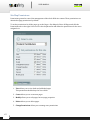
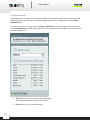
USER MANUAL Tools Sitefinity offers site export tool, so your website can easily be reused. For more information, please read Exporting Web Sites as Templates. 11. Users and Roles Overview Sitefinity users (also referred to as CMS Users) are users who can conduct content management and/or administrative tasks with a given Web site project. Such users can be managed by any user who is granted the Manage Users permission. A user role is a group of users associated with a set of user privileges. Roles are an efficient way to manage permissions for groups of users as they classify users with similar characteristics and responsibilities. Roles also determine which portions of CMS a user can view. There is one role that is automatically created with each new Sitefinity project: the Administrators role. The admin user is assigned to it by default and granted full global, modules and site map permissions. You cannot: restrict the permissions granted to the Administration role delete the Administrators role delete the last user in the Administrators role. You can define the set of privileges for each role and assign users to roles. All users assigned to a given role inherit the permissions defined for that role. A user can be assigned zero, one, or many roles. For example, Josh belongs to the Editors role that allows him to edit pages. However, the administrator decides to allow Josh to edit post comments, too. So, the administrator should choose between: creating a new role where this particular permission is allowed and adding Josh to it. or modifying the Editors role and granting all users assigned to it this additional permission. At the Administration > Users tab, you can: create roles and user accounts modify user profiles view and sort users 159 USER MANUAL 160 delete users and roles assign users to roles remove users from roles USER MANUAL Creating a User Account Follow the steps below to create a new user. We assume that the currently logged user belongs to the Administrators role. 1. Go to the Administration > Users. You will see a list of all available users. 2. Click Create user. 3. A form with the user profile fields opens. All fields in the Membership Info section are required. 4. Enter the user details. 5. Assign the user to role(s) by checking the role(s) in the checkbox list. You can also do that later. 161 USER MANUAL 6. Click Create this user. 7. The new user is shown in the list: 162 USER MANUAL Editing User Details 1. Click the Profile link in the list of users. 2. The user profile form opens. Apply your changes. You cannot change the Username and Password. When you are done, click Save user info. 165 USER MANUAL Managing Users and Roles Click a role in the left pane and all users assigned to it will be displayed: From here, it is most convenient to: a. remove users from the current role; b. delete users; c. assign users to a different role; d. edit user profiles. Remember that a user cannot do ANYTHING in Sitefinity until he/she is assigned to a role that has been given permissions. 166 USER MANUAL Deleting a User To delete a user, click the trashcan icon in the list of users. Any content modifications made by the user, even not yet approved will be saved. You can perform group deletion by selecting and clicking the Delete link or trashcan icon above the list. 167 USER MANUAL Changing Current User Details Each Sitefinity user can change their user profile. To edit your email, first name and last name: 5. Log in Sitefinity. 6. Click My Profile in the top right corner of the screen: 7. The user profile form opens. Apply your changes. You cannot change your username. 8. Click Save user info. 168 USER MANUAL To change your password: 6. Click the Change Password link in the left pane. 7. Enter your old password. 8. Enter your new password. 9. Re‐enter your new password. 10. Click Change password. 169 USER MANUAL Creating a Role Follow the steps below to create a new Sitefinity user role. We assume the currently logged user is assigned to the Administrators role. 1. Click the Administration tab. 2. Click the Create a role link in the left pane. 3. Type the desired role name: 4. Click Create. 170 USER MANUAL Deleting a Role Follow the steps below to delete a user role. We assume the currently logged user is assigned to the Administrators role. 1. Click the Administration tab. 2. Click the Manage roles link in the left pane. 3. You will see a list of all available roles. 4. Click the trashcan icon next to the role you want to delete. You cannot delete a role to which there are users assigned. You can use the View Users link to temporarily remove users from the role you want to delete. 171 USER MANUAL 12. Permissions Permissions are rights that define the type of actions a given user can perform. If a Sitefinity user does not have any permission, they can only navigate through the public part of the site. There are two explicit permission settings in Sitefinity: Allow and Deny. There is also an implicit deny setting available: Unset. Deny Denies authorization for the user role to perform the action stated. Deny is the most powerful permission setting in Sitefinity. If a user belongs to a role that has a specific permission set to Deny, that user cannot perform that function, even if he or she belongs to another role that has the same permission set to Allow. Allow Grants authorization for the user role to perform the action stated. Allow is the second‐most powerful permission setting in Sitefinity and the one most frequently set. Unset By default, most permissions in Sitefinity are not set to either Deny or Allow. The permissions are left unset, which implicitly denies user roles authorization to perform the action specified. However, because the permission is neither explicitly set to Deny nor explicitly set to Allow, authorization for that permission can be inherited from other roles to which the user is assigned. Inheritance Permissions in Sitefinity are inheritable. This is why if a permission is Unset for a given user in one role and explicitly set for another role the user is assigned to, the user inherits the Allow or Deny for that permission. When certain permissions are set for the site map, the permissions for the pages are the same (inherited) by default. There are several types of permissions: 172 Global Permissions Module Permissions Site Map/Pages Permissions Live Pages Permissions Permissions that apply to the users assigned to a public user role. These permissions are set if a page will be accessible by the members of a public user role or if a secured page will be included in the navigation controls, for example the RadTreeView and RadMenu controls. Live Pages Permissions would be used to restrict access to a page or branch of pages (e.g. an intranet that would need to be password-protected) USER MANUAL Global Permissions These are privileges to manage users, roles, permissions and files. By default there is one administrator user who is granted full global permissions, that is, his permissions are set to “unrestricted”. 1. Manage users allows you to: view the Administration > Users tab create user accounts edit user details assign users to roles remove users from roles delete users create user roles delete roles with no users in them 2. Manage permissions allows you to: view the Administration > Permissions tab manage global, modules, site map and pages permissions. 173 USER MANUAL 3. Manage files allows you to: view the Files tab upload, copy, move, rename and delete files/folders. 4. Edit templates allows you to: view the Templates tab upload master pages, duplicate, delete, rename and edit templates. 5. CMS access allows you to access the Sitefinity backend 174 USER MANUAL Module Permissions These allow the site administrators to control the management of third party controls that support this functionality. These permissions apply to all content items and not to a single item as in pages. To set the permissions for a whole module, go to the respective module tab and click the Permissions link in the left pane. Select a role in the dropdown list and define the permissions for the users assigned to it. 175 USER MANUAL 1. View allows you to see the module tab and all content items. 2. Create allows you to add new content items and edit your own items. 3. Modify allows you to edit content items created by other users. 4. Delete allows you to remove content items. 176 5. Change Permissions allows you to set the user permissions for the whole module. USER MANUAL Site Map Permissions Permissions granted to control the management of the whole Web site content. These permissions are inherited as page permissions by default. To set the permissions for all the pages, go to the Pages > Site Map tab. Select All Pages and click the Permissions tab on the right. Select a role in the dropdown list and define the permissions for the users assigned to it. 1. View allows you to view draft and published pages. This permission should always be set to Allow. 2. Create allows you to create new pages. 3. Modify allows you to edit pages, but not page properties. 4. Delete allows you to delete pages. 5. ChangePermissions allows you to manage user permissions. 177 USER MANUAL 6. ChangeProperties allows you to edit page properties. 7. Approve allows you to approve or decline page modifications. 8. Publish allows you to publish pages. 9. ModifyLayout allows you to change page Template and Theme. Modify must also be granted. 178 USER MANUAL Page Permissions Permissions given for a page to control the management of the page content and controls content. All permissions set for the site map are inherited as page permissions. To change this, click the Break inheritance link. To set the permissions for a page, go to the Pages > Site Map tab. Select the page in the site map and click the Permissions tab on the right. Select a role in the dropdown list and define the permissions for the users assigned to it. 1. View allows you to view draft and published pages. This permission should always be set to Allow. 2. Create allows you to create new pages. 179 USER MANUAL 3. Modify allows you to edit pages, but not page properties. 4. Delete allows you to delete pages. 5. ChangePermissions allows you to change rights granted to users. 6. ChangeProperties allows you to edit page properties. 7. Approve allows you to approve or decline page modifications. 8. Publish allows you to publish pages. 9. ModifyLayout allows you to change page Template and Theme. Modify must also be granted. If you want to secure a page and restrict the access to it, you can use the Anonymous access property: 1. Go to Pages > Site Map. 2. Click to select the page in the site map. 3. Click the Properties tab. 4. In the More Options section, find Anonymous access. 5. Select Deny to restrict anonymous user access to the page and require authentication. 6. Set the View page permission for the role whose access you want to restrict. 180