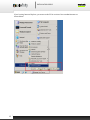
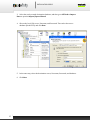
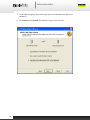
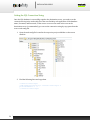
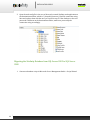
1
INSTALLATION GUIDE FOR V3.6 | Last Update : May 2009 | INSTALLATION GUIDE Contents 1. System Requirements .............................................................................................................................. 5 2. Licensing ....................................................................................................................................................... 5 Setting the License Key .................................................................................................................................... 6 Copyright Message ............................................................................................................................................. 8 License Agreement ............................................................................................................................................. 9 3. Introduction to Installing and Deploying Sitefinity ................................................................. 16 Development Machine and Production Server .................................................................................... 16 Which File Do I Download? .......................................................................................................................... 17 Installation Packages....................................................................................................................................... 19 4. Installing Sitefinity under Windows Server 2008 .................................................................... 21 Creating the Database ..................................................................................................................................... 21 Automatic Installation .................................................................................................................................... 22 Manual Installation .......................................................................................................................................... 29 5. Installing Sitefinity under Windows Vista ................................................................................... 34 Creating the Database ..................................................................................................................................... 34 Automatic Installation .................................................................................................................................... 34 Manual Installation .......................................................................................................................................... 34 6. Installing Sitefinity under Windows XP ........................................................................................ 35 Creating the Database ..................................................................................................................................... 35 Automatic Installation .................................................................................................................................... 37 Manual Installation .......................................................................................................................................... 37 7. Installing Sitefinity on Windows Server 2003 ........................................................................... 40 8. Installing Sitefinity in a Shared Hosting Environment ........................................................... 40 License Keys 40 Creating the Site 40 Preparing and Copying the Files ................................................................................................................ 41 Attaching your Database ............................................................................................................................... 42 Web.Config 42 2 INSTALLATION GUIDE 9. Installing Sitefinity in a Location Other Than Default Website .......................................... 45 10. Deploying Sitefinity in a Load Balanced Environment ........................................................ 46 11. Getting Started with the Sample Site .......................................................................................... 48 12. Upgrading Sitefinity Projects .......................................................................................................... 49 Overview 49 Upgrading Projects to Sitefinity 3.6 .......................................................................................................... 49 Upgrading Projects Created with Sitefinity Community to Standard Edition ......................... 50 Upgrading from Sitefinity Trial to Standard Commercial License ............................................... 50 Downgrading to the Community Edition or a Previous Version of Sitefinity .......................... 51 Upgrading to the latest version of RadControls for ASP.NET AJAX ........................................... 51 Upgrading Control Templates ..................................................................................................................... 52 13. Migrating the Database ..................................................................................................................... 54 Migrating an SQL Database ........................................................................................................................... 54 Copying the SQL Database to the Destination Server ........................................................................ 54 Setting the SQL Connection String ............................................................................................................. 59 Migrating the Sitefinity Database from SQL Server 2005 to SQL Server 2000 ....................... 60 Upgrading the Sitefinity Database from SQL Server 2000 to SQL Server 2005 ...................... 64 14. Configuring IIS ...................................................................................................................................... 64 Extensionless URLs .......................................................................................................................................... 64 IIS 5.x 64 IIS 6.x 65 IIS 7.0 66 Wildcard Application Mappings ................................................................................................................. 67 IIS 5.x 67 IIS 6.x 68 IIS 7 69 15. Configuring Localization ................................................................................................................... 71 Overview 71 Site Localization 71 Mapping Domain Name and Extension to Culture .............................................................................. 72 Module Localization ........................................................................................................................................ 74 16. Configuring Workflow and Versioning .................................................................................... 77 3 INSTALLATION GUIDE Page Level 77 Module Level 77 Page History 77 Module History 78 17. Troubleshooting ................................................................................................................................... 80 Login Failed for User ....................................................................................................................................... 80 You are Running a Trial Version of Sitefinity ........................................................................................ 80 Unknown server tag 'sfBlogDesignSettings:BehaviorSetting' warning while compiling/building your project ............................................................................. 80 "Unable to load one or more of the requested types. Retrieve the LoaderExceptionsProperty for more information." ......................................... 81 4 INSTALLATION GUIDE 1. System Requirements Serverside Requirements Microsoft® Windows Server 2000, 2003, 2008, Windows XP Professional, Windows Vista Internet Information Services 5.1+ Microsoft® .Net Framework v2.0, v 3.5 for the 3.5 build of Sitefinity Database Platforms Microsoft® SQL Server 2000 Microsoft® SQL Server 2005 Microsoft® SQL Server 2008 Microsoft® SQL Express MySQL Oracle 10+ Supported Browsers For a complete list with versions, please visit our system requirements page. JavaScript must be enabled on all browsers. 2. Licensing 5 INSTALLATION GUIDE Setting the License Key 1. Sitefinity Standard Edition Commercial License Intended for professional developers, the Standard Edition Commercial License allows you to generate one license key for the top level domain/server name. You do not need a license key to deploy the software on your testing and development servers; you can access the test application by IP address or http://localhost and will not receive copyright messages. If you have several domain names pointing to the same Web site, you do not need to purchase separate licenses. Consider the two cases below: a. Domain Alias This is a domain name that points to another primary domain. For example, if the primary domain name is "original.com" and a Domain Alias is registered for "alias.com", then “http://www.original.com” and “http://www.alias.com” will take visitors to the exact same pages of the “original.com” Web site. Furthermore, “http://original.com/somefile.html” will bring visitors to the exact same page as “http://alias.com/somefile.html”. b. Domain Forwarding (URL Redirect) Domain forwarding allows redirection of Web requests for the parked domain name to content hosted on a different server. In the case of domain forwarding, when a visitor attempts to access the forwarded domain, the Web browser automatically redirects to the specified Web site. In the case of domain aliases, please contact [email protected] and a sales representative will send you the Annex to Sitefinity EULA. You will need to sign and return this form, either by fax it to (617) 249 2116 (for U.S.) or e‐mail it to [email protected] together with your list of domain aliases. A sales representative shall activate these keys for you and our system shall send you an e‐mail with the new keys. To insert a domain license key into Sitefinity, follow these steps: 1. Login to your Client.net account 2. Click on licenses 3. Next to your domain alias, click key details: 4. Copy the code in between the root tags 6 INSTALLATION GUIDE 5. In your Sitefinity project, open this file: ~/Sitefinity/LicenseFile.xml 6. In between the <root> elements, insert the license key code you copied from step 4 If you have for three licensed domain aliases, for example, your license file could look like this: <root> <license <license <license <license </root> 7 control="cms" control="cms" control="cms" control="cms" company="xxx" licenseKey="..." /> company="domain alias for x" licenseKey="..." /> company="domain alias for x" licenseKey="..." /> company="domain alias for x" licenseKey="..." /> INSTALLATION GUIDE In the case of domain forwarding, it is sufficient to generate the Sitefinity license key for the primary domain name only. To generate a license key: 1. Sign in to your Client.net account. 2. In the left pane, click Licenses. 3. Click generate key as shown below: 4. On the next screen, enter in your domain. Exclude the http://www. part. So, if your domain is http://www.telerik.com, enter in telerik.com . A license key shall be e‐mailed to you, once these steps are complete. Put that file, called LicenseFile.xml, in the ~/Sitefinity folder of your application. Copyright Message To remove the copyright messages on the production server, save the LicenseFile.xml file in the ~/[YourWebsite]/Sitefinity folder and restart the application. Restarting the application can be done by following these steps: For Windows Vista and Windows Server 2008: 1. Click Start and in the search box, type in cmd 2. Type in IISReset For Windows XP and Windows Server 2003 1. Click Start > Run 2. Type in IISReset This will restart IIS. This will clear your cache because it stops the ASP.NET Worker Process that holds all caching information. Now, visit your website again and the message will disappear. For step by step instructions on how to protect this file from being downloaded, please refer to this article. 2. Sitefinity Standard Edition Trial License The Standard Edition Trial License allows you to install, copy and use Sitefinity for evaluation and testing purposes. This is a fully functional installation and works for unlimited time 8 INSTALLATION GUIDE without a license key. Although a trial message will not appear on an IP address or http://localhost , copyright messages will appear once the system has a DNS address, such as www.telerik.com and etc. Once a license key is purchased and placed inside the Sitefinity folder,, these messages are disabled. 3. Sitefinity Community Edition License Intended for hobbyists, the Sitefinity Community Edition License is a scaled‐down version of the Standard Edition and will work for unlimited time without displaying any copyright messages. The product is free of charge and can be deployed on any server without any license keys. The only requirement for Web sites developed with the Sitefinity Community edition is that the “Powered by Sitefinity” logo is displayed in the footer of every page. To download these logos, please visit our website. To change the style of the “Powered by Sitefinity” logo, follow these steps: 1. Open the project’s web.config file. 2. In the section cms defaultProvider="Sitefinity" add the attribute communityLogo. 3. Set its value to any of the available styles: Original, Dark or Light. To illustrate, this is what the web.config file should contain if you want to set a Dark style for the logo: <cms defaultProvider="Sitefinity" pageExtension=".aspx" pageEditorUIMode="Overlay" disabled="true" communityLogo="Dark"> For more information about the Community Edition, please visit our website. License Agreement For an online copy of our Sitefinity license agreement, please visit our license agreement page. Telerik Sitefinity Content Management System End-User License Agreement 9 INSTALLATION GUIDE By downloading and installing the product identified above and/or its related materials, you are accepting the following License Agreement. Check the box "I have read and agree to the License Agreement" if you agree. IMPORTANT – READ CAREFULLY: This license agreement (“LICENSE”) is a legal agreement between you (either an individual or a single entity, also referred to as "LICENSEE", "YOU") and Telerik Corp., ("Telerik"), for the product "Telerik Sitefinity" which includes computer software, associated media, printed materials, and "online" or electronic documentation (collectively referred to as “SOFTWARE”). By installing, copying, downloading, accessing, or otherwise using the SOFTWARE, you agree to be bound by the terms of this LICENSE. If you do not agree to the terms of this LICENSE, do not buy, install or use the SOFTWARE. Any earlier LICENSE we may have granted to you for the use of earlier versions of the SOFTWARE is replaced by this LICENSE. DEFINITIONS • CMS User/User seat - an individual user who has access to the administrative (content management) capabilities of the SOFTWARE through a unique username and password. • Site visitor - an individual who can access only the public (published) part of web-sites, created with the SOFTWARE. Such users do not have username and password for access to the administrative capabilities of the SOFTWARE. None of the Sitefinity LICENSES impose any limitation on the number of Site visitors. • Support Incident - A support incident is defined as a single support issue with the SOFTWARE and the reasonable effort required for resolving it. A single support incident is a support problem, which cannot be broken down into secondary issues. A single support incident may involve several e-mails and offline work in order to be resolved. The Customer needs to provide Telerik with detailed information about the problem encountered. Even though Telerik Support Engineers will make reasonable efforts to resolve the issue, Telerik does not guarantee that all problems will be resolved. All bug reports and product feature suggestions are not considered support incidents. • Development Machine - a computer used for custom development, staging, or testing of the SOFTWARE, before it is deployed on the Production Server. • Production Server – a computer used for the final deployment of the SOFTWARE. SOFTWARE PRODUCT LICENSE The SOFTWARE is protected by copyright laws and international copyright treaties, as well as other intellectual property laws and treaties and contains confidential information and trade secrets. The SOFTWARE is licensed to you, not sold. Telerik retains ownership of the copy of the SOFTWARE in your possession, and all copies you may be licensed to make. Telerik also retains all rights not expressly granted to you in this LICENSE. 1. GRANT OF LICENSE 10 INSTALLATION GUIDE Telerik hereby grants to you, and you accept, a LICENSE to install, copy, and use the SOFTWARE only as authorized below. (a) Standard Edition Commercial License: • The Sitefinity Standard LICENSE allows you to use the SOFTWARE for 1 (one) top level domain name (or server name). There is no limitation to the number of subdomains (i.e. by registering a key for mysite.com, you will be able to use it for all subdomains www.mysite.com, http://support.mysite.com, http://mysite.com, etc.). • To facilitate the development process, Telerik allows you to deploy the SOFTWARE on your testing and development servers and access your applications via the IP address(es). • There is no limitation to the number of CMS User accounts. • Included Support: Telerik guarantees response within 48 hours to your support inquiries. As part of your LICENSE you are entitled to receive unlimited number of support incidents. (b) Standard Edition Trial License: • You are granted a LICENSE for evaluation purposes only. You are authorized to install, copy, and use the SOFTWARE for the sole purpose of testing its functionality. You are not allowed to use it for any commercial purpose. • The Sitefinity Trial LICENSE is perpetual and works without license keys. The Trial LICENSE displays a random trial message that will be disabled once you purchase a license for the Standard Edition Commercial License and create a license key for your domain. • There is no limitation to the number of CMS User accounts. • Included Support: Telerik guarantees response within 72 hours to your support inquiries. As part of your LICENSE you are entitled to receive technical support for up to 5 support incidents. (c) Community Edition License: • The Sitefinity Community LICENSE allows you to use the SOFTWARE for 1 (one) top level domain name (or server name). There is no limitation to the number of subdomains (i.e. by registering a key for mysite.com, you will be able to use it for all subdomains www.mysite.com, http://support.mysite.com, http://mysite.com, etc.). • Telerik allows you to deploy the SOFTWARE on any testing, development or production server. • Included Support: This LICENSE entitles you to Community support only. You can submit inquiries via the Sitefinity Forums where other members of the community will be able to provide answers. The Forum is available to all Client.net account holders. Even though we actively monitor and answer posts, the Forum's main purpose is to offer convenient peer-to-peer assistance and we do not guarantee a reply to all threads. • Telerik requires the display of the “Powered by Sitefinity” logo on all pages that use the Sitefinity Community version. 11 INSTALLATION GUIDE • The Sitefinity Community LICENSE can be used for both personal and commercial websites. 2. DESCRIPTION OF OTHER RIGHTS AND LIMITATIONS (a) You are not allowed to use the SOFTWARE as a whole, or any of its comprising elements, as a basis for creation of another software product. (b) You are not allowed to use individually the software components comprising the SOFTWARE, but only as an integral part of the SOFTWARE. (c) You are not allowed to disassemble, decompile or "unlock", decode or otherwise reverse translate or engineer, or attempt in any manner to reconstruct or discover any source code or underlying algorithms of the SOFTWARE provided in object code form only. (d) You are not allowed to use, copy, modify, or merge copies of the SOFTWARE or any accompanying documents except as permitted in this LICENSE. (e) You may not use the Telerik product names, logos or trademarks to market your SERVICES or IMPLEMENTATIONS related to the SOFTWARE without the express prior consent of Telerik. (f) You agree to indemnify, hold harmless, and defend Telerik and its resellers from and against any and all claims or lawsuits including attorney's fees that arise or result from the use or distribution of your software product. (g) Independent software vendors involved in the development, maintenance and publication of .NET components are not allowed to use the SOFTWARE without the express permission of Telerik. 3. DELIVERY Telerik shall deliver to LICENSEE a master copy of the SOFTWARE licensed hereunder in compiled C# code in electronic files only. Documentation shall also be provided in electronic format. 4. UPGRADES The Standard Edition Commercial LICENSE entitles the LICENSEE to receive all version updates, patches, and bug-fixes released for a period of 1 (one) year after the day of purchase. SOFTWARE labeled as an upgrade replaces and/or supplements (and may disable) the product that formed the basis for your eligibility for the upgrade. You may use the resulting upgraded product only in accordance with the terms of this LICENSE. 12 INSTALLATION GUIDE 5. TERMINATION This LICENSE shall last as long as you use the SOFTWARE in compliance with this LICENSE. Telerik may terminate this LICENSE if you fail to comply with any of the terms and conditions herein. In such event you agree to cease using and destroy all copies of the SOFTWARE, which you have been licensed to use and distribute. 6. COPYRIGHT All title and copyrights in and to the SOFTWARE (excluding the Sitefinity software modules listed below), the accompanying materials, and any copies of the SOFTWARE, and any trademarks or service marks of Telerik are owned by Telerik. All title and intellectual property rights in and to the content that may be accessed through use of the SOFTWARE is the property of the respective content owner and may be protected by applicable copyright or other intellectual property laws and treaties. All error corrections, bug fixes, patches, updates or other modifications shall be the sole property of Telerik. The SOFTWARE includes derivate works based on the software products listed below. Telerik has rights to redistribute these modules; however the intellectual property for these products remains with their respective publishers: (a) “Lucene.net” – search engine software developed by “The Apache Software Foundation” (b) “Nolics.net 2005” - productivity tool developed by “Nolics” 7. LIMITED WARRANTY Telerik warrants solely that the SOFTWARE will perform substantially in accordance with the accompanying written materials for a period of ninety (90) days. Telerik does not warrant the use of the SOFTWARE will be uninterrupted or error free at all times and in all circumstances, nor that program errors will be corrected. This limited warranty shall not apply to any error or failure resulting from (i) machine error, (ii) LICENSEE's failure to follow operating instructions, (iii) negligence or accident, or (iv) modifications to the SOFTWARE by any person or entity other than Telerik. In the event of a breach of warranty, LICENSEE 's sole and exclusive remedy, is repair of all or any portion of the SOFTWARE. If such remedy fails of its essential purpose, LICENSEE 's sole remedy and Telerik's maximum liability shall be a refund of the paid purchase price for the defective SOFTWARE only. This limited warranty is only valid if Telerik receives written notice of breach of warranty within thirty days after the warranty period expires. 8. LIMITATION OF LIABILITY TO THE MAXIMUM EXTENT PERMITTED BY APPLICABLE LAW, IN NO EVENT 13 INSTALLATION GUIDE WILL Telerik BE LIABLE FOR ANY INDIRECT, SPECIAL, INCIDENTAL, OR CONSEQUENTIAL DAMAGES ARISING OUT OF THE USE OF OR INABILITY TO USE THE PRODUCT, INCLUDING, WITHOUT LIMITATION, DAMAGES FOR LOSS OF GOODWILL, WORK STOPPAGE, COMPUTER FAILURE OR MALFUNCTION, OR ANY AND ALL OTHER COMMERCIAL DAMAGES OR LOSSES, EVEN IF ADVISED OF THE POSSIBILITY THEREOF, AND REGARDLESS OF THE LEGAL OR EQUITABLE THEORY (CONTRACT, TORT OR OTHERWISE) UPON WHICH THE CLAIM IS BASED. IN ANY CASE, Telerik'S ENTIRE LIABILITY UNDER ANY PROVISION OF THIS AGREEMENT SHALL NOT EXCEED IN THE AGGREGATE THE SUM OF THE LICENSE FEES LICENSEE PAID TO Telerik FOR THE PRODUCT GIVING RISE TO SUCH DAMAGES, NOTWITHSTANDING ANY FAILURE OF ESSENTIAL PURPOSE OF ANY LIMITED REMEDY. SOME JURISDICTIONS DO NOT ALLOW THE EXCLUSION OR LIMITATION OF INCIDENTAL OR CONSEQUENTIAL DAMAGES, SO THIS EXCLUSION AND LIMITATION MAY NOT BE APPLICABLE. Telerik IS NOT RESPONSIBLE FOR ANY LIABILITY ARISING OUT OF CONTENT PROVIDED BY LICENSEE OR A THIRD PARTY THAT IS ACCESSED THROUGH THE PRODUCT AND/OR ANY MATERIAL LINKED THROUGH SUCH CONTENT. ANY DATA INCLUDED IN A PRODUCT UPON SHIPMENT FROM Telerik IS FOR TESTING USE ONLY AND Telerik HEREBY DISCLAIMS ANY AND ALL LIABILITY ARISING THEREFROM. THE EXTENT OF Telerik'S LIABILITY FOR THE LIMITED WARRANTY SECTION SHALL BE AS SET FORTH THEREIN. 9. MISCELLANEOUS This LICENSE will be governed by the law of the State of Massachusetts, U.S.A. If any provision of this LICENSE is to be held unenforceable, such holding will not affect the validity of the other provisions hereof. Failure of a party to enforce any provision of this LICENSE shall not constitute or be construed as a waiver of such provision or of the right to enforce such provision. This LICENSE represents the entire understanding between the parties with respect to its subject matter. YOU ACKNOWLEDGE THAT YOU HAVE READ THIS AGREEMENT, THAT YOU UNDERSTAND THIS AGREEMENT, AND UNDERSTAND THAT BY CONTINUING THE INSTALLATION OF THE SOFTWARE PRODUCT, BY LOADING OR RUNNING THE SOFTWARE PRODUCT, OR BY PLACING OR COPYING THE SOFTWARE ONTO YOUR COMPUTER HARD DRIVE, YOU AGREE TO BE BOUND BY THIS AGREEMENT'S TERMS AND CONDITIONS. YOU FURTHER AGREE THAT, EXCEPT FOR WRITTEN SEPARATE AGREEMENTS BETWEEN Telerik AND YOU, THIS AGREEMENT IS A COMPLETE AND EXCLUSIVE STATEMENT OF THE RIGHTS AND LIABILITIES OF THE PARTIES. 14 INSTALLATION GUIDE 15 INSTALLATION GUIDE 3. Introduction to Installing and Deploying Sitefinity Development Machine and Production Server Installation and deployment on a local development machine is strongly recommended for evaluation and development purposes. This scenario gives you the following advantages: • • • You can access the application through http://localhost or an IP address immediately after installation without the need to apply any license keys. You can use the generated Visual Studio .NET project for development. You can deploy the complete or “in‐development” Sitefinity project on the production Web server at any time. The Sitefinity installer tries to create its virtual folders in the default IIS site, "Default Web Site". If that site is stopped or does not exist, the installation will fail in creating the virtual directories. If you do not want to install Sitefinity under the Default Web Site, follow the instructions in this KB article: Installation in a location different from Default Web Site There are some disadvantages to installing Sitefinity directly on the production Web server and here are a few: • • • Trial messages will be displayed until you apply the Sitefinity license key. Development of custom controls is less convenient as you are not able to test them locally. You have to secure the access to the Sitefinity Project Manager through IIS, otherwise it could be accessed by unauthorized users through URL. An alternative is to remove the Project Manager from the Web server once your project is created. To install Sitefinity on the production server, you have to run the distribution file as administrator. Once complete, the wizard will install the application in \Program Files\telerik\Sitefinity3.x by default. The development machine should have a local copy of Sitefinity, which can be installed using the auto‐installer, with a separate database from the one on the production server. This local Sitefinity copy should be used for custom modules, such as user controls, creation of master pages and themes, and customizations on existing modules, such as adding additional fields. 16 INSTALLATION GUIDE Content is not added to this version of Sitefinity because that should be added to the production server. The production machine should have all of the files that were transferred from the development machine. This server has another different copy of the Sitefinity database. Content, such as pages and media such as images and documents, are added to this copy of Sitefinity. That’s because Sitefinity has workflow, so you can save pages, send them for approval and later publish them. Any new tables created on the development machine’s copy of Sitefinity should be run on this database too. Which File Do I Download? To access the Sitefinity downloads page, follow these steps: 1. Sign in to your Client.net account. 2. In the left pane, click Downloads. If you are using .NET 3.5, (.NET 2.0 files have similar names) you will see these files: 17 INSTALLATION GUIDE 18 INSTALLATION GUIDE Installation Packages Each installation package comes in two types: • • • EXE file for automatic installation The EXE file is intended for easy and automatic installation of Sitefinity. It installs the software on your computer in C:\Program Files\Telerik,\Sitefinity3.6\ and automatically creates the necessary Virtual Directories using the Project Manager. If the auto installer fails, then you may install Sitefinity manually. The EXE installation will not overwrite the previous Sitefinity installation, unless it is of the same version. Using the EXE file, you will have the option of creating the TIU sample site, which is a sample site using Sitefinity and available on our demo page. ZIP file (a.k.a. patch) for upgrading projects to a newer version This is the bare‐bones manual upgrade option. By applying the patch, you will keep your existing Sitefinity installation, as this archive contains only two folders: o Bin folder ‐ contains the .dll files; o Sitefinity folder ‐ contains the files that make up the public controls’ interfaces and their templates, as well as the administrative part of Sitefinity. o new_web.config contains the changes introduced with the particular release version. Blank Project.zip is for a manual installation. You do not need the auto installer or any other files, since the Project Manager just unzips this file and makes a Virtual Directory out of it. This may be unzipped into a directory of your choice and made into a Virtual Directory. Once this is complete, you will be prompted for a database connection and to create an administrative user. For more info, please read installing Sitefinity manually. The EXE and ZIP packages have all updates applied, so there is no need to update them 19 INSTALLATION GUIDE further. In other words, if you have downloaded the SiteFinity_3_5_SP1_standard.exe, you should not download and apply the SiteFinity_3_5_SP1_standard_patch_xxxx.zip. 20 INSTALLATION GUIDE 4. Installing Sitefinity under Windows Server 2008 These installation instructions discuss an automatic and a manual installation on Windows Server 2008 64bit using .NET 3.5, Sitefinity 3.6 hot fix, and SQL Server 2008. If the auto installer fails, then you may install Sitefinity manually. Creating the Database All of Sitefinity’s content is stored inside the database, so there is no file structure. Although you can use SQL Express and Sitefinity could put that database in your App_Data folder, it’s highly recommended that you create a database on your server and use that one. This will ensure you can run scripts on the database easier. To create a database, follow these steps: 1. Go to Start > All Programs > Microsoft SQL Server 2008 > SQL Server Management Studio 2008 2. Right click on that icon and left click Run as Administrator 3. On the login screen that appears, enter the appropriate credentials and click Connect. If you do not know this info, talk to your system administrator 4. Right click on the databases folder and click New Database 5. Enter in a name for the database, such as 36Test 6. In the SQL Server Management Studio, go to Database > Security > Users > Create a New User as shown below: 7. Give the user a name, such as NTSystem 8. On the dialog that appears, click on the ellipsis next to login box 9. On the next dialog, click browse 21 INSTALLATION GUIDE 10. You now need to add two users with full permissions on the database, so Sitefinity can login and perform read and write operations. Choose the checkbox for NT/System and role (this is when NT Authority is selected for Data Base connection step during installation. If you use SQL Server credentials for the database connection, a role with these credentials must be specified. For more info, please contact your system administrator) 11. Choose the db_Owner Schema and the db_Owner database role membership as shown below: 12. Perform steps 7‐11 above, except give the user a new name for step 7 (such as NTServiceNetwork) and for step 9 choose the NT/Service Network role 13. Click OK. Automatic Installation You must have Default Website in your IIS or else the Auto‐Installer will fail. To install in a location other than Default Website, please read that section of the manual. To use the auto‐ installer, follow these steps: 1. Login to your Client.net account 2. On the left hand side of the screen, click downloads 3. Download the auto‐installer as shown below: 22 INSTALLATION GUIDE 4. On the next screen, click save file 5. When the download has been completed, right click on it and click Open Containing Folder as shown below: 6. If User Account Control is on, right click on the installer and click Run as Administrator as shown below: 7. If User Account Control is off, just double click on the installer 8. On the next dialog that pops up, click Continue 9. On the User Account Control dialog that may appear next, provided User Account Control is turned on, click Allow 23 INSTALLATION GUIDE 10. On the Welcome to the Install Wizard screen, click Next 11. On the next screen, accept the EULA and click Next 12. On the next screen, click Next to install Sitefinity in the C:\Program Files(x86)\telerik\Sitefinity3.6\ directory 13. On the next screen, click Next to perform a complete installation 14. On the next screen, click Install 15. Once the installation is complete, check the box that asks to start the project manager and click finish: Sitefinity’s project manager creates the blank website itself by following these steps: 16. On the Project Manager screen, click on Create new project as shown below: 24 INSTALLATION GUIDE If you’re using Internet Explorer, you must run the 32 bit version of it as an administrator as shown below: 25 INSTALLATION GUIDE 17. Enter in a new name of your choosing, such as 36Test, for the site and click next 18. Select a template for the site and click Create this Project as shown below: 26 INSTALLATION GUIDE 19. After this is complete, you will see a screen that says the project has been created. Go to this URL in your browser: http://localhost/[Virtual_Directoy_Name]/Sitefinity/login.aspx or click Go to administer your project. Using 36Test as the site’s name, you could navigate to http://localhost/36Test/Sitefinity/login.aspx 20. You will now see a screen asking for database credentials. Fill in the form and if you are unsure what they are, contact your system administrator. Here is what the form could possibly look like: 27 INSTALLATION GUIDE Note: If you receive an error saying login for user has failed, please read this section of our guide. 21. Click Continue 22. Enter in a name for an admin on the next screen. This user will have unrestricted permissions throughout the CMS. When this is done, click Continue as shown below: Once these steps are complete, you can now login to your Sitefinity site. 28 INSTALLATION GUIDE Manual Installation Although Sitefinity offers an auto‐installer, there are times when a manual installation is necessary. These include computers with complicated role‐based security access control lists, which control a user’s role ability to access certain resources on a computer. So that Sitefinity can be used on these systems, the CMS has a manual installation by following these steps: 1. 2. 3. 4. Follow the steps from Creating the Database Login to your Client.net account On the left hand side of the screen, click on downloads Download this file: 5. Create this directory: C:\Program Files\Telerik\Sitefinity3.6\Websites 6. Unzip the project in the directory listed in step 5 7. Ensure that the Telerik folder has the required Role‐Based Permissions as shown below: 29 INSTALLATION GUIDE Since directories inherit access control lists, which are shown above, from their parent folder, everything in this directory will take permissions from the folder above it. In Windows Vista and Windows Server, the Network Service Account, which ASP.NET uses to access files in these operating systems, is the user account that needs access to all files in a directory. If this account is not added to the list, you likely receive permission based errors that assemblies cannot be loaded or found, even though they exist in the proper folders. To add the Network Service account, follow these steps: 1. 2. 3. 4. 5. 6. 7. 8. 30 Right click on the Telerik folder as shown above Click on the security tab On the next screen, click edit On the next screen, click add On the next screen, click advanced On the next screen, click find now In the search results box, click Network Service Using the screenshot in called Telerik properties above, check off all the boxes in that list INSTALLATION GUIDE Now that the permissions are configured, you must make a Virtual Directory by following these steps: 1. If you have not done so already, install IIS 7 on your machine 2. Go to Start > Control Panel (in classic view)> Administrative Tools > IIS Manager as shown below: 3. Right click Default Web Site, then click Add Application as shown below: 4. Give the site an alias of your choosing and navigate to the website’s location on your computer. As an example, the location could be C:\ProgramFiles\Telerik\Sitefinity3.6\Websites\36Test\ as shown below: 31 INSTALLATION GUIDE 5. Once this is complete, navigate to http://localhost/[Virtual_Directory_Name]/Sitefinity/Login.aspx in your browser 6. Complete the database credentials screen that appears. If you don’t know this info, talk to your system administrator: Note: If you receive an error saying login for user has failed, please read this section of our guide. 7. On the next page, complete the administrative user page: 32 INSTALLATION GUIDE At the end, you’ll be asked to login to your Sitefinity website. 33 INSTALLATION GUIDE 5. Installing Sitefinity under Windows Vista Sitefinity offers an auto‐installer that will work on all Vista systems except Home Premium, which lacks Windows Authentication. Installation on all Vista systems involves creating a database, a Virtual Directory, either by the auto installer or manually, then adding an admin user. Creating the Database Although you can use SQL Express and Sitefinity could put that database in your App_Data folder, it’s highly recommended that you create a database on your server and use that one, which can be done by selecting SQL 2005 from the database screen and completing the form. These steps are identical to the ones for Windows Server 2008. To create a database, follow these steps: 1. Go to Start > All Programs > Microsoft SQL Server [Year] > SQL Server Management Studio [Year] (Express will also work 2. Right click on that icon and left click Run as Administrator 3. On the login screen that appears, enter the appropriate credentials and click connect. If you do not know this info, talk to your system administrator 4. Right click on the databases folder and click New Database 5. Enter in a name for the database, such as 36Test Automatic Installation Using the Auto‐Installer for Windows Server for 2008 is the same as using it for Windows Vista. For more info on this subject, please refer to the Windows Server 2008 instructions. Sitefinity will get installed in C:\Program Files\Telerik\Sitefinity3.6\ folder. Manual Installation For Windows Vista Ultimate and Windows Vista Business, you may use the auto installer. If the auto installer fails or if you’re using Windows Vista Home Premium Edition, which does not support an automatic install due to no Windows Authentication, you can perform a manual install. These steps are the same as in Windows Server 2008. 34 INSTALLATION GUIDE 6. Installing Sitefinity under Windows XP Creating the Database All of Sitefinity’s content is stored inside the database, so there is no file structure. Although you can use SQL Express and Sitefinity could put that database in your App_Data folder, it’s highly recommended that you create a database on your server and use that one. This will ensure you can run scripts on the database easier. To create a database, follow these steps: 1. Go to Start > Program Files > Microsoft SQL Server 2005 (or 2008)> SQL Express Management Studio (or the express version) 2. Connect to your instance of SQL Server. If you don’t know these credentials, contact your system administrator 3. On the login screen that appears, enter the appropriate credentials and click Connect. If you do not know this info, talk to your system administrator 4. Right click on the databases folder and click New Database 5. Enter in a name for the database, such as 36Test 6. Expand the databases section, expand your database, then the security folder and right click on the users folder as shown below: 7. Click the ellipse buttons next to login and find the ASPNET user as shown below: 35 INSTALLATION GUIDE 8. Complete the form as shown below: 36 INSTALLATION GUIDE Automatic Installation The automatic installation requires downloading the auto‐installer, creating a database on your server (recommended), and creating an admin user. The process for an auto‐install on Windows XP is the same as with Windows Server 2008, except you need to ignore anything about running programs as an administrator. Manual Installation If the automatic installation of Sitefinity fails, then you can install Sitefinity manually by creating a Virtual Directory in IIS 6: 1. Go to Start > All Programs > Administrative Tools > Internet Information Services 2. Expand the computer, Web Sites and Default Website folders as shown below: 3. Right click on Default Website and go to New > Virtual Directory: 4. On the dialog that appears, click next 5. In the alias box give your site a name, such as 36Test 6. For the next step, browse to the location of your website: 37 INSTALLATION GUIDE 7. Click next 8. On the next step, click next 9. Click finish Once this directory has been created, you must navigate to it in your browser by following these instructions: 1. In this example, navigate to http://localhost/36Test/Sitefinity/Login.aspx 2. Complete the database credentials screen that appears. If you don’t know this info, talk to your system administrator 38 INSTALLATION GUIDE 3. On the next page, complete the administrative user page At the end, you will be asked to login to your Sitefinity website. 39 INSTALLATION GUIDE 7. Installing Sitefinity on Windows Server 2003 The installation instructions for installing Sitefinity on Windows Server 2003 are the same as installing Sitefinity on Windows XP. Any references to the ASPNET user should be replaced with the Network Service user. 8. Installing Sitefinity in a Shared Hosting Environment This article will give you instructions for deploying your Sitefinity Web site shared hosting plan. Although there are many other hosting providers that support Sitefinity, Discount ASP.NET was used in this example. License Keys If you are using the Community Edition, please skip to section Signing up for Discount ASP.NET. For the Standard Edition, you need to generate a license key and place it in the project’s Sitefinity folder. To do so, please follow these instructions: 1. Sign in to your Client.net account. 2. In the left pane, click Licenses. 3. Follow the on‐screen instructions. 4. After you complete step 3, a license file will be e‐mailed to you. 5. Save the LicenseFile.xml file in the \Sitefinity3.x\WebSites\[YourWebsite]\Sitefinity folder. 6. Restart the application to ensure no more trial messages appear. Creating the Site Note that the Sitefinity module providers cannot get their database objects created in medium trust environment and you may get errors. To prevent this, you need to enforce database upgrade in full trust environment, in your local website. Creating at least one content item in each module before uploading the upgraded database to the hosting server will initialize all modules in the database. We would recommend setting up your database’s admin first and creating a home page with some filler text, just so you can ensure that your site is working properly when you visit it. Ideally, you should create a theme and master pages on your local machine. Then, create the content (pictures, text, etc.) on the page live. For more information on this subject, follow the instructions in the User Manual, which can be found in the Sitefinity installation folder. 40 INSTALLATION GUIDE Hosting Plan We recommend using Windows Server 2008 and IIS 7 Integrated Pipeline Mode ‐ it works faster than Windows Server 2003 and IIS5. This plan will also give you 200 MB of memory in the application pool. To prevent your users from being logged out after being idle, set up a scheduled task to ping your site every 15 minutes. Signing Up for Discount ASP.NET You will first order a basic package and then an SQL 2005 database. Here are the instructions for signing up: 1. Go to this URL: https://www.discountasp.net/signup/package.aspx 2. If you have a domain, complete the info on the left hand side. If you do not have one, you must buy a domain for $15 per year. 3. On the next screen, complete the billing info. 4. Once you sign‐up, you need to order an SQL 2005 database. 5. Go to Account Management > Order Addons: 6. Order an SQL 2005 database. Note that it will be activated in a few hours’ time. Once this process is complete, you should attach the .mdf file from your local installation to their SQL Server. Preparing and Copying the Files While you are waiting for Discount ASP.NET to activate your database, you could delete the skin files in the RadControls folder in your root directory. Although this is optional, deleting these skin files would save some disk space on the server and your site would be uploaded faster. If you have created a user control using one of our UI controls, make sure that the skin you are using is in the appropriate folder. For more detailed instructions about which files are needed on the server, please see this KB article. When you have finished preparing your files, copy the Web site to their server. Do not upload the web.config file yet because you need to make some changes as stated further in this article. To copy your files, use an FTP client such as FileZilla. 41 INSTALLATION GUIDE Attaching your Database After you have copied the files and your database has been activated by Discount ASP.NET, you need to copy the contents of your Sitefinity SQL 2005 Express Database to the Discount ASP’s blank SQL 2005 Standard Database that you purchased. This process is known as attachment, even though you are not actually connecting a database to their server. Here are the instructions for attaching your database to their server: 1. Sign in to your account. 2. Go to SQL Tool Suite: 3. Type \App_data\sitefinity.mdf into the Database attachment box and click the Attach MDF File button: 4. You will see a success message on the screen. Web.Config You need to make a few changes to the application web.config file to deploy Sitefinity on the Discount ASP.NET server. First, you need to change the connection string in your web.config file because the location of your database will change for your local machine to their server. Here are the steps for changing your connection string: 42 INSTALLATION GUIDE 1. Sign in to your account at Discount ASP.NET 2. Go to MS SQL 2005 Databases: 3. 3. Copy and paste the connection string into your web.config, using the example above as a guideline. Here is a screenshot from our sample account: 4. On the Discount ASP control panel, click Login Manager. 5. On the Login Manager page, click change password: 6. Change the password to admin. This should correspond to the password portion of the connection string. 7. This is what your connection string looks like on your local machine: <connectionStrings> <add name="Sitefinity" connectionString="Data Source=.\SQLExpress;Integrated Security=True;User Instance=True;AttachDBFilename=|DataDirectory|Sitefinity.mdf" providerName="System.Data.SqlClient"/> </connectionStrings> This is what it should look like on the server: 43 INSTALLATION GUIDE <connectionStrings> <add name="Sitefinity" connectionString=" Data Source=tcp:sql2k511.discountasp.net;Initial Catalog=SQL2005_421853_sitef;User ID=SQL2005_421853_sitef_user;Password=admin;" /> </connectionStrings> Basically, everything after connectionString changes to what Discount ASP gives to you. Second, you need to turn off healthMonitoring: <healthMonitoring enabled="false" heartbeatInterval="0"> Third, you need to turn off page and module workflow allowPageWorkflow="false" allowWorkflow="False" Make sure the following lines are commented out: <!‐‐add name="SitefinityXml" securityProviderName="" type="Telerik.Lists.Data.XmlProvider, Telerik.Lists.Data" dataFile="~/App_Data/Lists.xml" visible="true" /‐‐> This next part is optional. You can change the errors mode, so instead of your users seeing a “Error in Applicaton” message, they can see a “Web page down for maintenance” message. In the application web.config, change this portion: <customErrors mode="Off" To this: <customErrors mode="RemoteOnly" defaultRedirect="~/customerrorpage.html"/> In your Web site, create an .html page with the customererrorpage.html title. Place any text there as necessary. Finally, upload the application web.config file to your server. Editing your website If you go to your Web site at http://www.mysite.com/, you can see it the way your end users would see it. If you go to http://www.mysite.com/sitefinity/admin/ , you are redirected to the login page. 44 INSTALLATION GUIDE 9. Installing Sitefinity in a Location Other Than Default Website By default, the Sitefinity installer creates its virtual folders in the default IIS site, "Default Web Site". If you do not want to install Sitefinity under the Default Web Site, you need to edit the MetaBase.xml which is the actual XML file that contains the IIS configuration settings. Here is how to tell the installer to create the virtual directories under a website called "My Test": 1. Open the %SystemRoot%\System32\Inetsrv\MetaBase.xml file and in the respective IIsWebServer element, notice the number similar to the highlighted number below. Copy this number. <IIsWebServer Location ="/LM/W3SVC/859801432" AuthFlags="0" LogPluginClsid="{FF160663‐DE82‐11CF‐BC0A‐00AA006111E0}" ServerAutoStart="TRUE" ServerBindings=":8090:" ServerComment="My Test"> 2. Open the /telerik/Sitefinity3.x/ProjectManager/Web.Config file and in the <appSettings> section, add this: <appSettings> <add key="rootSubPath" value="/W3SVC/859801432/Root" /> </appSettings> 3. Save the file. 4. Restart IIS and create your Sitefinity project. 45 INSTALLATION GUIDE 10. Deploying Sitefinity in a Load Balanced Environment There is one requirement that needs to be met in order to use Sitefinity in a load balanced environment. In the application web.config file, you need to change the cache dependency mode from InMemory to InDatabase: <configuration> <telerik> <dataAccess defaultConnection="DefaultConnection"> <cacheDependency mode="InDatabase" /> </dataAccess> </telerik> </configuration> When you set the mode to InDatabase, the changes you make on one of the sites will be immediately reflected on the other sites. Synchronizing images and other files between servers in the Web farm is the responsibility of your load balancing software. 46 INSTALLATION GUIDE 1. Save the web.config file and restart the application. For more information on assembly binding, please read these MSDN articles: http://msdn2.microsoft.com/en‐us/library/2fc472t2(vs.71).aspx http://msdn2.microsoft.com/en‐us/library/eftw1fys(VS.71).aspx 47 INSTALLATION GUIDE 11. Getting Started with the Sample Site Once you have installed Sitefinity on your machine, you can create your own Sitefinity project or try the same Telerik International University (TIU) site. You can use them with any supported database to run the TIU site. To use one of the sample sites as a template for your web site, do the following: 1. Set‐up the Sitefinity auto installer on either Windows Server 2008, Windows Vista, Windows XP or Windows Server 2003 2. Access the Project Manager locally through: the Start Menu > All Programs > telerik > Sitefinity3.x > Sitefinity3.x. URL: http://localhost/telerik/Sitefinity3.x/Default.aspx 3. Click on Explore Sample Site Sitefinity will now install the TIU site on your machine. 4. After the installation completes, you will be asked to login. User Name: admin Password : admin To access the TIU site, go through the project manager and click on the TIU site. 48 INSTALLATION GUIDE 12. Upgrading Sitefinity Projects Overview As newer versions of Sitefinity are released, the database structure changes. Because Sitefinity’s database is forward mapped, which means that classes are used to create database tables, swapping the files from the newer version upgrades the project. The necessary classes are already in the assemblies, so once the project is started the database structure changes automatically. If you’ve changed templates, then be aware that the names have changed for Sitefinity 3.6 and these must be mapped before changes can be made. Upgrading Projects to Sitefinity 3.6 To upgrade to Sitefinity 3.6, follow these steps: 1. Login to your Client.net account 2. Click on downloads 3. Download this file: 4. 5. 6. 7. Unzip it in a location of your choice Important! Back up your database and all files from your Sitefinity project Replace the files from the patch with the files in your application Please note that we are no longer overriding your control templates. By default, Sitefinity will use its own embedded templates both for the back‐end and the front‐ end. In order to use your customized control templates, you should map a view to each of them. For more information, please read the Upgrading Control Templates section in this guide 8. Delete the Telerik.Charting.dll from your project's bin directory. This assembly is now merged with Telerik.Web.UI.dll 9. Open the ~/Sitefinity/ServiceAssemblies directory and make sure you delete the assembly there. When you initialize the Newsletters module, it will be recreated. 10. If the project is local, press Ctrl + F5 in Visual Studio to build the project and resolve any errors. 49 INSTALLATION GUIDE 11. Once done with the upgrade, you need to start the Search Indexes. Otherwise, you will get error messages if you try to publish content. To start the Search Indexes, go to the administration area, Administration tab, section Services ‐> Search and start all indexes by clicking on the Start indexing links. Upgrading Projects Created with Sitefinity Community to Standard Edition To upgrade from Sitefinity Community Edition to Sitefinity Standard Edition: 1. Install the Sitefinity Standard Edition. 2. Create a new project with the Standard Edition. 3. Click Go to administer the project and point to the DB of the project created with the Community Edition. Note that if you are using SQL Express, at the first wizard step, you should copy the .MDF file from your old App_Data folder to the new project App_Data folder. If you are using SQL Server, enter the database connection settings here (to point to the old database). If using Windows Authentication, make sure the account that runs the ASPNET process (Network Service for Windows Vista and Windows Server 2008) has the appropriate permissions to the database. 4. Copy all custom files from your old project to the new project. These include user controls, scripts, images, .CSS files, .DLL files, etc. Do not replace existing files. 5. If you have made any modifications in your old project Admin folder and web.config file, add those to the new project. 6. Copy your old project .master files to the new project App_Master folder. Upgrading from Sitefinity Trial to Standard Commercial License Practically, there is no difference between the trial and developer/commercial editions of Sitefinity. Both are, in fact, the fully functional Sitefinity Standard Edition. The only difference is that the trial license cannot be used for commercial purposes and displays copyright messages. Once a commercial license is purchased and a license key applied, these messages are disabled. Switching from trial to developer license does not require you to uninstall and reinstall Sitefinity or replace assemblies with their developer versions. You only need to generate a license key for your top level domain and place the LicenseFile.xml file in the 50 INSTALLATION GUIDE ~/[YourWebsite]/Sitefinity folder. For more info on applying the license key, please refer to the Setting the License Key section of this guide. Downgrading to the Community Edition or a Previous Version of Sitefinity The steps for downgrading are the same for upgrading, so you’ll download the patch for the version you’d like to downgrade and swap files. Upgrading to the latest version of RadControls for ASP.NET AJAX About every 1‐3 months, the Sitefinity team releases a service pack that integrates the latest RadControls for ASP.NET AJAX with Sitefinity. Because a version of RadControls newer than Sitefinity has not been fully tested, we recommend waiting until the Sitefinity team releases a service pack to upgrade your RadControls. If it necessary to upgrade before a service pack, the software developer can use assembly binding to upgrade the project in the meantime by following these steps: 1. In the bin folder of your Sitefinity application, delete the Telerik.Web.UI assembly and its corresponding Telerik.Web.UI.XML file. 2. Copy in the latest version of the Telerik.Web.UI and the Telerik.Web.UI.XML file into the bin folder of the Sitefinity application Open the application web.config file to specify the binding redirection information for every assembly using the <assemblyBinding> element. The example above demonstrates upgrading from Q2 2008 SP 1 version of RadControls to the Q3 2008 SP2 release. <runtime> <assemblyBinding xmlns="urn:schemas-microsoft-com:asm.v1"> <dependentAssembly> <assemblyIdentity name="Telerik.Web.UI" publicKeyToken="a1432cd341173140" /> <bindingRedirect oldVersion=" 2008.2.1001.20" newVersion=" 2008.3.1314.35" /> </dependentAssembly> </assemblyBinding> </runtime> 3. Substitute the name, the publicKeyToken and oldVersion with the values from the assembly’s manifest. To get these values, simply right click on the assembly, click properties and then click the version tab as shown below: 51 INSTALLATION GUIDE For more info on Assembly Binding, please read this article. Upgrading Control Templates To display content, Sitefinity uses a series of user controls called control templates. Inside of these control templates are many common ASP.NET UI controls, such as literals, labels and textboxes. By default, these control templates are embedded inside assembles. To make changes to these control templates, you must extract them from the assemblies and then work with the code inside the controls. Some of the template names have changed since version 3.5. ControlPanelEdit.ascx, for example, was used to edit content from many modules, such as the Blogs and News module. This file no longer exists. If you have a previous version of Sitefinity and you’ve made changes to these templates, you’ll need to find out which template to use by following these steps: 1. Figure out which template you need: a. If you’d like to edit the template for creating a blog post, go to Modules > Blogs. b. Click on your blog c. Click the create a post button d. Notice that the route section says PostNewView: That is the template that you need. Sitefinity navigates to different templates by routes and these routes are hierarchical. Using the blogs module as an example, here is the hierarchy: 52 INSTALLATION GUIDE To navigate to the PostNewView, the blogs module must go to the BlogsControlPanel, then the PostsView, then the PostNewView. This is represented by dots as you see in the route query string above. 2. Create the following file in the ~/App_Data/Configuration directory : Telerik.Sitefinity.Configuration.ControlsConfig.xml 3. Add the code below to that file: <?xml version="1.0" encoding="utf-8"?> <controlsConfig> <viewMap> <!--Provides user interface for creating new blog post in the blogs module.--> <viewSettings hostType="Telerik.Blogs.WebControls.Admin.PostNewView" layoutTemplatePath="~/Sitefinity/Admin/ControlTemplates/Blogs /PostNew.ascx" /> </viewMap> </controlsConfig> 4. Press Ctrl + f5 to build the Visual Studio Project 5. Login to your Client.net account and click on downloads 6. Download this file: 7. Unzip that download and copy these files \Sitefinity\Admin\ControlTemplates\Blogs\PostNewView.ascx \Sitefinity\Admin\ControlTemplates\Blogs\App_LocalResources\PostNewView.ascx. resx Into these directories in your Sitefinity project: 53 INSTALLATION GUIDE PostNewView.ascx ‐ \Sitefinity\Admin\ControlTemplates\Blogs PostNewView.ascx.resx ‐ \Sitefinity\Admin\ControlTemplates\Libraries\App_LocalResources 8. Open the ~/Sitefinity/Admin/ControlTemplates/Blogs/PostNewView.ascx and make changes 13. Migrating the Database Some Sitefinity websites are using an older version of SQL Server, such as SQL 2000. Other times, software developers want to downgrade their database to a previous version of SQL Server. These instructions are for software developers who want to upgrade or downgrade their Sitefinity database to SQL 2000 or SQL 2005. Migrating an SQL Database If your Sitefinity Web site project uses a Microsoft SQL Server database, when migrating the project to a different location, you need to migrate the SQL database as well. Copying the SQL Database to the Destination Server To migrate the SQL database to the server: 1. Open the MS SQL Server Enterprise Manager and connect to the remote (destination) server. 2. On the destination server, create a database user with the same name as the database user on the source server. 54 INSTALLATION GUIDE 3. Connect to the SQL server on the remote machine and create a new database (for example BooksToGo). Add the database user (for example MyUser) and select the db_owner checkbox. 55 INSTALLATION GUIDE 56 INSTALLATION GUIDE 3. Select the newly created destination database, and then go to All Tasks > Import Data to open the Import/Export Wizard. 4. Choose the Local SQL server, Username, and Password. Then select the source database (BooksToGo) and click Next. 5. In the same way, select the destination server, Username, Password, and database. 6. Click Next. 57 INSTALLATION GUIDE 7. At the Table and Query step, select Copy objects and data between SQL Server databases. 8. Click Next and then Finish. The database copy process will start. 58 INSTALLATION GUIDE Setting the SQL Connection String Once the SQL database is successfully copied to the destination server, you need to set the connection string in the web.config file of the new Sitefinity web application. If the database name, Username, and Password, on the source server are the same as the ones on the destination server (recommended), you can set the connection string by copy‐paste from the source web.config file. 1. Open the web.config file located in the respective project subfolder on the source machine. 2. Find the following lines and copy them. <connectionStrings> <add name="Sitefinity" connectionString="…" providerName="…" /> </connectionStrings> 59 INSTALLATION GUIDE 3. Open the web.config file in the root of the newly created Sitefinity web application on the destination machine, which is C:\Inetpub\wwwroot\. Find the connection string lines and replace them with the ones you copied in step 2. If the database or the user password is different on the destination machine, make sure you modify the connection string accordingly. Migrating the Sitefinity Database from SQL Server 2005 to SQL Server 2000 1. Generate a database script in Microsoft Server Management Studio > Script Wizard: 60 INSTALLATION GUIDE 2. At the Options step, select SQL Server 2000 for Script for server version: 3. At the Object Types step, choose to script Stored Procedures, Tables and Functions: 61 INSTALLATION GUIDE 4. Open the script generated at step 1 in a text editor and replace in it: Replace nvarchar(max) with ntext Replace [nvarchar](max) with [ntext] Replace varbinary(max) with image Replace [varbinary](max) with [image] 5. Create a new database in SQL Server 2000 and run the script generated at step 2 and modified at step 4. 6. Download and install the Database Publishing Wizard tool. 7. Open SQL 2005 database in the Database Publishing Wizard and generate a script with the following options to script data only: 62 INSTALLATION GUIDE 8. Run the script generated in step 7 into the SQL Server 2000 database. 9. Open the application web.config. 10. Change the connections string to point to the SQL Server 2000 database. 11. Change the Nolics data providers in the dataAccess section: <dataAccess defaultConnection="DefaultConnection"> <connections> <add name="DefaultConnection" driver="Nolics.ORMapper.DataProviders.SqlServer2000Provider” connectionStringName="Sitefinity" /> <add name="GenericContentConnection" driver="Telerik.Cms.Engine.Data.Providers.GCSql2000Provider, Telerik.Cms.Engine.Data" connectionStringName="Sitefinity" /> </connections> 63 INSTALLATION GUIDE Upgrading the Sitefinity Database from SQL Server 2000 to SQL Server 2005 1. Upgrade the database using detach and attach. Please refer to this article for more information: How to: Upgrade database using detach and attach 2. Open the application web.config file and modify the connection string to point to the new database: <add name="Sitefinity" connectionString="data source=xxxx;UID=xxxx;PWD=xxxx;initial catalog=xxxx" providerName="System.Data.SqlClient" /> 3. Change the Nolics data providers in the dataAccess section: 14. Configuring IIS Extensionless URLs This topic describes an approach that handles HTTP 404 errors which you get if you request an extensionless URL like http://localhost/YourWebSite/home where home is set as a Page Group in Sitefinity. When you request an extensionless URL, you get HTTP 404. This means IIS receives the request but it serves the page configured for HTTP 404. It does not send the request to ASP.NET ISAPI. So, if you can forward all HTTP 404 to ASP.NET, you can serve extensionless URLs. In order to forward HTTP to ASP.NET ISAPI, you need to configure IIS to redirect to some .aspx extension on HTTP 404. Follow the steps below to make Sitefinity handle the request to sf404.aspx page and rewrite the path to the required URL. IIS 5.x 1. Click All Programs > Administrative Tools > Internet Information Services (IIS) Manager. 2. Expand the tree on the left until you see Web Sites > Default Web Site. 3. Expand the Default Web Site folder. 4. Right‐click your project virtual folder and select Properties. 5. On the Custom Errors tab, select HTTP error 404. 64 INSTALLATION GUIDE 6. Click Edit Properties. 7. From the Message Type list, choose URL. 8. In the URL field, type the path to sf404.aspx in your project: 9. Click OK. IIS 6.x 1. Click All Programs > Administrative Tools > Internet Information Services (IIS) Manager. 2. Expand the tree on the left until you see Web Sites > Default Web Site. 3. Expand the Default Web Site folder. 4. Right‐click your project virtual folder and select Properties. 5. On the Custom Errors tab, select HTTP error 404. 6. Click Edit. 7. From the Message Type list, choose URL. 8. In the URL field, type the path to sf404.aspx in your project: 9. Click OK. 65 INSTALLATION GUIDE IIS 7.0 Note: The settings below should be applied when running the server in Classic Pipeline Mode and are not required in Integrate Pipeline Mode. 1. Click All Programs > Control Panel > Administrative Tools >Internet Information Services (IIS) Manager. 2. Expand the tree on the left until you see Web Sites > Default Web Site. 3. Expand the Default Web Site folder. 4. Select your Web site and in the right pane, IIS section, select Error Pages. 5. In the right pane, click Edit. 6. Change the Path Type to Execute URL and type the path to sf404.aspx in your project: 7. Click Edit Feature Settings. 8. Change the default error response to Custom error pages: 9. 66 Click OK. INSTALLATION GUIDE Wildcard Application Mappings Sitefinity supports URLs without extensions if you set wildcard application mappings in IIS. Apart from setting wildcard application mappings, Sitefinity supports a better approach for URLs with no extensions. As wildcard mapping makes each and every request go through ASP.NET 2.0 ISAPI handler (including URLs with .gif, .css, .js, .html, etc.) and this inevitably worsens the performance, we would recommend the approach described in the Extensionless URLs topic. To set up Wildcard Application Mappings, follow these steps: IIS 5.x 1. Click All Programs > Administrative Tools > Internet Information Services (IIS) Manager. 2. Expand the tree on the left until you see Web Sites > Default Web Site. 3. Expand the Default Web Site folder. 4. Right‐click your project virtual folder and select Properties. 5. On the Virtual Directory tab, click Configuration to open the Application Configuration dialog. 6. Click Add to open the Add/Edit Application Extension Mapping dialog. 7. Browse to select the c:\windows\microsoft.net\framework\v2.0.50727\aspnet_isapi.dll file for the value of the Executable field. 8. In the Extension field, type “ .* ” to specify all kinds of extensions. 9. Select the All verbs checkbox. 10. Clear the Check that file exists checkbox. 67 INSTALLATION GUIDE 11. Click OK to close the Add/Edit Application Extension Mapping dialog. 12. Click OK to close the Application Configuration dialog. IIS 6.x 1. Click All Programs > Administrative Tools > Internet Information Services (IIS) Manager. 2. Expand the tree on the left until you see Web Sites. 3. Expand the Web Sites folder. 4. Right‐click your Web site to select Properties. 5. Click Configuration. 6. Click Insert… to open the Add/Edit Application Extension Mapping dialog. 7. Browse to select the c:\windows\microsoft.net\framework\v2.0.50727\aspnet_isapi.dll file for the value of the Executable field. 8. Clear the Verify that file exists checkbox. 68 INSTALLATION GUIDE 9. Click OK to close the Add/Edit Application Extension Mapping dialog. 10. Click OK to close the Application Configuration dialog. IIS 7 1. Click All Programs > Control Panel > Administrative Tools >Internet Information Services (IIS) Manager. If you are using Windows Vista, follow these steps: 1. Expand the sites folder on the left until you see Web Sites > Default Web Site. 2. Then, expand the Default Web Site folder 3. Select your website. If you are using Windows Server 2008, expand the folders as shown below: Please note that the W2008SQL32Bit icon shall be named differently on your machine, but the idea is the same. 2. Click on the website, then on Handler Mappings: 69 INSTALLATION GUIDE 3. On the right hand side of the screen, click Add Wildcard Script Map: 4. On the dialog that appears, browse to select the c:\windows\microsoft.net\framework\v2.0.50727\aspnet_isapi.dll 5. Give the application mapping as name: 6. Click OK 7. On the next dialog, click yes For more information, please view this article. 70 INSTALLATION GUIDE 15. Configuring Localization Overview The Sitefinity Standard Edition supports multilingual sites and each one needs to have a default language. Although you can only have one default language per Web site, Sitefinity supports an unlimited number of language versions of a website. Localization works on site, page and the module level and uses the same two letter abbreviations from the CultureInfo class. Site Localization Sitefinity allows end users to pick the site’s language: Users can also choose which version of a page to edit by following these steps: 1. Login to Sitefinity 2. Click on Pages 3. Choose the appropriate language: To configure localization for pages, follow these steps: 1. Find the <localization> section in the application web.config file. 2. First, you should set the persistenceMode attribute to either "QueryString" or "PathPrefix" to define the way URLs will be created: <localization defaultProvider="Sitefinity" persistenceMode="PathPrefix" defaultCulture="en" cultures="en, fr"> 71 INSTALLATION GUIDE Notice that the default culture is set to English. If you would like to have another default language, set the default culture property to the language’s two letter prefix: <localization defaultProvider="Sitefinity" persistenceMode="PathPrefix" defaultCulture="es" cultures="en, fr, es, de, bg"> 3. Save the web.config file and you will see the language selector in the top right corner of the screen. The order of languages in the dropdown is the same as set for the value of the cultures attribute. In the above example, setting the defaultCulture attribute to es does not ensure that the selected language in the dropdown (and hence the language version of the page that opens) is always Spanish. This depends on the browser settings: the default language set in the client browser definition overrides the defaultCulture definition in the application web.config. To force a specific culture, independent from the client browser settings and locale, do the following: 1. Find the localization element in the application web.config. 2. Add the autoSetClientLanguage attribute and set it to false: <localization defaultProvider="Sitefinity" autoSetClientLanguage="False" persistenceMode="PathPrefix" Mapping Domain Name and Extension to Culture To Map a Domain Name to Culture, follow these steps: 1. Find the <localization> section in the application web.config file. 2. Set the persistenceMode attribute to "DomainName". 3. Create a new section which contains the domains and the cultures to which they are mapped, surround it with opening and closing tags: “<cultureMappings>”, </cultureMappings>”. 4. Insert a line for each domain you want to map, for example: <add key="www.mydomain.com" culture="en" />, where “key” is the domain name you want to map, and “culture” is the culture to which you want to map it. 72 INSTALLATION GUIDE To illustrate, this is what the web.config file will contain after the update: <localization defaultProvider="Sitefinity" persistenceMode="DomainName" defaultCulture="en" cultures="en, de, fr"> <providers> <clear/> <add name="Sitefinity" type="Telerik.Localization.Data.DefaultProvider, Telerik.Localization.Data" connectionStringName="DefaultConnection"/> </providers> <cultureMappings> <add key="www.mydomain.com" culture="en" /> <add key="www.mydomain-de.com" culture="de" /> <add key="www.mydomain.fr" culture="fr" /> </cultureMappings> </localization> 5. Save the web.config file. To Map a Domain Extension to Culture, follow these steps: 1. Find the <localization> section in the application web.config file. 2. Set the persistenceMode attribute to "DomainExtension". 3. Create a new section which contains the domains and the cultures to which they are mapped, surround it with opening and closing tags:“<cultureMappings>”, </cultureMappings>”. 4. For each domain you want to map insert a line, for example: <add key="com" culture="en" />, where “key” is the domain extension you want to map, and “culture” is the culture to which you want to map it. 73 INSTALLATION GUIDE To illustrate, this is what the web.config file will contain after the update: <localization defaultProvider="Sitefinity" persistenceMode="DomainExtension" defaultCulture="en" cultures="en, fr, de, bg"> <providers> <clear/> <add name="Sitefinity" type="Telerik.Localization.Data.DefaultProvider, Telerik.Localization.Data" connectionStringName="DefaultConnection"/> </providers> <cultureMappings> <add key="com" culture="en" /> <add key="co.uk" culture="en" /> <add key="fr" culture="fr" /> </cultureMappings> </localization> Please, note that Sitefinity maps automatically a domain extension to a culture when there is a match between the two. You do not need to set the mapping explicitly in such cases. 5. Save the web.config file. Module Localization You can localize the following modules: Generic Content News Blogs Events To create different language versions of a module, follow these steps: 74 INSTALLATION GUIDE 1. Find the <cmsEngine> section in the application web.config file and set the allowLocalization attribute to true. <cmsEngine defaultProvider="MODULE_NAME"> <providers> <clear/> <add name="Generic_Content" visible="True" defaultMetaField="Name" securityProviderName="" allowLocalization="True" ... Setting this enables you to create versions of the content items for all the site cultures and display them by switching the languages in the selector on the live web site. 2. Find the <metaFields> section and set the localizable attribute to true for all fields that you want to localize. To make the Description field of the Generic Content module localizable, for example, add the text in red: <add key="Generic_Content.Description" valueType="LongText" visible="True" searchable="False" localizable="True" sortable="True" defaultValue="Add description here"/> Here is the end result in English: Here is the end result in German: 75 INSTALLATION GUIDE By localizing fields, you ensure that field can have a foreign language equivalent. In the example above, the content’s title is not localizable, so when you change to the French version, for example, the title will still say language. The content’s description field, however, will have a French language equivalent. The fields that are used to create the URL, for example Name for the Generic Content module, should not be localized: <add providerName="Blogs" publicationDateField="Publication_Date" urlRewriteFormat="[Publication_Date]/[Title].aspx" If you need to make these kinds of fields localizable, you can do either of the following: 1. Use ID for URL rewriting: urlRewriteFormat="[Publication_Date]/{ID}.aspx" 2. Use GUID for URL rewriting: urlRewriteFormat="[Publication_Date]/{GUID}.aspx" 76 INSTALLATION GUIDE 16. Configuring Workflow and Versioning Sitefinity supports workflow on the module and the pages level. Page Level To enable workflow on the page level, follow these steps: 1. Set the allow page workflow attribute to true in the Web.config: <add connectionStringName="DefaultConnection" allowPageHistory="true" allowPageWorkflow="true" cachingProviderName="ASPNET" name="Sitefinity" type="Telerik.Cms.Data.DefaultProvider, Telerik.Cms.Data" /> 2. Save the Web.config Module Level To configure workflow at the module level, follow these steps: 1. Locate this line of code in your Web.config: <cmsEngine defaultProvider="Generic_Content"> 2. Find the module’s provider (The Generic Content module is given as an example): <add name="Generic_Content" urlRewriteFormat="[Publication_Date]/[Name].aspx" urlDateTimeFormat="yy-MM-dd" urlWhitespaceChar="_" visible="True" defaultMetaField="Name" securityProviderName="" allowLocalization="True" allowVersioning="True" allowWorkflow="True" allowComments="false" commentsModeration="true" versioningProviderName="" connectionStringName="GenericContentConnection" type="Telerik.Cms.Engine.Data.Providers.DefaultProvider, Telerik.Cms.Engine.Data" /> 3. Save the Web.config Page History This feature is not available in the Sitefinity Community Edition. Sitefinity stores the history of content modifications. The site administrator can easily track 77 INSTALLATION GUIDE the modifications, the user identity and the time of the changes. Each time some content is modified, the changes are saved as a new version of the original content. The original content is saved in the database and can easily be restored. By default, page history is enabled. To disable it, open the project web.config file, find this line and set the allowPageHistory attribute to false: <add connectionStringName="DefaultConnection" allowPageHistory="false" allowPageWorkflow="false" name="Sitefinity" type="Telerik.Cms.Data.DefaultProvider, Telerik.Cms.Data" /> To preview and roll back to previous versions of a page: 1. Go to Pages >Site Map. 2. Click to select the page in the site map and go to the History tab. 3. Click View to open a preview of an older version of the page. 4. Click Rollback to substitute the current template with an older version. Module History Sitefinity stores all versions of items created within the Generic Content, News and Blogs modules. Each time some content is modified, the changes are saved as a new version of the original content. The original content is saved in the database and can easily be restored. The site administrator can easily track those modifications, the user identity and the time of the changes. By default, module history is enabled. To disable it, open the application web.config file and find this section: <cmsEngine defaultProvider="Generic_Content">. 78 INSTALLATION GUIDE In the <add> element for the respective module, find the allowVersioning attribute and set it to False. This is what it should look like for the News module: 79 <add name="News" defaultMetaField="Title" visible="False" securityProviderName="" allowVersioning="False" ... INSTALLATION GUIDE 17. Troubleshooting Although a more complete listing of common errors are listed in our Sitefinity Troubleshooting Guide, a few commons ones are listed in this section. Login Failed for User This error occurs because your database user lacks db_owner privileges on the Sitefinity database. When using SQL Server connection strings with Windows Authentication in an ASP.NET web application, the web application is trying to connect to the database with the account that runs the ASPNET working process (this is the ASPNET account in Windows XP and Windows Server 2003. For Windows Server 2008 and Windows Vista, this is the NETWORK SERVICES account). In this case, you should add the account to your database as a db_owner. The above will work only if the database and the Web site are on the same machine. Another solution is to impersonate the ASPNET account to a domain user with access to the database: <identity impersonate="true" userName="<domain>\<user>" password="<password>" /> For more information about impersonation, please refer to this article: ASP.NET Settings Schema You are Running a Trial Version of Sitefinity This error occurs because the license key file has been incorrectly applied or created. When you create the key, make sure it is domain.com. Do not include the http://www.domain.com/ as your whole key. For more info, please review this article. Unknown server tag 'sfBlogDesignSettings:BehaviorSetting' warning while compiling/building your project To resolve, please open: [YourProject]\Sitefinity\Admin\ControlTemplates\Blogs\Design\BlogPostsControlDesig ner.ascx 80 INSTALLATION GUIDE and change sfBlogDesignSettings:BehaviorSetting to sfBlogDesignSettings:BlogsBehaviorSetting. "Unable to load one or more of the requested types. Retrieve the LoaderExceptionsProperty for more information." Please ensure that you performed step 8 of the upgrading process. 81