1
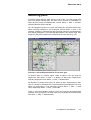
PART II
ALIGNING AND
MATCHING
7
ALIGNING GELS
Introduction
The MelView program has been especially designed to work with raw 2-DE
images, i.e. without the need for image preprocessing prior to 2-DE image analysis. Nevertheless several image enhancement facilities are provided that may
be useful when working with low quality 2-DE images (see Filtering gels on
page 12-2).
Gel alignment is a very useful technique for comparing 2-DE images that
present too many variations in protein migration. In general, while all Melanie II
programs may work with unaligned gel images, alignment might prove helpful
when comparing stacked gels, or for matching distorted 2-DE gel images.
You may align two or more gels at once. You must select a reference gel, i.e. an
image the other gels will be aligned to. At least four landmarks (for the default
alignment algorithm) must have been defined and must be well distributed over
the gel image. The other gels must contain the same landmarks, as the alignment algorithm will try to deform the images in order to best superimpose the
landmarks.
Alternatively, if you align gels that have already been matched, you may choose
to use existing pairs rather than landmarks as reference points (see Matching
gels on page 8-1).
The Melanie II User Manual
7-1
7
ALIGNING GELS
Creating corresponding landmarks
The first step consists in verifying that all gels you are going to align contain at
least four landmarks, and that they represent the same points in all gel images.
The easiest way to define these reference landmarks is probably to set landmarks in the center of a few spots corresponding to known proteins, and to
name the landmarks accordingly.
Only landmarks with identical names in all selected gels will be used for the
alignment. This means you do not need to delete existing landmarks, but you
can just add new ones. If you already have corresponding landmarks in your
gels, you may go to the next section. Otherwise, follow on with the current section.
Decide which gel will serve as the reference gel. Choose four to seven points in
this gel and set landmarks on it (see Creating landmarks on page 4-1). Select
the reference gel and one of the other gels. Stack them (Stack → Stack
Selected Gels, or Control1-T. Put the reference gel in front (Control1-F. Pick the
Hand tool. Put the cursor on top of one landmark. Hold down the mouse button,
press Control1-F and move the cursor to the corresponding point in the other
gel. Release the mouse button. The corresponding point in the second gel
should now lie exactly under the landmark. Press Control1-F twice to verify this.
If it is the case, select the Landmark tool and double-click on the point in the
second gel. This will create a new landmark. In the Landmark window, enter the
same landmark name as in the reference gel. Click OK. You do not need to
specify pI or Mw values. Repeat this step for all other landmarks.
Specify landmarks in the other gels following the steps described above. Save
the landmarks with File → Save → Save Landmarks.
Aligning gels
You may now align the gels. Select all gels that have to be aligned. Take Process → Align Gels → Align Gels. The selected gels will be aligned relative to
the reference gel, so that corresponding landmarks are best superimposed.
The reference gel is considered to be aligned with itself.
Operations on aligned gels
Most operations work on aligned gels in the same way they do on unaligned gel
images. Two types of functions in the MelView program have a different behavior with aligned gels:
1. On the Macintosh, use
7-2
The Melanie II User Manual
instead.
ALIGNING GELS
1 Matching - If the alignment has been performed correctly, then the gel matching program works faster and produces better results, because gel image distortion has partially been eliminated (see Matching gels on page 8-1).
2 Tools - Most tools that perform actions on one gel using the mouse button may
now be used to perform the actions synchronously on all aligned gels using the
right mouse button1:
• Hand tool - Select the Hand tool. Hold down the right mouse button1,
and move the cursor. The aligned gels will move synchronously. If you
use the middle button2, then only the selected gels will move.
• Region tool - Select the Region tool. Hold down the right mouse
button1, and drag the cursor. The same region will be selected in all
aligned gels (Fig. 7-1).
Figure 7-1. Synchronized regions in aligned gels
• Landmark tool - Select the Landmark tool. If you select landmarks
using the right mouse button1, landmarks located at the exact same
positions in all aligned gels will be selected at once. You may also
select landmarks by holding down the right mouse button1 and dragging the cursor to select all landmarks in the given region. Landmarks
in the corresponding region in all aligned gels will be selected.
• Feature tool - Select the Feature tool. If you select features using the
right mouse button1, features located at the exact same positions in
all aligned gels will be selected at once. You may also select features
1. On the Macintosh, hold down the Command key( ) and the mouse button.
2. On the PC mouse with 2 buttons, hold down the Control key and the right mouse button. On the Macintosh, hold down the Option key (
) and the mouse button.
The Melanie II User Manual
7-3
7
ALIGNING GELS
by holding down the right mouse button1, and dragging the cursor to
select all features in the given region. Features in the corresponding
region in all aligned gels will be selected.
• Label tool - Select the Label tool. If you select labels using the right
mouse button1, labels located at the exact same positions in all
aligned gels will be selected at once. You may also select labels by
holding down the right mouse button1, and dragging the cursor to
select all labels in the given region. Labels in the corresponding
region in all aligned gels will be selected.
• Magnify tool - Select the Magnify tool. If you magnify an area of a gel
using the right mouse button1, the same area in all aligned gels will be
magnified. You may then move the magnifying glass simultaneously
in all aligned gels.
Unaligning gels
To get back to the original images, select aligned gels, than take Process →
Align Gels → Unalign Gels. The original images will be displayed again in
place of the aligned ones.
Special alignments
By default gels are aligned relative to the X and Y image axes, using a second
degree alignment function in both the X and Y axes. You may decide to align
images according to only the X or Y axis, or to use another alignment function.
Choose Process → Align Gels → Other alignments and select the desired
option. First, second and third degree functions are available, that request at
least two, three and respectively four landmarks.
1. On the Macintosh, hold down the Command key(
7-4
The Melanie II User Manual
) and the mouse button.
8
MATCHING GELS
Introduction
Gel matching is a key operation in 2-DE gel image analysis. The basic gel
matching algorithm consists of comparing two gel images and finding pairs of
related features, i.e. features depicting the same protein in both gels. A pair is
represented by a doublet (f1, f2) where f1 is a feature ID in the first gel and f2 a
feature ID in the other gel. One generally says that gels have been matched,
and that individual features have been paired.
MelView can match two or more gels. Matching two gels means finding all the
pairs between features of the two gels. Matching several gels means picking
out a reference gel, then successively matching each gel with the reference
gel. In this way, features in all gels may be compared with features in the reference gel. For consistency, when matching only two gels, MelView will also ask
you to specify which one is the reference gel.
All features in selected gels that are paired with the same feature in the reference gel form so-called groups. The group concept is essential to analyze features in a set of gels. Elaborate reports and histograms may be produced from
them (see Groups on page 9-1).
The Melanie II User Manual
8-1
8
MATCHING GELS
In MelView you may accept to match gels with single pairs or multiple pairs.
Matching with single pairs means that one feature in a gel will be paired to
exactly one feature in the other gel. Matching with multiple pairs means allowing that one feature in one gel be paired to several features in the other gel
(Fig. 8-1).
Figure 8-1. One feature paired to two features in the other gel
Matching aligned or unaligned gels
The only prerequisite for matching two gels is that features have already been
detected and quantified. Aligning gels prior to matching is optional, but in many
cases the matching process will be faster and will produce better and more
accurate results, especially with distorted gel images (see Aligning gels on
page 7-1).
Automatic matching
To match two or more gels, select them using the Select tool or one of the
Select → Gels menu options. Choose Process → Match → Match Gels. MelView will first request that you designate the reference gel among the selected
gels. Pick one of the gels, then click OK. You will then be asked whether you
wish to allow multiple pairs. If you accept multiple pairs, press OK. If you want
only single pairs, then click No. All gels will then be matched with the reference
gel. Depending on the computer you are running MelView on, this might take
time.
Do not forget to save the pairs (File → Save → Save Pairs, or File → Save →
Save Changes, or just Control1-S). Saving pairs creates a pairs file that resides
in the same directory as the matched gels. Therefore, only gels that reside in
the same directory may be matched.
1. On the Macintosh, use
8-2
The Melanie II User Manual
instead.
MATCHING GELS
Creating starting pairs
MelView has been designed to automatically match gels. Nevertheless you
may speed and improve the matching process by specifying a few starting
pairs. There are three manners to define starting pairs: you may manually add
pairs, or you can automatically pair identical landmarks or labels.
You may manually add a pair either in stack mode or in tile mode.
Adding / deleting pairs in tile mode
Select two gels using the Select tool, then select one feature in one gel and one
or more features in the other gel using the Feature tool (click on one feature,
then hold down the shift key and click on the other ones). Choose Edit → Pairs
→ Add Pairs (or Control1-A).
To delete pairs, select paired features, then Edit
Control1-D).
→ Pairs → Delete Pairs (or
Adding / deleting pairs in stack mode
Select two gels using the Select tool and bring them into stack mode (Control1T). Using the Hand tool, put the cursor on the feature you want to pair in the
front gel, then hold down the mouse button and bring the other gel to the front
(Control1-F). Move the cursor to the second feature and release the mouse button. The two features should be superimposed. Press the “a” key (PC) or
Control1-A (Macintosh/Unix). MelView will pair the two features situated
exactly under the cursor. You may also add pairs in the same way as in tile
mode, by first selecting them.
To delete pairs, select pairs using one of the Select → Pairs options, then press
Control1-D.
Adding groups
A very convenient way to add pairs between a set of gels and a reference gel is
to create groups (see Groups on page 9-1 and Editing groups on page 11-5).
You first have to set a master (see Master gels on page 14-2). Choose DataBase → Set → Master and choose your reference gel as the master. Then
select one feature in the reference gel and features in the other selected gels.
Choose Edit → Groups → Group Features. The selected features will all be
paired to the selected feature in the reference gel.
1. On the Macintosh, use
instead.
The Melanie II User Manual
8-3
8
MATCHING GELS
Using landmarks as starting pairs
If two or more gels have landmarks with identical names, then you can use
these to create starting pairs. Select the gels, then Process → Match → Match
Landmarks. MelView will ask you to point to the reference gel. It will then, for
each feature in the reference gel that has a landmark defined in it, pair it with
features in the other gels that have the same landmark defined in them. These
newly created pairs may then be used as starting pairs for matching.
You may also copy some or all landmarks from a reference gel to a set of gels,
by doing a local matching of the detected features (see Matching / pasting landmarks on page 11-2).
Note that only landmarks that are located inside of features may be used.
Using labels as starting pairs
If two or more gels have labels with identical accession numbers (AC), then you
can use these to create starting pairs. Select the gels, then Process → Match
→ Match Labels. MelView will ask you to point to the reference gel. It will then
pair each feature in the reference gel that is associated to a label, to features in
the other gels that are coupled to labels with the same AC. These newly created pairs may then be used as starting pairs for matching.
Showing pairs
You can look at the matching results in stack mode. When two selected gels are
in stack mode, choose Show → Pairs → Show Pairs. The pairs between the
two staked gels will be highlighted in the form of blue vectors linking the locations of paired features. The head of the vector points to the feature in the front
gel (Fig. 8-2). To hide vectors, choose Show → Pairs → Hide Pairs.
Figure 8-2. Matched gels: blue vectors indicate paired features.
8-4
The Melanie II User Manual
MATCHING GELS
Selecting pairs
To observe paired features when gels are in tile mode, you have to select the
pairs. First select matched gels. You then have a number of possibilities. To
select all pairs among the selected gels, choose Select → Pairs → All Pairs.
All paired features will be selected.
You can highlight only pairs for a given set of features. Using the Feature tool,
select a number of features in one of the gels. Choose Select → Pairs → For
Features. Features in selected gels that have been paired to the selected features will be highlighted. If you have selected features in the reference gel, then
all pairs for the given features will be selected in the other gels (Fig. 8-3).
Figure 8-3. Selected paired features across three gels.
To observe pairs in a specific region, select a region in one gel using the
Region tool, then Select → Pairs → In Region. To select only multiple pairs,
excluding single pairs, take Select → Pairs → Multiple Pairs.
An algorithm to predict the accuracy of pairs has been implemented in MelView. It is based on the length of the vectors between paired features. You may
select only good pairs, or only bad pairs. Choose Select → Pairs → Good
Pairs, respectively Select → Pairs → Bad Pairs.
Finally, if you have selected a number of pairs by one of the above described
methods, and if your gels are in stack mode, you may display the selected pairs
with Show → Pairs → Selected Pairs.
The Melanie II User Manual
8-5
8
MATCHING GELS
Reports on pairs
MelView can display, print or save a report on pairs between two matched gels.
Select two matched gels and a number of pairs, using one of the selection
methods described above. Then take Show → Pairs → Report On Pairs. You
will get the list of all paired feature IDs (identifications) between both gels.
Another way to display the matching result is to select two or more matched
gels, then Show → Gels → Report On Matches. This will display the number of
pairs between all the selected gels and any open gels.
Finally, you may choose Show → Gels → Report All Matches. This displays
information on matching between all gels in a given directory. A pop-up window
will request the directory name (default: current directory).
8-6
The Melanie II User Manual