1
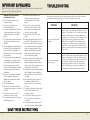
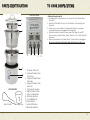
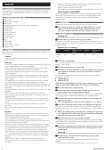
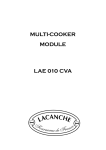
TM
Whole Grain
Gourmet™
Instruction Manual
TM
www.CoolShinyStuff.com
Model #NRC-1000
www.CoolShinyStuff.com
TM
NOTES
By:
Welcome to the NutriWare™ community!
With your NutriWare™ Whole Grain Gourmet™ you are well on your way to
meals that are healthy, delicious and easy to prepare. Cook anything
from white to brown rice, whole grains and even entire entrees with the
push of a button.
TM
By:
The Whole Grain Gourmet™ also has the revolutionary ability to boil
delicious whole grain pastas and other foods with its surgical stainless
steel colander.
And with completely surgical stainless steel cooking surfaces you can rest
assured that all food contact surfaces are non-reactive. With the Whole
Grain Gourmet™, the only thing you and your family will be consuming is
the delicious food you’ve prepared.
To maximize your health benefits, be sure to use fresh, organic foods
whenever possible. Free of pesticides and artificial additives, organic
foods will nourish you best.
This isn’t the only product from NutriWare™. Please visit us at
www.mynutriware.com to browse our other NutriWare™ products.
NutriWare™ nourishes the food that nourishes you.
Aroma Wellness Co.
6469 Flanders Drive
San Diego, CA 92121
U.S.A.
1-800-276-6286
www.mynutriware.com
Published By:
©2008 Aroma Housewares Company All Rights Reserved.
1
18
LIMITED WARRANTY
Aroma Wellness Company warrants this product free from defects in
material and workmanship for two years from provable date of purchase
in the continental United States.
Within this warranty period, Aroma Wellness Company will repair or
replace, at its option, defective parts at no charge, provided the product
is returned, freight prepaid with proof of purchase and U.S. $15.00 for
shipping and handling charges payable to Aroma Wellness Company.
Before returning an item, please call the toll free number below for a
return authorization number. Allow 2-4 weeks for return shipping.
Aroma Wellness™ Co. is committed to making the world a healthier,
happier place for current and future generations. We believe that being
socially and environmentally responsible is a compulsory duty for modern
businesses. Our mission is to provide innovative home product solutions
that bring health and wellness into the lives of all who use them. The
NutriWare™ line of kitchen appliances is in lockstep with Aroma
Wellness™ Co.’s overall mission.
This warranty does not cover improper installation, misuse, abuse or
neglect on the part of the owner. Warranty is also invalid in any case that
the product is taken apart or serviced by an unauthorized service station.
This warranty gives you specific legal rights, which may vary from state to
state, and does not cover areas outside the United States.
AROMA WELLNESS COMPANY
6469 Flanders Drive
San Diego, California 92121
1-800-276-6286
M-F, 8:30 AM - 5:00 PM, Pacific Standard Time
www.MyNutriware.com
The Aroma Wellness Co.’s San Diego staff
NutriWare™ is for those who want to get the most out of their food. This
new generation of kitchen appliances gives back what traditional
cooking methods take away. We seek to provide our customers with
convenient, wholesome ways to unlock the full health benefits of natural
foods.
NutriWare™ is committed to quality and therefore uses only safe,
non-reactive materials and advanced technology to create appliances
that are ultimately practical, versatile and safe.
17
2
IMPORTANT SAFEGUARDS
Basic safety precautions should always be followed when using electrical
appliances, including the following:
1. Important: Read all instructions
carefully before first use.
2. Do not touch hot surfaces. Use
handles or knobs.
3. Use only on a level, dry and
heat-resistant surface.
4. To protect against electrical shock,
do not immerse the cord, plug or
appliance in water or any other
liquid.
5. Close supervision is necessary when
the appliance is used by or near
children.
6. Always unplug from outlet when not
in use and before cleaning. Allow
unit to cool before putting on or
taking off parts and before cleaning
the appliance.
7. Do not operate any appliance with
a damaged cord or plug or after
the appliance malfunctions or has
been damaged in any manner.
Contact Aroma Wellness customer
service for examination, repair or
adjustment.
8. The use of accessory attachments
not recommended by Aroma
Wellness may result in fire, electric
shock or injury.
9. Do not use outdoors.
10. Do not let cord touch hot surfaces
or hang over the edge of a counter
or table.
11. Do not place on or near a hot
burner or in a heated oven.
12. Do not use the appliance for other
than its intended use.
3
13. Extreme caution must be used
when moving the appliance
containing hot water or other
liquids.
14. Do not touch, cover or obstruct
the steam vent on the top of the
rice cooker as it is extremely hot
and may cause scalding.
15. Use only with a 120V AC power
outlet.
16. Always unplug from the base of the
wall outlet. Never pull on the cord.
17. The rice cooker should be operated
on a separate electrical circuit from
other operating appliances. If the
electric circuit is overloaded with
other appliances, this appliance
may not operate properly.
18. Always make sure the outside of the
inner pot is dry prior to use. If the
inner pot is returned to the cooker
when wet, it may damage or cause
the product to malfunction.
19. Use extreme caution when opening
the lid during or after cooking. Hot
steam will escape and may cause
scalding.
20. Rice or grains should not be left in
the inner pot with the “KeepWarm” function on for more than
12 hours.
21. To prevent damage or deformation,
do not use the inner pot on a
stovetop or burner.
22. To disconnect, turn any control to
"Off,” then remove the plug from
wall outlet.
23. To reduce the risk of electric shock,
TROUBLESHOOTING
Because rice variations may vary in their make-up, results can also differ. Below are
some troubleshooting tips to help you achieve the desired consistency.
PROBLEM
SOLUTION
Rice is too dry/hard after
cooking.
If your rice is dry or hard/chewy when the rice cooker
switches to “Keep-Warm” mode, additional water and
cooking time will soften the rice. Depending on how
dry your rice is, add more water and stir through. Close
the lid and press the appropriate function button
(“White Rice” or “Brown Rice” depending upon the
rice being cooked). When the rice cooker switches to
“Keep-Warm” mode, open the lid and stir the rice to
check the consistency. Repeat as necessary until rice is
soft and moist.
Rice is too moist/soggy
after cooking.
If your rice is still too wet or soggy when the rice cooker
switches to “Keep-Warm” mode, use the rice paddle
to stir the rice. This will redistribute the bottom (moistest)
part of the rice as well as release excess moisture.
Close the lid and allow to remain on “Keep-Warm”
mode for 10-30 minutes as needed, opening the lid
and stirring periodically to release excess moisture.
cook only in removable container.
SAVE THESE INSTRUCTIONS
16
HOW TO CLEAN
ALWAYS UNPLUG UNIT AND ALLOW IT TO COOL COMPLETELY BEFORE
CLEANING.
1. Lid, steam tray, colander, rice paddle, measuring cup and inner pot are
dishwasher- safe. When using the dishwasher, it is best to place plastic
accessories on the top rack.
2. To Hand Wash: Wash lid, steam tray, colander, rice paddle and measuring
cup in warm, soapy water. Rinse and dry thoroughly.
3. Wash inner pot in warm, soapy water with a soft cloth.
4. Rinse and dry thoroughly before returning to the rice cooker.
5. Wipe the exterior of the rice cooker with a soft damp cloth.
NOTE:
• Do not submerge rice cooker body, cord or plug in water or any other
liquids.
• Always make sure that the outside of the inner pot is dry prior to use. If
the inner pot is wet when it is returned to the rice cooker it may
damage this product, causing it to malfunction.
SHORT CORD INSTRUCTIONS
1. A short power-supply cord is provided to reduce the risks resulting from
becoming entangled in or tripping over a longer cord.
2. Longer extension cords are available and may be used if care is
exercised in their use.
3. If a longer extension cord is used:
a. The marked electrical rating of the
extension cord should be at least as
great as the electrical rating of the
appliance.
b. The longer cord should be arranged
so that it will not drape over the
countertop or tabletop where it can
be pulled by children or tripped over
unintentionally.
POLARIZED PLUG
This appliance has a polarized plug (one blade is wider than the other);
follow the instructions below:
To reduce the risk of electric shock, this plug is intended to fit into a
polarized outlet only one way. If the plug does not fit fully into the outlet,
reverse the plug. If it still does not fit, contact a qualified electrician. Do
not attempt to modify the plug in any way.
If the supply cord is damaged it must be replaced by the manufacturer,
its service agent or a similarly qualified person in order to avoid a hazard.
This appliance is for household use only.
15
4
PARTS IDENTIFICATION
Control Panel
1
2
5
7
6
Accessories
5
• What you’ll need: Inner Pot
1. Add ingredients to the inner pot and place it into the Whole Grain
Gourmet™.
2. Press the “White Rice” button. The “White Rice” indicator light will
illuminate.
3. Allow soup to cook until ready, stirring often. Refer to soup/stew
package instructions for suggested cooking time.
4. When soup/stew is finished cooking, press the “Keep-Warm/Off”
button once to use the “Keep-Warm” function. The “Warm” light will
illuminate.
5. Rice cooker will remain in “Keep-Warm” mode until it is unplugged.
Be sure to unplug the unit from the wall outlet when it is not in use.
3
4
Rice Paddle
TO COOK SOUPS/STEWS
Measuring Cup
8
9
10
11
12
1. Tempered Glass Lid
2. Surgical Stainless Steel
Steam Tray
3. Surgical Stainless Steel
Colander
4. Surgical Stainless Steel
Inner Pot
5. Cool-Touch Handles
6. Digital Control Panel
7. Rice Paddle Holder
8. White Rice Button
9. Pasta/Boil Button
10. Steam Button
11. Warm/Off Button
12. Brown Rice Button
14
TO COOK PASTA/BOIL
BEFORE FIRST USE
• What you’ll need: Inner Pot • Colander
1. Read all instructions and important safeguards.
2. Remove all packaging materials and make sure items are received in
good condition.
3. Tear up all plastic bags, as they can pose a risk to children.
4. Wash accessories in warm, soapy water. Rinse and dry thoroughly.
5. Remove the inner pot from the Whole Grain Gourmet™ and clean with
warm, soapy water. Rinse and dry thoroughly before returning to
cooker.
6. Wipe body clean with a damp cloth.
7. Do not use abrasive cleaners or scouring pads.
8. Do not immerse the rice cooker base, cord or plug in water at any time.
1. Pour water into the inner pot (enough to cover food to be boiled).
2. Place the colander into the inner pot.
3. Place the inner pot and colander into the rice cooker. Set the lid over the
top.
4. Press the “Pasta” button. The “Pasta” indicator light will illuminate.
5. When the water has come to a boil, remove the lid. Carefully add pasta or
other foods to the colander, wearing protective oven mitts to avoid steam
burns. Do not re-cover with the lid.
6. Allow pasta/food to boil. Stir with a long-handled spoon and check for
doneness occasionally, taking care to use protective oven mitts to avoid
steam burns. Refer to food packaging for estimated cooking times.
7. When pasta or other food has finished cooking press the “Warm/Off”
button twice to turn off the power.
8. Using protective oven mitts, carefully lift the colander out of the rice
cooker, allowing all the water to drain into the inner pot.
9. Empty food from colander into a serving dish.
13
NOTES ON USING THE
WHOLE GRAIN GOURMET™
1. The stainless steel handles will be HOT during and after operation. Always
use protective oven mitts when removing the lid, steam tray, colander or
inner pot from the rice cooker.
2. When using the rice function, always place the lid on the rice cooker so
that the steam vent is facing away from the front of the rice cooker (toward
the side furthest from the control panel). This will prevent steam burns that
may otherwise occur when reaching for the lid handle.
3. Foods may not be cooked in the steam tray while pasta or other foods are
boiling. The high level of water needed for boiling will often cause foods in
the steam tray to become submerged in water. Over-boiling and sputtering
may also occur.
4. When using the pasta function do not cover with the lid.
5. When using the steam function, it is best to place the steam tray into the
colander before inserting it into the inner pot.
6. Always use protective oven mitts when removing the lid, colander or steam
tray both before and after cooking.
6
TO COOK RICE
TO STEAM
• What you’ll need: Inner Pot
1. Using the provided measuring cup, measure out the desired amount of
rice. One cup refers to one full, level cup. Cooked rice expands to
double the amount of dry rice; for example cooking 2 cups of raw rice
will yield 4 cups of cooked rice.
2. Rinse rice in a mesh strainer or other separate container (do not rinse
rice in the inner pot) until the water becomes relatively clear. Place
rinsed rice into the inner pot.
3. Using the provided measuring cup or the measurement lines inside the
inner pot, add the appropriate amount of water to the inner pot. Refer
to the “Rice/Water Measurement Chart” on page 8 of this manual for
reference. The water lines in the inner pot are meant for white rice only;
brown rice and rice mixes require additional water (see note below).
Smooth over the top of the rice with the rice paddle so that the surface
is level to ensure even cooking.
4. Place the inner pot in the Whole Grain Gourmet™, making sure that the
outside surface of the pot is dry. Place the lid over the rice cooker and
plug the power cord into a wall outlet.
5. To begin cooking, press the “White Rice” button (or “Brown Rice”
button if cooking brown rice). The “White Rice” indicator light will
illuminate. Once cooking is complete, the rice cooker will automatically
switch to “Keep-Warm” mode.
6. After cooking, use an oven mitt to remove the lid and use the rice
paddle to stir the rice. This will release excess moisture and give the rice
a fluffier texture. Then, close the lid and allow to remain in
“Keep-Warm” mode for 5-10 minutes. This will ensure optimal rice
texture and moisture level.
7. Press the “Warm/Off” button twice to turn off the heat and unplug the rice
cooker to turn off the power. It is not recommended to leave rice on
“Keep-Warm” mode for more than 12 hours.
VEGETABLE STEAMING CHART
NOTES ON COOKING RICE:
• Brown rice takes longer to cook and requires more water than white
rice due to the extra bran layers on the grains. The water lines in the
inner pot are meant for white rice only. Please see the chart on page 8
for brown rice cooking ratios.
• Brown rice, wild rice and rice mixes vary in their make-up. Some
variations may require longer cooking times and/or additional water in
order to achieve optimum results. Refer to the individual package
instructions for cooking suggestions.
• The measuring cup provided adheres to rice industry standards
(180mL) and is equal to roughly ¾ of a standard U.S. cup (240mL).
The rice/water measurement chart on page 8 refers to cups of
rice/water according to the measuring cup provided.
• Do not place more than 9 cups of uncooked white rice ( 7 cups if using
brown rice) into this appliance at one time. The maximum capacity of
this unit is 9 cups uncooked white rice (7 cups if using brown rice) which
yields 18 cups of cooked rice (14 cups if using brown rice).
7
VEGETABLE
ASPARAGUS
BROCCOLI
CABBAGE
CARROTS
CAULIFLOWER
CORN
EGGPLANT
GREEN BEANS
PEAS
SPINACH
SQUASH
ZUCCHINI
AMOUNT OF WATER
½ CUP
1/4 CUP
1 CUP
1 CUP
1 CUP
1 CUP
1¼ CUP
1 CUP
½ CUP
½ CUP
½ CUP
½ CUP
NOTES ON STEAMING VEGETABLES:
STEAMING TIME
7 MINUTES
5 MINUTES
15 MINUTES
15 MINUTES
15 MINUTES
15 MINUTES
15 MINUTES
15 MINUTES
7 MINUTES
7 MINUTES
7 MINUTES
7 MINUTES
• Since most vegetables only absorb a small amount of water, there is
no need to increase the amount of water with a larger serving of
vegetables.
• Altitude, humidity and outside temperature will affect cooking times.
• This steaming chart is for reference only. Actual cooking time may vary.
MEAT STEAMING CHART
MEAT
FISH
CHICKEN
PORK
BEEF
AMOUNT OF
WATER
2 CUPS
2½ CUPS
1 CUP
1 CUP
NOTES ON STEAMING MEAT:
STEAMING TIME
7 MINUTES
5 MINUTES
15 MINUTES
15 MINUTES
SAFE
TEMPERATURE
140ºF
165ºF
160ºF
160ºF
• Steaming times may vary depending upon the cut of meat being used.
• To ensure meat tastes its best, and is safe to eat, check that meat is
completely cooked prior to serving. Use a meat thermometer to see if the
internal temperature is at least that of the safe termperatures listed above.
If it is not, simply place more water in the inner pot and repeat the cooking
process until a safe temperature is reached.
12
TO SIMULTANEOUSLY STEAM &
COOK RICE
• What you’ll need: Inner Pot • Steam Tray
1. When cooking rice and steaming simultaneously, a maximum of 4 cups (8
cups cooked) of rice may be prepared (3 cups if using brown rice). This will
ensure that both the cooked rice and the steam tray fit properly into the
rice cooker.
2. Add the desired amount of rice and water to the inner pot. See “To Cook
Rice” on page 7 for detailed instructions. Place the inner pot into the base.
3. Refer to the steaming guides for vegetables or meat (page 12) for hints
and approximate steaming times. It is best to insert the food to be
steamed toward the end of the rice cooking cycle so that your meal is
fresh and warm all at once.
4. Place your choice of vegetables or meat into the steam tray. Open the
lid, using caution as steam escaping will be extremely hot, and place
steam tray into the rice cooker.
5. Close the lid and allow the cooker to resume cooking.
6. Remove food from the steam tray immediately after cooking. Using
protective oven mitts, pull up the handles on the steam tray and carefully
lift out.
7. After removing food, replace the lid and allow the rice to finish cooking.
When it is ready, the rice cooker will automatically switch to “Keep-Warm”
mode.
8. Press “WARM/OFF” twice to turn off the rice cooker. Always unplug the
rice cooker when not in use.
CAUTION:
• Use caution when opening the lid as steam escaping will be
extremely hot.
• If cooking pot is returned to cooker when wet it will damage this
product, causing it to malfunction.
TO COOK RICE
White Rice/Water Measurement Chart:
UNCOOKED
RICE
2 Cups
3 Cups
4 Cups
5 Cups
6 Cups
7 Cups
8 Cups
9 Cups
WHITE RICE
WATER WITH
MEASURING CUP
2-1/2 Cups
3-1/2 Cups
4-1/2 Cups
5-1/2 Cups
6-1/2 Cups
7-1/2 Cups
8-1/2 Cups
9-1/2 Cups
WHITE RICE
WATERLINE
INSIDE POT
Line 2
Line 3
Line 4
Line 5
Line 6
Line 7
Line 8
Line 9
APPROX. COOKED
RICE YIELD
4 Cups
6 Cups
8 Cups
10 Cups
12 Cups
14 Cups
16 Cups
18 Cups
Brown Rice/Water Measurement Chart:
UNCOOKED
RICE
2 Cups
3 Cups
4 Cups
5 Cups
6 Cups
7 Cups
NOTE:
BROWN RICE
WATER WITH
MEASURING CUP
3 Cups
4-1/4 Cups
5-1/2 Cups
6-3/4 Cups
8 Cups
9-1/4 Cups
APPROX. COOKED RICE
YIELD
4 Cups
6 Cups
8 Cups
10 Cups
12 Cups
14 Cups
• Due to the extra water needed to cook brown rice, the maximum
amount of brown rice that may be cooked at one time is 7 cups.
HELPFUL HINTS:
1. Rinse rice before placing it into the inner pot to remove excess bran
and starch. This will help reduce browning and sticking.
2. If you have experienced any sticking with the type of rice you are
using, try adding a light coating of vegetable oil or nonstick spray to
the bottom of the inner pot before adding rice.
3. The chart above is only a general measuring guide. As there are
many different varieties of rice available, rice/water measurements
may vary slightly.
11
8
TO COOK WHOLE GRAINS
TO STEAM
• What you’ll need: Inner Pot
The Whole Grain Gourmet is ideal for cooking and preparing a wide
variety of delicious, nourishing whole grains. Follow the instructions in “To
Cook Rice” on page 7 for the proper operational steps.
™
Refer to the chart below as a general reference for grain/water ratios for
popular whole grains in your Whole Grain Gourmet™. The measurements
given are using the provided measuring cup.
Whole Grain
Water to Grain Ratio
with Measuring Cup
Bulgur
2:1
Amaranth
Couscous
1½:1
Kasha
2:1
Kamut
®
Millet
Oats
Pearl Barley
Polenta
Quinoa
Rye Berries
Tritical Berries
NOTE:
3:1
Wheat Berries
3:1
2½:1
2:1
3:1
4:1
2:1
3:1
3:1
3½:1
For instructions and recipe ideas for whole grains from amaranth to
wheat, refer to the included recipe booklet. For a free copy of the
recipe booklet, visit us online at www.mynutriware.com or contact an
Aroma Wellness customer service representative at 800-276-6286 M-F
8:30am-5:00pm PST.
9
• What you’ll need: Inner Pot • Colander • Steam Tray
1. Add the desired amount of water to the inner pot according to the food
being cooked. A convenient steaming guide has been included on page
12 of this manual for reference.
2. Place food into the steam tray. Place steam tray into the colander.
3. Place the inner pot into the base. Place the colander and steam tray into
the inner pot and cover with the lid.
4. Press the “Steam” button. The “Steam” light will illuminate.
5. Allow to cook for the necessary amount of time (see page 12 for a
steaming guide). Using protective oven mitts, open the lid and check food
every so often for doneness.
6. Remove food immediately after the cooking process has completed.
Using protective oven mitts, grasp the handles of the colander and
carefully lift it out. Place on a heat-proof surface and carefully remove the
steam tray from the colander.
7. Press the “Warm/Off” button twice to turn off the heat. Do not leave food
in the machine after it has finished cooking. Leaving food in the inner pot
may cause it to overcook.
NOTES ON STEAMING:
• Always keep the lid closed during the entire steaming process.
Opening the lid causes a loss of heat and steam, resulting in a slower
cooking time. If you find it necessary to open the lid, you may want to
add a small amount of water to help restore the cooking time.
• Altitude, humidity and outside temperature will affect cooking times.
• The steaming chart on page 12 is for reference only. Actual cooking
time may vary.
• No more than 4 cups (uncooked) of rice may be prepared in the rice
cooker when simultaneously steaming (3 cups if using brown rice).
Cooking more than 4 cups of rice (3 cups if using brown rice) will cause
the steam tray to fit improperly into the rice cooker which will affect
cooking results as well as create a risk of injury.
10