1
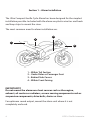
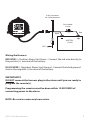
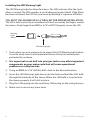
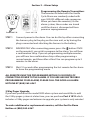
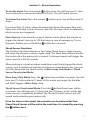
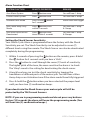
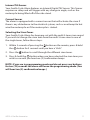
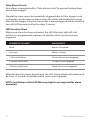
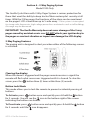
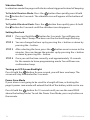
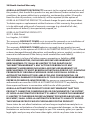
Remote Control Motorcycle Alarm System
Installation & Operation Instructions
User Manual for 9000 & 9100
www.gorillacyclealarm.com
©2014 Gorilla Automotive
Congratulations! You have purchased one of the most compact and
effective motorcycle alarms on the market today. With most motorcycles,
installation takes less than 30 minutes and can be done with common
hand tools.
The Gorilla Cycle Alarm protects your motorcycle by detecting disturbances
such as impacts, motion or any current drops in the electrical system. When
activated, the 120 db siren will sound for 30 seconds before stopping and
re-arming itself.
IMPORTANT!
Your new Gorilla Cycle Alarm was carefully packaged at the factory.
If you have any questions about the components included with your
alarm, please call the Gorilla Alarm Hotline at (800) 262-6267.
Gorilla Cycle Alarm Contents - 9000
QUANTITYDESCRIPTION
1
1
1
1
2
3
ALARM UNIT WITH MOTION TILT SENSOR
WIRING HARNESS
3-BUTTON REMOTE TRANSMITTER
LED WARNING LIGHT
PLASTIC WIRE TIES
HOOK & LOOP STRIPS
Gorilla Cycle Alarm with 2-Way Paging System – 9100
Includes all the above as well as:
QUANTITYDESCRIPTION
1
1
5-BUTTON 2-WAY PAGER REMOTE
2-WAY PAGER ANTENNA
NOTE: An 8MM or 5/16” drill bit will be required for the installation of
the LED warning light.
©2014 Gorilla Automotive
3
Section 1 – Alarm Installation
The Ultra Compact Gorilla Cycle Alarm has been designed for the simplest
installation possible. Included with the alarm are plastic wire ties and hook
and loop strips to mount the siren.
The most common areas for alarm installation are:
2
3
1
4
1 – Within Tail Section
2 – Under Rider or Passenger Seat
3 – Behind Side Covers
4 – Within Front Fairing
IMPORTANT!!!
Do not mount the alarm near heat sources such as the engine,
exhaust, oil coolers or radiators, or near moving components such as
suspension components, drive belts, chains or tires.
For optimum sound output, mount the alarm unit where it is not
completely enclosed.
4
©2014 Gorilla Automotive
3-Pin Connector
for 2-Way Antenna
Fuse Holder
2 Amp
Red
Black
BATTERY
12 Volt
LED
Wiring the Harness
RED WIRE (+ Positive) Alarm Unit Power - Connect the red wire directly to
the positive (+) terminal of the battery.
BLACK WIRE (- Negative) Alarm Unit Ground - Connect the black ground
wire to the negative (-) terminal of the battery.
IMPORTANT!!!
DO NOT connect the harness plug to the alarm until you are ready to
program the remote(s).
Programming the remotes must be done within 10 SECONDS of
connecting power to the alarm.
NOTE: Be sure to secure any loose wires.
©2014 Gorilla Automotive
5
Installing the LED Warning Light
The LED Warning Light has three functions: The LED indicates that the Cycle
Alarm is armed. The LED provides a visual deterrent against theft. If the Alarm
has been activated, the LED lets you know by blinking a sequence of flashes.
YOU MUST USE AN 8MM OR 5/16” DRILL BIT FOR PROPER INSTALLATION.
The LED is held in place by an interference fit and secured by the fingers around
the sleeve. A hole larger than 8MM or 5/16” will NOT properly secure the LED.
Warning
Light
Sleeve
LED Warning Light
1. Find a place on your motorcycle to mount the LED Warning Light where
it can be easily seen to alert potential thieves that your motorcycle is
protected by an alarm.
2. It is important to not drill into your gas tank or any other important
components on your motorcycle that will cause operational
problems or safety hazards.
3. Using an 8MM or 5/16” drill bit, drill a hole in the desired location.
4. Insert the LED Warning Light sleeve into the hole and feed the LED bulb
through the backside of the sleeve. When the LED bulb is inserted into
the sleeve properly it will click in place.
5. Plug the 2-Wire plug into the matching 2-Wire plug on the wiring harness.
6. Make sure to secure any loose wires.
6
©2014 Gorilla Automotive
2-Way Pager Antenna Installation (9100 Only)
STEP 1 Find a secure place on the motorcycle where you can mount
the 2-Way Antenna using the supplied hook and loop strips. The
2-Way Pager Antenna should be mounted in a location that will
not get wet and away from heat sources.
STEP 2 Route the 2-Way Antenna wire to the alarm unit while keeping the
wire hidden and secure.
STEP 3 Connect the 3-Wire plug on the Antenna to the matching 3-Wire
plug on the wiring harness.
2-Way
Antenna
Module
To Alarm
Module
NOTE: You need to connect the 2-Way Pager Antenna to the harness
before programming remotes.
©2014 Gorilla Automotive
7
Section 2 – Alarm Setup
Programming the Remote Transmitters
The remotes included with the Gorilla
Cycle Alarm are randomly coded with
over 500,000 different code sequences.
When you learn the remote(s) to the
alarm system, those codes are stored
until the alarm is disconnected from
power or reprogrammed.
Part # 8007-3B
Part # 8017-5B
STEP 1
Connect power to the alarm. You can do this by either connecting
the harness plug to the plug on the siren unit, or by having the
plugs connected and attaching the harness to the battery.
STEP 2
IMMEDIATELY after connecting power, press the button ONCE
on the remote(s) you wish to program to the alarm. You will hear
a confirmation chirp. If you are programming multiple remotes,
you will hear two confirmation chirps after programming a
second remote, and three after a third. You can program up to 3
remotes to the alarm.
STEP 3
Wait 10 seconds after programming the last remote for the alarm
to leave the programming mode.
ALL REMOTES MUST BE PROGRAMMED WITHIN 10 SECONDS OF
CONNECTING POWER TO THE ALARM. IF YOU ARE HAVING TROUBLE
PROGRAMMING YOUR ALARM, PLEASE CALL THE GORILLA ALARM
HOTLINE AT (800) 262-6267
2-Way Pager Upgrade
If you have purchased the model 9000 alarm system and would like to add
the 2-Way pager system at a later time, you can purchase Part # 1019 which
includes a 2-Way pager and antenna to upgrade your system in only minutes!
To order additional or replacement remotes, call the Gorilla Alarm
Hotline at (800) 262-6267
8
©2014 Gorilla Automotive
Section 3 – Alarm Operation
To arm the alarm: Press the remote button once. You will hear one (1) chirp.
Your motorcycle is now protected by the Shock, Tilt, and Current sensors.
To disarm the alarm: Press the remote
chirps.
button once. You will hear two (2)
If you hear four (4) chirps when disarming the alarm, this means that your
alarm was activated in your absence. (See LED Function Chart to determine
which sensor was triggered.)
Panic Feature: Your alarm has a panic feature which allows the remote to
trigger the alarm’s siren up to 100 feet away in case of emergency. To use
the panic feature, press & hold the button for 3 seconds.
Shock Sensor Functions
The Gorilla Cycle Alarm features a Two Stage Shock Sensor. Light impacts
will cause the alarm to sound a single chirp. This Warn Away feature notifies
the violator that the motorcycle is armed. A stronger impact will trigger the
alarm siren for a full 30 seconds.
When parking in a location where conditions may falsely trigger the shock
sensor, such as multi-level parking structures or construction sites, you can
arm the alarm with the shock sensor in Warn Away Only Mode or Shock
Sensor Deactivated Mode.
Warn Away Only Mode: Press the button twice within 5 seconds. You will
hear one (1) chirp and one (1) beep. In this mode, any impact to the bike
will ONLY trigger a Warn Away chirp.
Shock Sensor Deactivated Mode: Press the button three times within
5 seconds. You will hear one (1) chirp and two (2) beeps. In this mode, the
shock sensor is completely disabled. The Tilt and Current Sensors are still
armed and protecting your motorcycle.
Once the alarm is disarmed, these modes are cleared and the Two
Stage Shock Sensor will be active the next time it is armed by pressing
the button once.
©2014 Gorilla Automotive
9
Alarm Function Chart
SYSTEM FUNCTION
REMOTE OPERATION
REMARK
Arm Alarm System
Press
button once
You will hear 1 chirp
Disarm Alarm System
Press
button once
You will hear 2 chirps
Activate Panic Mode
Press & hold
for 3 seconds
Arm “Warn Away Only” Mode
Press button twice within 5 seconds
You will hear 1 chirp
& 1 beep
Arm with Shock Sensor
Deactivated
Press button three
times within 5 seconds
You will hear 1 chirp
& 2 beeps
button
Alarm Siren will trigger
Setting the Shock Sensor Sensitivity
Your Gorilla Cycle Alarm is programmed from the factory with the Shock
Sensitivity pre-set. The Shock Sensitivity can be adjusted to seven (7)
different levels using the remote. The Shock Sensor can also be deactivated
completely during the programming.
1. Within 5 seconds of pressing the button on the remote, press & hold
the
button for 3 seconds until you hear a “click”.
2. Press the button to scroll through the seven (7) levels of sensitivity.
The higher pitch of the tone, the more sensitive the alarm is to shock.
The “chirp” sound is the setting for deactivating the shock sensor.
3. At each level you can test the shock sensitivity by tapping the
handlebars or different parts of the motorcycle. You will hear a Warn
Away chirp or an Activation tone if the alarm would have fully triggered.
4. Press & hold the
button when you have selected the proper level
until you hear two (2) confirmation beeps.
If you deactivate the Shock Sensor your motorcycle will still be
protected by the Tilt/Current Sensors.
NOTE: If you are in programming mode and do not press any buttons
for ten (10) seconds the alarm will leave the programming mode (You
will hear two (2) confirmation beeps.)
10
©2014 Gorilla Automotive
Internal Tilt Sensor
Your Gorilla Cycle Alarm features an Internal Digital Tilt Sensor. This Sensor
requires no setup and will trigger with any change in angle, such as the
motorcycle being lifted off of the side stand.
Current Sensor
The alarm is equipped with a current sensor that will activate the siren if
there is any disturbance to the electrical system, such as an attempt to hot
wire the motorcycle or if the motorcycle is started.
Selecting the Siren Tones
Your Gorilla Cycle Alarm has been pre-set with the multi 5-tone siren sound.
If you wish to change the siren tone from the multi 5-tone siren to one of
the single tones, follow these steps:
1. Within 5 seconds of pressing the button on the remote, press & hold
the
button for 3 seconds until you hear a “click”.
2. Press the
button to scroll through the different siren tones.
3. Press & hold the
button when you have selected the siren tone you
wish to use until you hear two (2) confirmation beeps.
NOTE: If you are in programming mode and do not press any buttons
for ten (10) seconds the alarm will leave the programming mode (You
will hear two (2) confirmation beeps.)
©2014 Gorilla Automotive
11
False Alarm Circuit
Your alarm is equipped with a “false alarm circuit” to prevent battery drain
due to false triggers.
Should the same sensor be repeatedly triggered due to false triggers such
as thunder, construction or airport noise the alarm will disable that sensor
after the 5th trigger. Only the sensor that is being triggered will be disabled,
you will still be protected by the other 2 sensors.
LED Function Chart
When your alarm has been activated, the LED Warning Light will start
to flash in a programmed sequence to identify which sensor has been
triggered.
NUMBER OF FLASHES
ALARM MODE
None
Alarm is Disarmed
Constant
Alarm is Armed
1 Flash with Pause
Current Sensor was triggered
2 Flashes with Pause
Tilt Sensor was triggered
3 Flashes with Pause
Shock Sensor was triggered
After the alarm has been deactivated, the LED warning light will continue to
flash for 15 seconds to identify which sensor was triggered.
NOTE: Installation of the LED Warning Light is not required for alarm
operation.
12
©2014 Gorilla Automotive
Section 4 – 2-Way Paging System
Model 9100 Only
The Gorilla Cycle Alarm with 2-Way Pager System is serious protection for
those that want the ability to keep track of their motorcycle’s security at all
times. With the 2-Way pager, the functions of the alarm can be monitored
on the pager’s LCD screen from up to ½ mile away. *If the system is interrupted
by strong radio frequencies, high voltage power lines or obstacles such as tall buildings,
the range may be decreased.
IMPORTANT: The Gorilla Warranty does not cover damage of the 2-way
pager caused by accident or mis-use. DO NOT attach your ignition key to
the pager as constant vibration or impact can damage the LCD display.
2-Way Paging Features
The paging unit is designed to alert you when either of the following sensors
is activated:
Clearing the display
When the alarm is triggered and the pager remote receives a signal the
remote will flash what sensor was triggered until it is cleared. To clear the
screen, press the
button three (3) times within three (3) seconds.
Button Lock Mode
This mode allows you to lock the remote to prevent accidental pressing of
buttons.
To Activate: press
button once and quickly press & hold the button
for 3 seconds. You will see the icon in the bottom right of the screen
indicating the buttons are locked.
To Deactivate: press
for 3 seconds until the
©2014 Gorilla Automotive
button once and quickly press & hold the
icon disappears.
button
13
Vibration Mode
In vibration mode the pager will vibrate when triggered instead of beeping.
To Enable Vibration Mode: Press the
button then quickly press & hold
the button for 3 seconds. The vibration icon will appear at the bottom of
the screen.
To Disable Vibration Mode: Press the
button then quickly press & hold
the button for 3 seconds until the vibration icon disappears.
Setting the clock
STEP 1 Press and hold the
button for 3 seconds. You will hear one
beep, then 2 beeps. The hours on the clock will begin flashing.
STEP 2 You can change the hour up by pressing the + button or down by
pressing the – button.
STEP 3 After selecting the hour, press the
button once to move to the
minutes. You can change the minutes up by pressing the + button
or down by pressing the – button.
STEP 4 Once you set the time correctly, wait approximately 10 seconds
for the remote to leave programming mode. You will hear one
confirmation beep.
Turning on LCD Screen Backlight
Press & hold the
button for one second, you will hear one beep. The
screen will stay illuminated for 5 seconds.
Power Save Mode
If your alarm is not going to be used for a length of time, activating the
pager’s power save mode will extend the life of the battery while not in use.
Press & hold the
button for 10 seconds until you see the word SAVE
above the battery meter. To exit the Power Save Mode, press any button on
the remote.
14
©2014 Gorilla Automotive
24 Month Limited Warranty
GORILLA AUTOMOTIVE PRODUCTS warrants to the original retail purchase of
this product, that should this product or any part thereof, under normal use and
conditions, be proven defective in material or workmanship within 24 months
from the date of purchase, such defect(s) will be repaired (at the option of
GORILLA AUTOMOTIVE PRODUCTS) without charge for parts and repair labor.
To obtain repair or replacement within the terms of this warranty, the product
is to be delivered with proof of warranty coverage (e.g. dated bill of sale),
specification of defect(s) transportation prepaid, to:
GORILLA AUTOMOTIVE PRODUCTS
2011 E. 49th Street
Los Angeles, CA 90058
This warranty DOES NOT COVER costs incurred for removal or re-installation of
the product, or damage to vehicles electrical or mechanical systems.
This warranty DOES NOT COVER batteries nor apply to any product or part
thereof which, in the opinion of GORILLA AUTOMOTIVE PRODUCTS, has suffered
or been damaged through altercation, mishandling, misuse, neglect, accident, or
removal or defacement of the factory serial number/bar code label(s).
This warranty is in lieu of all other express warranties or liabilities. ANY
IMPLIED WARRANTIES, INCLUDING ANY IMPLIED WARRANTY OF
MERCHANTABILITY, SHALL BE LIMITED TO THE DURATION OF
THIS WRITTEN WARRANTY. ANY ACTION FOR BREACH OF ANY
WARRANTY HEREUNDER INCLUDING ANY IMPLIED WARRANTY OF
MERCHANTABILITY MUST BE BROUGHT WITHIN A PERIOD OF 12 MONTHS
FROM DATE OF ORIGINAL PURCHASE. IN NO CASE SHALL GORILLA
AUTOMOTIVE PRODUCTS BE LIABLE FOR ANY CONSEQUENTIAL OR
ACCIDENTAL DAMAGES FOR BREACH OF THIS OR ANY OTHER WARRANTY,
EXPRESS OR IMPLIED, WHATSOEVER. No person or representative is
authorized to assume for GORILLA AUTOMOTIVE PRODUCTS any liability other
than expressed herein in connection with the sale of this product.
GORILLA AUTOMOTIVE PRODUCTS DOES NOT WARRANT THAT THIS
PRODUCT CANNOT BE COMPROMISED OR CIRCUMVENTED. THE EXTENT
OF GORILLA AUTOMOTIVE PRODUCT’S LIABILITY UNDER THIS WARRANT
IS LIMITED TO THE REPAIR OR REPLACEMENT PROVIDED ABOVE AND, IN
NO EVENT, SHALL GORILLA AUTOMOTIVE PRODUCTS LIABILITY EXCEED
THE PURCHASE PRICE PAID BY PURCHASER FOR THE PRODUCT.
Some states do not allow limitations on how long an implied warranty lasts or
the exclusion or limitation of incidental or consequential damages, so the above
limitations or exclusions may not apply to you. This warranty gives you specific
legal rights and you may also have other rights, which vary from state to state.