1
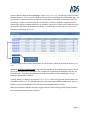
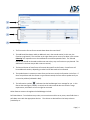
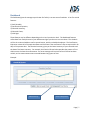
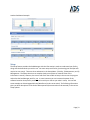
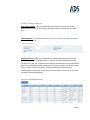
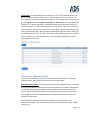
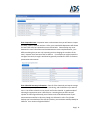
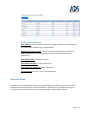
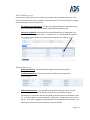
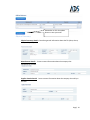
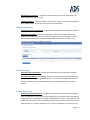
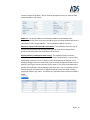
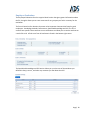
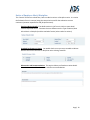
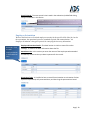
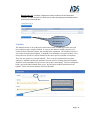
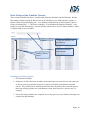
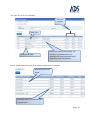
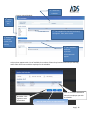
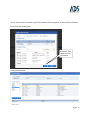
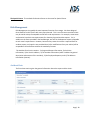
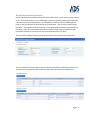
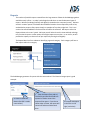
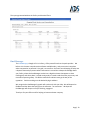
Ideas, Directions, and Problems
Chuck Arabas
(928) 814-2505
[email protected]
General Design & Purpose
The PoolManager is a complex program striving to be simple to the Users. Wherever possible, the
features (elements offered such as the Chemistry Log or Employee Information found it the appropriate
menus) present the same, or at least very similar, design, functions, and controls (buttons and pull-down
menus, for instance) for interacting with you (also known as the interface). This design will help you
learn the software quickly. First, let’s consider the anatomy and terminology for the PoolManager:
The log-in page is simple enough. However you should know that to protect you from usurpers and
scallywag hackers, we allow seven tries with your password before you are locked out and must update
your password.
After logging in, the first screen you see is the Dashboard (Like a home screen with useful summary
information to help operate your facility at a glance. Below is a portion of the Dashboard Interface.
Features (also Menu Item)
Menu Bar
Dashboard
Features
Page | 2
Another common design to the PoolManager is the Record Index screen, the opening screen for most of
the menu features. Records are the individual forms you fill-out to collect data in the PoolManager. The
record index is a summary of those records for a specific feature, with general information about the
record such as when it was filed and by who and whether it has been changed or modified from the
original filing. Below is the Record Index for the Chemistry Log (the first screen you see when you select
the Chemistry Log feature in the Operations Menu). To view or edit a record, click on a record in the
first column (also known as a Field).
Record
New record
To create a new record in most of the features, click on the New… button on the bottom of the Record
Index.
Notice the All, Active, Deleted Filters at the top of the page above. By selecting either of these choices,
you can control what data is available to view. Records are not generally deleted (and if they are you
will be warned). They simply stop being a part of the active portion of the PoolManager. You can
always bring them back if needed.
Creating, editing, or viewing a record opens a Form. A Form refers to the physical structure where you
enter data to create a record. Although some forms may have slightly different appearances, due to a
difference in information gathered, the interface remains fundamentally the same.
Below is an example of the edit Chemistry Log (also used to view an existing record), which provides a
list of common functions for nearly all forms:
Page | 3
1
2
3
5
4
1. The first section of most forms contains data about the record itself.
2. The Add Detail Row button adds an additional row in the second section (In this case, the
Chemistry Log Details). The scroll bar at the right allows you to move up or down in this section
(Warning: It is important to use the Add Button to avoid unexpected results. The TAB and
ENTER keys should not be used to add a new row as they may not function as you planned. The
Add button is the best way to add a row to a section).
3. The Second Section of most forms will contain data specific to the feature. Some forms will
have additional sections, depending on what kind of data needs to be collected.
4. The Update button is common to most forms and serves to save the information in the form. If
there are problems with the format or type of data entered, the form will not update until you
correct the problem (indicated in Red).
5. The information symbol (
) indicates that the PoolManager has a message for you. In this
feature that message is probably a notice that the value entered does not meet the range
requirement, with advice on how it might be corrected.
Other features common throughout the PoolManager Include:
Pull-Down Menus: To make data-entry easier, more consistent and less error prone, some fields have a
pull-down menu with the appropriate choices. The choices are derived from the SetUp values or
provided by us.
Page | 4
Time and Dates: Times and Dates have pull-down menus (the latter having a calendar) to make data
entry easier.
Closing Forms: You do not need to close a form. Simply pick the next feature you want to work with
and select it. Forms close automatically.
In the future, Functions and features of the PoolManager will expand into an almost intelligent assistant
to you. It will independently search for patterns within the data and email you with a notification of its
findings, connect you to your Health Department (making communication easy and efficient), notify you
of code changes and new federal requirements, send you messages about how it has improved, and like
any good assistant, welcome your feedback to ensure it is doing its job.
Pull Down Menus: The PoolManager offers many pull-down menus. If the choice you need does not
appear, please contact us.
Page | 5
Features
Menus at a glance
1. Dashboard
2. Setup
a. Facility
b. Maintenance
c. Management
3. Operations
a. Chemistry Log
b. Maintenance Log
c. Physical Inventory
d. Chemistry Inventory
e. Chemistry Usage
f. Facility Inspection
4. Management
a. Employee Information
b. Employee Evaluation
c. Employee Merit/Discipline
d. Orientation
e. Schedule
i. Pool Schedule
ii. Employee Schedule
iii. Staff Schedule
5. Risk Management
a. Accident Report
b. Incident Report
c. Health Department Evaluation
6. Reports
a. Operations
i. Chemical Usage
ii. Chemical Logs
iii. Maintenance Logs
iv. Facility Inspection
b. Management
i. Employees
ii. Employee Evaluation
c. Risk Management
i. Accident Report
Page | 6
Dashboard
The Dashboard gives the manager a quick view of a facility’s current state of condition. It has five critical
features:
1) Pool Schedule;
2) Certification Expiration;
3) Chemical Inventory;
4) Chemical Charts;
5) Vital Signs.
These features may be different depending on the User’s permission level. The Dashboard features
collect data from multiple areas in your database and give you the most current values. The schedule
will list the routine schedule as well as special events, with the scheduled employee. The Certification
Expiration reviews all of the expiration dates and lists them if the certification is due to expire within 30
days of the present date. The Chemical Inventory gives you the latest inventory of your chemicals and
the date of the latest inventory. For example, the Chemical Charts below provides the pattern of Free
chlorine over the latest 6 measurements. An astute manager will notice that Free Chlorine has been
volatile, and no measurements were entered between long spans of time.
Example:
Select Facility
Select Component
Page | 7
Another Dashboard example:
Setup
The Setup feature provides the PoolManager with the information it needs to understand your facility,
along with the boundaries you wish to set. You must setup each facility (a swimming pool and Spa each
require its own setup). There are three submenus in the Setup Menu: 1) Facility; 2) Maintenance; and 3)
Management. The Setup takes time to complete (and you may have to research some of the
information it needs). However, the time is well worth the trouble as Setup is the core to the program
and makes the PoolManager work for you. In some instances you can increase the power of the
software based on how specific you decide to be with your choices you make in setup. You can find
some examples at Swimmingpooltalk.com/WordPress (Under construction). The following information
gives you brief descriptions of the kind of data expected (Items starred must be entered) in the various
setup options:
Page | 8
Facility Setup Submenu
Enter Facility Details: These are the fundamental, physical characteristics of your
facility (Volume, Turnover Rate (select a TR and Flow Rate is calculated), Filter Rates,
Etc.).
Anti-Entrapment: This section of the setup collects the details of your anti entrapment
system, if you have one.
Add Water Details: Water Details describes the fundamental characteristics of your
water, mostly chemicals, temperature, etc. You will select the component from the
pull-down list. High, low, and ideal columns express the boundaries you find acceptable
(N/A when the component does not lend itself to a range of values). The Source column
refers to values in your source water. Increase and decrease columns tell the
PoolManager what chemicals or procedures you would use to increase or decrease the
component (see example below):
Page | 9
Facility Map: The Facility Map has two columns (or Fields): Zone and Description. You
may use any description for either column. Perhaps you prefer “Area” to Zone. The
more detail you are with this textual map the better. The location Locker room may not
give enough description while Men’s Locker Room – Shower gives the reader (perhaps a
supervisor…or a lawyer defending an accident) a better idea of the location (used in a
number of features – accident data being the most important). There is no reason you
cannot use both: one general, one specific. You can place a grid over a drawing of your
facility and label each grid – MLR 1 for Men’s Locker Room might be block 1 of the grid.
Any method that works for you is fine. The map is used in Maintenance forms, accident
forms, incident forms, and inspection forms. The method you decide to use should
clearly identify the location:
Maintenance Submenu (Setup)
There are three sections to complete: 1) Entering Maintenance Details, 2) Entering
Inspection Items, and 3) Entering Chemical Inventory Information.
Enter Maintenance Details: This section lists the elements of Maintenance. It is helpful
to think of tasks and their location as items that are frequently involved in maintenance.
For example, the pump room might be a location (which you entered into the Map
found in the Facility Submenu) and the task might be replacing seals for the pump, or
cleaning the hair strainer; Chemical Controllers and Strainer baskets are items often
involved in maintenance.
This list should include every maintenance task done on a routine basis or as a
preventative measure. You will also indicate the Type of Review (hourly, daily, weekly,
monthly, etc.).
Page | 10
Enter Inspection Items: Inspection items are those items that you will want to inspect
for safety, repairs, and wear and tear. Often, your state health department will dictate
the items that must be inspected on some routine basis. Some overlap may occur
between this set of information and the Maintenance Items completed earlier, (one
difference being that you are only inspecting and not changing the condition of the
item). However there are items that are distinct. For example you might inspect the
storage of chemicals, though it would not be generally considered a form of routine or
preventative maintenance.
Enter Chemical Inventory Information: Enter all of the chemicals you keep in storage:
the minimum quantity that would require reordering, and the Maximum you want to
store. You will also select the units you will use for the chemical. A good example of
selecting the appropriate units is Gas Chlorine. Assuming that you had a one ton
cylinder of chlorine gas delivered, you will select units of LBs because most of your
measurements would be in LBs, even though it is delivered in a One Ton Cylinder.
Perhaps you have a backup of two 150-Lb cylinders; your maximum would probably be
2300 Lbs. Your minimum might be 300 Lbs.
Page | 11
Management Submenu
Enter Position: Enter the positions (Director, manager, supervisor, for example) that
your facility uses to determine job responsibilities
Employee Evaluation Criteria: Enter specific skills and requirements that will be
evaluated (CPR skills test, CPR written test, Fitness level are just a few of the
possibilities)
Enter Budget Codes: Under Construction
Enter Budget Categories: Under Construction
Enter Budget Sub Categories: Under Construction
Congratulations! You have set-up your PoolManager.
Operation Menu
Probably one of the most popular menus of the Pool Manager, the operations menu focuses on the
maintenance side of your facility. It contains 6 features: 1) Chemistry Log, 2) Maintenance Log, 3)
Physical Inventory, 4) Chemical Inventory, 5) Chemical Usage, and 6) Facility Inspection.
Page | 12
The Chemistry L og:
The Chemistry Log focuses on the conditions of the water, which includes values that, if not
directly attributed to the water’s condition, at least interact in some ancillary way (i.e. humidity,
water temperature, and air temperature).
The Chemistry Log Information: You will enter general information about the testing
such as the facility name, time and date tested, and who did the testing.
Chemistry Log Details: You will select from the pull-down list the “component” you
measured and then enter the value. A symbol of an i (in a black circle) will appear if
you entered a value outside of the appropriate range (See Also: Pg4, No. 5).
Maintenance Log
Maintenance Details – The Maintenance Log opens like most of the forms.
Standard Maintenance – This section refers to values typical of most pools.
Additional Maintenance - You may add any maintenance items you wish. The pull
down list is generated from the Setup menu (the items you listed as common
maintenance). If you find a new item not listed, go to the setup menu and add it to your
list. It will then appear in the drop down list. The action is a drop down list of common
actions. If you have a suggestion, please forward it to us at Aquatic Data Solutions. The
observation column allows you to make any comment you like.
Page | 13
Remember to click the update
button to save your work.
Physical Inventory
Physical inventory Details - Describes general information about the file (what, where,
when, and by who).
Manufacturer Details - Stores contact information about the company that
manufactures the item.
Supplier Vendor Details - Stores contact information about the company that sold you
the item.
Page | 14
Maintenance Procedures – provides an open space for you to enter a description of
proper maintenance for the item.
Contacts (supplier) - Phone numbers, email contacts, and any other form of contact for
your supplier of this item can be stored in the Contacts feature.
Chemical Inventory
Chemical Inventory Information: Provides the same details as the typical form heading.
Chemicals Inventoried: When inventorying your chemicals in storage, use the pull
down menu to select the chemicals. Enter the amount you have in storage. The units
will be automatically entered. Always double-check to ensure the units do, in fact,
represent the amounts you added to the pool .
Chemical Usage
Chemical Usage Information: Provides the same details as the typical form heading.
Chemical Usage Details: After adding chemicals to the pool, record the chemicals and
amounts in the Chemical Usage Details section. The units will be added automatically
(check to ensure the value you added matches the units generated from the setup
menu).
Facility Inspection
Facility Inspection Information: Provides the same details as the typical form heading
with the addition of a summary score (percentage) for the number of items that passed
inspection and a score based on a quality rating between 0 and 10. It is possible to have
a 100% pass but a 50 % score on the quality portion simply because each item may have
been boarder line. How you decide to rate an item for inspection is entirely up to you.
Page | 15
If you decide that a 6 or 7 out of 10 is failing, you may do so. Simply give a score of 7,
but fail the item inspected.
The scores in this section are automatically generated from your ratings in the
Inspection List.
Facility Inspection List: The pull down list provided under “Item Inspected” is derived
from the Inspection list in the Setup Menu. If an item is missing, go to the Setup and
enter it in the Inspection list. The Condition is open ended and you can enter text to
describe the condition.
Management
Employee Information
The employee information section contains critical information, some of which is obvious. This
section holds much of the personal, descriptive information about an employee necessary for
communication, access to the PoolManager, current pay and history, and residence.
Employee Details: These details contain the essential information for an employee. Of
particular note is the Username. It is important because it is used as the login for the
PoolManager. Pay close attention to the fields that are starred. These fields must have
values before you can successfully update (save) the file. If a choice does not exist, you
can select any choice so that you can successfully update the record, make a note, and
Page | 16
contact us about the problem. We can add the appropriate choice (or make the field
optional, based on your input).
Addresses: The primary Address and Secondary Address accommodate those
employees who may have more than one address (such as College students who have a
home address and a college address.). You choose which address is primary.
Employee’s Contact Information & Certifications: If the pull down menus for Type of
Contact and Certifications do not have the choice you need, contact Aquatic Data
Solutions with the options you would like to see in the list.
Employee History (employment work history): The employee history tracks the
responsibility an employee has handled over his time of employment. It is particularly
helpful when someone calls for a reference after the employee has resigned. As an
employee changes from one responsibility level to another (Lifeguard to Supervisor, for
example), just log the previous position into the history. The Current field determines
whether the employee is still functioning in the same role or not. It is possible to hold
multiple positions simultaneously. A lifeguard might be a swim instructor and they
might have different pay scales. This will be very important when the financial model is
added.
Page | 17
Employee Evaluation
The Employee Evaluation form has a typical detail section that gives general information about
the file, though it allows you to enter comments for any purpose you feel is necessary for the
evaluation.
The form is based on four domains that seem to be important characteristics found in good
employees - Knowledge, Attitude, Performance, Specialized Knowledge and skill. The first 3
sections have specific items common to most evaluations and allow you to rate the attribute on
a scale of 0 to 10. A final score from all attributes is found in the bottom right corner.
The Specialized Knowledge and Skill section allows you to select one of the attributes you
defined in Setup, score it, and make any comment you like about that skill.
Page | 18
Notice of Employee Merit/Discipline
This “Notice” functions as a dual form, both as a Merit notice or a Discipline notice. It is tied to
the Evaluation form in concept (using the same criteria used for the evaluation ensures
consistency between expectations and job performance).
Employee Notice Details: The details section in this form is similar to most detail
sections explained earlier. Two items that are different are the Type of Notice (select
either Merit or Discipline) and the method of notice (select verbal or written).
Standard Performance Criteria: You would check as many areas as needed to indicate
which of the criteria the merit or discipline notice is being issued for.
Observation and Recommendation: This section allows you freedom to write details
about the event that led to the Notice and offer recommendations.
Page | 19
Special Criteria: The same special criteria used in the evaluation (and defined during
setup) are available in this section.
Reminder: If an empty space exists, you can enter data into it. If you
need additional space, use the Add Criteria button to add the rows.
Employee Orientation
Well run facilities have well trained employees not only for the specific skills of the job, but for
the expectations, the operational processes, standards required, and communication. An
Employee Orientation is the typical process for conveying the necessary information.
Reminder: Click
the Add
Employee button
to add additional
lines
Employee Orientation Details: The detail section is similar to most of the other
headings. It contains the basic information about the file.
Attendance List: In this section you enter the names of the employees who attended
and add any comments that you deem important for the record.
Orientation Topic: It is helpful to have a record from orientation to orientation of what
topics were presented, who presented them, and how long the presentations lasted.
Page | 20
Missed Topic List: Invariably, employees will have conflicts with the Orientation
schedule. The Missed Topic List allows you to select the employee and indicate which
topic he/she missed and why.
Schedule
Remember to save
your work by the
update button.
The Schedule feature is one of the most useful features in the PoolManager for the users who
have employees and a complex schedule. It is easy to use and user friendly, but not as selfevident as most of the other features, thus needing some explanation. The schedule, based on a
few simple concepts and assumptions, is designed to accommodate a busy pool schedule. First,
most pools seem to follow a routine schedule but also have special events that are temporary.
They also may operate on a seasonal schedule. There is always an interaction between the
employees’ schedules and the pool schedules where the process of filling positions (lifeguards,
front desk clerks, attendants) for a given time slot can prove challenging. We have attempted to
build a special schedule to handle these issues. We have three schedule modules that work
together. Below is the basic anatomy of the Pool Schedule
Select a schedule to view,
then click “edit” to modify.
Create a new Schedule
Page | 21
New Schedule Image:
Click to add routine
events.
Click to add special
events.
Click to save new
schedule
Page | 22
Basic Design of the Schedule Process:
There are three schedule sub menus: Pool Schedule, Employee Schedule, and Staff Schedule. Besides
the heading section describing the Record, each of the schedules has two additional major sections: 1)
Routine events (Lifeguard training class – every Monday and Wednesday at 10:00 am) and 2) Special
Events (A birthday party…). The first two schedules – Pool Schedule and Employee Schedule – work
together to create the third schedule – the staff schedule (which can be used as a master schedule). Below
is a partial image of a pool schedule.
To edit this schedule, click
the “edit link.
Monday’s Routine
events.
Indicates the selected
Pool Schedule.
Building your facility schedule:
1. Fill in the Pool Schedule.
2. Employees can fill in their own schedule from anywhere they can access the web and at any time
as long as you have given them permission to sign-in (see Employee Information explained
earlier). They will fill-in their schedule (not the times they can work but the events that prevent
them from working (algebra class in the Routine section, and Concert for a special event, for
example).
3. Once both of these schedules are completed, you or any supervisor you to whom you delegate can
complete the Staff Schedule.
Page | 23
The “Edit” Screen of a Pool Schedule:
Time span
of event
Enter Event
Enter note: Note can be anything: For
example it can indicate how many
employees are need to supervise event
(how many need to be schedule
Select day of week
Events: Special events that come up on occasion but do not occur routinely.
Enter the special event
Name
Enter Date, Begin Time and End Time
of special event
Page | 24
Employee Schedule
The employees can fill in their own schedule. As stated earlier, they would enter routine and
special events that would prevent them from working (when they are NOT available).
Only the employee has access to his or her schedule. He or she fills in the schedule online. The
process is the same as it is for the Pool Schedule. Below is an example of the Employee
schedule form.
Staff Scheduling
The Staff Schedule pulls information from both the Pool Schedule and the Employees’
schedules, allowing you to easily schedule employees for events (explained later). The notes
furnished in the pool schedule will guide you (or whoever you assign to do the scheduling).
Once the staff schedule is complete, neither the employee’s schedule nor the pool schedule can
be changed without the director’s/Owner’s permission. The image below shows 5 steps to
completing the staff schedule.
Page | 25
1st – Select the
schedule
Creating a New Schedule:
2nd Select
(click) a
day
3rd- The schedule for that day (and notes)
will appear. Then, select a time.
4th-Select staff
for routine
events (Click
button)
5th-The “available”
staff with
important
information will
appear.
A Pop-up box appears with a list of available, the number of hours they have accumulated (hrs worked),
and a select check box to add the employee to the schedule.
Reminder: Click
Update to save
information
Click on the select checkbox to
select the employee you wish
to schedule.
Note the View button as explained below
Page | 26
You can also click the view button to get a full schedule of the employee or by the position (see below).
The Pop-up after clicking View:
Reminder: click
Update to save
information.
A completed Schedule
Page | 27
The Special Events: The methods for Routine Events are the same for Special Events
Risk Management
Risk Management is arguably the most important function of a manager. We have designed
three features for this section with many more planned. This is one of those areas where there
may be a wide variety of acceptable record forms and requirements. For example, some states
and counties have their own requirements for chemistry logs and accident reports. So, in
addition to the forms provided in the PoolManager, we have in development reports acceptable
to each state’s requirements. However, because many states do not have a required form for
accident reports, we hope the one provided here (after modifications from your advice) will be
acceptable to those facilities without the mandatory formats.
The Accident form has six sections: 1) the general Report Information; 2) the Victim
Information; 3) the Victim’s address; 4) The Accident Information (which includes the general
description and outcome of the accident); 5) the Employee Response; and 6) The Witness
Information (contact).
Accident Data
The first three sections gives the general information about the report and the victim:
Page | 28
The fourth section gathers information about the accident:
And the last two sections gather data about the employee and witness accounts:
Reminder: Click Update button to
save information.
Page | 29
Incident Data
The Incident Data is similar to the Accident Data format, with five sections: 1) general file
information; 2) Persons of Interest; 3) Witness Information; 4) Employee Response; and Witness
Information.
The first three sections gather information about the incident:
The last two sections gather information about the Staff response:
Page | 30
Health Department Evaluation
Health Departments have different processes from state to state, county to county and even city
to city. The evaluation form in the PoolManager represents a general gathering of information
common to most Health Departments. As we expand the functions of the PoolManager, we
hope to solve the dilemma of the broad variety of inspections. There are four sections of the
Evaluation: 1) The general info about the file; 2) the quantitative evaluation; 3) the Qualitative
Evaluation; and 4) The open ended comments an inspector might make that explain or add
information relevant to the facility but may not fit anywhere else in the form.
The first section simply provides the general information about the file and the inspection:
The second and third sections gather both the quantitiative (directly measurable values such as
chlorine level) and qualitative criteria (indirect measures that require some judgement).
Page | 31
Reports
The number of possible reports created from the large amount of data the PoolManager gathers
would be nearly infinite. In today’s technilogical world there are two fundamental types of
reports : Written (hardcopy/printed) and digital (as viewed on the computer/screen). Because
we think written reports are valuable but should be limited to those required by code or law,
we decided to present a few reports simply as examples of how they might look. This is one
section that needs feedback from those who will utilize the software. We hope to tailor the
Reports Menu to the users’ needs. We hope you will either share this view and help us design
truly functional reports or offer options that might improve on our plan. In our vision, we will
provide the capacity to share most of your reports by sharing them digitally.
The Report Menu has four submenus identifying a general category. Each category will have a
few reports within the category:
Chemical Usage
Chemical Log
Maintenance Log
Facility Inspections
Employee
Employee Evaluation
Accident Report
The PoolManager generates all reports with the same method. The Chemical usage report is good
example:
2nd-Click on Generate
Button (the PDF is under
construction).
1st - Enter the Dates (from and to).
The Facility and Chemical fields are
optional to further control the
output of the report. If you do not
select either of these, the report will
contain all facilities and chemical
data.
The output will appear
in the form on the
right (see below)
Page | 32
The report generated without the facility and chemical filters:
Final Message:
The PoolManager, though still in its infancy , offers powerful tools to the pool specialist. We
believe it is the most comprehensive software available today, and yet remains incomplete
when compared to its potential. Our goal is to transform the static record keeping of today into
a dynamic data analysis process where information is turned into a deeper knowledge about
your facility, where the PoolManager evolves into a digital assistant that appears to have
intellegence, and where data is mined continuously to reveal trends that save you money and
time while improving safety. File folders stuffed into cabinets must go the way of the
typewriter. Decision making must be backed by logic and data.
We recognize the PoolManager’s growth will evolve only with your help. We will depend on
feedback and the ideas that spring from the collective - our customers. We hope the
PoolManager will disrupt our way of thinking, engage us
Thank you for your efforts and for helping us become a better company.
Page | 33