1
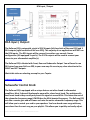
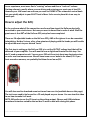
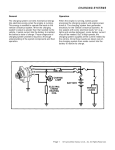
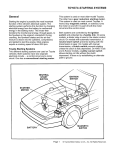
TACOTUNES.COM
ReCurve EZQ
Owner’s Manual
Toyota Factory Stereo Integration and sound optimization made easy.
Tacotunes.com has gone green . . . documentation is now online.
FOR 12V NEGATIVE GROUND USE ONLY
Online Audio Solutions, LLC – www.tacotunes.com
TACOTUNES.COM
Tacotunes.com would like to thank you for purchasing the ReCurve EZQ. We truly
appreciate your business. This manual is intended to give you a broad overview on how to
install, setup and tune your ReCurve EZQ. Please be sure to review installation videos and
read this manual before you begin your installation. A little planning will go a long way!
After years of customers asking us how to keep their stock head unit and add an amp(s), the
EZQ was developed over a 3 year period to work with Toyota’s head units and their internal
digital signal processor (DSP). Each vehicle manufacturer has a little “twist” to their DSP and
how they will “tune” the factory stereo. This product was developed with your Toyota in
mind. Additionally the turn key plug and play installation for your Toyota makes this the
easiest and fastet way to add an amp(s) to your stock head unit.
Before you begin your install you need to:
1.
2.
3.
4.
Plan the mounting location of your EZQ
Plan the mounting location(s) of your AMP(s).
Plan for the speakers and subs you will be using in your installation.
Routing your signal / power wire coming from your stock head unit to the Recurve
EZQ.
5. How to wire up the ReCurve EZQ
6. Register your EZQ within 30 days of purchase to extend your warranty.
http://www.tactounes.com/warranty
Mounting your ReCurve EZ and amp(s) should be planned ahead. You will want to be sure
you can gain access to the knobs on your ReCurve EZQ and amp(s). In most cases we try to
install the amp(s) under the driver side seat and then the passenger side seat. We have
some example installations online for your particular Toyota. In the Toyota Tacoma and
Tundra we generally recommend mounting the ReCurve ON the seat if it folds down or
under the rear seat if it folds up. Cars & SUVs depend on your accessories and options.
Example third row seats or covers.
NOTE: 5 channel amps (Speaker and subwoofer amp) have come a long way in recent years.
The days are two amps are becoming a thing of the past for most installations. Don’t get us
wrong, there are still plenty of multiple amp setups that make sense. Just depends on the
amount of power you are looking for ☺.
Online Audio Solutions, LLC – www.tacotunes.com
Speakers and subs, be sure to check out our vids on how to select speakers and subs for your
Toyota. For some Toyotas we have VERY detailed information on what fits along with
detailed installation videos. We are always offering give always to folks that provide
DETAILED installation pictures of Toyotas we have not yet documented a FULL install.
Installing and Routing the ReCurve Wiring System:
Routing the ReCurve wiring system from the head unit to your ReCurve EZQ is fairly simple.
Again, refer to installation videos and pictures of ideas. Just be sure the wires are not going
to interfere with any moving parts. i.e., brake, gas pedal, steering wheel, glove boxes etc . .
in most cases we recommend that you DO NOT run any of the ReCurve wires near the driver
side area.
Wiring up the ReCurve EZQ:
Wiring up the EZQ is very simple. We have color coded every wire to insure you do not have
any problems. In addition, the ReCurve EZQ is clearly labeled to match each wire coming
from the stock head unit. You will strip away roughly ¼” of wiring and then insert into the
supplied wiring connectors. You can watch this video for more information on how to make
the connections:
www.youtube.com
You will notice after you connect all the ReCurve wires coming from the head unit, that the
Remote Out (AMP) – BLUE is going to be unpopulated. Generally your amp installation /
wiring kit will included at least 17 feet of blue wire. This blue wire will run from the ReCurve
EZQ to the amp(s). This blue wire sends a signal and tells the amp(s) to turn on.
NOTE: Be sure to check out our installation kits. They include WAY more than a standard
install kit and makes your install go much faster and easier.
Online Audio Solutions, LLC – www.tacotunes.com
ReCurve EZQ
Large View
Online Audio Solutions, LLC – www.tacotunes.com
ReCurve EZQ Overview
Line Out
Speaker Inputs
Power
Input / Output
Line Out - Speaker Connections:
+ Right Front – Gray Wire (Passenger Side)
- Right Front – Gray / Black Wire (Passenger Side)
+ Left Front – White Wire (Driver Side)
- Left Front – White / Black Wire (Driver Side
+ Right Rear – Purple Wire (Passenger Side)
- Right Rear – Purple / Black Wire (Passenger Side)
+ Left Rear – Green Wire (Passenger Side)
- Left Rear – Green / Black Wire (Passenger Side)
Power Connections
Ground – Black Wire
12V+ - Yellow Wire
Remote In - Red
NOTE: All the wires ABOVE are included in the ReCurve EZQ wiring system. The blue wire
below is USUALLY included with an amp installation kit.
Remote Out (Amp) – Blue Wire
Online Audio Solutions, LLC – www.tacotunes.com
RCA Input / Output
Subwoofer
Control Knob
RCA Inputs
Not used
RCA Input / Output:
RCA Outputs
Connect to your new amp(s)
The ReCurve EZQ is setup with a total of 3 RCA inputs (left hand side of Recurve EZQ) and 3
RCA outputs (right hand side of ReCurve EZQ). The majority of our applications will NOT use
the RCA inputs. The RCA inputs will be covered in another user manual /stereo
configuration (JBL equipped Toyota’s). The 3 RCA outputs will be used to connect your
stereo to your aftermarket amplifier(s).
The ReCurve EZQ is labeled with Front, Rear and Subwoofer Output. You will need to run
RCA wires from your ReCurve EZQ to your new amp. Be sure to pay close attention to the
RIGHT and LEFT outputs.
Watch this video on selecting an amp for your Toyota:
www.youtube.com
Subwoofer Control Knob:
The ReCurve EZQ is equipped with a unique feature not often found in aftermarket
amplifiers. Most 5 channel & subwoofer amps offer a bass boost knob. The problem with
bass boost knob is they usually only boost the signal at around 45Hz. This leaves the rest of
the subwoofer frequency range LOWER than the 45Hz boosted frequency. The ReCurve EZQ
acts like a remote gain and will lower and raise the entire subwoofer frequency range. This
will allow you to match your sub to your speakers. You have heard some songs with way
more bass than the next song on your playlist. This allows you to quickly and easily adjust.
Online Audio Solutions, LLC – www.tacotunes.com
In our experience, most users find a “cruising” volume and then a “rock out” volume.
Cruising volume is usually where you are driving and enjoying your music say at level 20.
However your JAM comes on and now you want to CRANK it! The subwoofer control knob
lets you quickly adjust to your EXACT level of bass. So be sure to place this in an easy to
reach spot.
How to adjust the EZQ:
So far you know what all the connections are for and how to get the ReCurve physically
connected to your stock stereo. But now you want to know how to make it work. Well the
great news is that 90% of the ReCurve EZQ setup has been completed.
There are 26 adjustable knobs on the ReCurve EZQ, AND at first glance it can be somewhat
intimidating. But don’t stress, after a few minutes of playing with the knobs you will be able
to adjust the music to your desired “taste”.
The first step in setting up the ReCurve EZQ is to set the OUTPUT voltage level that will be
delivered to your amplifier. You will want to have a digital multi-meter for this step. You
don’t’ need an expensive unit. You can use a $30 unit from just about any electronics store
or order one from amazon.com. We will have some on our website for about $25. If you
hunt around on amazon, can probably find them for as low as $15.
You will also need to download some test tones from our site (available here on this page).
The test tones need to be burned to a CD and played on your stereo. You can view this video
to see how to make it all work.
NOTE: WE prefer to use the CD to set up the voltage output. Phones and USB interfaces
sometimes introduce variables that we don’t’ want to deal with during this phase.
Online Audio Solutions, LLC – www.tacotunes.com
We will be looking to provide around 4 – 6 volts of output to your amplifier. The ReCurve
EZQ can provide up to 12 volts of output. However, most amps are not setup to handle more
than 8 volts. There are some rare cases with older amps where you might need additional
output so we built that into the ReCurve.
The rest of the steps can be seen here on this video:
www.youtube.com
After you have completed the recurve output, you will need to set the gain on your amp.
We have another video here on how to set the gain properly on your amp.
www.youtube.com
Adjusting the EZQ EQ knobs:
Things to Remember:
Left refers to DRIVER side of vehicle
Right refers to PASSENGER side of vehicle.
Common Questions:
Online Audio Solutions, LLC – www.tacotunes.com
User Manual / Tech Support:
The user and installation guide(s) can be found online at:
http://www.tacotunes.com/recurve
Warranty / Registration:
http://www.tactounes.com/warranty
Registration MUST be completed with 30 days of purchase for the FREE extended warranty
coverage. NO EXCEPTIONS!!!!
THE RECRUVE EZQ IS WARRANTED FOR 90 DAYS FROM DATE OF PURCHASE.
An additional 12 month warranty (15 months total) is provided at NO COST to users that
register the ReCurve EZQ within 30 days of purchase. ****** NO EXCEPTIONS*****
Extended warranties are available for purchase.
All ReCurve EZQs are warranted for period of 90 days from the date of purchase against defects in materials and workmanship. The
warranty is for repair or replacement at the sole discretion of Online Audio Solutions LLC / authorized dealer. We may replace with a
new or reconditioned one of the same or similar design. Customer will be responsible for freight charges incurred to return the
product and will include a Cashier’s check or Money order in the amount of $20 for continental U.S or $35 for Hawaii, Alaska,
Canada and Puerto Rico, payable to Online Audio Solutions, LLC to cover return shipping and handling. To obtain warranty service,
the warranty registration MUST have been completed within 30 days of purchase
Before shipping the unit back to Online Audio Solutions, LLC. You must obtain an RMA# (Return Merchandize Authorization)
Please submit an RMA request online at www.tacotunes.com/rma.
This warranty does not cover any unit subjected to abuse, neglect, incorrect wiring, water damage, repair or modifications Any
damages resulting from legal action for breach or express or implied warranties shall be limited to the cost of the original purchase
price of the unit. As a condition of this warranty, it is agreed that the remedy provided by this document is the sole remedy under
this warranty. All liability for coincidental damages is excluded. The purchaser agrees to retain the original proof of purchase for
establishing the effective date of this warranty. Should Online Audio Solutions or authorized dealer replace your product under
warranty, this replacement shall be considered a transaction under the original warranty and does not extend the original warranty
period. This warranty is non-transferable.
ReCurve EZQ
Last update: 7/18/2014
Online Audio Solutions, LLC – www.tacotunes.com