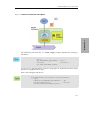
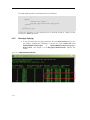
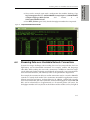
1
RTI Data Distribution Service
®
The Real-Time Publish-Subscribe Middleware
Getting Started Guide
Version 4.4
This Guide describes how to download and install RTI Data Distribution Service.
It also lays out the core value and concepts behind the product and takes you
step-by-step through the creation of a simple example application. Developers
new to RTI should read this document.
© 2009 Real-Time Innovations, Inc.
All rights reserved.
Printed in U.S.A. First printing.
May 2009.
Trademarks
Real-Time Innovations and RTI are registered trademarks of Real-Time Innovations, Inc.
All other trademarks used in this document are the property of their respective owners.
Copy and Use Restrictions
No part of this publication may be reproduced, stored in a retrieval system, or transmitted in any form
(including electronic, mechanical, photocopy, and facsimile) without the prior written permission of RealTime Innovations, Inc. The software described in this document is furnished under and subject to the RTI
software license agreement. The software may be used or copied only under the terms of the license
agreement.
Technical Support
Real-Time Innovations, Inc.
385 Moffett Park Drive
Sunnyvale, CA 94089
Phone:
(408) 990-7444
Email:
[email protected]
Website: http://www.rti.com/support
Contents
1 Welcome to RTI Data Distribution Service!
1.1
Why Choose RTI Data Distribution Service? .......................................................................1-2
1.1.1
Reduce Risk Through Performance and Availability ...........................................1-2
1.1.2
Reduce Cost through Ease of Use and Simplified Deployment .........................1-3
1.1.3
Ensure Success with Unmatched Flexibility ..........................................................1-3
1.1.4
Connect Heterogeneous Systems ............................................................................1-4
1.1.5
Interoperate with Databases, Event Engines, and JMS Systems .........................1-4
1.2
What Can RTI Data Distribution Service Do? ......................................................................1-5
2 Installing RTI Data Distribution Service
2.1
Installing RTI Data Distribution Service ...............................................................................2-1
2.1.1
Installing on a UNIX-Based System ........................................................................2-2
2.1.2
Installing on a Windows System..............................................................................2-3
2.2
License Management ...............................................................................................................2-5
2.2.1
Obtaining a License File............................................................................................2-5
2.2.2
Loading the License File ...........................................................................................2-6
2.2.3
Adding or Removing License Management ..........................................................2-6
2.3
Navigating the Directories ......................................................................................................2-6
2.4
Selecting a Development Environment.................................................................................2-8
2.4.1
Using the Command-Line Tools on UNIX-based Systems ..................................2-8
2.4.2
Using the Command-Line Tools on Windows Systems .......................................2-9
2.4.3
Using Microsoft Visual Studio ................................................................................2-9
3 Getting Started with RTI Data Distribution Service
3.1
Building and Running “Hello, World”..................................................................................3-1
3.1.1
Step 1: Set Up the Environment ...............................................................................3-2
3.1.2
Step 2: Compile the Hello World Program.............................................................3-6
3.1.3
Step 3: Start the Subscriber .......................................................................................3-8
3.1.4
Step 4: Start the Publisher .........................................................................................3-8
iii
3.2
Data Distribution Service (DDS) 101 .................................................................................. 3-10
3.2.1
An Overview of DDS Objects.................................................................................3-11
3.2.2
DomainParticipants .................................................................................................3-11
3.2.3
Publishers and DataWriters ................................................................................... 3-15
3.2.4
Subscribers and DataReaders ................................................................................ 3-16
3.2.5
Topics ........................................................................................................................ 3-19
3.2.6
Keys and Samples ................................................................................................... 3-20
4 Capabilities and Performance
4.1
Automatic Application Discovery ........................................................................................ 4-2
4.1.1
When to Set the Discovery Peers ............................................................................ 4-3
4.1.2
How to Set Your Discovery Peers ........................................................................... 4-3
4.2
Customizing Behavior: QoS Configuration......................................................................... 4-4
4.3
Compact, Type-Safe Data: Programming with Data Types............................................... 4-7
4.3.1
Using Built-in Types ................................................................................................. 4-9
4.3.2
Using Types Defined at Compile Time ................................................................ 4-13
4.3.3
Running with Dynamic Types............................................................................... 4-16
5 Design Patterns for Rapid Development
iv
5.1
Building and Running the Code Examples ......................................................................... 5-2
5.2
Subscribing Only to Relevant Data ....................................................................................... 5-4
5.2.1
Content-Based Filtering............................................................................................ 5-4
5.2.2
Lifespan and History Depth .................................................................................... 5-6
5.2.3
Time-Based Filtering ............................................................................................... 5-10
5.3
Accessing Historical Data When Joining the Network .................................................... 5-12
5.3.1
Implementation ....................................................................................................... 5-13
5.3.2
Running & Verifying............................................................................................... 5-14
5.4
Caching Data Within the Middleware................................................................................ 5-14
5.4.1
Implementation ....................................................................................................... 5-15
5.4.2
Running & Verifying............................................................................................... 5-18
5.5
Receiving Notifications When Data Delivery Is Late....................................................... 5-18
5.5.1
Implementation ....................................................................................................... 5-19
5.5.2
Running & Verifying............................................................................................... 5-21
6 Design Patterns for High Performance
6.1
Building and Running the Code Examples ..........................................................................6-2
6.2
Reliable Messaging...................................................................................................................6-4
6.2.1
Implementation ..........................................................................................................6-6
6.3
High Throughput for Streaming Data...................................................................................6-9
6.3.1
Implementation ........................................................................................................ 6-11
6.3.2
Running & Verifying................................................................................................6-12
6.4
Streaming Data over Unreliable Network Connections ...................................................6-13
6.4.1
Implementation ........................................................................................................6-14
7 The Next Steps
v
vi
1. Welcome
Chapter 1
Welcome to RTI Data Distribution
Service!
Welcome to RTI Data Distribution Service, the highest-performing DDS-compliant messaging system in the world. RTI Data Distribution Service makes it easy to develop,
deploy, and maintain distributed applications. It has been proven in hundreds of unique
designs for life- and mission-critical applications across a variety of industries. RTI Data
Distribution Service provides:
❏ Ultra-low latency, extremely-high throughput messaging
❏ Industry-leading reliability and determinism
❏ Connectivity for heterogeneous systems spanning thousands of applications
RTI Data Distribution Service is flexible; extensive quality-of-service (QoS) parameters
adapt to your application, assuring that you meet your real-time, reliability, and
resource usage requirements.
This chapter introduces basic concepts and summarizes how RTI Data Distribution Service addresses your high-performance needs. After this introduction, we'll jump right
into building distributed systems. The rest of this guide covers:
❏
First steps: Installing RTI Data Distribution Service and creating your first simple
application.
❏
Learning more: An overview of the APIs and programming model with a special
focus on the communication model, data types and qualities of service.
❏
Towards real-world applications: An introduction to meeting common real-world
requirements.
If you’d like to skip to the next chapter, click: Installing RTI Data Distribution Service.
1-1
1.1
Why Choose RTI Data Distribution Service?
RTI Data Distribution Service implements publish/subscribe networking for high-performance distributed applications. It complies with the Data Distribution Service (DDS)
standard from the Object Management Group (OMG). Developers familiar with JMS
and other middleware will see similarities, but will also find that DDS is not just another
MOM (message-oriented middleware) standard! Its unique peer-to-peer architecture
and unprecedented flexibility delivers much higher performance and adaptation to
challenging applications. DDS is the first truly real-time networking technology standard. RTI Data Distribution Service is by far the market leading implementation of DDS.
1.1.1
Reduce Risk Through Performance and Availability
RTI Data Distribution Service provides top performance, whether measured in terms of
latency, throughput, or real-time determinism1. One reason is its elegant peer-to-peer
architecture.
Traditional messaging middleware requires dedicated servers to broker messages—
introducing throughput and latency bottlenecks and timing variations. Brokers also
increase system administration costs and represent single points of failure within a distributed application, putting data reliability and availability at risk.
RTI doesn’t use brokers. Messages flow directly from publishers to subscribers with
minimal overhead. All the functions of the broker, including discovery (finding data
sources and sinks), routing (directing data flow), and naming (identifying data types
and topics) are handled in a fully-distributed, reliable fashion behind the scenes. It
requires no special server software or hardware.
Traditional message-oriented middleware implementations require a broker to forward
every message, increasing latency and decreasing determinism and fault tolerance.
RTI's unique peer-to-peer architecture eliminates bottlenecks and single points of failure.
1. For up-to-date performance benchmarks, visit RTI on the web at http://www.rti.com/products/dds/
benchmarks-cpp-linux.html.
1-2
Why Choose RTI Data Distribution Service?
The User's Manual has details on these and all other capabilities. This guide only provides an overview.
1.1.2
Reduce Cost through Ease of Use and Simplified Deployment
RTI Data Distribution Service helps keep development and deployment costs low by:
1.1.3
❏
Increasing developer productivity—Easy-to-use, standards-compliant DDS APIs
get your code running quickly. DDS is the established middleware standard for
real-time publish/subscribe communication in the defense industry and is
expanding rapidly in utilities, transportation, intelligence, finance, and other
commercial industries.
❏
Simplifying deployment—RTI Data Distribution Service automatically discovers
connections, so you don't need to configure or manage server machines or processes. This translates into faster turnaround and lower overhead for your
deployment and administration needs.
❏
Reducing hardware costs—Traditional messaging products require dedicated
servers or acceleration hardware in order to host brokers. The extreme efficiency
and reduced overhead of RTI's implementation, on the other hand, allows you to
achieve the same performance using standard off-the-shelf hardware, with fewer
machines than the competition.
Ensure Success with Unmatched Flexibility
Out of the box, RTI is configured to achieve simple data communications. However,
when you need it, RTI provides a high degree of fine-grained, low-level control over the
middleware, including:
❏ The volume of meta-traffic sent to assure reliability.
❏ The frequencies and timeouts associated with all events within the middleware.
❏ The amount of memory consumed, including the policies under which additional memory may be allocated by the middleware.
1-3
1. Welcome
The design also delivers high reliability and availability, with automatic failover, configurable retries, and support redundant publishers, subscribers, networks, and more.
Publishers and subscribers can start in any order, and enter and leave the network at
any time; the middleware will connect and disconnect them automatically. RTI Data Distribution Service provides fine-grained control over failure behavior and recovery, as well
as detailed status notifications to allow applications to react to situations such as missed
delivery deadlines, dropped connections, and slow or unresponsive nodes.
RTI’s unique and powerful Quality-of-Service (QoS) policies can be specified in configuration files so that they can be tested and validated independently of the application
logic. When not specified, the middleware will use default values chosen to provide
good performance for a wide range of applications.
The result is simple-to-use networking that can expand and adapt to challenging applications, both current and future. RTI eliminates what is perhaps the greatest risk of commercial middleware: outgrowing the capability or flexibility of the design.
1.1.4
Connect Heterogeneous Systems
RTI Data Distribution Service provides complete functionality and industry-leading performance for a wide variety of programming languages and platforms, including:
❏ C, C++, .NET, and Java development platforms
❏ Windows, Linux, Solaris, AIX, and other enterprise-class systems
❏ VxWorks, INTEGRITY, LynxOS, and other real-time and/or embedded systems
Applications written in different programming languages, running on different hardware under different operating systems, can interoperate seamlessly over RTI Distribution Service. RTI can connect disparate applications that must work together in even very
complex systems.
1.1.5
Interoperate with Databases, Event Engines, and JMS Systems
RTI provides connections between its middleware core and many types of enterprise
software. Simple-but-powerful integrations with databases, Complex Event Processing
(CEP) engines, and other middlewares ensure that RTI can bind together your real-time
and enterprise systems.
RTI also provides a Java Message Service (JMS) application programming interface. RTI
Data Distribution Service directly interoperates at the wire-protocol level with RTI Message Service, the world’s highest-performing JMS implementation1. RTI Message Service,
with its standard JMS interface, then provides integration with a wide range of enterprise service busses and application gateways.
For more information about interoperability with other middleware implementations,
including IBM MQ Series, please consult your RTI account representative.
1. For more information about RTI Message Service, visit on RTI the web at http://www.rti.com/products/
jms/index.html. For performance benchmark results, see http://www.rti.com/products/jms/latencythroughput-benchmarks.html.
1-4
What Can RTI Data Distribution Service Do?
1. Welcome
1.2
What Can RTI Data Distribution Service Do?
Under the hood, RTI Data Distribution Service goes beyond basic publish-subscribe communication to target the needs of applications with high-performance, real-time, and/or
low-overhead requirements. It features:
❏
Peer-to-peer, publish-subscribe communications—The most elegant, flexible data
communications model.
•
•
•
•
•
Simplified distributed application programming
Time-critical data flow with minimal latency
Clear semantics for managing multiple sources of the same data.
Customizable Quality of Service and error notification.
Guaranteed periodic messages, with minimum and maximum rates set by
subscriptions
• Notifications when applications fail to meet their deadlines.
• Synchronous or asynchronous message delivery to give applications control over the degree of concurrency.
• Ability to send the same message to multiple subscribers efficiently,
including support for reliable multicast with customizable levels of positive and negative message acknowledgement.
❏
Reliable messaging—Enables subscribing applications to customize the degree
of reliability required. Reliability can be tuned; you can guarantee delivery no
matter how many retries are needed or try messages only once for fast and deterministic performance. You can also specify any settings in between. No other
middleware lets you make this critical trade off on a per-message stream basis.
❏
Multiple communication networks—Multiple independent communication net-
works (domains), each using RTI Data Distribution Service, can be used over the
same physical network to isolate unrelated systems or subsystems. Individual
applications can participate in one or multiple domains.
❏
Symmetric architecture—Makes your application robust. No central server or
privileged nodes means your system is robust to application and/or node failures.
❏
Dynamic—Topics, subscriptions, and publications can be added or removed
from the system at any time.
1-5
❏
Multiple network transports—RTI Data Distribution Service includes support for
UDP/IP (IPv4 and IPv6)—including, for example, Ethernet, wireless, and Infiniband networks—and shared memory transports. It also includes the ability to
dynamically plug in additional network transports and route messages over
them. It can be configured to operate over a variety of transport mechanisms,
including backplanes, switched fabrics, and other networking technologies.
❏
Multi-platform and heterogeneous system support—Applications based on RTI
Data Distribution Service can communicate transparently with each other regardless of the underlying operating system or hardware. Consult the Release Notes to
see which platforms are supported in this release.
❏
1-6
Vendor neutrality and standards compliance—The RTI Data Distribution Service
API complies with the DDS specification. On the network, it supports the open
DDS Interoperability Protocol, Real-Time Publish Subscribe (RTPS), which is
also an open standard from the OMG.
What Can RTI Data Distribution Service Do?
1. Welcome
Am I Better Off Building My Own Middleware?
Sometimes application projects start with minimal networking needs. So it’s
natural to consider whether building a simplified middleware in-house is a
better alternative to purchasing a more-complex commercial middleware. While
doing a complete Return on Investment (ROI) analysis is outside the scope of
this document, with RTI Data Distribution Service, you get a rich set of highperformance networking features by just turning on configuration parameters,
and often, without writing a single line of additional code.
RTI has decades of experience with hundreds of applications. This effort created
an integrated and time-tested architecture that seamlessly provides the
flexibility you need to succeed now and grow into the future. Many features
require fundamental support in the core of the middleware and cannot just be
cobbled onto an existing framework. It would take many man-years of effort to
duplicate even a small subset of the functionality to the same level of stability
and reliability as delivered by RTI.
For example, some of the middleware functionality that your application can get
by just enabling configuration parameter include:
❏ Tuning reliable behavior for multicast, lossy and high-latency networks.
❏ Supporting high data-availability by enabling redundant data sources (for
example, “keep receiving data from source A. If source A stops publishing, then start receiving data from source B”), and providing notifications
when application enter or leave the network.
❏ Optimizing network and system resources for transmission of periodic
data by supporting time-based filtering of data (example: “receive a sample no more than once per second”) and deadlines (example: “expect to
receive a sample at least once per second”).
Writing network code to connect a few nodes is deceptively easy. Making that
code scale, handle all the error scenarios you will eventually face, work across
platforms, keep current with technology, and adapt to unexpected future
requirements is another matter entirely. The initial cost of a custom design may
seem tempting, but beware; robust architectures take years to evolve. Going
with a fire-tested, widely used design assures you the best performance and
functionality that will scale with your distributed application as it matures. And
it will minimize the profound cost of going down the wrong path.
1-7
1-8
Installing RTI Data Distribution Service
RTI Data Distribution Service is delivered as static and dynamic libraries with development tools, examples, and documentation that will help you use the libraries.
This chapter includes:
❏
❏
❏
❏
Installing RTI Data Distribution Service
License Management
Navigating the Directories
Selecting a Development Environment
Next Chapter —> Getting Started with RTI Data Distribution Service
2.1
Installing RTI Data Distribution Service
RTI Data Distribution Service is available for installation in the following forms, depending on your needs and your license terms:
❏
In a single package comprising both host (development) and target (deployment)
files. If you downloaded an evaluation of RTI Data Distribution Service from the
RTI web site at no cost, this is the distribution you have.
•
For Windows users: Your installation package is an executable installer
application.
•
For users of UNIX-based systems: Your installation package is a .tar.gz
archive.
2-1
2. Installation
Chapter 2
❏
In separate host and target packages. This distribution is useful for those customers who develop and deploy on different platforms, or who deploy on multiple platforms. RTI also delivers support for embedded platforms this way. To
request access to additional RTI host or target platforms, please contact your RTI
account representative.
•
For Windows users: You have at least two .zip archives: one for your host
platform and at least one target platform. Expand them into the same
directory, a directory of your choice.
•
2.1.1
For users of other operating systems: You have at least two .tar.gz archives:
one for your host platform and at least one target platform. Expand them
into the same directory, a directory of your choice.
Installing on a UNIX-Based System
The distribution is packaged in one or more .tar.gz files. Unpack them as described
below. You do not need to be logged in as root during installation.
1. Make sure you have GNU’s version of the tar utility (which handles long file
names). On Linux systems, this is the default tar executable. On Solaris systems,
use gtar.
2. Create a directory for RTI Data Distribution Service. We will assume that you want
to install under /opt/rti/ (you may replace references to /opt/rti/ with the directory of your choice).
3. Move the downloaded file(s) into your newly created directory. We assume your
distribution file is named rtidds44x-i86Linux2.6gcc3.4.3.tar.gz. Your filename
will be different depending on your architecture.
4. Extract the distribution from the uncompressed files. For example:
gunzip rtidds44x-i86Linux2.6gcc3.4.3.tar.gz
gtar xvf rtidds44x-i86Linux2.6gcc3.4.3.tar
Repeat this step as necessary if you have additional archive files. The names of
these files will differ based on the name of your target platform(s).
Using our example path, you will end up with /opt/rti/ndds.4.4x. (Note: If you have a
license-managed distribution of RTI Data Distribution Service, the directory will be
/opt/rti/ndds.4.4x_lic.)
Next, read License Management (Section 2.2).
2-2
Installing RTI Data Distribution Service
2.1.2
Installing on a Windows System
❏ Installing Using an Installer Application (Section 2.1.2.1)
❏ Installing from Zip Archives (Section 2.1.2.2)
2.1.2.1
Installing Using an Installer Application
If you have run the installer before and are reinstalling the software, be aware that the
installer will not automatically remove previous installations as a part of a new installation. If you want to replace a previous installation, or you want to modify it but are
unsure of which settings you selected originally, RTI recommends that you uninstall the
software (using Add or Remove Programs from the Control Panel) before reinstalling it.
The installer is a single executable file. Run the installer and follow the directions on the
screen. It will prompt you to choose whether to install the software only for yourself or
for all users of your computer; the latter option will require administrative privileges.
By default, the installer will place its files in the directory <path>\RTI\ndds.<version>,
where <path> depends on whether you’re installing only for yourself or for all users,
and <version> is the version of RTI Data Distribution Service you’re installing—for example, C:\Program Files\RTI\ndds.4.4x. (Note: If you have a license-managed distribution
of
RTI
Data
Distribution
Service,
the
directory
will
be
<path>\RTI\ndds.<version>_lic.) You may choose an alternative directory if you wish.
2-3
2. Installation
Depending on your needs and your license terms, you may either have an installer or a
two or more .zip archives (a host archive containing documentation, header files, and
other things you need for development, and one or more target archives containing the
libraries and other things you need for deployment). The following instructions
describe both situations:
The combination of the hardware, operating system, and compiler tool chain on the
machine(s) where your application will be deployed is referred to as that machine’s target architecture. Check the boxes to install the libraries corresponding to your environment.
The installer will prompt you to choose whether or not to set two environment variables. RTI recommends that you make both of these changes. The installer can:
❏ Set the NDDSHOME environment variable to the RTI Data Distribution Service
installation directory (such as C:\Program Files\RTI\ndds.4.4x, where x is a
version-specific letter).
❏ Update your Path environment variable to include %NDDSHOME%\scripts.
Next, read License Management (Section 2.2).
2-4
License Management
2.1.2.2
Installing from Zip Archives
The distribution is packaged in one or more .zip files. Unpack them as described below.
Depending on your version of Windows and where you want to expand these files,
your user account may or may not require administrator privileges.
2. Move the downloaded files into your newly created directory.
3. Extract the distribution from the uncompressed files. You will need a zip file utility such as WinZip® to help you.
Using our example path, you will end up with C:\Program Files\RTI\ndds.4.x.
Next, read License Management (Section 2.2).
2.2
License Management
Some distributions of RTI Data Distribution Service require a license file in order to run
(for example, those provided for evaluation purposes or on a subscription basis). A single license file can be used to run on any architecture and is not node-locked. You are not
required to run a license server.
2.2.1
Obtaining a License File
If your RTI Data Distribution Service distribution requires a license file, you will receive
one from RTI via email after you download the software. If you did not receive one,
please email [email protected] or contact your RTI account representative.
Save the license file in any location of your choice (the locations checked by the middleware are listed below).
If you have licenses for both RTI Data Distribution Service and RTI Message Service, you
can concatenate both of them into the same file.
If your version of RTI Data Distribution Service is licensed managed, the software will not
operate without a properly installed license file.
2-5
2. Installation
1. Create a directory for RTI Data Distribution Service. We will assume that you want
to install under C:\Program Files\RTI (you may replace references to C:\Program Files\RTI with the directory of your choice).
2.2.2
Loading the License File
Each time your RTI Data Distribution Service application starts, it will look for the license
file in the following locations until it finds a valid license:
1. In your application’s current working directory, in a file called license.dat.
2. In the location specified in the environment variable RTI_LICENSE_FILE,
which you may set to point to the full path of the license file, including the filename (for example, C:\RTI\my_license_file.dat).
3. In the RTI Data Distribution Service installation, in the file ${NDDSHOME}/
license.dat.
As RTI Data Distribution Service attempts to locate and read your license file, you may
(depending on the terms of the license) see a printed message with details about your
license.
If the license file cannot be found or the license has expired, your application may be
unable to initialize RTI Data Distribution Service, depending on the terms of the license. If
that
is
the
case,
your
application’s
call
to
DomainParticipantFactory.create_participant() will return null, preventing communication.
2.2.3
Adding or Removing License Management
If you are using an RTI software distribution that requires a license file in order to operate, and your license file changes—for example, you receive a new license for a longer
term than your original license—you do not need to reinstall RTI Data Distribution Service.
However, if you decide to migrate from a license-managed distribution of RTI Data Distribution Service to one of the same version that does not require license management, or
visa versa, RTI recommends that you first uninstall your original distribution before
installing your new distribution. Doing so will prevent you from inadvertently using a
mixture of libraries from multiple installations.
2.3
Navigating the Directories
Once you have installed RTI Data Distribution Service, you can access the example code
used in this document under $(NDDSHOME}/example. RTI supports the C, C++, C++/
CLI, C#, and Java programming languages. While we will examine the C++ and Java
2-6
Navigating the Directories
examples in the following chapters, you can access similar code in the language of your
choice.
The RTI Data Distribution Service directory tree is as follows:
${NDDSHOME}
Root directory where RTI Data Distribution Service is installed
Java library files
/doc
Documentation in HTML and PDF format
/example
Example code in C, C++, C++/CLI, C# and Java
/C
/CPP
/CPPCLI
/CSHARP
/JAVA
/QoS
/include
2. Installation
/class
Quality of Service (QoS) configuration files for the example
code. These configuration files do not depend on the language
bindings, and largely do not depend on the operating system
either.
Header files for C and C++ APIs
/jre
Java runtime environment files used by the rtiddsgen tool (you
do not need to use this JRE to run your own Java applications)
/lib
Library files
/ReadMe.html
Start page for accessing the HTML documentation
/resource
Document format definitions and template files used by
rtiddsgen
/scripts
RTI tools (this directory should be in your path)
The two most important directories for learning RTI Data Distribution Service are example and doc. The doc directory contains the RTI Data Distribution Service library information in PDF and HTML formats. You may want to bookmark the HTML directory since
you will be referring to this page a lot as you explore the RTI technology platform.
All the example code is shipped in C, C++, Java, and C#. You can access the example
code in a language of your choice from the respective locations under the example directory. These examples include:
❏
Hello_simple: This example demonstrates one of the simplest applications you
can write with RTI Data Distribution Service: it does nothing but publish and subscribe to short strings of text. This example is described in detail in Chapter 3:
Getting Started with RTI Data Distribution Service.
2-7
2.4
❏
Hello_builtin, Hello_idl, Hello_dynamic: These examples are also very simple to
run but demonstrate some of the unique capabilities of RTI Data Distribution Service: strongly typed data, QoS-based customization of behavior, and industryleading performance. These examples are described in Chapter 4: Capabilities
and Performance and Chapter 6: Design Patterns for High Performance.
❏
News: This example demonstrates a subset of the rich functionality RTI Data Distribution Service offers, including flexible support for historical and durable data,
built-in data caching, powerful filtering capabilities, and tools for working with
periodic data. This example is described in Chapter 5: Design Patterns for Rapid
Development.
Selecting a Development Environment
You can develop applications with RTI Data Distribution Service either by building and
executing commands from a shell window, or by using a development environment like
Microsoft® Visual Studio® or Eclipse™.
2.4.1
Using the Command-Line Tools on UNIX-based Systems
For Java-based applications, you can use the following script files to build and execute:
❏ example/JAVA/<example>/build.sh—Builds your Java source files; no parameters are needed.
❏ example/JAVA/<example>/run.sh—Runs the main program in either Publisher
or Subscriber mode. It accepts the following parameters:
• [pub|sub]—Run as publisher or subscriber
• –verbose—Increases output verbosity
(This script accepts other options, which we will discuss in later chapters.)
For C and C++ applications for UNIX-based systems, you can use the make command
with this makefile:
❏ example/[C|CPP]/<example>/make/Makefile.<architecture>
where <architecture> reflects the compiler, OS and processor combination for
your development environment. If you do not see your architecture listed, see
Generating Type Support Code with rtiddsgen (Section 4.3.2.1) for instructions
on how to generate an example makefile.
2-8
Selecting a Development Environment
2.4.2
Using the Command-Line Tools on Windows Systems
For Java-based applications, you can use the following script files to build and execute:
❏ example\JAVA\<example>\build.cmd—Builds Java source files; no parameters are needed.
Publisher or Subscriber mode. It accepts the following parameters:
• [pub|sub]—Run as publisher or subscriber
• –verbose—Increases output verbosity
(This script accepts other options, which we will discuss in later chapters.)
For Java users: The native libraries used by the RTI Java API require the Visual Studio
2005 service pack 1 redistributable libraries on the target machine. You can obtain this
package from Microsoft or RTI.
For C, C++, and C# users: Please use Microsoft Visual Studio 2005, service pack 1 or
later1, or Visual Studio 2008 to build and run the examples.
2.4.3
Using Microsoft Visual Studio
RTI Data Distribution Service includes solutions and project files for Microsoft Visual Studio in example\[C|CPP|CSHARP]\<example>\win32.
To use these solution files:
1. Start Visual Studio.
2. Select File, Open, Project/Solution.
3. In the File dialog, select the solution file for your architecture; the solution file
for Visual Studio 2005 for 32-bit platforms is
example\[C|CPP|CSHARP]\<example>\win32\Hello-i86Win32VS2005.sln.
1. If you are using an earlier version of Visual Studio, you can obtain a no-cost edition of Visual Studio
2005 or 2008 from Microsoft's web site.
2-9
2. Installation
❏ example\JAVA\<example>\run.cmd—Runs the main program, Hello, in either
2-10
Chapter 3
Getting Started with RTI Data Distribution
Service
This chapter includes:
❏ Building and Running “Hello, World”
❏ Data Distribution Service (DDS) 101
Next Chapter —> Chapter 4: Capabilities and Performance
3.1
Building and Running “Hello, World”
Let’s start by compiling and running Hello World, a basic program that publishes information over the network.
For now, do not worry about understanding the code (we start covering it in Chapter 4:
Capabilities and Performance). Use the following instructions to run your first middleware program using RTI Data Distribution Service.
3-1
3. Hello World
This chapter gets you up and running with RTI Data Distribution Service. First, you will
build and run your first RTI Data Distribution Service-based application. Then we'll take
a step back to learn about the general concepts in the middleware and show how they
are applied in the example application you ran.
3.1.1
Step 1: Set Up the Environment
There are a few things to take care of before you start working with the example code.
3.1.1.1
Set Up the Environment on Your Development Machine
a. Set the NDDSHOME environment variable.
Set the environment variable NDDSHOME to the RTI Data Distribution Service
install directory. (RTI Data Distribution Service itself does not require that you set
this environment variable. It is used in the scripts used to build and run the
example code because it is a simple way to locate the install directory. You may
or may not choose to use the same mechanism when you create scripts to build
and/or run your own applications.)
•
•
On UNIX-based systems: This location may be /opt/rti/ndds.4.4x.
On Windows systems: This location may be C:\Program Files\RTI\ndds.4.4x.
(The installer gave you the option to set this environment variable automatically as part of the installation process.)
If you have multiple versions of RTI Data Distribution Service installed: As mentioned above, RTI Data Distribution Service does not require that you have the
environment variable NDDSHOME set at run time. However, if it is set, the
middleware will use it to load certain configuration files. Additionally, you may
have previously set your path based on the value of that variable. Therefore, if
you have NDDSHOME set, be sure it is pointing to the right copy of RTI Data
Distribution Service.
b. Update your path.
Add RTI Data Distribution Service's scripts directory to your path. This will allow
you to run some of the simple command-line utilities included in your distribution without typing the full path to the executable.
•
On UNIX-based systems: Add the directory to your PATH environment vari-
•
On Windows systems: Add the directory to your Path environment variable.
able.
(The installer gave you the option to set this environment variable automatically as part of the installation process.)
c. Make sure Java is available.
If you plan to develop in a language other than Java, you do not need Java
installed on your system and can safely skip this step.
3-2
Building and Running “Hello, World”
If you will be going through the examples in Java, ensure that appropriate java
and javac executables are on your path. They can be found within the bin directory of your JDK installation. The Release Notes list the Java versions that are supported.
On Linux systems: Note that GNU java (from the GNU Classpath project) is not
supported—and will typically not work—but is on the path by default on many
Linux systems.
d. Make sure the preprocessor is available.
Check whether the C preprocessor (e.g., cpp) is in your search path. This step is
optional, but makes code generation with the rtiddsgen utility more convenient.
Chapter 4: Capabilities and Performance describes how to use rtiddsgen.
On Windows systems:
•
If you have Microsoft Visual Studio installed: Running the script
•
If you do not have Microsoft Visual Studio installed: This is often the case
with Java users. You can either choose not to use a preprocessor or to
obtain a no-cost version of Visual Studio from Microsoft's web site.
e. Get your project files ready.
If you installed RTI Data Distribution Service in a directory that is shared by multiple users (for example, in C:\Program Files on a Windows system, or /opt or
/local on a UNIX-based system), you may prefer to build and edit the examples
in a directory of your own so you do not interfere with other users. (Depending
on your file permissions, you may have to copy them somewhere else.) If you
would like, copy the directory ${NDDSHOME}/example to a location of your
choice. Where you see ${NDDSHOME}/example mentioned in the instructions
below, substitute your own copied directory instead.
3-3
3. Hello World
vcvars32.bat, vsvars32.bat, or vcvarsall.bat (depending on your version of
Visual Studio) will update the path for a given command prompt. If the
Visual Studio installer did not add cl to your path already, you can run this
script before running rtiddsgen.
•
On Windows systems: If you chose to install RTI Data Distribution Service in
C:\Program Files or another system directory, Microsoft Visual Studio
may present you with a warning message when you open a solution file
from the installation directory. If you see this dialog, you may want to
copy the example directory somewhere else, as described above.
•
On UNIX-based systems: The makefiles that RTI provides with the example
code are intended to be used with the GNU distribution of the make utility. On modern Linux systems, the make binary typically is GNU make.
On other systems, GNU make is called gmake. For the same of clarity, the
name gmake is used below. Make sure that the GNU make binary is on
your path before continuing.
3.1.1.2
Set Up the Environment on Your Deployment Machine
Some configuration has to be done for the machine(s) on which you run your application; the RTI installer can’t do that for you, because those machines may or may not be
the same as where you created and built the application.
a. Make sure Java is available.
If you are a Java user, see Step c in Section 3.1.1.1 for details.
3-4
Building and Running “Hello, World”
b. Make sure the dynamic libraries are available.
Make sure that your application can load the RTI Data Distribution Service
dynamic libraries. If you use C or C++ with static libraries (the default configuration in the examples covered in this document), you can skip this step. However,
if you plan to use dynamic libraries, or if you use Java or .Net (which always use
dynamic libraries), you will need to modify your environment as described here.
For more information about where Windows looks for dynamic libraries, see:
http://msdn.microsoft.com/en-us/library/ms682586.aspx.
• The dynamic libraries needed by C or C++ applications are in the directory
${NDDSHOME}/lib/<architecture>.
On UNIX-based systems: Add this directory to your LD_LIBRARY_PATH
environment variable.
• The native dynamic libraries needed by Java applications are in the directory
${NDDSHOME}/lib/<architecture>. Your architecture name ends in jdk, e.g.
i86Linux2.6gcc3.4.3jdk. (The gcc part—only present on UNIX-based architectures—identifies the corresponding native architecture that relies on the same
version of the C runtime library.)
On UNIX-based systems: Add this directory to your LD_LIBRARY_PATH
environment variable.
On Windows systems: Add this directory to your Path environment variable.
• Java .jar files are in the directory ${NDDSHOME}/class. They will need to be
on your application’s class path.
•
On Windows systems: The dynamic libraries needed by .Net applications are
in the directory %NDDSHOME%\lib\i86Win32dotnet2.0. You will need to
either copy the DLLs from that directory to the directory containing your executable, or add the directory containing the DLLs to your Path environment
variable1.
1. The file nddsdotnet.dll (or nddsdotnetd.dll for debug) must be in the executable directory. Visual Studio will, by default, do this automatically.
3-5
3. Hello World
On Windows systems: Add this directory to your Path environment variable or
copy the DLLs inside into the directory containing your executable.
3.1.2
Step 2: Compile the Hello World Program
Java on Windows Systems: To build the example appli-
cations:
1. From
your
command
shell,
%NDDSHOME%\example\JAVA\
Hello_simple\.
go
to
2. Type:
> build
Java on UNIX-based Systems: To build the example
applications:
1. From
your
command
shell,
go
to
${NDDSHOME}/example/JAVA/Hello_simple.
2. Type:
> ./build.sh
3-6
The same example code is
provided in C, C++, C#, and
Java.
The
following
instructions cover C++ and
Java in detail; the procedures
for C and C# are very similar.
The same source code can be
built and run on different
architecture.
The instructions also focus on
Windows and UNIX-based
systems. If you use an
embedded platform, see the
Embedded
Systems
Addendum
(RTI_DDS_GettingStarted_
EmbeddedSystemsAddendu
m.pdf) for more instructions
especially for you.
Building and Running “Hello, World”
C++ on Windows Systems: To build the example applications:
1. In
the
Windows
Explorer,
go
to
%NDDSHOME%\example\CPP\Hello_simple\win32 and open the Microsoft Visual Studio solution
file for your architecture. For example, the file for Visual Studio 2005 for 32-bit
platforms is Hello-i86Win32VS2005.sln.
2. The Solution Configuration combo box in the toolbar indicates whether you are
building debug or release executables; select Release. Select Build Solution from
the Build menu.
3. Hello World
C++ on UNIX-based Systems: To build the example applications:
1. From your command shell, go to ${NDDSHOME}/example/CPP/Hello_simple/.
2. Type:
> gmake -f make/Makefile.<architecture>
where <architecture> is one of the supported architectures; see the contents of the
make directory for a list of available architectures. (If you do not see a makefile
for your architecture, please refer to Section 4.3.2.1 to learn how to generate a
makefile or project files for your platform). This command will build a release
executable. To build a debug version instead, type:
> gmake -f make/Makefile.<architecture> DEBUG=1
3-7
3.1.3
Step 3: Start the Subscriber
Java: To start the subscribing application:
(As described above, you should have already set your path appropriately so that the
example application can load the native libraries on which RTI Data Distribution Service
depends. If you have not, you can set the variable RTI_EXAMPLE_ARCH in your command shell—e.g., to i86Win32jdk or i86Linux2.6gcc4.1.1.jdk—and the example launch
scripts will use it to set your path for you.)
❏
On a Windows system: From your command shell, go to
%NDDSHOME%\example\JAVA\Hello_simple and type:
> runSub
❏
On a UNIX-based system: From your command shell, go to
${NDDSHOME}/example/JAVA/Hello_simple and type:
> ./runSub.sh
C++: To start the subscribing application:
❏
On a Windows system: From your command shell, go to
%NDDSHOME%\example\CPP\Hello_simple and type:
> objs\<architecture>\HelloSubscriber.exe
where <architecture> is one of the supported architectures; see the contents of the
win32 directory for a list of available architectures. For example, the Windows
architecture name corresponding to 32-bit Visual Studio 2005 is i86Win32VS2005.
❏
On a UNIX-based system: From your command shell, go to
${NDDSHOME}/example/CPP/Hello_simple and type:
> objs/<architecture>/HelloSubscriber
where <architecture> is one of the supported architectures; see the contents of the
make directory for a list of available architectures. For example, the Linux architecture corresponding to Red Hat Enterprise Linux 5 is i86Linux2.6gcc4.1.1.
3.1.4
Step 4: Start the Publisher
RTI Data Distribution Service interoperates across all of the programming languages it
supports, so you can choose whether to run the publisher in the same language you
chose for the subscriber or a different language.
3-8
Building and Running “Hello, World”
Java: To start the publishing application:
(As described above, you should have already set your path appropriately so that the
example application can load the native libraries on which RTI Data Distribution Service
depends. If you have not, you can set the variable RTI_EXAMPLE_ARCH in your command shell—e.g., to i86Win32jdk or i86Linux2.6gcc4.1.1.jdk—and the example launch
scripts will use it to set your path for you.)
❏
On a Windows system: From a different command shell, go to
%NDDSHOME%\example\JAVA\Hello_simple and type:
> runPub
❏
On a UNIX-based system: From a different command shell, go to
${NDDSHOME}/example/JAVA/Hello_simple and type:
> ./runPub.sh
3. Hello World
C++: To start the publishing application:
❏
On a Windows system: From a different command shell, go to
%NDDSHOME%\example\CPP\Hello_simple and type:
> objs\<architecture>\HelloPublisher.exe
where <architecture> is one of the supported architectures; see the contents of the
win32 directory for a list of available architectures. For example, the Windows
architecture name corresponding to 32-bit Visual Studio 2005 is i86Win32VS2005.
❏
On a UNIX-based system: From a different command shell, go to
${NDDSHOME}/example/CPP/Hello_simple and type:
> objs/<architecture>/HelloPublisher
where <architecture> is one of the supported architectures; see the contents of the
make directory for a list of available architectures. For example, the Linux architecture corresponding to Red Hat Enterprise Linux 5 is i86Linux2.6gcc4.1.1.
3-9
If you typed "Hello, World" in the publishing application, you should see output similar
to the following:
Congratulations! You’ve run your first RTI Data Distribution Service program!
3.2
Data Distribution Service (DDS) 101
RTI Data Distribution Service is network middleware for real-time distributed applications. It provides the communications service that programmers need to distribute timecritical data between embedded and/or enterprise devices or nodes. RTI Data Distribution Service uses a publish-subscribe communications model to make data-distribution
efficient and robust.
RTI Data Distribution Service implements the Data-Centric Publish-Subscribe (DCPS) API
of the OMG’s specification, Data Distribution Service (DDS) for Real-Time Systems. DDS is
the first standard developed for the needs of real-time systems, providing an efficient
way to transfer data in a distributed system. With RTI Data Distribution Service, you
begin your development with a fault-tolerant and flexible communications infrastructure that will work over a wide variety of computer hardware, operating systems, languages, and networking transport protocols. RTI Data Distribution Service is highly
configurable, so programmers can adapt it to meet an application’s specific communication requirements.
3-10
Data Distribution Service (DDS) 101
3.2.1
An Overview of DDS Objects
The primary objects in RTI Data Distribution Service are:
❏
❏
❏
❏
❏
Figure 3.1
DomainParticipants
Publishers and DataWriters
Subscribers and DataReaders
Topics
Keys and Samples
DDS Components
3. Hello World
3.2.2
DomainParticipants
A domain is a concept used to bind individual applications together for communication.
To communicate with each other, DataWriters and DataReaders must have the same Topic
of the same data type and be members of the same domain. Each domain has a unique
integer domain ID.
Applications in one domain cannot subscribe to data published in a different domain.
Multiple domains allow you to have multiple virtual distributed systems on the same
physical network. This can be very useful if you want to run multiple independent tests
3-11
of the same applications. You can run them at the same time on the same network as
long as each test runs in a different domain. Another typical configuration is to isolate
your development team from your test and production teams: you can assign each team
or even each developer a unique domain.
DomainParticipant objects enable an application to
exchange messages within DDS domains. An application
must have a DomainParticipant for every domain in which
the application will communicate. (Unless your application is a bridging application, it will typically participate
in only one domain and have only one DomainParticipant.)
A DDS DomainParticipant
is analogous to a JMS
Connection.
DomainParticipants are used to create Topics, Publishers, DataWriters, Subscribers, and
DataReaders in the corresponding domain.
Figure 3.2
3-12
Segregating Applications with Domains
Data Distribution Service (DDS) 101
The C++ Hello_simple example application contains the following code, which instantiates a DomainParticipant. You can find more information about all of the APIs shown in
the online documentation.
participant = DDSDomainParticipantFactory::get_instance()->
create_participant(
0,
/* Domain ID */
DDS_PARTICIPANT_QOS_DEFAULT, /* QoS */
NULL,
/* Listener */
DDS_STATUS_MASK_NONE);
As you can see, there are four pieces of information you supply when creating a new
DomainParticipant:
The ID of the domain to which it belongs.
Its qualities of service (QoS). The discussion on Page 3-14 gives a brief introduc-
tion to the concept of QoS in DDS; you will learn more in Chapter 4: Capabilities
and Performance.
❏
Its listener and listener mask, which indicate the events that will generate callbacks to the DomainParticipant. You will see a brief example of a listener callback
when we discuss DataReaders below. For a more comprehensive discussion of the
DDS status and notification system, see Chapter 4 in the User’s Manual.
Here is the same logic in Java:
participant =
DomainParticipantFactory.get_instance().create_participant(
0, // Domain ID
DomainParticipantFactory.PARTICIPANT_QOS_DEFAULT,
null, // Listener
StatusKind.STATUS_MASK_NONE);
3-13
3. Hello World
❏
❏
What is QoS?
Fine control over Quality of Service (QoS) is perhaps the most important feature of RTI Data
Distribution Service. Each data producer-consumer pair can establish independent quality of
service (QoS) agreements—even in many-to-many topologies. This allows DDS designs to support
extremely complex and flexible data-flow requirements.
QoS policies control virtually every aspect of the DDS model and the underlying communications
mechanisms. Many QoS policies are implemented as "contracts" between data producers
(DataWriters) and consumers (DataReaders); producers offer and consumers request levels of
service. The middleware is responsible for determining if the offer can satisfy the request, thereby
establishing the communication or indicating an incompatibility error. Ensuring that participants
meet the level-of-service contracts guarantees predictable operation. For example:
❏ Periodic producers can indicate the speed at which they can publish by offering guaranteed
update deadlines. By setting a deadline, a producer promises to send updates at a minimum
rate. Consumers may then request data at that or any slower rate. If a consumer requests a
higher data rate than the producer offers, the middleware will flag that pair as incompatible
and notify both the publishing and subscribing applications.
❏ Producers may offer different levels of reliability, characterized in part by the number of past
data samples they store for retransmission. Consumers may then request differing levels of
reliable delivery, ranging from fast-but-unreliable "best effort" to highly reliable in-order
delivery. This provides per-data-stream reliability control. A single producer can support
consumers with different levels of reliability simultaneously.
Other QoS policies control when the middleware detects nodes that have failed, set delivery order,
attach user data, prioritize messages, set resource utilization limits, partition the system into
namespaces, control durability (for fault tolerance) and much more. The DDS QoS policies offer
unprecedented flexible communications control. The RTI Data Distribution Service User's Manual
contains details about all the QoS policies offered by DDS.
3-14
Data Distribution Service (DDS) 101
3.2.3
Publishers and DataWriters
An application uses a DataWriter to publish data into a
domain. Once a DataWriter is created and configured with
the correct QoS settings, an application only needs to use
the DataWriter’s “write” operation to publish data.
A Publisher is used to group individual DataWriters. You can
specify default QoS behavior for a Publisher and have it
apply to all the DataWriters in that Publisher’s group.
Figure 3.3
A DDS DataWriter is
analogous to a JMS
TopicPublisher.
A DDS Publisher is
analogous
to
the
producing aspect of a JMS
TopicSession.
Entities Associated with Publications
3. Hello World
The following code from the C++ Hello_simple example demonstrates creating a
DataWriter:
data_writer = participant->create_datawriter(
topic,
DDS_DATAWRITER_QOS_DEFAULT, /* QoS */
NULL,
/* Listener */
DDS_STATUS_MASK_NONE);
3-15
As you can see, each DataWriter is tied to a single topic. All data published by that
DataWriter will be directed to that Topic.
As you will learn in the next chapter, each Topic—and therefore all DataWriters for that
Topic—is associated with a particular concrete data type. The write operation, which
publishes data, is type safe, which means that before you can write data, you must perform a type cast:
string_writer = DDSStringDataWriter::narrow(data_writer);
Here is the analogous code in Java:
StringDataWriter dataWriter =
(StringDataWriter) participant.create_datawriter(
topic,
Publisher.DATAWRITER_QOS_DEFAULT,
null, // listener
StatusKind.STATUS_MASK_NONE);
Note that in this particular code example, you will not find any reference to the Publisher
class. In fact, creating the Publisher object explicitly is optional, because many applications do not have the need to customize any behavior at that level. If you, like this example, choose not to create a Publisher, the middleware will implicitly choose an internal
Publisher object. If you do want to create a Publisher explicitly, create it with a call to participant.create_publisher (you can find more about this method in the online documentation) and then simply replace the call to participant.create_datawriter with a call to
publisher.create_datawriter.
3.2.4
Subscribers and DataReaders
A DataReader is the point through which a subscribing
application accesses the data that it has received over the
network.
Just as Publishers are used to group DataWriters, Subscribers
are used to group DataReaders. Again, this allows you to
configure a default set of QoS parameters and event handling routines that will apply to all DataReaders in the Subscriber's group.
3-16
A DDS DataReader is
analogous to a JMS
TopicSubscriber.
A DDS Subscriber is
analogous
to
the
consuming aspect of a JMS
TopicSession.
Data Distribution Service (DDS) 101
Figure 3.4
Entities Associated with Subscriptions
3. Hello World
The following code from the C++ Hello_simple example demonstrates creating a
DataReader:
data_reader = participant->create_datareader(
topic,
DDS_DATAREADER_QOS_DEFAULT, /* QoS */
&listener,
/* Listener */
DDS_DATA_AVAILABLE_STATUS);
As you can see, each DataReader is tied to a single topic. A DataReader will only receive
data that was published on its Topic.
Here is the analogous code in Java:
StringDataReader dataReader =
(StringDataReader) participant.create_datareader(
topic,
Subscriber.DATAREADER_QOS_DEFAULT, // QoS
new HelloSubscriber(),
// Listener
StatusKind.DATA_AVAILABLE_STATUS);
3-17
RTI Data Distribution Service provides multiple ways for you to access your data: you
can receive it asynchronously in a listener, you can block your own thread waiting for it
to arrive using a helper object called a WaitSet, or you can poll in a non-blocking fashion. This example uses the former mechanism, and you will see that it passes a nonNULL listener to the create_datareader method. The listener mask
(DATA_AVAILABLE_STATUS) indicates that the application is only interested in
receiving notifications of newly arriving data.
Let’s look at the callback implementation in C++:
retcode = string_reader->take_next_sample(
ptr_sample,
info);
if (retcode == DDS_RETCODE_NO_DATA) {
/* No more samples */
break;
} else if (retcode != DDS_RETCODE_OK) {
cerr << "Unable to take data from data reader, error "
<< retcode << endl;
return;
}
The take_next_sample() method retrieves a single data sample (i.e., a message) from the
DataReader, one at a time without blocking. If it was able to retrieve a sample, it will
return DDS_RETCODE_OK. If there was no data to take, it will return
DDS_RETCODE_NO_DATA. Finally, if it tried to take data but failed to do so because
it encountered a problem, it will return DDS_RETCODE_ERROR or another
DDS_ReturnCode_t value (see the online documentation for a full list of error codes).
RTI Data Distribution Service can publish not only actual data to a Topic, but also metadata indicating, for example, that an object about which the DataReader has been receiving data no longer exists. In the latter case, the info argument to take_next_sample()
will have its valid_data flag set to false.
This simple example is interested only in data samples, not meta-data, so it only processes “valid” data:
if (info.valid_data) {
// Valid (this isn't just a lifecycle sample): print it
cout << ptr_sample << endl;
}
3-18
Data Distribution Service (DDS) 101
Let’s see the same thing in Java:
try {
String sample = stringReader.take_next_sample(info);
if (info.valid_data) {
System.out.println(sample);
}
} catch (RETCODE_NO_DATA noData) {
// No more data to read
break;
} catch (RETCODE_ERROR e) {
// An error occurred
e.printStackTrace();
}
3.2.5
Topics
Topics provide the basic connection points between DataWriters and DataReaders. To
communicate, the Topic of a DataWriter on one node must match the Topic of a
DataReader on any other node.
A Topic is comprised of a name and a type. The name is a string that uniquely identifies
the Topic within a domain. The type is the structural definition of the data contained
within the Topic; this capability is described in Chapter 4: Capabilities and Performance.
The C++ Hello_simple example creates a Topic with the following code:
topic = participant->create_topic(
"Hello, World",
/* Topic name*/
DDSStringTypeSupport::get_type_name(), /* Type name */
DDS_TOPIC_QOS_DEFAULT,
/* Topic QoS */
NULL,
/* Listener */
DDS_STATUS_MASK_NONE);
3-19
3. Hello World
Note that in this particular code example, you will not find any reference to the Subscriber class. In fact, as with Publishers, creating the Subscriber object explicitly is optional,
because many applications do not have the need to customize any behavior at that level.
If you, like this example, choose not to create a Subscriber, the middleware will implicitly
choose an internal Subscriber object. If you do want to create a Subscriber explicitly, create
it with a call to participant.create_subscriber (you can find more about this method in
the online documentation) and then simply replace the call to participant.create_datareader with a call to subscriber.create_datareader.
Besides the new Topic’s name and type, an application specifies three things:
❏
❏
A suggested set of QoS for DataReaders and DataWriters for this Topic.
A listener and listener mask that indicate which events the application wishes to
be notified of, if any.
In this case, the Topic’s type is a simple string, a type that is built into the middleware.
Let’s see the same logic in Java:
Topic topic = participant.create_topic(
"Hello World",
StringTypeSupport.get_type_name(),
DomainParticipant.TOPIC_QOS_DEFAULT, // QoS
null,
// Listener
StatusKind.STATUS_MASK_NONE);
3.2.6
Keys and Samples
The data values associated with a Topic can change over
time. The different values of the Topic passed between applications are called samples.
A
DDS
sample
is
analogous to a message in
other publish-subscribe
middleware.
An application may use a single Topic to carry data about
many objects. For example, a stock-trading application may
have a single topic, "Stock Price," that it uses to communicate information about Apple,
Google, Microsoft, and many other companies. Similarly, a radar track management
application may have a single topic, "Aircraft Position," that carries data about many
different airplanes and other vehicles. These objects within a Topic are called instances.
For a specific data type, you can select one or more fields within the data type to form a
key. A key is used to uniquely identify one instance of a Topic from another instance of
the same Topic, very much like how the primary key in a database table identifies one
record or another. Samples of different instances have different values for the key. Samples of same instance of a Topic have the same key. Note that not all Topics have keys. For
Topics without keys, there is only a single instance of that Topic.
3-20
Chapter 4
Capabilities and Performance
In the previous chapter, you learned the basic concepts in RTI Data Distribution Service
and applied them to a simple "Hello, World" application. In this chapter, you will learn
more about some of the powerful and unique benefits of RTI Data Distribution Service:
❏
A rich set of functionality, implemented for you by the middleware so that you
❏
Compact, type-safe data. The unique and expressive data-typing system built
into RTI Data Distribution Service supports not only opaque payloads but also
highly structured data. It provides both static and dynamic type safety—without
the network overhead of the "self-describing" messages of other networking
middleware implementations. See Compact, Type-Safe Data: Programming with
Data Types (Section 4.3) for more information.
❏
Industry-leading performance. RTI Data Distribution Service provides industry-
leading latency, throughput, and jitter performance. Chapter 6: Design Patterns
for High Performance provides specific QoS configuration examples to help you
get started. You can quickly see the effects of the changes you make using the
code examples described in that chapter. You can benchmark the performance of
RTI Data Distribution Service on your own systems with the RTI Example Perfor-
4-1
4. Capabilities and
Performance
don't have to build it into your application. Most of this functionality—including
sophisticated data filtering and expiration, support for durable historical data,
and built-in support for periodic data and deadline enforcement—can be
defined partially or even completely in declarative quality-of-service (QoS) policies specified in an XML file, allowing you to examine and update your application's configuration without rebuilding or redeploying it. See Customizing
Behavior: QoS Configuration (Section 4.2) for more information about how to
configure QoS policies. Chapter 5: Design Patterns for Rapid Development
describes how to reduce, filter, and cache data as well as other common functional design patterns.
mance Test. You can download the test from the RTI Public Knowledge Base,
http://www.rti.com/kb/. Search for ‘Example Performance Test for RTI Data
Distribution Service.’ (For more information about this test, see Chapter 7).
❏ You can also review the data from several performance benchmarks here: http:/
/www.rti.com/products/dds/benchmarks-cpp-linux.html.
Next Chapter —> Chapter 5: Design Patterns for Rapid Development
4.1
Automatic Application Discovery
As you’ve been running the code example described in this guide, you may have
noticed that you have not had to start any server processes or configure any network
addresses. Its built-in automatic discovery capability is one important way in which RTI
Data Distribution Service differs from other networking middleware implementations. It
is designed to be low-overhead and require minimal configuration, so in many cases
there is nothing you need to do; it will just work. Nevertheless, it’s helpful to understand the basics so that you can decide if and when a custom configuration is necessary.
Before applications can communicate, they need to “discover” each other. By default,
RTI Data Distribution Service applications discover each other using shared memory or
UDP loopback if they are on the same host or using multicast1 if they are on different
hosts. Therefore, to run an application on two or more computers using multicast, or on
a single computer with a network connection, no changes are needed. They will discover each other automatically! The chapter on Discovery in the RTI Data Distribution
Service User’s Manual describes the process in more detail.
If you want to use computers that do not support multicast (or you need to use unicast
for some other reason), or if you want to run on a single computer that does not have a
network connection (in which case your operating system may have disabled your network stack), there is a simple way to control the discovery process—you won’t even
have to recompile. Application discovery can be configured through the
NDDS_DISCOVERY_PEERS environment variable or in your QoS configuration file.
1. With the exception of LynxOS. On LynxOS systems, multicast is not used for discovery by default
unless NDDS_DISCOVERY_PEERS is set.
4-2
Automatic Application Discovery
4.1.1
When to Set the Discovery Peers
There are only a few situations in which you must set the discovery peers:
(In the following, replace N with the number of RTI Data Distribution Service applications you want to run.)
1.
If you cannot use multicast1:
Set your discovery peers to a list of all of the hosts that need to discover each
other. The list can contain hostnames and/or IP addresses; each entry should be
of the form [email protected]://<hostname|IP>.
2. If you do not have a network connection:
Some operating systems—for example, Microsoft Windows—disable some
functionality of their network stack when they detect that no network interfaces
are available. This can cause problems when applications try to open network
connections.
• If your system supports shared memory2, set your discovery peers to
[email protected]://. This will enable the shared memory transport only.
• If your system does not support shared memory (or it is disabled), set your
discovery peers to the loopback address, [email protected]://127.0.0.1.
How to Set Your Discovery Peers
As stated above, in most cases you do not need to set your discovery peers explicitly.
If setting them is required, there are two easy ways to do so:
❏ Set the NDDS_DISCOVERY_PEERS environment variable to a comma-separated list of the names or addresses of all the hosts that need to discover each
other.
•
On Windows systems: For example:
set [email protected]://mypeerhost1,\
[email protected]://mypeerhost2
1. To see if your platform supports RTI’s multicast network transport, see the RTI Data Distribution Service
Platform Notes.
2. To see if your platform supports RTI’s shared memory transport, see the RTI Data Distribution Service
Platform Notes.
4-3
4. Capabilities and
Performance
4.1.2
•
On UNIX-based systems: For example, if you are using csh or tcsh:
setenv NDDS_DISCOVERY_PEERS [email protected]://mypeerhost1,\
[email protected]://mypeerhost2
❏ Set the discovery peer list in your XML QoS configuration file.
For example, to turn on shared memory only:
<participant_qos>
<discovery>
<!-The initial_peers list are those "addresses" to which the
middleware will send discovery announcements.
-->
<initial_peers>
<element>[email protected]://</element>
</initial_peers>
<!-The multicast_receive_addresses list identifies where the domain
participant listens for multicast announcements from others.
Set this list to an empty value to disable listening over
multicast.
-->
<multicast_receive_addresses>
<!-- empty -->
</multicast_receive_addresses>
</discovery>
...
</participant_qos>
For more information, please see the RTI Data Distribution Service Platform Notes, User’s
Manual, and online documentation (from the main page, select Modules, Infrastructure
Module, QoS Policies, DISCOVERY).
4.2
Customizing Behavior: QoS Configuration
Almost every object in the DDS API is associated with QoS policies that govern its
behavior. These policies govern everything from the amount of memory the object may
use to store incoming or outgoing data, to the degree of reliability required, to the
amount of meta-traffic that the middleware will send on the network, and many others.
The following is a short summary of just a few of the available policies:
4-4
Customizing Behavior: QoS Configuration
Reliability and Availability for Consistent Performance:
❏
Reliability: Specifies whether or not the middleware will deliver data reliably. The
reliability of a connection between a DataWriter and DataReader is entirely user
configurable. It can be done on a per DataWriter-DataReader connection.
For some use cases, such as the periodic update of sensor values to a GUI displaying the value to a person, best-effort delivery is often good enough. It is the
fastest, most efficient, and least resource-intensive (CPU and network bandwidth) method of getting the newest/latest value for a topic from DataWriters to
DataReaders. But there is no guarantee that the data sent will be received. It may
be lost due to a variety of factors, including data loss by the physical transport
such as wireless RF or Ethernet.
However, there are data streams (topics) in which you want an absolute guarantee that all data sent by a DataWriter is received reliably by DataReaders. This
means that the middleware must check whether or not data was received, and
repair any data that was lost by resending a copy of the data as many times as it
takes for the DataReader to receive the data.
❏
History: Specifies how much data must be stored by the middleware for the
DataWriter or DataReader. This QoS policy affects the Reliability and Durability
QoS policies.
This QoS policy interacts with the Reliability QosPolicy by controlling whether
or not the middleware guarantees that (a) all of the data sent is received (using
the KEEP_ALL setting of the History QosPolicy) or (b) that only the last n data
values sent are received (a reduced level of reliability, using the KEEP_LAST setting of the History QosPolicy). See the Reliability QosPolicy for more information.
Also, the amount of data sent to new DataReaders whose Durability QosPolicy
(see below) is set to receive previously published data is controlled by the History QosPolicy.
❏
Lifespan: Specifies how long the middleware should consider data sent by a user
application to be valid.
4-5
4. Capabilities and
Performance
When a DataWriter sends data or a DataReader receives data, the data sent or
received is stored in a cache whose contents are controlled by the History
QosPolicy. The History QosPolicy can tell the middleware to store all of the data
that was sent or received, or only store the last n values sent or received. If the
History QosPolicy is set to keep the last n values only, then after n values have
been sent or received, any new data will overwrite the oldest data in the queue.
The queue thus acts like a circular buffer of length n.
The middleware attaches timestamps to all data sent and received. When you
specify a finite Lifespan for your data, the middleware will compare the current
time with those timestamps and drop data when your specified Lifespan expires.
You can use the Lifespan QosPolicy to ensure that applications do not receive or
act on data, commands or messages that are too old and have "expired."
❏
Durability: Specifies whether or not the middleware will store and deliver previ-
ously published data to new DataReaders. This policy helps ensure that DataReaders get all data that was sent by DataWriters, even if it was sent while the
DataReader was disconnected from the network. It can increase a system's tolerance to failure conditions.
Fault Tolerance for increased robustness and reduced risk:
❏
Liveliness: Specifies and configures the mechanism that allows DataReaders to
detect when DataWriters become disconnected or "dead." It can be used during
system integration to ensure that systems meet their intended responsiveness
specifications. It can also be used during run time to detect possible losses of
connectivity.
❏
Ownership and Ownership Strength: Along with Ownership Strength, Ownership
specifies if a DataReader can receive data from multiple DataWriters at the same
time. By default, DataReaders for a given topic can receive data from any
DataWriter for the same topic. But you can also configure a DataReader to receive
data from only one DataWriter at a time. The DataWriter with the highest Ownership Strength value will be the owner of the topic and the one whose data is
delivered to DataReaders. Data sent by all other DataWriters with lower Ownership Strength will be dropped by the middleware.
When the DataWriter with the highest Ownership strength loses its liveliness (as
controlled by the Liveliness QosPolicy) or misses a deadline (as controlled by the
Deadline QosPolicy) or whose application quits, dies, or otherwise disconnects,
the middleware will change ownership of the topic to the DataWriter with the
highest Ownership Strength from the remaining DataWriters. This QoS policy
can help you build systems that have redundant elements to safeguard against
component or application failures. When systems have active and hot standby
components, the Ownership QosPolicy can be used to ensure that data from
standby applications are only delivered in the case of the failure of the primary.
Built-in Support for Periodic Data:
❏
Deadline: For a DataReader, this QoS specifies the maximum expected elapsed
time between arriving data samples. For a DataWriter, it specifies a commitment
to publish samples with no greater than this elapsed time between them.
4-6
Compact, Type-Safe Data: Programming with Data Types
This policy can be used during system integration to ensure that applications
have been coded to meet design specifications. It can be used during run time to
detect when systems are performing outside of design specifications. Receiving
applications can take appropriate actions to prevent total system failure when
data is not received in time. For topics on which data is not expected to be periodic, the deadline period should be set to an infinite value.
You can specify an object's QoS two ways: (a) programmatically, in your application's
source code or (b) in an XML configuration file. The same parameters are available,
regardless of which way you choose. For complete information about all of the policies
available, see Chapter 4 in the RTI Data Distribution Service User's Manual or see the
online documentation.
The examples covered in this document are intended to be configured with XML files.
You can find several example configurations, called profiles, in the directory
${NDDSHOME}/example/QoS. The easiest way to use one of these profile files is to
either set the environment variable NDDS_QOS_PROFILES to the path of the file you
want, or copy that file into your current working directory with the file name
USER_QOS_PROFILES.xml before running your application.
Compact, Type-Safe Data: Programming with Data Types
How data is stored or laid out in memory can vary from language to language, compiler
to compiler, operating system to operating system, and processor to processor. This
combination of language/compiler/operating system/processor is called a platform.
Any modern middleware must be able to take data from one specific platform (say C/
gcc 3.2.2/Solaris/Sparc) and transparently deliver it to another (for example, Java/JDK
1.6/Windows XP/Pentium). This process is commonly called serialization/deserialization or marshalling/demarshalling. Messaging products have typically taken one of
two approaches to this problem:
❏
Do nothing. With this approach, the middleware does not provide any help and
user code must take into account memory-layout differences when sending messages from one platform to another. The middleware treats messages as an
opaque buffer of bytes. The JMS BytesMessage is an example of this approach.
❏
Send everything, every time. Self-describing messages are at the opposite
extreme, and embed full reflective information, including data types and field
names, with each message. The JMS MapMessage and the messages in TIBCO
Rendezvous are examples of this approach.
4-7
4. Capabilities and
Performance
4.3
The “do nothing” approach is lightweight on its surface but forces you, the user of the
middleware API, to consider all data encoding, alignment, and padding issues. The
“send everything” alternative results in large amounts of redundant information being
sent with every packet, impacting performance.
Figure 4.1
Self-Describing Messages vs. Type Definitions
RTI Data Distribution Service exchanges data type definitions, such as field names and types, once at
application start-up time. This increases performance and reduces bandwidth consumption compared to the
conventional approach, in which each message is self-describing and thus includes a substantial amount of
metadata along with the actual data.
RTI Data Distribution Service takes an intermediate approach. Just as objects in your
application program belong to some data type, data samples sent on the same Topic
share a data type. This type defines the fields that exist in the data samples and what
their constituent types are. RTI Data Distribution Service stores and propagates this metainformation separately from the individual data samples, allowing it to propagate samples efficiently while handling byte ordering and alignment issues for you.
With RTI, you have a number of choices when it comes to defining and using data types.
You can choose one of these options, or you can mix and match them—these approaches
4-8
Compact, Type-Safe Data: Programming with Data Types
interoperate with each other and across programming languages and platforms. So,
your options are:
❏
Use the built-in types. If a message is simply a string or a buffer of bytes, you can
use RTI's built-in types, described in Using Built-in Types (Section 4.3.1).
❏
Define a type at compile-time using a language-independent description language and the RTI code generator, rtiddsgen, as described in Using Types Defined
at Compile Time (Section 4.3.2). This approach offers the strongest compile-time
type safety.
The code generator accepts data-type definitions in a number of formats to make
it easy integrate RTI Data Distribution Service with your development processes
and IT infrastructure:
• OMG IDL. This format is a standard component of both the DDS and CORBA
specifications. It describes data types with a C++-like syntax. This format is
described in Chapter 3 of the User’s Manual.
• XML schema (XSD), whether independent or embedded in a WSDL file. XSD
may be the format of choice for those using RTI Data Distribution Service
alongside or connected to a web services infrastructure. This format is
described in Chapter 3 of the User’s Manual.
• XML in a DDS-specific format. This XML format is terser, and therefore easier
❏
Define a dynamic type programmatically at run time. This method may be
appropriate for applications with dynamic data description needs: applications
for which types change frequently or cannot be known ahead of time. It allows
you to use an API similar to those of Tibco Rendezvous or JMS MapMessage to
manipulate messages without sacrificing efficiency. It is described in Running
with Dynamic Types (Section 4.3.3).
The following sections of this document describe each of these models.
4.3.1
Using Built-in Types
RTI Data Distribution Service provides a set of standard types that are built into the middleware. These types can be used immediately. The supported built-in types are String,
KeyedString, Octets, and KeyedOctets. (On the Java and .NET platforms, the latter two
types are called Bytes and KeyedBytes, respectively; the names are different but the
4-9
4. Capabilities and
Performance
to read and write by hand, than an XSD file. It offers the general benefits of
XML—extensibility and ease of integration—while fully supporting DDSspecific data types and concepts. This format is described in Chapter 15 of the
User’s Manual.
data is compatible across languages.) String and KeyedStrings can be used to send
variable-length strings of single-byte characters. Octets and KeyedOctets can be used to
send variable-length arrays of bytes.
These built-in types may be sufficient if your data-type needs are simple. If your data is
more complex and highly structured, or you want DDS to examine fields within the
data for filtering or other purposes, this option may not be appropriate, and you will
need to take additional steps to use compile-time types (see Using Types Defined at
Compile Time (Section 4.3.2)) or dynamic types (see Running with Dynamic Types (Section 4.3.3)).
You can find the source for the Hello.java example in ${NDDSHOME}/example/JAVA/
Hello_builtin/src; the equivalent source code in other supported languages is in
${NDDSHOME}/example/<language>/Hello_builtin/src.
The program Hello.java will performs these steps:
1. Parse command-line arguments.
2. Check if the Quality of Service (QoS) file can be located.
The XML file that sets the Quality of Service (QoS) parameters is either loaded
from the file USER_QOS_PROFILES.xml in the current directory of the program, or from the environment variable NDDS_QOS_PROFILES. For more
information on how to use QoS profiles, see the chapter on "Configuring QoS
with XML" in the RTI Data Distribution Service User's Manual.
3. On the publishing side, send text strings as fast as possible, prefixing each one
with a serial number.
4. On the subscribing side, receive these strings, keeping track of the highest number seen as well as other statistics. Print these out periodically.
The steps for compiling and running the program are the same as mentioned in Building and Running “Hello, World” (Section 3.1). Run the publisher and subscriber from
the ${NDDSHOME}/example/<language>/Hello_builtin directory using one of the
QoS profiles provided in ${NDDSHOME}/example/QoS as described in Step 2 above.
You should see output like the following from the subscribing application:
4-10
Compact, Type-Safe Data: Programming with Data Types
Understanding the Performance Results
You will see several columns in the subscriber-side output:
❏
Seconds from start: The number of seconds the subscribing application has been
running. It will print one line per second.
❏
Total samples: The number of data samples that the subscribing application has
received since it started running.
❏
Total lost samples: The number of samples that were lost in transit and could not
be repaired, since the subscribing application started running. If you are using a
QoS profile configured for strict reliability, you can expect this column to always
display 0. If you're running in best-effort mode, or in a limited-reliability mode
(e.g., you have configured your History QosPolicy to only keep the most recent
sample), you may see non-zero values here.
4-11
4. Capabilities and
Performance
Next, try the other provided QoS profiles and see how your results change.
❏
Current lost samples: The number of samples that were lost in transit and could
not be repaired, since the last status line was printed. See the description of the
previous column for information about what values to expect here.
❏
Average samples per second: The mean number of data samples received per
second since the subscribing application started running. By default, these example applications send data samples that are 1 KB in size. (You can change this by
passing a different size, in bytes, to the publishing application with --size.)
❏
Current samples per second: The number of data samples received since the sub-
scribing application printed the last status line.
❏
Throughput megabits per second: The throughput from the publishing application to the subscribing application, in bits per second, since the subscribing
application printed the previous status line. The value in this column is equivalent to the current samples per second multiplied by the number of bits in an
individual sample.
The fixed "cost" of traversing your operating system's network stack is greater
relative to the cost of actually transmitting your data at small sample sizes; as
you increase the sample size, you will see the throughput more closely approach
the theoretical throughput of your network.
By batching multiple data samples into a single network packet, as the highthroughput example QoS profile does, you should be able to saturate a gigabit
Ethernet network with samples sizes as small as 100-200 bytes. Without batching
samples, you should be able to saturate the network with samples of a few kilobytes. The difference is due to the performance limitations of the network transport; enterprise-class platforms with commodity Ethernet interfaces can
typically execute tens of thousands of send()’s per second. In contrast, saturating
a high-throughput network link with data sizes of less than a kilobyte requires
hundreds of thousands of samples per second.
Is this the best possible performance?
The performance of an application depends heavily on the operating system, the network, and how it configures and uses the middleware. This example is just a starting
point; tuning is important for a production application. RTI can help you get the most
out of your platform and the middleware. To get a sense for how an application's behavior changes with different QoS contracts, try one of the other provided example QoS
profiles and see how the printed results change.
4-12
Compact, Type-Safe Data: Programming with Data Types
4.3.2
Using Types Defined at Compile Time
In this section, we define a type at compile time using a language-independent description and the RTI code generator, rtiddsgen.
The code generator accepts data-type definitions in a number of formats, such as OMG
IDL, XML Schema (XSD), and a DDS-specific format of XML. This makes it easy integrate RTI Data Distribution Service with your development processes and IT infrastructure. In this chapter, we will define types using IDL. (In case you would like to
experiment with a different format, rtiddsgen can convert from any supported format to
any other: simply pass the arguments -convertToIdl, -convertToXml, -convertToXsd, or
-convertToWsdl.)
The following sections will take your through the Hello_idl example. You can find the
source for this example in the directory ${NDDSHOME}/example/<language/
Hello_idl. This example includes two additional steps that you have not yet encountered with the built-in types:
❏ Defining your data type and generating code for it (see Generating Type Support
Code with rtiddsgen (Section 4.3.2.1))
❏ Registering that type with RTI Data Distribution Service (see Registering Data
Types (Section 4.3.2.2))
4.3.2.1
Generating Type Support Code with rtiddsgen
const long HELLODDS_MAX_PAYLOAD_SIZE = 8192;
const long HELLODDS_MAX_STRING_SIZE = 64;
/* This custom structure contains an opaque buffer of maximum size
* 8Kb, an unsigned long and a simple string (max size=64
* characters)
*/
struct HelloWorld {
string<HELLODDS_MAX_STRING_SIZE>
prefix;
long
sample_id;
sequence<octet, HELLODDS_MAX_PAYLOAD_SIZE>
payload;
};
4-13
4. Capabilities and
Performance
As mentioned, you can define types at compile time using OMG's IDL, XSD (and
WSDL), and XML. Do not worry about how the types are defined for now (we cover it
in Chapter 3 of the RTI Data Distribution Service User's Manual). For this example, we
will use the file ${NDDSHOME}/example/JAVA/Hello_idl/src/HelloWorld.idl.
To generate data-type support code:
You can build this example using the same commands shown in the previous chapter.
However, if you look inside of the build script in the Hello_idl directory (build.sh for
Java on UNIX-based systems, build.cmd for Java on Windows systems, make/Makefile.<architecture> for C++ on UNIX-based systems, or win32/Hello-<architecture>.vcproj for C++ on Windows systems), you will see a line similar to this1:
> rtiddsgen -ppDisable \
-language Java
-package com.rti.hello.idl \
HelloWorld.idl
This line invokes the code generator to create definitions of your data type in a target
programming language (Java in the example above), including logic to serialize and
deserialize instances of that type for transmission over the network.
For a complete list of the arguments rtiddsgen understands, and a brief description of
each of them, run it with the -help argument. More information about rtiddsgen, including its command-line parameters and the list of files it creates, can be found in Section
3.7 of the RTI Data Distribution Service User's Manual.
To generate additional example code:
The Hello_idl example code that is shipped with RTI Data Distribution Service uses the
HelloWorld data type. However, you can use rtiddsgen to generate a simple “Hello,
World” example application for any of your own data types.
The code generator will also generate make/project files for this example to allow you
to build it and to serve as further examples you can use as you configure your own
build system. These build files can be generated for any architecture RTI supports.
To generate such an example, pass the -example flag to the code generator:
> rtiddsgen -ppDisable \
-language <language> \
-example <architecture> \
<file>
1. The argument -ppDisable tells the code generator not to attempt to invoke the C preprocessor (usually
cpp on UNIX and cl on Windows) on the IDL file prior to generating code. In this case, the IDL file contains no preprocessor directives, so no preprocessing is necessary. However, if the preprocessor executable is already on your system path on Windows, running the Visual Studio script vcvars32.bat will do
this for you—you can omit this argument regardless.
4-14
Compact, Type-Safe Data: Programming with Data Types
…where language is one of C, C++, C++/CLI, C#, or Java and architecture is one of the
supported RTI architecture names, such as i86Linux2.6gcc3.4.3 for Red Hat Enterprise
Linux 4. For example:
> rtiddsgen -ppDisable \
-language C++ \
-example i86Win32VS2005 \
MyTypeDefinitions.idl
See Section 3.7, “Using rtiddsgen” in the User’s Manual for more information.
4.3.2.2
Registering Data Types
If you look in the file Hello.cxx, you will see that it creates a DomainParticipant, just like
the previous examples:
participant =
DDSDomainParticipantFactory::get_instance()->create_participant(
arg.domainId,
DDS_PARTICIPANT_QOS_DEFAULT,
NULL,
/* Listener */
DDS_STATUS_MASK_NONE);
It then makes one additional call:
The class HelloWorldTypeSupport is part of the code generated by rtiddsgen. Registering that type makes it known to the DomainParticipant so that it will know how to serialize and deserialize data of that type when you publish or subscribe to it. The most
important part of the registration is the name by which you register the type; you will
use that name later when you create a Topic. In this case, we choose to register the type
under its default name, the name "HelloWorld" defined in the IDL file. This is the string
returned by HelloWorldTypeSupport::get_type_name().
4-15
4. Capabilities and
Performance
DDS_ReturnCode_t rc = HelloWorldTypeSupport::register_type(
participant,
HelloWorldTypeSupport::get_type_name());
The Java version of this program, Hello.java, takes the same steps:
DomainParticipant participant =
DomainParticipantFactory.get_instance().create_participant(
arg.domainId,
DomainParticipantFactory.PARTICIPANT_QOS_DEFAULT,
null, // listener
StatusKind.STATUS_MASK_NONE);
HelloWorldTypeSupport.register_type(participant,
HelloWorldTypeSupport.get_type_name());
Note that in Java, errors during type registration are reported with exceptions.
Next, the example creates a Topic that will be used to publish samples of the type that we
just registered, using the name of the data type:
topic = participant->create_topic(
arg.topicName.c_str(),
HelloWorldTypeSupport::get_type_name(),
DDS_TOPIC_QOS_DEFAULT,
NULL,
/* listener */
DDS_STATUS_MASK_NONE);
Here's the same logic in Java:
Topic topic = participant.create_topic(
arg.topicName,
HelloWorldTypeSupport.get_type_name(),
DomainParticipant.TOPIC_QOS_DEFAULT,
null, // listener
StatusKind.STATUS_MASK_NONE);
4.3.3
Running with Dynamic Types
This method may be appropriate for applications for which the structure (type) of messages changes frequently or for deployed systems in which newer versions of applications need to interoperate with existing applications that cannot be recompiled to
incorporate message-type changes.
4-16
Compact, Type-Safe Data: Programming with Data Types
As your system evolves, you may find that your data types need to change. And unless
your system is relatively small, you may not be able to bring it all down at once in order
to modify them. Instead, you may need to upgrade your types one component at a timeor even on the fly, without bringing any part of the system down.
While covering dynamic types is outside the scope of this chapter, you can learn more
about the subject in Chapter 3 of the RTI Data Distribution Service User's Manual. You can
also view and run the Hello World example code located in ${NDDSHOME}/example/
<language>/Hello_dynamic/src.
4. Capabilities and
Performance
4-17
4-18
5. Design Patterns for
Rapid Development
Chapter 5
Design Patterns for Rapid Development
In this chapter, you will learn how to implement some common functional design patterns. As you have learned, one of the advantages to using RTI Data Distribution Service
is that you can achieve significantly different functionality without changing your
application code simply by updating the XML-based Quality of Service (QoS) parameters.
In this chapter, we will use a simple News example to illustrate these design patterns. A
news publishing application distributes articles from a variety of news outlets—CNN,
Bloomberg, etc.—on a periodic basis. However, the period differs from outlet to outlet.
One or more news subscribers poll for available articles, also on a periodic basis, and
print out their contents. Once published, articles remain available for a period of time,
during which subscribing applications can repeatedly access them if they wish. After
that time has elapsed, the middleware will automatically expire them from its internal
cache.
This chapter describes Building and Running the Code Examples and includes the following design patterns:
❏
❏
❏
❏
Subscribing Only to Relevant Data
Accessing Historical Data When Joining the Network
Caching Data Within the Middleware
Receiving Notifications When Data Delivery Is Late
Next Chapter —> Chapter 6: Design Patterns for High Performance
5-1
5.1
Building and Running the Code Examples
For each of the supported languages (C, C++, C# and JAVA), source code for the News
example is located in the directory ${NDDSHOME}/example/<language>/News.
The examples perform these steps:
1. Parse the command-line arguments.
2. Load the quality-of-service (QoS) file, USER_QOS_PROFILES.xml, from the
current working directory. The middleware does this automatically; you will not
see code in the example to do this. For more information on how to use QoS profiles, see the chapter on "Configuring QoS with XML" in the RTI Data Distribution
Service User's Manual.
3. On the publishing side, send news articles periodically.
4. On the subscribing side, receive these articles and print them out periodically.
The steps for compiling and running the program are similar to those described in
Building and Running “Hello, World” (Section 3.1). As with the Hello World example,
Java users should use the build and run command scripts in the directory
${NDDSHOME}/example/JAVA/News. Non-Java Windows developers will find the
necesssary Microsoft Visual Studio solution files in the subdirectory ${NDDSHOME}/
example/<language>/News/win32. Appropriate makefiles for building the C or C++
examples on UNIX platforms are located in the subdirectory ${NDDSHOME}/example/
<language>/News/make.
The News example combines the publisher and subscriber in a single program, which is
run from the ${NDDSHOME}/example/<language>/News directory with the argument
pub or sub to select the desired behavior. When running with default arguments, you
should see output similar to that shown in Figure 5.1. To see additional command-line
options, run the program without any arguments.
Both the publishing application and the subscribing application operate in a periodic
fashion:
❏ The publishing application writes articles from different news outlets at different
rates. Each of these articles is numbered consecutively with respect to its news
outlet. Every two seconds, the publisher prints a summary of what it wrote in
the previous period.
5-2
❏ The subscribing application polls the cache of its DataReader every two seconds
and prints the data it finds there. (Many real-world applications will choose to
process data as soon as it arrives rather than polling for it. For more information
about the different ways to read data, select Modules, Programming How-To’s,
DataReader Use Cases in the online API documentation. In this case, periodic
polling makes the behavior easy to illustrate.) Along with each article it prints, it
includes the time at which that article was published and whether that article
has been read before or whether it was cached from a previous read.
By default, both the publishing and subscribing applications run for 20 seconds and
then quit. (To run them for a different number of seconds, use the -r command-line
argument.) Figure 5.1 shows example output using the default run time and a domain
ID of 13 (set with the command-line option, -d 13).
Figure 5.1 Example Output for Both Applications
Publishing Application
Subscribing Application
5-3
5. Design Patterns for
Rapid Development
Building and Running the Code Examples
5.2
Subscribing Only to Relevant Data
From reading Chapter 3, you already understand how to subscribe only to the topics in
which you’re interested. However, depending on your application, you may be interested in only a fraction of the data available on those topics. Extraneous, uninteresting,
or obsolete data puts a drain on your network and CPU resources and complicates your
application logic.
Fortunately, RTI Data Distribution Service can perform much of your filtering and data
reduction for you. Data reduction is a general term for discarding unnecessary or irrelevant data so that you can spend you time processing the data you care about. You can
define the set of data that is relevant to you based on:
5.2.1
❏
Its content. Content-based filters can examine any field in your data based on a
variety of criteria, such as whether numeric values meet various equality and
inequality relationship or whether string values match certain regular expression
patterns. For example, you may choose to distribute a stream of stock prices
using a single topic, but indicate that you’re interested only in the price of IBM,
and only when that price goes above $20.
❏
How old it is. You can indicate that data is relevant for only a certain period of
time (its lifespan) and/or that you wish to retain only a certain number of data
samples (a history depth). For example, if you are interested in the last ten articles
from each news outlet, you can set the history depth to 10.
❏
How fast it’s updated. Sometimes data streams represent the state of a moving or
changing object—for example, an application may publish the position of a moving vehicle or the changing price of a certain financial instrument. Subscribing
applications may only be able to—or interested in—processing this data at a certain maximum rate. For example, if the changing state is to be plotted in a user
interface, a human viewer is unlikely to be able to process more than a couple of
changes per second. If the application attempts to process updates any faster, it
will only confuse the viewer and consume resources unnecessarily.
Content-Based Filtering
A DataReader can filter incoming data by subscribing not to a given Topic itself, but to a
ContentFilteredTopic that associates the Topic with an SQL-like expression that indicates
which data samples are of interest to the subscribing application. Each subscribing
application can specify its own content-based filter, as it desires; publishing applications’ code does not need to change to allow subscribers to filter on data contents.
5-4
5.2.1.1
Implementation
The C++ code to create a ContentFilteredTopic looks like this (see NewsSubscriber.cpp):
DDSContentFilteredTopic cft =
participant->create_contentfilteredtopic(
cftName.c_str(),
topic,
contentFilterExpression.c_str(),
noFilterParams);
if (cft == NULL) {
throw std::runtime_error(
"Unable to create ContentFilteredTopic");
}
The Topic and ContentFilteredTopic classes share a base class: TopicDescription.
The corresponding code in Java looks like the following (see NewsSubscriber.java):
ContentFilteredTopic cft = participant.create_contentfilteredtopic(
topic.get_name() + " (filtered)",
topic,
contentFilterExpression,
null);
if (cft == null) {
throw new IllegalStateException(
"Unable to create ContentFilteredTopic");
}
The variable contentFilterExpression in the above example code is an SQL expression
specified on the command line; see immediately below.
5.2.1.2
Running & Verifying
The following shows a simple filter with which the subscribing application indicates it
is interested only in news articles from CNN; you can specify such a filter with the –f or
--filterExpression command-line argument, like this in the Java example:
> ./run.sh sub -f "key='CNN' OR key='Reuters'"
(This example uses the built-in KeyedString data type. This type has two fields: key, a
string field that is the type’s only key field, and value, a second string. This example
uses the key field to store the news outlet name and the value field to store the article
text. The word “key” in the content filter expression “key='CNN'” refers to the field’s
5-5
5. Design Patterns for
Rapid Development
Subscribing Only to Relevant Data
name, not the fact that it is a key field; you can also filter on the value field if you like. In
your own data types, you will use the name(s) of the fields you define.)
You can find more detailed information in the online API documentation under Modules, DDS API Reference, Queries and Filters Syntax.
Figure 5.2 Using a Content-based Filter
Publishing Application
5.2.2
Subscribing Application
Lifespan and History Depth
One of the most common ways to reduce data is to indicate for how long a data sample
remains valid once it has been sent. You can indicate such a contract in one (or both) of
two ways: in terms of a number of samples to retain (the history depth) and the elapsed time
period during which a sample should be retained (the lifespan). For example, you may be
interested in only the most recent data value (the so-called “last values”) or in all data
that has been sent during the last second.
5-6
The history depth and lifespan, which can be specified declaratively with QoS policies
(see below), apply both to durable historical data sent to late-joining subscribing applications as well as to current subscribing applications. For example, suppose a subscribing application has set history depth = 2, indicating that it is only interested in the last
two samples. A publishing application sends four data samples in close succession, and
the middleware on the subscribing side receives them before the application chooses to
read them from the middleware. When the subscribing application does eventually call
DataReader::read(), it will see only samples 3 and 4; samples 1 and 2 will already have
been overwritten.
If an application specifies both a finite history depth and a finite lifespan, whichever
limit is reached first will take effect.
5.2.2.1
Implementation
History depth is part of the History QoS policy. The lifespan is specified with the
Lifespan QoS policy. The History QoS policy applies independently to both the
DataReader and the DataWriter; the values specified on both sides of the communication
need not agree. The Lifespan QoS policy is specified only on the DataWriter, but it is
enforced on both sides: the DataReader will enforce the lifespan indicated by each
DataWriter it discovers for each sample it receives from that DataWriter.
For more information about these policies, consult the online API documentation under
Modules, DDS API Reference, Infrastructure, QoS Policies.
You can specify these QoS policies either in your application code or in one or more
XML files. Both mechanisms are functionally equivalent; the News example uses the latter mechanism. For more information about this mechanism, see the chapter on “Configuring QoS with XML” in the RTI Data Distribution Service User’s Manual.
5.2.2.1.1
History Depth
The DDS specification, which RTI Data Distribution Service implements, recognizes two
“kinds” of history: KEEP_ALL and KEEP_LAST. KEEP_ALL history indicates that the
application wants to see every data sample, regardless of how old it is (subject, of
course, to lifespan and other QoS policies). KEEP_LAST history indicates that only a
certain number of back samples are relevant; this number is indicated by a second
parameter, the history depth. (The depth value, if any, is ignored if the kind is set to
KEEP_ALL.)
5-7
5. Design Patterns for
Rapid Development
Subscribing Only to Relevant Data
The News example specifies a default History policy of KEEP_LAST and a depth of 10
(see the file USER_QOS_PROFILES.xml):
<history>
<kind>KEEP_LAST_HISTORY_QOS</kind>
<depth>10</depth>
</history>
5.2.2.1.1
Lifespan Duration
The Lifespan QoS policy contains a field duration that indicates for how long each sample remains valid. The duration is measured relative to the sample’s reception time stamp,
which means that it doesn’t include the latency of the underlying transport.
The News example specifies
USER_QOS_PROFILES.xml):
a
lifespan
of
six
seconds
(see
the
file
<lifespan>
<duration>
<sec>6</sec>
<nanosec>0</nanosec>
</duration>
</lifespan>
5.2.2.2
Running & Verifying
The News example never takes samples from the middleware, it only reads samples, so
data samples that have already been viewed by the subscribing application remain in
the middleware’s internal cache until they are expired by their history depth or lifespan
duration contract. These previously viewed samples are displayed by the subscribing
application as “cached” to make them easy to spot. See how “CNN” articles are expired:
It's important to understand that the data type
Remember that there is a strong
used by this example is keyed on the name of the
analogy between DDS and relational
news outlet and that the history depth is databases: the key of a DDS Topic is like
enforced on a per-instance basis. You can see the the primary key of a database table,
effect in Figure 5.3: even though Reuters pub- and the instance corresponding to that
lishes articles faster than CNN, the Reuters arti- key is like the table row corresponding
cles do not "starve out" the CNN articles; each to that primary key.
outlet gets its own depth samples. (Figure 5.3
only shows articles from CNN and Reuters, because that makes it easier to fit more data
on the page. If you run the example without a content filter, you will see the same effect
across all news outlets.).
5-8
Figure 5.3 Using History and Lifespan
Article 1 initially received
from Reuters and CNN
CNN articles still available
Reuters articles 1-5 expired
due to history depth (10 samples)
CNN articles 1 & 2 expired
due to lifespan (6 seconds)
5-9
5. Design Patterns for
Rapid Development
Subscribing Only to Relevant Data
Next, we will change the history depth and lifespan duration in the file
USER_QOS_PROFILES.xml to see how the example's output changes.
Set the history depth to one.
Run the example again with the content-based filter shown here in the Java example:
> ./run.sh sub -f "key='CNN' OR key='Reuters'"
You will only see articles from CNN and Reuters, and only the last value published for
each (as of the end of the two-second polling period).
Now set the history depth to 10 and decrease the lifespan to three seconds.
With these settings and at the rates used by this example, the lifespan will always take
effect before the history depth. Run the example again, this time without a content filter.
Notice how the subscribing application sees all of the data that was publishing during
the last two-second period as well as the data that was published in the latter half of the
previous period.
Reduce the lifespan again, this time to one second.
If you run the example now, you will see no cached articles at all. Do you understand
why? The subscribing application’s polling period is two seconds, so by the time the
next poll comes, everything seen the previous time has expired.
Try changing the history depth and lifespan duration in
USER_QOS_PROFILES.xml to see how the example’s output changes.
5.2.3
the
file
Time-Based Filtering
A time-based filter allows you to specify a minimum separation between the data samples
your subscribing application receives. If data is published faster than this rate, the middleware will discard the intervening samples.
Such a filter is most often used to down-sample high-rate periodic data (see also Receiving Notifications When Data Delivery Is Late (Section 5.5)) but it can also be used to
limit data rates for aperiodic-but-bursty data streams. Time-based filters have several
applications:
❏ You can limit data update rates for applications in which rapid updates would
be unnecessary or inappropriate. For example, a graphical user interface should
typically not update itself more than a few times each second; more frequent
updates can cause flickering or make it difficult for a human operator to perceive
the correct values.
5-10
❏ You can reduce the CPU requirements for less-capable subscribing machines to
improve their performance. If your data stream is reliable, helping slow readers
keep up can actually improve the effective throughput for all readers by preventing them from throttling the writer.
❏ In some cases, you can reduce your network bandwidth utilization, because the
writer can transparently discard unwanted data before it is even sent on the network.
5.2.3.1
Implementation
Time-based filters are specified using the TimeBasedFilter QoS policy. It only applies to
DataReaders. For more information about this policy, consult the online API documentation under Modules, DDS API Reference, Infrastructure, QoS Policies.
You can specify the QoS policies either in your application code or in one or more XML
files. Both mechanisms are functionally equivalent; the News example uses the XML
mechanism. For more information, see the chapter on “Configuring QoS with XML” in
the RTI Data Distribution Service User’s Manual.
In the file USER_QOS_PROFILES.xml, you will see the following; uncomment it to
specify a time-based filter.
<!-<time_based_filter>
<minimum_separation>
<sec>1</sec>
<nanosec>1</nanosec>
</minimum_separation>
</time_based_filter>
<deadline>
<period>
<sec>3</sec>
<nanosec>0</nanosec>
</period>
</deadline>
-->
(At the same time we implement a time-based filter, we increase the deadline period.
See the accompanying comment in the XML file as well as the online API documentation for more information about using the Deadline and TimeBasedFilter QoS policies
together.)
5-11
5. Design Patterns for
Rapid Development
Subscribing Only to Relevant Data
5.2.3.2
Running & Verifying
Figure 5.4 shows some of the output after activating the filter:
Figure 5.4 Using a Time-based Filter
Article 1 sent at :31
Article 1 sent at :31
Article 6 sent at :32.
Articles 2-5 filtered.
Article 3 sent at :32.
Article 2 filtered.
Because you set the time-based filter to one second, you will not see more than two
updates for any single news outlet in any given period, because the period is two seconds long.
5.3
Accessing Historical Data When Joining the Network
In Section 5.2, you learned how to specify which data on the network is of interest to
your application. The same QoS parameters can also apply to late-joining subscribers,
applications that subscribe to a topic after some amount of data has already been published on that topic. This concept—storing sent data within the middleware—is referred
to as durability. You only need to indicate the degree of durability in which you’re interested:
❏
5-12
Volatile. Data is relevant to current subscribers only. Once it has been acknowledged (if reliable communication has been turned on), it can be removed from
the service. This level of durability is the default; if you specify nothing, you will
get this behavior.
❏
Transient local. Data that has been sent may be relevant to late-joining subscrib-
ers (subject to any history depth, lifespan, and content- and/or time-based filters
defined). Historical data will be cached with the DataWriter that originally produced it. Once that writer has been shut down for any reason, intentionally or
unintentionally, however, the data will no longer be available. This lightweight
level of durability is appropriate for non-critical data streams without stringent
data availability requirements.
❏
Transient. Data that has been sent may be relevant to late-joining subscribers and
will be stored externally to the DataWriter that produced that data. This level of
durability requires one or more instances of the RTI Persistence Service on your
network. As long as one or more of these persistence service instances is functional, the durable data will continue to be available, even if the original
DataWriter shuts down or fails. However, if all instances of the persistence service shut down or fail, the durable data they were maintaining will be lost. This
level of durability provides a higher level of fault tolerance and availability than
does transient-local durability without the performance or management overhead of a database.
❏
Persistent. Data that has been sent may be relevant to late-joining subscribers and
will be stored externally to the DataWriter that produced that data in a relational
database. This level of durability requires one or more instances of the RTI Persistence Service on your network. It provides the greatest degree of assurance for
your most critical data streams, because even if all data writers and all persistence server instances fail, your data can nevertheless be restored and made
available to subscribers when you restart the persistence service.
As you can see, the level of durability indicates not only whether historical data will be
made available to late-joining subscribers; it also indicates the level of fault tolerance with
which that data will be made available. Learn more about durability, including the RTI
Persistence Service, by reading the chapter on “Mechanisms for Achieving Information
Durability and Persistence” in the RTI Data Distribution Service User’s Manual.
5.3.1
Implementation
To configure data durability, use the Durability QoS policy on your DataReader and/or
DataWriter. The degrees of durability described in Section 5.3 are represented as an enumerated durability kind. For more information about this policy, consult the online API
documentation under Modules, DDS API Reference, Infrastructure, QoS Policies.
You can specify the QoS policies either in your application code or in one or more XML
files. Both mechanisms are functionally equivalent; the News example uses the XML
5-13
5. Design Patterns for
Rapid Development
Accessing Historical Data When Joining the Network
mechanism. For more information, see the chapter on “Configuring QoS with XML” in
the RTI Data Distribution Service User’s Manual.
In the file USER_QOS_PROFILES.xml, you will see the following:
<durability>
<kind>TRANSIENT_LOCAL_DURABILITY_QOS</kind>
</durability>
The above configuration indicates that the DataWriter should maintain data it has published on behalf of later-joining DataReaders, and that DataReaders should expect to
receive historical data when they join the network. However, if a DataWriter starts up,
publishes some data, and then shuts down, a DataReader that subsequently starts up
will not receive that data.
Durability, like some other QoS policies, has request-offer semantics: the DataWriter must
offer a level of service that is greater than or equal to the level of service requested by the
DataReader. For example, a DataReader may request only volatile durability, while the
DataWriter may offer transient durability. In such a case, the two will be able to communicate. However, if the situation were reversed, they would not be able to communicate.
5.3.2
Running & Verifying
Run the NewsPublisher and wait several seconds. Then start the NewsSubscriber.
Look at the time stamps printed next to the received data: you will see that the subscribing application receives data that was published before it started up.
Now do the same thing again, but first modify the configuration file by commenting the
durability configuration. You will see that the subscribing application does not receive
any data that was sent prior to when it joined the network.
5.4
Caching Data Within the Middleware
When you receive data from the middleware in your subscribing application, you may
be able to process all of the data immediately and then discard it. Frequently, however,
you will need to store it somewhere in order to process it later. Since you’ve already
expressed to the middleware how long your data remains relevant (see Subscribing
Only to Relevant Data (Section 5.2)), wouldn’t it be nice if you could take advantage of
the middleware’s own data cache rather than implementing your own? You can.
5-14
When a DataReader reads data from the network, it places the samples, in order, into its
internal cache. When you’re ready to view that data (either because you received a notification that it was available or because you decided to poll), you use one of two families of methods:
❏
take: Read the data from the cache and simultaneously remove it from that
cache. Future access to that DataReader’s cache will not see any data that was previously taken from the cache. This behavior is similar to the behavior of
“receive” methods provided by traditional messaging middleware implementations.
❏
read: Read the data from the cache but leave it in the cache so that it can poten-
tially be read again (subject to any lifespan or history depth you may have specified). The News example uses this method.
When you read or take data from a DataReader, you can indicate that you wish to access
all of the data in the cache, all up to a certain maximum number of samples, all of the
new samples that you have never read before, and/or various other qualifiers. If your
topic is keyed, you can choose to access the samples of all instances at once, or you can
read/take one instance at a time. For more information about keys and instances, see
Section 2.2.2, “Samples, Instances, and Keys” in the RTI Data Distribution Service User’s
Manual.
5.4.1
Implementation
The News example uses the read method, not the take method. That means that data is
only removed from the DataReader’s cache based on the history depth or the lifespan
duration, never because the application removed it explicitly.
5-15
5. Design Patterns for
Rapid Development
Caching Data Within the Middleware
The call to read looks like this in C++:
DDS_ReturnCode_t result = _reader->read(
articles,
// fill in data here
articleInfos,
// fill in parallel meta-data here
DDS_LENGTH_UNLIMITED, // any # articles
DDS_ANY_SAMPLE_STATE,
DDS_ANY_VIEW_STATE,
DDS_ANY_INSTANCE_STATE);
if (result == DDS_RETCODE_NO_DATA) {
// nothing to read; go back to sleep
}
if (result != DDS_RETCODE_OK) {
// an error occurred: stop reading
throw std::runtime_error("A read error occurred: " + result);
}
// Process data...
_reader->return_loan(articles, articleInfos);
It looks like this in Java:
try {
_reader.read(
articles,
// fill in data here
articleInfos,
// fill in parallel meta-data here
ResourceLimitsQosPolicy.LENGTH_UNLIMITED, // any # articles
SampleStateKind.ANY_SAMPLE_STATE,
ViewStateKind.ANY_VIEW_STATE,
InstanceStateKind.ANY_INSTANCE_STATE);
// Process data...
}
catch (RETCODE_NO_DATA noData) {
// nothing to read; go back to sleep
}
catch (RETCODE_ERROR ex) {
// an error occurred: stop reading
throw ex;
} finally {
_reader.return_loan(articles, articleInfos);
}
The read method takes several arguments:
❏
5-16
Data and SampleInfo sequences: The first two arguments to read or take are
lists: for the samples themselves and, in parallel, for meta-data about those samples. In most cases, you will pass these collections into the middleware empty,
and the middleware will fill them for you. The objects it places into these
sequences are loaned directly from the DataReader’s cache in order to avoid
unnecessary object allocations or copies. When you are done with them, call
return_loan.
If you would rather read the samples into your own memory instead of taking a
loan from the middleware, simple pass in sequences in which the contents have
already been deeply allocated. The DataReader will copy over the state of the
objects you provide to it instead of loaning you its own objects. In this case, you
do not need to call return_loan.
❏
Number of samples to read: If you are only prepared to read a certain number of
samples at a time, you can indicate that to the DataReader. In most cases, you will
probably just use the constant LENGTH_UNLIMITED, which indicates that
you are prepared to handle as many samples as the DataReader has available.
❏
Sample state: The sample state indicates whether or not an individual sample
has been observed by a previous call to read. (The News example uses this state
to decide whether or not to append “(cached)” to the data it prints out.) By passing a sample state mask to the DataReader, you indicate whether you are interested in all samples, only those samples you’ve never seen before, or only those
samples you have seen before. The most common value passed here is
ANY_SAMPLE_STATE.
❏
View state: The view state indicates whether the instance to which a sample
belongs has been observed by a previous call to read or take. By passing a view
state mask to the DataReader, you can indicate whether you’re interested in all
instances, only those instances that you have never seen before (NEW instances),
or only those instances that you have seen before (NOT_NEW instances). The
most common value passed here is ANY_VIEW_STATE.
❏
Instance state: The instance state indicates whether the instance to which a sample belongs is still alive (ALIVE), whether it has been disposed
(NOT_ALIVE_DISPOSED), or whether the DataWriter has simply gone away or
stopped writing it without disposing it (NOT_ALIVE_NO_WRITERS). The
most common value passed here is ANY_INSTANCE_STATE. For more information about the DDS data lifecycle, consult the RTI Data Distribution Service
User’s Manual and the online API documentation.
Unlike reading from a socket directly, or calling receive in JMS, a DDS read or take is
non-blocking: the call returns immediately. If no data was available to be read, it will
return (in C and C++) or throw (in Java and .Net) a NO_DATA result.
5-17
5. Design Patterns for
Rapid Development
Caching Data Within the Middleware
RTI Data Distribution Service also offers additional variations on the read() and take()
methods to allow you to view different “slices” of your data at a time:
❏ You can view one instance at a time with read_instance(), take_instance(),
read_next_instance(), and take_next_instance().
❏ You can view a single sample at a time with read_next_sample() and
take_next_sample().
For more information about these and other variations, see the online API documentation under Modules, Subscription Module, DataReader Support, FooDataReader.
5.4.2
Running & Verifying
To see the difference between read() and take() semantics, replace “read” with “take”
(the arguments are the same), rebuild the example, and run again. You will see that
“(cached)” is never printed, because every sample will be removed from the cache as
soon as it is viewed for the first time.
5.5
Receiving Notifications When Data Delivery Is Late
Many applications expect data to be sent and received periodically (or quasi-periodically). They typically expect at least one data sample to arrive during each period; a failure of data to arrive may or may not indicate a serious problem, but is probably
something about which the application would like to receive notifications. For example:
❏ A vehicle may report its current position to its home base every second.
❏ Each sensor in a sensor network reports a new reading every 0.5 seconds.
❏ A radar reports the position of each object that it’s tracking every 0.2 seconds.
If any vehicle, any sensor, or any radar track fails to yield an update within its promised
period, another part of the system, or perhaps its human operator, may need to take a
corrective action.
(In addition to built-in deadline support, RTI Data Distribution Service has other features
useful to applications that publish and/or receive data periodically. For example, it’s
possible to down-sample high-rate periodic data; see Subscribing Only to Relevant Data
(Section 5.2).
5-18
5.5.1
Implementation
Deadline enforcement is comprised of two parts: (1) QoS policies that specify the deadline contracts and (2) listener callbacks to be notified if those contracts are violated.
Deadlines are enforced independently for DataWriters and DataReaders. However, the
Deadline QoS policy, like some other policies, has request-offer semantics: the DataWriter
must offer a level of service that is the same or better than the level of service the
DataReader requests. For example, if a DataWriter promises to publish data at least once
every second, it will be able to communicate with a DataReader that expects to receive
data at least once every two seconds. However, if the DataReader declares that it expects
data twice a second, and the DataWriter only promises to publish updates only once a
second, they will not be able to communicate.
5.5.1.1
Offered Deadlines
A DataWriter promises to publish data at a certain rate by providing a finite value for
the Deadline QoS policy, either in source code or in one or more XML configuration
files. (Both mechanisms are functionally equivalent; the News example uses the latter
mechanism. For more information about this mechanism, see the chapter on “Configuring QoS with XML” in the RTI Data Distribution Service User’s Manual)
The file USER_QOS_PROFILES.xml contains the following Deadline QoS policy configuration, which applies to both DataWriters and DataReaders:
<deadline>
<period>
<sec>2</sec>
<nanosec>0</nanosec>
</period>
</deadline>
The DataWriter thus promises to publish at least one data sample—of each instance—
every two seconds.
If a period of two seconds elapses from the time the DataWriter last sent a sample of a
particular instance, the writer’s listener—if one is installed—will receive a callback to its
on_offered_deadline_missed method. The News example does not actually install a
DataWriterListener. See the section on requested deadlines below; the DataWriterListener
works in a way that’s parallel to the DataReaderListener.
5-19
5. Design Patterns for
Rapid Development
Receiving Notifications When Data Delivery Is Late
5.5.1.2
Requested Deadlines
The DataReader declares that it expects to receive at least one data sample of each
instance within a given period using the Deadline QoS policy. See the example XML
configuration above.
If the declared deadline period elapses since the DataReader received the last sample of
some instance, that reader’s listener—if any—will be invoked. The listener’s
on_requested_deadline_missed will receive a call informing the application of the
missed deadline.
The following code installs a DataReaderListener in C++:
DDSDataReader* reader = participant->create_datareader(
topic,
DDS_DATAREADER_QOS_DEFAULT,
&_listener,
// listener
DDS_STATUS_MASK_ALL);
// all callbacks
if (reader == NULL) {
throw std::runtime_error("Unable to create DataReader");
}
The following code installs a DataReaderListener in Java:
DataReader reader = participant.create_datareader(
topic,
Subscriber.DATAREADER_QOS_DEFAULT,
new ArticleDeliveryStatusListener(),
// listener
StatusKind.STATUS_MASK_ALL);
// all callbacks
if (reader == null) {
throw new IllegalStateException("Unable to create DataReader");
}
There are two listener-related arguments to provide:
❏
Listener: The listener object itself, which must implement some subset of the callbacks defined by the DataReaderListener supertype.
❏
Listener mask: Which of the callbacks you’d like to receive. In most cases, you
will use one of the constants STATUS_MASK_ALL (if you are providing a nonnull listener object) of STATUS_MASK_NONE (if you are not providing a listener). There are some cases in which you might want to specify a different listener mask; see the RTI Data Distribution Service User’s Manual and online API
documentation for more information.
5-20
The
News
example
has
a
very
simple
implementation
of
the
on_requested_deadline_missed callback. It prints the value of the key (i.e. the news
outlet name) for the instance whose deadline was missed. Here is the code in C++:
void ArticleDeliveryStatusListener::on_requested_deadline_missed(
DDSDataReader* reader,
const DDS_RequestedDeadlineMissedStatus& status) {
DDS_KeyedString keyHolder;
DDSKeyedStringDataReader* typedReader =
DDSKeyedStringDataReader::narrow(reader);
typedReader->get_key_value(keyHolder,
status.last_instance_handle);
std::cout << "->Callback: requested deadline missed: "
<< keyHolder.key
<< std::endl;
}
Here is the corresponding code in Java:
public void on_requested_deadline_missed(
DataReader reader,
RequestedDeadlineMissedStatus status) {
KeyedString keyHolder = new KeyedString();
reader.get_key_value_untyped(keyHolder,
status.last_instance_handle);
System.out.println("->Callback: requested deadline missed: " +
keyHolder.key);
}
5.5.2
Running & Verifying
Modify the file USER_QOS_PROFILES.xml to decrease the deadline to one second:
<deadline>
<period>
<sec>1</sec>
<nanosec>0</nanosec>
</period>
</deadline>
Note that, if you have a DataReader- or DataWriter-level deadline specified (inside the
file's datareader_qos or datawriter_qos elements, respectively)—possibly because you
previously modified the configuration in Section 5.2.3—it is overriding the topic-level
5-21
5. Design Patterns for
Rapid Development
Receiving Notifications When Data Delivery Is Late
configuration. Be careful that you don't modify a deadline specification that will only be
overridden later and not take effect.
You will see output similar to Figure 5.5:
Figure 5.5 Using a Shorter Deadline
5-22
6. Design Patterns for
High Performance
Chapter 6
Design Patterns for High Performance
In this chapter, you will learn how to implement some common performance-oriented
design patterns. As you have learned, one of the advantages to using RTI Data Distribution Service is that you can easily tune your application without changing its code, simply by updating the XML-based Quality of Service (QoS) parameters.
We will build on the examples used in Building and Running “Hello, World” (Section
3.1) to demonstrate the different use-cases. There are three example applications:
Hello_builtin, Hello_idl, and Hello_dynamic. These examples provide the same functionality but use different data types in order to help you understand the different typedefinition mechanisms offered by RTI Data Distribution Service and their tradeoffs. They
implement a simple throughput test: the publisher sends a payload to the subscriber,
which periodically prints out some basic statistics. You can use this simple test to
quickly see the effects of your system design choices: programming language, target
machines, quality of service configurations, and so on.
The QoS parameters do not depend on the language used for your application, and seldom on the operating system (there are few key exceptions), so you should be able to
use the XML files with the example in the language of your choice.
This chapter includes:
❏
❏
❏
❏
Building and Running the Code Examples
Reliable Messaging
High Throughput for Streaming Data
Streaming Data over Unreliable Network Connections
6-1
6.1
Building and Running the Code Examples
You can find the source for the Hello_builtin example for Java in ${NDDSHOME}/
example/JAVA/Hello_builtin; the equivalent source code in other supported languages
is in the directories ${NDDSHOME}/example/<language>. The Hello_idl and
Hello_dynamic examples are in parallel directories under ${NDDSHOME}/example/
<language>.
The examples perform these steps:
1. Parse their command-line arguments.
2. Check if the Quality of Service (QoS) file can be located.
The XML file that sets the Quality of Service (QoS) parameters is either loaded
from the file USER_QOS_PROFILES.xml in the current directory of the program, or from the environment variable NDDS_QOS_PROFILES. For more
information on how to use QoS profiles, see the chapter on "Configuring QoS
with XML" in the RTI Data Distribution Service User's Manual.
3. On the publishing side, send text strings as fast as possible, prefixing each one
with a serial number.
4. On the subscribing side, receive these strings, keeping track of the highest number seen, as well as other statistics. Print these out periodically.
The steps for compiling and running the program are the same as mentioned in Building and Running “Hello, World” (Section 3.1). Run the publisher and subscriber from
the ${NDDSHOME}/example/<language>/Hello_builtin directory using one of the
QoS profile files provided in ${NDDSHOME}/example/QoS by copying it into your
current working directory with the file name USER_QOS_PROFILES.xml. You should
see output like the following from the subscribing application:
Understanding the Performance Results
You will see several columns in the subscriber-side output, similar to Figure 6.1.
❏
Seconds from start: The number of seconds the subscribing application has been
running. It will print out one line per second.
❏
Total samples: The number of data samples that the subscribing application has
received since it started running.
6-2
Figure 6.1
Example Output from the Subscribing Application
❏
Total lost samples: The number of samples that were lost in transit and could not
be re-paired, since the subscribing application started running. If you are using a
QoS profile configured for strict reliability, you can expect this column to always
display 0. If you are running in best-effort mode, or in a limited-reliability mode
(e.g., you have configured your History QoS policy to only keep the most recent
sample), you may see non-zero values here.
❏
Current lost samples: The number of samples that were lost in transit and could
not be repaired, since the last status line was printed. See the description of the
previous column for information about what values to expect here.
❏
Average samples per second: The mean number of data samples received per
second since the subscribing application started running. By default, these example applications send data samples that are 1 KB in size. (You can change this by
passing a different size, in bytes, to the publishing application with --size.)
❏
Current samples per second: The number of data samples received since the sub-
scribing application printed the last status line.
6-3
6. Design Patterns for
High Performance
Building and Running the Code Examples
❏
Throughput megabits per second: The throughput from the publishing application to the subscribing application, in bits per second, since the subscribing
application printed the previous status line. The value in this column is equivalent to the current samples per second multiplied by the number of bits in an
individual sample.
With small sample sizes, the fixed "cost" of traversing your operating system's
network stack is greater than the cost of actually transmitting the data; as you
increase the sample size, you will see the throughput more closely approach the
theoretical throughput of your network.
By batching multiple data samples into a single network packet, as the highthroughput example QoS profile does, you should be able to saturate a gigabit
Ethernet network with samples sizes as small as 100-200 bytes. Without batching
samples, you should be able to saturate the network with samples of a few kilobytes. The difference is due to the performance limitations of the network transport; enterprise-class platforms with commodity Ethernet interfaces can
typically execute tens of thousands of send()’s per second. In contrast, saturating
a high-throughput network link with data sizes of less than a kilobyte requires
hundreds of thousands of samples per second.
Is this the best possible performance?
The performance of an application depends heavily on the operating system, the network, and how it configures and uses the middleware. This example is just a starting
point; tuning is important for a production application. RTI can help you get the most
out of your platform and the middleware.
To get a sense for how an application's behavior changes with different QoS contracts,
try the other provided example QoS profiles and see how the printed results change.
6.2
Reliable Messaging
Packets sent by a middleware may be lost by the physical network or dropped by routers, switches and even the operating system of the subscribing applications when buffers become full. In reliable messaging, the middleware keeps track of whether or not
data sent has been received by subscribing applications, and will resend data that was
lost on transmission.
Like most reliable protocols (including TCP), the reliability protocol used by RTI uses
additional packets on the network, called metadata, to know when user data packets are
6-4
lost and need to be resent. RTI offers the user a comprehensive set of tunable parameters
that control how many and how often metadata packets are sent, how much memory is
used for internal buffers that help overcome intermittent data losses, and how to detect
and respond to a reliable subscriber that either falls behind or otherwise disconnects.
When users want applications to exchange messages reliably, there is always a need to
trade-off between performance and memory requirements. When strictly reliable communication is enabled, every written sample will be kept by RTI Data Distribution Service
inside an internal buffer until all known reliable subscribers acknowledge receiving the
sample1.
If the publisher writes samples faster than subscribers can acknowledge receiving, this
internal buffer will eventually be completely filled, exhausting all the available space—
in that case, further writes by the publishing application will block. Similarly, on the
subscriber side, when a sample is received, it is stored inside an internal receive buffer,
waiting for the application to take the data for processing. If the subscribing application
doesn't take the received samples fast enough, the internal receive buffer may fill up—in
that case, newly received data will be discarded and would need to be repaired by the
reliable protocol.
Although the size of those buffers can be controlled from the QoS, you can also use QoS
to control what RTI Data Distribution Service will do when the space available in one of
those buffers is exhausted. There are two possible scenarios for both the publisher and
subscriber:
Publishing side: If write() is called and there is no more room in the DataWriter’s buffer,
RTI Data Distribution Service can:
1. Temporarily block the write operation until there is room on this buffer (for
example, when one or more samples is acknowledged to have been received
from all the subscribers).
2. Drop the oldest sample from the queue to make room for the new one.
Subscribing side: If a sample is received (from a publisher) and there is no more room on
the DataReader’s buffer:
1. Drop the sample as if it was never received. The subscribing application will
send a negative acknowledgement requesting that the sample be resent.
2. Drop the oldest sample from the queue to make room for the new one.
1. RTI Data Distribution Service also supports reliability based only on negative acknowledgements
("NACK-only reliability"). This feature is described in detail in the User's Manual (Section 6.5.2.3) but is
beyond the scope of this document.
6-5
6. Design Patterns for
High Performance
Reliable Messaging
6.2.1
Implementation
There are many variables to consider, and finding the optimum values to the queue size
and the right policy for the buffers depends on the type of data being exchanged, the
rate of which the data is written, the nature of the communication between nodes and
various other factors.
The RTI Data Distribution Service User’s Manual dedicates an entire chapter to the reliability protocol, providing details on choosing the correct values for the QoS based on
the system configuration. For more information, refer to Chapter 10 in the User’s Manual.
The following sections highlight the key QoS settings needed to achieve strict reliability.
In the reliable.xml QoS profile file, you will find many other settings besides the ones
described here. A detailed description of these QoS is outside the scope of this document, and for further information, refers to the comments in the QoS profile and in the
RTI Data Distribution Service User’s Manual.
6.2.1.1
Enable Reliable Communication
The QoS that control the kind of communication is the Reliability QoS of the DataWriter
and DataReader:
<datawriter_qos>
...
<reliability>
<kind>RELIABLE_RELIABILITY_QOS</kind>
<max_blocking_time>
<sec>5</sec>
<nanosec>0</nanosec>
</max_blocking_time
</reliability>
...
</datawriter_qos>
...
<datareader_qos>
<reliability>
<kind>RELIABLE_RELIABILITY_QOS</kind>
</reliability>
</datareader_qos>
This section of the QoS file enables reliability on the DataReader and DataWriter, and tells
the middleware that a call to write() may block up to 5 seconds if the DataWriter’s cache
is full of unacknowledged samples. If no space opens up in 5 seconds, write() will
6-6
return with a timeout indicating that the write operation failed and that the data was
not sent.
6.2.1.2
Set History To KEEP_ALL
The History QoS determines the behavior of a DataWriter or DataReader when its internal buffer fills up. There are two kinds:
❏
KEEP_ALL: The middleware will attempt to keep all the samples until they are
acknowledged (when the DataWriter’s History is KEEP_ALL), or taken by the
application (when the DataReader’s History is KEEP_ALL).
❏
KEEP_LAST: The middleware will discard the oldest samples to make room for
new samples. When the DataWriter’s History is KEEP_LAST, samples are discarded when a new call to write() is performed. When the DataReader’s History is
KEEP_LAST, samples in the receive buffer are discarded when new samples are
received. This kind of history is associated with a depth that indicates how many
historical samples to retain.
<datawriter_qos>
<history>
<kind>KEEP_ALL_HISTORY_QOS</kind>
</history>
...
</datawriter_qos>
...
<datareader_qos>
<history>
<kind>KEEP_ALL_HISTORY_QOS</kind>
</history>
...
</datareader_qos>
The above section of the QoS profile tells RTI to use the policy KEEP_ALL for both
DataReader and DataWriter.
6-7
6. Design Patterns for
High Performance
Reliable Messaging
6.2.1.3
Controlling Middleware Resources
With the ResourceLimits QosPolicy, you have full control over the amount of memory
used by the middleware. In the example below, we specify that both the reader and
writer will store up to 10 samples (if you use a History kind of KEEP_LAST, the values
specified here must be consistent with the value specified in the History’s depth).
<datawriter_qos>
<resource_limits>
<max_samples>10</max_samples>
</resource_limits>
...
</datawriter_qos>
...
<datareader_qos>
<resource_limits>
<max_samples>2</max_samples>
</resource_limits>
...
</datareader_qos>
The above section tells RTI to allocate a buffer of 10 samples for the DataWriter and 2 for
the DataReader. If you do not specify any value for max_samples, the default behavior is
for the middleware to allocate as much space as it needs.
One important function of the Resource Limits policy, when used in conjunction with
the Reliability and History policies, is to govern how far "ahead" of its DataReaders a
DataWriter may get before it will block, waiting for them to catch up. In many systems,
consuming applications cannot acknowledge data as fast as its producing applications
can put new data on the network. In such cases, the Resource Limits policy provides a
throttling mechanism that governs how many sent-but-not-yet-acknowledged samples
a DataWriter will maintain. If a DataWriter is configured for reliable KEEP_ALL operation, and it exceeds max_samples, calls to write() will block until the writer receives
acknowledgements that will allow it to reclaim that memory.
If you see that your reliable publishing application is using an unacceptable amount of
memory, you can specify a finite value for max_samples. By doing this, you restrain the
size of the DataWriter's cache, causing it to use less memory; however, a smaller cache
will fill more quickly, potentially causing the writer to block for a time when sending,
decreasing throughput. If decreased throughput proves to be an issue, you can tune the
reliability protocol to process acknowledgements and repairs more aggressively, allowing the writer to clear its cache more effectively. A full discussion of the relevant reliability protocol parameters is beyond the scope of this example. However, you can find a
6-8
useful example in high_throughput.xml. Also see the documentation for the DataReaderProtocol and DataWriterProtocol QoS policies in the on-line API documentation.
6.3
High Throughput for Streaming Data
This design pattern is useful for systems that produce a large number of small messages
at a high rate.
In such cases, there is a small but measurable overhead in sending (and in the case of
reliable communication, acknowledging) each message separately on the network. It is
more efficient for the system to manage many samples together as a group (referred to
in the API as a batch) and then send the entire group in a single network packet. This
allows RTI Data Distribution Service to minimize the overhead of building a datagram
and traversing the network stack.
Batching increases throughput when writing small samples at a high rate. As seen in
Figure 6.2, throughput can be increased several-fold, much more closely approaching
the physical limitations of the underlying network transport.
Figure 6.2
Benefits of Batching
Batching delivers tremendous benefits for messages of small size.
6-9
6. Design Patterns for
High Performance
High Throughput for Streaming Data
Figure 6.3
Benefits of Batching: Sample Rates
A subset of the batched throughput data above, expressed in terms of samples per second.
Collecting samples into a batch implies that they are not sent on the network (flushed)
immediately when the application writes them; this can potentially increase latency.
However, if the application sends data faster than the network can support, an
increased share of the network's available bandwidth will be spent on acknowledgements and resending dropped data. In this case, reducing that meta-data overhead by
turning on batching could decrease latency even while increasing throughput. Only an
evaluation of your system's requirements and a measurement of its actual performance
will indicate whether batching is appropriate. Fortunately, it is easy to enable and tune
batching, as you will see below.
Batching is particularly useful when the system has to send a large number of small
messages at a fast rate. Without this feature enabled, you may observe that your maximum throughput is less than the maximum bandwidth of your network. Simultaneously, you may observe high CPU loads. In this situation, the bottleneck in your system
is the ability of the CPU to send packets through the OS network stack.
For example, in some algorithmic trading applications, market data updates arrive at a
rate of from tens of thousands of messages per second to over a million; each update is
some hundreds of bytes in size. It is often better to send these updates in batches than to
publish them individually. Batching is also useful when sending a large number of
small samples over a connection where the bandwidth is severely constrained.
6-10
6.3.1
Implementation
RTI can automatically flush batches based on the maximum number of samples, the
total batch size, or elapsed time since the first sample was placed in the batch, whichever comes first. Your application can also flush the current batch manually. Batching is
completely transparent on the subscribing side; no special configuration is necessary.
Figure 6.4
Batching Implementation
RTI collects samples in a batch until the batch is flushed.
For more information on batching, see the User’s Manual (Section 6.5.1) or online documentation (the Batch QosPolicy is described in the Infrastructure Module).
Using the batching feature is simple—just modify the QoS in the publishing application’s configuration file.
For example, to enable batching with a batch size of 100 samples, set the following QoS
in your XML configuration file:
<datawriter_qos>
...
<batch>
<enable>true</enable>
<max_samples>100</max_samples>
</batch>
...
</datawriter_qos>
6-11
6. Design Patterns for
High Performance
High Throughput for Streaming Data
To enable batching with a maximum batch size of 8K bytes:
<datawriter_qos>
...
<batch>
<enable>true</enable>
<max_data_bytes>8192</max_data_bytes>
</batch>
...
</datawriter_qos>
To force the DataWriter to send whatever data is currently stored in a batch, use the
DataWriter’s flush() operation.
6.3.2
Running & Verifying
1. To run and verify the new QoS parameters, first run Hello_builtin using a simple reliable configuration—batching is turned off. Copy reliable.xml from
$NDDSHOME/example/QoS
to
$NDDSHOME/example/<language>/
Hello_builtin and rename it to USER_QOS_PROFILES.xml. Observe the
results.
Figure 6.5
6-12
Initial Performance Results
2. Next, run the example again with a configuration that includes batching. Copy
high_throughput.xml from ${NDDSHOME}/example/QoS to ${NDDSHOME}/
example/<language>/Hello_builtin
and
rename
it
to
USER_QOS_PROFILES.xml.
3. Run Hello_builtin again. Verify that the throughput numbers have improved.
Figure 6.6
6.4
Improved Performance Results
Streaming Data over Unreliable Network Connections
Systems face unique challenges when sending data over lossy networks that also have
high-latency and low-bandwidth constraints—for example, satellite and long-range
radio links. While sending data over such a connection, a middleware tuned for a highspeed, dedicated Gigabit connection would throttle unexpectedly, cause unwanted timeouts and retransmissions, and ultimately suffer severe performance degradation.
For example, the transmission delay in satellite connections can be as much as 500 milliseconds to 1 second, which makes such a connection unsuitable for applications or middleware tuned for low-latency, real-time behavior. In addition, satellite links typically
have lower bandwidth, with near-symmetric connection throughput of around 250–500
Kb/s and an advertised loss of approximately 3% of network packets. (Of course, the
throughput numbers will vary based on the modem and the satellite service.) In light of
6-13
6. Design Patterns for
High Performance
Streaming Data over Unreliable Network Connections
these facts, a distributed application needs to tune the middleware differently when
sending data over such networks.
RTI Data Distribution Service is capable of maintaining liveliness and application-level
QoS even in the presence of sporadic connectivity and packet loss at the transport level,
an important benefit in mobile, or otherwise unreliable networks. It accomplishes this
by implementing a reliable protocol that not only sequences and acknowledges application-level messages, but also monitors the liveliness of the link. Perhaps most importantly, it allows your application to fine-tune the behavior of this protocol to match the
characteristics of your network. Without this latter capability, communication parameters optimized for more performant networks could cause communication to break
down or experience unacceptable blocking times, a common problem in TCP-based
solutions.
6.4.1
Implementation
When designing a system that demands reliability over a network that is lossy and has
high latency and low throughput, it is critical to consider:
❏ How much data you send at one time (e.g., your sample or batch size).
❏ How often you send it.
❏ The tuning of the reliability protocol for managing meta- and repair messages.
It is also important to be aware of whether your network supports multicast communication; if it does not, you may want to explicitly disable it in your middleware configuration (e.g., by using the NDDS_DISCOVERY_PEERS environment variable or setting
the initial_peers and multicast_receive_address in your Discovery QoS policy; see the
online API documentation).
6.4.1.1
Managing Your Sample Size
Pay attention to your packet sizes to minimize or avoid IP-level fragmentation. Fragmentation can lead to additional repair meta-traffic that competes with the user traffic
for bandwidth. Ethernet-like networks typically have a frame size of 1500 bytes; on such
networks, sample sizes (or sample fragment sizes, if you've configured RTI Data Distribution Service to fragment your samples) should be kept to approximately 1400 bytes or
less. Other network types will have different fragmentation thresholds.
The exact size of the sample on the wire will depend not only on the size of your data
fields, but also on the amount of padding introduced to ensure alignment while serializing the data.
6-14
Figure 6.7 shows how an application's effective throughput (as a percentage of the theoretical capacity of the link) increases as the amount of data in each network packet
increases. To put this relationship in another way: when transmitting a packet is expensive, it's advantageous to put as much data into it as possible. However, the trend
reverses itself when the packet size becomes larger than the maximum transmission
unit (MTU) of the physical network.
Figure 6.7
Example Throughput Results over VSat Connection
Correlation between sample size and bandwidth usage for a satellite connection
with 3% packet loss ratio.
To understand why this occurs, remember that data is sent and received at the granularity of application samples but dropped at the level of transport packets. For example, an
IP datagram 10 KB in size must be fragmented into seven (1500-byte) Ethernet frames
and then reassembled on the receiving end; the loss of any one of these frames will
make reassembly impossible, leading to an effective loss, not of 1500 bytes, but of over
10 thousand bytes.
On an enterprise-class network, or even over the Internet, loss rates are very low, and
therefore these losses are manageable. However, when loss rates reach several percent,
the risk of losing at least one fragment in a large IP datagram becomes very large1. Over
1. Suppose that a physical network delivers a 1 KB frame successfully 97% of the time. Now suppose that
an application sends a 64 KB datagram. The likelihood that all fragments will arrive at their destination is 97%
to the 64th power, or less than 15%.
6-15
6. Design Patterns for
High Performance
Streaming Data over Unreliable Network Connections
an unreliable protocol like UDP, such losses will eventually lead to near-total data loss
as data size increases. Over a protocol like TCP, which provides reliability at the level of
whole IP datagrams (not fragments), mounting losses will eventually lead to the network filling up with repairs, which will themselves be lost; the result can once again be
near-total data loss.
To solve this problem, you need to repair data at the granularity at which it was lost:
you need, not message-level reliability, but fragment-level reliability. This is an important feature of RTI Data Distribution Service. When sending packets larger than the MTU
of your underlying link, use RTI's data fragmentation and asynchronous publishing features to perform the fragmentation at the DDS level, hence relieving the IP layer of that
responsibility.
<datawriter_qos>
...
<publish_mode>
<kind>ASYNCHRONOUS_PUBLISH_MODE_QOS</kind>
<flow_controller_name>
DDS_DEFAULT_FLOW_CONTROLLER_NAME
</flow_controller_name>
</publish_mode>
...
</datawriter_qos>
<participant_qos>
...
<property>
<value>
<element>
<name>
dds.transport.UDPv4.builtin.parent.message_size_max
</name>
<value>1500</value>
</element>
</value>
</property>
...
</participant_qos>
The DomainParticipant's dds.transport.UDPv4.builtin.parent.message_size_max property sets the maximum size of a datagram that will be sent by the UDP/IPv4 transport.
(If your application interfaces to your network over a transport other than UDP/IPv4,
the name of this property will be different.) In this case, it is limiting all datagrams to the
6-16
MTU of the link (assumed, for the sake of this example, to be equal to the MTU of Ethernet).
At the same time, the DataWriter is configured to send its samples on the network, not
synchronously when write() is called, but in a middleware thread. This thread will
"flow" datagrams onto the network at a rate determined by the FlowController identified by the flow_controller_name. In this case, the flow controller is a built-in instance
that allows all data to be sent immediately. In a real-world application, you may want to
use a custom FlowController that you create and configure in your application code.
Further information on this topic is beyond the scope of this example. For more information on asynchronous publishing, see Section 6.4.1 in the RTI Data Distribution Service
User's Manual. You can also find code examples demonstrating these capabilities online
in the Solutions area of the RTI Customer Portal, http://www.rti.com/support. Navigate to Code Examples and search for Asynchronous Publication.
6-17
6. Design Patterns for
High Performance
Streaming Data over Unreliable Network Connections
6.4.1.2
Acknowledge and Repair Efficiently
Piggyback heartbeat with each sample. A DataWriter sends "heartbeats"—meta-data
messages announcing available data and requesting acknowledgement—in two ways:
periodically and "piggybacked" into application data packets. Piggybacking heartbeats
aggressively ensures that the middleware will detect packet losses early, while allowing
you to limit the number of extraneous network sends related to periodic heartbeats.
<datawriter_qos>
...
<resource_limits>
<!-- Used to configure piggybacks w/o batching -->
<max_samples>
20 <!-- An arbitrary finite size -->
</max_samples>
</resource_limits>
<writer_resource_limits>
<!-- Used to configure piggybacks w/ batching; see below -->
<max_batches>
20 <!-- An arbitrary finite size -->
</max_batches>
</writer_resource_limits>
<protocol>
<rtps_reliable_writer>
<heartbeats_per_max_samples>
20 <!-- Set same as max_samples -->
</heartbeats_per_max_samples>
<rtps_reliable_writer>
</protocol>
...
</datawriter_qos>
The heartbeats_per_max_samples parameter controls how often the middleware will
piggyback a heartbeat onto a data message: if the middleware is configured to cache 10
samples, for example, and heartbeats_per_max_samples is set to 5, a heartbeat will be
piggybacked unto every other sample. If heartbeats_per_max_samples is set equal to
max_samples, this means that a heartbeat will be sent with each sample.
6.4.1.3
Make Sure Repair Packets Don’t Exceed Bandwidth Limitation
Applications can configure the maximum amount of data that a DataWriter will resend
at a time using the max_bytes_per_nack_response parameter. For example, if a
DataReader sends a negative acknowledgement (NACK) indicating that it missed 20
6-18
samples, each 10 KB in size, and max_bytes_per_nack_response is set to 100 KB, the
DataWriter will only send the first 10 samples. The DataReader will have to NACK again
to receive the remaining 10 samples.
In the following example, we limit the number of bytes so that we will never send more
data than a 256 Kb/s, 1-ms latency link can handle over one second:
<datawriter_qos>
...
<protocol>
<rtps_reliable_writer>
<max_bytes_per_nack_response>
28000
</max_bytes_per_nack_response>
</rtps_reliable_writer>
</protocol>
...
</datawriter_qos>
6.4.1.4
Use Batching to Maximize Throughput for Small Samples
If your application is sending data continuously, consider batching small samples to
decrease the per-sample overhead. Be careful not to set your batch size larger than your
link’s MTU; see Managing Your Sample Size (Section 6.4.1.1).
For more information on how to configure throughput for small samples, see High
Throughput for Streaming Data (Section 6.3).
6-19
6. Design Patterns for
High Performance
Streaming Data over Unreliable Network Connections
6-20
7. Available
Documentation
Chapter 7
The Next Steps
Congratulations! You have completed the Getting Started Guide. This document is, of
course, only an introduction to the power and flexibility of RTI Data Distribution Service.
We invite you to explore further by referring to the wealth of information, examples,
and resources available.
The RTI Data Distribution Service documentation includes:
❏ Getting
Started Guide (RTI_DDS_GettingStarted.pdf)—This document
describes how to download and install RTI Data Distribution Service. It also lays
out the core value and concepts behind the product and takes you step-by-step
through the creation of a simple example application. Developers should read
this document first.
If you are using RTI Data Distribution Service on an embedded platform or
with a database, you will find additional documents that specifically address
these configurations:
• Addendum for Embedded Systems
(RTI_DDS_GettingStarted_EmbeddedSystemsAddendum.pdf)
• Addendum for Database Setup
(RTI_DDS_GettingStarted_DatabaseAddendum.pdf).
❏ What’s New (RTI_DDS_WhatsNew.pdf)—This document describes changes and
enhancements in the current version of RTI Data Distribution Service. If you are
upgrading from a previous version, read this document first.
❏ Release Notes and Platform Notes (RTI_DDS_ReleaseNotes.pdf and
RTI_DDS_PlatformNotes.pdf)—These documents provide system requirements,
compatibility, and other platform-specific information about the product, including specific information required to build your applications using RTI Data Distribution Service, such as compiler flags and libraries.
7-21
❏ User’s Manual (RTI_DDS_UsersManual.pdf)—This document describes the features of the product and how to use them. It is organized around the structure of
the DDS APIs and certain common high-level tasks.
❏ API Documentation (ReadMe.html, RTI_DDS_ApiReference<Language>.pdf)—
This extensively cross-referenced documentation, available both in HTML and
printable PDF formats, is your in-depth reference to every operation and configuration parameter in the middleware. Even experienced RTI Data Distribution
Service developers will often consult this information.
The Programming How To's (available from the main page) provide example
code. These are hyperlinked code snippets to the full API documentation, and
provide a good place to begin learning the APIs. Start by reviewing the Publication Example and Subscription Example, which provide step-by step examples of how to send and receive data with RTI Data Distribution Service.
Many readers will also want to look at additional documentation available online. In
particular, RTI recommends the following:
❏ RTI Public Knowledge Base—Accessible from http://www.rti.com/support.
The Knowledge Base provides sample code, general information on RTI Data
Distribution Service, performance information, troubleshooting tips, and other
technical details.
❏ RTI Customer Portal—Accessible from http://www.rti.com/support. The portal provides a superset of the solutions available in the RTI Public Knowledge
Base. Select the Find Solution link to see sample code, general information on
RTI Data Distribution Service, performance information, troubleshooting tips, and
other technical details. You must have a user name and password to access the
portal; these are included in the letter confirming your purchase. If you do not
have this letter, please contact [email protected].
❏ RTI Example Performance Test—This example application includes code and
configuration files for testing and optimizing the performance of a simple RTI
Data Distribution Service application on your system. The program will test both
throughput and latency under a wide variety of middleware configurations. It
also includes documentation on tuning the middleware and the underlying
operating system.
The performance test can be downloaded from the RTI Knowledge Base, accessible from http://www.rti.com/support. In the Performance category, look for
Example Performance Test for RTI Data Distribution Service.
You can also review the data from several performance benchmarks here: http:/
/www.rti.com/products/dds/benchmarks-cpp-linux.html.
7-22
❏ Whitepapers and other articles—These documents are available from http://
www.rti.com/resources.
7-23
7. Available
Documentation
Of course, RTI also offers excellent technical support and professional services. To contact technical support, simply log into the portal, send email to [email protected], or contact the telephone number provided for your region. We thank you for your
consideration and wish you success in meeting your distributed challenge.
7-24