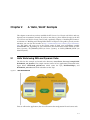
1
RTI Connext DDS
Core Libraries and Utilities
XML-Based Application Creation
Getting Started Guide
Version 5.1.0
© 2012-2013 Real-Time Innovations, Inc.
All rights reserved.
Printed in U.S.A. First printing.
December 2013.
Trademarks
Real-Time Innovations, RTI, DataBus, and Connext are trademarks or registered trademarks of Real-Time
Innovations, Inc. All other trademarks used in this document are the property of their respective owners.
Copy and Use Restrictions
No part of this publication may be reproduced, stored in a retrieval system, or transmitted in any form
(including electronic, mechanical, photocopy, and facsimile) without the prior written permission of RealTime Innovations, Inc. The software described in this document is furnished under and subject to the RTI
software license agreement. The software may be used or copied only under the terms of the license
agreement.
Technical Support
Real-Time Innovations, Inc.
232 E. Java Drive
Sunnyvale, CA 94089
Phone:
(408) 990-7444
Email:
[email protected]
Website: https://support.rti.com/
ii
Contents
1
Introduction .......................................................................................1-1
2
A ‘Hello, World’ Example..................................................................2-1
2.1
Hello World using XML and Dynamic Data...................................................................................... 2-1
2.1.1 Build the Application............................................................................................................... 2-2
2.1.2 Run the Application ................................................................................................................. 2-2
2.1.3 Examine the XML Configuration Files Definition............................................................... 2-3
2.1.4 Publisher Application .............................................................................................................. 2-7
2.1.5 Subscriber Application ............................................................................................................ 2-8
2.1.6 Subscribing with a Content Filter .......................................................................................... 2-9
2.2
Hello World using XML and Compiled Types ................................................................................ 2-10
2.2.1 Define the Data Types using IDL or XML........................................................................... 2-10
2.2.2 Generate Type-Support Code from the Type Definition ...................................................2-11
2.2.3 Build the Application..............................................................................................................2-11
2.2.4 Run the Application ............................................................................................................... 2-12
2.2.5 Examine the XML Configuration Files Definition............................................................. 2-13
2.2.6 Publisher Application ............................................................................................................ 2-14
2.3
Subscriber Application........................................................................................................................ 2-16
3
Using Connext Prototyper ................................................................3-1
4
Understanding XML-Based Application Creation .........................4-1
4.1
Important Points .................................................................................................................................... 4-1
4.2
Loading XML Configuration Files....................................................................................................... 4-2
4.3
XML Syntax and Validation ................................................................................................................. 4-2
4.3.1 Validation at Run-Time............................................................................................................ 4-2
4.3.2 Validation during Editing ....................................................................................................... 4-3
4.4
Accessing Entities Defined in XML Configuration from an Application ...................................... 4-3
4.5
XML Tags for Configuring Entities ..................................................................................................... 4-4
4.5.1 Domain Library ........................................................................................................................ 4-5
4.5.2 Participant Library ................................................................................................................... 4-8
4.6
Names Assigned to Entities................................................................................................................ 4-12
4.6.1 Referring to Entities and Other Elements within XML Files ........................................... 4-13
4.7
Creating and Retrieving Entities Configured in an XML File ....................................................... 4-15
4.7.1 Creating and Retrieving a DomainParticipant Configured in an XML File .................. 4-15
4.7.2 Creating and Retrieving Publishers and Subscribers........................................................ 4-16
4.7.3 Creating and Retrieving DataWriters and DataReaders................................................... 4-17
4.7.4 Creating Content Filters ........................................................................................................ 4-18
4.7.5 Using User-Generated Types ................................................................................................ 4-18
iii
Chapter 1
Introduction
XML-Based Application Creation is a mechanism to simplify the development and programming of RTI Connext™ applications. Connext supports the use of XML for the complete system
definition. This includes not only the definition of the data types and Quality of Service settings
(as was possible in previous versions of the product), but also the definition of the Topics,
DomainParticipants, and all the Entities they contain (Publishers, Subscribers, DataWriters and
DataReaders).
With the traditional approach an application developer
must program explicitly into the code the actions needed to
join a domain, register the data types it will use, create the
Topics and all the Entities (Publishers, Subscribers, DataReaders and DataWriters) that the application uses. Even for simple applications this “system creation” code can result in
hundreds of lines of boiler-plate code. Beyond being error
prone, the traditional approach results in larger code-bases
that are harder to understand and maintain. Using XMLBased Application Creation can significantly simplify this
process.
This document assumes you have
a basic understanding of Connext
application development and
concepts such as Domains,
DomainParticipants,
Topics,
DataWriters and DataReaders.
For an overview of these concepts,
please read Introduction to
Connext, Section 3.2 in the RTI
Core Libraries and Utilities
Getting Started Guide, which is
part of your distribution, or you
can find it online at http://
community.rti.com/content/page/
documentation.
XML-Based Application Creation is a simple layer that
builds on top of the standard APIs. Everything that you do
with the XML configuration can also be done with the
underlying APIs. In this manner, an application can be initially developed using XML-Based
Application Creation and transitioned to the traditional API at a later time. This would be useful
in case the application has to be deployed on a platform without a file system or needs to be
ported to a DDS-compliant library that does not support XML-based configuration such as RTI
Connext Micro.
Using XML-Based Application Creation is easy: simply edit USER_QOS_PROFILE.xml to
define:
❏
❏
❏
❏
The data types that will be used to communicate information in the system
The Topics that will be used in the domain, associating each Topic with a data type
The DomainParticipants that can potentially be used, giving each a participant name
The DataWriters and DataReaders present within each DomainParticipant, each associated
with its corresponding Topic.
The application code simply indicates the participant configuration name of the DomainParticipant that the application wants to create. The XML-Based Application Creation infrastructure
takes care of the rest: creating the DomainParticipant, registering the types and Topics, and populating all the configured Entities.
1-1
When the application needs to read or write data, register listeners, or perform any other action,
it simply looks up the appropriate Entity by name and uses it.
XML-Based Application Creation enables several powerful new work flows:
❏ Developers can describe all the Entities that a Connext application will need in an XML
file and then create that application with a single function call, saving many hundreds of
lines of setup code.
❏ Application descriptions written in XML are usable from all programming languages.
❏ The complete domain (including the data types and Topics that can be in the domain)
may be defined in an XML file and shared amongst all the developers and applications.
❏ The Quality of Service (QoS) that should be used for each DomainParticipant, Topic,
DataReader, and DataWriter can be fully specified in the XML and shared amongst a
group of developers and applications.
❏ The XML description of the application can be used in combination with RTI Prototyper to
design and prototype application deployment scenarios, allowing quick testing and validation without the need for programming.
To use the companion RTI Connext Prototyper, see Chapter 3.
1-2
Chapter 2
A ‘Hello, World’ Example
This chapter assumes that you have installed the RTI Connext Core Libraries and Utilities and configured your environment correctly. If you have not done so, please follow the steps in the RTI
Core Libraries and Utilities Getting Started Guide, specifically Chapter 2 “Installing RTI Connext”
and Section 3.1 “Building and running Hello World” in Chapter 3. The guide is part of your distribution; you can also find it online at http://community.rti.com/content/page/documentation. The guide will assist you in the correct setting of both your environment variable
NDDSHOME and, depending on your architecture, the environment variable PATH (on Windows Systems), LD_LIBRARY_PATH (on Linux systems), or DYLD_LIBRARY_PATH (on
MacOS Systems).
2.1
Hello World using XML and Dynamic Data
The files for this example are located in the directory <installation directory>/example/CPP/
HelloWorld_xml_dynamic. This simple scenario consists of two applications, illustrated in the
figure below: HelloWorld_publisher.exe which writes the Topic, HelloWorldTopic, and
HelloWorld_subscriber.exe which subscribes to that Topic.
Figure 2.1
Hello World Domain
First we will run the application, then we will examine the configuration file and source code.
2-1
Hello World using XML and Dynamic Data
2.1.1
Build the Application
The example code is provided in C++, C#, and Java. The following instructions describe how to
build it on Windows and UNIX-based systems. If you will be using an embedded platform, see
the Core Libraries and Utilities Getting Started Guide Addendum for Embedded Systems
(RTI_CoreLibrariesAndUtilities_GettingStarted_EmbeddedSystemsAddendum.pdf)
for
instructions specific to these platforms.
To build the example C++ applications on a Windows System:
1. In
Windows
Explorer,
go
to
<installation
directory>\example\CPP\HelloWorld_xml_dynamic\win and open the Microsoft® Visual Studio®
solution file for your architecture. For example, the file for Visual Studio 2008 32-bit platforms is HelloWorld-vs2008.sln.
2. The Solution Configuration combo box in the toolbar indicates whether you are building
debug or release executables; select Release. Then select Build Solution from the Build
menu.
To build the example C++ applications on a UNIX-based System:
1. From your command shell, change directory to <installation directory>/example/CPP/
HelloWorld_xml_dynamic.
2. Type:
> gmake -f make/Makefile.<architecture>
where <architecture> is one of the supported architectures (e.g., Makefile.i86Linux2.6gcc4.4.5); see the contents of the make directory for a list of available
architectures. This command will build a release executable. To build a debug version
instead, type:
> gmake -f make/Makefile.<architecture> DEBUG=1
2.1.2
Run the Application
The previous step should have built two executables: HelloWorld_subscriber and
HelloWorld_publisher. These applications should be in proper architecture subdirectory under
the objs directory. For example, objs\i86Win32VS2008 in the Windows example cited below
and objs/i86Linux2.6gcc4.4.5 in the Linux example.
To start the subscribing application on a Windows system:
From
your
command
shell,
go
to
ple\CPP\HelloWorld_xml_dynamic and type:
<installation
directory>\exam-
> objs\<architecture>\HelloWorld_subscriber.exe
where <architecture> is the architecture you just built; look in the objs directory to see the
name of the architecture you built. For example, the Windows architecture name corresponding to 32-bit Visual Studio 2008 is i86Win32VS2008.
To start the subscribing application on a UNIX-based systems:
From your command shell, change directory to <installation directory>/example/CPP/
HelloWorld_xml_dynamic and type:
> objs/<architecture>/HelloWorld_subscriber
where <architecture> is the architecture you just built; look in the objs directory to see the
name of the architecture you built. For example, i86Linux2.6gcc4.4.5.
You should immediately see some messages from the publishing application showing that it is
writing data and messages from the subscribing application showing the data it receives. Do not
2-2
Hello World using XML and Dynamic Data
worry about the contents of the messages. They are generated automatically for this example.
The important thing is to understand how the application is defined, which will be explained in
the following sections.
2.1.3
Examine the XML Configuration Files Definition
A Connext application is defined in the file USER_QOS_PROFILES.xml found in the directory
<installation directory>/example/CPP/HelloWorld_xml_dynamic. Let’s review its content to
see how this scenario was constructed. The main sections in the file are:
❏
❏
❏
❏
QoS definition section
Type definition section
Domain definition section
Participant definition section
The entire file is shown below. The we will examine the file section-by-section.
<dds xmlns:xsi="http://www.w3.org/2001/XMLSchema-instance"
xsi:noNamespaceSchemaLocation="../../../resource/qos_profiles_5.1.0/schema/
rti_dds_profiles.xsd"
version="5.1.0">
<!-- QoS Library -->
<qos_library name="qosLibrary">
<qos_profile name="DefaultProfile">
</qos_profile>
</qos_library>
<!-- types -->
<types>
<const name="MAX_NAME_LEN" type="long" value="64"/>
<const name="MAX_MSG_LEN" type="long" value="128"/>
<struct name="HelloWorld">
<member name="sender" type="string" key="true"
stringMaxLength="MAX_NAME_LEN"/>
<member name="message" type="string"
stringMaxLength="MAX_MSG_LEN"/>
<member name="count" type="long"/>
</struct>
</types>
<!-- Domain Library -->
<domain_library name="MyDomainLibrary" >
<domain name="HelloWorldDomain" domain_id="0">
<register_type name="HelloWorldType"
kind="dynamicData"
type_ref="HelloWorld" />
<topic name="HelloWorldTopic"
register_type_ref="HelloWorldType">
<topic_qos name="HelloWorld_qos"
base_name="qosLibrary::DefaultProfile"/>
</topic>
</domain>
</domain_library>
2-3
Hello World using XML and Dynamic Data
<!-- Participant library -->
<participant_library name="MyParticipantLibrary">
<domain_participant name="PublicationParticipant"
domain_ref="MyDomainLibrary::HelloWorldDomain">
<publisher name="MyPublisher">
<data_writer name="HelloWorldWriter"
topic_ref="HelloWorldTopic"/>
</publisher>
</domain_participant>
<domain_participant name="SubscriptionParticipant"
domain_ref="MyDomainLibrary::HelloWorldDomain">
<subscriber name="MySubscriber">
<data_reader name="HelloWorldReader"
topic_ref="HelloWorldTopic">
<datareader_qos name="HelloWorld_reader_qos"
base_name="qosLibrary::DefaultProfile"/>
</data_reader>
</subscriber>
</domain_participant>
</participant_library>
2.1.3.1
QoS Definition
The DDS Entities that are defined have an associated QoS. The QoS section of the XML file provides the means to define QoS libraries and profiles that can be used to configure the QoS of the
defined Entities.
The syntax of the QoS libraries and profiles section is described in the RTI Core Libraries and Utilities User’s Manual, Chapter 17 “Configuring QoS with XML.”
In this example, the QoS library and profile are empty, just to provide a placeholder where the
QoS can be specified. Using this empty profile results in the default DDS QoS being used:
<!-- QoS Library -->
<qos_library name="qosLibrary">
<qos_profile name="DefaultProfile">
</qos_profile>
</qos_library>
2.1.3.2
Type Definition
The data associated with the HelloWorld Topic consists of two strings and a numeric counter:
❏ The first string contains the name of the sender of the message. This field is marked as
“key” as signals the identity of the data-object.
❏ The second string contains a message.
❏ The third field is a simple counter which the application increments with each message.
This example uses the dynamic data API, so the data type must be defined in the XML configuration. This is accomplished by adding the type definition within the <types> tag:
2-4
Hello World using XML and Dynamic Data
<types>
<const name="MAX_NAME_LEN" type="long" value="64"/>
<const name="MAX_MSG_LEN" type="long" value="128"/>
<struct name="HelloWorld">
<member name="sender" type="string" key="true"
stringMaxLength="MAX_NAME_LEN"/>
<member name="message" type="string"
stringMaxLength="MAX_MSG_LEN"/>
<member name="count" type="long"/>
</struct>
</types>
The <types> tag may be used to define a library containing the types that the different applications will need. However, for this simple example just one data-type, the HelloWord type seen
above, is included.
2.1.3.3
Domain Definition
The domain section is used to define the system’s Topics and the corresponding data types associated with each Topic. To define a Topic, the associated data type must be registered with the
domain giving it a registered type name. The registered type name is used to refer to that data
type within the domain at the time the Topic is defined.
In this example, the configuration file registers the previously defined HelloWorld type under
the name HelloWorldType and then defines a topic with name HelloWorldTopic associated with
the registered type, referring to it by its registered name HelloWorldType:
<!-- Domain Library -->
<domain_library name="MyDomainLibrary" domain_id=”0” >
<domain name="HelloWorldDomain">
<register_type name="HelloWorldType"
kind="dynamicData"
type_ref="HelloWorld"/>
<topic name="HelloWorldTopic"
register_type_ref="HelloWorldType"/>
</domain>
</domain_library>
Note that attribute type_ref in the <register_type> element refers to the same HelloWorld type
defined in the <types> section.
A domain definition may register as many data types and define as many Topics as it needs. In
this example a single data type and Topic suffices.
Note that domain_library can be used to define multiple domains. However in this example
only one domain is used.
2.1.3.4
Participant Definition
The participant section is used to define the DomainParticipants in the system and the DataWriters and DataReaders that each participant has. DomainParticipants are defined within the
<participant_library> tag.
Each DomainParticipant:
❏ Has a unique name (within the library) which will be used later by the application that
creates it.
❏ Is associated with a domain, which defines the domain_id, Topics and data types the
DomainParticipant will use.
2-5
Hello World using XML and Dynamic Data
❏ Defines the Publishers and Subscribers within the DomainParticipant. Publishers contain
DataWriters and Subscribers contain DataReaders.
❏ Defines the set of DataReaders it will use to write data. Each DataReader has a QoS and a
unique name which can be used from application code to retrieve it.
❏ Defines the set of DataWriters it will use to write data. Each DataWriter has a QoS and a
unique name which can be used from application code to retrieve it.
❏ Optionally the Participants, Publishers, Subscribers, DataWriters and DataReaders can specify a QoS profile that will be used to configure them.
The example below defines two DomainParticipant entities called PublicationParticipant and
SubscriptionParticipant:
<participant_library name="MyParticipantLibrary">
<domain_participant name="PublicationParticipant"
domain_ref="MyDomainLibrary::HelloWorldDomain">
<publisher name="MyPublisher">
<data_writer name="HelloWorldWriter"
topic_ref="HelloWorldTopic"/>
</publisher>
</domain_participant>
<domain_participant name="SubscriptionParticipant"
domain_ref="MyDomainLibrary::HelloWorldDomain">
<subscriber name="MySubscriber">
<data_reader name="HelloWorldReader"
topic_ref="HelloWorldTopic">
<datareader_qos name="HelloWorld_reader_qos"
base_name="qosLibrary::DefaultProfile"/>
</data_reader>
</subscriber>
</domain_participant
</participant_library>
Examining the XML we see that:
❏ The PublicationParticipant bound to the domain MyDomainLibrary::HelloWorldDomain.
❏ The participant contains a single Publisher (with name MyPublisher which itself contains a single DataWriter named HelloWorldWriter.
❏ The DataWriter writes the Topic HelloWorldTopic which is defined in the domain MyDomainLibrary::HelloWorldDomain.
Similarly:
❏ The SubscriptionParticipant is also bound to the domain MyDomainLibrary::HelloWorldDomain.
❏ The participant contains a single Subscriber (with name MySubscriber which itself contains a single DataReader named HelloWorldReader.
❏ The DataReader reads the topic HelloWorldTopic which is defined in the domain MyDomainLibrary::HelloWorldDomain.
2-6
Hello World using XML and Dynamic Data
Since both participants are in the same domain and the HelloWorldWriter DataWriter writes the
same Topic that the HelloWorldReader DataReader reads the two participants will communicate
as was illustrated in Figure 2.1, “Hello World Domain,” on page 2-1.
2.1.4
Publisher Application
Open the file <installation directory>/examples/CPP/HelloWorld_publisher.cxx and look at
the source code.
The logic of this simple application is contained in the publisher_main() function. The logic can
be seen as composed of two parts:
❏ Entity Creation
❏ Use of the Entities
Entity Creation: The application first creates a DomainParticipant using the function
create_participant_from_config() this function takes the configuration name of the participant
MyParticipantLibrary::PublicationParticipant which is the same name that was specified in the
XML file. Note that the name in the XML file PublicationParticipant has been qualified with the
name of the library it belongs to MyParticipantLibrary.
DDSDomainParticipant * participant =
DDSTheParticipantFactory->create_participant_from_config(
"MyParticipantLibrary::PublicationParticipant");
This single function call registers all the necessary data types and creates and the Topics and
Entities that were specified in the XML file. In this simple case the participant only contains a
Publisher MyPublisher with a single DataWriter HelloDataWriter. However, in more realistic
scenarios this single call can create hundreds of entities (both readers and writers).
Use of the Entities: The remaining part of the function uses the created Entities to perform the
logic of the program.
This example writes data using the single DataWriter. So the application looks up the HelloWorldWriter DataWriter using the fully qualified name MyPublisher::HelloWorldWriter and narrows it to be a DynamicDataWriter:
DDSDynamicDataWriter * dynamicWriter = DDSDynamicDataWriter::narrow(
participant->lookup_datawriter_by_name(
"MyPublisher::HelloWorldWriter"));
Once the DataWriter is available, some data objects need to be created and used to send the data.
As this example uses dynamic data, and the type code is internally created, you can use the
operations create_data() and delete_data() in a DataWriter to create and delete a data object. This
is achieved with the calls seen below:
/* Create data */
DDS_DynamicData *dynamicData = dynamicWriter->create_data(
DDS_DYNAMIC_DATA_PROPERTY_DEFAULT);
/* Main loop to repeatedly send data */
for (count=0; count < 100 ; ++count) {
/* Set the data fields */
retcode = dynamicData->set_string(
"sender",
DDS_DYNAMIC_DATA_MEMBER_ID_UNSPECIFIED,
"John Smith");
2-7
Hello World using XML and Dynamic Data
retcode = dynamicData->set_string(
"message",
DDS_DYNAMIC_DATA_MEMBER_ID_UNSPECIFIED,
"Hello World!");
retcode = dynamicData->set_long(
"count",
DDS_DYNAMIC_DATA_MEMBER_ID_UNSPECIFIED,
count);
/* Write the data */
retcode = dynamicWriter->write(*dynamicData, DDS_HANDLE_NIL);
...
}
/* Delete data sample */
dynamicWriter->delete_data(dynamicData
Note that the operations, such as set_long() are used to set the different attributes of the dynamicData object. These operations refer to the attribute names (e.g., “count”) that were defined as
part of the data type.
2.1.5
Subscriber Application
Open the file <installation directory>/examples/CPP/HelloWorld_subscriber.cxx and look at
the source code.
The logic of this simple application is contained in the subscriber_main() function. Similar to
the publisher application the logic can be seen as composed of two parts:
❏ Entity Creation
❏ Use of the Entities
Entity Creation: The application first creates a DomainParticipant using the function
create_participant_from_config(). This function takes the configuration name of the participant
MyParticipantLibrary::SubscriptionParticipant which is the same name that was specified in
the XML file. Notice that the name in the XML file SubscriptionParticipant has been qualified
with the name of the library it belongs to MyParticipantLibrary.
DDSDomainParticipant * participant =
DDSTheParticipantFactory->create_participant_from_config(
"MyParticipantLibrary::SubscriptionParticipant”);
This single function call registers all the necessary data types and creates and the Topics and
Entities that were specified in the XML file. In this simple case the participant only contains a
subscriber MySubscriber with a single DataReader HelloDataReader. However in more realistic
scenarios this single call can create hundreds of Entities (both DataReaders and DataWriters).
Use of the Entities: The remaining part of the function uses the entities that were created to perform the logic of the program.
This example only needs to read data using the single DataReader. So the application looks up
the HelloWorldReader DataReader using the fully qualified name MySubscriber::HelloWorldReader
and narrows it to be a DynamicDataReader:
DDSDynamicDataReader * dynamicReader = DDSDynamicDataReader::narrow(
participant-> lookup_datareader_by_name(
"MySubscriber::HelloWorldReader"));
To process the data, the application installs a Listener on the DataReader. The HelloWorldListener, defined on the same file implements the DataReaderListener interface, which the
DataReader uses to notify the application of relevant events, such as the reception of data.
2-8
Hello World using XML and Dynamic Data
/* Create a DataReaderListener */
HelloWorldListener * reader_listener = new HelloWorldListener();
/* set listener */
retcode = dynamicReader->set_listener(reader_listener,
DDS_DATA_AVAILABLE_STATUS);
The last part is the implementation of the listener functions. In this case, we only implement the
on_data_available() operation which is the one called when data is received.
The on_data_available() function receives all the data into a sequence and then uses the
DDS_DynamicData::print() function to print each data item received.
void HelloWorldListener::on_data_available(DDSDataReader* reader)
{
DDSDynamicDataReader * ddDataReader = NULL;
DDS_DynamicDataSeq dataSeq;
DDS_SampleInfoSeq infoSeq;
DDS_ReturnCode_t retcode = DDS_RETCODE_ERROR;
DDS_Long i = 0;
ddDataReader = DDSDynamicDataReader::narrow(reader);
retcode = ddDataReader->take(
dataSeq, infoSeq, DDS_LENGTH_UNLIMITED,
DDS_ANY_SAMPLE_STATE, DDS_ANY_VIEW_STATE, DDS_ANY_INSTANCE_STATE);
printf("on_data_available:%s\n",
ddDataReader->get_topicdescription()->get_name());
for (i = 0; i < dataSeq.length(); ++i) {
if (infoSeq[i].valid_data) {
retcode = dataSeq[i].print(stdout, 0);
}
}
retcode = ddDataReader->return_loan(dataSeq, infoSeq);
}
2.1.6
Subscribing with a Content Filter
To use a content filter, modify the SubscriptionParticipant configuration to look like this:
<participant_library name="MyParticipantLibrary">
...
<domain_participant name="SubscriptionParticipant"
domain_ref="MyDomainLibrary::HelloWorldDomain">
<subscriber name="MySubscriber">
<data_reader name="HelloWorldReader" topic_ref="HelloWorldTopic">
<datareader_qos name="HelloWorld_reader_qos"
base_name="qosLibrary::DefaultProfile"/>
<filter name="HelloWorldTopic" kind="builtin.sql">
<expression> count > 2
</expression>
</filter>
</data_reader>
</subscriber>
</domain_participant>
</participant_library>
2-9
Hello World using XML and Compiled Types
The extra XML within the <filter> tag adds a SQL content filter which only accepts samples with
the field count greater than two.
Now run HelloWorld_subscriber without recompiling and check the expected that the behavior.
2.2
Hello World using XML and Compiled Types
The files for this example are located in the directory <installation directory>/example/CPP/
HelloWorld_xml_compiled. This simple scenario consists of two applications identical in purpose to the one illustrated in Figure 2.1, “Hello World Domain,” on page 2-1:
HelloWorld_publisher.exe, which writes to the Topic “HelloWorldTopic,” and
HelloWorld_subscriber.exe which subscribes to that same Topic.
In contrast with previous example, which uses the DynamicData API, this example uses compiled types.
Compiled types are syntactically nicer to use from application code and provide better performance. The drawback is that there is an extra step of code-generation involved to create that
supporting infrastructure to marshal and unmarshal the types into a format suitable for network
communications.
2.2.1
Define the Data Types using IDL or XML
The first step is to describe the data-type in a programming-language neutral manner. Two languages are supported by the Connext tools: XML and IDL. These languages (XML and IDL) provide equivalent type-definition capabilities so you can choose either one depending on your
personal preference. You can even transform between one and the other with the RTI tools. That
said, as the rest of the configuration files use XML, it is often more convenient to also use XML to
describe the data types so they can be shared or moved to other XML configuration files.
The directory <installation directory>/example/CPP/HelloWorld_xml_compiled contains the
XML description of the data type in the file HelloWorld.xml and it also contains the equivalent
IDL description in HelloWorld.idl.
Let’s examine the contents of the XML file:
<?xml version="1.0" encoding="UTF-8"?>
<types xmlns:xsi="http://www.w3.org/2001/XMLSchema-instance"
xsi:noNamespaceSchemaLocation="../../../resource/rtiddsgen/schema/
rti_dds_topic_types.xsd">
<const name="MAX_NAME_LEN" type="long" value="64"/>
<const name="MAX_MSG_LEN" type="long" value="128"/>
<struct name="HelloWorld">
<member name="sender" type="string" key="true"
stringMaxLength="MAX_NAME_LEN"/>
<member name="message" type="string" stringMaxLength="MAX_MSG_LEN"/>
<member name="count"
type="long"/>
</struct>
</types>
The file defines a structure type called “HelloWorld” consisting of a string (the sender), a string
(the message), and an integer count. Note that the type-declaration syntax is identical the one
used within the USER_QOS_PROFILES.xml file that we used for the dynamic example (section
Type Definition (Section 2.1.3.2)).
2-10
Hello World using XML and Compiled Types
2.2.2
Generate Type-Support Code from the Type Definition
This step produces code to support the direct use of the structure ‘HelloWorld’ from application
code. The code is generated using the provided tool named rtiddsgen.
The code-generation supports many programming languages. The XML-Based Application Creation currently supports C, C++, Java, and C#. We will use C++ in this example.
To generate code, follow these steps (replacing <architecture> as needed for your system; e.g.,
i86Win32VS2008 or i86Linux2.6gcc4.4.5):
On a Windows system:
From your command shell, change directory to <installation directory>/example\CPP\HelloWorld_xml_compiled and type:
rtiddsgen –language C++ -example <architecture> HelloWorld.xml
On a UNIX-based system:
From your command shell, change directory to <installation directory>/example/CPP/
HelloWorld_xml_dynamic and type:
rtiddsgen –language C++ -example <architecture> HelloWorld.xml
As a result of this step you will see the following files appear in the directory
HelloWorld_xml_dynamic: HelloWorld.h, HelloWorld.cxx, HelloWorldPlugin.h, HelloWorldPlugin.cxx, HelloWorldSupport.h, and HelloWorldSupport.cxx
The most notable thing at this point is the fact that the HelloWorld.h file contains the declaration of the C++ structure, built according to the specification in the XML file:
static const DDS_Long MAX_NAME_LEN = 64;
static const DDS_Long MAX_MSG_LEN = 128;
typedef struct HelloWorld
{
char* sender; /* maximum length = ((MAX_NAME_LEN)) */
char* message; /* maximum length = ((MAX_MSG_LEN)) */
DDS_Long count;
} HelloWorld;
2.2.3
Build the Application
The example code is provided in C++, C#, and Java. The following instructions describe how to
build it on Windows and UNIX-based systems. If you will be using an embedded platform, see
the RTI Core Libraries and Utilities Getting Started Guide Addendum for Embedded Systems
(RTI_CoreLibrariesAndUtilities_GettingStarted_EmbeddedSystemsAddendum.pdf)
for
instructions specific to these platforms.
C++ on Windows Systems:
1. In
the
Windows
Explorer,
go
to
<installation
directory>\example\CPP\HelloWorld_xml_compiled and open the Microsoft Visual Studio solution file
for your architecture. For example, the file for Visual Studio 2008 for 32-bit platforms is
HelloWorld-vs2008.sln.
2. The Solution Configuration combo box in the toolbar indicates whether you are building
debug or release executables; select Release. Select Build Solution from the Build menu.
2-11
Hello World using XML and Compiled Types
C++ on UNIX-based Systems:
1. From your command shell, change directory to <installation directory>/example/CPP/
HelloWorld_xml_compiled.
2. Type:
gmake -f Makefile.<architecture>
where <architecture> is one of the supported architectures (e.g., Makefile.i86Linux2.6gcc4.4.5). This command will build a release executable. To build a debug
version instead, type:
gmake -f Makefile.<architecture> DEBUG=1
2.2.4
Run the Application
The previous step built two executables: HelloWorld_subscriber and HelloWorld_publisher.
These applications should be in proper architecture subdirectory under the objs directory. For
example, objs\i86Win32VS2008 in the Windows example cited below and objs/
i86Linux2.6gcc4.4.5 in the Linux example.
1. Start the subscribing application:
On a Windows system:
From
your
command
shell,
go
to
<installation
ple\CPP\HelloWorld_xml_compiled and type:
directory>\exam-
objs\<architecture>\HelloWorld_subscriber.exe
where <architecture> is the architecture you just built; see the contents of the objs
directory to see the name of the architecture you built. For example, the Windows
architecture name corresponding to 32-bit Visual Studio 2005 is i86Win32VS2005.
On a UNIX-based system:
From your command shell, change directory to <installation directory>/example/
CPP/HelloWorld_xml_ compiled and type:
objs/<architecture>/HelloWorld_subscriber
where <architecture> is the architecture you just built of the supported architectures;
examine the contents of the objs directory to see the name of the architecture you
built.
2. Start the publishing application:
On a Windows system:
From
your
command
shell,
go
to
<installation
ple\CPP\HelloWorld_xml_compiled and type:
directory>\exam-
objs\<architecture>\HelloWorld_publisher.exe
where <architecture> is the architecture you just built; see the contents of the objs
directory to see the name of the architecture you built.
On a UNIX-based system:
From your command shell, change directory to <installation directory>/example/
CPP/HelloWorld_xml_ compiled and type:
objs/<architecture>/HelloWorld_publisher
2-12
Hello World using XML and Compiled Types
You should immediately see some messages on the publishing application showing that it is
writing data and messages in the subscribing application indicating the data it receives. Do not
worry about the contents of the messages. They are generated automatically for this example.
The important thing is to understand how the application is defined which will be explained in
the following subsections.
2.2.5
Examine the XML Configuration Files Definition
This system is defined in the file USER_QOS_PROFILES.xml found in the directory <installation directory>/example/CPP/HelloWorld_xml_compiled. Let’s look at its content and what are
the elements defined to construct this scenario.
<dds xmlns:xsi="http://www.w3.org/2001/XMLSchema-instance"
xsi:noNamespaceSchemaLocation="../../../resource/qos_profiles_5.1.0/schema/
rti_dds_profiles.xsd"
version="5.1.0">
<!-- Qos Library -->
<qos_library name="qosLibrary">
<qos_profile name="DefaultProfile">
</qos_profile>
</qos_library>
<!-- Domain Library -->
<domain_library name="MyDomainLibrary" >
<domain name="HelloWorldDomain" domain_id="0">
<register_type name="HelloWorldType" kind="userGenerated"/>
<topic name="HelloWorldTopic"
register_type_ref="HelloWorldType">
<topic_qos name="HelloWorld_qos"
base_name="qosLibrary::DefaultProfile"/>
</topic>
</domain>
</domain_library>
<!-- Participant library -->
<participant_library name="MyParticipantLibrary">
<domain_participant name="PublicationParticipant"
domain_ref="MyDomainLibrary::HelloWorldDomain">
<publisher name="MyPublisher">
<data_writer name="HelloWorldWriter"
topic_ref="HelloWorldTopic"/>
</publisher>
</domain_participant>
<domain_participant name="SubscriptionParticipant"
domain_ref="MyDomainLibrary::HelloWorldDomain">
<subscriber name="MySubscriber">
<data_reader name="HelloWorldReader"
topic_ref="HelloWorldTopic">
<datareader_qos name="HelloWorld_reader_qos"
base_name="qosLibrary::DefaultProfile"/>
</data_reader>
</subscriber>
</domain_participant>
</participant_library>
</dds>
The examination of this file reveals virtually the same information as was found in the
HelloWorld_xml_dynamic example. This is no surprise as we are essentially trying to define the
same system. Please revisit Examine the XML Configuration Files Definition (Section 2.1.3) for a
2-13
Hello World using XML and Compiled Types
description of what each section in the XML does.
Here we highlight the only two differences that can be seeing in the configuration file for the of
the HelloWorld_xml_compiled example when compared with that of the
HelloWorld_xml_dynamic example:
❏ The type definition “<types>” section does not appear in the configuration of the
HelloWorld_xml_compiled example.
❏ The registration of the data types within the domain is slightly different
The type-definition section that appears between the tags “<types>” and “</types>” is not
there because in this case the data types are compiled in. So the type-definition has been moved
to an external file to facilitate the code generation described in Section Generate Type-Support
Code from the Type Definition (Section 2.2.2).
The registration of the data-type inside the domain uses the syntax:
<register_type name="HelloWorldType" kind="userGenerated" />
This contrasts with what was used in the HelloWorld_xml_dynamic example:
<register_type name="HelloWorldType" kind="dynamicData" type_ref="HelloWorld" />
The modified syntax indicates a kind=“userGenerated” which means that the type will be
defined via code generation and not use the DynamicData API. Since the type is defined via
code generation there is no need to provide a reference to the type-definition so the type_ref
attribute is not present.
To sum it up, the XML configuration file is essentially the same except that the type definitions
of the data types that will be compiled in are not present and that is indicated at the time the
data type is registered in the domain by means of the attribute kind="userGenerated".
2.2.6
Publisher Application
Open the file <installation directory>/examples/CPP/HelloWorld_publisher.cxx and look at
the source code.
The logic of this simple application is contained in the publisher_main() function. The logic can
be seen as composed of three parts:
❏ Type registration (this step is new compared to the HelloWorld_xml_dynamic)
❏ Entity creation
❏ Use of the Entities
Type Registration: The first thing the application does is register the data-types that were
defined in the code-generation step. This is accomplished by calling the register_type_support()
function on the DomainParticipantFactory.
/* type registration */
retcode = DDSTheParticipantFactory->register_type_support(
HelloWorldTypeSupport::register_type,
"HelloWorldType");
The function register_type_support() must be called for each code-generated data type that will
be associated with the Topics published and subscribed by the application. In this example there
is only one Topic and one data type, so only one call to this function is required.
The function register_type_support() takes as a parameter the TypeSupport function that
defines the data type in compile code. In this case it is HelloWorldTypeSupport::register_type
this function is declared in the HelloWorldSupport.h. However you cannot see it directly there
because it is defined using macros. Instead you will find the line:
2-14
Hello World using XML and Compiled Types
DDS_TYPESUPPORT_CPP(HelloWorldTypeSupport, HelloWorld);
This line defines the HelloWorldTypeSupport::register_type() function.
In general if you include multiple data-type definitions in a single XML (or IDL) file called
MyFile.xml (or MyFile.idl) you will have multiple TypeSupport types defines within the generated file MyFileTypeSupport.h. You can identify them searching for the
DDS_TYPESUPPORT_CPP() macro and you should register each of them (the ones the application uses) using the operation register_type_support() as was shown earlier.
Entity Creation: The steps needed to create the entities are the same as for the
HelloWorld_xml_dynamic example. The application first creates a DomainParticipant using the
function create_participant_from_config() this function takes the configuration name of the
participant “MyParticipantLibrary::PublicationParticipant” which is the same name that was specified in the XML file. Note that the name in the XML file “PublicationParticipant” has been qualified with the name of the library it belongs to “MyParticipantLibrary”.
DDSDomainParticipant * participant =
DDSTheParticipantFactory->create_participant_from_config(
"MyParticipantLibrary::PublicationParticipant");
This single function call registers all the necessary data types and creates and the Topics and
Entities that were specified in the XML file. In this simple case the participant only contains a
publisher “MyPublisher” with a single DataWriter “HelloDataWriter”. However in more realistic scenarios this single call can create hundreds of entities (both readers and writers).
Use of the Entities: The remaining part of the function uses the entities that were created to perform the logic of the program.
This example only needs to write data using the single data writer. So the application looks-up
the “HelloWorldWriter” DataWriter using the fully qualified name “MyPublisher::HelloWorldWriter” and narrows it to be a HelloWorldDataWriter. Note the difference with the
HelloWorld_xml_dynamic example. Rather than the generic “DynamicDataWriter” used in the
example here we use a DataWriter specific to the HelloWorld data type.
HelloWorldDataWriter * helloWorldWriter = HelloWorldDataWriter::narrow(
participant->lookup_datawriter_by_name(
"MyPublisher::HelloWorldWriter"));
/* Create data */
HelloWorld * helloWorldData = HelloWorldTypeSupport::create_data();
/* Main loop */
for (count=0; (sample_count == 0) || (count < sample_count); ++count)
{
printf("Writing HelloWorld, count: %d\n", count);
/* Set the data fields */
helloWorldData->sender = "John Smith";
helloWorldData->message = "Hello World!";
helloWorldData->count
= count;
retcode = helloWorldWriter->write(*helloWorldData, DDS_HANDLE_NIL);
if (retcode != DDS_RETCODE_OK) {
printf("write error %d\n", retcode);
publisher_shutdown(participant);
return -1;
}
NDDSUtility::sleep(send_period);
}
Note that the data object helloWorldData can be manipulated directly as a plain-language object.
This means that in order to set a field in the object the application can refer to it directly as in:
2-15
Subscriber Application
helloWorldData->count
= count;
This “plain language object” API is both higher performance and friendlier to the programmer
than the DynamicData API.
2.3
Subscriber Application
Open the file <installation directory>/examples/CPP/HelloWorld_subscriber.cxx and look at
the source code.
The logic of this simple application is in the subscriber_main() function. Similar to the publisher
application the logic can be seen as composed of three parts:
❏ Type registration (this step is new compared to the HelloWorld_xml_dynamic)
❏ Entity creation
❏ Use of the Entities
Type Registration: This step is identical to the one for the publisher application. The first thing
the application does is register the data-types that were defined in the code-generation step.
This is accomplished calling the register_type_support() function on the DomainParticipantFactory.
/* type registration */
retcode = DDSTheParticipantFactory->register_type_support(
HelloWorldTypeSupport::register_type, "HelloWorldType");
Please refer to the explanation of the publishing application for more details as this step us
regardless of whether the application uses a type to publish or subscribe.
Entity Creation: The steps needed to create the entities are the same as for the
HelloWorld_xml_dynamic example. The application first creates a DomainParticipant using the
function create_participant_from_config() this function takes the configuration name of the
participant “MyParticipantLibrary::SubscriptionParticipant” which is the same name that was
specified in the XML file. Note that the name in the XML file “SubscriptionParticipant” has been
qualified with the name of the library it belongs to “MyParticipantLibrary”.
DDSDomainParticipant * participant =
DDSTheParticipantFactory->create_participant_from_config(
"MyParticipantLibrary::SubscriptionParticipant");
This single function call registers all the necessary data-types and creates and the Topics and
Entities that were specified in the XML file. In this simple case the participant only contains a
Subscriber “MySubscriber” with a single DataReader “HelloDataReader”. However in more realistic scenarios this single call can create hundreds of entities (both DataReaders and DataWriters).
Use of the Entities: The remaining part of the function uses the entities that were created to perform the logic of the program.
This example only needs to read data using the single DataReader So the application looks-up the
“HelloWorldReader” DataReader using the fully qualified name “MyPublisher::HelloWorldReader” and narrows it to be a HelloWorldDataReader:
2-16
Subscriber Application
HelloWorldDataReader * helloWorldReader =
HelloWorldDataReader::narrow(
participant->lookup_datareader_by_name(
"MySubscriber::HelloWorldReader"));
To process the data, the application installs a Listener on the DataReader. The HelloWorldListener, defined on the same file implements the DataReaderListener interface, which the
DataReader uses to notify the application of relevant events, such as the reception of data.
/* Create a data reader listener */
HelloWorldListener *reader_listener = new HelloWorldListener();
/* set listener */
retcode = helloWorldReader->set_listener(reader_listener,
DDS_DATA_AVAILABLE_STATUS);
The last part is the implementation of the listener functions. In this case we only implement the
on_data_available() operation, which is called when data is received.
The on_data_available() function receives all the data into a sequence and then uses the HelloWorldTypeSupport::print() function to print each data item received.
void HelloWorldListener::on_data_available(DDSDataReader* reader)
{
HelloWorldDataReader *helloWorldReader = NULL;
HelloWorldSeq dataSeq;
DDS_SampleInfoSeq infoSeq;
DDS_ReturnCode_t retcode = DDS_RETCODE_ERROR;
DDS_Long i = 0;
helloWorldReader = HelloWorldDataReader::narrow(reader);
retcode = helloWorldReader->take(
dataSeq, infoSeq, DDS_LENGTH_UNLIMITED,
DDS_ANY_SAMPLE_STATE, DDS_ANY_VIEW_STATE, DDS_ANY_INSTANCE_STATE);
for (i = 0; i < dataSeq.length(); ++i) {
if (infoSeq[i].valid_data) {
HelloWorldTypeSupport::print_data(&dataSeq[i]);
}
}
retcode = helloWorldReader->return_loan(dataSeq, infoSeq);
}
Note that the sequence received is of type HelloWorldSeq which contains the native plain language objects of type HelloWorld. This can be manipulated directly by the application. For
example the fields can be dereferenced as shown in the code snippet below:
HelloWorld *helloWorldData = &dataSeq[i];
printf(“count= %s\n”, helloWorldData->count);
2-17
Chapter 3
Using Connext Prototyper
RTI Connext Prototyper is a companion tool for use with the XML-Based Application Creation
feature. This tool allows application developers to quickly try out scenarios directly from their
XML descriptions, without writing any code. Prototyper is included with Connext DDS and Connext Mesaging.
On a Windows system:
From
your
command
shell,
go
to
<installation
ple\CPP\HelloWorld_xml_dynamic. Open two console windows.
directory>\exam-
In one window, type (all on one line):
$NDDSHOME\scripts\rtiddsprototyper
-cfgName PublicationParticipant "MyParticipantLibrary::PublicationParticipant"
In the other window, type (all on one line):
$NDDSHOME\scripts\rtiddsprototyper
-cfgName SubscriptionParticipant "MyParticipantLibrary::SubscriptionParticipant"
On a UNIX-based system:
From
your
command
shell,
go
to
<installation
HelloWorld_xml_dynamic. Open two console windows.
directory>/example/CPP/
In one window, type (all on one line):
${NDDSHOME}/scripts/rtiddsprototyper
-cfgName PublicationParticipant "MyParticipantLibrary::PublicationParticipant"
In the other window, type (all on one line):
${NDDSHOME}/scripts/rtiddsprototyper
-cfgName SubscriptionParticipant "MyParticipantLibrary::SubscriptionParticipant"
You can run both of these on the same computer or on separate computers within the same
(multicast enabled) network. You should immediately see the subscribing application receive
and print the information from the publishing side.
For more information, please read the RTI Connext Prototyper Getting Started Guide (in
<NDDSHOME>/doc/pdf).
3-1
Chapter 4
Understanding XML-Based Application
Creation
Figure 4.1 depicts a Connext application built with the aid of both the Connext API and an XML
configuration file. Using the XML configuration file in combination with the XML-Based Application Creation feature simplifies and accelerates application development.
The Entities defined in the XML configuration file can be created by a single call to the API.
Once created, all Entities can be retrieved from application code using standard “lookup” operations so they can be used to read and write data.
Figure 4.1
Using both Connext API and XML Configuration File to Develop an Application
Connext Application
Connext API
4.1
XML Configuration
File
Important Points
❏ Applications can instantiate a DomainParticipant from a participant configuration
described in the XML Configuration file. All the Entities defined by such a participant
configuration are created automatically as part of DomainParticipant creation. In addition,
multiple participant configurations may be defined within a single XML configuration
file.
❏ All the Entities created from a participant configuration are automatically assigned an
entity name. Entities can be retrieved via “lookup” operations specifying their name.
Each Entity stores its own name in the QoS policies of the Entity so that they can be
retrieved locally (via a lookup) up and communicated via discovery. This is described in
4-1
Loading XML Configuration Files
Creating and Retrieving Entities Configured in an XML File (Section 4.7).
❏ An XML configuration file is not tied to the application that uses it. Different applications
may run using the same configuration file. A single file may define multiple participant
configurations. A single application can instantiate as many DomainParticipants as
desired.
❏ Changes in the XML configuration file do not require recompilation, even if Entities are
added or removed, unless the logic that uses the Entities also needs to change.
4.2
Loading XML Configuration Files
Connext loads its XML configuration from multiple locations. This section presents the various
approaches, listed in load order.
The following locations contain QoS Profiles (see Chapter 15 in the RTI Core Libraries and Utilities
User's Manual) and may also contain Entity configurations.
❏ $NDDSHOME/resource/qos_profiles_5.x.y/xml/NDDS_QOS_PROFILES.xml
This file contains the Connext default QoS values; it is loaded automatically if it exists.
When present this is the first file loaded. (Where x.y represent version numbers.)
❏ File specified in NDDS_QOS_PROFILES Environment Variable
The files (or XML strings) separated by semicolons referenced in this environment variable, if any, are loaded automatically. These files are loaded after the
NDDS_QOS_PROFILES.xml and they are loaded in the order they appear listed in the
environment variable.
❏ <working directory>/USER_QOS_PROFILES.xml
This file is loaded automatically if it exists in the ‘working directory’ of the application,
that is, the directory from which the application is run. This file is loaded last.
4.3
XML Syntax and Validation
The configuration files uses XML format. Please see Examine the XML Configuration Files Definition (Section 2.1.3) for an example XML file and a description of its contents.
4.3.1
Validation at Run-Time
Connext validates the input XML files using a built-in Document Type Definition (DTD). You can
find a copy of the builtin DTD in $NDDSHOME/resource/qos_profiles_<version>/schema/
rti_dds_profiles.dtd.
This is only a copy of the DTD that Connext uses. Changing this file has no effect unless you
specify its path with the DOCTYPE tag, described below.
You can overwrite the built-in DTD by using the XML tag, <!DOCTYPE>. For example, the following indicates that Connext must use a different DTD file to perform validation:
<!DOCTYPE dds SYSTEM
"/local/usr/rti/dds/modified_rti_dds_profiles.dtd">
4-2
Accessing Entities Defined in XML Configuration from an Application
If you do not specify the DOCTYPE tag in the XML file, the built-in DTD is used. The DTD path
can be absolute or relative to the application's current working directory.
4.3.2
Validation during Editing
Connext provides DTD and XSD files that describe the format of the XML content. We highly recommend including a reference to the XSD in the XML file. This provides helpful features in code
editors such as Visual Studio, Eclipse, or Netbeans, including validation and auto-completion
while you are editing the XML file.
To include a reference to the XSD file, use the noNamespaceSchemaLocation attribute inside the
opening <dds> tag, as illustrated below (replace ‘5.x.y’ with the current version number):
<?xml version="1.0" encoding="UTF-8"?>
<dds xmlns:xsi="http://www.w3.org/2001/XMLSchema-instance"
xsi:noNamespaceSchemaLocation="../../../resource/qos_profiles_5.x.y/schema/
rti_dds_profiles.xsd"
version="5.x.y">
You may use relative or absolute paths to the schema files. These files are provided as part of
your distribution in the following location (replace 5.x.y with the current version number):
❏ <Connext installation directory>/resource/qos_profiles_5.x.y/schema/
rti_dds_profiles.xsd
❏ <Connext installation directory>/resource/qos_profiles_5.x.y/schema/
rti_dds_profiles.dtd
If you want to use the DTD for syntax validation instead of the XSD, use the <!DOCTYPE> tag.
Note, however, that this validation is less strict and will offer far less help in terms of auto-completion. The use of <!DOCTYPE> is shown below. Simply replace $NDDSHOME with your Connext installation directory and replace ‘5.x.y’ with the current version number:
<?xml version="1.0" encoding="UTF-8"?>
<!DOCTYPE dds SYSTEM
$NDDSHOME/resource/qos_profiles_5.x.y/schema/rti_dds_profiles.dtd">
<dds>
...
</dds>
4.4
Accessing Entities Defined in XML Configuration from an
Application
You can use the operations listed in Table 4.1 to retrieve and then use the Entities defined in your
XML configuration files.
Table 4.1
Operations Intended for Use with XML-Based Configuration
Working with…
Configuration-Related Operations
Reference
create_participant_from_config
DomainParticipantFactory
create_participant_from_config_w_params
Section 4.7.1
lookup_participant_by_name
register_type_support
Section 4.7.5
4-3
XML Tags for Configuring Entities
Table 4.1
Operations Intended for Use with XML-Based Configuration
Working with…
Configuration-Related Operations
Reference
lookup_publisher_by_name
lookup_subscriber_by_name
DomainParticipant
Section 4.7.2
lookup_datawriter_by_name
lookup_datareader_by_name
4.5
Publisher
lookup_datawriter_by_name
Subscriber
lookup_datareader_by_name
Section 4.7.3
XML Tags for Configuring Entities
There are two top-level tags to configure Entities in the XML configuration files:
❏ <domain_library>: Defines a collection of domains. A domain defines a global dataspace where applications can publish and subscribe to data by referring to the same Topic
name. Each domain within the domain library defines the Topics and associated datatypes that can be used within that domain. Note that this list is not necessarily exhaustive. The participants defined within the <participant_library> might add Topics beyond
the ones listed in the domain library.
❏ <participant_library>: Defines a collection of DomainParticipants. A DomainParticipant
provides the means for an application to join a domain. The DomainParticipant contains
all the Entities needed to publish and subscribe data in the domain (Publishers, Subscribers, DataWriters, DataReaders, etc.).
Figure 4.2 and Table 4.2 describe the toplevel tags that are allowed within the root
<dds> tag.
Table 4.2
Figure 4.2
Top-Level Tags in Configuration File
Top-Level Tags in Configuration File
Tags within <dds>
Description
Number
of Tags
Allowed
Specifies a domain library. Set of <domain> definitions.
<domain_library>
Attributes:
name
0 or more
Domain library name
4-4
XML Tags for Configuring Entities
Table 4.2
Top-Level Tags in Configuration File
Tags within <dds>
<participant_library>
Number
of Tags
Allowed
Description
Specifies a participant library. Set of <domain_participant> definitions.
name
Participant library name
0 or more
Specifies a QoS library and profiles.
4.5.1
<qos_library>
The contents of this tag are specified in the same manner as for a Con- 0 or more
next QoS profile file—see Chapter 15 in the RTI Core Libraries and Utilities User’s Manual.
<types>
Defines types that can be used for dynamic data registered types.
0 or 1
Domain Library
A domain library provides a way to organize a
set of domains that belongs to the same system.
A domain represents a data space where data
can be shared by means of reading and writing
the same Topics, each Topic having an associated
data-type. Therefore, in a <domain> tag you can
specify Topics and their data types.
Figure 4.3
Domain Library Tag
Figure 4.3, Table 4.3, and Table 4.4 describe what
tags can be in a <domain_library>.
❏ The <register_type> tag specifies a type
definition that will be registered in the
DomainParticipants whenever they specify a Topic associated with that data type.
❏ The <topic> tag specifies a Topic by associating it with a <register_type> that
contains the type information.
In a domain, you can also specify the domain ID to which the DomainParticipant associated with
this domain will be bound.
Table 4.3
Domain Library Tags
Tags within
<domain_library>
Description
Number of
tags allowed
Specifies a domain.
Attributes:
name
<domain>
Domain name
domain_id (optional) Domain ID (default id=0)
1 or more
Base domain name. Specifies
base_name (optional) another domain from which properties will be inherited.
Note that a domain may inherit from another “base domain” definition by using the base_name
attribute. A domain that declares a “base domain” might still override some of the properties in
the base domain. Overriding is done simply by including elements in the derived domain with
the same name as in the base domain.
4-5
XML Tags for Configuring Entities
Table 4.4
Domain Tags
Tags within
<domain>
Number
of tags
allowed
Description
Specifies how a type is registered
Attributes:
name
Name used to refer to this registered type
within the XML file. This is also the name
under which the type is registered with the
DomainParticipants unless overridden by the
1 or more
<registered_name> tag.
kind
Specifies whether the type is built-in, dynamic
data or generated by the user.
<register_type>
Reference (fully qualified name) to a defined
type_ref (optional) type within <types>. Required when kind is
dynamic data.
Specifies a topic associating its data-type and optionally QoS.
Attributes:
name
Name of the topic if no <registered_name> is
specified.
1 or more
register_type_ref
Reference (name) to a register_type within this
domain with which this topic is associated.
<topic>
The <register_type> tag, described in Figure 4.4 and
Table 4.5, determines how a type is registered by
specifying the type definition and the name with
which it is registered.
Table 4.5
Figure 4.4
Register Type Tag
Register Type Tag
Tags within
<register_type>
<registered_name>
Description
Number of tags allowed
Name with which the type is registered.
The <topic> tag, described in Figure 4.5 and
Table 4.6, describes a Topic by specifying the name
and type of the Topic. It may also contain the QoS
configuration for that Topic.
0 or 1
Figure 4.5
Topic Tag
4-6
XML Tags for Configuring Entities
Table 4.6
Topic Tag
Tags within <topic >
Description
Number of tags allowed
<registered_name>
Name of the Topic.
0 or 1
<topic_qos>
Topic QoS configuration.
0 or 1
Some elements may refer to already specified types and QoS tags. The definitions of these referenced tags may appear either in the same configuration file or in a different one—as long as it is
one of the ones loaded by Connext as described in Section 4.2.
If a QoS is not specified for an Entity, then the QoS will be set to a default value that is either the
default configured in the XML files, or if such default does not exist, then the Connext QoS
defaults. Please see Chapter 15 “Configuring QoS with XML” in the RTI Core Libraries and Utilities User’s Manual for additional details in configuring QoS via XML.
For example:
<!-- types -->
<types>
<struct name="MyType">
<member name="message" type="string"/>
<member name="count" type="long"/>
</struct>
</types>
<!-- Domain Library -->
<domain_library name="MyDomainLibrary" >
<domain name="MyDomain" domain_id="10">
<register_type name="MyRegisteredType"
kind="dynamicData" type_ref="MyType"/>
<topic name="MyTopic" register_type_ref="MyType">
<topic_qos base_name="qosLibrary::DefaultProfile"/>
</topic>
</domain>
</domain_library>
The above configuration defines a domain with name “MyDomain” and domain_id “10” containing a Topic called “MyTopic” with type “MyType” registered with the name “MyRegisteredType”:
❏ <register_type>: It defines the registration of a dynamic data type with name “MyRegisteredType” and definition “MyType”–defined in the same file.
❏ <topic>: with name “MyTopic” and whose corresponding type is the one defined above
with the name “MyRegisteredType” found within the same configuration. The
Topic QoS configuration is the one defined by the profile “qosLibrary::DefaultProfile”, which is defined in a different file.
Note that the DomainParticipant created from a configuration profile bound this domain will be
crated with domain_id=10, unless the domain_id is overridden in the participant configuration.
4-7
XML Tags for Configuring Entities
4.5.2
Participant Library
A participant library provides a way to organize a set of participants belonging to the same
system. A participant configuration specifies all
the entities that a DomainParticipant created
from this configuration will contain.
Figure 4.6
Participant Library Tag
Figure 4.6, Table 4.7, and Table 4.8 shows the
description of a <participant_library> and the
tags it contains.
A <domain_participant> can be associated
with a domain where topics and their associated types are already defined. The elements
<register_type> and <topic> may also be
defined in a <domain_participant>—the same
way it is done in a <domain>. This makes it
possible to add Topics, data-types, etc. beyond
the ones defined in the domain, or alternatively
redefine the elements that are already in the
<domain>.
A <domain_participant> is defined by specifying the set of Entities it contains. This is done
using tags such as <publisher>, <subscriber>, <data_writer> and <data_reader>, which specify
a Entity of their corresponding type. These Entities are created within the DomainParticipant
instantiated from the configuration profile that contains the definitions.
Table 4.7
Participant Library Tag
Tags within
<participant_library>
Description
Number
of Tags
Allowed
Specifies a participant configuration.
Attributes:
<domain_participant>
name
Participant configuration name.
base_name (optional)
Base participant name. It specifies
another participant from which to
inherit the configuration.
domain_ref (optional)
Reference (fully qualified name) to
a defined <domain> in the domain 1 or more
library.
Domain ID. If specified, overrides
the id in the domain it refers to.
domain_id (optional)
If no domain_id is specified
directly or in the referenced
domain
then
the
default
domain_id is 0.
A <domain_participant> may inherit its configuration from another “base participant” specified
using the base_name attribute. In this case, overriding applies to the base
<domain_participant> as well as to the referred <domain>.
Note that in DataWriters always belong to a Publisher and DataReaders to a Subscriber. For this reason the <data_writer> and <data_reader> typically appear nested inside the corresponding
<publisher> and <subscriber> tags. However, for convenience, it is possible to define
4-8
XML Tags for Configuring Entities
<data_writer> and <data_reader> tags directly under the <domain_participant> tag. In this
case, the DataWriters and DataReaders are created inside the implicit Publisher and Subscriber,
respectively.
Table 4.8
Domain Participant Tag
Tags within
<domain_participant >
Description
Number
of Tags
Allowed
<register_type>
Specifies how a type is registered. Same as within the
0 or more
<domain> tag
<topic>
Specifies a topic. Same as within the <domain> tag
0 or more
Specifies a Publisher configuration.
Attributes:
<publisher>
name
Publisher configuration name.
multiplicity (optional)
Number of Publishers that are
created with this configuration.
0 or more
Default is 1.
Specifies a Subscriber configuration.
Attributes:
<subscriber>
name
Subscriber configuration name.
multiplicity (optional)
Number of Subscribers that are
created with this configuration.
0 or more
Default is 1.
Specifies a DataWriter configuration. The DataWriter will
be created inside the implicit Publisher.
Attributes:
<data_writer>
name
DataWriter configuration name.
topic_ref
Reference (name) a <topic> 0 or more
within the <domain> referenced
by its <participant> parent.
multiplicity (optional)
Number of DataWriters that are
created with this configuration.
Default is 1.
Specifies a data reader configuration. The DataReader
will be created inside the implicit subscriber.
Attributes:
<data_reader>
name
Data reader configuration name.
topic_ref
Reference (name) a <topic> 0 or more
within the <domain> referenced
by its <participant> parent.
multiplicity (optional)
Number of DataReaders that are
created with this configuration.
Default is 1.
<participant_qos>
DomainParticipant QoS configuration.
0 or 1
4-9
XML Tags for Configuring Entities
The <publisher>, <subscriber>, <data_writer>, and <data_reader> tags are described in
Figure 4.7, Table 4.9, Table 4.10, Table 4.11 and Table 4.12.
Figure 4.7
Publisher and Subscriber Tags
The <publisher> tag defines by default a Publisher. It may contain a QoS configuration and a several DataWriters. Likewise, the <subscriber> tag defines by default a Subscriber. It may contain a
QoS configuration and a several DataReaders.
Table 4.9
Publisher Tag
Tags within
<publisher >
Description
Number of
Tags Allowed
<data_writer>
Specifies a DataWriter configuration. Same as within the
0 or more
<participant> tag.
<publisher_qos>
Publisher QoS configuration.
0 or 1
Table 4.10 Subscriber Tag
Tags within
<subscriber>
Description
Number of
Tags Allowed
<data_reader>
Specifies a DataReader configuration. Same as within the
0 or more
<participant> tag.
<subscriber_qos>
Subscriber QoS configuration.
0 or 1
Table 4.11 DataWriter Tag
Tags within
<data_writer >
<datawriter_qos>
Description
DataWriter QoS configuration
Number of
Tags Allowed
0 or 1
Table 4.12 DataReader Tags
Tags within
<data_reader>
<datareader_qos>
Description
DataReader QoS configuration.
Number of
Tags Allowed
0 or more
4-10
XML Tags for Configuring Entities
Table 4.12 DataReader Tags
Tags within
<data_reader>
Description
Number of
Tags Allowed
Enables the creation of DataReader with this configuration
from a ContentFilteredTopic.
Attributes:
<filter>
name
Name of the ContentFilteredTopic. The ContentFilteredTopic will be associated with the
same Topic referenced by the containing 0 or 1
<data_reader>
filter_kind
Specifies which ContentFilter to use. It
defaults to the builtin.sql filter.
The <filter> tag within a <data_reader> enables content filtering. It causes the corresponding
DataReader to be created from a ContentFilteredTopic with the specified filter
characteristics.
Table 4.13 Filter Tag
Tags within
<filter >
<expression>
Description
Filter expression
Number of
Tags Allowed
0 or 1
List of parameters. Parameters are specified using
<param> tags.
The maximum number of parameters is 100.
<parameter_list>
<parameter_list>
<param>param_0</param>
<param>param_1</param>
...
</parameter_list>
0 or 1
For example:
<domain_participant name="MyParticipant"
domain_ref="MyDomainLibrary::MyDomain">
<publisher name="MyPublisher">
<data_writer name="MyWriter" topic_ref="MyTopic"/>
</publisher>
<subscriber name="MySubscriber">
<data_reader name="MyReader"
topic_ref="MyTopic">
<filter name="MyFilter" kind="builtin.sql">
<expression> count > %0 </expression>
<parameter_list>
<param>10<param>
</parameter_list>
</filter>
</data_reader>
</subscriber>
</domain_participant>
4-11
Names Assigned to Entities
The above configuration defines a <domain_participant> that is bound to the <domain>
“MyDomain”.
A DomainParticipant created from this configuration will contain:
❏ A Publisher which has a DataWriter created from the Topic “MyTopic”.
❏ A Subscriber which has DataReader created from a ContentFilteredTopic whose related
Topic, “MyTopic”, uses a SQL filter.
4.6
Names Assigned to Entities
Each Entity configured in a XML file is given a unique name. This name is used to refer to them
from other parts of the XML configuration and also to retrieve them at run-time using the Connext API.
In the context of XML-based configuration we should distinguish between two kinds of names:
❏ Configuration name: The name of a specific Entity’s configuration. It is given by the
name attribute of the corresponding XML element.
❏ Entity name: The actual name of the Entity within the run-time system. In most cases,
the Entity name is the same as the configuration name. However there are two exceptions:
• DomainParticipants may be given their Entity names explicitly when they are created using create_participant_from_config_w_params(). If no explicit name is
given, as occurs with create_participant_from_config(), a name will be generated
automatically (see Creating and Retrieving a DomainParticipant Configured in an
XML File (Section 4.7.1)).
• Whenever the attribute multiplicity is set to a value greater than one. This setting
indicates that a set of Entities should be all from the same configuration. As each
Entity must have a unique name the system will automatically append a number
to the configuration name to obtain the Entity name. For example, if we specified a
multiplicity of “N”, then for each index “i” between 0 and N-1 the system will
assign entity names according to the table below:
Entity Name
Index: i
“configuration_name”
0
“configuration_name#i”
[1,N-1]
That is, the Entity name followed by the token “#” and an index.
For example:
<publisher name="MyPublisher">
<data_writer name="MyWriter" multiplicity="3"
topic_ref="MyTopic"/>
</publisher>
For the above XML configuration, the name assignment is:
4-12
Names Assigned to Entities
Configuration
“MyPublisher”
Entity
Publisher
Multiplicity
1
Entity Names
“MyPublisher”
“MyWriter”
“MyWriter”
DataWriter
3
“MyWriter#1”
“MyWriter#2”
The entity name is stored by Connext using the EntityNameQosPolicy QoS policy for DomainParticipants, Publishers, Subscribers, DataWriters and DataReaders. The policy is represented by the
following C structure:
Struct DDS_EntityNameQosPolicy {
char * name;
char * role_name
}
The mapping is:
Field
Value
name
Entity name
role_name
Configuration name
For example, for the following configuration:
<domain_participant name="MyParticipant"
domain_ref="MyDomainLibrary::MyDomain">
<publisher name="MyPublisher">
<data_writer name="MyWriter" topic_ref="MyTopic"/>
</publisher>
</domain_participant>
The corresponding QoS policies for each entity are:
Entity
QoS Policy
DomainParticipant
EntityNameQosPolicy
Publisher
EntityNameQosPolicy
DataWriter
EntityNameQosPolicy
Field Values
name = [participant_name]
role_name = “MyParticipant”
name = “MyPublisher”
role_name = “MyPublisher”
name = “MyWriter”
role_name = “MyWriter”
Where [participant_name] represents the value of the participant entity name specified at creation
time.
4.6.1
Referring to Entities and Other Elements within XML Files
Entities and other elements within the XML file are addressed using a hierarchical name that
matches their declaration hierarchy. This is summarized in the table below.
Entity or
Element
Hierarchical Name
Example Use
type
[type_name]
type_ref="MyType"
qos
[qos_library_name]::[qos_profile_name]
base_name="qosLibrary::DefaultProfile"
4-13
Names Assigned to Entities
Entity or
Element
domain
Hierarchical Name
[domain_libary_name]::[domain_name]
participant
[participant_library_name]::
[participant_name]
Example Use
domain_ref=
"MyDomainLibrary::MyDomain"
base_name=
”MyParticipantLibrary::PublicationParticipant”
[topic_name]
Must be defined within the scope of the topic_ref="MyTopic"
Domain or the Participant that refer to it
topic
[subscriber_name]
publisher
Must be defined within the scope of the base_name=”MyPublisher”
Participant that refers to it
[subscriber_name]
subscriber
Must be defined within the scope of the base_name=”MySubscriber”
Participant that refers to it
[publisher_name]::[datawriter_name]
base_name=”MyPublisher::MyWriter”
data_writer If addressing from within the same Publisher the “publisher_name::” prefix may base_name=”MyWriter”
be omitted
[subscriber_name]::[datareader_name]
base_name=”MySubscriber::MyReader”
data_reader If addressing from within the same Subscriber the “subscriber_name::” prefix base_name=”MyReader”
may be omitted
The example above corresponds to a configuration such as the one following:
<dds xmlns:xsi="http://www.w3.org/2001/XMLSchema-instance"
xsi:noNamespaceSchemaLocation="../../../resource/qos_profiles_5.x.y/
schema/rti_dds_profiles.xsd"
version="5.x.y">
<types>
<struct name="MyType">
<member name="mylong" type="long"/>
</struct>
</types>
<domain_library name="MyDomainLibrary" >
<domain name="MyDomain" domain_id="0">
<register_type name="MyRegisteredType"
kind="dynamicData" type_ref="MyType" />
<topic name="MyTopic"
register_type_ref="MyRegisteredType"/>
</domain>
</domain_library>
<participant_library name="MyParticipantLibrary">
<domain_participant name="MyParticipant"
domain_ref="MyDomainLibrary::MyDomain">
<publisher name="MyPublisher">
4-14
Creating and Retrieving Entities Configured in an XML File
<data_writer name="MyWriter" topic_ref="MyTopic"/>
</publisher>
<subscriber name="MySubscriber">
<data_reader name="MyReader" topic_ref="MyTopic"/>
</subscriber>
</domain_participant>
</participant_library>
</dds>
4.7
Creating and Retrieving Entities Configured in an XML File
There are two kinds of operations that affect Entities configured in an XML file:
❏ Create the defined entities. Only the operation create_participant_from_config() in the
DomainParticipantFactory triggers the creation of a DomainParticipant and all its contained Entities given a configuration name.
❏ Retrieve the defined entities: After creation, you can retrieve the defined Entities by
using the lookup_by_name() operations available in the DomainParticipantFactory,
DomainParticipant, Publisher and Subscriber.
4.7.1
Creating and Retrieving a DomainParticipant Configured in an XML File
To create a DomainParticipant from a configuration profile in XML, use the function
create_participant_from_config(), which receives the configuration name and creates all the
entities defined by that configuration.
For example :
<participant_library = "MyLibrary">
<domain_participant name="MyParticipant"
domain_ref="MyDomainLibrary::MyDomain"
domain_id="1>
...
</domain_participant>
</participant_library>
Given the above configuration, a DomainParticipant is created as follows:
DDSDomainParticipant * participant =
DDSTheParticipantFactory->create_participant_from_config
("MyLibrary::MyParticipant");
if (participant == NULL) {
//handle error
}
The DomainParticipant is bound to the domain_id specified in either the <domain_participant>
tag—this has precedence—or the <domain> tag. In this example the domain_id is set to one.
When the DomainParticipant is created by means of create_participant_from_config(), a name
will be generated automatically based on the configuration name and the number of existing
participants created from the same configuration. The generation follows the same strategy
explained in Names Assigned to Entities (Section 4.6) for the domain entities where the multi-
4-15
Creating and Retrieving Entities Configured in an XML File
plicity is replaced by the number of existing participants. If this is number is identified by "N",
the participant name for a new participant will be assigned as follows:
Participant Name
N
"configuration_name"
0
"configuration_name#N"
[1,N-1]
For example, if we create three participants from the configuration "lib::participant", the names
assigned as the participants are created will be:
❏ -participant
❏ -participant#1
❏ -participant#2
Once a participant is created, it can be retrieved by its name at any other place in your program
as follows, based on the previous example and assuming that only one participant was created:
participant =
DDSTheParticipantFactory->lookup_participant_by_name("MyParticipant");
if (participant == NULL) {
//handle error
}
To provide more flexibility, create_participant_from_config_w_params() allows you to specify
the participant name. You can also override the specification in the configuration for the domain
ID and QoS profile for the participant and entites in the domain.
4.7.2
Creating and Retrieving Publishers and Subscribers
Publishers and Subscribers configured in XML are created automatically when a DomainParticipant is created from the <domain_participant> that contains the <publisher> and <subscriber>
configurations.
Given the following example:
<domain_participant name="MyParticipant"
domain_ref="MyDomainLibrary::MyDomain">
<publisher name="MyPublisher" multiplicity="2">
...
</publisher>
<subscriber name="MySubscriber">
...
</subscriber>
</domain_participant>
Once a DomainParticipant is created as explained in Creating and Retrieving a DomainParticipant Configured in an XML File (Section 4.7.1), Publishers and Subscribers can be retrieved from
the created DomainParticipant using their name as follows:
DDSPublisher * publisher =
participant->lookup_publisher_by_name(“MyPublisher”);
if (publisher == NULL) {
//handle error
}
4-16
Creating and Retrieving Entities Configured in an XML File
DDSPublisher * publisher_1 =
participant->lookup_publisher_by_name(“MyPublisher#1”);
if (publisher == NULL) {
//handle error
}
DDSSubscriber * subscriber =
participant->lookup_subscriber_by_name(“MySubscriber”);
if (subscriber == NULL) {
//handle error
}
4.7.3
Creating and Retrieving DataWriters and DataReaders
DataWriters and DataReaders configured in XML are created automatically when a DomainParticipant is created from the <domain_participant> that contains the <data_writer> and
<data_reader> configurations.
Given the following example:
<domain_participant name="MyParticipant"
domain_ref="MyDomainLibrary::MyDomain">
<publisher name="MyPublisher">
<data_writer name="MyWriter" topic_ref="MyTopic"/>
</publisher>
<subscriber name="MySubscriber">
<data_reader name="MyReader" topic_ref="MyTopic"/>
</subscriber>
</domain_participant>
Once a DomainParticipant is created as explained in Section 4.7.1, DataWriters and DataReaders
can be retrieved from the created DomainParticipant using their fully-qualified name as shown
below:
DDSDataWriter * dataWriter =
participant->lookup_dataWriter_by_name(“MyPublisher::MyWriter”);
if (dataWriter == NULL) {
//handle error
}
DDSDataReader * dataReader =
participant->lookup_datareader_by_name(“MySubscriber::MyReader”);
if (dataReader == NULL) {
//handle error
}
Or from the created Publisher and Subscriber using their ‘unqualified’ name as shown below:
DDSDataWriter * dataWriter =
publisher->lookup_dataWriter_by_name(“MyWriter”);
if (dataWriter == NULL) {
//handle error
}
4-17
Creating and Retrieving Entities Configured in an XML File
DDSDataReader * dataReader =
subscriber->lookup_datareader_by_name(“MyReader”);
4.7.4
Creating Content Filters
To use a content filter, modify the “SubscriptionParticipant” configuration to look like this:
<participant_library name="MyParticipantLibrary">
...
<domain_participant name="SubscriptionParticipantWithFilter"
domain_ref="MyDomainLibrary::HelloWorldDomain">
<subscriber name="subscriber">
<data_reader name="HelloWorldReader"
topic_ref="HelloWorldTopic">
<datareader_qos name="HelloWorld_reader_qos"
base_name="qosLibrary::DefaultProfile"/>
<filter name="HelloWorldTopic" kind="builtin.sql">
<expression>count> count < 20 </expression>
</filter>
</data_reader>
</subscriber>
</domain_participant>
</participant_library>
It adds a SQL content filter, which only accepts samples with the field count greater than two.
Now run the HelloWorld_subscriber application without recompiling and check that it only
receives data when counter less than 20 as expected.
4.7.5
Using User-Generated Types
If a user-generated type by means of rtiddsgen is desired rather than dynamic data, the corresponding type support must be registered with the DomainParticipantFactory before creating a
DomainParticipant. To register the type support, use the function register_type_support() in the
DomainParticipantFactory, which takes (a) a pointer to a function that registers a type and (b)
the type name it is registered with. Then the specified function will be called automatically by
the middleware whenever the type registration is needed.
The definition of this function is given by:
typdef DDS_ReturnCode_t (*DomainParticipantFactory_RegisterTypeFunction)
(DDSDomainParticipant * participant,
const char * type_name);
This “register type function” should be generated using the rtiddsgen command-line tool from
the IDL or XML definition of the data type. See Hello World using XML and Compiled Types
(Section 2.2) for a simple example of how to follow this process.
For example, the following XML snippet defines a data type registered under the name MyType
with a TypeSupport that is user-generated. To use this data type, the application must also generate the TypeSupport code for the appropriate language binding using rtiddsgen and associate
the generated TypeSupport with the name MyType. This association is made by calling the
operation register_type_support() on the DomainParticipantFactory:
4-18
Creating and Retrieving Entities Configured in an XML File
<domain name="MyDomain" domain_id="13">
<register_type name="MyType" kind="userGenerated"/>
...
</domain>
Continuing the example above, assume that the structure of "MyType" is described in the IDL
file MyType.idl. Also assume that you are using the C++ language API and you have already
run rtiddsgen and generated the type-support files: MyTypeSupport.h and MyTypeSupport.cxx. These files will contain the declaration and implementation of the function MyTypeSupport::register_type().
In
this
situation,
you
must
associate
the
MyTypeSupport::register_type() operation with the type name MyType by calling DDSTheParticipantFactory->register_type_support() from your application code prior to creating the
DomainParticipant as shown in the C++ snippet below:
DDS_ReturnCode_t * retCode =
DDSTheParticipantFactory->register_type_support(
FooTypeSupport::register_type, "MyType");
if (retCode != DDS_RETCODE_OK) {
//handle error
}
You can find an example of using a user-generated type in <installation directory>/examples/
CPP/HelloWorld_xml_compiled. Also refer to the description of this example in Hello World
using XML and Compiled Types (Section 2.2).
4-19